Oracle User Management Setup and Administration
Setup Tasks
This section discusses the setup tasks for Oracle User Management. The implementor or system administrator sets up access control and security policies in Oracle E-Business Suite by defining roles, role inheritance hierarchies, role categories, and registration processes. These components specify the different levels of access to various application menus and data that are available to administrators.
Defining Role Categories
As part of the Oracle E-Business Suite RBAC model, Oracle User Management introduces Role Categories. Administrators can create role categories to bundle roles and responsibilities to make the process of searching for roles and responsibilities easier. In the Oracle User Management Overview section, see: Role Based Access Control (RBAC).
Steps
-
Log on as a user that is assigned the Security Administrator role (typically as sysadmin), select the User Management responsibility in the navigator and then click the Role Categories subtab.
-
Go to the editable table, click the Update button and then click the Create Lookup Code button.
-
Enter the required information in the Create Lookup Code fields and click the Apply button.
Creating and Updating Roles
In Oracle E-Business Suite, a role represents a job function that confers the privileges required to perform that job. Roles can be defined to determine what applications (responsibilities) as well as what data and functions within those applications users can access. In the Oracle User Management Overview section, see: Role Based Access Control (RBAC).
Steps
-
Log on as a user that is assigned the Security Administrator role (typically as sysadmin), select the User Management responsibility in the navigator and then click the Roles & Role Inheritance subtab.
-
Click the Create Role button.
-
Enter the required information to configure your role and optionally continue to configure it by accessing the following:
-
Permissions. Use this tab to assign permissions to your role.
Delegated Administration Setup Using the Security Wizard
Information in this section only applies to delegated administration roles in the context of the Oracle User Management application.
-
User Administration. Enables you to determine the set of users that can be managed by administrators to whom your role is assigned. The administrator can assign or revoke user accounts and roles for the users you specify here.
-
Organization Administration. Enables you to determine the external organizations that can be viewed in Oracle User Management by administrators to whom your role is assigned.
-
Role Administration. Enables you to determine which roles the administrator can assign to or revoke from the set of users specified in the User Administration section.
-
-
-
Click Save or Apply to save your changes.
-
Optionally update the role by performing the following:
-
Locate the role you want to modify by using the Search fields or by expanding the appropriate nodes in the Role Inheritance Hierarchy menu.
-
Click the Update icon and modify the role as required.
-
Guidelines
The Save button saves your changes and continues to display them in the current page. The Apply button saves your changes and returns to the previous page. You can optionally organize your roles using role categories during the process of creating and updating roles, otherwise they will be stored under the "Miscellaneous" role category by default. For more information, see: role categories. You can also define any required subordinate roles or superior roles through role inheritance hierarchies.
Security Wizard
The Security Wizard page lists the security wizards available to the currently logged-in user. After launching the wizard by clicking its name, the user can use it to set up the data security policies associated with the role. After completion of the wizard, the user will be returned to the Create/Update Role UI.
Assigning Permissions to Roles
You can assign permissions to a role by creating a grant that specifies the navigation menu, permission sets, and/or the data security policies that are available at runtime to the role's assignees. Menus and permission sets in turn include individual functions and permissions. In the Oracle User Management Overview section, see: Role Based Access Control (RBAC).
Steps
-
Log on as a user that is assigned the Security Administrator role (typically as
sysadmin), select the User Management responsibility in the navigator and then click the Roles & Role Inheritance subtab. -
In the Role Inheritance Hierarchy, access the role to which you want to assign a permission and click the Update icon.
-
Click the Permissions subtab, and then click Create Grant button.
-
Define the grant by entering the required information and clicking Next:
-
Enter the required information to identify the grant, such as Name and Effective From date.
-
Security Context. These optional parameters restrict the availability of the permissions being assigned. If you do not define the security context, then permissions are available to users in all contexts. Security contexts are also referred to as Activation Contexts.
-
Operating Unit. In many cases, an organization consists of several different operating units. You can limit your grant to only be active in the context of an individual operating unit.
-
Responsibility. Responsibilities determine the applications that can be accessed by users. You can optionally limit your grant to be available only in the context of an individual responsibility, or with all responsibilities.
-
-
Data Security. You must select a business object when you create Data Security policies. For more information, see: Oracle Application Object Library Security.
-
-
If you have defined a specific object in the preceding step, then choose the object data context for the object, also referred to as the data scope. Specifying the object data context provides an additional level of access granularity for the object. Choose one of the following from the Data Context menu:
-
All Rows. This option provides access to all rows for the database object. For example, if the database object is a book, creating a data security policy for all rows of the object will provide access to all books catalogued in the database.
-
Instance. This option provides access to an instance of the object. A specific instance generally corresponds to a single row in the database, and is typically identified by the primary key value for the object. For example, a data security policy for the book object could contain a unique ISBN number, to return only one book from the database.
-
Instance Set. This option provides access to a related set of instances of the object. This set is specified as a predicate on the attributes of the object. The predicate is expressed as a SQL WHERE clause, and can optionally be implemented as a VPD policy. For example, a data security policy could include an instance set for all books published in the year 2013.
-
-
Select the required permission set or navigation menu containing the functions (permissions) that you wish to assign to the role, by choosing an option from the LOV.
-
Review your grant information and click Finish.
Searching For Assigned Roles
The number of roles and responsibilities in some installations can be in the tens of thousands, or even more. Since any given user can potentially have a very large number of roles and responsibilities assigned, it can be very time-consuming to determine which roles have been assigned to which users.
A search capability allows administrators to look for:
-
All Roles: Find all roles assigned to the current user
-
Specific Role: Find if a role has been assigned to an user, and quickly change the attributes associated with it.
-
Inactive Role Assignments: Find all inactive User-Role assignments.
-
Active Role Assignments: Find all active User-Role assignments.
-
Assignable Roles: Find all roles for which the current logged in administrator has "Can Assign" privilege.
-
Revokable Roles: Find all roles for which the current logged in administrator has "Can Revoke" Privilege.
Steps
-
Navigate to the User Management responsibility and then click the Users subtab.
-
Use the search fields to locate the required people or users.
-
Click on the Update icon.
-
Select any of the above specified criteria, such as "Specific Role" in the drop-down list and "Sales Manager" in the text box.
-
Click on the Go button.
Users Tab
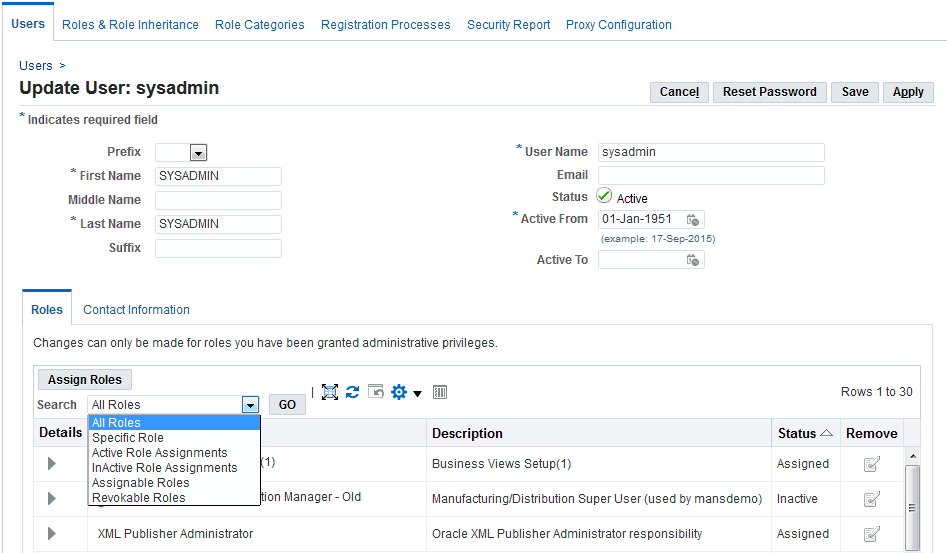
Note: Some screenshots used in this book were captured on an earlier release. Although the colors and interface elements of these images consequently have a different appearance, the functionality they illustrate also applies to the current release.
Examples
-
All Roles: If a user selects "All Roles" in the drop-down, all the roles assigned to the user will be displayed.
-
Specific Role: If a user selects "Specific Role" from the drop-down list, another text box user appears to allow entry of a role (for example, User Management). A list of users with that role will then be displayed.
-
Inactive Role Assignments: If a user selects "Inactive Role Assignments" from the drop-down list, all inactive User-Role assignments will be displayed.
-
Active Role Assignments: If a user selects "Active Role Assignments" from the drop-down list, all active User-Role assignments will be displayed.
-
Assignable Roles: If a user selects "Assignable Roles" from the drop-down list, all roles for which the current logged in administrator has "Can Assign" Privilege will be displayed.
-
Revokable Roles: If a user selects "Revokable Roles" from the drop-down list, all roles for which the current logged in administrator has "Can Revoke" Privilege will be displayed.
Diagnostics for User-Role Assignment
UMX is heavily dependent on concurrent manager, Deferred Agents, and Background engines. If any of these are down, the assignments do not take place or may only take place after an excessively long time.
A diagnostic feature built in the User-Role Assignment page checks that the required processes are running when an update is submitted. If they are all running, it reports how much time may be needed for the changes to be effected.
If one or more are down, the diagnostic feature displays a warning and advises which processes will need to be started in order for the changes to be made successfully. For example, you may receive a message that says: "Warning - Updates to Role data will not be visible in the application until the following processes are started: Workflow Background Engine."
Creating Instance Sets and Permission Sets
Delegated administration setup for User Administration requires the creation of instance sets and permission sets. All possible combinations of permissions are seeded as permission sets that are available from this screen. A data security object, UMX_SYS_ACCT, represents system accounts. Administrators can create instance sets against this object to specify system accounts that can be managed.
Steps
-
Log on as a user who has been assigned the Security/LSA Administrator role (typically as
sysadmin), select the User Management responsibility in the navigator, and then click Roles & Role Inheritance. -
In the role hierarchy, access the role to which you want to assign user administration privileges, and click the Update icon.
-
Click on the Security Wizards button.
-
Click on the Run Wizard icon for "User Management: Security Administration Setup."
-
Click the User Administration tab, then click the Add More Rows button.
-
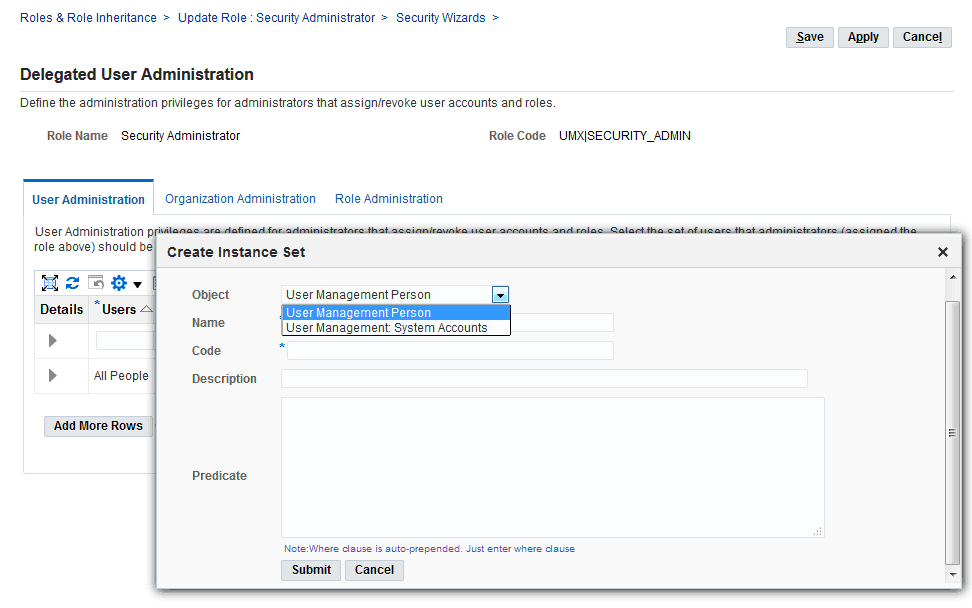
In the Users field, select the set of users that can be managed by Administrators to whom the role is assigned. The drop-down list contains various data security policies that relate to the User Management Person Object (UMX_PERSON_OBJECT) and User Management: system accounts object (UMX_SYS_ACCT). The user can now create his own policies on both these objects by clicking on the link "Create Instance Set For Users."
-
In the Permissions field, select the permissions to be associated with the delegated administration role. The Permissions drop-down list includes permission sets that contain permissions associated with the User Management Person object and User Management: system accounts object. All possible combinations of the existing permissions have been seeded here, enabling organizations to add permission sets based on their general business needs and the level of granularity they prefer for administering users.
Create Instance Set Window
Selecting Required Permission Set (Data Security Policy)
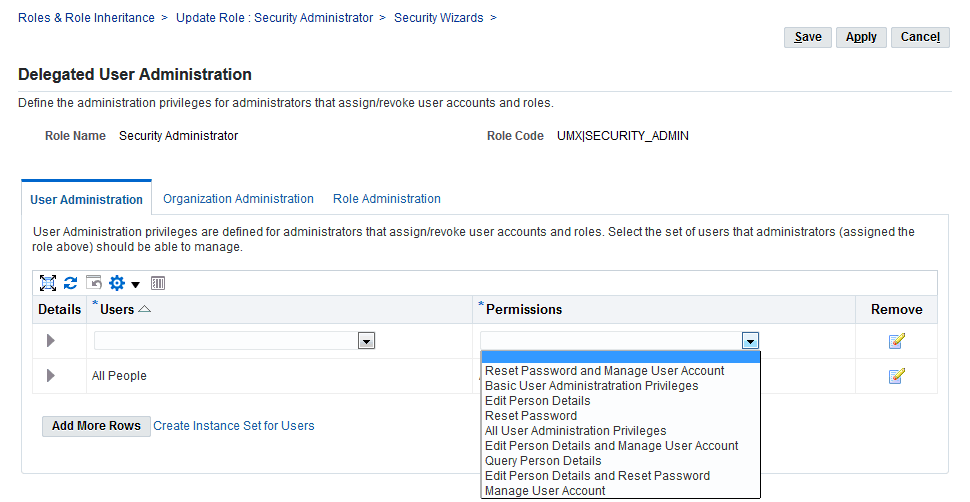
This capability means that there is no longer any need to navigate to the Functional Administrator or Functional Developer responsibilities when creating permission sets and instance sets, so that the entire delegated administration set up should now take no more than a few minutes.
Defining Delegated Administration Privileges for Roles
Delegated Administration Privileges determine the users, roles and organization information that delegated administrators (local administrators) can manage. Each privilege is granted separately, yet the three work in conjunction to provide the complete set of abilities for the delegated administrator. In the Oracle User Management Overview section, see: Delegated Administration.
Defining User Administration Privileges for Roles
A local administrator must be granted User Administration Privileges to determine the users and people the local administrator can manage. Local administrators can be granted different privileges for different subsets of users. For example, a local administrator can be granted privileges only to query one set of users, and granted full privileges (including update and reset password) for another set. Local administrators cannot query users for which they do not have administration privileges.
Oracle User Management ships with the following seeded permissions for defining user administration privileges for roles:
| Function Code | Display Name | Description |
|---|---|---|
| UMX_OBJ_ACTIVATE_ACCT | Create, Inactivate, Reactivate User Account, Update Username | Permission for creating, inactivating, and reactivating user accounts, and updating user name. Must be granted with a data security policy on the User Management Person. |
| UMX_OBJ_EDIT_PERSON | Edit Person Details | Permission for editing person details. Must be granted with a data security policy on the User Management Person (UMX_PERSON_OBJECT) business object. |
| UMX_OBJ_PASSWD_MGMT | Reset Password | Permission to reset passwords. Must be granted with a data security policy on the User Management Person (UMX_PERSON_OBJECT) business object. |
| UMX_OBJ_VIEW_PERSON | Query Person Details | Permission to query person details Must be granted with a data security policy on the User Management Person (UMX_PERSON_OBJECT) business object.
Additional Information: This is the minimum permission required by any security administrator that wishes to manage people and users in Oracle User Management. |
| UMX_SYSTEM_ACCT_ADMINSTRATION | Maintain System Accounts (users not linked to a person) | Create, Inactivate, Reactivate, Reset Password for all System Accounts (defined as user accounts not associated with a person).
Additional Information: Only grant to System Administrators. |
Steps
-
Log on as a user that is assigned the Security Administrator role (typically as
sysadmin), select the User Management responsibility in the navigator and then click the Roles & Role Inheritance subtab. -
In the role hierarchy, access the role to which you want to assign user administration privileges and click the Update icon.
-
Click on the Security Wizards button.
-
Click on the Run Wizard icon for "User Management: Security Administration Setup."
-
Click the User Administration subtab and then click the Add More Rows button.
-
In the Users field, select the set of users that can be managed by Administrators to whom the role is assigned. The drop-down list contains various data security policies that pertain to the User Management Person Object (UMX_PERSON_OBJECT). Oracle User Management ships with sample data security policies for users. Organizations can use these policies or create their own. For more information, see: Defining Data Security Policies.
-
In the Permissions field, select the permissions that you wish to associate with the delegated administration role. Permissions determine the actions an administrator can perform when managing the set of users defined in the previous step. The Permissions drop-down list includes permission sets that contain permissions associated with the User Management Person object. Different combinations of the existing permissions can be grouped into new permission sets, enabling organizations to add permission sets based on their business needs and the level of granularity they prefer for administering users. For more information, see: Permission Sets.
-
Click Save or Apply to save your changes.
Guidelines
Delegated administration can provide different permissions on different subsets of users. Once you define users and permissions for a role, you can optionally view the permissions that belong to the permission set by clicking the Show node. You can also remove the user administration privileges for a set of users by clicking the Remove icon.
Defining Role Administration Privileges for Roles
Role Administration Privileges define the roles that local administrators can directly assign to and revoke from the set of users they manage.
Oracle User Management ships with the following seeded permission for defining role administration privileges for roles:
| Function Code | Display Name | Description |
|---|---|---|
| UMX_OBJ_ADMIN_ROLE | Assign/Revoke Role | Permission for assigning/revoking roles in the User Management application. Must be granted with a data security policy on the User Management Role (UMX_ACCESS_ROLE) business object. |
Steps
-
Log on as a user that is assigned the Security Administrator role (typically as
sysadmin), select the User Management responsibility in the navigator and then click the Roles & Role Inheritance subtab. -
In the navigation menu, access the role for which you want to define role administration and click the Update icon.
-
Click on the Security Wizards button.
-
Click on the Run Wizard icon for "User Management: Security Administration Setup."
-
Click the "Role Administration" link and use the Available Roles fields to search for the role(s) that you want to associate with this role and which administrators can manage once they are assigned this role.
-
Select the desired role(s), move them to the Selected Roles column and click Save or Apply.
Guidelines
The Save button saves your changes and continues to display them in the current page. The Apply button saves your changes and returns to the previous page.
Defining Organization Administration Privileges for Roles
Organization Administration Privileges define the external organizations a local administrator can view in Oracle User Management. This privilege enables an administrator to search for people based on their organization, assuming the local administrator has also been granted access to view the people in that organization (User Administration Privileges). Depending on what administration account registration process has been granted, the administrator may have the ability to register new people for that organization.
Oracle User Management ships with the following seeded permission for defining organization administration privileges for roles:
| Function Code | Display Name | Description |
|---|---|---|
| UMX_OBJ_VIEW_RLTNSHPS | Query/Register Organization Relationship | Permission to query/register organization relationship. Must be granted with a data security policy on the User Management Organization (UMX_ORGANIZATION_OBJECT) business object. |
Steps
-
Log on as a user that is assigned the Security Administrator role (typically as
sysadmin), select the User Management responsibility in the navigator and then click the Roles & Role Inheritance subtab. -
In the navigation menu, access the role to which you want to define organization administration and click the Update icon.
-
Click on the Security Wizards button.
-
Click on the Run Wizard icon for "User Management : Security Administration Setup."
-
Click the "Organization Administration" link and then click the Assign Organization Privileges button. The drop-down list contains various data security policies that pertain to the User Management Person Object (UMX_PERSON_OBJECT). Oracle User Management ships with sample data security policies for organization administration privileges. Organizations can use these policies to create their own.
-
Search for and select the appropriate organization privileges.
-
Click Save or Apply to save your changes.
Guidelines
The Save button saves your changes and continues to display them in the current page. The Apply button saves your changes and returns to the previous page.
Defining Data Security Policies
With Oracle E-Business Suite, organizations can use Data Security to manage permission assignments that control access to objects. Data Security policies can only be defined for applications that have been written to utilize the Data Security Framework. For more information, see: Overview of Data Security. Access to the specific object must be formed with a specified Data Security Policy (also referred to as the Data Scope or Access Policy). The Data Security Policy restricts operations so that they only can be performed on a subset of instances of the corresponding database object. For more information, see: Object Instance Sets.
Steps
-
Log on as a user with the Functional Developer responsibility, click the Functional Developer responsibility in the navigator, navigate to the Security tab and then click the Objects subtab.
-
Search for and access the object for which you want to create data security policies. For example, to locate the User Management Person business object (UMX_PERSON_OBJECT), enter "UMX%" in the Code field, click the Go button, and then click User Management Person object (UMX_PERSON_OBJECT) in the search results list. For any object for which you are creating a policy, ensure that the SQL statement returns the primary key value for that object. In this example, this is a list of person party IDs.
-
Click the Object Instance Sets subtab. Click the Create Instance Set button to create a new object instance set or click the Update icon to modify an existing one.
-
Enter the required information and then click the Apply button.
Caution: For performance reasons, ensure that SQL predicates are tuned properly. For security reasons, ensure that they are tested and that they return the correct result. Oracle is not responsible for the performance or correctness of data security policies defined by organizations.
Defining Role Inheritance Hierarchies
With role inheritance hierarchies, a role can contain sub roles. When a user is assigned a role, the user inherits the privileges defined for that role and for all of its sub roles. For example, the Sales Manager role can contain the Manager and Sales Rep roles, both of which in turn contain the Employee role. Any individual who is granted the Sales Manager role automatically inherits the Manager, Sales Rep and Employee roles.
Role Inheritance Hierarchies
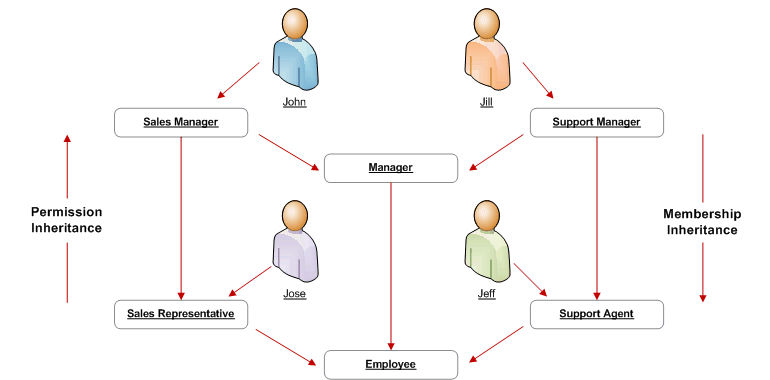
With Role Inheritance hierarchies, roles inherit the permissions assigned to their sub roles.
Steps
-
Log on as a user that is assigned the Security Administrator role (typically as
sysadmin), select the User Management responsibility in the navigator and then click the Roles & Role Inheritance subtab. -
Locate the role for which you want to create a role inheritance hierarchy by using the Search fields or by expanding the appropriate nodes in the Role Inheritance Hierarchy menu. If you are building a role inheritance hierarchy that contains several roles, start with highest level role to which you want to add inherited subordinate roles.
-
Click the Add Node icon next to this role.
-
In the resulting menu, search for the role either by using the Search fields or by locating it in the Role Inheritance Hierarchy menu.
-
Select the role and then click the Select button or the Quick Select icon.
-
Repeat this process until you have added all of the required subordinate roles to their corresponding super roles. You can optionally verify the results by expanding the nodes for all super roles within your role inheritance hierarchy. You can also remove any subordinate roles by clicking the Remove Node icon.
Deployment Options
Organizations can use different deployment options for role inheritance hierarchies depending on their requirements.
Assigning Existing Responsibilities to Roles Using Role Inheritance
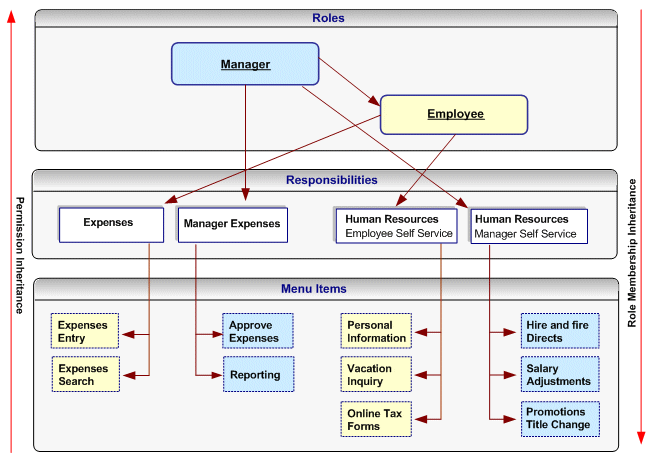
Organizations that have already defined their responsibilities can utilize RBAC by creating roles and assigning their existing responsibilities to those roles. For example, an organization could create an Employee role and a Manager role, and add to these the Expenses and Human Resources responsibilities that it wishes to make available to employees and managers respectively. Then, instead of manually assigning or revoking each of these responsibilities to or from its employees, the organization can simply assign or revoke the Employee and Manager roles as required. Since the Manager role inherits the employee role, managers that are assigned the Manager role also inherit all the responsibilities and privileges associated with the Employee role.
In the following example, a Human Resource Manager inherits the Human Resources Manager Self Service responsibility through the Manager role as well as the Human Resources Employee Self Service responsibility, which the Manager role inherits from the Employee role.
Additional Information: In this section, references to the Expenses and Human Resources responsibilities are used as examples only. Some applications may require organizations to create multiple responsibilities to operate with their existing security models. For more information, consult the application-specific documentation.
Assigning Existing Responsibilities to Roles Using Role Inheritance
Steps
-
Create roles representing the required job functions such as Manager and Employee.
-
Define a role inheritance hierarchy. For more information, see: Defining Role Inheritance Hierarchies.
-
Ensure the responsibilities are inherited by their corresponding roles.
-
Assign the roles to users as required.
Fully Utilizing RBAC and Role Inheritance to Determine Access to an Application
In older releases of Oracle E-Business Suite, access to individual functions within an application could only be defined through responsibilities, menu hierarchies, and menu exclusions. Responsibilities had the dual role of defining application navigation menus and granting permissions to the application. New responsibilities with one of the following had to be defined for each set of users with different job functions that required access to a set of pages within an application:
-
A completely new menu hierarchy for each responsibility, or
-
A common menu covering the superset of all functions within the application, and menu exclusion rules defined for each responsibility.
The Human Resources application, for example, typically required a minimum of two responsibilities, one for employees and one for managers.
Separating Navigation Menus and Access Control
Oracle User Management provides new alternatives for defining access to an application with RBAC and Role Inheritance, allowing organizations to separate navigation menus from access control. Responsibilities can now be defined to represent an application itself and as a result, only one responsibility may be required for each application. A menu can be tailored for each application with specific consideration to usability and end user navigation experience. Access to parts of the application (responsibility) and its corresponding menu hierarchy are instead controlled by different roles, each representing a specific job function or set of people.
Benefits
Using this mechanism for determining access control provides several benefits.
-
Administration and changes can be accomplished with minimal effort:
-
A new page only has to be added to a single menu.
-
The permission to access a new page, only has to be granted once to the lowest level (subordinate role) in the role inheritance hierarchy.
-
An entirely new application (responsibility) can automatically be assigned to a set of people by simply defining it as the subordinate role of an existing role.
-
Permissions to access the various pages and functions within a new application should only be assigned at the lowest level in the role inheritance hierarchy. The permissions are then automatically inherited by all superior roles in the hierarchy.
-
Revoking access to a page, or an entire application, can be accomplished as easily as adding access.
-
-
Improved end user experience. In the applications navigator, end users will see a list of applications to which they have access. Access to the various functions within each application is determined by the roles assigned to the end user.
Steps
Additional Information: In this section, references to the Expenses and Human Resources responsibilities are used as examples only. Some applications may require organizations to create multiple responsibilities to operate with their existing security models. For more information, consult the application-specific documentation.
-
Define a new responsibility that will be used to represent a specific application such as Expenses or Human Resources. For more information, see: Defining a Responsibility.
-
Design a complete menu that includes all the menu functions within an application as well as any required submenus, and attach this menu to the new responsibility. For example, both the Expenses and Human Resources responsibilities would include all employee and manager menus. For more information, see: Defining a New Menu Structure.
-
Following the "principle of least privilege," all the menu options within the application (each menu item corresponds to a function/permission) should be disabled by default. To accomplish this, remove the selection from the "grant" checkbox for each menu item:
The following figure illustrates application responsibilities (in this case, Expenses and Human Resources) with all their menus disabled:
Responsibilities Representing an Entire Application with Disabled Menus
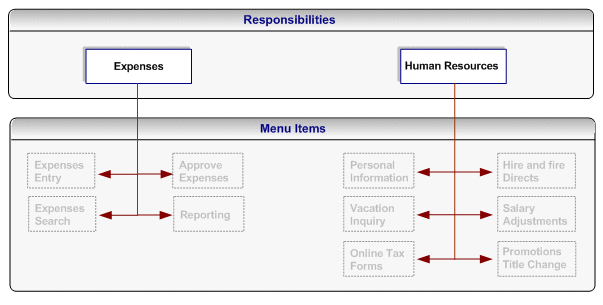
Additional Information: A user cannot access any of the menu items (functions) within the application if you assign the responsibility to the user at this stage.
-
Create roles representing the people with various job functions that require access to the application, for example, a Manager role and an Employee role. For more information, see Creating and Updating Roles
-
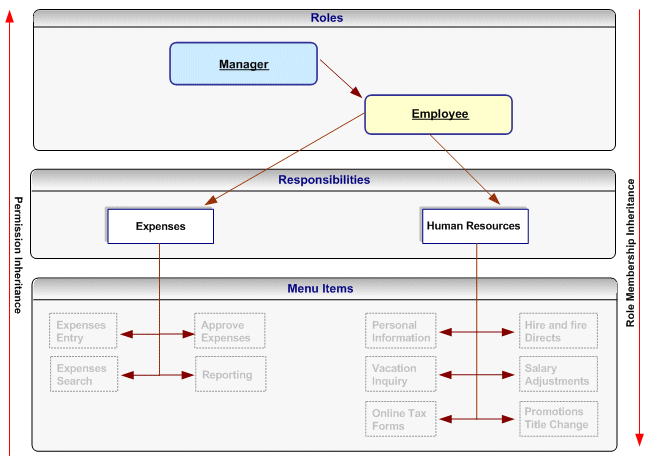
Define role inheritance relationships. For more information, see Defining Role Inheritance Hierarchies For example, the Manager role should inherit the Employee role, and the Employee role should inherit the Expenses and Human Resources responsibilities. The following figure illustrates a role inheritance relationship in which a role inherits the responsibilities that are inherited by its subordinate role:
Role Inheritance Relationship in Which a Role Inherits the Responsibilities Inherited by its Subordinate Role
-
Assign permissions to each role. For more information, see: Assign permissions to each role. Each permission maps to a menu item (function) within the application (responsibility) that should be available to the users to whom the role is assigned. For example, an organization will grant the employee-related permissions from the Expenses and Human Resources responsibilities to the Employee role, and will grant the manager-related permissions for these responsibilities to the Manager role. Consequently, the manager role will have access to all the menu items within these responsibilities, but the Employee role will only have access to the Employee-related functions.
Permissions, Roles, and Inheritance
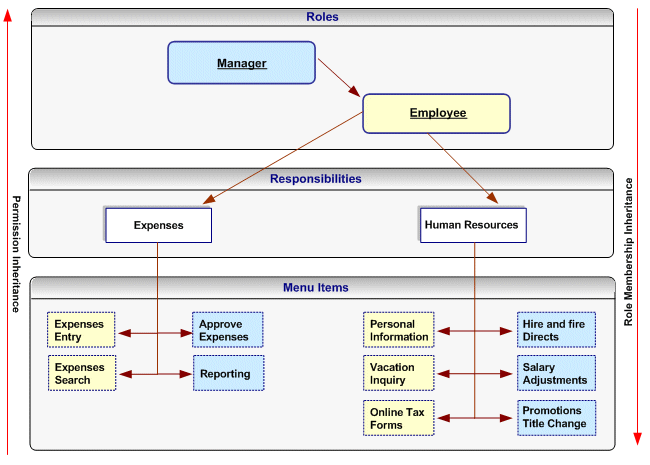
Permissions assigned to a subordinate role in the role inheritance hierarchy are automatically inherited by the superior roles. For example, if you grant the permission for accessing the Online Tax Forms page to the Employee role, anyone with the Manager role will automatically have access to this page through role inheritance. Because the Hire and Fire Directs page is only granted to the Manager role, it is not available to users that are only assigned the Employee role.
Permissions are always assigned through permission sets, which represent named sets of functions (permissions). When determining what permissions (functions/menu items) should be granted to each role, you may have to create new permission sets. For more details, see: Permission Sets. Menus and permission sets are stored in the same tables in the database; which means that they are interchangeable (both can be used) to assign permissions.
-
Optionally assign any additional permissions and data security policies to roles as required by each application.
Guidelines
Oracle User Management ships with the following Customer Administrator and Security Administrator roles. These roles illustrate how to setup Roles and Role Inheritance to determine user access within an application (responsibility). Both roles inherit the User Management responsibility but each role is granted different permissions and data security policies. The User Management responsibility has the grant flag removed for all functions (permissions) in the menu hierarchy. Instead, these permissions are granted to the role depending on each role's requirements:
| Role Attribute | Customer Administrator | Security Administrator |
|---|---|---|
| Permission Sets |
|
|
| User Administration |
|
|
Creating and Updating Registration Processes
Registration processes are predefined registration components that enable end users to perform some of their own registration tasks, such as requesting new accounts or requesting additional access to the system. They also provide administrators with a faster and more efficient method of creating new user accounts.
Oracle User Management provides four types of registration process:
-
Self Service Account Requests
-
Self-Service Requests for Additional Access
-
Account Creation by Administrators
-
Administrator Assisted Request for Additional Access
In the Oracle User Management Overview section, see: Provisioning Services.
Steps
Registration processes all use the same infrastructure and processing logic. Steps for defining a registration process will vary depending on the type of registration process you are creating.
-
Log on as a user that is assigned the Security Administrator role (typically as
sysadmin), select the User Management responsibility in the navigator and then click the Registration Processes subtab. -
Click Create Registration Process.
-
Enter the required information for the Registration Process Description and click Next. This information specifies:
-
Role. The role with which you optionally associate the registration process and that is assigned to the user at the end of the registration process once the request has been processed.
-
Type. The type of registration process you wish to create.
-
Registration Process Code. The unique identifier for the registration process.
-
Display Name. The display name for the registration process.
-
Description. A description of the registration process.
-
Application. The application with which the registration process is classified. This can be used to help query the registration process.
-
Active From. The date from which the registration process is first active.
-
Active To. The date you can optionally specify to terminate the registration process.
-
-
Enter the runtime execution information for the registration process and click Next. This information specifies:
-
Registration Start Page. The first page (which is represented as a function) in the registration process that captures any additional user registration information. This is optional unless you are creating a Self Service Account Request registration process.
-
Notification Event. The workflow business event that invokes a workflow. The notification workflow subscribes to the event and subsequently sends notifications to the approver or to the user.
-
Approval Transaction Type. The set of approval routing rules that is interpreted at runtime by the Oracle Approval Management rules engine. The rules determine whether approval is required and by what set of users based on user transaction types you have defined specifically for use with Oracle User Management.
-
Business Event Name. Custom business event that will be raised by Oracle User Management with context information for processing.
-
-
Enter the eligibility information for the registration process by selecting the appropriate roles or groups from the Available Groups column and clicking Submit. For Self-Service Requests for Additional Access, eligibility defines the users who are able to register for the role associated with the registration process. For Account Creation by Administrators, eligibility determines what administrators can register new users through the registration process. Oracle User Management ships with the following seeded permissions for defining eligibility policies:
Seeded Permissions for Self Service Additional Access and Account Creation by Administrators Eligibility Function Code Display Name Description UMX_OBJ_ADMIN_CRTN_FLOW Administrator Assisted Account Creation Permission representing "Administrator Assisted Account Creation" registration processes. This must be granted as a data security policy on the Registration Process (UMX_REG_SRVC) business object. UMX_OBJ_ROLE_ELGBLTY Self Service Eligibility Permission representing registration processes for additional access. Determines the set of end users that should be eligible to register for a given role/registration process. This must be granted as a data security policy on the Registration Process (UMX_REG_SRVC) business object. -
Register subscriptions to the appropriate business events raised by Oracle User Management, and ensure that your subscription logic writes the registration data into the appropriate destination schemas.
-
Optionally update the registration process by searching for it and clicking Update in the search results page.
-
Optionally set the following profile options for registration processes of type Self Service Account Request:
-
Registration Links. Oracle User Management provides support for displaying different registration links on the login page based upon the application tier through which the login page is accessed. Organizations can set the server level profile option, "UMX: Register Here Link - Default Registration Process" (UMX_REGISTER_HERE_REG_SRV) to specify different destinations for the registration link.
-
Registration Parameters. The registration link can also contain additional parameters that are not known at design time. These parameters are available at all stages of the registration process; for example, for routing approval requests. You can set the server level profile option "UMX: Register Here Link - Default Registration Parameters" (UMX_REGISTER_HERE_REGPARAMS) for this purpose. The format for setting this profile option is: "ParamName1=ParamValue1&ParamName2=ParamValue2":
-
UI-specific Parameters. Organizations can additionally specify parameters used to control the rendering of the registration user interface, such as the menu displayed in the registration UI. The server level profile option, "UMX: Register Here Link - Default HTML Parameters" (UMX_REGISTER_HERE_HTMLPARAMS) can be set for this purpose. The format for setting this profile option is: "ParamName1=ParamValue1&ParamName2=ParamValue2":
-
Additional Information: The Apache server may need to be restarted for the changes to take effect.
Configuring the User Name Policy
The Oracle User Management registration infrastructure supports a configurable user name policy. This policy is used to generate a suggested user name in the sample user creation flows shipped with the application, as well as for validating the chosen user name format.
Note: Oracle User Management is supplied with a default policy that identifies users by their email address.
Seeded User Name Policies
The following table lists the seeded user name policies that are shipped with Oracle E-Business Suite.
| Code | Description |
| UMX_USERNAME_POLICY:EMAIL_ADDRESS | User name policy with email address format defined as the policy. |
| UMX_USERNAME_POLICY:NONE | User name policy with no restriction on user name format. |
Administrators can configure either of these seeded policies. In addition to these, custom policies can also be implemented if desired.
Note: For details of how to create a custom policy, see My Oracle Support Knowledge Document 399400.1, Oracle Applications User Management (UMX) Developer's Guide.
Configuration of user name policy is a three-stage process.
Stage 1 - Suggested User Name Generation Subscription Setup
-
Log on as a user that is assigned the Workflow Administrator Web Applications responsibility (typically
sysadmin). -
Go to Workflow Administrator Web Applications and select Business Events.
-
From the Business Events page, search for the Business Event with the name oracle.apps.fnd.umx.username.generate.
-
Click on the Subscription icon to go to the Subscriptions page.
-
For the subscription corresponding to the policy, change the status to "Enabled."
Stage 2 - Validation Event Subscription Setup
-
Log on as a user that is assigned the Workflow Administrator Web Applications responsibility (typically
sysadmin). -
Go to Workflow Administrator Web Applications and then select Business Events.
-
From the Business Events page, search for the Business Event with the name oracle.apps.fnd.user.name.validate.
-
Click on the Subscription icon to go to the Subscriptions page.
-
For the subscription corresponding to the policy, change the status to "Enabled."
Stage 3 - Profile Option Setup
-
Log on as a user that is assigned the Functional Administrator responsibility (typically
sysadmin). -
Navigate to Functional Administrator, then Core Services, and select Profiles.
-
Search with the Profile Name of UMX: User Name Policy in the Maintain Profile Options page.
-
Click on the Update icon to go to the Update Profile Option page.
-
Choose a value corresponding to the policy and click Apply.
Additional Requirements
-
In all the three of the stages above, the values set must correspond to the same user name policy.
-
The listener and JVMs must be restarted after the user name policy is changed.
Delegated Administration Tasks
The Delegated Administration layer of Access Control in Oracle E-Business Suite enables local administrators to perform a variety of specifically defined administrative tasks. Once they are assigned the appropriate roles, local administrators manage the subset of users and people to which they have access by creating, updating, or disabling accounts, granting or revoking a limited subset of their organization's roles, and changing passwords.
Maintaining People and Users
Oracle User Management enables local administrators to manage people and users in the system. People are individuals in the system who may or may not possess a user account, whereas users are individuals in the system who possess user accounts. In addition, system administrators can also manage system accounts that are not linked to people.
Typically, people and users are managed by local administrators, who can perform the following tasks:
-
Register new people (optional: requires access to have been granted to the "Account Creation by Administrators" registration process)
-
Create, update, or disable user accounts
-
Reset passwords
-
Grant users access to different parts of the system by assigning or revoking roles
Common Prerequisites
The following are prerequisites for performing any delegated administration task listed in the preceding section. Each task may have additional prerequisites:
-
A role that is granted the User Maintenance UIs (UMX_USER_ADMIN_UI_PERMS) permission set. The role must also inherit the User Management responsibility.
-
Appropriate privileges for User Administration, Role Administration, and Organization Administration.
-
The Query Person Details (UMX_PERSON_OBJECT) permission for the set of people and administrator can manage.
-
Optionally, the Edit Person Details (UMX_OBJECT_EDIT_PERSON) permission for the set of people that the administrator can manage.
-
For system administrators, the Maintain System Accounts (UMX_SYSTEM_ACCOUNT_ADMINISTRATION) permission.
Steps
-
Navigate to the User Management responsibility and then click the Users subtab.
-
Use the search fields to locate the required people or users.
-
Manage the generated list of people or users by clicking the required icon and performing the necessary steps in the resulting window. Options for managing people and users vary depending on the permissions assigned to the administrator. Oracle User Management ships with the following basic and advanced options for maintaining people and users:
-
Query users
-
Edit personal information
-
Reset password
-
Maintain account information (create, inactivate, reactivate accounts)
-
Maintain system accounts
-
Assign or revoke roles
-
Creating, Inactivating, and Reactivating User Accounts
Administrators can create a user account for any person in the system who does not already possess one.
Prerequisites
To create, inactivate, and reactivate user accounts, an administrator must be assigned the following:
-
Common prerequisites, as detailed in the Maintaining People and Users section, Common Prerequisites.
-
The Create, Inactivate, Reactivate User Account (UMX_OBJ_ACTIVATE_ACCT) permission for the set of people that the administrator can manage.
By default, user names are derived from the person's email address.
Steps
-
Log in as a user with a role granting you access to the User Management responsibility, select the User Management responsibility in the navigator and click the Users subtab.
-
Search for the person for whom you wish to create an account and then click the Create Account icon next to the person's name if the account does not already exist. Your search will only generate results for the subset of users that you are eligible to manage.
-
Enter or modify the required information and click Submit.
Guidelines
Oracle recommends that you base user names on the person's email address.
Resetting User Passwords
Oracle User Management enables administrators to reset passwords for the set of users in the system that they manage. When the password is reset, an email message is sent to the user using the UMX Password (UMXUPWD) workflow.
Prerequisites
To reset user passwords, an administrator must be assigned the following:
-
In the Maintaining People and Users section, see: Common Prerequisites.
-
The Reset Password (UMX_OBJ_PASSWD_MGMT) permission for the users that the administrator can manage
Steps
-
Log in as a user with a role granting you access to the User Management responsibility. Select the User Management responsibility in the navigator and click the Users subtab.
-
Use the Search field to locate the user whose password you wish to change and then click the Reset Password icon next to the user.
-
On the Reset Password page, click Submit.
The person for whom you reset the password receives an email notification stating that the password has expired and must be reset the next time the user logs in. This notification is sent by the UMX Password (UMXUPWD) workflow.
Unlocking Locked User Accounts
Oracle User Management enables administrators to unlock user accounts that have been locked due to unsuccessful attempts to log in using an incorrect password.
Prerequisites
To unlock an account, an administrator must be assigned the following:
-
In the Maintaining People and Users section, see: Common Prerequisites.
-
The Reset Password (UMX_OBJ_PASSWD_MGMT) permission for the users that the administrator can manage.
Steps
-
Log in as a user with a role granting access to the User Management responsibility.
-
Select the User Management responsibility in the navigator, and click the Users subtab.
-
Use the Search field to locate the user whose account you wish to unlock. The user account is locked if the Account Status column displays a padlock icon along with status "Locked."
-
Click the "Reset Password" icon next to that user and follow the steps mentioned in the section above to reset the user's password. As a result of resetting the password, the user account will be unlocked.
Assigning Roles to or Revoking Roles from Users
Oracle User Management enables administrators to assign roles to or revoke roles from the subset of users that they manage.
Prerequisites
To assign roles to or revoke roles from users, an administrator must be assigned the following:
-
Common prerequisites from the Maintaining People and Users section, Common Prerequisites.
-
The appropriate administrative privileges for the role the administrator assigns or revokes. For more information, see: Defining Role Administration Privileges for Roles.
Steps
-
Log in as a user with a role granting you access to the User Management responsibility, select the User Management responsibility in the navigator, and click on the Users subtab.
-
Search for the person to whom you wish to assign roles or from whom you wish to revoke roles.
-
From the search results table, navigate to the User Details page by clicking on the Update icon next to the person's name.
-
To assign a role to the user, click the Assign Roles button on the User Details page and select the desired role.
To revoke a role from the user, you must end-date the role. If the role is an inherited role, you can only remove it by removing the role from which it originates in the role inheritance hierarchy. You can view a role's inheritance hierarchy by clicking on the Show link next to the role.
Additional Guidelines
The administrator can only grant or revoke roles for which he has the appropriate privileges. If a registration process exists for the role, it will be invoked and the request will be handled by the Oracle User Management registration engine. If not, then the role is assigned directly. If the role is associated with a registration process for existing users and the registration process has a reference for capturing additional information, then the "Additional Information Required" link is rendered. The administrator must click on this link and provide any required additional information before the request is processed.
Fine Grained Access Control for Role Administration
Fine grained access (FGA) control for roles extends the delegated administration functionality by securing administrator operations for role administration. Fine Grained Access for RBAC (FGA for RBAC) , provides the functionality to support requirements of the form "this administrator can run security wizards for some roles but not others." More specifically, FGA for RBAC allows a security administrator to set up a limited administrator, who can only perform restricted actions on a role.
The following privileges are available for administering roles:
-
Assign Role - Allows an administrator to assign only a certain set of roles.
-
Revoke Role - Allows an administrator to revoke only a certain set of roles.
-
Update Role - Allows an administrator to update only a certain set of roles.
-
Manage Grants - Allows an administrator to create grants on a set of roles.
-
Alter Hierarchy - Allows an administrator to change the role hierarchies of only those roles upon which this privilege is given.
-
Run Security Wizard - Allows an administrator to run security wizards on a certain set of roles.
The security administrator can define privileges for roles via the Role Administration tab on the Delegated Administration Screen.
Steps
-
The Security Administrator creates a new role, such as one called Limited Security Administrator, then enables FGA on this role by running the Delegated Administration setup wizard.
-
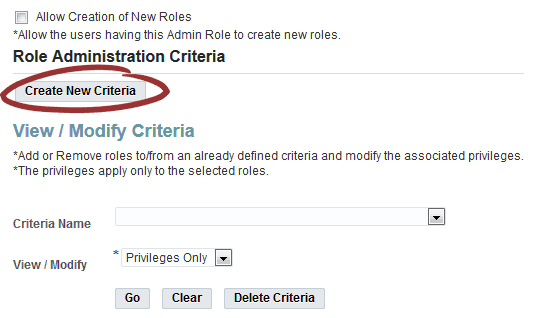
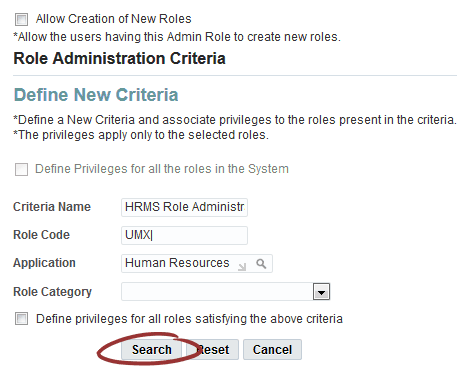
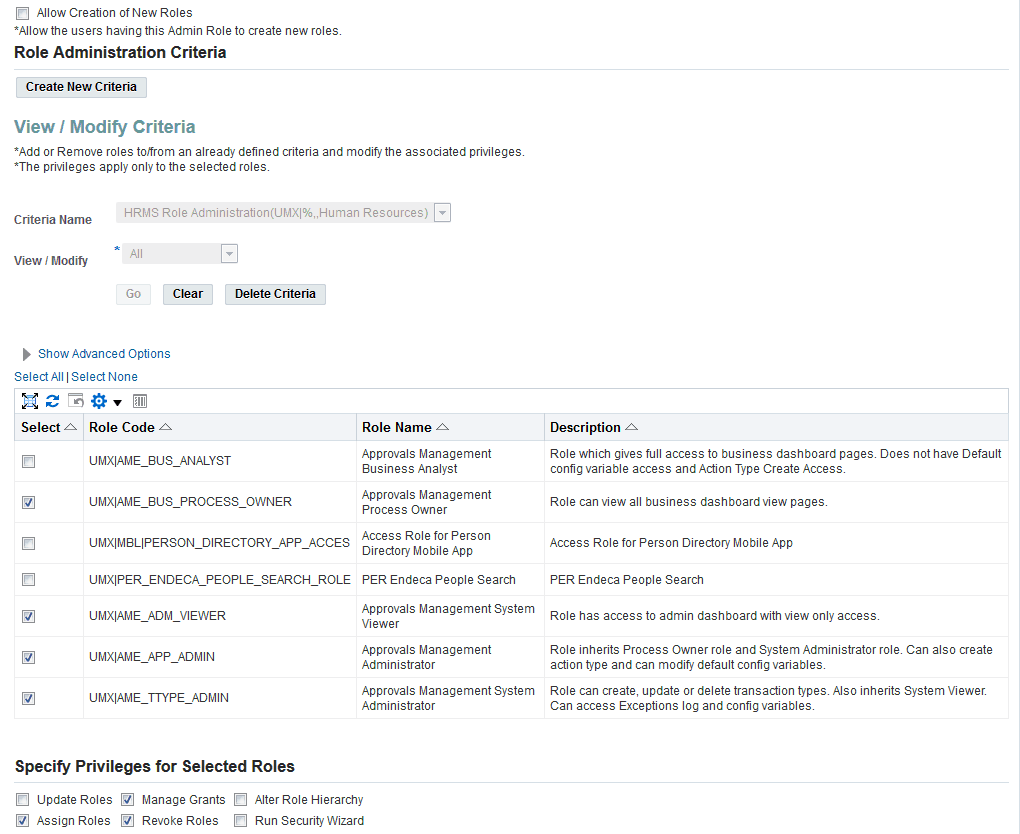
In the setup's Role Administration tab, the Security Administrator creates a new role administration criterion, for example HRMS Role Administration. A criterion is simply a set of roles to which a set of privileges can be assigned. An administrator role can be associated with any number of criteria.
-
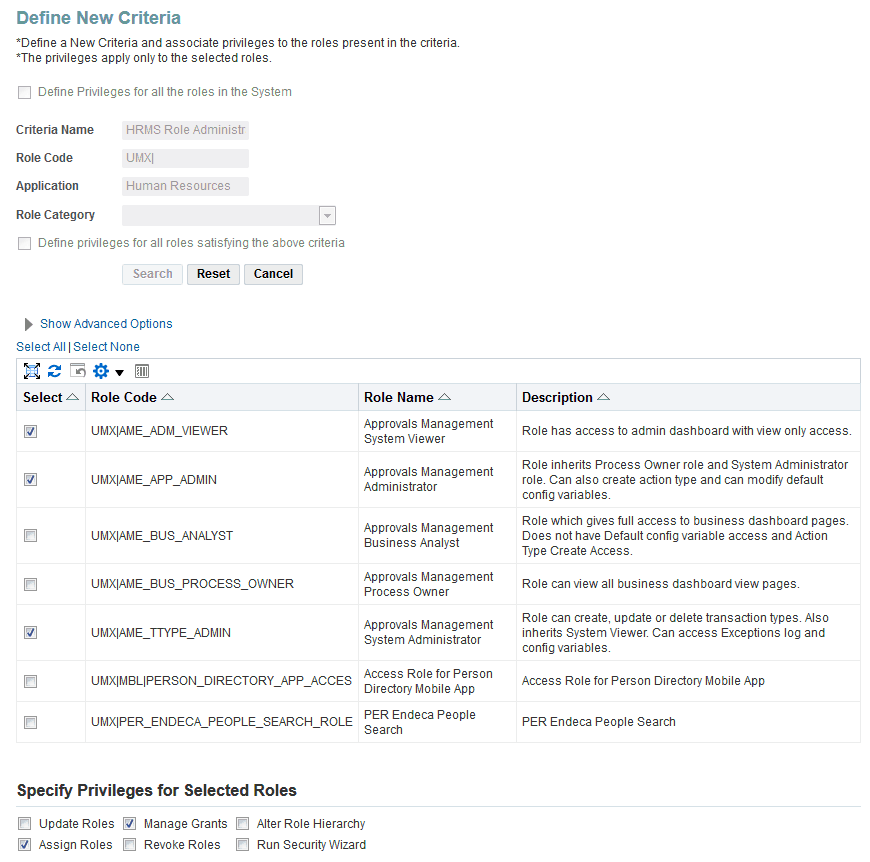
The Security Administrator assigns the Assign Role and Manage Grants privilege to this new criterion.
Any administrator to which the new Limited Security Administrator role is assigned will only be able to administer those roles present in the role administration criterion.
The following screenshots illustrate this process.
Create New Criteria
Define New Criteria
Select Roles and Privileges
Update Criteria
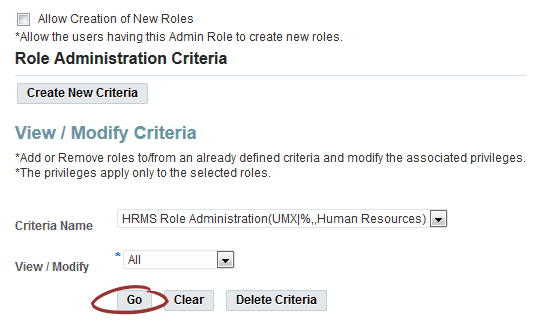
View/Modify Criteria
Managing System Accounts
UMX formerly supported data security policies for users with a party_id in the TCA schema (HZ_PARTIES table). All such user operations were based on the "User Management Person" Object (UMX_PERSON_OBJECT). As this object was based on the HZ_PARTIES table, it could only manage users linked to a person, or (to put it another way) who had a party_id in the TCA schema. Actions such as "Query Person Details," "Reset Password," "Edit Person Details," and "Create, Inactivate, or Reactivate Account" on users were dependent on data security policies and permissions granted on the User Management Person Object (UMX_PERSON_OBJECT). Administrators therefore had to create data security policies on the User Management Person Object (UMX_PERSON_OBJECT).
This raised the question of how to administer system accounts, which lack a party_id. UMX had a permission called "Maintain System Account" Permission, which used to maintain all users who lacked party_id. Administrators with this permission could perform all operations on users who lacked a party_id. However, this did not address the issue of how to administer some sets of system accounts with restricted operations.
UMX_SYS_ACCT Object
A data security object called User Management: system accounts (UMX_SYS_ACCT) is now provided to support accounts that lack a party_id in the TCA Schema. This User Management: system accounts object is based on the database object (table) FND_USER.
Steps to use UMX_SYS_ACCT
-
Log on as a user who has been assigned the Security Administrator role (typically as
sysadmin), select the User Management responsibility in the navigator, and click the Roles & Role Inheritance subtab. -
In the role hierarchy, access the role to which you want to assign user administration privileges, and click the Update icon.
-
Click Security Wizards.
-
Click the Run Wizard icon for "User Management: Security Administration Setup."
-
Click the User Administration subtab, then click on link "Create Instance Set For Users."
-
Click Add More Rows.
-
In the Users field, select the set of users who can be managed by administrators to whom the role was assigned. The drop-down list contains various data security policies that pertain to the "User Management Person" and "User Management: system accounts" objects. Select the instance set that you created in Step 5.
-
In the Permissions field, select the permissions that you wish to associate with the delegated administration role.
If you want to query a user and reset his password, select "Query and Reset Password" permission set in the drop-down
-
Click Apply or Save or to save your changes.
Registering External Organization Contacts
Oracle User Management provides a sample registration process that enables administrators to register new people for their organizations. Organizations can use the sample registration process directly or reference it as an example of how to define their own administration registration processes.
Prerequisites
To register new people, an administrator must be assigned the following:
-
The common prerequisites detailed in the Maintaining People and Users section, Common Prerequisites.
-
The necessary privileges to invoke the specific administrative account creation registration processes; these are defined as part of the registration process definition.
-
Organization Administration privileges for all organizations for which an administrator needs to be able to register new people.
Steps
-
Log in as a user with a role granting you access to the User Management responsibility, select the User Management responsibility in the navigator and click the Users subtab.
-
In the Register dropdown list, select administrative account registration process you wish to invoke, and click Go.
-
Enter the information required by the registration process as defined by the registration UI for the registration process, click Submit and then click OK in the resulting page.
Registering User Accounts
From the User Maintenance page under User Management, choose "User Account" from the Register list and click Go to register an Oracle E-Business Suite user. This user is an authorized user of Oracle E-Business Suite, and is uniquely identified by a user name.
Once defined, a new Oracle E-Business Suite user can sign on to Oracle E-Business Suite and access data through Oracle E-Business Suite windows.
The Create User Account user interface pages are similar to the Oracle Forms-based Users window.
Note: If you have upgraded from a previous release of Oracle E-Business Suite, ensure that you have run the Party Merge concurrent program to update your user data. If you have not run this program, you may receive errors in querying your user data.
For more information, see the Oracle Trading Community Architecture documentation.
After you have entered the information below, you can click Submit.
Note: This user creation procedure is seeded as registration process "UMX_USER_ACCOUNT_CREATION." This registration process can be updated with the addition of an approval process. A notification will be sent to the approver. When the approver approves, the user is created.
Click the Assign Roles to assign roles and update details for the user.
Account Information
Enter these fields for the user.
User Name
An application user enters this user name to sign on to Oracle E-Business Suite.
The user name should only contain characters allowed by Oracle Single Sign-On.
Tip: We recommend that you define meaningful user names, such as the employee's first initial followed by their last name. Or, for a group account, you can define the application user name so as to indicate the purpose or nature of the group account.
Active From/To
Enter the date range for which this user account will be active.
The user cannot sign on to Oracle E-Business Suite before the start date or after the end date. The default for the start date is the current date. If you do not enter an end date, the user name is valid indefinitely.
You cannot delete an application user from Oracle E-Business Suite because this information helps to provide an audit trail. You can deactivate an Oracle E-Business Suite user at any time by setting the End Date to the current date.
If you wish to reactivate a user, change the End Date to a date after the current date, or clear the End Date field.
Enter the email address for this user.
Fax
Enter the fax number for this user.
Password Expiration
-
Days - Enter the maximum number of days between password changes. A pop-up window prompts an application user to change their password after the maximum number of days you specify has elapsed.
-
Access - Enter the maximum allowed number of sign-ons to Oracle E-Business Suite allowed between password changes. A pop-up window prompts an application user to change their password after the maximum number of accesses you specify has elapsed.
Tip: We recommend that you require all application users to make regular password changes. This reduces the likelihood of unauthorized access to Oracle E-Business Suite.
Link to a Party
Use the Person, Supplier, and Customer fields to enter the name of an employee (person), customer, or supplier contact. Enter the last name and first name, separated by a comma, of the employee, customer, or supplier who is using this application user name and password. Use the List of Values to select a valid name.
For more information on using these fields, see the Oracle Trading Community Architecture documentation.
Update User
After clicking Assign Roles on the Create User Account page, you can add details for roles, contact information, and securing attributes.
Roles
Click Assign Roles to search for existing roles and assign them to this user. Enter a justification for each role.
Contact Information
If you have chosen to link this user to a party, you can view contact information here. Note that personal information originates from the human resources system and cannot be updated here.
Securing Attributes
Securing attributes are used by some Oracle HTML-based applications to allow rows (records) of data to be visible to specified users or responsibilities based on the specific data (attribute values) contained in the row.
You may assign one or more values for any of the securing attributes assigned to the user. If a securing attribute is assigned to both a responsibility and to a user, but the user does not have a value for that securing attribute, no information is returned for that attribute.
For example, to allow a user in the ADMIN responsibility to see rows containing a CUSTOMER_ID value of 1000, assign the securing attribute of CUSTOMER_ID to the ADMIN responsibility. Then give the user a security attribute CUSTOMER_ID value of 1000.
When the user logs into the Admin responsibility, the only customer data they have access to has a CUSTOMER_ID value of 1000.
Name
Select an attribute you want used to determine which records this user can access. You can select from any of the attributes assigned to the user's responsibility.
Application
The owning application for the attribute.
Value
Enter the value for the attribute you want used to determine which records this user can access.
Reset Password
You can reset a user's password by clicking Reset Password and then Submit. The user will need to change the password upon the next login.
Alternatively, you can reset the password on the main User Maintenance page.
Managing Proxy Users
This section describes how to set up and use the proxy user feature, which allows a user to delegate some of their capabilities to another user.
Note: For an introduction to this feature, see: The Proxy User Feature.
Defining Exclusions from Proxy User Delegation
An administrator can exclude certain responsibilities from being allowed to be delegated to proxy users. For example, you may have responsibilities such as "Employee Self-Service" where a user can change personal information and see salary and payslip information. Allowing proxy users access to other users' personal information through such responsibilities may cause privacy and legal issues. It is therefore essential to restrict delegation by proxy users as needed.
Excluded Responsibilities Page

Steps to Exclude a Responsibility from Being Delegated
-
Log in as System Administrator and navigate to User Management > Proxy Configuration > Exclusions.
-
Click Add Responsibility.
-
Select the name of the responsibility you want to exclude from delegation by users.
-
Click Apply.
Alternatively, if you do not want users to be able to delegate any responsibilities, administrators can disable the entire Grant Responsibility Access region of the Proxy Configuration page. To do so, set the UMX: Disable Proxy Responsibilities (UMX_PROXY_RESP_DISABLE) profile option to Yes. This profile option can be set only at site level. The default value is No.
Configuring Worklist Access
By default, when a user grants worklist access to a proxy through the Proxy Configuration page, the proxy user can view and act on notifications from the delegated item types in the worklist. However, the proxy user cannot access resources linked from a notification such as attachments, unless the associated Oracle Workflow responsibility has also been delegated to the proxy user.
Administators can optionally use the UMX: Autonomous Proxy Worklist (UMX_PROXY_WORKLIST_AUTONOMOUS) profile to enable proxy users to access linked resources from delegated notifications without having the associated Oracle Workflow responsibility explicitly delegated to them. If you set this profile option to Yes, then the Grant Worklist Access region in the Proxy Configuration page is disabled. Instead, a Worklist Access link appears in a tip in the Oracle E-Business Suite home page, the Oracle Workflow home page, and the worklist itself. Users can use this link to navigate to a Worklist Access page where they can grant proxy users worklist access that implicitly includes the associated Oracle Workflow responsibility access. See: Granting Worklist Access with Implicit Oracle Workflow Responsibility Access.
The UMX: Autonomous Proxy Worklist profile option can be set only at site level. The default value is No.
Making Workflow Item Types Available for Delegation
By default, the list of available workflow item types a user can delegate to a proxy displays those item types for which the user has previously received at least one notification. You can also choose to add item types that you want to appear in the lists for all users. In this way you can allow users to grant a proxy access to handle any notifications they may receive from those item types in the future.
To add an item type to the available list, define the internal name of the item type as a lookup code for the WF: Vacation Rule Item Types lookup type. See: Setting Up Notification Handling Options, Oracle Workflow Administrator's Guide.
Defining Proxy User Delegation Policies
An administrator can set up policies that govern which users (delegators) can select as their proxy users. Several predefined policies already exist, although you can create additional policies if needed. Creating new policies requires a thorough understanding of creating data security policies and object instance sets, therefore using predefined policies is recommended, if possible.
-
Log in as System Administrator and navigate to User Management, then Proxy Configuration, and select Policies.
-
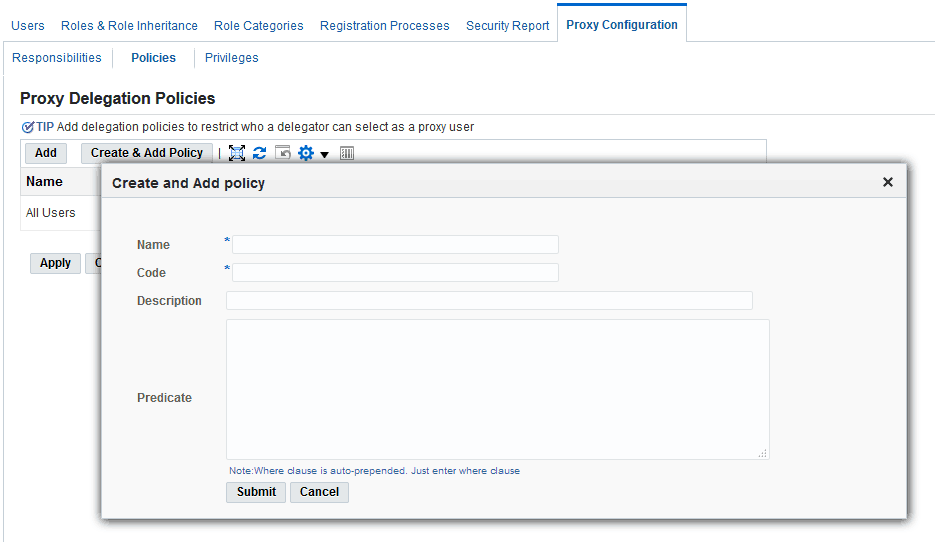
Click Add to use one of the predefined policies, as described in the following table:
Proxy Delegation Policy Name Description All Suppliers All suppliers belonging or visible to the organization All Customers All customers belonging or visible to the organization. All Internal Users All internal users visible to the organization. If you want to create your own policy, click Create & Add Policy to create a policy specific to your organization.
Create and Add Policy Window
-
Click Apply.
Giving a User Delegation Privileges
There are two ways to give a user privileges to delegate to a proxy user:
-
Use the Proxy Delegation Privilege page to give delegation privileges to all users, or users of a specific role or responsibility.
-
Use the User Details page to assign the Manage Proxies role to an individual user. By assigning the Manage Proxies role to the delegator, you make the delegator eligible to grant proxy privileges to other users to act on the delegator's behalf.
Assign Delegation Privileges to All Users or Users with a Selected Role or Responsibility
-
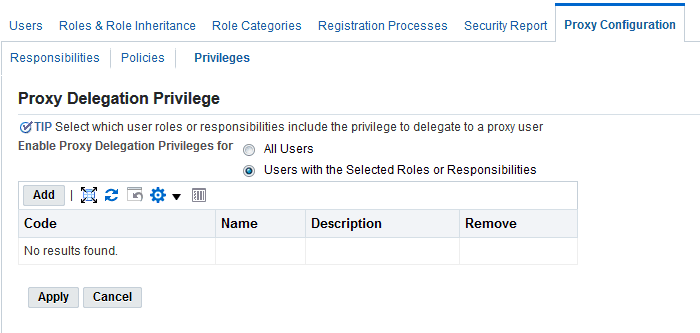
Log in as System Administrator and navigate to User Management, then Proxy Configuration, and select Privileges.
Proxy Delegation Privilege Page
-
If you want to give delegation privileges to all users, select the All Users option. If you want to give delegation privileges to users of a specific role or responsibility, select the Users with the Selected Roles or Responsibilities option, and then choose the role or responsibility you want.
-
Click Apply.
Assign the Manage Proxies Role to an Individual User
-
Log in as System Administrator and navigate to User Management and select Users.
-
Query the user (delegator) that you wish to have the ability to grant proxy privileges to other users: click on the Update icon of the results table to navigate to the User Details page.
-
On the User Details page, click Assign Role, and search for "Manage Proxies" role in the list of values.
Pick this role, supply the justification, and click Apply.
Delegating to a Proxy User
Once a user has delegation privileges, either by proxy user privileges configuration or by being given the Manage Proxies role directly, that user (the delegator) can then delegate other users as proxy users. For example, an employee going on vacation might want to designate her manager as a proxy user during her absence.
-
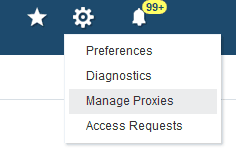
As a user with the delegation privileges, log on to Oracle E-Business Suite and click the global Settings menu.
Settings Menu with Manage Proxies Menu Item Selected
-
Select Manage Proxies to navigate to the Proxy Configuration page, where you can see and update any existing proxies.
-
Click Add Proxy to add a new proxy user to work on your behalf.
Proxy Configuration Page

-
On the Add People page, select a user from the list of values, updating the start and end dates if required. You can also enter notes that will be displayed in the notification that your proxy user will receive to advise that he has been designated as a proxy.
Add People Page

-
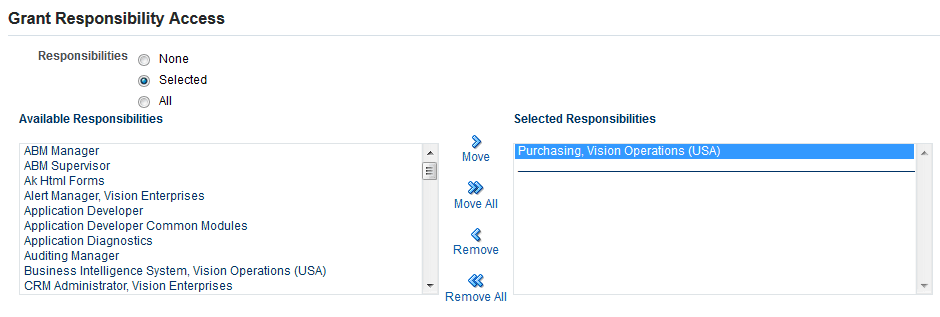
In the Grant Responsibility Access region, you can select None, Selected, or All responsibilities to delegate to your proxy user. If you choose the Selected option, you can then select any responsibilities from the Available Responsibilities list that you want your proxy user to access, and move them over to the Selected Responsibilities list. Your proxy user will see only the responsibilities you select here when working on your behalf.
Note: You may not see all of your responsibilities in the Available Responsibilities list if your administrator has excluded certain responsibilities from delegation. Additionally, if your site does not allow responsibilities to be delegated, your administrator may disable the entire Grant Responsibility Access region.
Grant Responsibility Access Region
-
In the Grant Worklist Access region, you can select None, Selected, or All Workflow item types to delegate to your proxy user. If you choose the Selected option, you can then select any workflow item types from the Available Item Types list that you want your proxy user to access, and move them to the Selected Item Types. By default, the Available Item Types list displays those item types for which you have previously received at least one notification. Your administrator can also add item types to this list to let you grant your proxy user access to handle other notifications you may receive in the future. Your proxy user will see only the selected workflow item types when working on your behalf.
Ensure that you also grant your proxy user the associated Oracle Workflow responsibility to allow them to access resources linked from notifications such as attachments.
Note: Your administrator may configure your site to include Oracle Workflow responsibility access implicitly when you grant worklist access. In this case, the Grant Worklist Access region in the Proxy Configuration page is disabled. Instead, use the Worklist Access page available from the Worklist Access tip link that appears in your home page or worklist. See: Granting Worklist Access with Implicit Oracle Workflow Responsibility Access.
Grant Worklist Access Region

-
Click Apply to save the changes.
-
Once the changes are saved, a notification will be sent to the user who has been granted the proxy privileges.
Granting Worklist Access with Implicit Oracle Workflow Responsibility Access
If your administrator has configured worklist access at your site to include implicit Oracle Workflow responsibility access, then you can grant worklist access through the Worklist Access page instead of the Proxy Configuration page.
-
Navigate to the Worklist Access page by navigating to the Oracle E-Business Suite home page, your Oracle Workflow home page, or your worklist, and selecting the Worklist Access tip link.
You can review users who currently have access to your worklist. The start and end dates for each user determine the access period when the user can view and act on your worklist. The user's active or inactive status depends on whether the current date is within the access period.
Note: If a user has an e-mail address defined in Oracle E-Business Suite, you can select the link in the User Name column to send e-mail to that user.
-
To grant access to another user, choose the Grant Worklist Access button.
-
Select the user you want, and enter an optional description.
Note: If an administrator has restricted the user list of values, then only the values to which you have access appear in the list. See: Configuring the Oracle Workflow User List of Values, Oracle Workflow Administrator's Guide.
-
Specify the start date when the user can begin accessing your worklist. You can optionally also specify an end date after which the user will no longer have access, or leave the end date blank to grant access indefinitely.
-
Choose whether to grant the user access to notifications from all item types or only from selected item types.
If you are granting access only to selected item types, select the item types you want in the Available Item Types list and move them to the Selected Item Types list. By default, the Available Item Types list displays those item types for which you have previously received at least one notification. Your workflow administrator can also add item types to this list to let you grant a user access to handle other notifications you may receive in the future. See: Setting Up Notification Handling Options, Oracle Workflow Administrator's Guide.
-
-
To update the description for a user, the start and end dates of the user's access period, or the item types to which the user has access, select the Update icon for that user and enter your changes.
-
To delete a user from the list, select the Delete icon for that user. The user will no longer have access to your worklist, even if the user's access status was previously Active.
Note: When you delete a user, the record of the user's access no longer appears in your Worklist Access page. If you want to keep this record for reference, you can simply set the end date to end the user's access, rather than deleting the user.
Acting as a Proxy User
If you are a user designated to act on behalf of another user (the delegator), you may initially receive a notification that you have been designated as a proxy user for the delegator, though receiving the notification is not required (and some organizations do not use Oracle Workflow).
Acting as Proxy User with Explicitly Granted Responsibility Access
-
If you are a user permitted to act on behalf of other users, a Switch User link or icon appears in the page header. Select the Switch User link or icon.
Oracle E-Business Suite Page Header Switch User Icon

-
Your own user name appears with the prefix "Logged In As" in the upper corner of the page.
-
To switch to another user (act as a delegate), choose the Switch User icon or link to access the Switch User page.
Switch User Page

-
The Switch User page shows an alphabetical list of people who have specified that you can act on their behalf as a delegate.
-
Click on the icon in the Switch column to switch to Proxy Mode, where you can act on behalf of the selected user.
-
After you have selected a delegator, the application enters Proxy Mode. While you are working as a proxy user, you will see your name and the name of the user for whom you are acting as proxy. You will not see the Favorites or Settings choices in the header, nor will you see the Navigator's Top Ten List for Oracle Forms-based forms. While you are in proxy mode, the link changes from Switch User to Return to Self, though the icon remains the same.
-
For most pages, a notice appears near the top of the page that says "Proxy For" with the user name of the delegator, indicating that you are acting as a proxy user for that delegator.
Proxy User Oracle E-Business Suite Home Page

If you are using a form built with Oracle Forms, a notice appears at the very top of the window showing that you are acting as a proxy user.
Proxy Oracle Forms Window

-
The user login information details reflect that you are now acting on behalf of the selected delegator.
-
Perform your tasks as the proxy.
For more information about handling another user's workflow notifications while acting as a proxy, see: Worklist Access, Oracle Workflow User's Guide.
-
To exit Proxy Mode, return to the Home page and click on Return to Self (the Switch User icon).
Note: If you are permitted to act as a proxy user for multiple delegators, you cannot switch directly from one to another. You must Return to Self first.
Acting as a Worklist Proxy User with Implicit Oracle Workflow Responsibility Access
-
If you have been granted access to a delegator's worklist and your site is configured to grant proxy users worklist access with implicit Oracle Workflow responsibility access, then a Switch User button appears in the Oracle E-Business Suite home page, your Oracle Workflow home page, and your worklist. To view another user's worklist, select the Switch User button.
-
The Switch User page displays the user whose worklist you were previously viewing and the list of users whose worklists you can access. Select the user whose worklist you want to view.
-
When you view another user's worklist, you can view and act on that user's notifications and access linked resources such as attachments. However, you cannot act on notifications marked as being sent from you, and you cannot define vacation rules for that user or grant access to that user's worklist to anyone else. If the other user granted you access only to selected item types, then when you view that user's worklist, the page displays only notifications that belong to those item types.
For more information about handling another user's workflow notifications while acting as a proxy, see: Worklist Access, Oracle Workflow User's Guide.
Note: When you view another user's worklist in the Oracle E-Business Suite home page or your Oracle Workflow home page, the Full List button shows the number of open notifications to which you have access in that user's worklist, rather than your own open notifications.
When you view another user's worklist in the full Advanced Worklist or Personal Worklist, the worklist page displays the name of the user to whom the worklist belongs.
Running the Proxy User Report
In Proxy Mode, Page Access Tracking (PAT) is automatically turned on to track the pages visited by the proxy user when acting on behalf of the delegator.
A concurrent program, Page Access Tracking Data Migration, needs to be run for the delegator to see the most recent updates in the report. The administrator must run this report.
To see a report on your proxy user's activities, perform the following steps as the delegator:
-
Under Settings, select the Manage Proxies function.
-
Select Run Proxy Report.
-
Specify the proxy user whose actions you want to review, the responsibility with which the proxy user performed the actions, and the start and end dates for the date range during which the proxy user performed the actions. Then run the report.
Proxy Report Page

Running the Proxy Audit Data Report
Administrators can run a report to review Audit Trail data for actions performed by a proxy user for any delegator user. To make the proxy audit data available, you must first set up Audit Trail and run the Audit Trail Update Tables Report. See: Steps to Enable Audit Trail.
To run the proxy audit data report, you must log in as a user with the FND_PROXY_AUDIT permission. This permission is granted to the SYSADMIN user by default. An administrator can optionally grant it to other users.
To run the proxy audit data report, perform the following steps:
-
Choose the Settings > Manage Proxies function.
-
Select Run Proxy Audit Data Report.
-
Specify the database object you want to review, the delegator user, and the proxy user whose actions you want to review. Optionally specify the start and end dates for the date range during which the proxy user performed the actions. Then run the report.
Proxy Audit Report Page
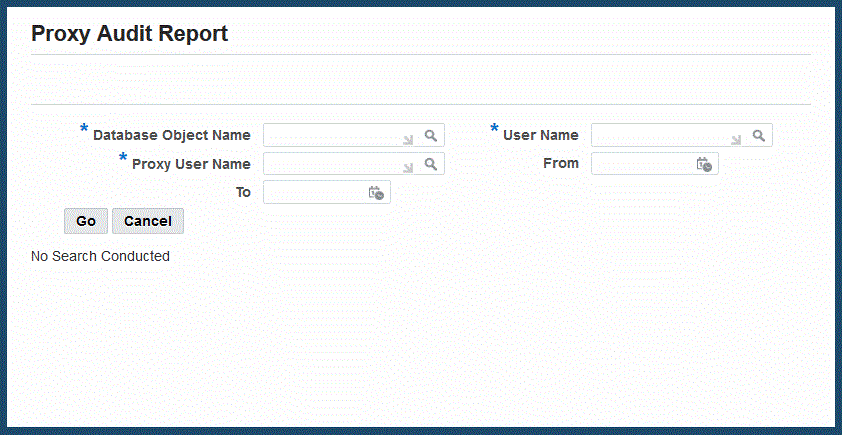
-
The Proxy Audit Report page submits a concurrent request for the audit report and displays the request ID. Choose the report status link to navigate to the Requests page. From this page, you can check the report status, view the report output, and optionally republish the report.
Self Service Features
Implementors and administrators can verify the successful configuration of end user functions by performing the tasks described in this section.
Self-Service Registration
Oracle User Management enables users to register for access to applications without requiring assistance from administrators. To register for application access, users must provide information in the required fields and click the Submit button.
Oracle User Management ships with the following sample self-service registration processes:
-
Employee Self-Service Registration
-
Customer Self-Service Registration (external individuals)
Organizations can use these registration processes in their existing form, or can use them as references for developing their own registration processes.
Important: External users can access product functionality within Oracle E-Business Suite to perform their business tasks, including certain Oracle Workflow features such as worklist notifications and vacation rules that are available to all Oracle E-Business Suite users. These Oracle Workflow pages include user fields that by default, display all users and roles defined in Oracle E-Business Suite. Predefined responsibilities and grants are available with the July 2022 CPU patch to restrict the user and role information displayed to external users in these Oracle Workflow fields. If you define a custom security group, responsibility, or role for external users, ensure that you also define grants to secure and restrict the values displayed in the Oracle Workflow user list of values. For more information, see the following:
-
My Oracle Support Knowledge Document 2881609.1, Setting Up Grants to Restrict User Access.
-
Configuring the Oracle Workflow User List of Values, Oracle Workflow Administrator's Guide.
-
Your product-specific documentation.
Requesting Additional Application Access
Oracle User Management enables you to request additional access to the specific applications for which you are eligible. Application access is based on roles and to access an application you must be granted the appropriate role. Perform the following to view the roles you have been assigned and to request additional ones.
Steps
-
After logging into the system, click the Preferences link in the upper right corner, and click the Access Requests link in the sidebar menu. The Access Requests page displays the roles you have been assigned. Click the Request Access button to request one or more additional roles.
-
Most roles are organized according to role categories: roles that are not categorized appear under the Miscellaneous node. Select the role category that contains the role you want to request. If you do not see the required role, then either you are not eligible for the role or it has not been set up to for additional access requests.
-
Select the role or roles you require for additional access to the system, and click on the Add to List button. You can optionally remove roles from your list by clicking on the Remove Roles button.
-
When you have selected all your required roles, click on the Next button.
-
Enter a justification for your request and click on the Next button. You can remove any pending roles or check their status in the page that appears next.
Guidelines
Some roles may require you to provide additional information. In such cases, the system will prompt you for additional information before you can complete the process for requesting a role.
If the role being assigned would cause a separation of duties violation, the operation will flag this in the workflow attributes, and any approvers for the request will see the details.
Login Assistance
It is not uncommon for system administrators to have to reset a user's forgotten password, or even advise a user of the account's user (login) name. This is unproductive for both the user, who cannot do any work in the meantime, and for the administrator. In addition, a user will occasionally request the password to be reset, when it is actually the user name that has been forgotten, or vice versa. This type of occurrence leads to even more time being lost.
A new feature reduces the time spent in such administrative activities by implementing a login help mechanism that is easily accessed from the Oracle E-Business Suite Login Page. A user simply clicks on the "Login Assistance" link located below the Login and Cancel buttons.
On the screen that appears, you can either:
-
Go to the Forgot Password section, enter the correct user name and then click on the Forgot Password button. You will then be emailed details of how to reset your password.
-
Go to the Forgot User Name section, enter the email address associated with the account, and click on the Forgot User Name button. The user name will then be emailed to the address specified.
For security, the relevant data is stored securely in workflow tables, and the URLs employed have both an expiration time and a single-use limitation.
The identify verification process required in previous releases of Oracle E-Business Suite is no longer needed. Instead, a link to a secure page is sent to the email address of the user name defined in the system. From this secure page, the user can change password immediately.
Security Reports
The Security Reports feature of UMX enables a security administrator to query the security infrastructure, identifying users who have access to specified security entities and listing the type of access those security entities grant.
Home Page
From the main page of Security Reports, the security administrator can create reports on the basis of User, Role/Responsibility, Function/Permission, or Data Security Object. A different set of reports is created for each parameter.
Security Reports Page

When creating reports, the security administrator can specify:
-
The report required
-
Whether the report is to be viewed online or offline
-
The format of the report
In addition, the security administrator can:
-
Schedule recurring reports (reports that are generated offline on a periodic basis)
-
Filter conditions specific to the report, to help restrict the number of rows seen in the output
For example, a check of offline reports filed by a user might show:
Offline Report Status Page
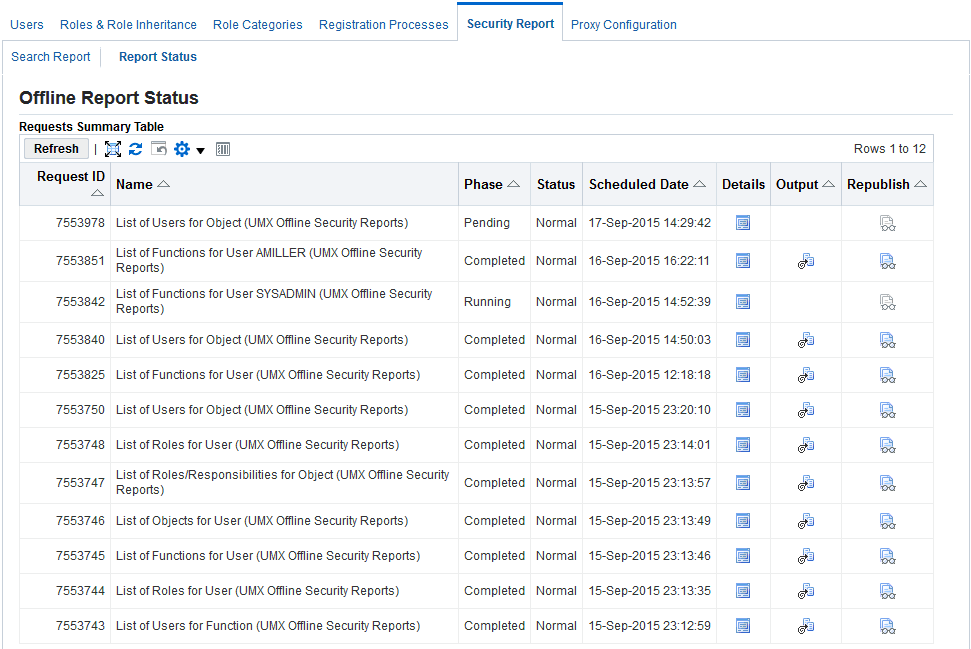
The following sections describe some the reports that can be produced.
Listing Functions for a User
This report will display assigned functions to a given user. The main record will show:
-
Function display name
-
Internal name
-
Function type
-
Who columns
For each main record there will be a detail row that will show all the paths from which this function is available to the end user, whether it is accessible from that path, and if not, the reason and the date of assignment.
List of Functions Report
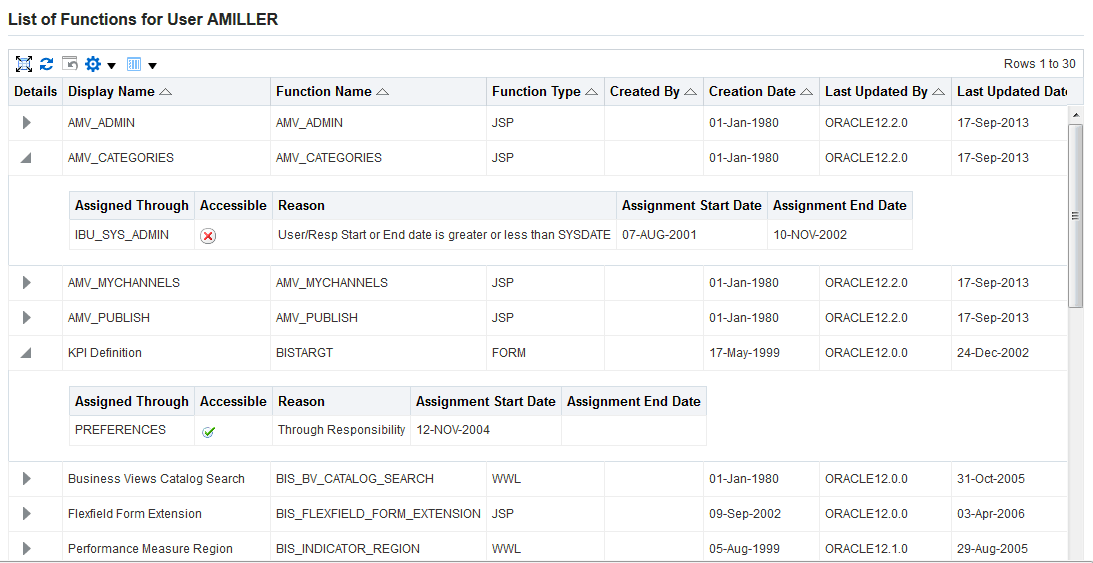
Filter Conditions
This report has the following filters:
-
Function Type: Zero or one function types can be selected; only those records which have this function type will be shown.
-
Include Global Granted Functions: This filter allows or prevents information on functions assigned from global grants being added to the report.
-
Function Name/Function Display Name: This filter accepts a wildcard for function name, and can be used to check if a given user has this function.
Listing Data Security and Business Objects for a User
The fields listed in the main table for this report are:
-
Object Name: The internal code for the object, and a sortable column for this table.
-
Object Display Name: The user-friendly name for the object.
-
Database Object Name: The database object with which the object is associated.
The detailed region (Show/Hide) contains the following information:
-
Instance Type: The type of object instance to which the user has access. Valid values for this field are:
-
Set
-
Instance
-
All/Global
-
-
Assignment Type/Assigned Through: This field indicates the source via which the user has an access on this object. Valid values for this field are:
-
Role Grant
-
User Grant
-
Global
-
Permission set: The permission set name through which the user has access on this object, the permissions are shown as a comma separated values.
-
As the same object could be assigned through multiple paths, all the paths are shown here.
List of Objects Report
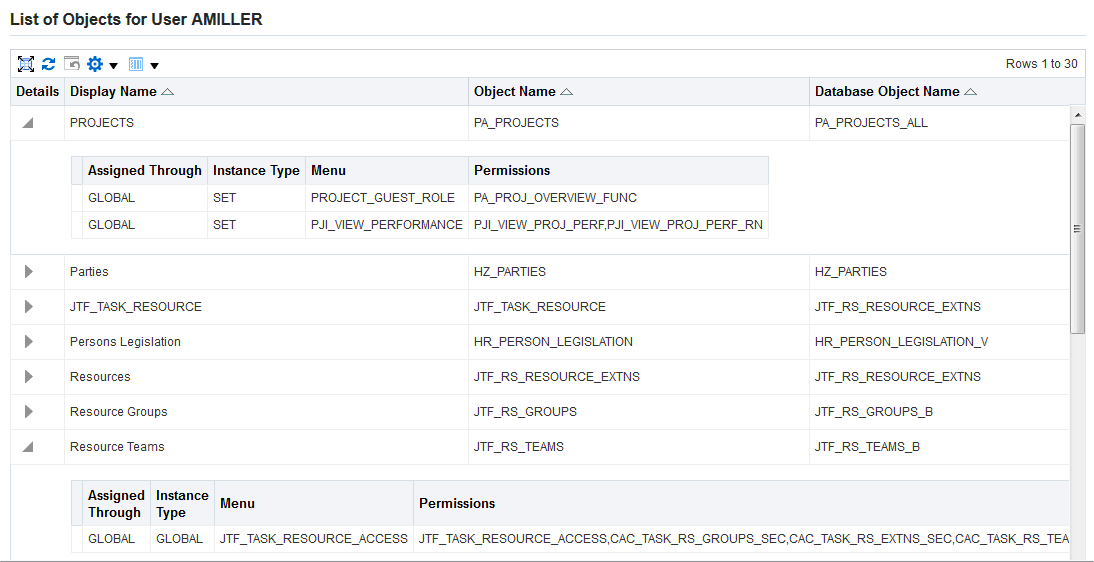
Filter Conditions
This report has the following filters:
-
Database Object Name: This filter is used to control which objects are shown in the report.
Listing Roles and Responsibilities for a User
The fields listed in the main table for this report are:
-
Role Display Name: The 'user friendly' name for the role.
-
Role Type: Can be a responsibility or role.
-
Assignment Status: Indicates whether the User-Role/Responsibility Assignment is active or not.
-
Assignment Type: This field indicates whether the role is directly assigned to the user, inherited by the user, or both. The valid values for this column are:
-
Direct
-
Indirect
-
Both
-
The detailed region (Show/Hide) contains the following information:
-
Dates information: For all roles (both direct and indirect), this region contains information about:
-
Effective Start Date: Date from which the user- role relationship is active.
-
Effective End Date: Date on which the user-role relationship ends.
-
Role/Responsibility Start Date
-
Role/Responsibility End Date
-
-
Justification/Comments: This field is shown only for roles whose assignment type is 'Direct/Both'. It lists any comments added by the administrator who has assigned the role or responsibility to the user.
-
Assigning Role: In the case of indirect assignments, this column shows the parent role through which this role was assigned to the user.
List of Roles Report
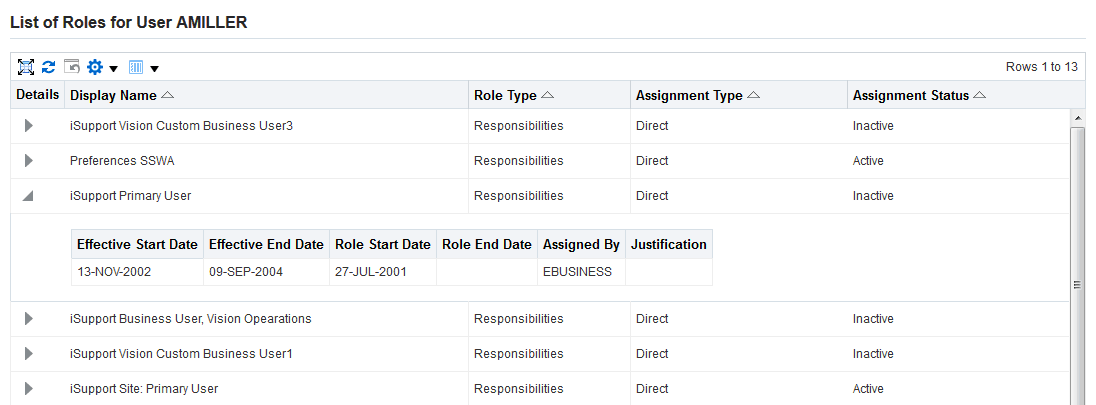
Filter Conditions
-
Role Name: Used to control which roles and responsibilities are shown in the report. This filter accepts a wild card.
-
Assignment Status: Controls whether the end user sees Active, Inactive, or All assignments.
-
Role Type: Controls whether the end user wants to see Roles, Responsibilities, or All.
-
Assignment Type: This filter controls whether the end user wants to see assignment types of Direct, Indirect, Both or, or All.
Listing Users With a Given Role
The fields listed in the main table for this report are:
-
User Name
-
Assignment Status: Whether the User to Role assignment is active or not.
-
User Status: Whether the user is active or not.
-
Assignment Type: Whether the role is inherited, directly assigned, or both. Valid values for this column are:
-
Direct
-
Indirect
-
Both
-
The detailed region (Show/Hide) contains the following information:
-
How: This information is given only for the relationships that are indirectly inherited by the user.
-
Parent Role Name: Name of the Immediate Parent Role through which this role has been inherited by the user. If the role has been assigned to this user through different paths, all the parent roles from the various paths will be shown.
-
-
Justification: Given only for the relationships that are directly assigned.
-
Justification is 'ASSIGNMENT_REASON' in WF_User_Role_Assignments.
-
List of Users of a Given Role Report
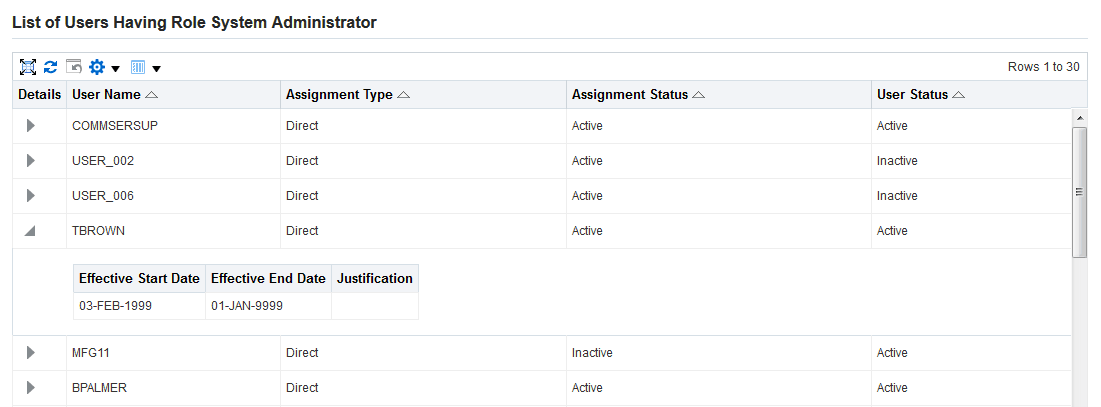
Filter Conditions
-
Assignment Type: Controls whether 'Direct', 'Indirect', 'Both' or 'All' types are shown.
-
User Status: Displays report based on User Status, which can be specified as 'Active', 'Inactive', or 'All'.
-
Assignment Status: Displays report based on User to Role Assignment Status, which can be specified as 'Active', 'Inactive', or 'All'.
-
User Name: Displays report filtered by User Name.
Listing Functions That Can Be Accessed From a Given Role
This report displays assigned functions to a given user. All columns are sortable. The main record will show Function Display Name, Internal Name, Function Type, and Who columns.
List of Functions Accessed from a Given Role Report

Filter Conditions
-
Function Name: This filter accepts a wildcard for Function Name, and can be used to check if a given role has the functions in question.
-
Function Type: Only those records with the specified function type will be shown.
Listing Objects for a Given Role
The fields listed in the main table for this report are:
-
Object Name: The internal code for the object, and a sortable column for this table.
-
Object Display Name: The user-friendly name for the object.
-
Database Object Name: The database object with which this object is associated.
The detailed region (Show/Hide) contains the following information:
-
Instance Type: The type of object instance to which this role gives access. Valid values for this field are:
-
Set
-
Instance
-
All/Global
-
-
Assignment Type/Assigned Through: This field indicates the parent role through which this role grants access on this object.
-
Permission Set: The name through which the user has access on this object's permissions, which are shown as comma-separated values.
As the same function or permission could be assigned through multiple paths, all the paths are shown here.
List of Objects for a Given Role Report

Filter Conditions
There are no applicable filter conditions.
Listing Users for a Given Function
The fields listed in the main table for this report are:
-
User Name
-
Who Columns
The detailed region (Show/Hide) contains the following information:
-
Accessible Through: The Child Role/Responsibility/Grant through which the function is accessible from this role.
-
Accessibility: Whether the function is accessible through this path.
-
Reason: The reason the function is not accessible.
As the same function or permission could be assigned through multiple paths, all the paths are shown here.
List of Users for a Given Function Report
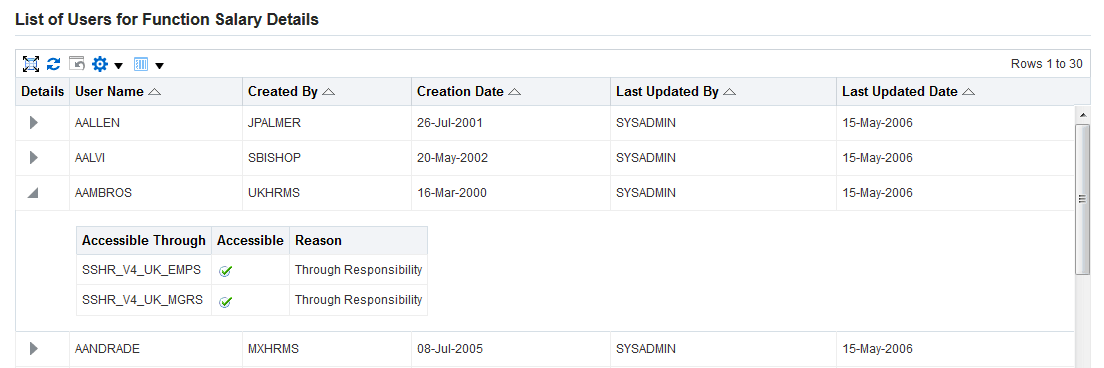
Filter Conditions
-
User Name: The report can be restricted on the basis of the User Name (for example, "Joe%").
Listing Roles and Responsibilities for a Given Object
The fields listed in the main table for this report are:
-
Role Display Name: User Friendly Name
-
Role Type: Responsibility/Role
-
Who Columns
The detailed region (Show/Hide) contains the following information:
-
Instance Type of Grant: Can be Set, All, or Instance
-
Permission Set: Permissions granted for this role on this object
As the same role or responsibility could be assigned through multiple paths, all the paths are shown here.
List of Roles/Responsibilities for a Given Object Report

Filter Conditions
-
Role Name: The report can be filtered on the basis of Role Name.