Setting Up
Oracle Environmental Accounting and Reporting Setup Overview
The Oracle Environmental Accounting and Reporting (EAR) setup steps span several Oracle applications including Oracle E-Business Suite, Oracle Business Intelligence Enterprise Edition (OBIEE), and the Oracle EAR setup as follows:
-
Set up the following prerequisite applications of Oracle E-Business Suite to be able to run the EAR application:
-
Oracle System Administration
-
Oracle Inventory
-
Oracle General Ledger
-
Oracle Human Resource Management System
-
Oracle Payables
-
Oracle Assets
-
Oracle Projects
Depending on your individual requirements, there may be EAR related or additional setup required. If this is the case, then the details are provided in the “Setting Up in Other Applications" topic.
-
-
Perform the EAR setup including Lookups, Reporting Structures, Parameters, Formulas, Flexfields, Reporting Combinations, UOMs, UOM Classification, Organization, and Organization Hierarchies, Assets, Sources, Suppliers, Items, and KPI definitions. Schedule the Oracle Data Integrator (ODI) ETL (Extract, Transform, and Load) batch or shell script to run for specific intervals of time as required. The program loads the data from the source EBS system to the data warehouse schema for environmental reporting.
-
Set up OBIEE that provides analytics from data spanning enterprise sources and applications.
Setting Up in Other Applications
Perform the following prerequisite setup in other applications of the E-Business Suite for running the Oracle Environmental Accounting and Reporting (EAR) application. Refer to the details for setting up these requirements provided in the application user's guides indicated.
Setting Up in Oracle System Administrator
Set up the following in Oracle System Administrator:
-
Profile Options
-
GHG: Data Warehouse Database Link.
-
BNE Allow No Security Rule
See: Setting Up Profile Options.
-
-
Descriptive flexfield structure for transaction source. As described earlier, one of the modes to capture environmental emissions, is through the Inventory Miscellaneous Issue of Environmental Items to Assets. If this method is chosen, then it is required, to define a corresponding Transaction Type. For defining this Transaction Type, a new “GHG Asset” Context Value, with a transaction prompt as Asset, for the Descriptive Flexfield “Transaction Source”, must be defined. Refer to the Oracle E-Business Suite Flexfields User's Guide for more information on how to set up flexfields.
You can use the following responsibilities that are seeded in the Oracle System Administration application.
-
Environmental Accounting and Reporting Administrator Responsibility
-
Environmental Accounting and Reporting User Responsibility
Refer to Oracle E-Business Suite Maintenance Guide for more information.
Setting Up in Oracle General Ledger
Set up the following in Oracle General Ledger:
-
Accounting Key Flexfields
Refer to Oracle E-Business Suite Flexfields User's Guide.
Setting Up in Oracle Human Resources Management
Set up the following in Oracle Human Resources Management:
-
Locations (Required)
-
Multi-Org Access Control (Optional)
To set up Multi-Org Access Control perform the following tasks:
-
Define a Multi-Org Security Profile. See: Defining a Security Profile, Oracle HRMS Implementation Guide.
-
Set the profile option MO: Security Profile to your security profile for each application responsibility that needs to access multiple operating units.
-
Set the profile option MO: Default Operating Unit to a default operating unit for the responsibility from the step above.
-
Refer to the Oracle E-Business Suite Multiple Organizations Implementation Guide for more information.
Setting Up in Oracle Inventory
Set up the following in Oracle Inventory:
-
Items (Required)
-
Subinventory (Required)
-
Units of Measure (Required)
-
Units of Measure Conversions (Optional)
-
Units of Measure Classes (Required)
-
Descriptive flexfield structure for transaction source. Refer to "Setting Up in Oracle System Administrator" topic for information.
-
Transaction Source Type to track inventory issues to the environmental assets. For example, you can define a Transaction Source Type with the following information:
-
Name: GHG Issue
-
Description: GHG Issue
-
Validation Type: Value Set
-
Context: GHG Asset
This setup is optional and is only required if you have installed Oracle Inventory and maintain inventory of items that you issue to assets have impact on the environment.
-
-
Transaction Type. If you want to account for emissions related to Inventory Issues, then you must set up the GHG Inventory Issue to GHG Asset Transaction Type. For example, you can define transaction type with the following information:
-
Name: GHG Inventory Issue to GHG Asset
-
Description: GHG Inventory Issue to GHG Asset
-
Action: Issue from Stores
Refer to the Oracle Inventory User's Guide for more information.
-
Setting Up in Oracle Payables
Set up Supplier and Supplier Sites. Refer to the Oracle Payables User's Guide for more information on setting up Supplier and Supplier Sites.
Setting Up in Oracle Assets
Set up Assets. Refer to the Oracle Assets User's Guide for more information on setting up assets.
Setting Up in Oracle Projects
Set up the following in Oracle Projects:
-
Projects
-
Tasks
Refer to the Oracle Projects Implementation Guide for more information.
Setting Up in Oracle Environmental Accounting and Reporting
The following is a list of setups required for Oracle EAR:
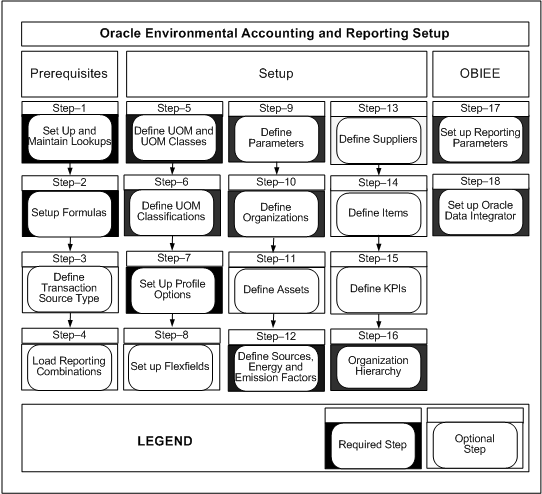
Setting Up Lookups
Set up the following lookups in Oracle Environmental Accounting and Reporting (EAR) according to your organization's requirements:
-
Area UOM (GHG_AREA_UOM): Optionally, set up the unit of measure used when measuring the area of a property. For example, square feet or square meters. This lookup is used when integrating EAR with a property manager application, such as Oracle Property Manager.
-
Emission Type (GHG_EMISSION_GAS): Set up emission types to define the types of gas emissions that result from consuming or producing a source. For example, carbon dioxide (CO2), Perflouroethane (C2F6), nitrous oxide (N2O) etc. EAR provides 27 seeded emission types.
-
Property Disposition (GHG_PROPERTY_DISPOSITION): Optionally, set up the property disposition to identify the main use of the property. For example, some valid property uses include office, manufacturing facility, on market, subleased, and terminated. This lookup is used when integrating EAR with a property manager application, such as Oracle Property Manager. The following disposition values are seeded in the EAR application:
Code Meaning NONE None ONMKT On Market SUBLEA Subleased TER Terminated UNUSED Unused -
Energy Types (GHG_ENERGY_TYPE): Optionally, set up energy types used by sources. For example, Electricity, Fuel, Cooling, and Heating. Energy types used are specified in the following CDP report sections:
-
Gross Energy Usage
-
Gross Energy Usage by Energy Type
-
-
Legislation (GHG_LEGISLATION): Set up Legislation codes to define government entities that require carbon permits. For example, set up a code for a certain city that requires permits, such as the Northeast U.S. states' Regional Greenhouse Gas Initiative (RGGI), Tokyo Metropolitan Trading Scheme, or the Kyoto Protocol. For more information about carbon permits, refer to Setting Up Carbon Permit Management.
-
Locations (GHG_LOCATION): Set up a location to replicate the State or County values defined within the Oracle E-Business Suite. Oracle EAR then uses it to identify the state/country that an asset resides in. When a location specific emission factor is used, these values are used to determine the correct factors to use, when calculating the emission information. For example, the Emission Source ELECTRICITY is location specific, and can have different factors depending on the state that the facility is consuming the ELECTRICITY in.
-
Measurement Criteria (GHG_MEASUREMENT_CRITERIA): Set up Measurement Criteria to indicate the reliability of information that is related to the transactions. For example, the Measurement Criteria for a Paper Invoice is 'A', i.e. very reliable. The following measurement criteria are seeded in the EAR application:
Number Code Meaning 1 A Supplier Invoice 2 AA Indirect measurement at consumption point 3 AAA Direct measurement at consumption point 4 BBB Simplified consumption measurement -
Property Units of Measure (GHG_PROPERTY_UNITS_OF_MEASURE): Set up the units of measure used to measure properties, such as square feet or square meters. The concurrent program 'Load Organizations and Organization Hierarchy from Property Manager' uses the property unit of measure lookup values when importing properties from Oracle Property Manager. The following values are seeded in the EAR application: SFT (square feet), SMT (square meter), and SYD (square yard).
-
Source Category (GHG_SOURCE_CATEGORY): Set up source categories to use for grouping sources together for reporting purposes in the Environmental Sources window. For example, sources such as Chilled Water, Hot Water, and Steam Water can be grouped under a Water source category. The following source categories are seeded in the EAR application:
-
Water
-
Waste
To view reports for these categories, refer to Understanding the Water and Waste Dashboard. You can add additional categories and create custom dashboards for them as needed.
-
-
Standard Industry Codes (GHG_SIC_CODES): Set up the Standard Industry Codes suitable to your organization.
-
Target Type for Organizations (GHG_TARGET_TYPE): This seeded lookup defines the following codes and meanings for organization target types:
-
Emission
-
Energy
-
Usage
-
-
Tenure Type for Property (GHG_PROPERTY_TENURE): Optionally, set up tenure types for properties. The tenure type indicates whether the building is leased, owned, managed, or mixed. This lookup is used when integrating EAR with a property manager application, such as Oracle Property Manager. The following tenure values are seeded in EAR:
Code Meaning L Leased MG Managed MI Mixed O Owned -
Transport Types (GHG_TRANSPORT_TYPE): Set up transport types to identify the various diesel engine types. You must enter emission factors for diesel engines by the engine type as each type has a different emission value. For example, EURO 1, EURO 2, EURO 3.
To define lookups
-
Navigate to the Application Object Library Lookups window
-
Perform a query to review seeded lookup types for the application Oracle Environmental Accounting and Reporting.
-
The following information displays for the lookup Type:
-
Look up type in the Type field.
-
A short description of the lookup type in the Meaning field.
-
A detailed description of the lookup type in the Description field.
-
-
To add additional lookup values:
-
Enter the Code for the lookup value.
-
Enter a short description for the lookup value in the Meaning field.
-
Optionally, enter a detailed description for the lookup value in the Description field.
-
Enter the Effective Dates for the lookup value in the From and To fields. If you do not enter a From date, the new lookup value is valid immediately. If you do not enter a To date, the new lookup value is valid indefinitely.
-
-
Select the Enabled checkbox to enable the lookup value.
-
Click Save.
Defining Organization Hierarchy Lookup
Oracle EAR enables you to define multi-level organization hierarchies to support multi level analysis and reporting of environmental data. To define a hierarchy you must define additional look up values for the standard Oracle HRMS look up type HIERARCHY_NODE_TYPE.
Additional lookup values needed for EAR are as follows:
| Code | Description |
| GHG_ORGANIZATIONS | Organization |
| GHG_FACILITIES | Facility |
| GHG_SUB_FACILITIES | Sub Facility |
To define additional lookup values
-
Navigate to the Application Utilities: Hierarchy Node Type Lookups window.
-
The following information displays:
-
HIERARCHY_NODE_TYPE type in the Type field.
-
HIERARCHY NODE TYPE displays in the Meaning field.
-
Human Resources displays in the Application field.
-
Hierarchy Node Types for the generic hierarchy in the Description field.
-
-
Enter the Code for the lookup value.
-
Enter a short description for the lookup value in the Meaning field.
-
Optionally, enter a detailed description for the lookup value in the Description field.
-
Enter a Tag for the lookup value.
-
Enter the Effective Dates for the lookup value in the From and To fields. If you do not enter a From date, the new lookup is valid immediately. If you do not enter a To date, the new lookup value is valid indefinitely.
-
Select the Enabled checkbox to enable the lookup value.
-
Click Save.
Setting Up Formulas for Operating Units
Oracle Environmental Accounting and Reporting provides seeded formulas for calculating emissions. The following formulas are stored in the GHG_EMISSION_FORMULAS_ALL table:
| Formula ID | Description | Formula Content | Secondary Formula ID |
| -1 | None | Null | N/A |
| 1 | Standard | Q x (EC x EF) | 3 |
| 2 | Electricity | Q x EF | N/A |
| 3 | Energy | Q x EF | N/A |
| 4 | Waste | Q x EF | N/A |
Following is the description of the variables used in the formulas:
-
Q is the usage quantity of the emission source.
-
EC is energy factor.
-
EF is emission factor.
Run the Setup Formulas for Operating Units concurrent program to enable environmental accounting for all operating units operating units that existed in the system while running the concurrent request. Refer to the topic Environmental Accounting Overview, in the Environmental Accounting chapter for detailed information on using formulas for environmental accounting.
To run the Setup Formulas for Operating Units concurrent program:
-
Navigate to the Submit Request window.
-
Select Set up Formulas for Operating Units.
-
Click OK , and Submit.
Setting Up Units of Measure Classes
You must set up a UOM Class for Energy to allow the entry of data in Energy Units. Oracle Environmental Accounting and Reporting uses gigajoules (GJ) to account and report energy. For example, you can define a unit of measure class with the following information:
-
Name: ENERGY
-
Description: Energy
-
Base Unit: GJ
-
UOM: GJ
If you choose to use a different UOM (for example, Ton) other than kilograms (KG) for reporting emissions in the Business Intelligence dashboards, then use either an existing UOM Class or define a new one. Refer to the GHG: Emission UOM Class profile option within Setting Up Profile Options for more information.
You can define additional UOM Classes as required by your organization. Refer to the Oracle Inventory User's Guide for more information about setting up units of measure.
Setting Up Units of Measure
Set up Energy Units of Measure (UOM) and Conversion to allow the entry of data in energy units. For example, you can define a unit of measure with the following information:
-
Name: GJ
-
UOM: GJ
-
Description: Gigajoules
-
Class: ENERGY
You can define additional UOMs as per the requirement of your organization. Refer to the Oracle Inventory User's Guide for more information on setting up units of measure.
Note: You can set up units of measure in both the Oracle Environmental Accounting and Reporting and Oracle Inventory applications, but must be setup only once.
Setting Up Units of Measure Conversions
Set up a UOM conversion to enable UOM conversions for sources that are required to be recorded in the energy and emission calculations. A source may normally be used, consumed, or generated in a unit of measure (UOM) different from that of the base energy factor set up for it in the EAR application.
Any item or environmental source can use a standard unit of measure conversion, but you also have the option to define a unit of measure conversion for a particular item or source. The following examples illustrate why this could be useful:
-
Grease is typically purchased in kilograms, but for the purposes of calculating emissions, the rates provided consider grease as a liquid and thus require a volumetric unit.
-
You can purchase liquefied petroleum gas (LPG) by cylinder size or cylinder weight, but the energy content factors are based on volumetric units such as kiloliters or gallons.
-
In most cases, purchased electricity does not have an associated item in the source transactions (for example, electricity is purchased in kWh), but there are cases where electricity is purchased based on the use of an item (for example, the number of gallons of diesel oil required to power a generator) which requires an additional conversion.
When you enter an emissions transaction, the system searches for a unit of measure conversion in this order:
-
Source unit of measure conversion. This could be defined for either a non-item related environmental source or for an environmental source with a related item.
-
Either an item intra-class or inter-class unit of measure conversion.
-
Standard unit of measure conversion.
Refer to the Oracle Inventory User's Guide for more information on setting up units of measure.
To set up a source unit of measure conversion
You can define a unit of measure conversion for a particular source. The source may or may not have an associated item. For example, fuel oil may be defined as both an inventory item and a source. Electricity may only bedefined as a source.
-
Navigate to the Source Unit of Measure window.
-
In the From Unit field, select the source's unit of measure from the list of values.
-
In the Source field, select a source from the list of values.
-
In the Conversion field, enter a multiplier value to convert from the source's unit of measure to the converted unit of measure.
-
In the To Unit field, enter the converted unit of measure.
Tip: For example, Box = 8 x Each. The From Unit = Box, the Conversion = 8, and the To Unit = Each. For a particular source, there are 8 individual units (Each) in a box.
-
In the Inactive On field, enter the date when the source unit of measure conversion becomes inactive. Optional.
-
Click Save.
To set up an intra-class unit of measure conversion
Intra-class unit of measure conversions are available for use in emissions transactions involving sources that have a related item. Use intra-class unit of measure conversions to convert between units of measure in the same class. For example, set up a conversion between Kiloliters (Fluid class) and Gallons (Fluid class).
-
Navigate to the Unit of Measure Conversions window, Intra-class tab.
-
In the Item field, select an item from the list of values.
-
In the Source Unit field, select a unit of measure from which you want to convert from the list of values.
The value defaults into the Source Class field depending on which unit was selected.
-
In the Conversion field, enter a multiplier value to convert from the source unit of measure to the destination unit of measure.
For example, if the unit of measure to which you want to convert from (the source UOM) is Quart, then the class defaults to Fluid, the destination base unit of measure defaults to Gallon, and you enter .25 into the Conversion field.
-
Optionally, in the Inactive On field, specify a date at which this intra-class unit of measure conversion becomes inactive.
-
Click Save.
To set up an inter-class unit of measure conversion
Inter-class unit of measure conversions are available for use in emissions transactions involving sources that have a related item. Use inter-class unit of measure conversions to convert between units of measure in different classes. For example, set up a conversion between Kiloliters (Fluid class) and Drums (Quantity class).
-
Navigate to the Unit of Measure Conversions window, Inter-class tab.
-
In the Item field, select an item from the list of values.
-
In the Destination Base Unit field, select a unit of measure to which you want to convert from the list of values.
The value defaults into the Destination Class field depending on which unit was selected.
-
In the Conversion field, enter a multiplier value to convert from the source unit of measure to the destination unit of measure.
For example, if the unit of measure to which you want to convert from (the source UOM) is Kiloliters, then the class defaults to Fluid. The destination UOM is Drums, which has a class of Quantity. Enter a conversion value of 0.2082.
-
Optionally, in the Inactive On field, specify a date at which this inter-class unit of measure conversion becomes inactive.
-
Click Save.
To set up a standard unit of measure conversion
Standard unit of measure conversions are available for use by any item or source if no specific source or item unit of measure conversion is defined.
-
Navigate to the Unit of Measure Conversions window, Standard tab.
-
In the Unit field, select the unit of measure to which you want to convert from the list of values.
The unit of measure class defaults into the Class field based on the unit of measure selected. See: Setting Up Unit of Measure Classification. The base unit of measure defaults into the Base field based on the unit of measure selected.
-
In the Conversion field, enter the multiplier value used to convert the base unit to the converted unit.
For example, if the unit of measure to which you want to convert is Day, then the class defaults to Time, the base unit of measure defaults to Hours, and you enter 24 into the Conversion field.
-
Optionally, in the Inactive On field, specify a date at which this standard unit of measure conversion becomes inactive.
-
Click Save.
Setting Up Unit of Measure Classification
Set up the UOM classification to maintain a standard unit of measure for measuring the usage quantities for a single environmental source or a group of related sources to facilitate calculations and reporting of the source usages and emissions by the Oracle Environmental Accounting and Reporting (EAR) application. The UOM Classification window enables you to define the broad classifications for sources, with a base unit of measure. The EAR dashboards require all transactions for an emission source in the same unit of measure for consistent reporting. For example, you can define a classification called Electricity to classify all sources that provide electricity and set up KWh (kilowatt hour) as a standard UOM for the classification. If you enter the usage data of any source that falls under the Electricity Classification, then the application converts the UOM the usage is recorded in, into the standard UOM of KWh to further calculate the usage quantities and emissions.
To set up UOM classification
-
Navigate to the UOM Classification window.
-
Enter a unique code to identify the classification name in the Classification Code field.
-
Enter a brief description for the classification in the Description field.
-
Select a Standard UOM from the LOV for the classification. All sources which use the classification are converted into the selected standard UOM.
-
Click Save.
Setting Up Profile Options
Set up the following profile options:
| Profile Option | User User |
Sys Admin User |
Sys Admin Resp |
Sys Admin Resp |
Sys Admin App |
Sys Admin Site |
Required | Default Value |
|---|---|---|---|---|---|---|---|---|
| BNE Allow No Security Rule | - | - | - | - | - | Yes | Yes | No |
| GHG: Debug Log Level | - | - | - | - | - | Yes | No | Null |
| GHG: Emission UOM | - | - | - | - | - | Yes | No | Null |
| GHG: Emission UOM Class | - | - | - | - | - | Yes | No | Null |
| GHG: Energy UOM Class | - | - | - | - | - | Yes | Yes | Null |
| GHG: Location specific Emission Factor Selection | - | - | - | - | - | Yes | Yes | Null |
| GHG: Organization Hierarchy Type for Reporting | - | - | - | - | - | Yes | No | Null |
| GHG: PN Location DFF Column for HR Location | - | - | - | - | - | Yes | No | Null |
| GHG: Processing Batch Size | - | - | - | - | - | Yes | No | Null |
| GHG: Reporting Energy UOM | - | - | - | - | - | Yes | No | GJ |
| GHG: Source Instance | - | - | - | - | - | Yes | No | Null |
| GHG:Target Schema | - | - | - | - | - | Yes | No | Null |
BNE Allow No Security Rule
This profile option enables users to view Oracle Web Applications Desktop Integrator (WebADI) templates. Change the default value from No to Yes in order to download templates and use WebADI.
Default: No
Options: Change the value to Yes in order to use WebADI templates in the application.
Recommended Change Level: Site
GHG: Debug Log Level
This profile option enables the user to choose the log level, which helps to trace the location of the code related to any errors.
Default: Null
Options: a valid log level.
Recommended Change Level: Site
GHG: Emission UOM
This profile option stores the UOM required for reporting emissions. Set up this profile option only if you setup the GHG: Emission UOM Class profile option. The LOV includes all UOMs that belong to the UOM Class set in the GHG: Emission UOM Class profile option. If this profile option is left blank, the system reports the emissions in kilograms (KG) regardless of whether KG exists or does not exist as a UOM.
Note: The Environmental Ledger always stores and displays the GHG emissions in kilograms regardless of the settings of the GHG: Emission UOM Class and GHG: Emission UOM profile options. These two profile options apply only to reporting and viewing GHG emissions in the pre-built Oracle Business Intelligence dashboards.
Default: Null
Options: all UOMs within the selected Emission UOM Class
Recommended Change Level: Site
GHG: Emission UOM Class
This profile option stores the UOM Class of the desired UOM for reporting emissions in the Oracle Business Intelligence dashboards. You only need to specify an emission UOM Class if you choose to use a UOM other than kilograms (KG) for reporting and viewing GHG emissions in the pre-built Oracle Business Intelligence dashboards. It works in the following ways:
-
If you choose to use a different UOM (such as Ton), then you can use an existing or define a new UOM Class. Ensure that the desired reporting UOM (Ton) and the UOM KG belong to the same UOM Class. In addition, ensure that the proper UOM conversions are defined. Finally, specify the emission UOM Class in this profile option, GHG: Emission UOM Class.
Note: If the UOM "KG" is not defined in the system, then you must define KG as a UOM. The application uses KG as a basis for converting the values to the desired UOM for reporting emissions.
-
If you do not set up this profile option, by default, the system reports emissions in KG regardless of whether KG exists or does not exist as a UOM in the system.
Default: Null
Options: all defined UOM Classes
Recommended Change Level: Site
GHG: Energy UOM Class
This profile option stores the UOM class that is created as part of the implementation step for Energy. This profile option determines if the secondary formula is used to calculate the emissions if the UOM class of the source UOM is same as the value set for this profile option during the creation of ledger entries.
Default: Null
Options: All UOM classes
Recommended Change Level: Site
GHG: Location specific Emission Factor Selection
This profile option stores the type of location (such as STATE or COUNTRY) and can be set up at the Site or Organization level. The profile value is used as a basis to derive the location specific energy and emission factors for environmental accounting of transactions that are related to emission sources.
Default: Null
Options: STATE, COUNTRY.
Recommended Change Level: Organization
GHG: Organization Hierarchy Type for Reporting
This profile option stores the organization hierarchy type used for reporting. The setup and transactions for all entities belonging to the organization hierarchy type specified here are loaded to the data warehouse.
Default: Null
Options: All hierarchy names.
Recommended Change Level: Site
GHG: PN Location DFF Column for HR Location
This profile option identifies the descriptive flexfield (DFF) attribute column where Oracle Property Manager stores the Oracle Human Resources Location ID for Building, Floor, and Office locations. You only need to populate this profile option if you are importing property details from Oracle Property Manager. The concurrent program 'Load Organizations and Organization Hierarchy from Property Manager' imports the location IDs from the DFF column name specified in this profile option.
Default: Null
Options: All DFF attribute column names where the Oracle Human Resources property location IDs could be stored within Oracle Property Manager.
Recommended Change Level: Site
GHG: Processing Batch Size
This profile option enables the user to set the processing batch size. Adjust the number to achieve the best performance for your system configuration.
Default: Null
Options: Any whole number.
Recommended Change Level: Site
GHG: Reporting Energy UOM
This profile option stores the value of Energy UOM used for environmental reporting. The environmental ledger maintains the Energy UOM in Giga Joules (GJ) but in the Energy dashboard, users can view the energy reports in the UOM selected using this profile option.
Default: GJ
Options: All valid Energy Units within the Energy UOM Class.
Recommended Change Level: Site
GHG: Source Instance
This profile option stores the name of the source EBS instance which supplies data to the data warehouse.
Default: Null
Options: All valid EBS instances.
Recommended Change Level: Site
GHG:Target Schema
This profile option stores the target data warehouse schema name. The target data warehouse stores data from the source EBS instance.
Default: Null
Options: All valid data warehouse schema names.
Recommended Change Level: Site
Defining Key Flexfield Structures for Reporting
Certain legislation requires the reporting of energy usage and emissions in specific formats. For example, the National Greenhouse and Energy Reporting Act requires the reporting of energy usage and emissions using a three segment combination defined as Parent Source, Source, and Activity Data. A sample combination is:
-
Parent Source - electricity
-
Source - coal (other than that to produce coke)
-
Activity Data - non-transport
To set up and use this three segment combination, perform the following steps:
-
Set up a multi-segment Key Flexfield structure, known as the Reporting Flex Structure.
Link this flexfield structure to specific factors defined for an emission source.
-
Define the value sets and their values.
Describe the value sets using descriptions from the legislation.
-
Load valid reporting combinations into the database using SQL Scripts.
The legislation specifies the valid combinations of values. For more information, see: Reporting Combinations.
While defining emission sources and factors in EAR, when you enter the values in the KFF segments, the application validates against combinations that are pre-loaded and stored in the tables.
Defining Descriptive Flexfields for Reporting
You can also set descriptive flexfields in the EAR application to store and report additional information. In Oracle Environmental Accounting and Reporting, you can use descriptive flexfields to enter additional information for organizations and environmental sources. For example, you can use descriptive flexfields to store physical and chemical properties for a source for additional reporting. You can enter additional information using the following descriptive flexfields:
-
Organizations for Environmental Accounting flexfield for organizations.
-
Sources for Environmental Accounting flexfield for sources.
Reporting Combinations
In Oracle Environmental Accounting and Reporting you can load valid reporting combinations using an sql script. Refer to the Oracle Environmental Accounting and Reporting Installation Notes for Business Intelligence and Data Warehouse (find the version for your release at https://support.oracle.com) for further details. The reporting combinations that you set up and associate with emission factors are validated based on these reporting combinations that you load into the GHG_REPORT_COMBINATIONS table of the EAR application.
Note: You can load the reporting combinations only after defining the key flexfield reporting structure.
Run the following query to get a list of all structures for the Key Flexfield "Environmental Reporting". This would also give the corresponding ids:
SELECT ID_FLEX_NUM,
ID_FLEX_STRUCTURE_NAME
FROM fnd_id_flex_structures_vl
WHERE id_flex_code = 'GHG#';
Run the following insert statement as many times as many valid combinations are needed:
INSERT INTO ghg_report_combinations
(code_combination_id,
last_update_date,
last_updated_by,
chart_of_accounts_id,
segment1,
segment2,
segment3,
start_date_active,
enabled_flag,
summary_flag)
VALUES
(1, -- Should be a unique number
SYSDATE,
0,
55034, -- Should be the id_flex_num from previous query
'FCE', --\
'OS', -- Enter values as per your requirement
'50', --/
'01-JAN-2009',
'Y',
'Y');
Setting Up Parameters
The Oracle Environmental Accounting and Reporting (EAR) parameters are defined at the Operating Unit level.
To set up parameters
-
Navigate to the Define Environmental Parameters window. The Operating Unit displays. If using MOAC, select the desired Operating Unit.
-
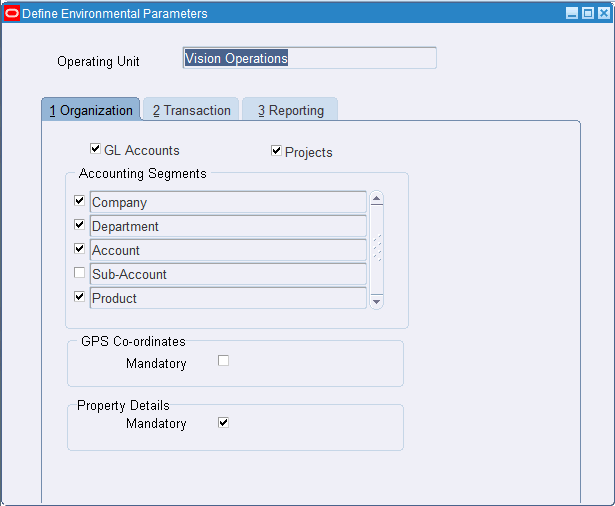
In the Organization tab, select GL Accounts if you want the application to identify an organization using accounting code combinations that are referenced in AP Invoices. If you select GL Accounts, select the specific Accounting Segments in the Chart of Accounts to identify the Organization
-
Select Projects if you want the application to identify an Organization using projects, and tasks numbers that are referenced in AP Invoices. Select GPS Coordinates if you want the GPS Coordinates entry to be mandatory in the Define Organizations window.
-
Select Property Details if you want property details entry to be mandatory in the Environmental Organizations window.
You can either import property details from an application such as Oracle Property Manager or enter property details manually.
Additional Information: Once you save this parameter, you can deselect it, but you will be unable to import the property details from Oracle Property Manager or enter the property details manually in the Organizations window. If you deselect Property Details, the following warning message appears:
By unchecking the property details flag, you will not be able to add or import new property details records in the organizations setup.
-
In the Transaction tab, you can define the date to be used by the EAR Application as the Emission Date when an invoice is created from a Purchase Order Match. The Oracle Payables application allows you to define the Invoice Match Option to be used by Oracle Payables at Supplier Site level. Refer to the Oracle Account Payables User's Guide for more information. Options available are:
-
Purchase Order (2-Way Match). This option allows you to match against the Purchase Order regardless of the existence of receipts against it.
-
Receipts (3-Way Match). This option only allows you to match the Purchase Order when a valid receipt exists against it.
The Transaction tab has two zones that determine how the EAR application derives the emission date dependent on the Invoice Match Option defined on the Supplier site.
-
-
Select the Emission Date as:
-
PO Match Emission Date (Used when Invoice Match Option is Purchase Order):
-
INVOICE: If you select Invoice, then the date entered in the Invoice Date field on the Invoice Entry window is used as the Emission Date.
-
RECEIPT: If you select Receipt, then if there are existing receipts for this Purchase Order, the latest Receipt's date is used as the Emission Date. If there are no receipts for the Purchase order, then the Invoice Date is used as the Emission Date.
-
-
PO Receipt Match Emission Date (Used when Invoice Match Option is Receipts) :
-
INVOICE: If you select Invoice, then the date entered in the Invoice Date field on the Invoice Entry window is used as the Emission Date.
-
RECEIPT: If you select Receipt, then the Receipt's date for the goods on the Purchase Order is always used as the Emission Date.
-
The Emission Date displays in the From and To fields in the Environmental Emissions window, when you enter an invoice or when you match an invoice to a purchase order or a purchase order receipt.
For more information, refer to Environmental Accounting for Invoices.
-
-
In the Reporting tab, select the Reporting structure to determine the reporting key flexfields to be used for mapping Emission Sources to statutory reporting combinations.
-
Select a reporting structure from the LOV of the Reporting Flex Structure field. This determines the reporting structure displayed in the Environmental Sources window.
-
Click Save.
Setting Up Organizations
An Environmental Organization can be thought of as a single undertaking or as an enterprise or any entity that performs activities or a series of activities that emit greenhouse gases and/or produces, or consumes energy at a single site and is attributable to a single industry sector.
The Environmental Organizations window enables you to create organization entities that are required for hierarchical reporting of emission information. These entities can be facilities, sub-facilities, aggregate facilities, etc. for reporting aggregation and government agencies that may be interested in data related to an organization. Optionally, you can import organizations and organization hierarchies from a property manager application, such as Oracle Property Manager. See: Importing an Organization Hierarchy from Oracle Property Manager.
It is not required to enter or select a organization for each transaction as the application derives the appropriate organization from the general ledger account segment or project/task values on each distribution line for a Payables invoice. You must enter or select an organization for each transaction if you are entering environmental data manually using the Environmental Transaction Batches window.
Refer to the Environmental Accounting chapter for more information on manually entering environmental data. Organization definitions and organization mapping rules determine how the organizations are derived by the application.
You can use descriptive flexfields to store additional attributes related to an organization such as area, employee headcount, etc. with this window.
To set up Organizations
-
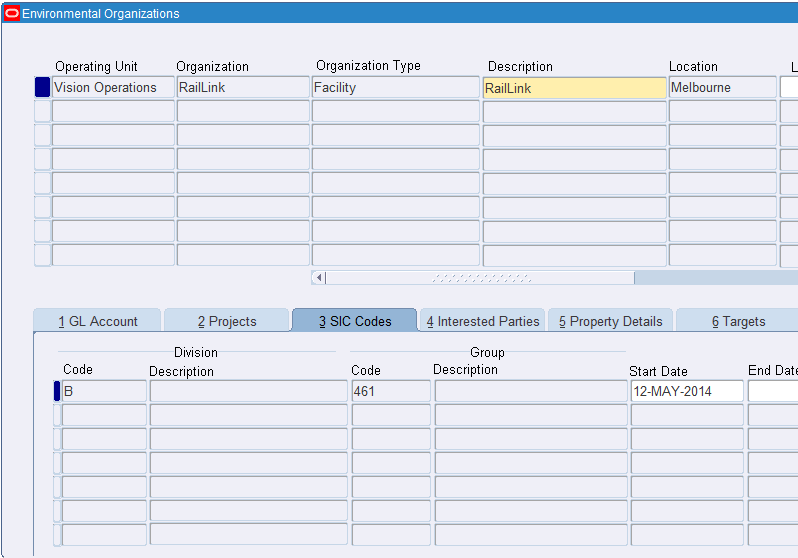
Navigate to the Environmental Organizations window. The Operating Unit displays.
-
Enter the name of the organization in the Organization field.
-
Select the type of the organization from the list of values (LOV) in the Type field. The following values display in the LOV:
-
Aggregate Facility: This is a logical facility that acts as a container for many smaller facilities.
-
Facility: This is a main container for collecting emission transactions.
-
Government Agency
-
Joint Venture
-
Management Unit
-
Organization
-
Partnership
-
Sub-facility
-
-
Optionally, enter a brief description for the organization in the Description field.
-
Select a location for the organization from the Location field LOV. The LOV displays all the locations that you define in Oracle HRMS. This is used to determine the state of the location when looking for location specific rates applied on emissions. This step is required.
-
Enter the Latitude and Longitude for the location of the organization. Optional. If you select the GPS Coordinates check box in the Parameters window, then you must provide the latitude and longitude.
Refer to Setting Up Parameters for more information
-
Select Allow Transactions if you want to allow transactions to be entered for the organization. This step is required.
-
Enter the size of the organization in the Size field. Valid options are Large, Medium, and Small.
-
Enter the CEO name and the Company No for the organization. This is required for GHG reporting using OBIEE dashboards.
-
Select a currency for the organization from the Currency field LOV. The LOV displays the currencies defined in either Oracle Payables or Oracle General Ledger.
Caution: You can not change the currency of an organization later. Instead, you must enter a new effective End Date for the organization, then add the organization again with a new currency value and new effective dates.
-
Enter the effective Start Date for the organization. This step is required.
-
Optionally, enter the effective End Date for the organization.
-
Enter information in the GL Accounts tab. If you select the GL Accounts check box in the Parameters window, then this tab is enabled. Refer Setting Up Parameters for more information.
Enter the following information to map the organization to accounting flexfield segments that have been set up in Oracle General Ledger, for a specific date range:
-
Flexfield Low as the lowest Value in the accounting flexfield range.
-
Flexfield High as the highest value in the accounting flexfield range.
-
Start Date as the effective start date for the accounting flexfield mapping to the organization.
-
End Date as the effective end date for the accounting flexfield mapping to the organization.
Note: You cannot change existing mapped facilities. You can end date a mapping rule and then define a new facility mapping rule.
-
-
Enter information in the Projects tab. If you select the Projects checkbox in the Parameters window, then this tab is enabled. Refer to Setting Up Parameters for more information.
Enter the following information to map the organization to projects and tasks that have been set up in Oracle Projects for a specific data range:
-
Projects Low as the lowest value in the project range.
-
Projects High as the highest value in the project range.
-
Tasks Low as the lowest value in task range within the project.
-
Tasks High as the highest value in task range within the project.
-
Start Date as the effective start date for the project and tasks mapping to the organization.
-
End Date as the effective end date for the project and tasks mapping to the organization.
-
-
Use the SIC Codes tab to enter the following information to map the organization to a standard industry code:
-
Division Code as the division reporting code for the organization (Required).
-
Division Description defaults to description for the Division Code.
-
Group Code as the group reporting code for the organization.
-
Group Description defaults to the description for the Group Code.
-
Start Date as the effective start date for the division and group code mapping to the organization (Required).
-
End Date as the effective end date for the division and group code mapping to the organization.
Note: You must link an organization to only one SIC code.
-
-
In the Interested Parties tab, enter the following information to define organizations or agencies that are interested in the transactions of the organization:
-
Interested Organization is the name of an organization interested in the organization.
-
Interest Type from the following available options:
-
Equity Control: This indicates that the interested organization has equity control in the facility or organization.
-
Financial Control: This indicates that the interested organization has financial control in the facility or organization.
-
Operational Control: This indicates that the interested organization has operational control in the facility or organization.
Note: Each organization can have only one operational control.
-
Analysis Reporting: This indicates that the interested organization has analysis reporting interest in the facility or organization.
-
Equity Interest: This indicates that the interested organization has equity interest in the facility or organization.
-
Financial Interest: This indicates that the interested organization has financial interest in the facility or organization.
-
Statutory Reporting: This indicates that the interested organization has statutory reporting interest in the facility or organization.
-
-
Share as the percentage of interest the interested organization has in the facility or organization.
-
Start Date as the effective start date for the interested organization's interest in the organization.
-
End Date as the effective end date for the interested organization's interest in the organization.
-
-
In the Property Details tab, for organizations that do not use Oracle Property Manager, enter the following property details:
-
Tenure - Select a lookup value indicating whether the building is leased, owned, managed, or mixed.
-
Disposition - Select a lookup value indicating why the building, floor, office, or section is non-occupiable. For example, the lease was terminated or the property is for sale.
-
Area - Gross area of the building.
-
Area UOM - Area unit of measure.
-
Headcount - The number of people working in the building, office or floor level.
-
Effective Date - the date the property details become effective, usually the current date.
Important: The Property Details tab only appears if property details are enabled in the Parameters window. You can not enter or update property details if they are imported from Oracle Property Manager.
-
-
Optionally, in the Targets tab, enter the targets for the organization.
You can set performance targets at the organizational level for energy, emissions, and usage for specific periods. The Targets dashboard enables ongoing visual comparison of the actual performance of the organization versus the targets that have been set. See: Understanding the Targets Dashboard. Enter the following target information for one or more sources:
-
Target Type: Select the type of target to set for the organization. Choices include Emission, Energy, or Usage.
-
All Sources: Select this option if the target type applies to all sources without a specified target. You can not specify a Usage target for all sources.
-
Source: Enter a source if this target only applies to a specific source (not all sources).
-
Target Value: Enter the numeric value of the target. For example, enter 30000000 for an Emission target of 30,000,000 kilograms of CO2-e. You can specify a value with up to 6 decimal places.
-
Target UOM: The target unit of measure defaults to the following unchangeable values:
-
GJ (gigajoules) when defining an energy target.
-
KG (kilograms) when defining a CO2-e emissions target.
There is no default UOM when defining a usage target. When defining a usage target, you can use any unit of measure defined in Oracle Inventory Management. However, you must define the source UOM conversion and the interclass UOM conversion before using the usage target. See: Setting Up Units of Measure Conversions.
-
-
Start Date: Enter the date when the target becomes effective.
-
End Date: Enter the date when the target is no longer effective.
-
-
Click Save.
Defining Property Types
If you plan to import property details from Oracle Property Manager, you must associate the environmental Organization Type (for example, Facility or Sub Facility) to the Oracle Property Manager entity, Property Type (for example, Building, Floor, and Office), and the Property Function Type (for example, Data Center, Office, Storage, Conference) for the relevant environmental organizations.
For more information about Property Function Types, see: Lookups in Oracle Property Manager, Oracle Property Manager Implementation Guide.
For more information about Property Types, see: Location Hierarchy, Oracle Property Manager Implementation Guide.
To define property types
-
Navigate to the Property Types window. In the Property Type field, select a type from the list of values.
-
In the Property Function Type field, select a function from the list of values to associate with the property type.
-
In the Organization Type field, select an organization type from the list of values to associate with a property type.
-
Repeat the above steps until you have defined property types and property function types for all organization types used in the relevant environmental organizations.
-
Save your work.
Related Topics
Importing an Organization Hierarchy from Oracle Property Manager
Defining Assets
An Asset is an equipment or a plant that generates emissions and / or consumes or produces energy. A transport type, organization or supplier may be related to an asset. For example, a transport truck can be defined as an asset having a Euro 1 Engine (transport type) and belong to a supplier.
The Environmental Asset page enables you to define assets with additional information, such as location and engine type that allows the Oracle Environmental Accounting and Reporting application to determine the correct emission factor to use for the asset.
To define an environmental asset
-
Navigate to the Environmental Assets window.

-
Select the Type of asset that you want to create. This step is required. Select:
-
Internal if the asset you are using is an Asset that is already defined in Oracle Assets. Refer to the Oracle Assets User's Guide for more information.
-
External if you are defining an asset only in the Oracle Environmental Accounting and Reporting (EAR) application to enable the recording of usage transactions.
-
-
Select a Book from the list of values (LOV). This is enabled only for Internal type of assets and is a required step.
-
Enter a unique Asset Number for an External asset or select a number from the LOV for an Internal Asset (Required).
-
Enter a brief description for the asset.
-
Check the Retired check box if you do not want to use this asset in transactions that have environmental impact.
-
Enter a Tag Number for the asset, if you are defining an External asset. For an Internal asset, the tag number defaults to the one defined in Oracle Assets.
-
Enter a Serial Number for the asset, if you are defining an External asset. For an Internal asset, the serial number defaults to the one defined in Oracle Fixed Assets.
-
Review the asset Category details. The asset category details display only for an internal asset. This field is not enabled for an External asset.
-
Select a Location for the asset from the LOV that displays a list of facilities. Refer to Setting Up Lookups for details on how to define locations.
-
Select a Transport Type for the asset. Add examples of transport type.
-
Enter a Supplier Name for the asset if the asset belongs to an external supplier.
-
Optionally, select a supplier Site for the asset.
-
Enter the Company Identifier as the code for the company.
-
Enter the start date of the effective date range for the asset in the Start Date field (Required).
-
Optionally, enter the end date of the effective date range for the asset in the End Date field.
-
Click Save.
Defining Sources
An Environmental Source defines a product or activity whose use creates emissions and / or consumes or produces energy. For example, black coal, transport fuels, coal tar, biogases, fossil fuels, and biomass municipal and industrial materials, if recycled and combusted to produce heat or electricity. You can classify a source under one of the following scopes specified by the GHG Protocol and seeded in the Oracle EAR application:
-
Scope 1: Greenhouse gas emissions from sources that are owned or controlled by an organization. For example, vehicles and equipment, stationary sources, onsite landfills, waste water treatment plants etc.
-
Scope 2: Greenhouse gas emissions resulting from the generation of electricity, heat or steam purchased by the organization.
-
Scope 3: Greenhouse gas emissions from sources not owned or directly controlled by the organization but are related to the organization activities. For example, employee transportation contracted waste disposal etc.
Sources can also be created to track usage related to other environmental aspects where there is no related energy or emissions, for example, water, or alternatively for products or activities that cause pollution but have no related energy or environmental emissions, for example, Employee Head Count, Kilometers Traveled, and Detonation of explosives.
Emission Factors
An Emission Factor is a factor used to calculate the amount of an Emission Type produced (typically a gas) by consuming or producing an Emission Source. For example, according to the National Greenhouse and Energy Reporting (NGER) in the energy industry, burning one ton of black coal produces 27.0 gigajoules (GJ) of energy. One gigajoule of energy produced by burning Black Coal produces 88.2 kilograms (kgs) (emission factor) of Carbon Dioxide, 0.03 kilograms of Carbon Dioxide equivalent (CO2-e) for Emission Type Methane and 0.2 kilograms of Carbon Dioxide equivalent (CO2-e) for Emission Type Nitrous Oxide. The following information can be derived from the example:
-
The Emission Source is Black Coal.
-
The Emission Types are Carbon Dioxide, Methane, and Nitrous Oxide.
-
The NGER factors are normalized to Kgs/GJ of CO2-e for emissions regardless of the emission type.
-
The emission factors are:
-
CO2: 88.2 kgs/GJ of CO2-e
-
Methane: 0.03 kgs/GJ of CO2-e
-
Nitrous Oxide: 0.2 kgs/GJ of CO2-e
-
Energy Factors
An Energy Factor is a factor used to calculate the amount of energy consumed or produced by an Emission Source. Therefore, using the example above in Emission Factors, consuming 20,000 tons of Black Coal for a purpose other than for the production of electricity or Coke produces the following amount of energy:
Energy Consumed = 20,000 x 27 =540,000 GJ
Source Combinations
Source combinations are used to store attribute specific energy and emission factors for a source. The attributes can be location, transport type, and measurement method. For example, emission factor for electricity consumed in a state, can be different from that of another state in the same country.
Working with Overrides
Emission and energy factors are provided by respective government departments to help the estimation of the emissions for organizations. These factors are usually scientifically verified but are based on broad generalizations on the way that a source is consumed and the amount of energy and emission generated. In the context of environmental accounting, these factors are referred to as Method 1 under the GHG Protocol. To enable organizations to present more accurate values for emission and source usage, GHG Protocol provides for the Methods 2 to 4. The rules for Method 2 to 4 are extremely strict and define the exact scientific evidence required to satisfy the government auditors on the validity of the proposed emission factor. Hence, where required organizations can define overrides for the Method 1 in specifying their emission factors.
For example, consider an organization that runs a factory. At this factory there is a smoke stack that releases the emission from an oil fired boiler. Under the Method 1, the government provides the factors that must be used in this context. The factory may have installed monitoring equipment in the smoke stack to see the actual emissions. If these emissions are lower than the ones provided by the government, then there is a valid reason to over-ride the Method 1.
The EAR application enables you to create overrides that can exist at the following levels:
-
Item: If you set the override to an Item, then the application uses the item specific factors defined for the item, when consuming that item. For example, consider two oil tanks, one with an additive that produces less emissions and one without it. In the environmental Items inventory, 2 items are setup to represent the fuels. When issuing the fuel to an asset, either of the fuels can be used. But if you issue the fuel with the additive, then the application uses the specific factor defined for it, for emission calculation.
-
Organization: If you set the override to an organization, then the application uses the organization specific factors defined for the source, when the source is consumed at that organization.
-
Supplier: If you set the override to a Supplier, then the application uses the supplier specific factors defined for the source, when consuming source provided by that supplier. For examples, there may be two suppliers A and B providing the same fuel. But Supplier A adds an additive to its fuel that reduces emissions. So the factors are different for each supplier and an override can be set to supplier A or B.
You can define and manage the sources required by your organization using the Environmental Sources window. You can also set up the emission factors associated with sources. You can use descriptive flexfields with this window to store additional attributes related to the source.
To define emission sources
-
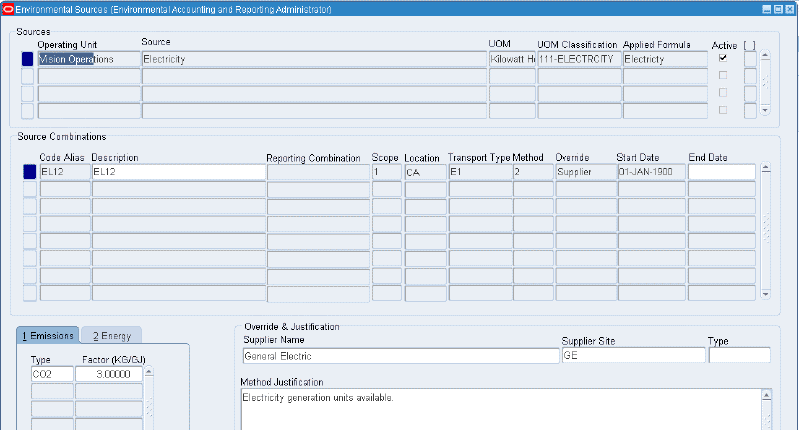
Navigate to the Environmental Sources window.
-
In the Sources region, select an Operating Unit that can use the emission sources you are creating.
-
Enter a name for the source in the Source field. For example, coal, diesel etc.
-
Select a unit of measure in which you want to express the emissions from the source in the UOM field. Refer to Setting Up Units of Measure for more information.
-
Select a UOM Classification for the emission source to determine other units of measure that can be used for the emission source. Refer to Setting Up UOM Classifications for more information.
-
Select an Applied Formula to use for the calculation of total emissions for any recorded usages for the emission source. Refer to Setting Up Formulas for Operating Units for more information.
-
Optionally, select an Energy Type to specify the energy type used by the source. Refer to Setting Up Lookups for more information. This information is used to create the CDP reports Gross Energy Usage and Gross Energy Usage by Energy Type.
-
Optionally, select a Category to categorize the type of emission source.
The Category field displays values from the Source Category (GHG_SOURCE_CATEGORY) lookup. The two seeded values are Water and Waste. You can view reports about these two categories of emission sources in the Water and Waste Dashboard.
Tip: You can add additional categories to the Source Category lookup and create custom dashboards for these categories, similar to the Water and Waste Dashboard. If you do not create additional categories, then there is no need to select a category if the source does not belong to either the Water or Waste category.
-
Select the Active check box to indicate that the emission source is active for the operating unit. It is selected by default.
-
In the Source Combinations region, enter a Code Alias as an alias for the source combination. This is required during the entry of usage transactions and the upload of usage transactions for the emission source.
-
Enter a Description for the source combination.
-
Enter a Reporting Combination for the emission source based on your local legislative reporting combinations. You must enter a reporting combination for a source only if you want the source to be reported in your environmental reports.
-
Enter the emission Scope for the emission source. Valid options are:
-
0: No scope
-
1: Direct
-
2: Indirect
-
3: Other indirect
-
-
Select the Location Code for the source combination.
-
Select the Transport Type for the source combination.
-
Select a measurement method for the source combination in the Method field. Valid options are: 1, 2, 3 and 4. Refer to Setting Up Lookups for more information on Location Codes, Transport Types and Measurement Methods.
-
Select an Override Type for the source combination. If you select 1 as the method, then this field is not required. Refer to the topic "Working with Overrides" topic for more information.
-
Enter a Start Date for the effective date range for the source combination. Required.
-
Enter an End Date for the effective date range for the source combination.
-
Enter the following in the Emissions tab:
-
Type: Select a type of gas of interest for which an emission calculation is required for each usage transaction.
-
Factor: Enter a factor as the quantity of a greenhouse gas emitted per unit of energy (kg CO2-e /GJ), fuel (t CH4/t coal) or a similar measure. Emissions are calculated by multiplying the factor (e.g. kg CO2/GJ energy in petrol) with activity data (e.g. kilolitres x energy density of petrol used).
-
-
Enter the following in the Energy tab:
-
Type: Select Energy as the type of consumption for which an energy calculation is required for each usage transaction.
-
Factor: Enter a factor as the energy obtained from 1 unit of source in the default unit of measure of giga joules, for the emission source combination. For example, the energy factor for Gasoline is 34.2 GJ/KL.
Note: If you want to capture the usage of sources that have no emissions, then leave the Emission Factors section blank. The application does not generate any CO2-e or energy record.
Note: Factors cannot exist with a date overlap where the following attributes are the same:
-
Source
-
Scope
-
Location
-
Transport Type
-
Measurement Method
-
Override Type
-
-
Use the Override and Justification region to enter factor overrides for the sources. The section enables you to enter the following information depending on the selected Override Type:
-
If you select the Override Type as Item, then you can enter the Item, Description, and Type.
-
If you select the Override Type as Organization, then you can enter Organization Name and Description.
-
If you select Supplier, then you can enter Supplier Name, Supplier Site, and Type.
-
-
Enter the required Override for the source.
-
In the Method Justification field, enter a justification for the method of calculation of the emission and energy factors for the emission source combination. If you select 1 in the Method field in the Emission Combinations section, then this field is required. You can set the override at the organization level.
-
Click Save.
Defining Suppliers
You must define suppliers defined in Oracle Accounts Payables as Environmental Suppliers that provide products or services whose usage transactions are used by the EAR application for emission calculations.
To define suppliers
-
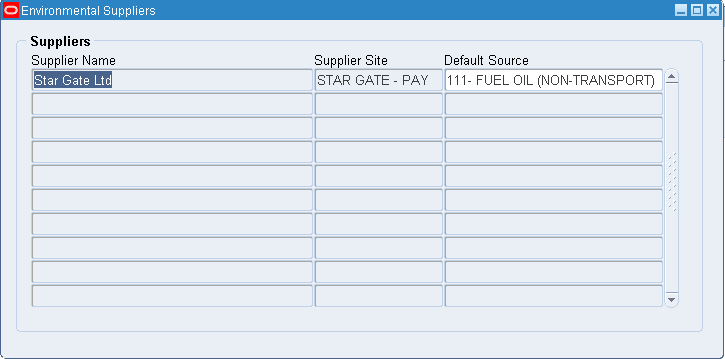
Navigate to the Environmental Suppliers window.
-
Select a Supplier Name whose usage transactions for products or services are used in emissions calculations. The LOV displays a list of suppliers that are set up in Oracle Accounts Payables and have a status as Active.
-
Select a Supplier Site whose usage transactions for products or services are used in emissions calculations. All suppliers with a Status as Active display in the LOV.
-
Select a Default Source which is used as a default emission source for all transactions for the Supplier and Supplier Site. If this field is left blank, then a default emission source does not appear on each usage transaction.
-
Click Save.
Defining Items
You must define items defined in Oracle Inventory as Environmental Items to be able to identify their default emission sources to record their usages and account for environmental emissions in the Oracle Environmental Accounting and Reporting application. For example, diesel, liquefied petroleum gas, gasoline, etc.
To define Environmental Items
-
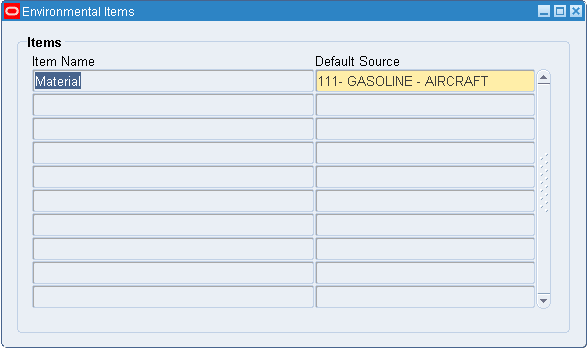
Navigate to the Environmental Items window.
-
Select an Item Name from the LOV that displays all the Oracle Inventory Items. Only Items with an “Active” Item Status display in the LOV. Refer Setting Up in Other Applications.
-
Select a Default Source as the default emission source for all usages of this inventory item.
-
Click Save.
Defining Key Performance Indicators
Key Performance Indicators (KPIs) in reporting dashboards enable you to assess business performance. For programs designed to reduce usage or emissions, you can track a KPI over a time period to evaluate if the program is effective or is producing the expected results. For example, Fuel Emissions per Km traveled, Fuel Usage per Km traveled, Electricity Usage per Employee On-site, and Electricity Usage per Occupied Room in a hotel.
A KPI is configured using the Environmental KPI Definitions window in the Oracle Environmental Accounting and Reporting application with a numerator and a denominator. The numerator / denominator have an associated KPI Type, KPI Action and UOM.
The KPI Type defines the source of the quantity used in the KPI. The following KPI types are available in the EAR application:
-
Usage: Usage quantity from transactions converted to Standardized Usage UOM.
-
Energy: Energy quantity in gigajoules (GJ) from environmental transactions.
-
Emissions: CO2-e emission quantity in kilograms (Kgs) from environmental transactions.
-
Value: Value in domestic currency from environmental transactions.
The KPI Action defines the action that is performed by the related KPI calculation in Reporting. T following KPI actions are available in the EAR application:
-
Sum: Adds the related quantity (Qty) defined by the KPI Type for the granular period, normally 1 month.
-
Average: Averages the related Qty defined by the KPI Type for the most granular period, normally 1 month. For example, KPI Electricity Usage per Employee on-site requires average of daily count, for the period of a month to be compared with sum of total electricity used for the month.
-
Minimum
-
Maximum
-
Weighted Average: Use to project values over a monthly, quarterly, or yearly period when you have an insufficient amount of data for the period. For example, if you only have two months of data, but you want to project the average KPI value for the year, use this formula:
(Sum of the KPI values for each month) *12/(the number of entries present in the year) = weighted average KPI value for the year.
There must be at least one emission source assigned to the Numerator List and Denominator List. For example, if the List's KPI Type is 'Usage', then all of the emission sources in the list must have the same Unit of Measure Classification.
The following example explains how the EAR application calculates the metric values using the various KPI actions:
Consider that a company by the name Global Industries has a metric defined as, Quantity of Electricity per Full-time-equivalent (FTE) Employee. This metric is needed for each facility within the company. The company requires the analysis of this metric per month by facility with the ability to aggregate up a time period hierarchy (from month to quarter to year) and also aggregate up an organization hierarchy (from facility to region to division to company).
For the metric the following data is required:
-
Electricity (kWh)
-
FTE employee headcount (employee)
The unit of measure for this metric is kWh per FTE.
Data is collected in the following way:
-
Electricity activity information is sourced from utility bills. The bills arrive quarterly for a 90/91 day billing period.
-
Employee headcount is sourced from the Human Resources department.
Also, consider that the company has the following single organization hierarchy and has the levels, Company, Division, Region and Facility.
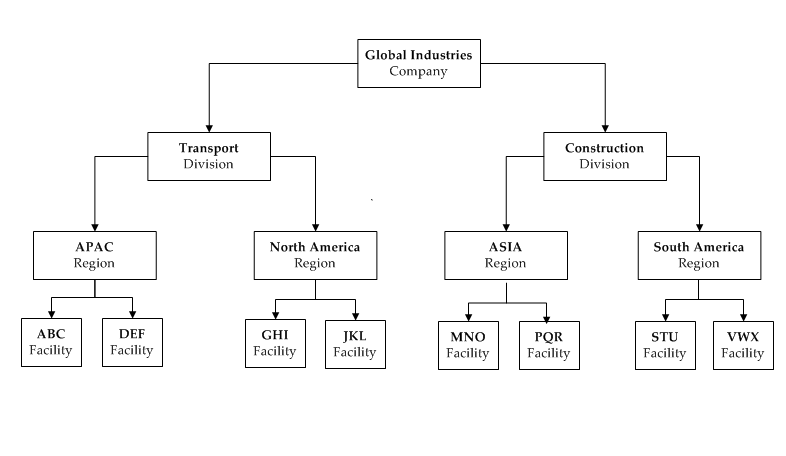
A time period hierarchy exists as Year, Quarter, and Month.
With all the data captured for the company the following section describes how the various KPI actions (Sum, Average, Minimum, Maximum, and Weighted Average) are applied to determine this metric in different scenarios. When the metric is to be shown at a level other than facility and month, the aggregation chosen for the numerator and denominator is applied. The chosen aggregations are applied in the BI Server using the metadata definitions in the BI repository.
For the ABC facility in the Year 2008 and Quarter 1 consider that the following data exists:
| kWh | FTE |
| 152 | 30 |
| 165 | 30 |
| 177 | 31 |
The metric values are calculated as follows:
| Action | Numerator Value | Denominator Value | Metric Value |
| Sum | 152+165+177 = 494 | 30+30+31 = 91 | 494/91 = 5.43 |
| Average | (152+165+177) / 3 = 164.67 | (30+30+31) / 3 = 30.33 | 164.67 / 30.33 = 5.43 |
| Minimum | Min(152, 165, 177) = 152 | Min(30, 30, 31) = 30 | 152/30 = 5.07 |
| Maximum | Max(152, 165, 177) = 177 | Max(30, 30, 31) = 31 | 177/31 = 5.71 |
Weighted Average Example
If you want to project the amount of KWh used per FTE over a period of a year, but only have 3 months of data, consider using the Weighted Average metric value instead of the Average metric value.
Weighted Average: (152/30 + 165/30 + 177/31) * 12/3 = 65.11
Average: (152 + 165 + 177)/((30 + 30 + 31)/3) =16.29
Since the monthly average of KWh used per FTE is 5.43, the weighted average projection of KWh used per FTE for an entire year is more accurate. You can also apply this same logic to project quarterly values when you have less than 3 months of data and to monthly values when you have less than 30 days of data.
For the Transport division in the Year 2008 and Month 1 consider that the following data exists:
| kWh | FTE |
| 152 | 30 |
| 45 | 9 |
| 456 | 33 |
| 234 | 17 |
The metric values are calculated as follows:
| Action | Numerator Value | Denominator Value | Metric Value |
| Sum | 887 | 89 | 887/89 = 9.97 |
| Average | 221.75 | 22.25 | 221.75/22.25 = 9.97 |
| Minimum | 45 | 9 | 45 / 9 =5.00 |
| Maximum | 456 | 33 | 456/33 = 13.82 |
For the South America region, in the Year 2009 and quarter 3 consider that the following data exists:
| kWh | FTE |
| 425 | 56 |
| 469 | 56 |
| 436 | 56 |
| 82 | 23 |
| 91 | 23 |
| 93 | 23 |
The metric values are calculated as follows:
| Action | Numerator Value | Denominator Value | Metric Value |
| Sum | 1,596 | 237 | 6.73 |
| Average | 266 | 39.5 | 6.73 |
| Minimum | 82 | 23 | 3.56 |
| Maximum | 469 | 56 | 4.04 |
To define KPIs
-
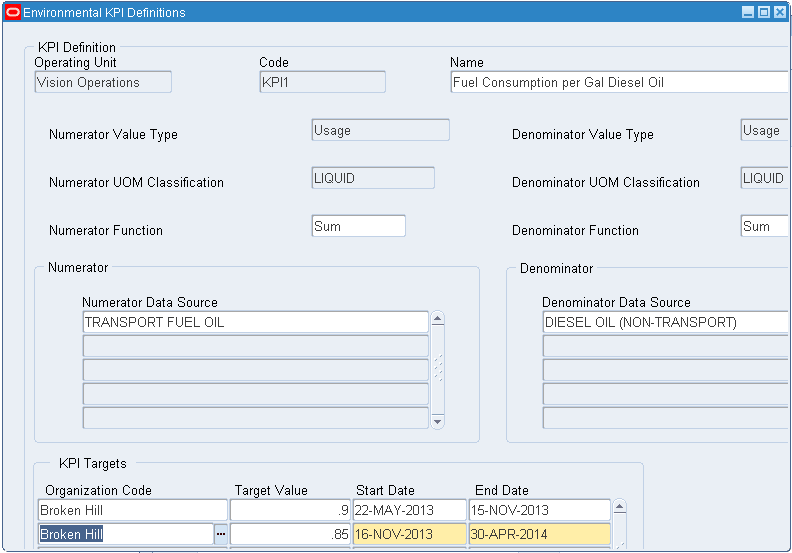
Navigate to the Environmental KPI Definitions window.
-
Select an Operating Unit that owns the facility or organization for which you are defining the KPIs
-
Enter a Code and a Name for the KPI.
-
Select a Numerator UOM Classification for the numerator in the formula. This determines other permitted units of measure for the formula and their conversion to the base unit of measure.
-
Select a Denominator UOM Classification for the denominator in the formula. This determines other permitted units of measure for the formula and their conversion to the base unit of measure.
Caution: The Numerator and Denominator UOM Classification fields are enabled only if the Value Type field value is Usage. For other value types such as Energy, CO2-e Emissions, and Financial Value, the classification fields are disabled.
-
Select a Numerator Value Type as the type of formula value to be used as the numerator in the formula.
-
Select a Denominator Value Type as the type of formula value to be used as the denominator in the formula.
-
Select a Numerator Function as the type of algebraic function for which the numerator is used in the formula.
Important: When calculating a weighted average KPI, always select 'Sum' as the Numerator Function and 'Weighted Average' as the Denominator Function.
-
Select a Denominator Function as the type of algebraic function for which the denominator is used in the formula.
-
Enter Numerator Data Sources as the emission source that must be used in the numerator in the formula.
-
Enter Denominator Data Sources as the emission source that must be used in the denominator in the formula.
-
In the KPI Targets region, specify one or more targets for different organization and date ranges:
-
Select an existing Environmental Organization.
-
Enter a Target Value for this organization and date range.
-
Select a Start Date when the KPI target value becomes effective for the organization.
-
Select an End Date when the KPI target value becomes ineffective for the organization.
-
-
Click Save.
Setting Up Carbon Permit Management
Carbon Permit Management enables a company to participate in emissions trading (sometimes referred to as cap-and-trade). Some governments use a market-based approach to control pollution by providing economic incentives for achieving reductions in the emissions of pollutants. These governments set a limit or cap on the amount of a pollutant that may be emitted. This limit or cap is allocated or sold to firms in the form of emissions permits, which represent the right to emit or discharge a specific volume of the specified pollutant.
Companies are required to hold a number of permits (or carbon credits) equivalent to their emissions. Liable entities must have procedures in place to ensure that they purchase or surrender the correct amount of permits for each relevant year. Typically, in carbon tax and emission trading schemes, significant penalties apply for not surrendering the correct amount of permits by the compliance date. Companies must establish processes to actively manage the trading of permits, such as funding purchases when needed and understanding which permits to use to meet their liabilities. Use the Carbon Permit Management pages in Oracle Environmental Accounting and Reporting to track carbon permits by organization. Create carbon permit reports using the Carbon Permit tab in the Emissions Dashboard (see: Understanding the Emissions Dashboard).
Prerequisites
- Add lookup values for the Legislation lookup. See: Setting Up Lookups.
- Verify that the environmental organization for which you want to set up carbon permit management has an assigned currency. See: Setting Up Organizations.
To create a carbon permit
-
Navigate to the Enter Carbon Permits window.
-
Select an Operating Unit for which to maintain carbon permit information.
-
Select an environmental Organization within the operating unit for which to maintain carbon permit information.
-
Enter the effective Start Date for the carbon permit. This step is required.
-
Enter the effective End Date for the carbon permit.
-
Enter the Compliance Deadline of the legislation. This is the end date for reporting on carbon permits for the specific legislation.
-
Select a Legislation value from the LOV.
-
Enter the number of Free Allocated Permits allocated by the legislation for this carbon permit.
-
Enter the Estimated Permit Cost (cost per permit).
-
The Currency code of the estimated permit cost defaults from the currency specified for the environmental organization. You cannot change the currency.
-
In the CO2-e Quantity Per Permit field, enter the quantity of CO2-e allocated to a single permit.
-
In the CO2-e UOM Per Permit field, the unit of measure in which the carbon content of permits is measured defaults from the profile option 'GHG: Emission UOM'. If this profile option is not set up, the unit of measure defaults to 'KG'.
-
In the Included Scope region, Scope field, select the scope under which carbon permits are reported. You can add multiple scopes if needed.
-
Click Save.
The Environmental Carbon Permit Management window is shown below, in two parts.
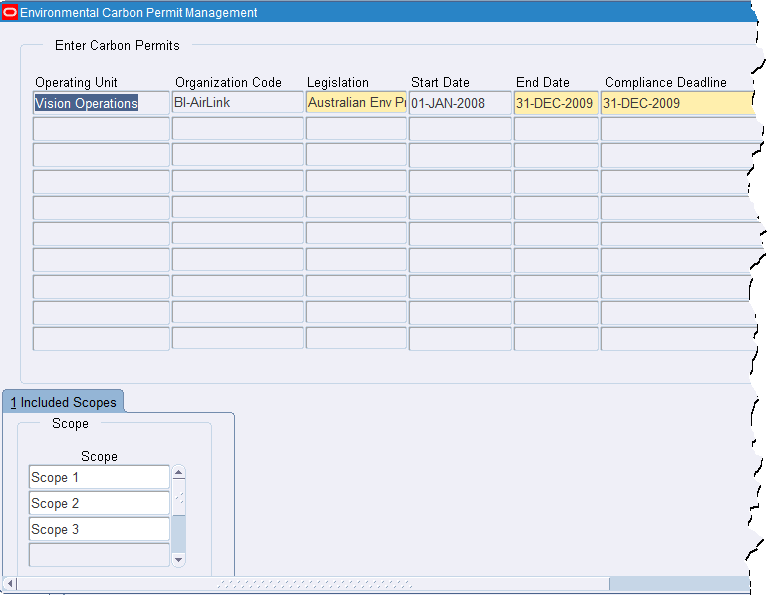
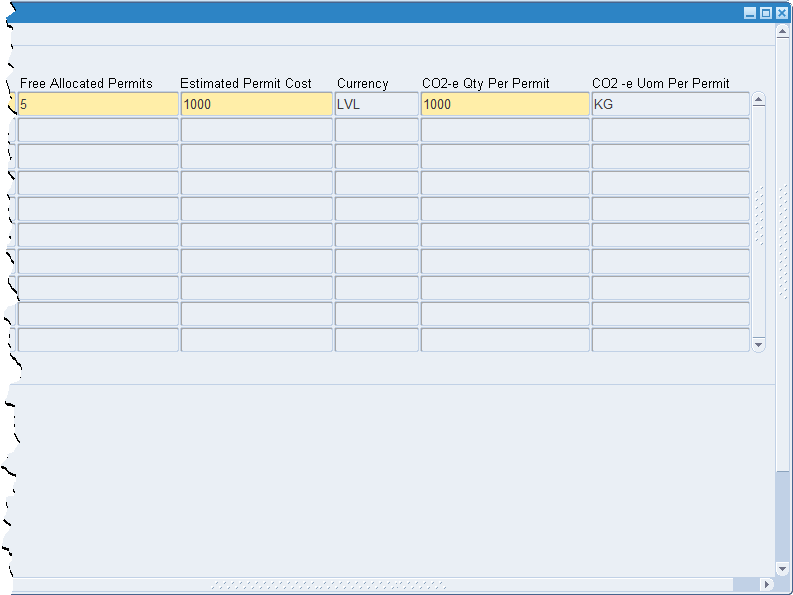
Related Topics
Understanding the Emissions Dashboard, Carbon Permits tab.
Setting Up in Oracle Data Integrator
Oracle Environmental Accounting and Reporting (EAR) uses Oracle Data Integrator (ODI) to transfer data from EAR to the Business Intelligence Data Warehouse tables. This transfer occurs by running ETL (Extract, Transform, and Load) programs in ODI. For detailed information on the installation steps, refer to the Oracle Environmental Accounting and Reporting Installation Notes for Business Intelligence and Data Warehouse (find the version for your release at https://support.oracle.com) for further details.
Setting Up in OBIEE
You must define the Calendar and the Organization Hierarchy for a specific user, user group or application, to view the dashboard reports. Refer to the Oracle Environmental Accounting and Reporting Installation Notes for Business Intelligence and Data Warehouse (find the version for your release at https://support.oracle.com) for further details.
Defining an Organization Hierarchy
Oracle Environmental Accounting and Reporting (EAR) application enables you to build multiple hierarchies for various business requirements, such as legal, reporting, operations, etc. A hierarchy must be defined with meaningful levels and branches to correctly represent the various levels of your organization. The levels define parent-child relationships and a child can only have one parent within a hierarchy. You must create a balanced organization hierarchy to be able to view in the OBIEE dashboards. A balanced hierarchy implies that each level within the hierarchy includes logical relationships between each level. Following is an example of a balanced hierarchy:
A company called Global Industries has an organizational hierarchy that has the levels, Company, Division, Region, and Facility. The following diagram represents the organization hierarchy:
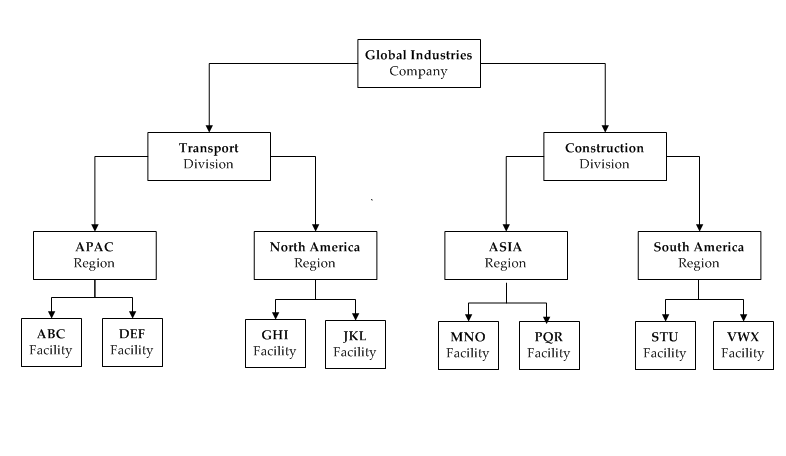
Oracle Environmental Accounting and Reporting uses the functionality of Generic Hierarchies available as a part of Oracle HRMS. The Hierarchy Node Types defined in the Organization Hierarchy Lookup are used in defining the Hierarchy Structure. Refer to the "Defining Organization Hierarchy Lookup" topic for more information. Although you can add any number of levels to a hierarchy, OBIEE supports a maximum of 12 levels for reporting.
To define an Organizational Hierarchy, firstly, a Hierarchy Type must be defined. While defining the Hierarchy type, the Hierarchy Code must be entered as GHG_ORGANIZATION_STRUCTURE. Node type combinations are seeded in the application that you can review while defining the Organization hierarchy. Please note that the Organization Node Type can only have a Node Type as Facility under it. However the Organization Node Type cannot be under the Facility Node Type. But the Organization and Facility Node Types can exist at the same level. Similarly a Sub Facility Node Type can only be a child to a Facility Node Type. Secondly, a Hierarchy name must be defined and associated to the Hierarchy Type defined earlier. Refer to the “Defining a Hierarchy Type” and “Defining a Hierarchy” topics for detailed information.
Importing an Organization Hierarchy from Oracle Property Manager
You can create organization entities in the Environmental Organizations window that are required for hierarchical reporting of emission information or you have the option to import them from a property manager application, such as Oracle Property Manager. Data entities for Region, Property, Building, Floor, and Office are imported from Oracle Property Manager along with their implicit hierarchy to create a new default hierarchy in EAR. This hierarchy, named the GHG Property Manager Organization Hierarchy, has six levels:
| Level | Entity Type |
|---|---|
| 1 | Company Name |
| 2 | Region |
| 3 | Property |
| 4 | Building |
| 5 | Floor |
| 6 | Office |
The information brought across from Property Manager for these hierarchies includes any associated tenure, disposition, area, and headcount data and is displayed in the Property Details tab for each Environmental Organization. These property details are synchronized periodically using the Load Organizations and Organization Hierarchy from Property Manager concurrent program to capture any ongoing changes that are made in Property Manager.
The following steps describe the process flow of importing and updating property information from Oracle Property Manager to EAR:
-
Create or update properties in Oracle Property Manager. See: Defining Properties, Oracle Property Manager User Guide.
-
Create or update buildings in Oracle Property Manager. Enter the HR Location ID in the descriptive flexfield (DFF) of the building. Associate the building to a region. See: Defining Buildings, Oracle Property Manager User Guide.
-
Create or update floors in Oracle Property Manager. Enter the HR Location ID in the DFF of the building. Associate the floor to the building. See: Defining Floors, Oracle Property Manager User Guide.
-
Create or update offices in Oracle Property Manager. Enter the HR Location ID in the DFF of the building. Associate the office to the floor. See: Defining Offices, Oracle Property Manager User Guide.
-
Import an organization hierarchy from Oracle Property Manager (explained in the steps below, titled "To load organizations and the organization hierarchy from Oracle Property Manager") or update an organization hierarchy when property information changes have been made in Oracle Property Manager (explained in the steps below, titled "To update organizations and the organization hierarchy from Oracle Property Manager").
Prerequisites
- Set up the lookups for Area UOM, Tenure Type for Property, Property Disposition, and Property Units of Measure. See: Setting Up Lookups.
- Add the GHG_PN_ORG_HIERARCHY code to the Application Utilities Lookup HIERARCHY_TYPE.
-
From the Applications Developer responsibility, navigate to the Applications Utilities Lookups window:
(N) Application > Lookups > Common
-
In the Type field, query HIERARCHY_TYPE.
-
Add a code 'GHG_PN_ORG_HIERARCHY' with a meaning 'GHG Property Manager Organization Hierarchy'.
- Query the 'Locations' descriptive flexfield within the Property Manager application. Create a new segment (for example, PN HR Location) under the Building context, then create new segments for Floor and Office contexts, also. Use the same column (attribute number) for Building, Floor and Office contexts.
- Set the profile option 'GHG: PN Location DFF Column for HR Location' value to the column value used when creating new segments within the Building, Floor, and Office contexts of the 'Locations' descriptive flexfield. See: Setting Up Profile Options
- Create a new HR Location for the building. See: Setting Up Locations, Oracle Human Resources Management Systems Enterprise and Workforce Management Guide. You can use the same location for the floor and office, too. Note the location_id of the HR Location. The EAR application uses a default location (GHG_ORG_LOC_1_2_3) for the property, region and sub-region. Since the Property Manager entities (property, region, sub-region, building, floor, and office) are imported as organizations into EAR, which require HR locations, a default location is required.
- Create Property Manager seed data in EAR:
-
Run the 'Create Default HR Location' concurrent program. This program creates the default HR location GHG_ORG_LOC_1_2_3 in EAR for Level 1 and Level 2 locations (property, regions, and subregions) imported from Oracle Property Manager.
-
Run the concurrent program 'Create UOM, Tenure and Disposition Codes from Property Manager'. This program populates the Property Manager UOM, Tenure and Disposition codes into EAR.
-
Run the concurrent program 'Create Property Manager Organization Hierarchy'. This creates a 6 level organization hierarchy in EAR.
- Complete the following EAR setup steps:
-
Create a level 1 organization (a company), then add it as the level 1 node in the GHG Property Manager Organization Hierarchy created earlier.
See: Setting Up Organizations and Finding an Organization Hierarchy.
-
In the Define Environmental Parameters window, select the Property Details Mandatory box for the operating unit. See: Setting Up Parameters.
-
Define Property Types. See: Defining Property Types
Navigate to the Property Manager responsibility: Setup > Flexfields > Descriptive > Segments (B) Segments.
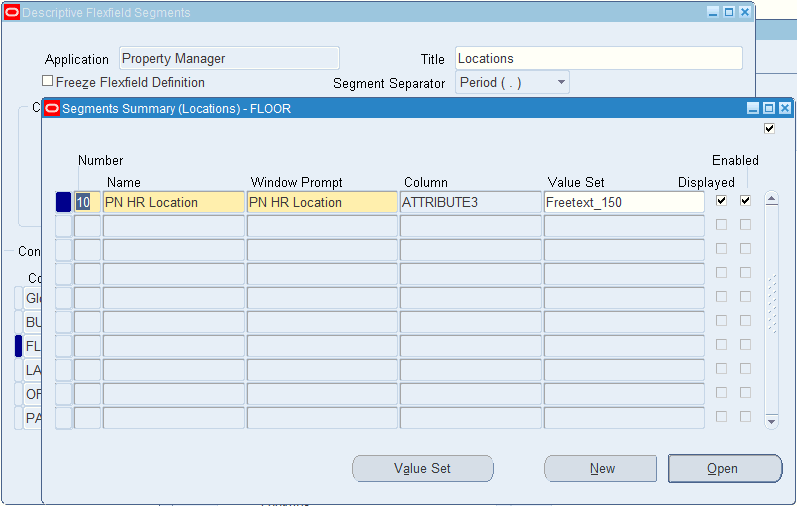
To load organizations and the organization hierarchy from Oracle Property Manager
-
Navigate to the Submit Request window.
-
In the Name field, select Load Organizations and Organization Hierarchy from Property Manager.
-
The Parameters window opens. In the From Date field, enter the effective date from which to load the organizations and organization hierarchy. The field defaults to today's date.
-
Click Submit.
To update organizations and the organization hierarchy from Oracle Property Manager
After the first time you create the organization hierarchy from Oracle Property Manager, you only need to synchronize the organizations and hierarchy between EAR and Property Manager when there are changes in Oracle Property Manager.
-
Navigate to the Submit Request window.
-
In the Name field, select Load Organizations and Organization Hierarchy from Property Manager
Important: Consider running this concurrent program on a periodic basis to synchronize organizations and the hierarchy between EAR and Property Manager.
-
In the Parameters field, enter the From Date. This is the date any organization updates become effective. This field defaults to today's date.
-
Click Submit
Related Topics
Defining a Hierarchy Type
The Create Hierarchy Type page enables you to create hierarchy types. Seeded hierarchy types are provided in the application. A hierarchy type remains available after deleting its structure. You can then redefine its structure.
To create a hierarchy type
-
Navigate to the Maintain Hierarchy Structure page.
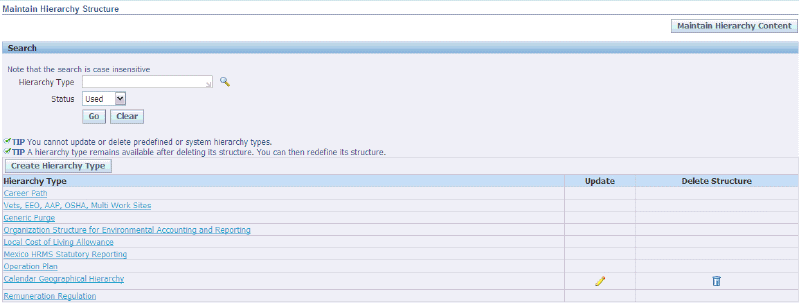
-
Click Create Hierarchy Type to create a new hierarchy type.

The Create Hierarchy Type page displays. Enter the following information:
-
Hierarchy Type as the name of the new hierarchy type. This hierarchy type is used for defining all hierarchies in your organization.
-
Hierarchy Type Code as the code for the new hierarchy type. You must enter the code as GHG_ORGANIZATION_STRUCTURE.
-
Description as a brief description for the new hierarchy type.
-
-
Click Continue. The Hierarchy Type Structure page displays.

-
In the Hierarchy Type Information region, select Allow Duplicate Name to enable the creation of multiple hierarchies of this type.
-
Select Allow Multiple Versions to enable the creation of multiple versions of hierarchies of this type.
-
In the Node Type Information region, the following fields display:
-
Node Type
-
Value Set
-
-
Click Add Child to add nodes to this node type.
-
Click Update Child to update the child nodes of this node type.
-
Click Delete child node from this node type.
To view and update hierarchy types
-
In the Search region, make no entries to search for all records. Enter any of the following criteria to narrow your search:
-
Hierarchy Type
-
Status to find a hierarchy type using the status.
-
-
Click Go. A list of Hierarchy Types display in the results region.
-
To view the hierarchy structure, click the Hierarchy Type. The View Hierarchy Type page displays. Refer to the “Viewing Hierarchy Structure” topic for more information.
-
To update the hierarchy structure, click Update. Refer to the “Updating Hierarchy Type” topic for more information.
Defining a Hierarchy
You can define a hierarchy using the Create Hierarchy page. You must define a Hierarchy Type before defining a hierarchy.
To define an organization hierarchy
-
Navigate to the Maintain Hierarchy Content page.
-
Click Create Hierarchy. The Create Hierarchy page displays.
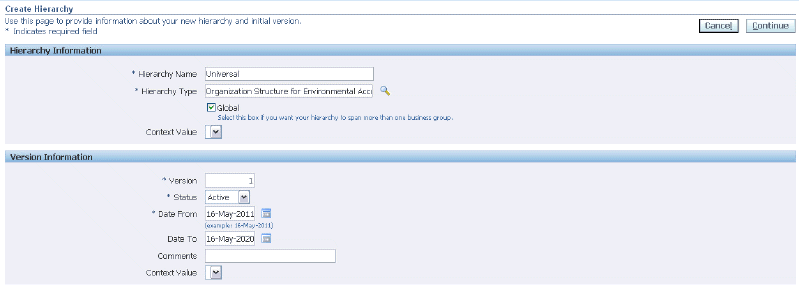
Enter the following information in the Hierarchy Information region:
-
Hierarchy Name
-
Hierarchy Type
-
Select Global if you want the hierarchy to span over more than one business group.
-
Context Value
-
-
Enter the following information in the Version Information region:
-
Version of the hierarchy. Required.
-
Status as active or inactive. Required.
-
Date From as the date from when the hierarchy is effective.
-
Date To as the date until when the hierarchy is effective. Optional.
-
Comments
-
Context Value
-
-
Click Continue. A message displays that a new hierarchy is created.
Creating a Hierarchy Version
You can create a version of a hierarchy using the Create New Version page.
To create a hierarchy version
-
Navigate to the Maintain Hierarchy Content page.
-
Select the Create Version option for the hierarchy you want to create a version for. The application enables you to create a version in the following ways:
-
Create new version without data
-
Copy existing version with data
-
-
When you select the Create new version without data, then the Create Hierarchy Version Appears. In the Hierarchy Information region, the Hierarchy Name and Hierarchy Type display. You cannot edit the Global checkbox.
-
Enter the following in the Version Information region:
-
Version of the hierarchy. Required.
-
Status as active or inactive. Required.
-
Date From as the date from when the hierarchy is effective.
-
Date To as the date until when the hierarchy is effective. Optional.
-
Comments
-
Context Value
-
-
Click Continue. A message displays that the version is created.
Finding an Organization Hierarchy
You can search for organization hierarchies and view its details using the Maintain Hierarchy Content page.
To find organization hierarchies
-
Navigate to the Maintain Hierarchy Content page.
-
In the Search region, enter any of the following criteria to narrow your search:
-
Hierarchy Name to find a hierarchy using its name.
-
Version to find a hierarchy using the version of the hierarchy.
-
Hierarchy Type to find a hierarchy using its type.
-
Status to find a hierarchy using its status. Options are Active and Inactive.
-
Effective Date to find a hierarchy using its effective date.
-
-
Click Go. The page displays the results of the search.
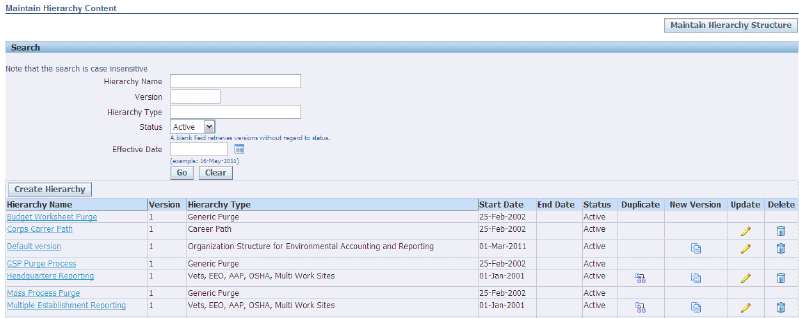
The following information displays for each hierarchy:
-
Hierarchy Name is the name of the organization hierarchy.
-
Version is the version of the hierarchy.
-
Hierarchy Type is the type of hierarchy.
-
Start Date and End Date are the effective dates for the hierarchy.
-
Status is the hierarchy status and displays as active or inactive.
-
-
To view the hierarchy, click the Hierarchy Name. The View Hierarchy page displays the Hierarchy Information and Version Information for the hierarchy.
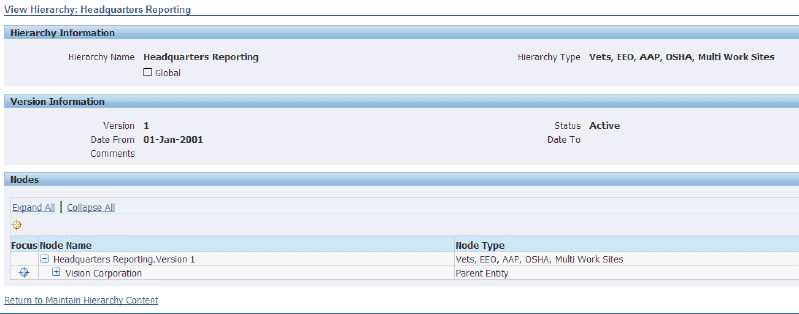
The following fields display in the Nodes region:
-
Node Name
-
Node Type
-
-
To create a duplicate of a hierarchy, select the Duplicate option for the hierarchy you want to duplicate. The Duplicate Hierarchy page displays. Use this page to copy the selected hierarchy to a new hierarchy. You can copy the version of the hierarchy available on the effective date you specify. Enter the following information:
-
Hierarchy Name
-
Effective Date
-
Select Global if you want the hierarchy to span over more than one business group.
-
-
To create a new version of a hierarchy, select the Create Version option for the hierarchy. You can create a new version using the following options:
-
Create new version without data
-
Copy existing version with data
Refer to Creating a Hierarchy Version for more information.
-
-
To update a hierarchy, click the Update option for the hierarchy you want to update. Refer to Updating a Hierarchy Version for more information.
-
To delete a hierarchy, click the Delete option for the hierarchy you want to delete.
-
Click Maintain Hierarchy Structure to update or delete hierarchy types. Refer to Updating a Hierarchy Type for detailed information.
Updating a Hierarchy Version
You can update a hierarchy version using the Update Hierarchy Version page. You cannot update predefined or seeded hierarchies.
To update a hierarchy version
-
Navigate to the Maintain Hierarchy Content page.
-
Select the Update option for the hierarchy version you want to update. The Update Hierarchy Version page displays. In the Hierarchy Information region, the Hierarchy Name and Hierarchy Type display. You cannot edit the Global checkbox.
-
Enter the Context Value.
-
In the Version Information region, the hierarchy Version displays. Enter the following information:
-
Status as active or inactive (required).
-
Date From as the date from when the hierarchy is effective.
-
Date To as the date until when the hierarchy is effective (optional).
-
Comments (optional).
-
Context Value
-
-
Click Continue. The Maintain Nodes page displays. The Hierarchy Information and Version Information display.
-
In the Nodes region, the following information displays:
-
Node Name
-
Node Type
-
-
To add a child node, click Add Child. The Add Child Node page displays. Enter the following information for the new node:
-
Select the Node Type as Child or Parent
-
Node Name
-
Context Value
-
-
To update a child node, click Update. The Update Node page displays the Node Type. Update the following information for the node:
-
Node Name
-
Context Value
-
-
Click Apply. A message confirms that the node is updated.
Viewing a Hierarchy Type
You can view the details of a Hierarchy Structure Type using the View Hierarchy Type page. A hierarchy type remains available after deleting its structure. You can then redefine its structure.
To create a hierarchy type
-
Navigate to the Maintain Hierarchy Structure page.
-
In the Search region, make no entries to search for all records. Enter any of the following criteria to narrow your search:
-
Hierarchy Type
-
Status to find a hierarchy type using the status.
-
-
Click Go. A list of Hierarchy Types display in the results region.
-
To view a hierarchy structure, click the Hierarchy Type. The View Hierarchy Type page displays.

-
In the Hierarchy Type Information region, the following information displays:
-
Hierarchy Type
-
Allow Duplicate Name is selected if duplicate names for hierarchies are allowed in the hierarchy type.
-
Allow Multiple Versions is selected if multiple versions of hierarchies can be defined with this hierarchy type.
-
-
In the Node Type Information region, the following information displays:
-
Node Type
-
Value Set
-
-
If you want to navigate to the Maintain Hierarchy Content page, click Maintain Hierarchy Content.
Updating a Hierarchy Type
You can update a hierarchy type using the Update Hierarchy Type page. You cannot update or delete seeded hierarchy types. A hierarchy type remains available after deleting its structure. You can then redefine its structure.
To update a hierarchy
-
Navigate to the Maintain Hierarchy Structure page.
-
In the Search region, make no entries to search for all records. Enter any of the following criteria to narrow your search:
-
Hierarchy Type.
-
Status to find a hierarchy type using the status.
-
-
Click Go. A list of Hierarchy Types display in the results region.
-
To update a hierarchy type, click Update for a hierarchy type. The Update Hierarchy Type page appears. The Hierarchy Type and Hierarchy Type Code display
-
Optionally, enter a new Description for the Hierarchy Type and click Continue. The Hierarchy Type Structure page appears.
-
In the Hierarchy Type Information region, select Allow Multiple Hierarchies to enable the creation of multiple hierarchies of this hierarchy type.
-
Select Allow Multiple Versions to enable the creation of multiple versions of hierarchies of this type.
-
In the Node Type Information region, the following information displays:
-
Node Type
-
Value Set
-
-
Click Add Child to add child node to the node type. The Add Child Node Type page appears. Select a Node Type and Value Set to add and click Apply.
-
Click Add Another Row to add another child node.
-
Click Update Child to update a child node. The Update Child Node page appears that displays the Node Type. Select a Value set for the node type and click Apply. A message confirms that the node type is updated.
-
To navigate to the Update Child Node page, click Back
-
To delete a child node from the node type, click Delete.
-
Click Finish after you have made your changes.