Using the HTML-Based Product Workbench
This chapter covers the following topics:
- Overview of the Product Workbench
- Searching for Items
- Viewing Item Information
- Managing Bills of Material/Product Structures
- Managing Changes
Overview of the Product Workbench
Use the HTML-based Product Workbench to perform many of the tasks you currently perform using the Microsoft Windows-based Product Workbench. The Microsoft Windows-based Product Workbench requires browser plugins to work with major browsers, such as Microsoft Internet Explorer, Google Chrome, and Mozilla Firefox. These companies have begun to phase out the use of browser plugins. Eventually, as more functional requirements are added to the HTML-based Product Workbench, it will replace the Microsoft Windows-based Product Workbench.
Using the HTML-based Product Workbench, you can visually review, edit and manage product structures (bills of material) in Oracle Product Hub as well as query items and edit attribute information for components. You can also:
-
Perform product structure changes, such as adding components, changing component attributes, and deleting components, in the context of a structure directly or in the context of a change order.
-
Query items using either simple or advanced search methods. From the search results, access the product structure editor with one click.
-
Permit viewing, editing, and changing items, product structures, and components using role-based security and change policies.
-
Use filters to efficiently review and update an indented structure (bill of material) and all attribute information for the past, current, and future effective product structure.
-
Seamlessly navigate between the HTML-based Product Workbench and the HTML-based Oracle Product Hub UI when performing an advanced item search, viewing item details, creating a structure, viewing structures, and viewing change orders.
Choosing which Product Workbench to Use
Although both of the following Product Workbench versions are available for your use, begin using the HTML-based Product Workbench so you can become familiar with its operation and features.
-
HTML-Based Product Workbench - Compatible with all browsers certified for use with Oracle E-Business Suite (EBS).
-
Microsoft Windows-Based Product Workbench - Supported on Microsoft Edge in IE mode and on Microsoft Internet Explorer.
Selecting an Access Scenario
Before using the HTML-based Product Workbench, you must install a standalone patch and assign a role to each user who needs access. Before installing the patch, refer to Applying the HTML-Based Product Workbench Patch, My Oracle Support Doc ID 3012296.1. After installing the patch, decide which of the following access scenarios to use.
Note: To enable the Windows-based Product Workbench, refer to Product Workbench Overview.
| Scenario Number | Accessing Product Workbench (Windows-Based) | Accessing Product Workbench (HTML-Based) | Implementation Steps |
|---|---|---|---|
| 1 | Yes | Yes | Assign the role Product Workbench Access Role to the user. Refer to: Assigning Roles to or Revoking Roles from Users, Oracle E-Business Suite Security Guide. |
| 2 | Yes | No | No action required. |
| 3 | No | Yes |
|
Setting Preferences
You can set two display preferences for the Product Workbench:
-
Display Mode: Choose either a standard or compact layout. Both modes display the same information, but the compact layout displays more items per page in the HTML-based Product Workbench Items and Structure: (item name) pages and more attribute rows per page in the Attributes drawer of the Structure: (item name) page.
-
Hide Change Action Column While Editing A Structure: Choose either Yes or No. If you add, delete, or change a component in a structure, an add, delete, or change icon appears next to the component, so the Change Action column information is redundant.
You can set these preferences from any page within any responsibility that enables you to access the HTML-based Product Workbench.
Additional Information: The default values of the Product Workbench display preferences are controlled by the following profile options.
-
DNA: Display mode for HTML-Based Product Workbench
-
DNA: Hide Change Action column
To set Product Workbench display preferences:
-
Navigate to a page within a responsibility that enables you to access the HTML-based Product Workbench.
-
Click Settings, then select the Preferences menu item.
-
Click the Product Workbench Display Preferences vertical tab.
-
In the Display Mode field, select either Compact or Standard.
-
In the Hide Change Action column while editing a structure field, select either Yes or No.
-
Click Apply.
Related Topics
Managing Bills of Material/Product Structures
Searching for Items
Use the HTML-based Product Workbench to perform a simple item search in the currently selected organization or click Advanced Search.
Prerequisites
- For the option to view an item's structure list or to edit an item structure from the Advanced Search Search Results page, you must add the Structures and Edit Structure sections to a display format. These sections are displayed as columns, each containing an icon with a direct link to either the Structure List page or the Structure: (item name) page. For more information on how to display a section in a display format, see To create an administrator level display format, Oracle Product Hub Implementation Guide.
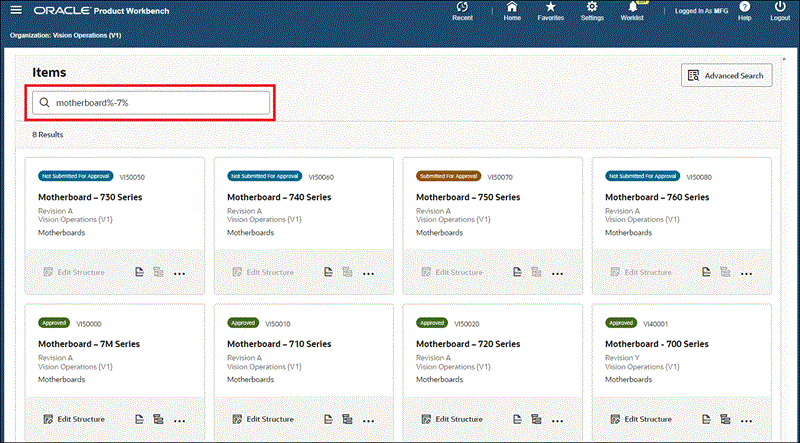
To perform a simple item search, follow these steps:
-
From the Home page navigation tree, select your responsibility. Next, select Product Workbench, then Items.
The HTML-based Product Workbench Items page opens.
-
In the Search field, enter a full or partial key word, such as an item name, description, or Item Catalog Category (ICC).
Additional Information: If you enter multiple conditions in the Search field, the search results include all items that meet at least one of the conditions (this is the OR condition in Boolean logic). For example, if you enter
VI40650 VI40001in the Search field, the search results returned include the two item numbers VI40650 and VI40001. The Boolean logical operators AND and NOT are not supported when using the HTML-based Product Workbench simple search. -
Press Enter.
The items matching the key words you entered appear in the search results. To narrow your search results, change the key words.
Item Search Results
Additional Information: Only items for which you have view privileges appear in the search results. To learn more about privileges and role based security, refer to Overview of Roles and Role Based Security, Oracle Product Hub Implementation Guide.
To perform an advanced search, follow these steps:
When you perform an advanced search, the system performs the search in the Oracle Inventory Item Catalog. From the Search Results page, you can either:
-
Select one or more items to display them in the Product Workbench Items page.
-
Click Structures for an item to view the Structure List page for the item and revision.
-
Click Edit Structure for an item to view the Product Workbench Structure: (item name) page.
Additional Information: You must have the Product Workbench Access Role in order for the Edit Structure column to appear in your search results, even if you selected a display format that contains the Edit Structure section, as described in the prerequisite to searching for items.
-
From the Home page navigation tree, select your responsibility. Next, select Product Workbench, then Items.
The Product Workbench Items page opens.
-
Click Advanced Search.
The Item Catalog Advanced Search page opens. For further instructions, see: To perform an advanced search.
To display items from the search results in the Product Workbench Items page
-
In the Search Results page, select each item you want to view in the HTML-based Product Workbench, then click Apply.
The selected items appear in the Product Workbench Items page.
Optional Action: From the Search Results page, click Recent, then the Product Workbench link.
The Product Workbench Items page opens, displaying all items from the Search Results page.
To view an item's structure list
Required Action: For the option to view an item's structure list from the Advanced Search Search Results page, you must add the Structures section to a display format. For more information on how to display a section in a display format, see To create an administrator level display format, Oracle Product Hub Implementation Guide.
-
In the Search Results page, select a display format containing the Structures section. Click Go.
-
For one of the items in the results, click Structures.
Click Structures in the Search Results page
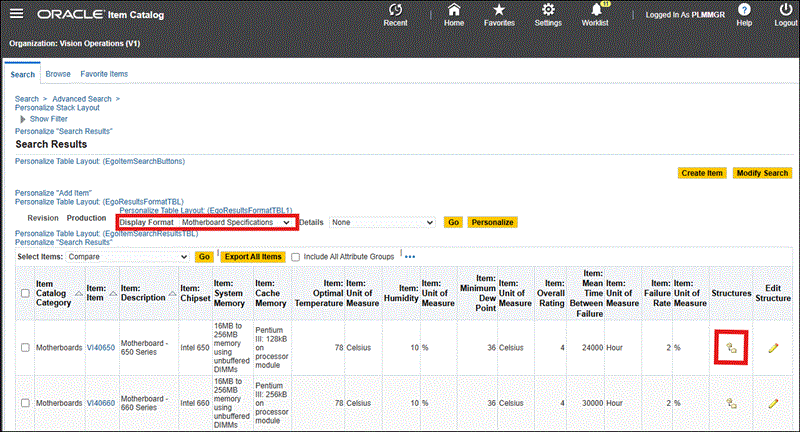
The Structure List page for the item and revision opens.
To edit an item's structure
Required Action: For the option to edit an item's structure from the Advanced Search Search Results page, you must add the Edit Structure section to a display format. For more information on how to display a section in a display format, see To create an administrator level display format, Oracle Product Hub Implementation Guide.
-
In the Search Results page, select a display format containing the Edit Structure section. Click Go.
-
For one of the items in the results, click Edit Structure.
Click Edit Structure in the Search Results page
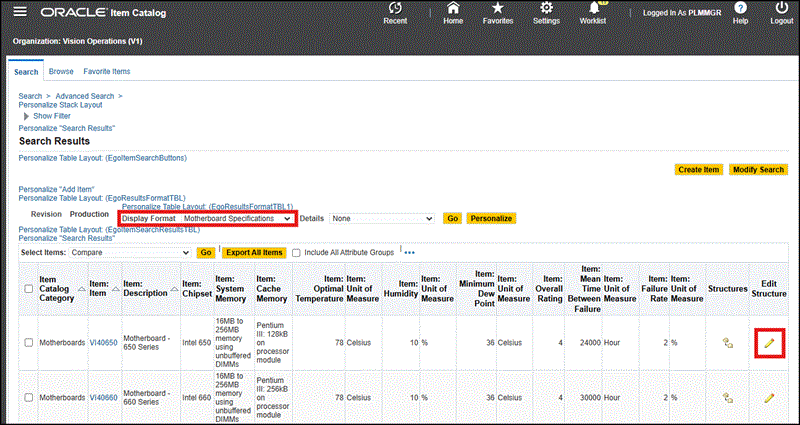
The Structure: (item name) page opens, if a structure exists for the item.
Related Topics
Overview of the Product Workbench
Managing Bills of Material/Product Structures
Viewing Item Information
You can view detailed information for any item that appears in your search results.
Prerequisites
- Search for and find one or more items using a search method described previously in Searching for Items.
To view an item's details:
From the Product Workbench Items page search results, for a particular item, click More Actions, then click View Item Details.
The item's Overview page opens.
Related Topics
Overview of the Product Workbench
Managing Bills of Material/Product Structures
Managing Bills of Material/Product Structures
Use the HTML-based Product Workbench to perform the following tasks for a product structure:
Prerequisites
- Search for and find one or more items using either one of the simple search or advanced search methods described above in Searching for Items.
- Before creating a new structure, review the required setup tasks in Overview of Item Structures, Oracle Product Hub Implementation Guide.
-
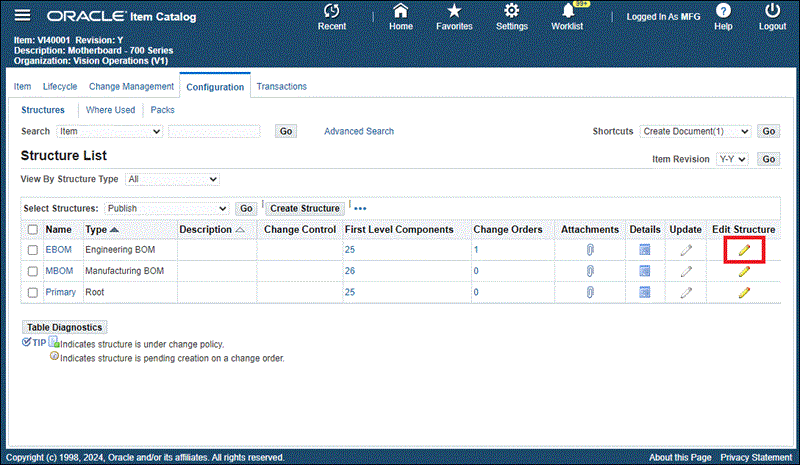
Use one of the following two methods to view structure details for an item:
-
In the Items page search results, for one of the items, click View Structure.
The Item Catalog Structure List page opens. Refer to Viewing Item Structures.
Tip: If you have edit structure privileges, you can also view structure details by returning to the HTML-based Product Workbench using one of the following methods:
-
Click Recent. In the Recently Visited page, click Product Workbench.
-
In the Structure List table, for a particular structure, click Edit Structure.
-
In the Structure List table, select a structure name. In the Structure: (structure name) page, Actions field, select Edit Structure, then click Go.
-
-
If you have edit structure privileges, in the Items page search results, click an item. The Structure: (item name) page opens.
By default, the Primary structure for the item appears, using the default display format for its structure type.
-
To view item details for a component in a structure:
-
In the Structure: (item name) page, click Actions for a component, then click View Item Details.
The item's Overview page opens.
Tip: Click Recent to return to the Structure: (item name) page.
To view a list of all structures using a component
-
In the Structure: (item name) page, click Actions for a component, then click Item Where Used.
The Where Used: (item name) page opens. This page shows all structures in which the item is a component, and always opens with the current date filter applied.
Tip: Click Recent to return to the Structure: (item name) page.
-
In the Items page search results, for one of the items, click Create Structure.
The Create Structure page opens.
-
In the Structure Type field, select one of the available types.
The structure names associated with the selected structure type appear in the Structure Name field.
-
In the Structure Name field, select one of the names from the list.
-
In the Effectivity field, select Date.
Additional Information: You can only create, view, and edit date-effective structures in the HTML-based Product Workbench. Unit and revision-effective structures are not supported.
-
(Optional) In the Structure Description field, add a description of the structure.
-
(Optional) Select Preferred Structure to use this structure as the default structure for the item.
-
Click one of the following options:
-
Apply. The Items page opens, so you can search for an item.
-
Create Another. The Create Structure page refreshes, so you can create another structure.
-
Save and Edit Structure. The Structure: (structure name) page opens for the item's new structure.
-
-
Click Actions, then Add Components.
Alternatively, in the item row, right-click to select Add Components.
For additional steps, refer to the following task, To add a component to the structure.
Conditional Action: You can only edit or view an item's date-effective structure in the HTML-based Product Workbench when both of the following conditions are true:
-
You have edit structure privileges for the item.
-
the item is in a lifecycle phase whose change policies allow direct updates.
-
In the Items page search results, for one of the items, either click Edit Structure or double-click the item's card.
The HTML-based Product Workbench Structure: (Item Name) page opens.
Optional Action: Alternatively, you can open the HTML-based Product Workbench Structure: (Item Name) page in two other ways:
-
From an item's Structure List page (the Configuration tab of the item's Overview page). For a particular structure, click Edit Structure.
Accessing the HTML-based Product Workbench from the Structure List page
-
From an item's Structure List page, click a structure name, which opens the Structure: (structure name) page. In the Actions field, select Edit Structure, then click Go.
The HTML-based Product Workbench Structure: (Item Name) page opens using the filter criteria from the View region of the Structure: (structure name) page.
Accessing the HTML-based Product Workbench from the Structure: (structure name) page

-
To filter an item's structures and components:
Each item can have multiple structures and each structure can have multiple components. Use the filters to view the structure and components you want to edit.
-
In the HTML-based Product Workbench Structure: (Item Name) page, the primary structure for the item appears. Click Filters.
-
In the Filters drawer, optionally select a value for each of the following fields:
-
Structure Name (Structure Type): select one of the structures in the list.
-
Revision: select the item revision.
-
Date: select the effective date of the structure.
-
Search Criteria: select the search criteria template to use as a filter.
-
Display Format: select the display format to use when displaying the item's filtered structure.
Tip: If you select a display format that displays one or more attributes, you can edit the attribute values from the Structure: (item name) page by double-clicking a component row and changing one or more attribute values. Once you click a different row, the changed attribute values appear with an edit icon. Click Save.
-
Components Scope: select whether to view current, current and future, or all components.
-
Changes: select whether to view Implemented Only, Implemented + All Unimplemented, or a specific change order.
Selecting Filters for an Item's Structures and Components

-
-
Click Apply.
The structure and components that meet your filter criteria appear.
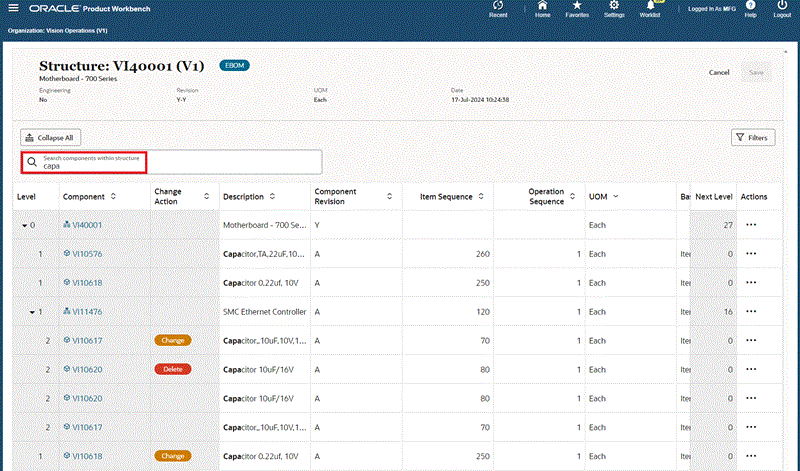
To search for components within the structure:
Use the Search components within structure field to further narrow your list of structure components.
-
In the Search for Components within Structure field, enter a key word.
Only those components that contain the key word text in the display format columns shown are listed in the results.
Using the Search for Components within Structure field in the Product Workbench
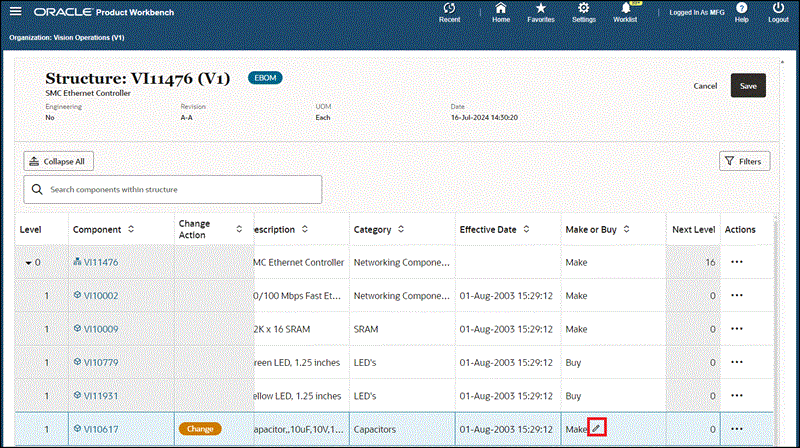
To edit a component's attributes:
Important: Before editing a component's attributes:
-
You must have edit privileges for the attribute group to change an attribute's value.
-
If an attribute is a parameter in a user-defined function, then updating the attribute's value updates the function’s result. For example, function-generated item names and descriptions update when a function’s parameter attribute value is updated. To learn about user-defined functions, see Creating User-Defined Functions for Item Attributes, Oracle Product Hub Implementation Guide.
-
Disabled, grayed out cells indicate non-editable cells. The following icons indicate the reasons:
-
Change Policy: Change Order Required. Changes are only allowed through a change order.
-
Change Policy: Not Allowed. Changes to these attributes are not allowed in this specific lifecycle phase of the item. To learn more about change policies, see Defining Change Policies, Oracle Product Hub Implementation Guide.
-
Common Bill. A grayed out common bill icon indicates you are viewing a non-editable common bill and no changes to the bill are allowed. If you are viewing an editable common bill, you can edit the following five material control attributes at the component level:
-
Supply Type
-
Sub Inventory
-
Locator
-
Operation Sequence
-
Include in Cost Rollup
-
For more information about common structures, see To create common structures.
-
-
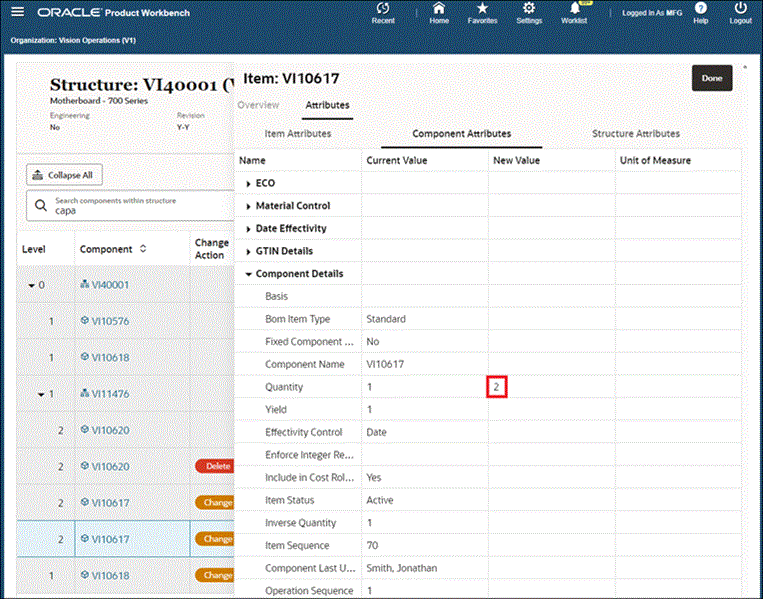
Click Actions for one of the components in the structure, then click Change Attributes.
Alternatively, click the component's name link.
The item's Attributes drawer opens.
Tip: If you can see the attributes you want to change in the selected display format, you can edit the attribute values from the Structure: (item name) page by double-clicking a component row and changing one or more attribute values. Once you click a different row, the changed attribute values appear with an edit icon and the Change Action column displays a Change badge. Click Save or Done.
If you click Save, the changes are saved. The Change badge and edit icon no longer appear. You remain on the Structure: (item name) page and can continue editing the structure.
If you click Done, the changes are saved. You return to the page you were on before you began editing the item's structure.
-
Select one of the following attributes subtabs:
-
Item Attributes
-
Component Attributes
-
Structure Attributes
-
-
In the Attributes drawer, expand an attribute group until the current value of the attribute you want to change appears.
Conditional Action: When you expand a multi-row attribute group, numbered rows appear. Expand a numbered row to view the current value of an attribute you want to change. To add a new row, right-click the multi-row attribute group, then click Add Attribute Row. To delete an existing row, right-click the multi-row attribute group, then click Delete Attribute Row.
-
Double-click the New Value field for the attribute you want to change. Enter or select the new value.
Changing an Item Attribute Value
-
Click Done.
The Attributes drawer closes. A Change badge appears in the Change Action field.
-
Click Save or Done.
If you click Save, the changes are saved. The Change badge and edit icon no longer appear. You remain on the Structure: (item name) page and can continue editing the structure.
If you click Done, the changes are saved. You return to the page you were on before you began editing the item's structure.
A confirmation message appears, informing you that your changes saved successfully.
To add a component to the structure:
You can add a component at any level in a structure. If you add a component to a leaf node in a structure, a subassembly structure for the leaf node is automatically created. By adding the component in the context of an alternate structure name, you create the subassembly structure using the alternate structure name. The subassembly Primary structure name is automatically created at the same time, but only the subassembly Primary structure name header is created; it does not include any components.
-
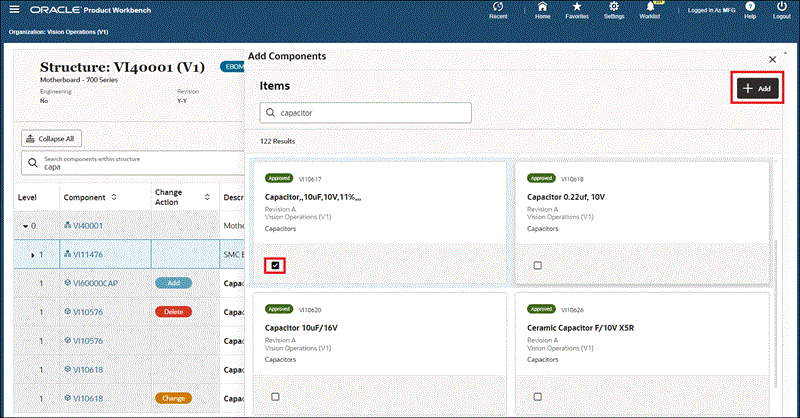
In the Structure: (item name) page, select the item or a component in the item's structure, click Actions, then Add Component.
Alternatively, right-click on a component, then click Add Component.
The Add Components drawer opens.
-
Use the Items search field or click Advanced Search to search for one or more items to add as components.
Note: Save any changes made so far before clicking Advanced Search.
The search results appear.
Searching for a Component to Add
-
Select one or more items to add as components.
-
Click Add.
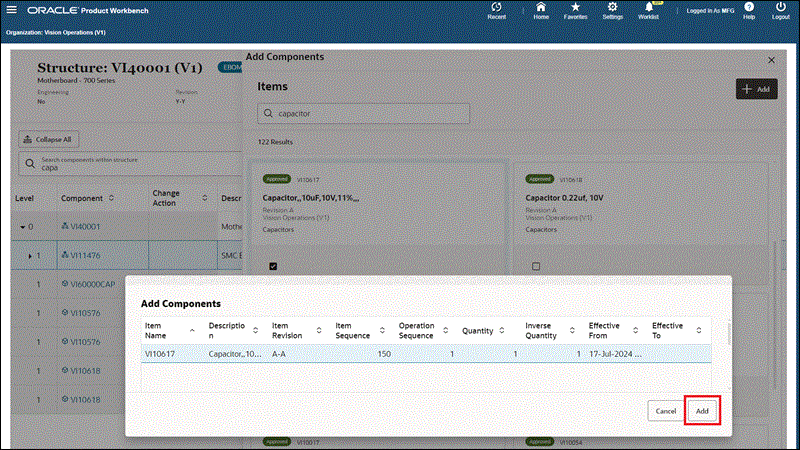
The Add Components page opens.
-
Verify that each component listed has the correct values in the following fields. If not, double-click the field to change the value.
-
Item Sequence
-
Operation Sequence
-
Quantity
-
Inverse Quantity
-
Effective From
-
Effective To
Modifying Component Attributes Before Adding a Component
-
-
Click Add.
The added components appear as rows in the Structure: (item name) page with the Add badge in the Change Action column.
-
Click Save or Done.
If you click Save, the changes are saved. The Change badge and edit icon no longer appear. You remain on the Structure: (item name) page and can continue editing the structure. A confirmation message appears, informing you that your changes saved successfully.
If you click Done, the changes are saved. You return to the page you were on before you began editing the item's structure.
To delete a component from the structure:
-
In the Structure: (item name) page, in a component row, click Actions, then Delete Component.
Alternatively, right-click a component row, then click Delete Component.
A Delete badge appears in the Change Action field.
-
Click Save or Done.
If you click Save, the changes are saved. The Change badge and edit icon no longer appear. You remain on the Structure: (item name) page and can continue editing the structure. A confirmation message appears, informing you that your changes saved successfully.
If you click Done, the changes are saved. You return to the page you were on before you began editing the item's structure.
Related Topics
Overview of the Product Workbench
Managing Changes
The HTML-based Product Workbench enables you to make changes to a structure and to any component's attributes at the same time in the context of a change order. When you open the HTML-based Product Workbench from a change order, the item's structure automatically appears using the Change Order display format.
Use the HTML-based Product Workbench to perform the following change order-related tasks for product structures:
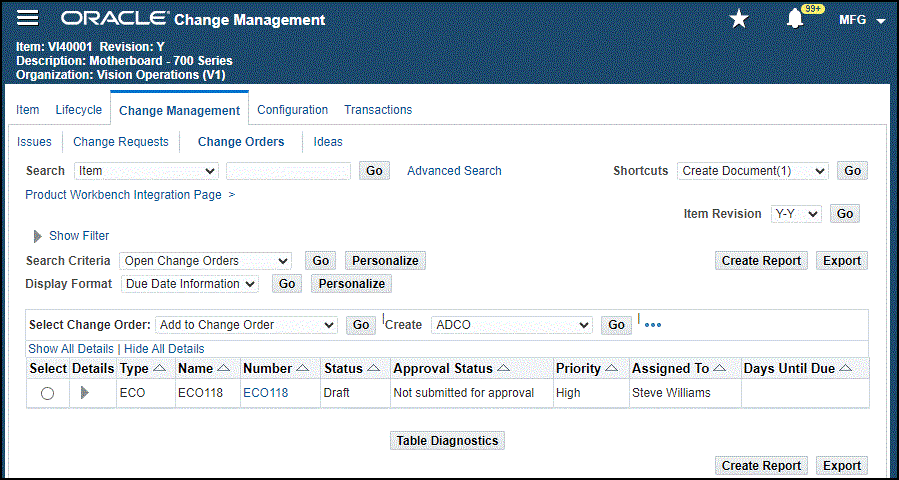
To view all change orders associated with an item
-
Search for an item in the HTML-based Product Workbench. See Searching for Items.
The search results appear.
-
From the Product Workbench Items page search results, for a particular item, click More Actions, then click View Change Orders.
The item's Change Orders page opens.
Change Orders page
Tip: Alternatively, you can navigate to the same Change Orders page by searching for an item in the Item Catalog. From the search results, click the item link. From the item's Overview page, click the Change Management tab, then the Change Orders secondary tab.
To view structure changes related to one change order
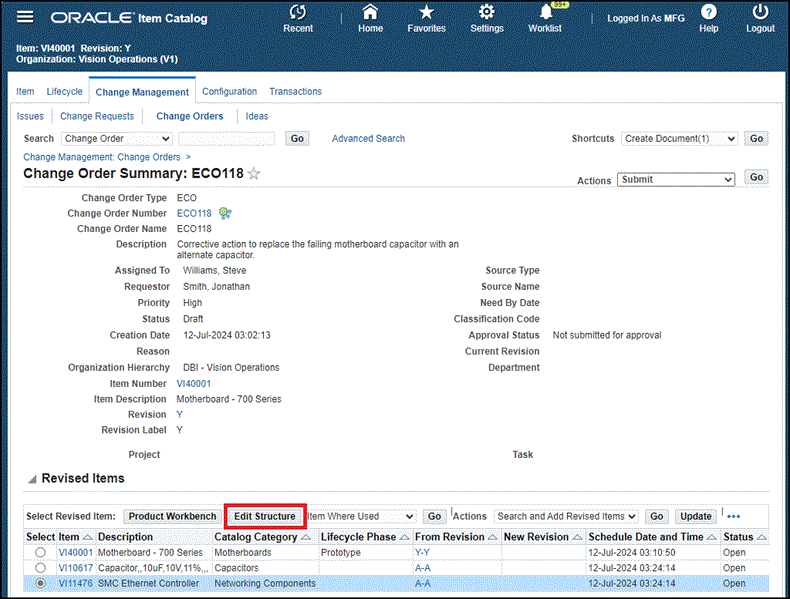
You can select a revised item in a change order and then view the item's structure in the context of the change order. Navigate to the HTML-based Product Workbench from a change order using either of the following methods:
-
Find an item. From the item's Overview page, click the Change Management tab and continue to navigate to the Change Order Summary: (change order number) page.
-
Find a change order. This method is described in the following steps.
-
Find a change order. See Searching for Ideas, Issues, and Changes.
The change order search results appear.
-
From the change order search results, in the Number column, click a change order number link.
The Change Order Summary: (change order number) page opens.
-
From the Change Order Summary: (change order number) page, select an item in the change order, then click Edit Structure.
Change Order Summary: (change order number) page
Additional Information: You can also use either of the following methods to navigate to the Structure: (item name) page:
-
From the change order's Revised Items page (the change order's Lines tab), select an item in the change order, then click Edit Structure.
Revised Items page
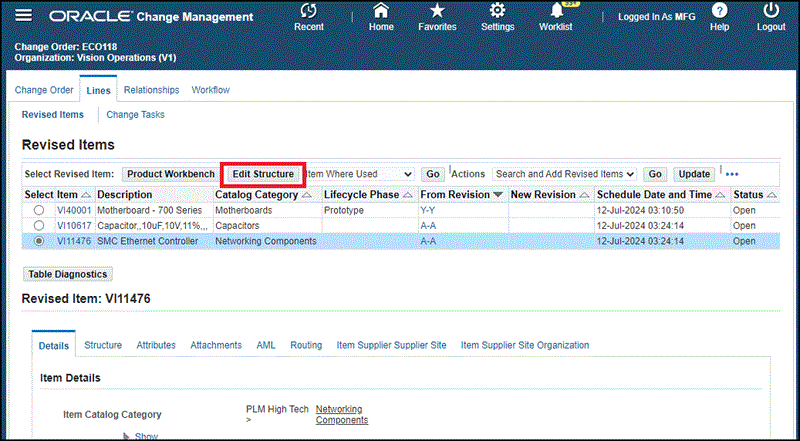
-
In the Revised Items page, select an item. Select the Structure subtab. Click Edit Structure.
Revised Items page, Structure subtab

The HTML-based Product Workbench Structure: (item name) page opens using the Change Order display format, in the context of the change order and the structure name selected for the revised item. The Change Action column displays a badge, indicating the type of structure change associated with the change order. The Change Notice column displays the change order number.
Structure: (item name) page
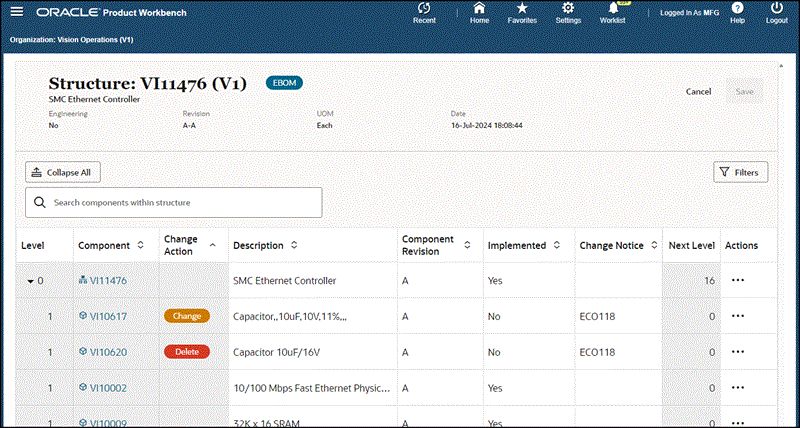
Note: Since the page opens in the context of the change order and the structure name selected for the revised item, you can only change the following filters:
-
Search Criteria
-
Display Format
-
Components Scope
-
To find all changes within the structure
Since the default Change Order display format includes the Change Action and Change Notice columns, you can search the structure for the change order number using the change order number as a key word in your search.
-
In the Search components within structure field, enter the change order number, then press Enter.
Only the components with changes related to the change order number entered are listed in the results.
To add a structural change to the change order
If you view an item's structure in the context of a change order and then you edit the structure, the edits becomes part of the change order record.
-
View an item's structure in the context of a change order by following the steps listed previously in To view structural changes related to one change order.
-
Edit the structure by following the steps listed previously in To edit an item's structure.
Tip: If you can see the attributes you want to change in the selected display format, then you can edit the attribute values from the Structure: (item name) page by double-clicking a component row and changing one or more attribute values. Once you click a different row, the changed attribute values appear with an edit icon and the Change Action column displays a Change badge. Click Save. Once you save the change, the edit icon no longer appears.
Caution: You cannot modify user defined attributes for components and structures through a change order.
Changing a Component Attribute Value in the Structure: (item name) page
To view an item's structural change details by change order number
Although you can identify each changed component record and the associated change order number in the HTML-based Product Workbench, you must view the structural change details, such as the change to an attribute value, in Change Management.
-
Find a change order. See Searching for Ideas, Issues, and Changes.
The change order search results appear.
-
From the change order search results, in the Number column, click a change order number link.
The Change Order Summary: (change order number) page opens.
-
In the Change Order Summary: (change order number) page, click the Change Order Number link.
The change order's Overview page opens.
-
In the change order's Overview page, click the Lines tab.
The change order's Revised Items page opens.
-
In the change order's Revised Items page, select an item that you revised in the HTML-based Product Workbench.
-
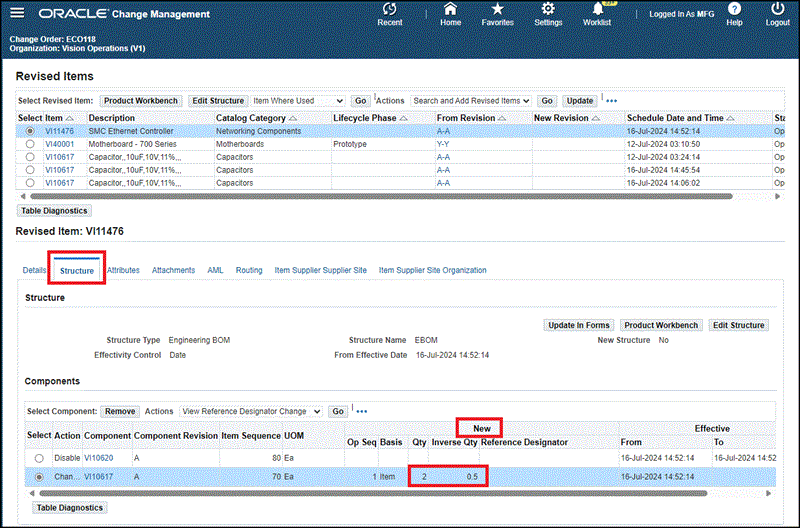
In the Revised Item: (item name) region, click the Structure tab.
The Revised Item: (item name) region now lists each component change for the selected item and change order number. The New column displays the field values changed. The Action column displays whether a component was added, deleted, or changed.
Change Order Revised Items page, Lines tab, Revised Items secondary tab, Structure subtab
-
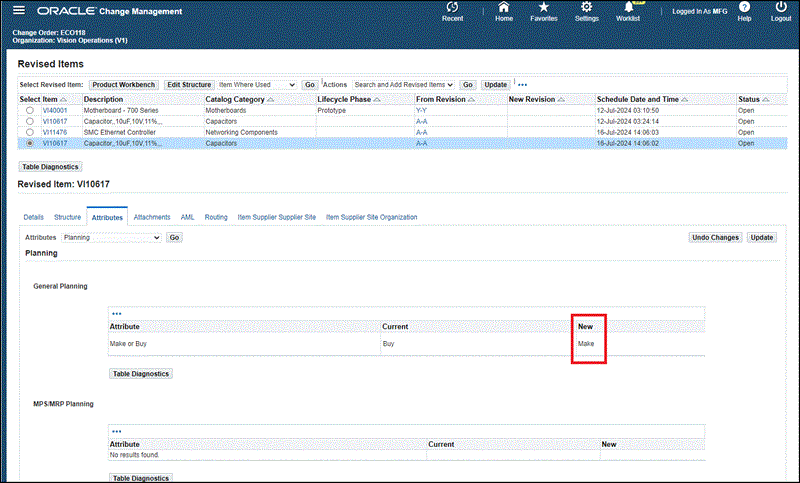
In the Revised Item: (item name) region, click the Attributes tab.
-
In the Attributes field, select an attribute group, then click Go.
The current and new attribute values of the changed attributes appear.
Change Order Revised Items page, Lines tab, Revised Items secondary tab, Attributes subtab
Related Topics