Managing Delivery Lines
This chapter covers the following topics:
- Overview of Delivery Lines
- Viewing the Status of a Delivery Line
- Delivery Line Statuses
- Viewing Delivery Line Status
- Splitting Delivery Lines
- Transferring Delivery Lines to Cycle Counting
- Assigning Delivery Lines to a Delivery
- Unassigning Delivery Lines From a Delivery
- Unassigning Delivery Lines From a Transportation Batch
- Auto-Creating Deliveries for Delivery Lines
- Auto-Creating a Trip for Delivery Lines
- Purging Delivery Lines
- Assigning Freight Costs to Delivery Lines
- Back Ordering Delivery Lines
- Calculating Weight and Volume for Delivery Lines
- Pick Releasing Delivery Lines From the Shipping Transactions Window
- Pick Releasing Delivery Lines From the Shipping Execution Simplified User Interface
- Managing Sales Order Changes
- Entering Serial Numbers for Delivery Lines
Overview of Delivery Lines
A booked order line that is eligible to be shipped can be viewed as a delivery line in the Shipping Transactions window and in the Shipping Execution Simplified User Interface. Delivery lines with common attributes such as Ship From and Ship To addresses can be grouped together as a delivery. Delivery lines from different sales orders can be grouped together as a single delivery.
You can manage these tasks for delivery lines:
-
Note: The Line/LPN, Inventory Details, and Source regions on the Line window include dual unit of measure, grade, and lot process fields. If the OPM item is dual UOM controlled, lot controlled, and has a grade, then you will see values in these fields. Otherwise, these fields will be blank.
Refer to Using Oracle Order Management with Process Inventory for description of process fields.
The application does not enable the following actions for delivery lines, if you have set Fulfillment Batch as the value for WSH: Distributed Source Entity profile option:
-
Auto-create deliveries
-
Assign to delivery
-
Auto-create trip
-
Auto-pack
-
Auto-pack master
-
Launch pick release
-
Pack
-
Unpack
-
Packing workbench
-
Pick and ship
-
Pick, pack, and ship
-
Cycle count
Viewing the Status of a Delivery Line
The released status of a delivery line identifies its progress through the shipping process. A typical shipping process includes the following stages: orders are entered, booked, scheduled, and the delivery detail goes to Ready to Release status where the next step is pick release. Then the order is pick released, and the delivery detail goes to either staged/pick confirmed status or to released to warehouse. You can view released status in the:
Oracle Shipping Execution
-
Shipping Transaction window
-
Quick Ship window
-
Shipping Execution Simplified User Interface
Oracle Order Management
-
Additional Order Information window
Navigation: Sales Orders window - Order Information tab > Actions > Additional Order Information > Deliveries tab
-
Additional Line Information window
Navigation: Sales Orders window - Line Items tab > Actions > Additional Order Information > Deliveries tab
Delivery Line Statuses
Not Applicable
The delivery line is invoiceable but non-shippable, for example, a service line or a warranty line.
Not Ready to Release
The delivery line is not eligible for pick release.
Occurs when the order line is manually imported into Oracle Shipping Execution using the Import Delivery Line concurrent process. It has not reached the Awaiting Shipping workflow activity. It is not scheduled and has no reservations.
Ready to Release
The delivery line is eligible for pick release.
Occurs when the order line has reached the Awaiting Shipping workflow activity (it is booked, scheduled, and in Oracle Shipping Execution).
Note: Only lines that are in Ready to Release status will be considered for Pick and Ship and Pick, Pack, and Ship processes.
Released to Warehouse
Pick release has processed the delivery line and has:
-
Created move order headers and lines.
-
Found available quantity and created inventory allocations.
-
Not pick confirmed. If you want to progress the delivery lines, navigate to Oracle Inventory Move Order Transaction window and perform manual pick confirm.
Planned for Crossdocking
Crossdocking in Oracle Warehouse Management refers to the use of inbound receipts to satisfy outbound demands. Planned crossdocking occurs during pick release when Oracle Warehouse Management uses release sequence rules to sequence demand sources, and fulfills the demand based on the allocation method specified during pick release. When you run pick release, the system uses the allocation method to determine whether crossdock should be planned. A delivery line in Planned for Crossdocking status indicates that a crossdock supply has been identified and the delivery line has been pick released.
For more information, see the Oracle Warehouse Management User's Guide, Oracle Warehouse Management Crossdocking.
Note: The crossdocking feature is valid only for Oracle Warehouse Management-enabled organizations.
Staged/Pick Confirmed
The delivery line is pick confirmed; inventory is transferred from storage sub inventory to staging sub inventory. Oracle Order Managements Line Item tab shows the status as Picked.
It remains staged until ship confirm.
Backordered
Any of the following circumstances will cause this delivery line status to occur:
-
Pick release has processed the delivery line and cannot find the entire quantity.
This typically occurs when the inventory balance indicates that there is not enough material (either because there is not enough material or because the inventory balance is incorrect).
-
At ship confirm, you:
-
Enter Shipped Quantity that is less than original Requested Quantity.
-
Back order the entire delivery quantity.
-
Transfer a reservation to cycle count.
This typically occurs when the material that you want to ship:
-
Has become unavailable, for example, damaged between picking and shipping.
-
Is not available. There is a discrepancy between the actual quantity and the system quantity. The discrepant quantities are moved to cycle count and the remainder ship.
-
In the Lines/LPNs tab of the Shipping Transactions window, you can select Backorder from the Actions list for delivery lines that are staged and need to be backordered. For more information about how to back order material, see Back Ordering Delivery Lines.
Shipped
The delivery line is ship confirmed and posted as intransit, interface to Oracle Order Management and Oracle Inventory has not completed, or has been deferred.
Interfaced
Delivery sourced from Oracle Order Management: The delivery line is shipped and the OM Interface and Inventory Interface concurrent processes have completed.
Delivery sourced from all other Oracle Applications: The delivery line is shipped and the Inventory Interface concurrent process has completed.
Cancelled
The sales order line that the delivery line supports is cancelled.
Replenishment Requested
Forward pick replenishment is an important activity in a warehouse. By replenishing a forward pick area, a distribution center disaggregates material stored in a reserve or bulk area and moves it to a pick area that is optimized for unite picking. Replenishment to a forward pick area allows a distribution center to reap the benefits of bulk procurement and optimized storage in a reserve area as well as optimized picking for order profiles with smaller quantities. The replenishment types are available:
-
Pull Replenishment: A replenishment suggestion is auto-created as soon as a shortfall is detected during the order release process. This type of replenishment is useful for items with high uniform demand in forward pick areas.
-
Push Replenishment: Using push replenishment, the aggregated future demand for an item is replenished to a forward pick area for future picking activity. This type of replenishment is useful for items with irregular demand in a forward pick area.
-
Dynamic Execution: Dynamic execution orchestrates the warehouse tasks in such a way that a pick task to a forward pick area will be dispatched only when replenishment has been completed. Similarly a replenishment task will be dispatched only when a forward pick area has enough capacity to receive the replenished material.
If the quantity is not available in the correct pick unit of measure, instead of backordering the quantity, the delivery lines are assigned a status of Replenishment Requested.
-
Supports the Forward Pick Replenishment feature in Oracle Warehouse Management System (WMS).
-
The Replenishment Requested status is assigned only when Pull or Push replenishment is initiated.
Replenishment Completed
The warehouse management system changes the status of delivery detail lines from Replenishment Requested to Replenishment Completed after Oracle Warehouse Management releases the tasks that are associated with the replenishment requested delivery lines.
Note: Supports the Forward Pick Replenishment feature in Oracle Warehouse Management System (WMS).
Related Topics
Oracle Warehouse Management User's Guide, Dynamic Replenishment.
Viewing Delivery Line Status
To View the Status of a Delivery Line Using the Shipping Transactions Window
-
Navigate to the Query Manager window, and find the delivery lines.
-
Find the column named Line Status to see the status of the delivery line, or select the line and click Detail to display the line details and the Line Status field.
-
Click Done.
-
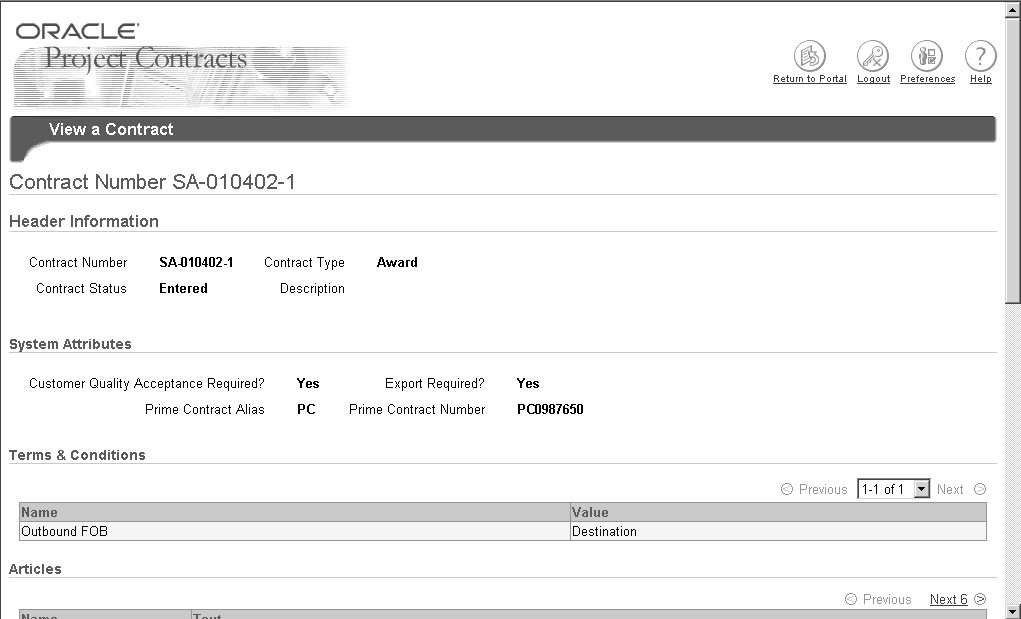
If the delivery line is for a contract deliverable from Oracle Project Contracts:
-
Navigate: Tools > Show Contract Details.
-
View the contract details on the web page that displays.
Oracle Project Contracts Screen - View a Contract
-
To View the Status of a Delivery Line Using the Shipping Execution Simplified User Interface (Alternate Method)
-
Navigate to the Details page.
-
Click Search.
The Search Details page appears.
-
Enter search criteria for the delivery lines for which you want to view the status, and click Go.
-
Perform one of these procedures:
To View the Status of a Delivery Line Using the Search Details Page
-
The status of a delivery line is displayed in the Status column of the search results table.
Note: You can also view the status of a delivery line by performing the steps above from the Details page when any infotile is selected.
To View the Status of a Delivery Line Using the Detail Page
-
Click the Detail link for a delivery line in the search results table of the Search Details page.
The Line Details page appears.
-
The status of a delivery line is displayed in the Line Status field.
-
Splitting Delivery Lines
You split delivery lines under various situations. You might split a delivery line to accommodate packing requirements, or when a backorder occurs.
To Split Delivery Lines Using the Shipping Transactions Window
-
Navigate to the Query Manager window, and find the delivery line(s) you want to split.
-
Select the delivery line you want to split.
-
From the Actions menu, select Split Line.
-
Click Go.
Split Delivery Line window
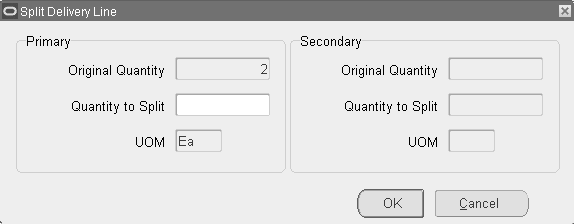
The Original Quantity displays the line quantity.
-
Enter the quantity you want to split.
For example, if you split 9 items from a line consisting of 10 items, two delivery lines would result: one line with one item, and the second line with nine items.
-
Click OK.
The delivery lines are split into two lines.
Set the profile option WSH: Ship Confirm with Source Requested Quantity UOM to Yes to enter values in the Source region.
-
Save your work.
Note: When you split a staged delivery detail and when fulfillment base of the order line is secondary, the application checks for deviation not only in the new detail being created, but also on the quantities remaining on the original detail. If the quantities on original detail do not meet deviation, then the application displays an error message saying that the remaining quantity is higher than the allowed deviation for the item. You must reenter the quantity.
For information regarding fulfillment base of the line, see Defining Sales Order Line Shipping Information, Oracle Order Management User's Guide.
To Split Delivery Lines Using the Shipping Execution Simplified User Interface (Alternate Method)
-
Navigate to the Details page.
-
Click Search.
The Search Details page appears.
-
Enter search criteria for the delivery lines that you want to split, and click Go.
-
Perform one of these procedures:
To Split Delivery Lines Using the Search Details Page
-
Select one delivery line by clicking the corresponding check box in the Select column.
-
From the Actions menu, select Split Line.
-
Click Go.
The Split Line page appears displaying the delivery line quantity in the Original Quantity field.
-
Enter the split information.
For more information on how to split a delivery line, see the procedure: To Split Delivery Lines Using the Shipping Transactions Window.
-
Click Apply.
Note: You can also split a delivery line by performing the steps above from the Details page when any infotile is selected.
To Split Delivery Lines Using the Detail Page
-
Click the Detail link for a delivery line in the search results table of the Search Details page.
The Line Detail page appears.
-
From the Actions menu, select Split Line.
-
Click Go.
The Split Line page appears displaying the delivery line quantity in the Original Quantity field.
-
Enter the split information.
For more information on how to split a delivery line, see the procedure: To Split Delivery Lines Using the Shipping Transactions Window.
-
Click Apply.
-
Transferring Delivery Lines to Cycle Counting
You can transfer delivery lines to cycle counting to manage inventory discrepancies.
If you back order a line with an inventory discrepancy, the backorder removes the reservation so that the quantity of the backorder remains available until you perform an inventory adjustment to correct it. The unavailable item could be pick released again before you perform the inventory adjustment transaction, unnecessarily sending pickers to retrieve it.
If the reservation for the unavailable quantity is moved to cycle count, however, it is not available for pick release and the inventory control staff can correct the discrepancy on the next cycle count.
By specifying a quantity for cycle counting in the Shipping Transactions form, you create a back order for the entire quantity or for a partial quantity of the delivery line. The Shipping Transactions window transfers the reservation for the back ordered quantity to cycle counting.
For example, you are processing a staged delivery line with quantity 10. If you use the transfer cycle count functionality with this delivery line and specify two, the transfer cycle count functionality:
-
Splits the delivery line into two delivery lines, one with quantity eight and one with quantity two.
-
Leaves the delivery line with quantity eight as staged.
-
Back orders the delivery line with quantity two and transfers its reservation to cycle counting.
If you use the transfer cycle count functionality with this delivery line and specify 10, the transfer cycle count functionality back orders the entire delivery line and transfers its reservation to cycle counting.
To use this functionality, you must have security privilege Cycle Count Delivery Line. This security privilege appears on the Shipping Execution Role Definition window, Lines/LPNs tabbed region.
See: Oracle Order Management Implementation Manual, Shipping Execution Setup chapter.
To view the reservation, use the Oracle Inventory Item Reservations form. Query the reservations for the organization and item number of the delivery and select the demand source as Cycle Count. The connection between the delivery line and the reservation is the item number.
See: Oracle Inventory User's Guide.
You can also transfer delivery quantities to cycle counting during ship confirm by specifying:
-
Cycle count the entire quantity
-
Cycle count unspecified quantities
To Transfer Delivery Lines to Cycle Counting Using the Shipping Transactions Window
-
Navigate to the Query Manager window, and find the delivery line that you want to transfer to cycle counting.
-
From the Actions menu, select Cycle Count.
-
Click Go.
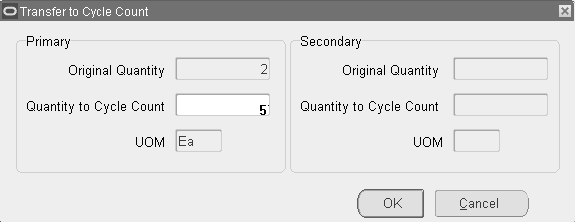
Transfer to Cycle Count window
-
In the Primary region:
-
In Original Quantity and UOM, verify the delivery line quantity and item unit of measure.
-
In Quantity to Cycle Count, enter the quantity that you want transferred to cycle counting.
Note: The Secondary region is used by Oracle Process Manufacturing.
-
-
Click OK.
-
Save your work.
To Transfer Delivery Lines to Cycle Counting Using the Shipping Execution Simplified User Interface (Alternate Method)
-
Navigate to the Details page.
-
Click Search.
The Search Details page appears.
-
Enter search criteria for the delivery lines that you want to transfer to cycle counting, and click Go.
-
Perform one of these procedures:
To Transfer Delivery Lines to Cycle Counting Using the Search Details Page
-
Select one delivery line by clicking the corresponding check box in the Select column.
-
From the Actions menu, select Cycle Count.
-
Click Go.
The Cycle Count page appears displaying the delivery line quantity in the Original Quantity field.
-
Enter the transfer to cycle count information.
For more information on how to transfer delivery lines to cycle counting, see the procedure: To Transfer Delivery Lines to Cycle Counting Using the Shipping Transactions Window.
Note: You can also transfer delivery lines to cycle counting by performing the steps above from the Details page when any infotile is selected.
-
Click Apply.
To Transfer Delivery Lines to Cycle Counting Using the Delivery Page
-
Click the Detail link for a delivery line in the search results table of the Search Details page.
The Line Detail page appears.
-
From the Actions menu, select Cycle Count.
-
Click Go.
The Cycle Count page appears displaying the delivery line quantity in the Original Quantity field.
-
Enter the transfer to cycle count information.
For more information on how to transfer delivery lines to cycle counting, see the procedure: To Transfer Delivery Lines to Cycle Counting Using the Shipping Transactions Window.
-
Click Apply.
-
Assigning Delivery Lines to a Delivery
You can assign delivery lines to an existing delivery.
Prerequisites
The delivery lines cannot be assigned to an existing delivery.
To Assign Delivery Lines to a Delivery Using the Shipping Transactions Window
-
Navigate to the Query Manager window, and find the delivery lines.
-
Select the delivery lines you want to assign.
-
From the Actions menu, select Assign to Delivery.
-
Click Go to display the Deliveries window.
-
Select the delivery to which you want to assign the delivery lines.
The delivery lines are assigned to the selected delivery.
-
Save your work.
To Assign Delivery Lines to a Delivery Using the Shipping Execution Simplified User Interface (Alternate Method)
-
Navigate to the Details page.
-
Click Search.
The Search Details page appears.
-
Enter search criteria for the delivery lines that you want to assign to a delivery, and click Go.
-
Perform one of these procedures:
To Assign Delivery Lines to a Delivery Using the Search Details Page
-
Select one delivery line by clicking the corresponding check box in the Select column.
-
From the Actions menu, select Assign to Delivery.
-
Click Go.
The Assign to Delivery page appears.
-
Select the delivery you want to assign to the delivery line in the Delivery Name field.
-
Click OK.
Note: You can also assign delivery lines to a delivery by performing the steps above from the Details page when any infotile is selected.
To Assign Delivery Lines to a Delivery Using the Delivery Page
-
Click the Detail link for a delivery line in the search results table of the Search Details page.
The Line Detail page appears.
-
From the Actions menu, select Assign to Delivery.
-
Click Go.
The Assign to Delivery page appears.
-
Select the delivery you want to assign to the delivery line in the Delivery Name field.
-
Click OK.
-
Unassigning Delivery Lines From a Delivery
You can unassign selected delivery lines from a delivery.
Prerequisites
The delivery lines must be assigned to an existing delivery.
To Unassign Delivery Lines From a Delivery Using the Shipping Transactions Window
-
Navigate to the Query Manager window, and find the delivery lines.
-
Select the delivery lines that you want to unassign from the delivery.
-
From the Actions menu, select Unassign from Delivery.
The lines are unassigned from the delivery.
-
Save your work.
To Unassign Delivery Lines From a Delivery Using the Shipping Execution Simplified User Interface (Alternate Method)
-
Navigate to the Details page.
-
Click Search.
The Search Details page appears.
-
Enter search criteria for the delivery lines that you want to unassign from a delivery, and click Go.
-
Perform one of these procedures:
To Unassign Delivery Lines From a Delivery Using the Search Details Page
-
Select one or more delivery lines by clicking the corresponding check boxes in the Select column.
-
From the Actions menu, select Unassign from Delivery.
-
Click Go.
Note: You can also assign delivery lines to a delivery by performing the steps above from the Details page when any infotile is selected.
To Unassign Delivery Lines From a Delivery Using the Line Detail Page
-
Click the Detail link for a delivery line in the search results table of the Search Details page.
The Line Detail page appears.
-
From the Actions menu, select Unassign from Delivery.
-
Click Go.
-
Unassigning Delivery Lines From a Transportation Batch
You can unassign delivery lines from a transportation batch.
Note: You can only unassign delivery lines from a transportation batch, if you are integrating Oracle Shipping Execution with Oracle Transportation Management using the batch based method.
Prerequisites
The delivery lines must be assigned to a transportation batch.
To Unassign Delivery Lines From a Transportation Batch Using the Shipping Transactions Window
-
Navigate to the Query Manager window, and find the delivery lines assigned to the transportation batch.
-
Select the delivery lines that you want to unassign from the transportation batch.
-
From the Actions menu, select Unassign from Transportation Batch.
The lines are unassigned from the transportation batch.
-
Save your work.
To Unassign Delivery Lines From a Transportation Batch Using the Shipping Execution Simplified User Interface (Alternate Method)
-
Navigate to the Details page.
-
Click Search.
The Search Details page appears.
-
Enter search criteria for the delivery lines that you want to unassign from a transportation batch, and click Go.
-
Perform one of these procedures:
To Unassign Delivery Lines From a Transportation Batch Using the Search Details Page
-
Select one or more delivery lines by clicking the corresponding check boxes in the Select column.
-
From the Actions menu, select Unassign from Transportation Batch.
-
Click Go.
To Unassign Delivery Lines From a Transportation Batch Using the Line Detail Page
-
Click the Detail link for a delivery line in the search results table of the Search Details page.
The Line Detail page appears.
-
From the Actions menu, select Unassign from Transportation Batch.
-
Click Go.
-
Auto-Creating Deliveries for Delivery Lines
During Pick Release, you can automatically create deliveries for delivery lines that have been successfully released for shipment. Lines are grouped onto deliveries based on the grouping attributes specified in the Shipping Parameters window.
To Auto-Create Deliveries for Delivery Lines Using the Shipping Transactions Window
-
Navigate to the Query Manager window, and find the delivery lines.
-
Multi-select the delivery lines for which you want to create a delivery.
-
From the Actions menu, select Auto-create Deliveries.
-
Click Go.
The deliveries are created for the selected lines based on the delivery grouping rules set up in the Shipping Parameters window.
-
Save your work.
Note: You can auto-create deliveries during pick release by setting the Autocreate Delivery option to Yes within the Shipping tab of the Release Sales Orders for Picking window or by specifying a Release Rule that has the Autocreate Delivery option set to Yes.
To Auto-Create Deliveries for Delivery Lines Using the Shipping Execution Simplified User Interface (Alternate Method)
-
Navigate to the Details page.
-
Click Search.
The Search Details page appears.
-
Enter search criteria for the delivery lines for which you want to auto-create a delivery, and click Go.
-
Perform one of these procedures:
To Auto-Create Deliveries for Delivery Lines Using the Search Details Page
-
Select one or more delivery lines by clicking the corresponding check boxes in the Select column
-
From the Actions menu, select Auto-create Deliveries.
-
Click Go.
Note: You can also auto-create deliveries for delivery lines by performing the steps above from the Details page when any infotile is selected.
To Auto-Create Deliveries for Delivery Lines Using the Delivery Page
-
Click the Detail link for a delivery line in the search results table of the Search Details page.
The Line Detail page appears.
-
From the Actions menu, select Auto-create Deliveries.
-
Click Go.
-
Auto-Creating a Trip for Delivery Lines
You can automatically create trips for delivery lines that have not been assigned to an existing delivery or trip. Auto-creating trips automatically creates a trip, stops, deliveries, and delivery legs for selected delivery lines.
Prerequisites
The delivery lines cannot be assigned to an existing delivery or trip.
To Auto-Create a Trip for Delivery Lines Using the Shipping Transactions Window
-
Navigate to the Query Manager window and find the delivery lines.
-
Select the delivery lines for which you want to create a trip.
-
From the Actions menu, select Auto-create Trip.
-
Click Go.
Trips are created for the selected delivery lines based on the delivery grouping rules defined in the Shipping Parameters window. You can view the trip name that has been created for the delivery lines in the Path by Stop tab in the Shipping Transactions window.
-
Save your work.
To Auto-Create a Trip for Delivery Lines Using the Shipping Execution Simplified User Interface (Alternate Method)
-
Navigate to the Details page.
-
Click Search.
The Search Details page appears.
-
Enter search criteria for the delivery lines for which you want to auto-create a trip, and click Go.
-
Perform one of these procedures:
To Auto-Create a Trip for Delivery Lines Using the Search Details Page
-
Select one or more delivery lines by clicking the corresponding check boxes in the Select column.
-
From the Actions menu, select Auto-create Trip.
-
Click Go.
Note: You can also auto-create a trip for delivery lines by performing the steps above from the Details page when any infotile is selected.
To Auto-Create a Trip for Delivery Lines Using the Delivery Page
-
Click the Detail link for a delivery line in the search results table of the Search Details page.
The Line Detail page appears.
-
From the Actions menu, select Auto-create Trip.
-
Click Go.
-
Purging Delivery Lines
Oracle Shipping Execution enables you to purge (permanently delete) delivery lines from the Oracle Shipping Execution tables.
All information associated with the purged entities is also purged, for example freight costs, weight and volume, dates, and exceptions.
These are the limitations when purging delivery lines:
-
The parent sales order or purchase order must either be purged and not have any open activities, such as invoices.
-
To purge delivery lines, the status must be Interfaced, Canceled, or Closed. In the case of inbound delivery lines, Canceled delivery lines cannot be purged because the status can be reversed.
Related Topics
Shipping Purge Concurrent Process
Assigning Freight Costs to Delivery Lines
Freight costs are shipment-related costs such as freight, insurance, duty fee, special handling, or priority service. You can assign freight costs to delivery lines at any time even after ship confirmation. However, costs assigned after ship confirmation are not passed as freight costs to Order Management; instead, they are stored in the shipping system for future reference.
Although freight costs can be defined in any currency, only the currency that is defined for the operating unit is displayed. When costs are passed to Order Management, the currency is converted to the order header currency.
If freight costs were entered in the Shipping Transactions window or in the Shipping Execution Simplified User Interface, and those freight costs need to be passed to Oracle Order Management for invoicing, then you must set up a pricing modifier.
Refer to the Oracle Order Management Implementation Manual for more information about Freight and Special Charges.
To Assign Freight Costs to a Delivery Line Using the Shipping Transactions Window
-
Navigate to the Query Manager window and find the delivery line.
-
Select the delivery line for which you want to assign freight costs.
-
From the Actions menu, select Assign Freight Costs.
-
Click Go.
The Freight Costs window appears.
-
Enter the Name, Type, Currency Code, Amount, and Conversion Type, and Creation Date.
-
Click Done.
At ship confirmation, the freight cost is applied. If a pricing modifier was set up, then the information is interfaced to Oracle Order Management.
-
Save your work.
See Defining Freight Costs, Oracle Order Management Implementation Manual
To Assign Freight Costs to a Delivery Line Using the Shipping Execution Simplified User Interface (Alternate Method)
-
Navigate to the Details page.
-
Click Search.
The Search Details page appears.
-
Enter search criteria for the delivery lines to which you want to assign freight costs, and click Go.
-
Perform one of these procedures:
To Assign Freight Costs to a Delivery Line Using the Search Details Page
-
Select one delivery line by clicking the corresponding check box in the Select column.
-
From the Actions menu, select Assign Freight Costs.
-
Click Go.
The Freight Costs page appears.
-
Click the Create Freight Cost icon (+ plus sign).
-
Enter the freight cost information.
For more information on entering freight cost, see the procedure: To Assign Freight Costs to a Delivery Line Using the Shipping Transactions Window.
-
Click Apply.
Note: You can also assign freight costs to a delivery line by performing the steps above from the Details page when any infotile is selected.
To Assign Freight Costs to a Delivery Line Using the Delivery Page
-
Click the Detail link for a delivery line in the search results table of the Search Details page.
The Line Detail page appears.
-
From the Actions menu, select Assign Freight Costs.
-
Click Go.
The Freight Costs page appears.
-
Enter the freight cost information.
For more information on entering freight cost, see the procedure: To Assign Freight Costs to a Delivery Line Using the Shipping Transactions Window.
-
Click Apply.
-
Back Ordering Delivery Lines
You can back order material for selected delivery lines from the staging subinventory to source subinventory. These delivery lines must not be assigned to any delivery. To back order material:
-
Navigate to the Shipping Transactions window.
-
On the Lines/LPNs tab, select the Actions list.
-
Select Backorder.
-
Click Go. A Backorder Reason pop-up window appears only if you have selected Auto Allocate or Auto Transact for the Automate Backorder Move drop-down list. This drop-down list is present in the Shipping Transaction tab of the Shipping Parameters window.
Calculating Weight and Volume for Delivery Lines
You can calculate the weight and volume for selected delivery lines.
When a new delivery detail (line) is created because of change in order line quantity, the system will retrieve the unit weight and volume from the existing delivery details (belonging to same order line) so that all delivery details belonging to same order line have the same unit weight and volume. When a delivery detail is created for a new order line, the system will retrieve the latest unit weight and volume from Inventory Master Item window.
Related Topics
Calculating Weight and Volume for a Delivery
Calculating Weight and Volume for a Trip Stop
Pick Releasing Delivery Lines From the Shipping Transactions Window
During pick release, delivery lines are released to the warehouse for picking based on the Pick Release and shipping criteria. In addition to pick releasing by trip, delivery, and container, you can also pick release by delivery lines. If the stop and delivery are not specified, only lines that are not assigned to the delivery are selected for release. If stop and delivery are specified, all selected lines meeting the release criteria, whether they are assigned to a delivery or not, are released.
To Pick Release Delivery Lines Using the Shipping Transactions Window
-
Navigate to the Query Manager window, and find the delivery lines.
-
Select the delivery lines you want to pick release.
-
From the Actions menu, select Launch Pick Release.
-
Click Go.
The selected delivery lines are pick released and the Messages box displays if the pick release was successful or failed.
Related Topics
Pick Releasing Delivery Lines From the Shipping Execution Simplified User Interface
During pick release, delivery lines are released to the warehouse for picking based on the Pick Release and shipping criteria. In addition to pick releasing by trip, delivery, and container, you can also pick release by delivery lines. If the stop and delivery are not specified, only lines that are not assigned to the delivery are selected for release. If stop and delivery are specified, all selected lines meeting the release criteria, whether they are assigned to a delivery or not, are released.
To Pick Release Delivery Lines Using the Shipping Execution Simplified User Interface
-
Navigate to the Details page.
-
Click Search.
The Search Details page appears.
-
Enter search criteria for the delivery lines that you want to pick release, and click Go.
-
Perform one of these procedures:
To Pick Release Delivery Lines Using the Search Details Page
-
Select one or more delivery lines by clicking the corresponding check boxes in the Select column.
-
From the Actions menu, select Launch Pick Release.
-
Click Go.
Note: You can also pick release delivery lines by performing the steps above from the Details page when any infotile is selected.
To Pick Release Delivery Lines Using the Delivery Page
-
Click the Detail link for a delivery line in the search results table of the Search Details page.
The Line Detail page appears.
-
From the Actions menu, select Launch Pick Release.
-
Click Go.
-
Click Apply.
-
Managing Sales Order Changes
Changes to sales orders affect Oracle Shipping Execution if the order is booked. Since delivery details exist, they must remain coordinated with the sales order lines.
Oracle Shipping Execution evaluates the delivery details every time there are any of the following sales order line updates:
-
Split
-
Change quantity
-
Change schedule
-
Change schedule date
-
Change ship set
-
Change delivery group
-
Changes resulting from automatic end item substitution initiated by:
-
Planner Workbench actions in Oracle Advanced Supply Chain Planning
-
Scheduling or rescheduling actions from Oracle Order Management
-
Automatic end item substitution can be performed until the status of the order line is Pick Release..
-
Item changes are restricted for ship sets, pick-to-order (PTO), and assemble-to-order (ATO) processes.
-
In general, Oracle Shipping Execution honors sales order line changes as long as their delivery lines are not:
-
Shipped or in a confirmed delivery
-
In Warehouse Management organizations and require unpacking or unassignment from delivery
Changing Delivery Line Item
Item changes initiated from Oracle Order Management are updated in Oracle Shipping Execution until the status of the order line is picked. Oracle Shipping Execution evaluates the status of the delivery details to ensure that the item change is acceptable and then updates the item on the delivery detail. Item attributes such as Description, Pickable flag, Weight/Volume UOM codes, Unit Weight/Volume and Hazard Classification are also updated. Shipping also completes weight and volume changes for the item change.
Additional Considerations:
-
If the delivery detail is required by Oracle Transportation Management (OTM), then the corresponding delivery will be identified as Update Required so that it can re-sent to OTM for planning. Shipping will update any existing reservations for the order line from the old item to the new item.
-
If the primary UOM of the new item is different than the primary UOM of the old item, then the item change is not allowed and an error message will be displayed.
-
If the line belongs to a warehouse that is either third party warehouse (TPW) or carrier manifesting enabled in the Organization parameters and the delivery status is either Shipment Requested or Shipment Advice Received, then the item change is not allowed.
-
If there is an item change and if either the old organization or the new organization (if organization is also changed as part of item substitution) is an OPM organization, then the update is not allowed.
-
If any detail exists that is packed into a container, then the update is not allowed.
Note: Item changes are restricted for ship sets/ ship model complete and assemble-to-order (ATOs), and pick-to-order (PTOs).
Split
Oracle Shipping Execution performs as follows during an order line split:
-
Disallows the order line to split if any delivery line is shipped or in a confirmed delivery.
-
Sequences the delivery details by their released status in the following order: Shipped, Staged/Pick Confirmed, Ready to Release, Not Ready to Release, Backordered, and Released to Warehouse, and attempts to fulfill the sales order split line quantity by using them one-by-one.
-
If an existing delivery line Requested Quantity can fulfill or partially fulfill the remaining split order line quantity, then the delivery line is assigned the quantity from the split sales order line.
-
If an existing delivery line Requested Quantity is too large to fulfill the split order line quantity, then the split the delivery and assign the split delivery to the split order line. Carry serial numbers with the split delivery details.
-
Retain reservations with inventory controls; randomly assign the others to the new delivery details.
-
Change delivery lines with status Released to Warehouse to status Ready to Release, cancel their move order lines, and recreate reservations for them.
Change Quantity
Oracle Shipping Execution performs as follows during an order line change quantity. Change quantity is a change in the ordered quantity:
-
Sequence the delivery details by packed status in the order Not packed, Packed.
-
Then, sequence the delivery details by firm status in the order Not Firm, Contents Firm, or Routing and Contents Firm.
-
Then, sequence the delivery details by released status in the order Ready to Release, Not Applicable, Backordered, Released to Warehouse, Staged/Pick Confirmed.
Increased Quantity
Oracle Shipping Execution performs as follows during an increase to the delivery line quantity:
-
Attempt to increase the delivery detail Requested Quantity of the first delivery detail. For this to succeed, the detail must be unassigned or the delivery must be open, the delivery line must not be packed in a container, and released status must be Not Ready to Released or Ready to Released.
-
Otherwise, create a new delivery detail.
-
Do not modify reservations. You can create a manual reservation for the quantity.
Note: If the order line quantity is increased, you will have to manually create the extra reservations.
Decreased Quantity
Oracle Shipping Execution performs as follows during a decrease to the delivery line quantity:
-
Decrease the Requested Quantity of delivery details one-by-one but skip delivery details with delivery status Confirmed, Closed, In transit.
-
Refuse the reduction if there are not enough eligible lines to meet the decreased quantity.
-
If the delivery line released status is Released to Warehouse, Oracle Inventory adjusts reservation quantity during pick confirm. For all other delivery line released statuses, Oracle Shipping Execution reduces the reservation quantity.
-
Logs an exception for any lines that are staged, part of a firm delivery, or packed inside a container.
Note: If the order line quantity is decreased, you will have to manually change the reservation.
Change Schedule
Change schedule is:
-
A change in ship-from organization
-
A change in subinventory
-
Unscheduling a line
Subinventory
Oracle Shipping Execution performs as follows during a sub inventory change:
-
Changes sub inventory if status is Not Ready to Release or Ready to Release.
-
Does not change sub inventory if status is Released to Warehouse or Staged/Pick Confirmed. Pick confirm can change the sub inventory.
Ship-From Organization and Unscheduling
Oracle Shipping Execution performs as follows during a ship-from organization and unscheduling change:
-
If no allocations were created:
-
Delete the move order line.
-
Set the status to Ready to Release.
-
-
If allocations were created, and the line is not pick confirmed:
-
Cancel the move order line.
-
Clear the inventory control information. Leave sub inventory information if delivery detail is Released to Warehouse.
-
Delete and recreate the reservation for the new subinventory.
-
Set the status to Ready to Release.
-
-
Pick confirmation is completed:
-
Clear the inventory control information. Leave sub inventory information if delivery detail is Released to Warehouse or Staged/Pick Confirmed.
-
Delete and recreate the reservation for the new subinventory.
-
Set the status to Ready to Release.
-
Log an exception.
-
Unassign from container and delivery.
-
Change Scheduled Date
Oracle Shipping Execution performs as follows during an order line change scheduled date. Change scheduled date is a change in the date scheduled:
-
Change the date.
-
Log an exception if the new scheduled date is after the original scheduled date.
Change Ship Set
Oracle Shipping Execution performs as follows during an order line change ship set. Change ship set is a changed ship set name:
-
If there is no current ship set, assign the ship set to the delivery lines.
-
If there is a current ship set, change the ship set on the delivery line if the status is Not Ready to Release, Ready to Release, Released to Warehouse (without allocations), or Staged/Pick Confirmed. If the status is Released to Warehouse (without allocations), change the ship set on the move order also.
-
If the status is Released to Warehouse and there are allocations, refer to the shipping parameter Enforce Ship Set at Picking. If ship sets are enforced, do not honor the change to the sales order line.
Change Delivery Group
Delivery Grouping attributes consist of ship-to location, ship-from location, intermediate ship-to location, customer, freight terms, FOB code, ship method, order type, ship set, and shipment priority. Click More to define additional grouping attributes based on descriptive flexfields.
-
Check the shipping parameter grouping attributes.
-
Change all values for the attributes that are mandatory or enforced.
-
If the sales order line is assigned to a delivery or container, unassign the line from the delivery and log an exception.
-
If none of the enforced or mandatory attributes are changed but intermediate ship-to location, customer, freight terms, FOB, ship method, order type, ship set, and shipment priority, or additional descriptive flexfields is changed, log an exception for each packed delivery line.
Order Cancellations
With the material picking process, a sales order can be canceled after it has been pick released without requiring you to backorder in Oracle Shipping Execution. If an order quantity is reduced after pick release, any requested and detailed quantities on the move order line are reduced accordingly and any Reservations that exist for the sales order will be updated to reflect the new order quantity. These changes are made automatically and require no intervention from you.
Note: If you cancel an entire order that has serial numbers assigned to it, the system will remove the serial numbers during cancellation. If you are canceling a serialized line from an order (not canceling the entire order) then you will be required to unassign the specific line serial numbers before proceeding.
Entering Serial Numbers for Delivery Lines
You can enter an individual serial number or a range of serial numbers for a delivery line.
To Enter Serial Numbers for Delivery Lines Using the Shipping Transactions Window
-
Navigate to the Query Manager window, and find the delivery lines.
-
In the Shipping Transactions window, select the delivery line for which you want to enter the serial numbers and enter the shipped quantity in the Shipped Qty field.
-
Select the Tools menu and then select Serial Numbers.
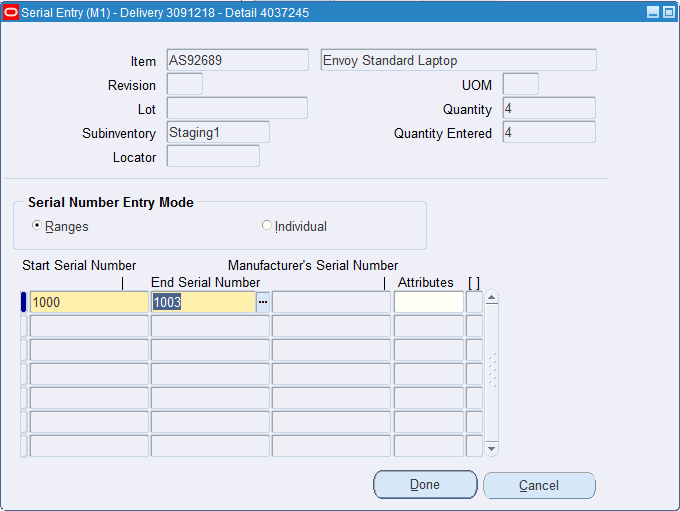
Serial Entry window
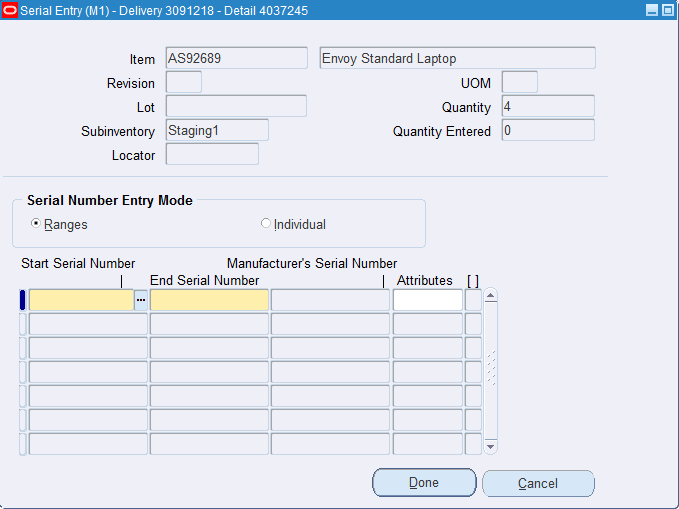
The Serial Entry window appears.
-
Enter the serial numbers by performing one of the following:
To Enter a Range of Serials
-
Select the Serial Number Entry Mode option of Ranges.
-
Enter a Start Serial Number.
The system uses the start serial number that you entered and automatically determines the range of serial numbers for you based on the quantity and populates the End Serial Number field.
Serial Entry window
-
Click Done.
-
Click Save.
To Enter an Individual Serial
-
Select the Serial Number Entry Mode option of Individual.
-
Enter a Start Serial Number.
The system automatically populates the End Serial Number field with the same value as the Start Serial Number field.
-
(Optional) Add another row and enter the next individual serial number in the Start Serial Number field.
-
Click Done.
-
Click Save.
-
To Enter Serial Numbers for Delivery Lines Using the Shipping Execution Simplified User Interface (Alternate Method)
-
Navigate to the Details page.
-
Click Search.
The Search Details page appears.
-
Enter search criteria for the delivery lines for which you want to enter serial numbers, and click Go.
-
Click the Detail link for the delivery line.
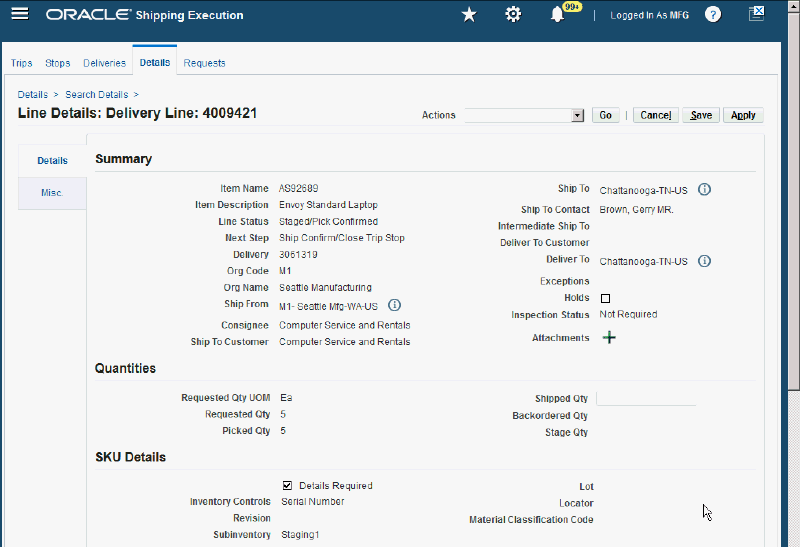
Line Details: Delivery Line page (1 of 2)
Line Details: Delivery Line page (2 of 2)
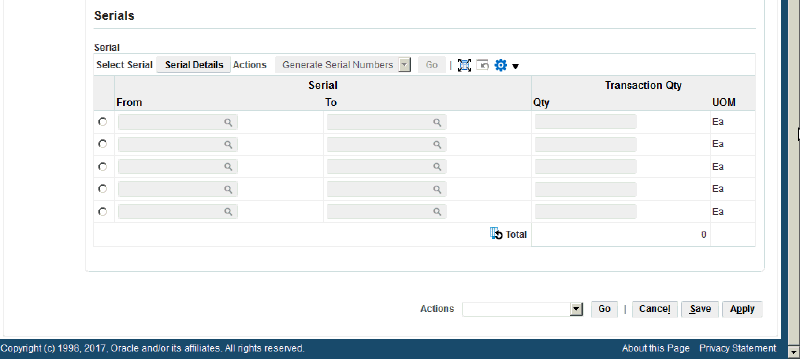
The Line Details: Delivery Line page appears.
-
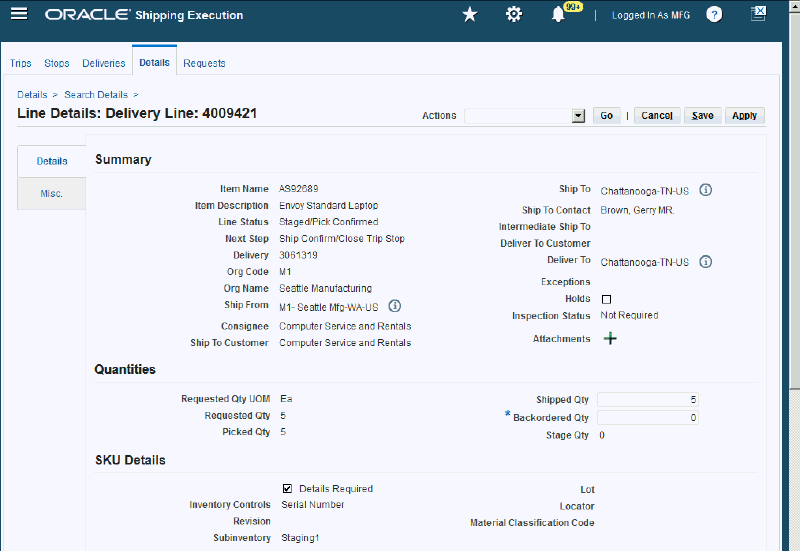
In the Quantities region of the page, enter the Shipped Qty for the delivery line.
-
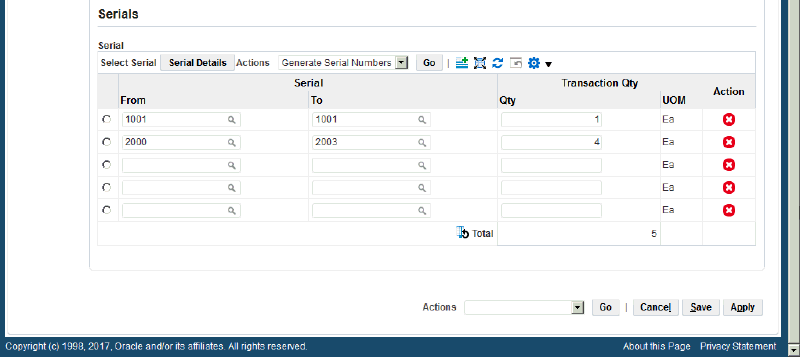
In the Serials region of the page, enter the serial numbers for the deliver line by performing one of the following:
To Enter a Range of Serial Numbers
-
Enter a Serial From and Serial To and enter a quantity in the Qty field.
The serial number range that you enter must equate to the quantity that you enter.
-
(Optional) Enter another row and enter another range of serial numbers and a quantity in the Qty field.
Line Details: Delivery Line page (1 of 2)
Line Details: Delivery Line page (2 of 2)
-
Save your work:
-
Click Save to save your work and stay on this page.
-
Click Apply to save your work and return to the previous page.
-
To Enter a Range of Serial Numbers (Generate Serial Numbers)
-
Select a row in the serial number table and enter a quantity in the Qty field.
-
Select Generate Serial Numbers in the Actions menu and click Go.
The system creates the serial numbers for you and displays them in the Serial From and Serial To fields.
-
Save your work:
-
Click Save to save your work and stay on this page.
-
Click Apply to save your work and return to the previous page.
-
To Enter an Individual Serial Number
-
Enter a Serial From and Serial To of the same value and enter a quantity of 1 in the Qty field.
-
(Optional) Enter another row and enter another individual serial number in the Serial From and Serial To fields and enter a quantity of 1.
-
Save your work:
-
Click Save to save your work and stay on this page.
-
Click Apply to save your work and return to the previous page.
-
-