Job and Resource Workbenches
This chapter describes the Job Workbench and Resource Workbench, two graphical displays enabling you to view and reschedule jobs and resources.
This chapter covers the following topics:
- Overview of the Job Workbench and Resource Workbench
- Setup
- Using the Job Workbench
- Filtering Job Workbench Information
- Setting Job Workbench Display Preferences
- Using the Resource Workbench
- Setting Resource Workbench Display Preferences
- Viewing Resource Load
- Adjusting Resource Capacity
- Rescheduling on the Job and Resource Workbenches
- Printing Your Gantt Chart
Overview of the Job Workbench and Resource Workbench
Scheduling enables you to produce jobs using resources, materials, and customer requirements according to expected dates and times. You can view job and operation schedules, and resource load compared to capacity through two graphical displays: the Job Workbench and the Resource Workbench. The Job Workbench enables you to view and reschedule jobs and operations, providing a visual job oriented display of work on the shop floor. You can interactively reschedule jobs, operations, and resources. You can manually control the rescheduling or let the system automatically schedule.
Note: Oracle Work in Process uses the infinite scheduling mode— assuming infinite capacity. Schedule times shown in the Gantt chart can be a result of constrained scheduling in Advanced Planning, or unconstrained scheduling in manufacturing.
The Resource Workbench provides a visual display of work on the shop floor by performing resource. This enables you to monitor resources, assign alternate resour, or change scheduling. Features in both workbenches include:
-
Gantt chart showing a visual display of work and resources on the shop floor
-
Ability to set a customized display
-
Drag and drop functionality for jobs and resources for rescheduling
-
Ability to reschedule jobs based on available resources and material
-
Adjustable bucket sizing for the Gantt chart and resource panes
-
Simultaneous and alternate resources invoked during high demand, or when a resource is unavailable
-
Display of job related sales order and customer information
-
Ability to dispatch jobs to instances of machines
-
Gantt chart printing enabling a shop floor hard copy reference
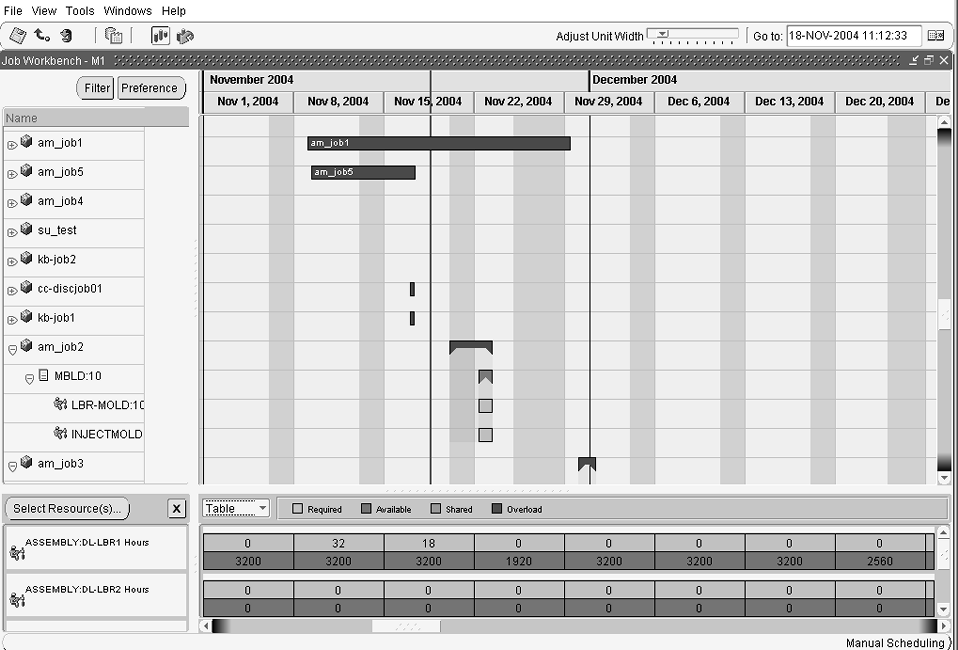
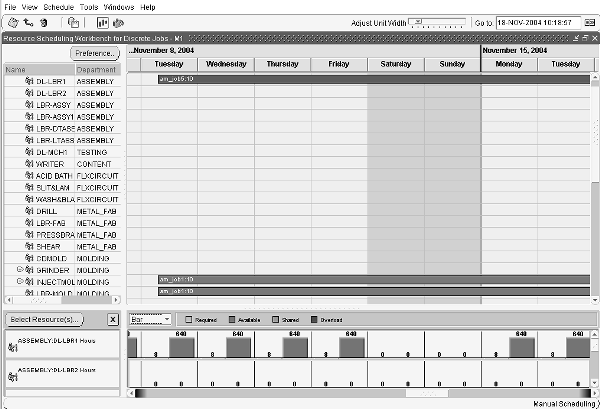
Workbench Panes
Both workbenches display a tree hierarchy with a table view, the Gantt Chart, and panes for Resource Load, Select Resource and Resource Load Versus Capacity. The status bar indicates the current scheduling mode and displays messages.
-
Tree Hierarchy:The Job Workbench tree displays your shop floor work in job, operation, and resource order. The Resource Workbench tree displays resources and resource instances. You can expand and collapse records. The Gantt Chart pane displays the corresponding records. Display preferences are selected in the Preference window.
-
Gantt Chart Pane: Consists of a time line in a horizontal bar chart for information on the tree. The time line represents a time bucket for the chart.
-
Select Resource Pane: Used to select the available resources to display in the Resource Load Versus Capacity pane.
-
Resource Load Versus Capacity Pane: Displays the required resource load, compared to the available resource capacity and resource instances. This pane shares the same time line as the Gantt Chart and reflects rescheduling activity. You can set preferences to see the resulting changes, as you make them, on resource loads before saving your work.
Note: Resource load includes all shop floor demand, not just demand displayed on the workbench.
Related Topics
Filtering Job Workbench Information
Setting Job Workbench Display Preferences
Setting Resource Workbench Display Preferences
Rescheduling on the Job and Resource Workbenches
Setup
You first define work in process scheduling and resource information to use the Job Workbench and Resource Workbench features. This includes defining:
-
Work in Process scheduling parameters: These parameters set resource factors in scheduling calculations, simultaneous resources, 24 hour resources, and utilization and efficiency factors. See: WIP Parameters
-
Bills of Material information: Scheduling is based on the calendars, shifts, departments, resources, routing, and planning defined in Oracle Bills of Material. See: Overview of Work in Process Scheduling
-
Resource information: See: Resource Requirements
Using the Job Workbench
When you initially launch the Job Workbench, jobs are displayed that fit the filtering criteria set in the Startup filter. You can:
-
Select session filtering criteria to display other jobs and resources
-
Expand or collapse jobs and operations in the tree
-
Display resources and view resource capacity and load
-
Change the column spacing size on the pane by moving the arrow on the Adjust Unit Width box
-
Change the date horizon displayed by entering a date in the Go to box, and selecting Enter
-
Return to the system date by choosing the Go To Today icon
Restore Customized View
The workbench automatically restores the last-worked customized view at startup. When you create a preferred view through pane sizing, time bucket selection, and row height adjustment—that view displays in the next launch of the workbench. This eliminates readjusting the view each time the workbench is opened.
Menus and Toolbar
The Job Workbench toolbar provides the following choices:
-
Save: Saves latest changes to the database
-
Revert: Restores last database change and view
-
Refresh: Repaints the workbench view with changes from other simultaneous users
-
Automatic/Manual Scheduling: Invokes manual or automatic job scheduling mode
-
Show/Hide Resource Load: Displays or hides the Select Resources, and Resource Load Versus Capacity panes
-
Refresh Resource Load: Refreshes Resource Load Versus Capacity pane with latest changes
The workbench menus provide the following choices:
-
File
-
Print: Enables Gantt chart printing. See: Printing Your Gantt Chart
-
-
View
-
Resource Load: Check box enables or hides the Select Resource, and Resource Load Versus Capacity panes.
-
Refresh Resource Load: Refreshes Resource Load Versus Capacity pane with latest changes
-
-
Tools
-
WIP Parameters: Accesses the Work in Process Parameters window, see: WIP Parameters
-
Create/Modify Jobs: Accesses Discrete Jobs window to create or modify jobs, see: Defining Discrete Jobs Manually
-
Startup Filter: Sets the initial display each time you open the workbench
-
Adjust Resource Capacity: Accesses the Resource Load Versus Capacity pane to modify the required resource
-
Tool Tip Windows
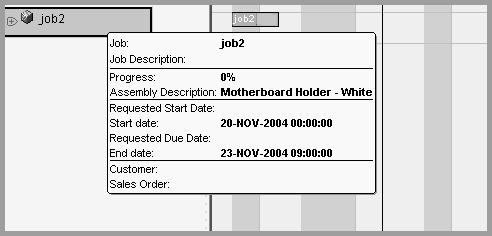
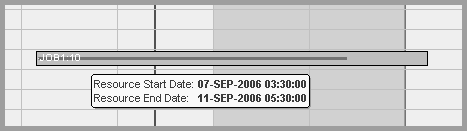
Tool tip windows provide an ease of use mechanism for displaying start and end date information about jobs. They are displayed by rolling your cursor over the appropriate bar on the Gantt chart. For more detailed information, you can access the Properties windows.
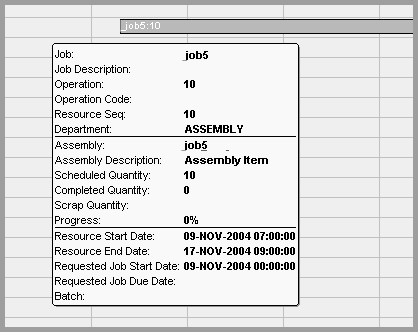
Job Tool Tip
The Job tool tip window displays the following information: Job name, Job Description, Progress percentage of completed operations, Assembly Description, Requested Start Date, Start date, Requested Due Date, End date, Customer, and Sales Order.
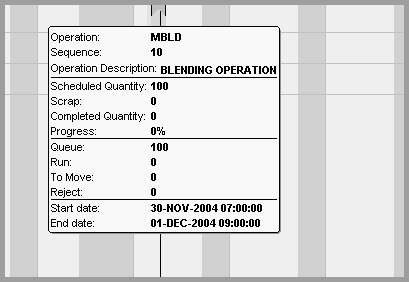
Job Operation Tool Tip
The Job Operation tool tip window displays the following information: Operation number, operation Sequence, Operation Description, Scheduled Quantity, Scrap, Completed Quantity, Progress percentage of completed operations, Start date, and End date. Also displayed are the quantities in Queue, Run, To Move, and Reject.
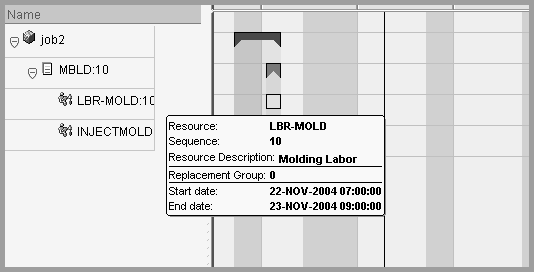
Job Resource Tool Tip
The Job Resource tool tip window displays the following information: Resource name, resource Sequence, Resource Description, Replacement Group, Start date, and End date.
Bar Inspector Tool Tip
The Bar Inspector tool tip window provides scheduling accuracy by displaying start date and end date information during a drag and drop action. This tool tip is available for job, operation, and resource bars on the Job Workbench.
Properties Windows
Information for each job, operation, and resource on the Job Workbench is displayed in Properties windows. These windows contain information about dates, quantities, descriptions of the scheduling data, and sales order and customer information.
To view a property window
-
Right-click on a job, operation, or resource in the tree hierarchy or Gantt Chart pane. A drop-down menu appears.
-
Choose Properties. The property window for the respective job, operation, or resource appears.
-
Choose OK to close the window.
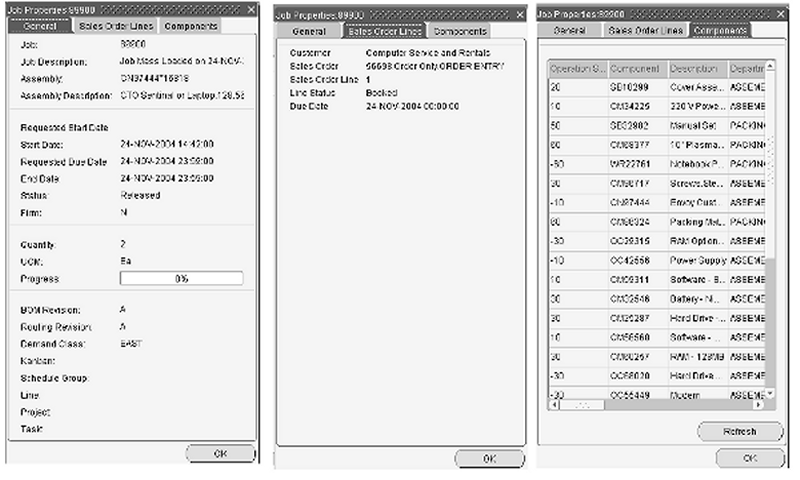
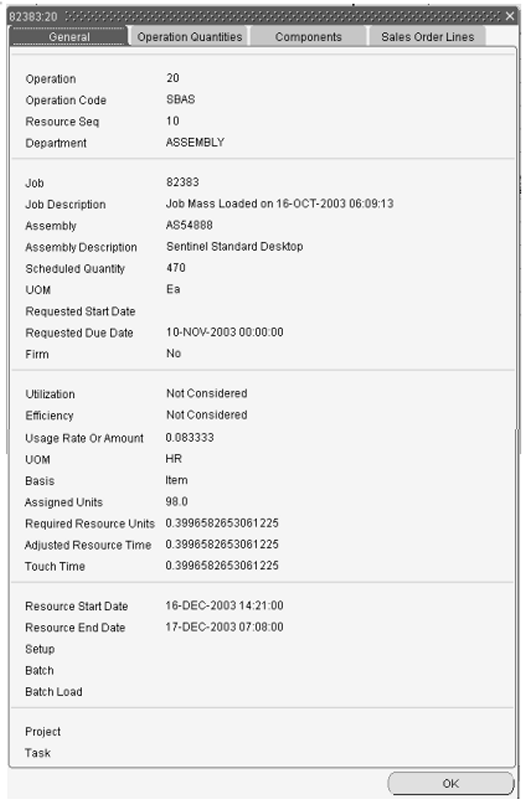
Job Properties Window
Job information is on three tabbed areas: General, Sales Order Lines, and Components. The data on the General tab originates from the Discrete Jobs window when you create the job, or derives through job transactions such as status and revision changes. This includes job and assembly number, description, dates, and quantity data. The progress bar displays a value that is calculated by the percent completed of all operations based on the time of each operation.
The Sales Order Lines tab displays information about all sales order lines linked to this job. This includes customer, status, and due date information.
The Components tab displays the component detail information for each operation sequence. This includes item master details, bill of material requirements, and quantity information derived through job transactions. You can update this view to display current transactions by choosing Refresh.
See: Defining Discrete Jobs Manually
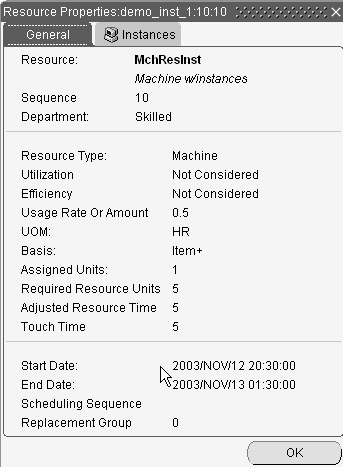
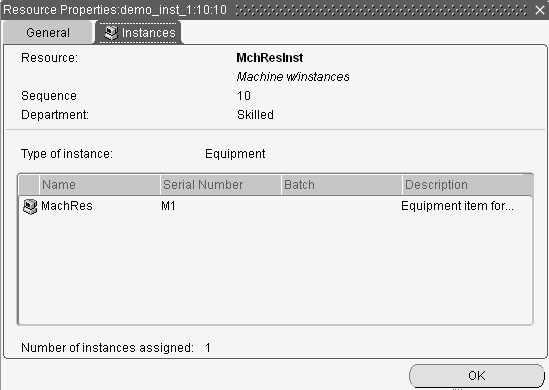
Job Resource Properties Window
The Resource Properties window consists of two tabbed areas. The information on the Resource Properties window displays resources assigned to a particular job operation. The data on the General tab originates from the Resource Requirements window when you assign a resource to an operation. The Instances tab displays the resource name, the type of instance, the instance names, and the number of assigned instances.
See: Adding and Updating Resource Requirements
Assigning Resource Instances
You can assign resource instances to a job on the Job Workbench. Resource instances are defined on the Resource Instance window, and viewable in the Properties windows.
-
Select a resource on the tree or Gantt chart, and right-click with your cursor to display the popup menu.
-
Choose Assign to Instance to display the Assign Instance window.
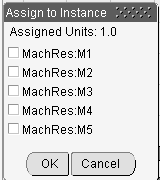
-
Select the instances you want to assign to this resource.
-
Choose OK to save your work.
Firming Jobs or Schedules
You can firm plan jobs or schedules on the Job Workbench. Firming a job prevents Planning from suggesting rescheduling and replanning recommendations when changes to supply or demand occur. If replanning is required, the planning process creates new jobs or schedules to cover the new demand. This value is derived from the specific window where you create a job or schedule.
To firm a job or schedule on the Job Workbench
-
Select a job from the tree or Gantt chart, and right-click on the record to display the popup menu.
-
Enable the Firm check box.
-
Save your work.
Filtering Job Workbench Information
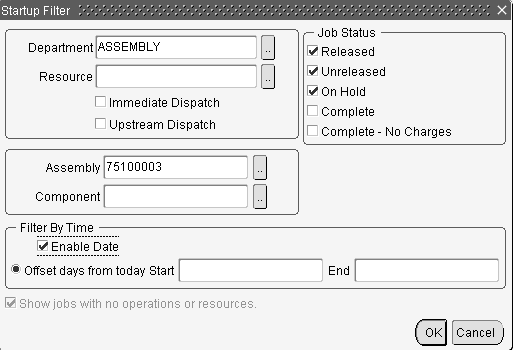
The Session Filter and the Startup Filter windows enable you to display specific jobs in the tree hierarchy and Gantt Chart, and eliminate jobs that do not meet your criteria. The Startup filter sets the initial display each time you open the workbench, the Session filter is used to change settings in a specific session.
To set job filter settings when opening the workbench
-
Select Startup Filter from the Tools menu to display the window.
-
You can select a department and resource. Only departments with jobs already defined display in this field.
-
If you select a department or resource, you can choose dispatch information, the values are:
-
Immediate Dispatch: Includes all job operations ready for production in the specified department or defined resource.
-
Upstream Dispatch: Includes all job operations that will be ready in the near future for production in the specified department or defined resource. This indicates a quantity of assemblies ready to be moved in the previous operation.
-
-
In the Job Status region, select the job status types to display on the workbench. Your choices are:
-
Released: The job is transactable
-
Unreleased: The job is planned but not released for work and not yet transactable
-
On Hold: The job is prevented from progressing through the production cycle
-
Complete: The job is complete and charges are allowed
-
Complete No Charges: The job is complete but charges are not allowed
-
-
You can specify Assembly and Component criteria information.
-
Use the Filter By Time region to use offset days in your criteria. Check Enable Date to enable the Offset days from today date fields.
Enter values, in days, to create the time period window around your system date for filtering. Jobs falling within this time period, in conjunction with other criteria, display. Jobs that overlap this time period display if part of the job is in the selected time window.
-
If you want to display jobs without attached operations or resources, check the Show jobs with no operations or resources box.
This box is disabled if you are filtering by department or resource. Departments identify which group is performing the operation, and are also used for charging resources at an operation. Therefore, these jobs would always have operations and resources defined.
-
Choose OK to save your filter criteria.
To filter job information for your session
-
Choose Filter from the tree pane to display the Session Filter window.
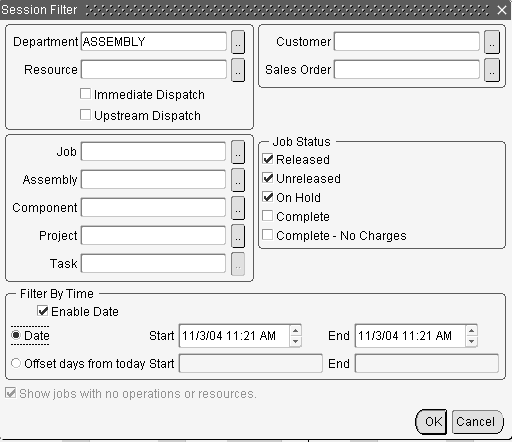
-
You can select a department and resource. Only departments with jobs already defined will display in this field.
-
If you select a department or resource, you can choose dispatch information, the values are:
-
Immediate Dispatch: Includes all job operations ready for production in the specified department or defined resource.
-
Upstream Dispatch: Includes all job operations that will be ready in the near future for production in the specified department or defined resource.
-
-
Optionally, you can select a customer or sales order.
-
You can specify Job, Assembly, Component, Project, and Task criteria information.
-
In the Job Status region, indicate the job status types to display on the workbench: Your choices are:
-
Released
-
Unreleased
-
On Hold
-
Complete
-
Complete No Charges
-
-
Use the Filter By Time region to select date and time criteria. You can filter by either date or offset days. Check the Enable Date check box to enable these fields.
If you choose Date, select values in the Start and End date and time fields. Jobs falling within this time period, in conjunction with other criteria, display. Jobs that overlap this time period window can display if part of the job is in the selected time window.
If you choose Offset days from today, enter the number of days used to create the time period window around your system date. For example, if you enter 3 in the Start field, and 2 in the End field—jobs are filtered using a time period window of 5 days. That is 3 days before today’s date, added to 2 days after today’s date.
-
If you want to display jobs without attached operations or resources, check the Show jobs with no operations or resources box.
This box is disabled if you are filtering by department or resource.
-
Choose OK to save your filter criteria. The Job Workbench refreshes and shows the selected jobs associated with the information entered.
Setting Job Workbench Display Preferences
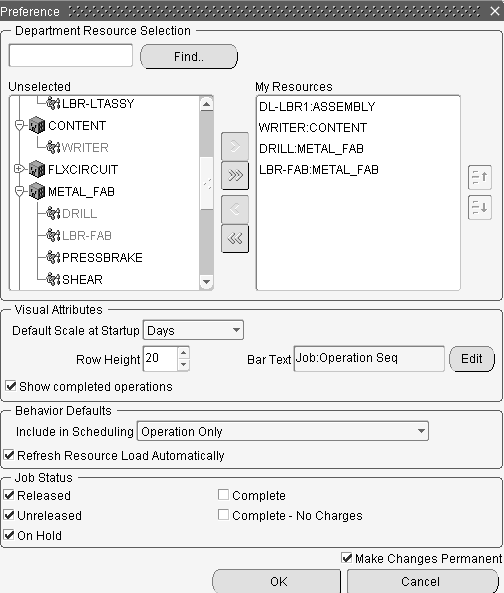
Data display on the workbench is controlled by preferences selected in the Preference window. You can select options for the tree display, bar display, and scheduling behavior.
To set display features on the Job Workbench
-
Choose Preference from the tree pane to display the Preference window.
-
In the Tree Columns region, select job fields you want to display on the workbench from the Unselected column, and move them to the Selected column.
The field values include
End Date Sales Order To Move Quantity Start Date Scheduled Quantity Assigned Units Assembly Department Available 24 Hours Assembly Description Minimum Transfer Quantity Basis Completed Quantity Queue Quantity Resource Description Customer Reject Quantity Resource Type Requested Completion Date Run Quantity Setup Requested Start Date Scrap Quantity UOM Usage Rate - - 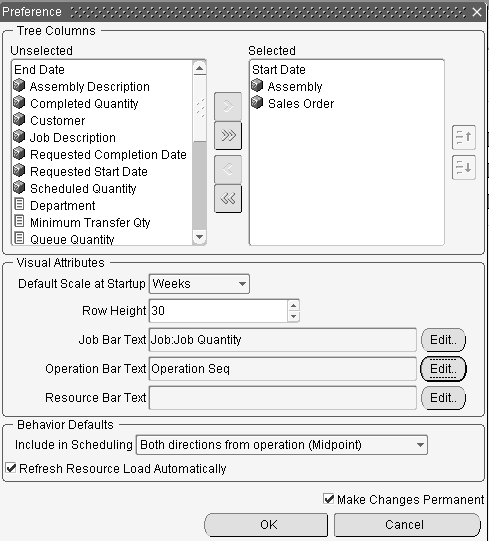
-
The Visual Attributes region is used to select default bucket size, row height, and text display. In the Default Scale at Startup field, select the time line bucket size to display when you initialize the workbench. Your choices are Months, Weeks, Days, hours, 30 Minutes, and 15 Minutes.
-
In the Row Height field, select a value, in pixels, for the height of the row on the Gantt chart.
Note: Larger row height is optimal, visually, if you have overlapping resources.
-
The Job Bar Text, Operation Bar Text, and Resource Bar Text fields enable you to select the descriptive text displayed for the particular bar type. To select descriptive text, choose Edit to display the Bar Text window.
-
For Job Bar Text, select Job, Assembly, or Job Quantity.
-
For Operation Bar Text, select Operation Sequence, Department, or Standard Operation Code
-
For Resource Bar Text, select Resource Sequence or Resource Code
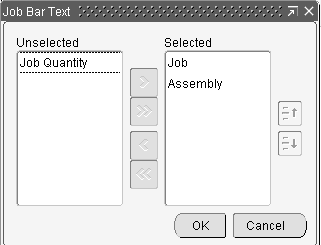
Select a category in the Unselected column, and use the arrow key to move to the Selected column. You can order the list by using the vertical arrow keys next to the Selected column.
-
-
Choose OK to save your work, and display the Preference window.
-
Set the default automatic scheduling option in the Behavior Default region. Set the scheduling method in the Include in Scheduling box. Your choices are:
-
Both directions from operation (Midpoint): Reschedules all prior and next operations when a time slot is found for the operation. Prior operations are backward scheduled. Next operations are forward scheduled.
-
Forward from operation (Midpoint Forward): Moves only the selected and next operations, keeping them in sequence, when a time slot is located to move this specified operation. Prior operations will not be rescheduled.
-
Backward from operation (Midpoint Backward). Moves only the selected and prior operations, keeping them in sequence, when a time slot is located to move this specified operation. Next operations will not be rescheduled.
-
Operation Only:Only the operation that is selected will be scheduled. Prior and next operations will not be rescheduled.
-
-
Check Refresh Resource Load Automatically if you want to display the immediate results of resource updates as you are working. If this box is not checked, you must select Refresh Resource Load from the menu or toolbar to view the updates in your session.
-
Check make Changes Permanent if you want to save these settings for each time you initialize the workbench.
-
Choose OK to save your work.
Using the Resource Workbench
When you initially launch the Resource workbench, it displays resources set in the Preference window. The selected resources and corresponding departments display in the tree hierarchy, and the current scheduling information is viewed on the Gantt chart. If settings are not defined in the Preference window, you must define your view to display records for the current session.
Restore Customized View
The workbench automatically restores the last-worked customized view at startup. When you create a preferred view through pane sizing, time bucket selection, and row height adjustment—that view displays in the next launch of the workbench. This eliminates readjusting the view each time the workbench is opened.
Menus and Toolbar
The workbench toolbar provides the following choices:
-
Save: Saves latest changes to the database
-
Revert: Restores last database change and view
-
Refresh: Repaints the workbench view with changes from other simultaneous users
-
Automatic/Manual Scheduling: Invokes manual or automatic job scheduling mode
-
Show/Hide Resource Load: Displays the Select Resources, and Resource Load Versus Capacity panes
-
Refresh Resource Load: Refreshes Resource Load Versus Capacity pane with latest changes
The workbench menus provide the following choices:
-
File
-
Print: Enables Gantt charts printing. See: Printing Your Gantt Chart
-
-
View
-
Resource Load: Enables or hides the Select Resource, and Resource Load Versus Capacity panes.
-
-
Schedule
-
Manual/Automatic: Invokes manual or automatic job scheduling mode
-
Adjust Resource Capacity: Accesses the Capacity Changes window, see: Adjusting Resource Capacity
-
-
Tools
-
WIP Parameters: Accesses the Work in Process Parameters window, see: WIP Parameters
-
Create/Modify Work Orders: Accesses Discrete Jobs window to create or modify jobs, see: Defining Discrete Jobs Manually
-
View Item Supply/Demand: Accessing the Supply/Demand Detail window to display demand information, see: Viewing Item Supply/Demand Information, Oracle Inventory User's Guide
-
Tool Tip Windows
Tool tip windows provide an ease of use mechanism for displaying start and end date information. The window is displayed by rolling your cursor over the appropriate resource bar on the Gantt chart. For more detailed information, you can access the Properties window.
Resource Tool Tip
The Resource tool tip window displays the following data: job name and description, operation, operation code, resource sequence, department, assembly name and description, quantity information, start date, and end date information.
Bar Inspector Tool Tip
The Bar Inspector tool tip window provides scheduling accuracy by displaying start date and end date information during a drag and drop action. This tool tip is available for job, operation, and resource instance bars on the Resource Workbench.
Resource Properties Windows
Information for each job and resource is displayed in Properties windows. These windows contain information about dates, quantities, assembly descriptions, sales orders, and customers. See: Properties Windows
Resource Properties Windows
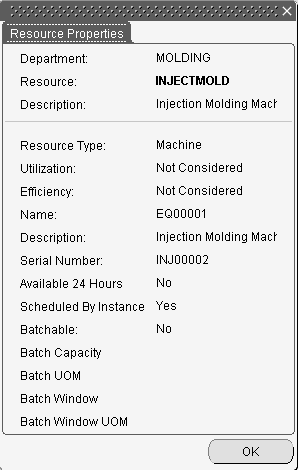
The Resource Properties window displays information about a specific resource assigned to a particular department. You access this window by right-clicking on a specific resource in the tree. This window displays department, and resource name, type, serial number. It also displays resource factors such as utilization, availability, instance, and batch information.
Resource Properties for Job Operation Window
The Resource Properties window for the job operation is accessed by right-clicking on a job on the Gantt chart. It has four tabbed regions—General, Operation Quantities, Components, and Sales Order Lines. This window displays the same information as the Job Properties and Operation Properties windows on the Job Workbench, see: Properties Windows
View Job Information Pane
You can view an entire job and all its operations and resources by accessing the View Job Information pane
To display the Job Information pane
-
Select a job on the Gantt chart, and right-click with your cursor to display the popup menu.
-
Choose View Job Information.
This pane displays the job name, assembly number, and all operations and resources for the selected job.

-
To view resource information, select an operation bar and right click to display the popup menu
-
Choose Properties, and select the Resources tabbed region in the Resource Properties for Job Operation window:
The Resources region lists all resources used for this operation.
-
Choose the Close box to close this pane.
Setting Resource Workbench Display Preferences
Data display on the workbench is controlled by preferences selected in the Preference window. You can select options for the tree display, bar display, and scheduling default.
To set display features on the Resource Workbench
-
Choose Preference from the tree pane to display the Preference window.
-
You can search for a resource by entering text in the Find field, and choosing Find.
The window moves to the section of the resource tree where your search string result is located.
-
In the Tree Columns region, select resources you want to display from the Unselected column, and move them using the arrow key, to the My Resources column. You can order the list by using the vertical arrow keys next to the My Resources column.
Resource Instances
You can define specific machines to machine type resources, and specific employees to labor type resources. You can assign or override the resource instances assigned to the job.
Instances are defined on the Resource Instance window, and viewable in the Properties windows. You can assign resource instances on the Job Workbench, but you must navigate to the Resource Requirements window to unassign the instance.
To assign a resource instance on the Resource Workbench
-
Select a resource instance on the tree, for a specific resource.
-
Use your cursor to drag the instance to the instance rows for that specific resource.
-
Save your work.
-
Related Topics
Viewing Resource Load
Both workbenches contain the Select Resource window, and the Resource Load pane to display your shop floor resources. Choose Resource Load from the menu, toolbar, or popup menus to display these windows.
Resource Load Pane
The load for each resource selected is displayed on this bar or table view graph. Resource load includes all shop floor demand, not just demand displayed on the workbench.

The Resource Load pane displays the resources specifying them as Required, Available, Shared, and Overloaded.

Load and Usage Information
When the job is scheduled using the infinite scheduler, there are usage records for the operation resources. The load graph uses these usage records to display the load used by the resource. The usage rate and the start and end times of the operation resources correspond to each other. For example, if the usage rate for a resource was 0.5 hours, and the job quantity is 10, then the resource would require 5 hours to complete, spanning a time period from 8:00 – 13:00. For example:
-
If the work week is Monday through Friday, and the resource is scheduled to be used from Friday to Monday—usage is not reported during the unavailable hours on Saturday and Sunday.
-
If a job operation resource is dragged from the Friday to Monday schedule, to Monday through Thursday schedule—resource usage is 8 hours for each day because that is the available time on each daye.
Selecting Resources for Display
The first level nodes on the Select Resource window contain departments, with a secondary level of any resources that are owned or borrowed (shared) by that department. If resource instances exist, they are displayed in the next level.
The Show Shared Resource check box enables you to display the shared resources in the Unselected list, otherwise they will not appear. This check box is used for load calculation: If it is not enabled, load usage is aggregated up to the owning department level for the resource.
Note: Borrowed resources, and any instances for that resourc, e display in italic font.
To select resources for display on the workbench
-
Navigate to the Job Workbench or Resource Workbench.
-
Choose Select Resource Load from the menu, toolbar, or popup menus to display the Select Resource and Resource Load panes.
-
Choose Select Resource to display the Select Resource window.
-
You can search for a resource by entering text in the Find field, and choosing Find.
The window moves to the section of the resource tree where your search string result is located.
-
Select records in the Available Resources column, and use the arrow key to move records to the Selected Resources column.
If you select a department, all resources in that department are moved to the Selected Resources column.
-
Enable the Show Borrowed Resources box if you want to display shared resources on the Resource Load graph.
The resources viewable in the Select Resource window are shown by owning department. Shared resources display on a separate line in the Resource Load graph. When resources are shared across departments, the resource availability is taken from the owning department.
-
Choose OK to save your work.
Adjusting Resource Capacity
You can adjust resource capacity to respond to machine or personnel availability. This includes: .
-
Delete or add a day of capacity, adjusting for overtime shifts or shop closures
-
Add or delete resource units when either extra resources are obtainable or resources are unavailable
-
Adjust Assigned Units or Usage Rate for the resource on the job routing
Simulation sets are used to link resource changes to available resource capacity. If the Use in Scheduling field is enabled on the Simulation Sets window for particular simulation sets, capacity modifications associated with that set are used when scheduling jobs. Simulation sets are defined, associated to resources in Oracle Bills of Material, and linked to Work in Process scheduling in Work in Process Parameters window. When you assign resources to departments, you can use simulation sets for capacity modifications by defining them on the Capacity Changes window in Oracle Bills of Material. See: Assigning Resources to a Department, Oracle Bills of Material User's Guide and WIP Parameters
Changing Capacity
There are two methods for adjusting resource capacity: You can change capacity in Oracle Bills of Material, or directly on the workbench.
To adjust capacity in Bills of Material
-
Navigate to the Departments window, see: Defining a Department, Oracle Bills of Material User's Guide
-
Choose Resources to navigate to the Resources window.
-
Select a resource, then choose Shifts to display the Shifts window.
-
Select a shift, and choose Capacity Changes to define capacity changes for a shift. The Capacity Changes window displays. See: Assigning Resources to a Department, Oracle Bills of Material User's Guide.
To adjust capacity in the Job or Resource Workbench
-
Select Adjust Resource Capacity from the tools menu, or right-click on a resource, and select Change Capacity from the popup menu.
The Capacity Changes window displays.
Note: A resource must be assigned to a department and a shift to display this window.
This window displays the resource name and the department assigned, the simulation set used to link resource changes to available capacity, and any specified instances. In the Capacity Changes region, change or add information depending on the resource definition. If you selected a resource scheduled by instance, the only available value in the Action field is Delete a Day. For these resources, access the instance to adjust capacity.
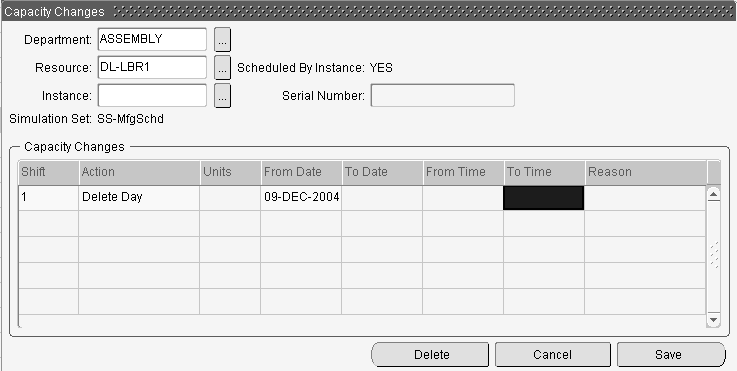
-
In the Shift field, select available shifts from the list of values. Shifts are defined on the Shifts window when you are assigning a resource to a department.
-
Select the action you want to perform. The choices are Add Capacity, Delete a Day, Reduce Capacity, or Add a Day. You can only delete work days, and only add non-work days.
-
If you are adding or reducing capacity, select the capacity units you want to change.
-
In the Date fields, From and To, select the dates for this capacity action to occur.
-
In the Time fields, From and To, the values default from the shift information, but can be changed.
-
Save your work.
Alternate Resources
You can set alternate resources from the Job or Resource Workbenches if they are defined on the Resource Requirements window. Alternate resources consist of other resources—or groups of resources—used instead of the primary resource in the job operation. When rescheduling jobs, the alternate resource is invoked if the primary resource cannot complete the job or schedule by the Requested Due Date.
-
If you are in the manual scheduling mode, you can only use alternate resources for operation type resources. In this case, no other operations will use the alternate resource. The resource is automatically scheduled when the resource is exchanged with the alternate.
-
If you are in the automatic scheduling mode, the Automatic Reschedule window displays when the alternate resource is selected.
Note: For automatic rescheduling, Oracle recommends first expanding the Work Order node and then rescheduling.
See: Adding and Updating Resource Requirements
To select an alternate resource in manual scheduling mode
-
Right-click on a resource, and select Choose Alternate Resource from the popup menu.
The Alternate Resource window displays.
-
Select a resource group listed on the window.
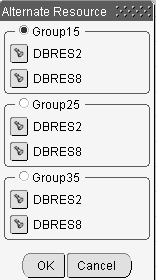
-
Choose OK to save your work.
The operation is rescheduled using the new resource information.
To select an alternate resource in automatic scheduling mode
-
Expand the Work Order node. Right-click on a resource, and select Choose Alternate Resource from the popup menu.
The Alternate Resource window displays.
-
You can select the Flashlight icon to locate the corresponding resource on the workbench. If the resource is not already displaying, this action loads that resource on the workbench. This enables you to view the capacity of that resource.
-
Select a resource group listed on the window.
-
Choose OK to submit your resource selection.
The Automatic Reschedule window displays.
-
Select scheduling information, see Automatically Rescheduling Start and End Dates
Rescheduling on the Job and Resource Workbenches
You can manually or automatically reschedule the start and end dates of a job, operation, or resource. The manual or automatic scheduling modes are accessed from the menu, toolbar, and popup menus. You also have the option on the Resource Workbench to schedule consecutive resources without interruption between the scheduling times.
Manually Rescheduling Start and End Dates
You can manually reschedule any job, operation, or resource without regard for scheduling rules. Invoke the manual mode from the menu, toolbar, or popup menus.
To manually forward or backward reschedule by dragging and dropping
-
Select a record to reschedule on the Gantt chart.
-
Position your cursor at the start or end of a job, operation, or resource bar.
-
Grab and drag forward or backward. The beginning or end of the bar moves respective to the direction.
The Bar Inspector window displays, showing the Start and End Dates, as you are moving the bar.
-
Save your work.
To reschedule consecutive resources on the Resource Workbench
-
Select a resource to reschedule on the Gantt chart, and right-click to display the popup menu.
-
You have two choices for moving resources:
-
Snap Left moves the resource to the end date and time of the prior scheduled resource
-
Snap Right moves the resource to the beginning of the next scheduled resource
-
-
Save your work.
To manually forward or backward reschedule using the editor
-
Select a record to reschedule on the tree or Gantt chart, and right-click to display the popup menu.
-
Choose Manual Reschedule to display the Edit Schedule window.
-
If you have accessed this window from the Job Workbench, expand the job tree to display all operations and resources.

-
In the Start Date and End Date fields, enter the new dates for the specific job, operation, or resource.
-
Choose Apply to save your work. Or choose OK to save your work and close this window.
The bar moves to the new date when the Gantt chart is refreshed.
-
If you have accessed this window from the Resource Workbench, enter new dates in the Start Date and End Date fields.

-
Choose Schedule to save your work. The bar moves to the new date when the Gantt chart is refreshed.
Automatically Rescheduling Start and End Dates
You can automatically reschedule, the required resource and material are used as the determining factor. You can initiate automatic rescheduling by moving jobs, operations, and resources, or through the Automatic Reschedule window. The job is moved forward or backward.
To automatically forward or backward reschedule by dragging and dropping
-
Toggle or select Automatic Scheduling from the menu or toolbar.
-
Expand the Work Order node, and then expand the job tree to display all operations and resources.
Oracle recommends expanding the Work Order node for automatic rescheduling.
-
Select a record to reschedule on the Gantt chart.
-
Position your cursor at the start or end of a job, operation, or resource bar.
-
Grab and drag forward or backward.
The beginning or end of the bar moves respective to the direction, and he Automatic Reschedule window displays.
-
Choose Schedule on the Automatic Reschedule window to generate new scheduling data.
-
Save your work.
To automatically forward or backward reschedule using the automatic rescheduler
-
To automatically schedule all records on the workbench, toggle or select Automatic Scheduling from the menu, toolbar, or popup menus.
-
Expand the Work Order node.
-
To automatically schedule individual records—select a record to reschedule on the tree or Gantt chart.

-
Right-click to display the popup menu.
-
Choose Automatically Reschedule to display the Automatic Reschedule window.
You can also place your cursor on the forward or backward portion of a record, and drag the record to display the Automatic Reschedule window.
-
In the Work Orders Scheduling Direction box, select your scheduling direction. Your choices are Forward or Backward.
-
Enter a scheduling date.
For Forward scheduling, enter From Start Date. For Backward scheduling, enter From End date.
-
Choose Schedule on the Automatic Reschedule window to generate new scheduling data.
-
Save your work.
Printing Your Gantt Chart
You have the ability to print Gantt charts to use as referable hard copies on the production shop floor. This feature supports customizing the format and content, and offers a print preview. You can specify:
-
Date and time range
-
The level of job and operation details, or resource levels
-
Snapshot view of the Gantt chart
-
Number of jobs or resources to avoid a cluttered display.
To print a Gantt chart directly from the Job or Resource Workbench
-
Select Print from the File menu to display the Print window.
This window contains two tabbed areas: one for Print options and one for Page Setup.
-
In the Print Option tab, choose one of the options:
-
Screen snapshot: Prints the view exactly as it appears on the visible area of the screen.
-
Print options: Options are provided to print the number of records, level of detail, and time line.
-
-
If you chose Print options, you have the option to enter a value for the number of records printed.
-
For the Job Workbench, enter a value in the Number of Jobs box. Printing begins with the first job displayed on the Gantt chart.
-
For the Resource Workbench, select either All selected resources—or enter a value in the Number of Resources box. Printing begins with the first resource displayed on the Gantt chart.
-
-
In the Expand Level box, select the level of detail you want on the output.
-
For the Job Workbench, the levels are:
-
Collapse all: Displayed jobs are not expanded to other levels.
-
Expand all to Operations level: Jobs are expanded to the operation level.
-
Expand all to Resource level: Jobs are expanded down to the operation and resource levels.
-
-
For the Resource Workbench, the levels are:
-
Collapse all: Displayed resources are not expanded to other levels.
-
Expand all to Resource Instance level: Resources are expanded down to the resource instance level.
-
-
-
Choose a time line for the data on this report. Choices are:
-
Months
-
Weeks
-
Days
-
Hours
-
30 Minutes
-
15 Minutes
-
-
If you are printing the Gantt chart from the Resource Workbench, in the Date Range region, select Enable Date Selection to consider dates in your print version.
-
Choose one of the date options:
-
Number of days forward: Enables you to enter days forward from the current date to consider in the print output.
-
Date: Enables you to enter a date range in the Start and End date fields.
-
-
In the Page Setup tab, select the paper format orientation. Choices are Portrait or Landscape.

-
In the Paper Size for preview box, select a paper size for the Preview print option.
-
In the Manual scaling box, you can scale your Gantt chart printing by selecting a size of the original chart. This can be useful when charts contain great amounts of data, and you want to print on one paper size. You can:
-
Fit to page width
-
Fit to page height
-
Choose a value from 10% to 500% of the original chart
-
-
You can choose a print order for Gantt charts spanning multiple pages. Choices are:
-
Print rows first: Divide the output by printing all the rows first, then the corresponding columns
-
Print columns first: Divide the output by printing all the columns first, then corresponding rows
-
-
Choose Preview to access the Print Preview window. This enables you to view on screen your the result of your print selections, and return to the Print window to change settings.
-
Choose Print to print your Gantt chart.