Manage Manufacturing Quality
This chapter explains how to manage the quality of manufactured items as you complete manufacturing transactions in the following applications:
-
Oracle Work in Process
-
Oracle Shop Floor Management
-
Oracle Flow Manufacturing
-
Oracle Project Manufacturing
-
Oracle Process Manufacturing (OPM)
-
Oracle Mobile Manufacturing
This chapter covers the following topics:
- Manufacturing Quality Collection Points
- Quality Data Collection in Work in Process and Shop Floor Management
- Inline Quality in Manufacturing Execution System
- Setting up Quality Data Collection
- Work in Process Business Examples
- Quality Data Collection in Project Contracts
- Quality Data Collection in Oracle Process Manufacturing
Manufacturing Quality Collection Points
When managing manufacturing quality, you can collect quality data from transactions in the following applications:
-
Work in Process, Shop Floor Management, Manufacturing Execution System, and Flow Manufacturing
-
Oracle Process Manufacturing
-
Mobile Manufacturing
Additionally, you can collect Project Manufacturing quality data using the existing Quality integration with other manufacturing transactions.
Work in Process, and Shop Floor Management
You can collect quality data during the Work in Process Move and Completion transactions and the Shop Floor Management Move Lot Based Job transaction. As you perform these transactions, you can:
-
Collect data on manufacturing processes that affect product quality
-
Collect data on the lot and serial controlled items that you build
-
Report failure by problem and product
-
Place a job or repetitive schedule on hold
For example, you can collect information about the life cycle of serialized assemblies, as well as Work in Process-specific information required for process control improvements.
Before you can collect quality data during transactions, you must first set up and associate one or more collection plans with the transaction. This will enable you to enter quality results, by accessing the Quality windows or pages either directly from Quality or from the WIP or SFM windows or pages.
Manufacturing Execution System
In the Manufacturing Execution System, quality data can be collected inline for single level plans without any child plans. You can enter quality results in the same page as parent transactions for single level collection plans associated with the move assembly and complete assembly transactions.
Flow Manufacturing
Quality's integration with Flow Manufacturing enables you to collect quality data while performing completion transactions. Completion transactions include line operation completions, assembly completions, and work orderless completions.
When you have one or more collection plans associated to the transaction, you can access the Quality application. This will enable you to enter quality results either:
-
directly into the Quality application, in the Enter Quality Results window
-
through the HTML Flow Workstation
-
by activating the transaction window's Quality button and the Tools menu's Enter Quality Results selection from the forms user interface
Oracle Process Manufacturing (OPM)
Quality's integration with OPM enables you to log nonconformances whenever actual production results or actions differ from the OPM Master Batch Record. You can log a nonconformance when entering or updating a batch. See: Oracle Process Operations User's Guide.
Additional Information: You must install Oracle Process Operations to track nonconformances within OPM. A nonconformance is defined as the difference between the observed conditions and the acceptance criteria or the deviation between the testing performed and the approved procedure. The acceptance criteria is stated within an approved protocol such as a master batch record.
Mobile Manufacturing
If you are using Oracle Quality and at least one qualified collection plan exists, the Quality button is enabled on Mobile Manufacturing windows.
See the list of supported mobile transactions in Collection Plans for Managing Manufacturing Quality.
Other resources:
Mobile Manufacturing, Oracle Mobile Supply Chain Applications User's Guide.
Mobile Quality, Oracle Mobile Supply Chain Applications User's Guide.
Setting Up Serial Number Control Tracking, Oracle Work in Process User's Guide
Project Manufacturing
Oracle Quality's integration with Oracle Project Contracts is accomplished through other manufacturing transactions, including WIP Move, WIP Completion, WIP Work Order-less Completion, Purchasing Receiving, and Purchasing Inspections. Transactional data is collected using Project Number and Task Number Collection Triggers.
You can enter project contract quality results directly. See: Entering Quality Results Directly, and query quality data, based on a Contract, Contract Number, and Deliverable Number combination.
For more information, see:
Quality Data Collection in Oracle Purchasing
Work in Process and Shop Floor Management
Overview of Project Contracts, Oracle Project Contracts User's Guide.
Related Topics
Collection Plans for Managing Manufacturing Quality
Quality Data Collection in Work in Process, Shop Floor Management, and Flow Manufacturing
Quality Data Collection in Project Contracts
Quality Data Collection in Oracle Process Manufacturing
Oracle Process Operations User's Guide
Collection Plans for Managing Manufacturing Quality
To be able to collect quality results during a transaction, you must set up and define one or more collection plans specific to the transaction. See: Quality Data Collection During Transactions and Associating Collection Plans with Transactions. You can create your own collection plan, or you can use a template provided specifically for a transaction to create a plan. See: Collection Transaction Templates. The manufacturing transactions with their respective templates are:
-
Move Transactions (Oracle Work in Process)
-
Template WIP Move Plan
-
-
Completion Transactions (Oracle Work in Process)
-
Template WIP Completion Plan
-
-
Work Order-less Completions (Flow Manufacturing)
-
Template Work Order Less Completion Plan
-
Template Work Orderless Plan
-
-
Line Operation Completion (Flow Manufacturing Workstation)
-
Template Completions Plan
-
-
Move Lot Based Job (Shop Floor Management)
-
Process Nonconformance (Oracle Process Manufacturing)
-
Template Nonconformance Master Plan
-
Template Nonconformance Master Plan(Nonconformance only)
-
-
Oracle Mobile Manufacturing provides the following Oracle Work in Process transactions using mobile device hardware:
-
Mobile Completion Transactions (Oracle Manufacturing Mobile Applications)
-
Mobile Flow Transactions (Oracle Manufacturing Mobile Applications)
-
Mobile License Plate Number Inspection (Oracle Warehouse Management System)
-
Mobile Material Transactions (Oracle Manufacturing Mobile Applications)
-
Mobile Move Transactions (Oracle Manufacturing Mobile Applications)
-
Mobile Move and Complete (Oracle Manufacturing Mobile Applications)
-
Mobile Return Transactions (Oracle Manufacturing Mobile Applications)
-
Mobile Return and Move (Oracle Manufacturing Mobile Applications)
-
Mobile Scrap/Reject Transactions (Oracle Manufacturing Mobile Applications)
-
Template Scrap Reject Plan
-
-
Mobile Serialized Completion (Oracle Manufacturing Mobile Applications)
-
Mobile Serialized Material Transaction (Oracle Manufacturing Mobile Applications)
-
Mobile Serialized Move (Oracle Manufacturing Mobile Applications)
-
Mobile Serialized Move and Complete (Oracle Manufacturing Mobile Applications)
-
Mobile Serialized Return (Oracle Manufacturing Mobile Applications)
-
Mobile Serialized Return and Move (Oracle Manufacturing Mobile Applications)
-
Mobile Serialized Scrap/Reject (Oracle Manufacturing Mobile Applications)
-
Mobile Work Orderless Transactions (Oracle Manufacturing Mobile Applications)
-
While specifying the transaction, you can define one or more unique collection triggers for the plan, to enable you to choose the conditions under which quality data is collected during the transaction:
-
You can make quality data entry mandatory by setting the Mandatory option See: Mandatory Data Collection.
-
You can define a collection plan to run in the background if you want to collect data without user intervention. See: Background Data Collection.
-
You can add quality actions to collection plans, to define the rules that determine when these actions are to be invoked. See: Quality Actions, Message Actions, Alert Actions, and User-Defined Actions.
Quality Data Collection in Work in Process and Shop Floor Management
- Set up and define one or more collection plans specific to the transaction. See: Collection Plans for Managing Manufacturing Quality.
- Perform the Move transaction in Work in Process, but do not save your work. See: Performing Move Transactions, Oracle Work in Process User's Guide.
- At a minimum, you must complete Job or Assembly Line, From/To, and Transaction Quantity before the Enter Quality Results option is available on the Tools menu or the Quality button is activated.
To enter quality results during a Work in Process Move transaction
If Oracle Quality is installed, and if at least one collection plan is associated with a Move transaction, the Enter Quality Results Tools menu option and the Quality button on the toolbar in the Move Transactions window are enabled and you can enter quality results. You can also enter quality results in the Discrete Execution Workstation during the Move transaction. See the Oracle Work in Process User's Guide for more information if you plan to use the Discrete Execution Workstation.
Additional Information: These instructions also apply to the Shop Floor Management Move Lot Based Job window. The Move Lot Based Job window (for lot based jobs) is the same as the Move Transactions window (for discrete jobs). The Shop Floor Management Supervisor Workbench and Dispatch List are similar to the Discrete Execution Workstation.
-
Before saving your work, choose Enter Quality Results from the Tools menu or select the Quality button. The Enter Quality Results window opens.
Important: If you attempt to save a Move transaction and Oracle Quality finds one or more mandatory collection plans, you must enter quality results before proceeding.
-
Select a collection plan. The Enter Quality Results window opens.
You can select any collection plan that is associated with Move Transactions (Oracle Work in Process) and enabled.
-
Find and assign specifications:
-
If the selected collection plan is associated with the item specification type, the specification is derived from the assembly item being moved.
-
If the selected collection plan has been associated with the customer or supplier specification type, the Find Specifications window opens.
-
If no specification can be found for the item, the system searches for a specification based on the item's category. The default category set that you defined using the QA:Quality Category Set profile option is used to determine the item category. See: QA:Quality Category Set.
-
If the collection plan is not associated with a specification type, you can optionally invoke the Find Specifications window from the Enter Quality Results window using the Find Specs button. See: Finding Specifications During Transactional Data Collection.
After you either select a specification or cancel the selection, the Find Specifications window closes and the Enter Quality Results window is again in view.
-
-
In the Results region of the Enter Quality Results window, enter one or more records.
You must enter quality data for mandatory collection plan elements. See: Context Element Dependencies. When you define collection elements, the Prompts that you enter display as column headings. If data collection is not mandatory, you can select Cancel to skip quality data entry.
Note: You can enter quality data as you perform move transactions, if you are working in a Shop Floor Management enabled organization. In the Results region, enter the Quanity, To Step, To Operation and Job.
-
Save your work.
If you save your work using Save and Proceed the current results are cleared. You can continue to enter results for the same collection plan and for the same specification, if assigned.
To view collection plan or specification attachments while entering quality data
To enter quality data during a Work in Process Completion transaction
If Oracle Quality is installed, and if at least one collection plan is associated with a Completion transaction, the Enter Quality Results Tools menu option and the Quality button are enabled in the Completion Transactions window and you can enter quality results. You can also enter quality results in the Discrete Execution Workstation during the Completion transaction. See the Oracle Work in Process User's Guide for more information if you plan to use the Discrete Execution Workstation.
Before you can enter quality results, you must perform a Completion transaction, but do not save your work. See: Completion Transaction Types, Oracle Work in Process User's Guide.
Tip: Enter lot and serial information if applicable. It is recommended that lot and serial data be entered before entering quality data. If the item in question is under lot and serial control, it is required that lot and serial data be added.
-
Before saving your work, choose Enter Quality Results from the Tools menu or select the Quality button from the toolbar. The Enter Quality Results window opens.
The collection plan that is alphabetically first is displayed first. You can use the Collection Plan field's arrows to navigate to other collection plans.
-
Select a collection plan.
You can select any collection plan that is associated with the Completion transaction and that is enabled.
-
Find and assign specifications (during this step the Find Specifications window opens in front of the Enter Quality Results window):
-
If the selected collection plan has been associated with the customer or supplier specification type, the Find Specifications window automatically opens.
-
If the selected collection plan is associated with the item specification type, the specification is derived from the assembly item being moved.
-
If no specification for the item can be found, the system searches for a specification based on the item's category. The default category set that you defined using the QA:Quality Category Set profile option is used to determine the item category. See: QA:Quality Category Set.
-
If the collection plan is not associated with a specification type, you can optionally invoke the Find Specifications window from the Enter Quality Results window using the Find Specs button. See: Finding Specifications During Transactional Data Collection.
After you either select a specification or cancel the selection, the Find Specifications window closes and the Enter Quality Results window is again in view.
-
-
In the Results region of the Enter Quality Results window, enter one or more records.
You must enter quality data for mandatory collection plan elements. See: Context Element Dependencies. When you define collection elements, the Prompts that you enter display as column headings. If data collection is not mandatory, you can select Cancel to skip quality data entry.
Note: If you have defined more than one collection plan for this transaction, you can repeat steps 2, 3, and 4 to enter quality data for all applicable collection plans. Use the Collection Plan field's arrows to navigate to other collection plans.
-
Save your work.
Note: Selecting OK accepts the quality data and returns you to the Completion transaction window in Work in Process. Selecting Cancel rejects the quality data that you entered and also returns you to the Completion transaction window.
During a WIP Move transaction in the discrete execution workstation, after entering quality results in a nonconformance plan, you can generally view the nonconformance number it generates.
Related Topics
Quality Collection Transactions
Entering Quality Results Directly
Work in Process and Shop Floor Management
Collection Plans for Managing Manufacturing Quality
Setting up Routings for Quality Data Collection
Work in Process Business Examples
Inline Quality in Manufacturing Execution System
Inline quality data entry in Manufacturing Execution System (MES) for Discrete Manufacturing is available for the following transactions:
-
Move Assembly Transactions
-
Complete Assembly Transactions
You can use the inline region to enter quality results in the same page as the parent transaction without having to navigate to multiple pages for single level plans without any child plans. The inline quality result entry will available only for single level plans. If there are only single level applicable plans, the need to navigate to multiple pages is eliminated.
See: Moving and Completing Assemblies, and Quality Display Modes in Oracle Manufacturing Execution System for Discrete Manufacturing User's Guide.
Setting up Quality Data Collection
You have a number of choices regarding the exact point of quality data collection. Through collection triggers, you can tie a very specific point in your routing to quality data collection, thus ensuring that quality results are recorded as soon as they become available, and quality problems are caught as soon as they become evident.
In setting up your routings and planning your quality collection, you should consider the following key questions:
-
Who should be entering the data?
-
When does the data become available to this person?
-
When is it appropriate and convenient to enter the data?
The answers to these questions should help you determine how to set up your routings and collection triggers. Keep them in mind as you read on.
Business example: Quality Data Collection for Work Order Routings
The following are examples of how you might set up your routings to support meaningful integration with Oracle Quality via collection triggers. They are designed to show you how you might address some of the same issues that may arise during the set up process.
Routing 1: Planned Inspection, All Assemblies
If you are performing inspections on 100% of your assemblies at key points in your assembly process, you would likely set up inspection operations as part of your assembly's routing. The Defect Code Pareto Analysis business example for the RF transmitter manufacturer used this kind of approach.
The following diagram illustrates the above text.
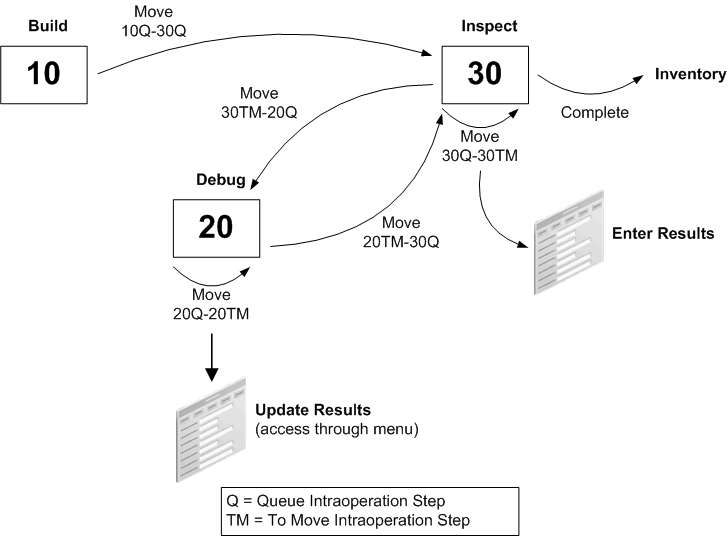
The inspection operation needs to be last in the routing because 100% inspection is required. Making the inspection the last operation ensures that all of your assemblies, including those that may need to be reinspected if any debugging or reworking has taken place, are inspected because all assemblies must pass through the To Move step of the last operation before they can be completed. Your debug operation should not be a count point operation, and as such, should not be the last operation on your routing.
Since all of your assemblies must go through the inspection operation, this operation should be a count point operation. Defining the collection trigger as a move into the To Move step of the inspection operation ensures that the results are entered when the inspection work at the operation is done and the assemblies are ready to move on, either into Inventory or to the debug operation. Triggering results collection off a move into the last intraoperation step of the operation helps ensure that the qualified personnel at the inspection operation enters the inspection results. Note that the move that triggers the quality data collection could be an intraoperation move, as shown in the diagram, but could also be an interoperation move straight into To Move of the inspection operation.
You should use the Update Quality Results window to update the results records with appropriate defect and disposition codes. You can access this window through the Oracle Quality menu.
Routing 2: Planned Inspection, Some Assemblies
If inspection is part of your standard routing for an assembly, but only a fraction of your assemblies actually go through inspection, you may want to use the routing model illustrated in the following diagram:
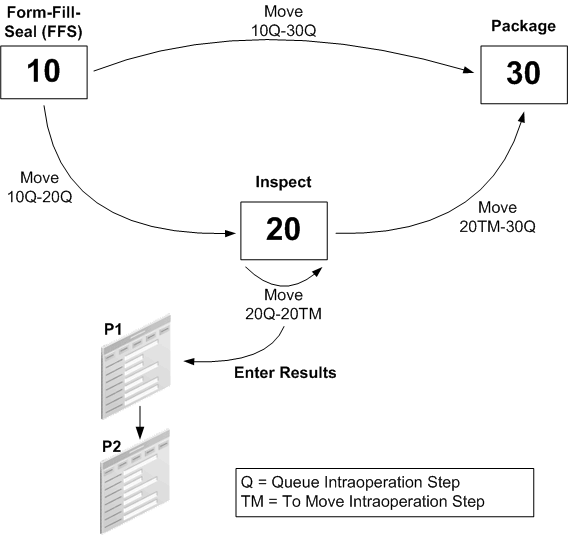
The medical compound manufacturer in the Yield Reporting example used this particular model. While this routing contains similar steps as the previous example, the key difference is that not all assemblies are inspected. Therefore neither the inspection nor the disposition operations should be count point operations. This means that if you do a move transaction from operation 10, operation 30 (i.e. the next count point operation) is defaulted as your "to" operation. You should override the default for those assemblies that are to be inspected.
A move into the To Move step of your inspection operation can once again serve as the collection trigger for results entry.
Routing 3: Exception Reporting
You may want to capture quality information only when there is a quality problem. You may also want to give employees at every point on the routing the authority to report a quality problem, regardless of whether the operation is an inspection operation. The simplest way to support this need would be to use the routing model, illustrated in the following diagram:
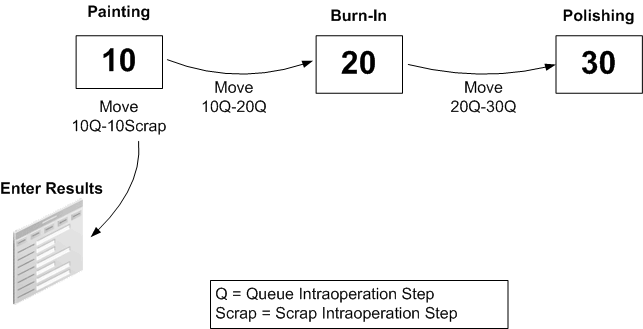
In other words, you simply use your regular routing, and define a collection trigger to fire on move into the Scrap intraoperation step. You can make this specific to one or several operations, or use the same trigger to fire whenever a move to Scrap is entered.
Similarly, you could define moves into Reject to be a collection trigger for quality results entry.
Routing 4: In-line Debug or Rework
If your product and processes support in-line rework, that is, if you can sometimes fix an assembly at a designated rework operation, you may want to concentrate on recording quality data pertaining to the assemblies you are reworking. For example, you may want to capture historical information about serialized assemblies. You may also do the detailed analysis of the cause of the defect at the rework center, and consequently you want to report this information there.
The following diagram illustrates the above text.
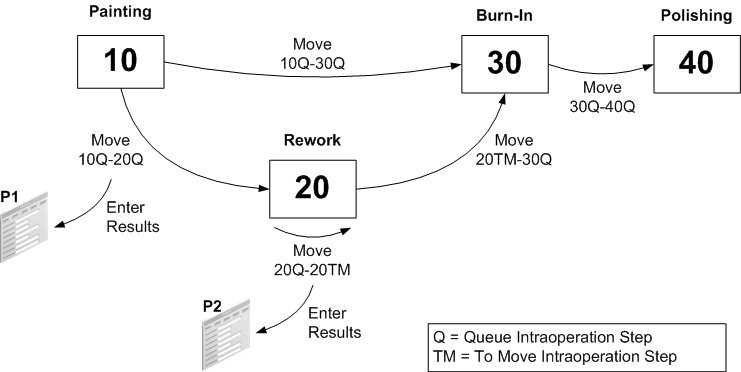
The rework operation should not be a count point operation, since you do not expect to be moving all assemblies into the rework operation. The example shows two collection triggers associated with the rework operation, one fires when you move into the Queue of the rework operation from any other operation, the other fires when you do an intraoperation move to the To Move step of the operation. The first collection plan, P1, might have the Employee ID, the operation sequence or resource ID of the machine where the defect was discovered, and a free text description of the problem captured at the source, and it may invoke an action rule to alert the rework center that a failed assembly is on its way. This could be particularly relevant if the rework operation is in another building, or tends to get overloaded. P2 may include more detailed information, i.e. information that becomes available after some analysis has been done at the rework operation.
The advantage of using two collection plans rather than using one and updating it, is that you can invoke both collection plans through collection triggers. If you used one collection plan, as in the previous example, you would have to update it to enter the results of your analysis by accessing the Update Quality Results window through the menu. The advantage of having only one collection plan, on the other hand, is that results are typically displayed by collection plan.
Routing 5: Enforcing Data Collection During Final Inspection
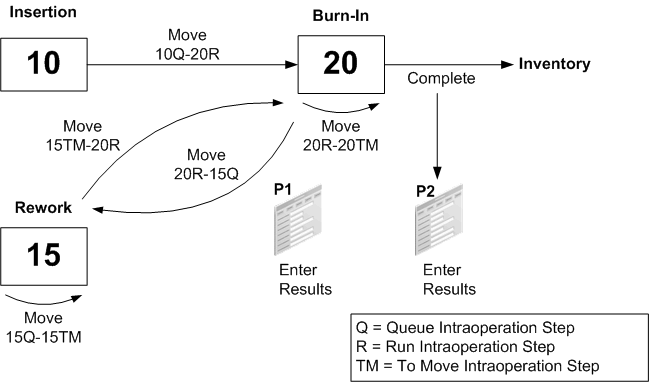
Your process may include inserting resistors into circuit boards. The boards then go through a burn in period so that any early failures can be detected and reworked. Each unit that passes the burn in period is further tested for voltage measurement before it is completed and put into inventory. You are interested in capturing the quantity of units that pass or fail burn in, as well as in ensuring that the test activity is performed and that appropriate test results are captured.
To accomplish this, you have to define two collection plans.
-
Plan P1 will be associated with the Run intraoperation step of the burn in operation and will capture the quantity of units that pass or fail burn in. This plan will be triggered whenever you move your boards from the Run intraoperation step of the burn in operation. You thus will be able to capture both the quantity of units that pass burn in (20R-20TM), as well as those that fail (20R-15Q) it and have to be reworked. Since only some of your assemblies will undergo rework, the rework operation will not be a count point operation.
-
Plan P2 will be triggered by the Work in Process Completions transaction to enforce testing and collecting the results. In this plan, if your assemblies are under serial control, you can capture the test voltage pertaining to each serialized assembly. Later on, you may want to query up historical information about the serialized assemblies.
The following diagram illustrates the above text.
Related Topics
Overview of Routings, Oracle Bills of Material User's Guide
Creating a Routing, Oracle Bills of Material
Overview of Routings and Operations, Oracle Bills of Material User's Guide
Work in Process Business Examples
Quality Data Collection in Work in Process and Shop Floor Management
Work in Process and Shop Floor Management
Collection Plans for Managing Manufacturing Quality
Work in Process Business Examples
The following examples describe how you might use Oracle Quality with Oracle Work in Process. These examples illustrate some of the most common applications of quality systems on the shop floor and demonstrate how to use Oracle Quality to collect the desired information.
Defect Code Pareto Analysis
You are the quality manager for a manufacturer of radio frequency (RF) transmitter equipment used in fiber optics communications applications. Your long-term quality goal is to achieve zero-defect manufacturing. However, you realize that small step improvements are required before your long-term goal can be reached. Therefore your immediate short-term goal is zero-defects in one particular area - customer shipments.
To meet this goal you must implement procedures that ensure that every transmitter is tested with a power meter at an Inspection station before it leaves the factory. To ensure a "flat" response over a wide range of frequencies, two samples are taken based on a given frequency input. The resultant output measured in decibels (DB) is an indicator of how well the RF transmitter meets customer requirements. The choice of input frequency used depends on the type of transmitter you are building, i.e. on the item model. For instance, for one model, the RF transmitter model, has output of 20 dB +/- 0.5 at an input frequency of 10 megahertz (Mhz) but has an output of 19.5 dB +/- 1.0 at an input frequency of 500 Mhz.
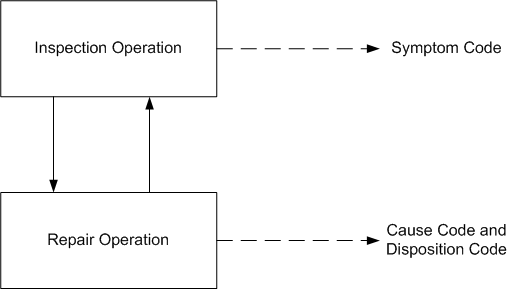
When a transmitter fails test, a Symptom Code that clearly describes the observed results is assigned and the unit is moved to a repair operation. Based on the Symptom Code, directed analysis in the repair area leads to the assignment of a Cause Code and subsequently a Disposition Code.
You can use inquiries, reports, and Pareto Charts to analyze the most common causes of defects. Appropriate corrective actions can then be taken to ensure that your long-term goal of zero-defect manufacturing is met.
The following diagram illustrates the quality data collection points discussed above:
Setup
Based upon the above information, you have determined that you need to create a RF Transmitter collection plan that includes the following collection elements:
-
Job
-
Item
-
Serial Number
-
Transaction Date
-
Assembler ID
-
Symptom Code
-
Cause Code
-
Disposition Code
-
Date of Manufacture
-
Low Frequency
-
Low dB Reading
-
High Frequency
-
High dB Reading
-
Quality Control Id (Employee Id of the person performing the analysis
Collection Elements
Of the collection elements listed above, six (Assembler ID, Low Frequency, Low dB Reading, High Frequency, High dB Reading, and Quality Control Id) are user-defined. All others are predefined (Symptom Code, Cause Code, and Disposition Code) or context elements (Job, Item, Serial Number, and Transaction Date). See: Defining Collection Elements.
Specifications
Specifications ensure that products are useable and are typically based upon customer requirements. Therefore the next step is to define an item specification, 'RF Transmitter1', specifically for your Model 1 RF Transmitter. Note that you can define separate specifications for each transmitter model that you manufacture.
Add the Low DB and High DB collection elements to the RF Transmitter1 specification. If the required specification limits for these collection elements, 19.5 dB +/- 1.0 and 20 dB +/- 0.5 respectively, have been defined for the collection element they are automatically copied as you add them to the specification. If they have not been defined, you can define them in the Specification Elements window. See: Defining Specifications and Defining Specification Elements.
Finally, add the Low Frequency and High Frequency collection elements to the specification. If the required target values for these collection elements, 10 megahertz (Mhz) and 500 (Mhz) respectively, have been defined for the collection element they are automatically copied as you add them to the specification. If they have not been defined, you can define them in the Specification Elements window. If you set the QA:Default Specifications Target profile option to Yes, these target values are automatically defaulted when the RF Transmitter collection plan is invoked by a move transaction.
Collection Element and Collection Plan Element Values
You can define lists of values or SQL validation statements for the required predefined attribute collection elements (Symptom Code, Cause Code, and Disposition Code) and for your user-defined collection elements. Lists of values can be defined at the collection element level and copied to their corresponding collection plan elements. However, you can also define unique lists of values for the collection plan elements. For example, the list of values for the RF Transmitter collection plan elements Symptom Code, Cause Code, and Disposition Code - Okay and Failed, Not Applicable and Assembler Error, and Not Applicable and Scrap respectively - are unique to only this collection plan. See Defining Collection Element Values and See: Defining Collection Plan Element Values.
Important: Upper and Lower Specification Limits are not required for the Low Frequency and High Frequency specification elements since frequency is an input in testing RF transmitters.
Collection Plan
Next, create the "RF Transmitter" collection plan and add the above listed collection elements to it. All collection plan elements, except Cause and Disposition Code, should be defined as displayed and mandatory. Cause and Disposition Code should be defined as non-mandatory so that they can be skipped when you enter your initial results. Later, after further results analysis has been done, they can be updated using the Update Quality Results window.
Collection Plan Element Actions
Next, define appropriate actions for each of your collection plan elements. For example, when a Symptom Code results value of 265 (indicating no signal output) is entered, you can send a message to the power meter operator that says "Db reading is too low. Please move this item to the repair station." See: Defining Collection Element Actions.
Transactions
Next, associate the RF Transmitter collection plan with the WIP move transaction. The move transaction should be made mandatory to ensure that quality data is collected before the move transaction is saved.
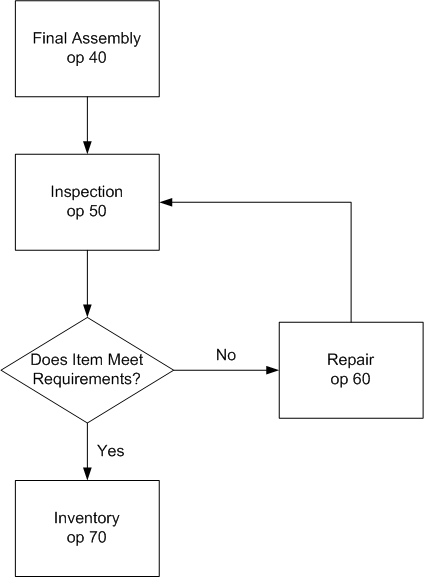
Based upon the moves shown in Figure 1 - from Final Assembly operation to Inspection, from Inspection to Repair, from Repair back to Inspection - define the following collection triggers and conditions:
-
From Operation Sequence Number <= 50 (Inspection)
-
To Operation Sequence Number > 50 (Inspection)
The above collection triggers and conditions accomplish the following:
-
Assemblies cannot be completed into inventory from Operation 40 (Final Assembly) without passing through Operation 50 (Inspection)
-
All moves into Operation 60 (Repair) trigger mandatory data collection
Important: Multiple results entries for a serial number indicate that the item was repaired, perhaps more than once.
Specification Type
Last, assign a default specification type to the collection plan, in this case an item specification. Assigning a default specification type ensures that an appropriate specification can be chosen during quality data collection.
Data Collection
As transmitters are moved into the Inspection operation, the RF Transmitter collection plan is invoked. Because a specification type has been associate with the RF Transmitter collection plan, a specification - in this case the RF Transmitter1 specification - should be selected before data collection can begin.
The inspector is prompted for the serial number of the transmitter and for the assembler's ID (the assembler ID is noted on the routing sheet that the inspector receives along with the transmitter). Low and High Frequency default values, defaulted from the Low and High Frequency specification element target values, are automatically displayed. The inspector tests the transmitter using the suggested frequencies, then enters the corresponding Low DB and High DB results values. If both DB values are within the specification limits defined for the RF transmitter, the inspector enters the "Okay" Symptom Code and "Not Applicable" Cause and Disposition Codes. The tested transmitter can now be completed into inventory.
If however, the Low or High DB value is outside the specification limits, the message action "Item DB is outside specification. Please route item to repair station." is invoked. The inspector selects the failed Symptom Code, but because they are not mandatory, skips data entry for the Cause and Disposition Code. Once quality data collection is complete, the failed transmitter is moved to the Repair operation.
In the Repair operation, a technician determines the exact cause of the problem, fixes it, then updates the Cause and Disposition Code values using the Update Quality Results window. Once the problem is fixed the technician moves the transmitter back to the Inspection operation where the process is repeated until the transmitter passes inspection. Transmitters that pass test can be completed into inventory.
The following diagram illustrates the process operations discussed above:
Results Analysis
You can view and report quality results in a variety of ways. You can view all results for a particular serialized item or for a particular Symptom Code = 055 (no signal output). You can also create custom reports based on your results.
You can view your results in graphical form. For example, you can create Pareto chart with using the symptom code as the X-axis element and limiting the results selected to those Cause Codes that are equal to 265. You can them create similar Pareto charts using the same Symptom Code but different Cause Codes to visualize the differences between different cause codes. Cause Codes resulting in a significant symptomatic occurrences indicates that the product or process should be redesigned.
Similarly, you can create then compare Pareto charts for one Cause Code but different Assembler IDs. You can then determine if a particular assembler is contributing to increased transmitter rejects and repairs. Once problems are identified, corrective actions - such as training or assembly process improvements - can be taken.
The identification and analysis of production problems are essential if the goal of zero defects is to are realized. Studies have shown that operator and other familiar with manufacturing processes are adept at devising solutions once they are convinced that problems do indeed exist. Pareto and other charts that graphically illustrate problems are vital to any quality improvement effort.
Related Topics
Defining Collection Plan Elements
Associating Specification Types with Collection Plans
Defining Actions that Assign a Value: User-Defined Formulas
Associating Transactions with Collection Plans
Creating and Viewing Pareto Charts
Viewing Quality Results Details
Using the Quality Results ReportWriter
Performing Move Transactions, Oracle Work in Process User's Guide
Work in Process Business Examples
Quality Data Collection in Work in Process and Shop Floor Management
Work in Process and Shop Floor Management
Collection Plans for Managing Manufacturing Quality
Yield and Quality Cost Reporting
Yield reporting is a very common measure of quality and yield, the percent of defect-free units produced, can be calculated using Oracle Quality's user-defined formulas. As director of quality at a printed circuit board (PCB) manufacturing facility, you have decided to use yield reporting and quality cost reporting, another common tool in quality analysis, in your quality program.
An important quality characteristic of a printed circuit boards in your industry is that they be free from of 'open' and 'short' defects. An open is a defect that creates a break in the circuit; a short is a defect that changes the circuit pattern. Both of these defects can be detected by an electrical test performed by a board tester. Boards that are tested and free from defects are shipped to various computer manufacturers who populate them with components before assembling them into their products.
Boards that are found to be defective during test are normally routed to a Rework operation. Rework typically involves repairing circuits by either soldering for open defects and/or cutting out circuit lines for short defects. Rework repairs are expensive and, when they happen too often, can results in escalating manufacturing costs.
Sometimes boards with intermittent defects pass final electrical test and are shipped to customers. If defective boards are used in a customer's product, not only is your product quality compromised but the customer's is compromised as well. Defective products can erode customer confidence and result in losses for all parties involved. Obviously, board quality is therefore an important issue.
Currently your the plant is experiencing an increase in quality related problems. As director of quality it is your responsibility to discuss these problems with your customers and to outline to them a program for improving product quality.
Your first step is to assemble a product quality team. The quality team's initial mission is to improve the 'circuitize' process. A typical measure of quality for this process is first pass yield which is the yield measured during the first pass, before any rework is done.
The plant produces PCBs in batches of 200 units and all units are put through electrical test. It is during test that defective units are detected. Units that fail electrical test are moved to a rework operation where rework is performed for certain defects, namely 'open' and 'short' defects. Units that are inspected and found to have either Handling or Machine damage are disposed off as scrap.
The team is also interested in another measure of process quality: determining the cost of quality. They realize that they can more readily grab management's attention by presenting an analysis of quality costs than an analysis of first pass yield. The components of quality costs, also known as internal failure costs, include rework process costs and the costs of material that go into rework and the costs of scrap. Internal failure costs are dependent on the following factors.
-
The item type, whether it is core, multi-layer board etc.
-
Defect code
-
Defect occurrences
The following diagram illustrates the process operations discussed above:
Setup
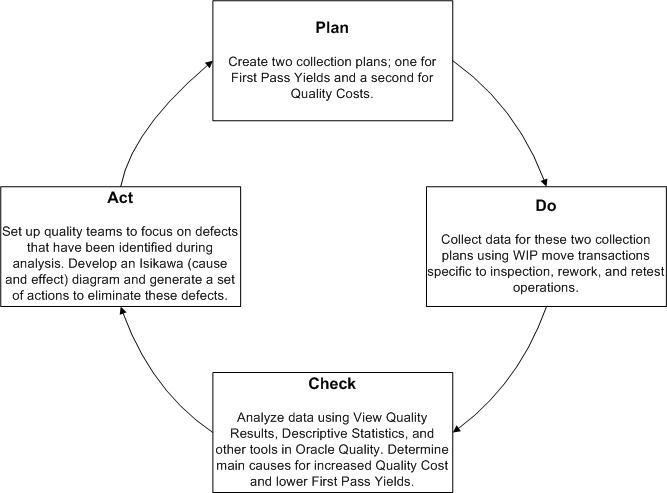
Based upon this business example, you have determined that you need to create two collection plans. The first, First Pass Yield, should include the following collection elements.
-
Job
-
Item
-
Product Type
-
Quantity Inspected
-
Quantity Passed
-
First Pass Yield
The second collection plan, Quality Cost, should include the following collection elements:
-
Job
-
Item
-
Quantity Inspected
-
Quantity Rejected
-
Defect Code
-
Total Quality Cost
Cost Table
In this example, Total Quality Cost is calculated using information stored in a custom Oracle database table that is external to Oracle Quality and Oracle Manufacturing. This table should, at a minimum include Item, Defect Code, and Defect Unit Cost columns as it is assumed that for a given Item and Defect Code there is a specific Defect Unit Cost. Total Quality Cost is calculated by multiplying the defect cost per unit by the number of occurrences.
Important: You could also create a collection plan to collect the data that is stored in Cost Table.
Normally, such a cost table would be maintained by the costing department with input from the quality department regarding the cost of defective units. Defect Unit Costs are either the cost of scrap, when items cannot be repaired, or the cost of rework, or both. Rework costs are normally calculated based on actual labor costs and average labor time required to repair an item. Scrap costs are normally based on the cost of scrapped material and the actual labor cost incurred in the disposal of the scrapped product.
In this example, the unit costs associated with open and short defects are considered rework costs since items with these defects are reworked. Defects that are caused by machine and handling damage cannot be repaired and result in scrap costs. It should be noted that an item with multiple 'open' and 'short' defects can be reworked many times but can only be scrapped once.
Collection Elements
Of the collection elements listed above (for both collection plans), six (First Pass Yield, Product Type, Quantity Inspected, Quantity Rejected, Quantity Passed, and Total Quality Costs) must be defined by the user. Item and Job are context elements and data for these collection elements is automatically collected as move transactions are entered. Defect Code is a predefined collection element. See: Defining Collection Elements.
Collection Element and Collection Plan Element Values
You can define lists of values for the predefined collection element, Defect Code, and the user-defined collection elements. For example, the Defect Code list of values must include, at a minimum, the following values: open, short, handling damage, machine damage. See: Defining Collection Element Values and Defining Collection Plan Element Values.
Collection Plan
Next, create the First Pass Yield collection plan and add the above listed collection elements to it. All collection plan elements, except First Pass Yield, should be defined as mandatory.
Also create the Cost of Quality collection plan and add the above listed collection elements to it. All collection plan elements should be defined as displayed and mandatory.
Transactions
Next, associate the First Pass Yield collection plan with the WIP move transaction. The move transaction should be made mandatory to ensure that quality data is collected before the move transaction is saved.
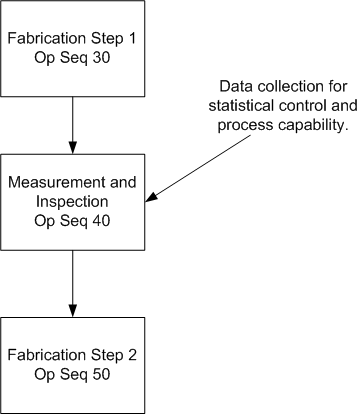
Based upon the fact that data collection for First Pass Yield should be invoked each time a move into or out of the Test Operation is made, define the following collection triggers and conditions:
-
From Operation Sequence Number <= 40 (Test Operation)
-
To Operation Sequence Number > 40 (Test Operation)
Also associate the Cost of Quality collection plan with the WIP move transaction and define the following collection triggers and conditions.
-
From Operation Sequence number = 45 (Rework Operation)
-
To Operation Sequence number = 48 (Retest Operation)
Again, the move transaction should be made mandatory to ensure that quality data is collected before the move transaction is saved.
Important: The “=" condition is used when defining collection triggers for the From Operation and To operation sequences because data should be collected when boards are moved from Rework to Retest. The “<=" conditions was not used for the Rework operation because rework is not mandatory. All PCBs do not require rework and many boards that pass through the Retest Operation are found to be defect free.
Quality Actions: Calculating First Pass Yield
To calculate First Pass Yield, select the First Pass Yield collection plan and define a user-defined formula per the following steps:
-
From the Collection Plans window, select the 'Quantity Passed' collection plan element then choose the Actions button. The Quality Actions window appears.
-
In the Action Rules region, selecting the 'is entered' condition.
Note: The formula that calculates First Pass Yield should be triggered by an action rule defined for the Quantity Passed collection plan element. It is assumed that the user enters results values for Quantity Inspected, then Quantity Passed since these two values must be entered before the value of First Pass Yield can be calculated.
-
In the Actions this Rule Invokes region, select the Assign a value action.
-
In the Action Details region, choose the Action Details button. The Assign a Value window appears.
-
In the Assign to field, select the First Pass Yield collection plan element.
-
Select the option to assign a value using a formula (this is the default selection).
-
Enter the following formula:
(&QP/&QI)*100
where QP and QI are tokens for collection elements Quantity Passed and Quantity Inspected respectively
-
Choose the Variables button. The Output Variables window appears.
-
Enter the token name QP for the Quantity Passed collection plan element. Also enter the token name QI for the Quantity Inspected collection plan element.
-
Choose OK to exit both the Output Variables and Quality Actions windows.
-
Save your work.
When results are entered, First Pass Yield is automatically calculated using the values entered for Quantity Passed and Quantity Inspected.
Since a First Pass Yield of less than 70% indicates a severe quality problem, you can optionally define an action, such as sending a message to the quality team leader, that is triggered when this critical yield is reached.
Quality Actions: Calculating Total Cost of Quality
To calculate Total Cost of Quality, select the Cost of Quality collection plan then define a user-defined formula per the following:
-
From the Collection Plans window, select the Defect Code collection plan element then choose the Actions button. The Quality Actions window appears
-
In the Action Rules region, selecting the is entered condition.
-
In the Actions this Rule Invokes region, select the Assign a value action.
-
In the Action Details region, choose the Action Details button. The Assign a Value window appears.
-
In the Assign to field, select the Total Quality Cost collection plan element.
-
Select the option to define SQL text (formula is the default selection).
-
Enter the following formula:
Select &QD*unit_cost
From cost_table
where defect_code = &DEF and item_type = &ITEM
Note: QD, DEF and ITEM are tokens names (see Step 9) and unit_cost, defect_code and item_type are names of columns in the cost_table.
-
Choose the Variables button. The Output Variables window appears.
-
Enter the token name QD for the Quantity Defective collection plan element, enter the token name DEF for the Defect Code collection plan element, and enter the token name ITEM for the Item collection plan element.
-
Choose OK to exit both the Output Variables and Quality Actions windows.
-
Save your work.
When results are entered for the Cost of Quality collection plan, the collection element values for Item and Defect Code are read from the external cost table and the Total Cost of Quality is automatically calculated per the above user-defined SQL script.
Results Analysis: First Pass Yield
After a few jobs are processed in the Circuitize operation and enough sample data has been collected, the quality team can choose to analyze data either after a given number of jobs have been processed or days have elapsed or after a member of the quality team is notified that the first pass yield has dropped below the threshold level of 70 percent.
The team can then view and chart quality results in a variety of ways. For example:
-
By item
-
By product type
-
By job
Data can be viewed in View Quality Results then exported to a statistics program/package and checked for differences between data sample subgroups. Statistical tests can be performed to determine differences in product types. Histograms can be created for to check for First Pass Yields differences between jobs.
The patterns of defects within subgroups can be further analyzed using Pareto charts. In this example, two important subgroups in such an analysis would be the subgroups resulting from open and short defects. Differences in subgroups should always be investigated since they reveal process anomalies that, once corrected, contribute to the continuous improvement process.
Continuous Improvement
A preliminary data analysis soon reveals that the primary cause of low first pass yields is 'open' defects. The operators performing the rework validated this conclusion when they met with quality team members. Furthermore, these operators stated that open defects occurred more frequently in core items.
Based on results of the quality teams data analysis and real-time observations, you have decided to focus your efforts on investigating the causes of open defects. As part of this investigative process, you have called a meeting with the quality team and performed a cause-and-effect analysis using an Ishikawa diagram. From this brainstorming session a list of the factors that contribute to defects has been drawn. These factors include:
-
Conveyor speed
-
Concentration of Etch chemicals
-
Laminator pressure
-
Thickness of copper
Your next step is to narrow this list of factors down to just one key factor using statistical tools. First a factorial experiment, an industrial experiment that statistically analyzes the effects of various factors on product quality, is designed and executed. Then the data from this experiment is analyzed using a statistical analysis software package. Analysis reveals that conveyor speed is the major factor influencing first pass yields. Therefore the quality team recommends that conveyor speed be increased by about 20 percen%.
After increasing the conveyor speed there is a noticeable increase in the first pass yield. Thus the team has achieved their first small step towards process improvement. To close the loop in the continuous improvement cycle, an analysis of post-process improvement data is made and plans to further reduce defects are made. This cycle of improvements is consistent with the Deming cycle for continuous improvement.
The following diagram illustrates Deming's Circle For Continuous Improvement:
Results Analysis: Cost of Quality
Using the Descriptive Statistics window, select the Cost of Quality collection plan and generate descriptive statistics using the Total Quality Cost collection plan element as the statistical element. You can generate descriptive statistics based on all or selected subgroups of data. For example, using the search capabilities of the Show Results Where region, you can select and analyze results that are specific to an Item, a Job, or a specific Defect Code. The statistical sums of the various subgroups represent the cost of quality.
Related Topics
Defining Collection Plan Elements
Associating Transactions with Collection Plans
Defining Actions that Assign a Value: User-Defined Formulas
Associating Specification Types with Collection Plans
Viewing Descriptive Statistics
Creating and Viewing Pareto Charts
Creating and Viewing Histograms
Performing Move Transactions, Oracle Work in Process User's Guide
Work in Process Business Examples
Quality Data Collection in Work in Process and Shop Floor Management
Work in Process and Shop Floor Management
Collection Plans for Managing Manufacturing Quality
Process Capability Study
You are the general manager for a precision sheet metal job shop specializing in high quality fabricated parts to the computer industry. Customer orders are usually large and are built-to-order by job based on customer specifications. Each part produced has several critical dimensions that should meet customer specifications. In an effort to meet high quality standards, you have implemented a quality improvement program throughout the shop.
Process result for all critical dimensions are collected on the shop floor. For example, one critical dimension is the width of a rear flange that is formed on a press brake. The press brake operator measures the flange width immediately after forming the part. Measurements are randomly taken for four parts produced over the life of the job; for example, the first and last parts produced on the job as well as two from the middle might be measured. The deviation between the specified and actual flange width is calculated by subtracting the actual width from the nominal specification width stated by the specification. Although specifications can vary for each customer, the deviation specification for flange width is 2.0 +/- 0.04 units for all customers.
The immediate goal of your quality improvement program is to maintain a process capability index of at least 1.2. By agreement, process capability is to be estimated only after 40 measurements are recorded. The two Process Capability indices used most often in evaluating the relationship between the process and the customer are Cp and Cpk. They are described mathematically as follows:
| Cp = (upper spec - lower spec) / 6 * Standard Deviation |
| Cpk = min {(Mean - Lower Spec ) / 3 * Standard Deviation, (Upper Spec - Mean)} / 3 * Standard Deviation |
Cp measures how dispersed the data is without regard to whether the data is evenly distributed around the midpoint between the Upper and Lower Specification Limits (usually referred to as the nominal value).
Cpk weights the dispersion of data about the nominal which usually lies as a midpoint between the Upper and Lower Specification Limits. The denominator in the Cpk index indicates how much room is needed on either side of the mean to contain most of the distribution. The numerator measures the amount of room from the mean to the specification on the side where there is less room. For both Cp and Cpk, higher values are better and indicate higher process capability.
Cp depends only on the value of the standard deviation and is not affected by the relative position of the mean with respect to the nominal specification. On the other hand Cpk considers the value of the standard deviation and the mean. However, before estimating process capability the issue of statistical control should be addressed. Without statistical control, process capability estimations may prove erroneous due to the inherent instability of the process. Therefore, statistical control should be established before calculating process capability indices.
When a process is in statistical control - is operating with the minimum amount of variation possible (the variation due to common causes) - it can be expressed mathematically as follows:
| Standard Deviation = s = Rbar / d2 |
Using the above expression it is possible to calculate process capability using the Rbar value from a Xbar and R chart. Establishing statistical control for flange width became a priority action item. A quality team was set up in the sheet metal job shop. They established three objectives which are:
-
control the process
-
measure process capability
-
improve the process
Setup
Create collection elements and a collection plan as described below.
Collection Elements
Define the user-defined collection elements Flange Width, Deviation and Machine number in collection element setup.
Collection Plan
Create a collection plan called "Rear Flange" with the following collection elements:
-
Item
-
Job Number
-
Customer Name
-
Specification
-
Employee Name
-
Machine Number
-
Flange Width
-
Deviation
The following diagram illustrates the process flow for the fabricated parts:
Associated Collection Transactions and Collection Plans
Choose the Transactions button in Collection Plan window. Select the move transaction and define the following collection triggers and conditions:
-
From Operation Sequence Number <= (at most) 40
-
To Operation Sequence Number > (greater than) 40
-
Item = (equals) rear flange
Make results entry for the move transaction mandatory using the Mandatory check box.
Associated Specification Types and Collection Plans
Associate the collection plan with a customer specification using the Specification button in the Collection Plans window. This ensure that you are prompted to select a customer specification when the collection plan is invoked as you enter move transactions.
Profile Option for Specification
The team wants to populate the collection element Specification with the specification value for Flange Width for the customer entered during data entry. This can be achieved by setting the QA:Default Specification Target profile option to Yes. See: Profile Options.
When the default specification value is use, the correct specification for a given customer name is automatically defaulted. The next step is to calculate the deviation of the flange reading from the specification. We use user-defined formula to calculate the deviation. The steps are as follows:
-
From the Collection Plans window, select the 'Flange Width' collection plan element then choose the Actions button. The Quality Actions window appears
-
In the Action Rules region, select the 'is entered' condition.
-
In the Actions this Rule Invokes region, select the Assign a value action.
-
In the Action Details region, choose the Action Details button. The Assign a Value window appears.
-
Select the Deviation collection plan element to Assign the value To.
-
Select the option to assign a value using a formula (this is the default selection).
-
Enter the following formula:
&FW - &SP
where FW and SP are tokens for collection elements Flange Width and Specification respectively
-
Choose the Variables button. The Output Variables window appears.
-
Enter the token name 'FW' for the Flange Width collection plan element. Also enter the token name 'SP' for the Total Quantity collection plan element.
-
Choose OK to exit both the Output Variables and Quality Actions windows.
-
Save your work.
Specification
Every customer has a different set of specifications for Flange width. Therefore for every customer a flange width specification is created in Specification setup. There were seven different customers and therefore a similar number of specifications were created. For the sake of convenience the specifications were provided with their respective customer names.
The quality team is interested in examining the control chart after 40 readings have been recorded in the collection plan.
The collection plan is now ready for collecting data. Every job containing Rear Flange triggers a collection plan where the inspector after selecting the customer specification enters readings on flange width. The team uses the View Quality Results window to see whether at least 40 records have been entered in for the Rear Flange collection plan. After two days, they realize that the requisite number of readings is available for analysis.
The team devises a plan for control chart implementation. They realize that certain considerations are paramount in initiation of a control chart including rational sub-grouping, type of chart, frequency and the type of study being conducted. Their initial conclusion is that the chart should be an Xbar and R chart.
Control Chart Analysis
An examination of the control charts reveals that the process average is not under control. This implies that the average is affected by assignable causes on several occasions:
-
Three separate points above Upper control limit: point 10,14,17
-
Three separate points below Lower control limit: point 7, 11, 15
In addition, there is excessive short term variation represented by:
| Standard Deviation = s = Rbar / d2 |
as discussed previously. Even with an R chart in control, the manufacturing process for flange width is not constructed to meet the desired specifications.
As shown below, the pattern suggests that the process average crept upward then was probably adjusted downward. This adjustment cycle, which was repeated for a total of four cycles, is an observation worth investigating.
The inherent process capability was estimated as follows:
| Standard Deviation = Rbar / d2 = 0.057 / 2.06 = 0.027 |
and 6 times the standard deviation, which is 0.162, and the specification width is 0.08 which means that the inherent variability is twice what is specified.
The following diagram illustrates the above text.
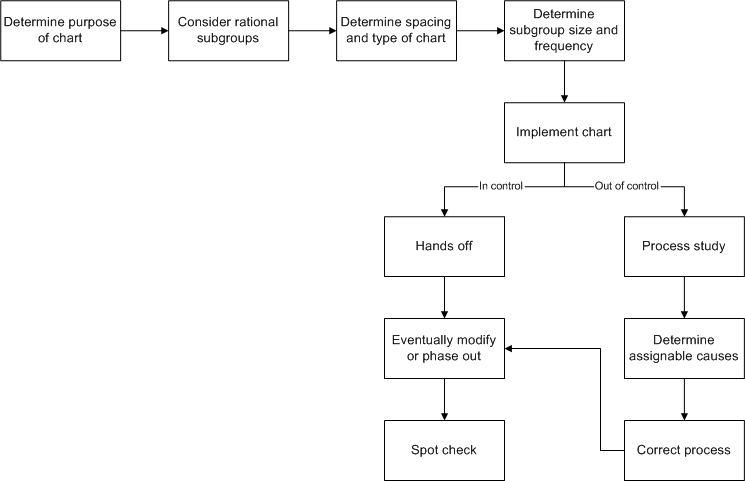
Two major types of investigations are needed to reduce the process variability to the stated specifications:
-
What are the important assignable causes producing the shifting process average shown by the X bar control chart?
Once identified, how can improvements be effected? The control chart can be continued and watched by production personnel to learn how to control this average.
-
What are the possible ways of reducing the inherent variability of the process as measured by the standard deviation?
Standard Deviation = s = Rbar / d2 Sometimes relationships between recorded adjustments made in the process and changes in the Range chart can be helpful. For example there is a suggestion that the process variation increased during point 14 to 18 on the R chart. This suggestion would usually be disregarded in routine production; however in a process capability study (which is an industrial investigation of the ability of a process to manufacture within specification) it would warrant investigation.
These two major investigations can lead to other major studies and with every study a greater understanding of process variation takes place. The quality team turns this knowledge into action items and implement them. These action items result in a predictable measure of statistical process control. With every improvement step a SPC chart is generated and process capability is remeasured and the continuous improvement cycle is repeated.
Related Topics
Defining Collection Plan Elements
Associating Specification Types with Collection Plans
Defining Actions that Assign a Value: User-Defined Formulas
Associating Transactions with Collection Plans
Creating and Viewing Control Charts
Performing Move Transactions, Oracle Work in Process User's Guide
Work in Process Business Examples
Quality Data Collection in Work in Process and Shop Floor Management
Work in Process and Shop Floor Management
Collection Plans for Managing Manufacturing Quality
Quality Data Collection in Project Contracts
Oracle Project Contracts uses Quality's existing integration with other manufacturing transactions, including WIP Move, WIP Completion, WIP Work Order-less Completion, Purchasing Receiving, and Purchasing Inspections.You cannot set up a collection plan to collect data during a specific Project Contracts transaction. Instead, transactional quality data is collected by other manufacturing transactions using the Project Number and Task Number collection triggers. See: Collection Triggers.
You can use three collection elements specific to Oracle Project Contracts. You can collect data based on Contract Number, Contract Line Number, and Deliverable Number when entering quality results directly (not during a transaction).
To query project contract data
You can query quality data for the three Project Contracts collection elements, which include Contract Number, Contract Line Number, and Deliverable Number.
-
Navigate to the Find Contract form.
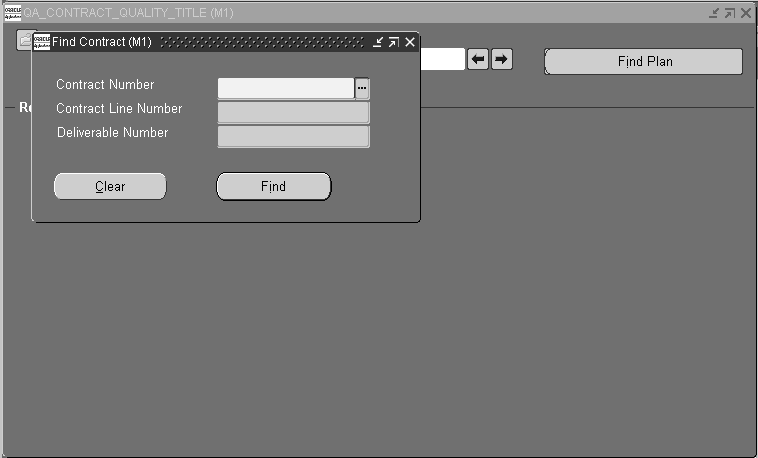
-
Enter a Contract Number.
-
Optionally, enter the Contract Line Number to view specific information.
-
Optionally, enter the Deliverable Number of the contract. You can only enter data into this field if you entered a Contract Line Number.
-
Select Find to view quality information.
Related Topics
Quality Data Collection During Transactions
Associating Collections Plans with Transactions
Predefined Collection Elements
Quality Collection Transactions
Entering Quality Results Directly
Quality Data Collection in Oracle Process Manufacturing
Quality's integration with Oracle Process Manufacturing (OPM) enables users of Oracle Process Operations to log nonconformances whenever actual production results or actions differ from the OPM Master Batch Record. Log a nonconformance from the following windows by selecting Log Nonconformance from the Actions menu:
-
Batch window
-
Batch Details window
-
Batch Steps window
Before you can collect quality data when working with OPM batches, you must first set up and associate one or more collection plans with the Process Nonconformance (Oracle Process Nonconformance) transaction. This activates the Actions menu's Log Nonconformance selection so that you can enter quality results. You can create your own collection plan, or you can use one of the following templates provided specifically for the Process Nonconformance transaction as well as nonconformances in general:
-
Template Nonconformance Master Plan
-
Template Nonconformance Master Plan(Nonconformance only)
See: Template Nonconformance Master Plan, Oracle Quality Implementation Guide.
Prerequisites
- Set up and define one or more collection plans specific to the transaction. See: Collection Plans for Managing Manufacturing Quality.
To enter process nonconformance data during batch production
-
Select Log Nonconformance from the Actions menu.
-
Select a collection plan. The Enter Quality Results window opens.
You can select any collection plan that is associated with the Process Nonconformance transaction and enabled.
-
In the Results region of the Enter Quality Results window, enter one or more records.
When you define collection elements, the Prompts that you enter display as column headings. If data collection is not mandatory, you can select Cancel to skip quality data entry.
-
Save your work.
Related Topics
Nonconformance and Dispositions Solution, Oracle Quality Implementation Guide
Oracle Process Operations User's Guide