You use Oracle VM Manager to create and configure storage repositories, and to present one or more storage repositories to Oracle VM Servers in a server pool. This chapter discusses the flow of the operations you perform after the discovery of your physical storage hardware, LUNs, file systems and so on, in order to make a storage repository available to the Oracle VM Servers in your server pool. Once the storage repository is accessible, you can start adding storage resources and building VMs with those resources.
Depending on the configuration of Oracle VM Servers in your environment, restrictions may apply to the creation of storage repositories:
When using server pools without clustering functionality, two storage options are available: file servers (NFS) and local physical disks in a local storage array. Remember that local storage imposes severe restrictions, as described in Section 4.6.4, “Using Local Storage”.
Local storage, or unused disks in your Oracle VM Servers, are discovered as LUNs in a local storage array. If you want to use a single-server setup with local storage, be sure to deactivate clustering in your server pool. This eliminates the need for a server pool file system, which cannot be on a local disk by definition.
Only a server pool with multiple servers, active clustering and attached storage (NFS, iSCSI, fibre channel) can offer high availability, load balancing and similar advanced functionality.
Oracle VM Manager allows you to perform a number of management operations on the storage repositories under its control. Table 4.2, “Storage Repository Management Operations” describes the possible operations at the level of a storage repository. To access these functions in Oracle VM Manager, open the Repositories tab, use the tree view in the navigation pane to select repositories, then choose the appropriate button from the toolbar above.
Storage repositories are presented to individual servers, meaning that not all repositories are necessarily available for example when you deploy a VM on a specific Oracle VM Server. To see which servers have access to a storage repository, select the repository in the navigation pane and verify the access status in the management pane with the Perspective set to Info.
Table 4.2. Storage Repository Management Operations
Operation | Description |
|---|---|
Create repository | |
Present repository |
See Section 4.8.2, “Presenting or Unpresenting a Storage Repository”. |
Edit repository |
|
Delete repository |
|
Refresh and resync repository |
Select a repository in the table and click
Refresh and Resync Selected
Repository
Oracle VM Manager re-checks the disk contents of the selected repository. Any detected changes will be reflected in the various content tabs (Assemblies, ISO files, ...) of the storage repository. |

After you complete the preparation phase described above in Section 4.6.1, “Discovering File Servers” and Section 4.6.3, “Discovering SAN Servers”, Oracle VM Manager is fully aware of the underlying physical storage providers available for use as a storage repository.
A storage repository should be at least 10GB in size. In addition to this minimum size requirement, you should include enough storage space for virtual machines, templates, ISO files and other virtual machine resources.
To create a storage repository for your server pool:
In Oracle VM Manager, open the Repositories tab.
In the toolbar above the navigation pane, click Create New Repository
 .
.
In the Create a Data Repository dialog box, enter the following information:
Repository Name: The name you wish to use to identify the repository.
Repository Location: Either a network file server or a physical disk.
If you selected Physical Disk as location, proceed to Physical Disk as the Repository Location. If you selected Network File Server as location, click Search
 to select a location in the Select
Network File System dialog box:
to select a location in the Select
Network File System dialog box:
Select a Network File Server from the list. The available file systems appear. Note that only a refreshed file system can be used.
Select the file system you wish to install the storage repository on. Click OK.
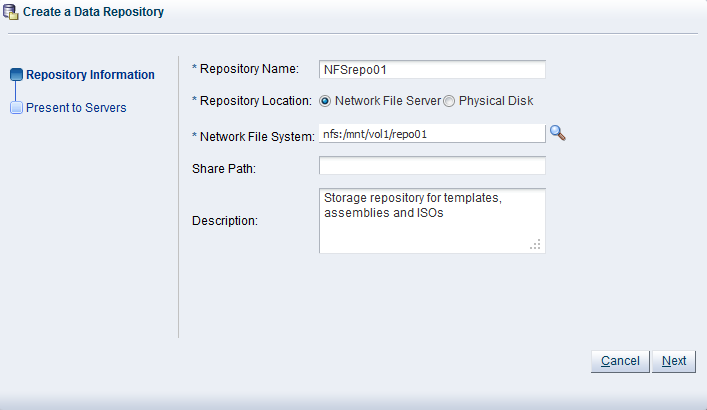
Optionally provide this additional information:
Share Path: Path to a subdirectory on the selected file system.
Description: Information you would like to add about this storage repository.
Proceed to Present the storage repository to servers.
If you selected Physical Disk as the Repository Location, click Search
to select a location in the Select
Physical Disk dialog box:
Select a Storage Array and, if applicable, a Volume Group from the respective lists. The available disks appear.
Select the physical disk you wish to install the storage repository on. Click OK.
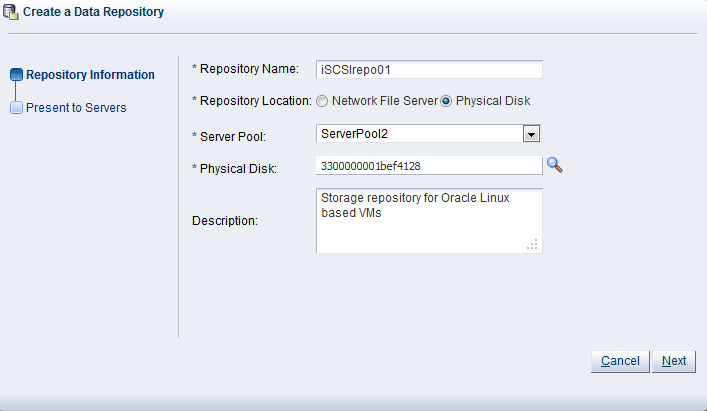
Select from the list to which Server Pool this storage repository should be provided. Optionally enter additional information about this storage repository in the Description field.
NoteWhen you create a storage repository on a LUN, only clustered server pools can be selected.
Click Next to proceed to the second section of the wizard: Present to Servers.
When the storage repository is prepared and created, it must also be made available for use by your Oracle VM Servers before it can be populated. Typically you present the storage repository to all the Oracle VM Servers in the server pool. However, should you wish to set up storage differently, Oracle VM Manager allows you to present a repository to a selection of Oracle VM Servers instead of the entire server pool. See also Section 4.8.2, “Presenting or Unpresenting a Storage Repository”
In the Present to Servers dialog box, use the arrow buttons to move the required Oracle VM Servers from the left to the right pane.
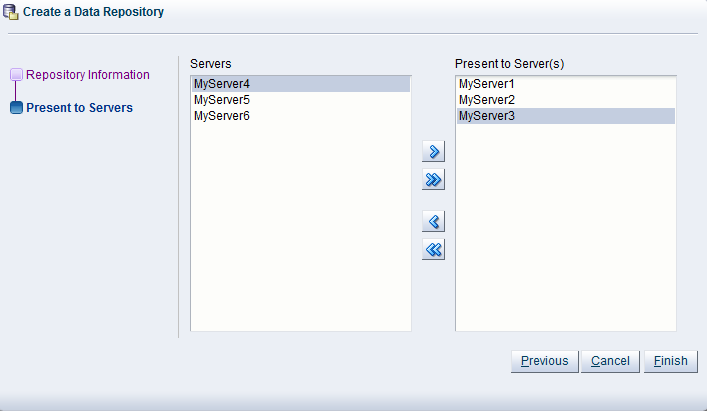
Click Finish to create the new storage repository and present it to the selected Oracle VM Servers. The new storage repository is displayed in the Repositories table in the management pane.
At this point, the storage repository has been created, Oracle VM Manager has taken ownership, and the selected Oracle VM Servers have access in order to store virtual machines, ISO files, templates and so on. To modify the configuration of servers with access to the storage repository, see Section 4.8.2, “Presenting or Unpresenting a Storage Repository”.
As part of the storage repository creation you can select the Oracle VM Servers to which the repository must be made available. However, you can modify this selection afterwards and present the repository to new servers or unpresent it from servers already selected earlier.
Presenting the storage repository to an Oracle VM Server is the equivalent of mounting a file system. Essentially, when you present the repository to the Oracle VM Servers in your server pool, the repository file system is mounted by the root user on each Oracle VM Server. This is an essential factor in the HA configuration of the Oracle VM setup.
To present a storage repository to your Oracle VM Servers:
Open the Repositories tab and select the repository of your choice in the navigation pane.
Click Present/Unpresent
 in the toolbar above to change the list of servers the
repository is presented to.
in the toolbar above to change the list of servers the
repository is presented to.
In the Present Repository dialog box, use the arrow buttons to move the required Oracle VM Servers between the presented and unpresented panes.
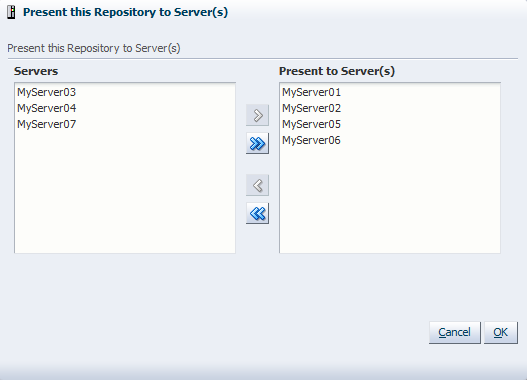
In the Present Repository dialog box, use the arrow buttons to move the required Oracle VM Servers between the presented and unpresented panes.
Click OK to present the storage repository to the selected Oracle VM Servers.
NFS-based storage repositories can be shared by multiple server pools controlled by the same Oracle VM Manager. OCFS2-based storage repositories always belong to a single clustered server pool. Therefore only members of that server pool appear in either pane.
Your external storage setup is now complete. The storage repository is available to your Oracle VM Servers. When the server pool is ready you can start creating virtual machines. For more information, see Chapter 6, Managing Server Pools.
To edit a storage repository:
Select the repository in the tree view in the navigation pane and click Edit Selected Repository
 in the toolbar above.
In the Edit Repository dialog box you can make the following changes:
Server Pool: This option is available if your repository location is a Physical Disk. It allows you to change the server pool that the repository is associated with. This option makes it simple to move OCFS2 repositories from one server pool to another. Usually after changing server pool association, you should change the servers or server pool where the repository is presented. See Section 4.8.2, “Presenting or Unpresenting a Storage Repository” for more information on this.
Name: Edit the name of the selected repository.
Description: Optionally enter a more elaborate description of the selected repository.
Release Ownership: Select this check box to allow the repository to be used by another Oracle VM Manager.
Click OK to save the changes to the storage repository.
To delete an owned storage repository:
Make sure that all content has been removed from the storage repository you wish to delete.
Select the repository in the tree view in the navigation pane and click Delete Selected Repository
 in the toolbar above.
Confirm that you wish to delete this storage repository: click OK to continue.
To delete a storage repository without removing the contents:
Select the repository in the tree view in the navigation pane and click Present/Unpresent
in the toolbar above.
In the Present Repository dialog box, unpresent the storage repository from all Oracle VM Servers. Click OK.
Select the repository in the tree view in the navigation pane and click Edit Selected Repository
in the toolbar above. Select the
Release Ownership check box
and click OK.
Select the now unowned repository in the table and click Delete.
Confirm that you wish to delete this storage repository: click OK to continue.
When your server pool is fully configured with Oracle VM Servers, network and storage, you use Oracle VM Manager for all management and maintenance operations on the storage repository. The storage resources residing in the repository (ISO files, templates, and so on) are also managed through Oracle VM Manager. Management operations on the storage resources inside a storage repository are discussed in detail in a separate chapter: Section 7.5, “Virtual Machine Resources”. Detailed instructions for the use of different types of storage entities with virtual machines are discussed in Chapter 7, Managing Virtual Machines.
A Oracle VM Server can be configured to enable third party applications to perform a back up on the contents of a storage repository. To enable this, an Oracle VM Server is configured to provide an NFS share that a third party back up tool can use to access the contents of the repository. The Oracle VM Server must be in a clustered server pool and have the OCFS2-based storage repository presented to it.
When you have created a repository export, use the Repository Path (displayed in the management pane table) and the Oracle VM Server hostname or IP address to connect to the NFS mount point from the third party back up software.
To create a repository export:
Click the Servers and VMs tab.
In the navigation pane, select the Oracle VM Server on which you want to create the repository export location.
Select Repository Exports from the Perspective drop-down list in the management pane.
Click Create Repository Export..
in the toolbar.
The Create Repository Export dialog box is displayed.
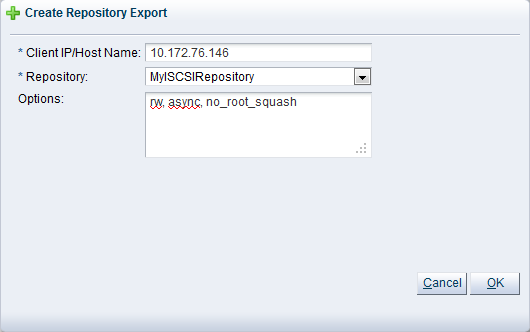
Enter or select the following:
Client IP/Host Name: The IP address or hostname of the computer for which to grant access to the repository contents. This is likely to be the machine on which the third party back up and restore software is running.
Repository: An OCFS2-based storage repository presented to the Oracle VM Server. This is the repository you want to back up.
Options: The parameters to include in the NFS mount configuration, for example:
rw, async, no_root_squash
Click OK.
To edit a repository export, select the entry in the table in the management pane and click Edit Repository Export..
in the toolbar.
To delete a repository export, select the entry in the table in the management pane and click Delete Repository Export
in the toolbar.