Oracle® Enterprise Manager Ops Center
Managing the Configuration of a Virtual Machine
12c Release 1 (12.1.1.0.0)
E35862-01
August 2012
This guide provides an end-to-end example for how to use Oracle Enterprise Manager Ops Center.
Introduction
Oracle Enterprise Manager Ops Center provides operations for managing virtual machines. A virtual machine is created in a virtualization host, that is placed in a server pool. When you create a virtual machine, you define the required resources for it. After you create the virtual machine, you can manage the resources and add new resources.
This guide shows you how to manage the configuration of a hardware virtualized machine (HVM), created in an Oracle VM Server for x86 system that is placed in a server pool. The virtual machine configuration such as CPU threads and memory units can be modified, and storage and network resources can be added to it.
You can manage the configuration of a virtual machine dynamically, except for attaching networks, which requires the virtual machine to be in shutdown state. You must reboot the virtual machine after the dynamic configuration for the changes to be applied.
See Related Articles and Resources for links to related information and articles.
What You Will Need
In this example, you will need the following to manage a virtual machine configuration:
-
A user with the Virtualization Admin role to perform all of the operations described in this example.
-
A hardware virtualized machine in an Oracle VM Server for x86, and in shutdown state.
-
An Oracle VM Storage Repository library to associate with the virtual machine.
-
At least one available network to assign to the virtual machine. The network must be assigned the Virtual Machine role.
-
At least two CPU threads, and 2048 MB of memory to assign to the virtual machine.
Managing Virtual Machine Configuration Actions
The following actions are available to manage the virtual machine configuration in Oracle Enterprise Manager Ops Center:
Adding Storage
Storage libraries provide the storage resources required for virtual machines. When you associate a storage library with a virtualization host, the library becomes available for the virtual machines running in that host. You can add storage from the libraries that are available to the virtual machine.
In this example, virtual disks from an Oracle VM Storage Repository are added to a virtual machine which is in shutdown state.
The following procedure details the steps required to add storage to a virtual machine:
-
Select Server Pools from the Assets section in the Navigation pane.
-
Select the virtual machine that is in shutdown state.
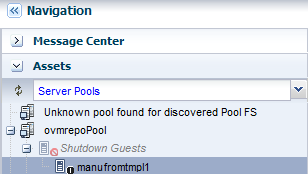
Description of the illustration vm_select_asset.png
-
Click Add Storage in the Actions pane.
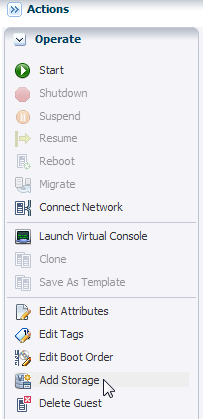
Description of the illustration vm_actions_pane.png
-
Click the Add icon to add storage.
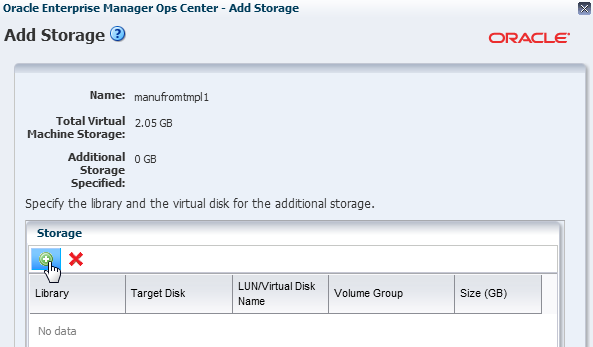
Description of the illustration vm_add_icon.png
The storage libraries associated with the corresponding virtual machine are displayed in the Library list. The library can be an Oracle VM Storage Repository, Static Block Storage, or Dynamic Block Storage library.
-
Select the Oracle VM Storage Repository library from the list.
-
Enter a virtual disk name in the LUN/Virtual Disk Name field, and specify the size for the disk. The selection of virtual disks varies according to the library selected. Click Finish to add the specified storage to the virtual machine.
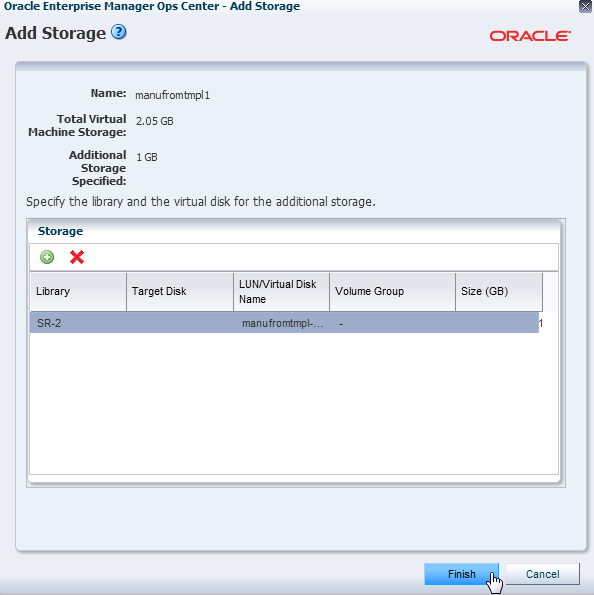
Description of the illustration vm_add_storage.png
The specified storage is added to the virtual machine.

Description of the illustration vm_storage_tab.png
Connecting a Virtual Machine to a Network
A network enables virtual machines to communicate with each other or with the Internet. When a network is assigned to a server pool, the network is accessible from each virtualization host in the pool. You can connect a virtual machine to an accessible network assigned to a server pool.
The network assigned to the server pool must be assigned the Virtual Machine role, so that it can be used to connect to the virtual machine. To see the roles assigned to the networks attached to a server pool, select an Oracle VM Manager from the Administration section of the Navigation pane, and then select the Networks tab from the center pane:

Description of the illustration vm_manager.png
In this example, a virtual machine, in shutdown state, is connected to a network.
The following procedure describes the steps to connect a virtual machine to a network:
-
Select Server Pools from the Assets section in the Navigation pane.
-
Select the virtual machine that is in shutdown state.

Description of the illustration vm_select_asset.png
-
Click Connect Network in the Actions pane.
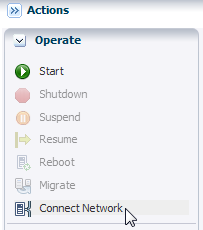
Description of the illustration vm_actions_pane2.png
-
Only available networks that are not currently connected to the selected virtual machine appear in a table. Select the networks to which you want to connect the virtual machine, then click Connect To Network to finish.
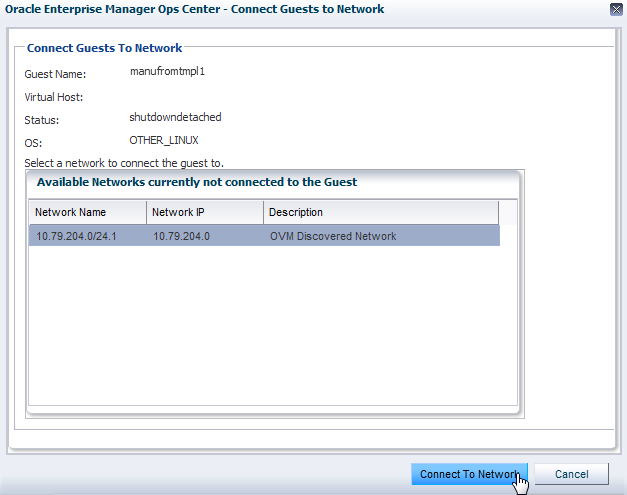
Description of the illustration vm_connect_network.png
The specified network is connected to the virtual machine.

Description of the illustration vm_network_tab.png
Editing CPU and Memory Utilization
The CPU allocation and memory are defined when you create a virtual machine. You can modify the virtual machine configuration and change the CPU or memory resources.
In this example, a virtual machine's CPU threads and memory allocation are modified.
The following procedure takes you through the steps to edit the CPU and memory utilization of a virtual machine:
-
Select Server Pools from the Assets section in the Navigation pane.
-
Select the virtual machine that is in shutdown state.

Description of the illustration vm_select_asset.png
-
Click the Summary tab to see the virtual machine's CPU and memory utilization.

Description of the illustration vm_summary1.png
-
Click Edit Attributes in the Actions pane.
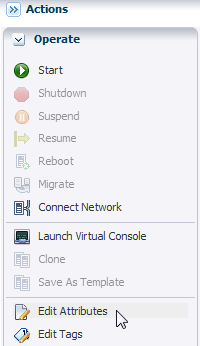
Description of the illustration vm_actions_pane3.png
The information displayed in the Summary tab is now editable.
-
In this example, change the number of CPU threads from 1 to 2, and double the amount of memory that you want to assign to the virtual machine. Click Save to save changes.

Description of the illustration vm_summary2.png
The specified CPU and memory configuration is applied to the virtual machine.

Description of the illustration vm_summary_tab.png
Editing Boot Order
Virtual machines have an option to edit the boot properties. The boot options are set according to the installation source. You can modify the order of the boot options in which you want to start the virtual machine. However, the supported boot order depends on the type of the virtual machine.
The following procedure describes the steps to edit the boot order in a virtual machine:
-
Select Server Pools from the Assets section in the Navigation pane.
-
Select the virtual machine that is in shutdown state.

Description of the illustration vm_select_asset.png
-
Click Edit Boot Order in the Actions pane.
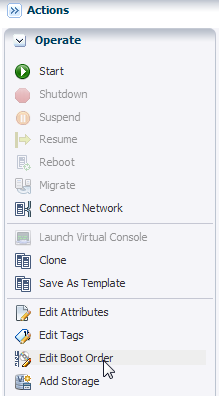
Description of the illustration vm_actions_pane4.png
The Edit Boot Order wizard is displayed. The Available Boot Options appear on the left side of the window. The Boot Order for the Boot Options appears on the right side of the window.
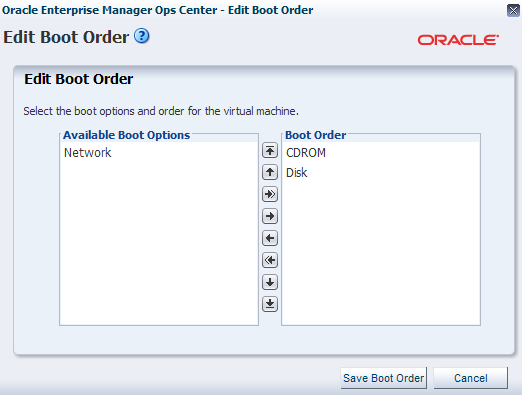
Description of the illustration vm_boot_order.png
-
Use the arrow keys to arrange the boot order, then click Save Boot Order. In this example, select Disk from the Boot Order list and use the top arrow to move it to the top of the Boot Order list.
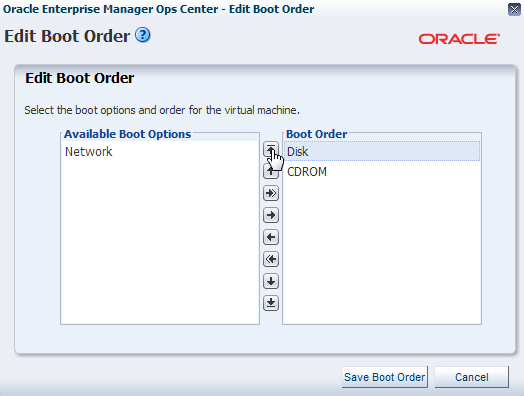
Description of the illustration vm_boot_order2.png
The order of the boot options for the virtual machine is saved. You can verify that the changes in the boot order have been saved when you open the Summary tab in the center pane, and look for the current boot order:

Description of the illustration vm_bootorder_tab.png
What's Next?
After managing your virtual machines configuration, you can manage their life cycle with operations such as start, suspend, resume, or reboot. You can also migrate your virtual machines from one virtualization host to another virtualization host.
Related Articles and Resources
The following chapters in the Oracle Enterprise Manager Ops Center Feature Reference Guide contain more information about virtual machines and server pools:
Other examples are available at http://docs.oracle.com/cd/E27363_01/nav/howto.htm.
Documentation Accessibility
For information about Oracle's commitment to accessibility, visit the Oracle Accessibility Program website at http://www.oracle.com/pls/topic/lookup?ctx=acc&id=docacc.
Oracle customers have access to electronic support through My Oracle Support. For information, visit http://www.oracle.com/pls/topic/lookup?ctx=acc&id=info or visit http://www.oracle.com/pls/topic/lookup?ctx=acc&id=trs if you are hearing impaired.
Oracle Enterprise Manager Ops Center Managing the Configuration of a Virtual Machine, 12c Release 1 (12.1.1.0.0)
E35862-01
Copyright © 2007, 2012, Oracle and/or its affiliates. All rights reserved.
This software and related documentation are provided under a license agreement containing restrictions on use and disclosure and are protected by intellectual property laws. Except as expressly permitted in your license agreement or allowed by law, you may not use, copy, reproduce, translate, broadcast, modify, license, transmit, distribute, exhibit, perform, publish, or display any part, in any form, or by any means. Reverse engineering, disassembly, or decompilation of this software, unless required by law for interoperability, is prohibited.
The information contained herein is subject to change without notice and is not warranted to be error-free. If you find any errors, please report them to us in writing.
If this is software or related documentation that is delivered to the U.S. Government or anyone licensing it on behalf of the U.S. Government, the following notice is applicable:
U.S. GOVERNMENT END USERS: Oracle programs, including any operating system, integrated software, any programs installed on the hardware, and/or documentation, delivered to U.S. Government end users are "commercial computer software" pursuant to the applicable Federal Acquisition Regulation and agency-specific supplemental regulations. As such, use, duplication, disclosure, modification, and adaptation of the programs, including any operating system, integrated software, any programs installed on the hardware, and/or documentation, shall be subject to license terms and license restrictions applicable to the programs. No other rights are granted to the U.S. Government.
This software or hardware is developed for general use in a variety of information management applications. It is not developed or intended for use in any inherently dangerous applications, including applications that may create a risk of personal injury. If you use this software or hardware in dangerous applications, then you shall be responsible to take all appropriate fail-safe, backup, redundancy, and other measures to ensure its safe use. Oracle Corporation and its affiliates disclaim any liability for any damages caused by use of this software or hardware in dangerous applications.
Oracle and Java are registered trademarks of Oracle and/or its affiliates. Other names may be trademarks of their respective owners.
Intel and Intel Xeon are trademarks or registered trademarks of Intel Corporation. All SPARC trademarks are used under license and are trademarks or registered trademarks of SPARC International, Inc. AMD, Opteron, the AMD logo, and the AMD Opteron logo are trademarks or registered trademarks of Advanced Micro Devices. UNIX is a registered trademark of The Open Group.
This software or hardware and documentation may provide access to or information on content, products, and services from third parties. Oracle Corporation and its affiliates are not responsible for and expressly disclaim all warranties of any kind with respect to third-party content, products, and services. Oracle Corporation and its affiliates will not be responsible for any loss, costs, or damages incurred due to your access to or use of third-party content, products, or services.