 Implementation Considerations
This chapter discusses:
Implementation considerations.
Definition of the business units.
PeopleSoft Payables control hierarchy.
Definition of the accounting environment.
Voucher and payment processing.
Setting up File Attachments.
Implementation Considerations
To implement a PeopleSoft application for an organization, you design the system's business structure and then you apply that structure to the system. Before you can do that, you must determine the best way to map the new system to the business structures, practices, and procedures.
Begin by examining the organization's needs thoroughly before entering data and transactions. You should:
Analyze the payables processing requirements according to the business and organizational needs.
Review the current environment and consider the changes that might be made now and in the future.
Because PeopleSoft Payables is sophisticated and configurable, there are a number of steps involved in implementing a new system. These are the key steps:
Determine the organization's payables requirements.
Configure PeopleSoft Payables to meet those requirements.
Set up the control tables.
Set up PeopleSoft security.
Convert data from existing systems.
Process vouchers and payments.
Generate reports and inquiries.
Definition of the Business Units
In PeopleSoft applications, a business unit is an organization or organizational subset that is independent with regard to one or more accounting or operational functions. Business units are flexible structural devices that you can use to implement PeopleSoft products based on how a business is organized. In PeopleSoft Payables, a business unit is defined as an independent transaction-processing entity.
When deciding on the business units for the organization, take a close look at the existing structure of the system. Examine the organizational elements (such as company codes, organization codes, and division codes) and relate them to business units. Consider whether you can simply map existing structures to business units or whether you need to modify structures to make the best use of PeopleSoft Payables.
For example, suppose that an organization has multiple subsidiaries. Each subsidiary operates as a separate entity with its own payables department and its own rules for invoicing and for tracking payables transactions. In such a case, it makes sense to set up separate payables business units for each subsidiary.
First, determine how many business units to use for the organization. Then consider the various payables processing rules and reporting requirements of the organization. Ask yourself whether you need to report some transactions separately from others. Also, consider whether some transactions must be reported together.
As you determine the optimal business unit structure for the organization, keep in mind that certain features such as the Interunit Accounting feature require multiple business units. You may decide to set up separate business units even if you do not need them for processing reasons. For example, you may want to maintain accounting control and balances at a level lower than the company level.
See Also
Setting Up PeopleSoft Payables Business Units
 General Ledger Distribution Considerations
Be sure to consider general ledger distribution as you determine how many business units you need. Before establishing payables business units, you must establish general ledger business units. If you use only Oracle's PeopleSoft financial applications, generally the PeopleSoft Payables business units are the same as the PeopleSoft General Ledger business units. You set up the general ledger first and then set up PeopleSoft Payables to mirror the general ledger. If you use a different general ledger system, then you cannot use business units. In that case, you must carefully consider how to distribute from PeopleSoft Payables to the general ledger.
Once you create your business units, you then associate the payables business units with the general ledger business units. The association does not need be one-to-one; you can consolidate multiple payables business units in one general ledger business unit. However, you cannot associate a single payables business unit with multiple general ledger business units. That is, you cannot have one payables business unit that distributes to multiple general ledger business units (with the exception of interunit accounting entries). This diagram illustrates this concept:
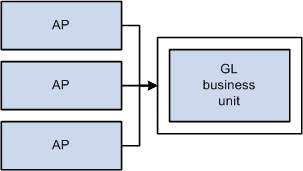
Payables and General Ledger Business unit relationships
PeopleSoft Payables Control Hierarchy
In PeopleSoft Payables, business units are the highest level of a hierarchy of defaults, called the control hierarchy, which facilitates both voucher entry and payment processing. As you formulate the PeopleSoft Payables structure, consider the five components of the control hierarchy that are key to PeopleSoft Payables:
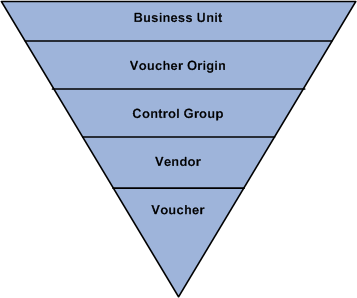
Levels of the PeopleSoft Payables control hierarchy
Default values entered at the business unit level appear automatically at the voucher level, unless you override the defaults with values stored at an intermediate level (namely, the voucher origin, control group, or vendor level). This hierarchy provides increased flexibility and control to fit unique business needs. For example, instead of requiring a PeopleSoft Payables user to enter the same default values repeatedly on vouchers, the system uses the control hierarchy to enter the predetermined values automatically. Then the user can override these values on the voucher.
When you enter default values and select processing rules at the levels that govern the control hierarchy, the system initially validates the information for you. The system then validates the data again during transaction processing to verify that it has the correct values assigned at the level that you designate.
This section reviews the components of the control hierarchy and their role in a PeopleSoft Payables implementation. As you set up control tables and prepare to process vouchers and payments, you need to understand how the control hierarchy works.
This section discusses:
Business units
Voucher origins
Control groups
Vendors
Vouchers
Business Units
A PeopleSoft Payables business unit is an independent processing entity. Each business unit acts as a separate area of control, representing the primary level at which system tables can be controlled independently.
Depending on the business requirements, you can set up business units to share core control tables such as calendars, payment terms, and vendors. In the PeopleSoft system, TableSet processing handles this setup for you automatically, eliminating the need to maintain multiple sets of data for each business unit.
See Also
PeopleTools PeopleBook: PeopleSoft Application Designer
Setting Up PeopleSoft Payables Business Units
Voucher Origins
Each transaction entered into PeopleSoft Payables must have a valid origin, such as online or batch processing, that you define in the Voucher Origin table. You must have at least one origin, and each user must be associated with an origin. You can set up control values at the voucher origin level to override business unit defaults and automatically appear lower levels in the control hierarchy.
For example, if you have automated systems that pass information to PeopleSoft Payables—such as an electronic data interchange (EDI) interface—you might define an origin specific to those systems. Or you might set up and assign particular origins to individual data entry clerks, associating each voucher origin with a specific group of approved vendors and allowing each data entry clerk to create vouchers for those vendors only. For example, suppose that certain foreign invoices have distinct payment terms and other processing rules; you could set up a voucher origin with those default values and assign the origin to the data entry clerk who handles foreign vendors.
See Also
Control Groups
Use control groups to maintain control over vouchers. Control groups enable you to:
Post several groups of vouchers in one step.
Divide large numbers of vouchers among data entry clerks while retaining centralized control over voucher processing.
Use separate processing rules for a particular vendor's vouchers within a business unit.
See Also
Defining Voucher Control Groups
Vendors
You can define a set of vendors for each business unit or share vendors across multiple business units. You can also associate vendors with other vendors in the system and—if you use PeopleSoft Receivables—associate a PeopleSoft Payables vendor with a PeopleSoft Receivables customer for reporting purposes.
Vendors can have multiple addresses and multiple locations. Addresses are the physical addresses of the vendor; a location corresponds to a unique way of doing business.
You use the location level to:
Define payment terms and banking information for the vendor.
Define a number of payment parameters that are used during payment processing.
Generate separate checks for each voucher at the location level.
Specify matching options if matching is used to approve vouchers for payment.
At the location level, for example, you specify the number of days to delay discounted payment after the discount payment date has been reached—as well as the number of days to delay net payment after the net due date has been reached. This provides additional payment flexibility based on how well you know vendors. For example, you can indicate how long a vendor typically waits for payment while still giving a discount.
Maintaining vendor data is simple with PeopleSoft Payables. You can:
Approve, inactivate, and reactivate vendors.
Record vendor information and conversations.
Report on vendor activity and outstanding payment balances, as well as withholding and value-added tax (VAT) information.
See Also
Maintaining Vendor Information
Vouchers
The lowest level of the control hierarchy is vouchers. Vouchers are supplier invoices with system applied defaults. You can enter them either manually using the online pages or automatically using the Voucher Build Application Engine process (AP_VCHRBLD). Each voucher is assigned a unique identifier—a voucher ID— either automatically or manually; the voucher ID provides a means for tracking all invoices, adjustments, and payments through the system.
See Also
Entering and Processing Vouchers Online: General Voucher Entry Information
Definition of the Accounting Environment
PeopleSoft Payables uses tables to store not only the data for business transactions but also the accounting environment and processing rules that drive the system and provide consistency while minimizing data entry. Before you can begin processing vendors, vouchers, and payments, you must set up the accounting framework, which includes calendars, ChartFields, ChartField values, currency types, user profiles, general ledger journal information, and so on.
See Also
PeopleSoft Application Fundamentals 9.1 PeopleBook
PeopleSoft General Ledger 9.1 PeopleBook
Defining Procurement Controls for General Ledger Business Units
ChartField Combination Editing
You track payables transactions based on the ChartField combinations that you define when you set up ChartField combination editing in PeopleSoft General Ledger. PeopleSoft General Ledger uses your accounts in combination with other ChartFields to create journal entries. In PeopleSoft Payables, ChartField combination editing provides a method to validate online and batch voucher entry accounting distribution information.
By defining valid combinations, you can filter entries before you post them to ledgers, saving time and effort during reconciliation and closing. Although you employ ChartField combination editing rules during online and batch voucher entry, the PeopleSoft General Ledger Journal Editing Application Engine process (GL_JEDIT) performs the final validation of journal entries before you post them to the ledger.
You can set up ChartField combination editing to reject vouchers with ChartField combination editing errors, recycle them, provide a warning, or perform no ChartField combination editing at all. You can set these options at the business unit, origin, control group, and vendor levels of the PeopleSoft Payables control hierarchy.
See Also
Defining Procurement Controls for General Ledger Business Units
Defining and Using ChartFields
Editing ChartField Combinations
Voucher and Payment ProcessingThis section discusses:
Voucher processing.
Payment processing.
Voucher Processing
PeopleSoft Payables provides control over voucher processing and enables you to control voucher header information. The system:
Checks for duplicate invoices.
Calculates and confirms taxes.
Converts the transaction currency to the base currency.
Assigns default payment terms and calculates the payment due dates.
Validates your vendors against financial sanctions lists if financial sanctions validation is required.
You also have control over voucher line items. The system assigns numeric line numbers for you to ensure that each has a unique identifier. When you enter merchandise amounts on voucher lines, the sum of the line amounts must equal the gross voucher amount less the sum of freight, sales tax, and VAT entered on the voucher header. You can also define the sales and use tax and VAT at the voucher line level. In the event of an imbalance, you determine how the system responds—either rejecting or recycling vouchers until they are correct.
All vouchers must be approved before they can be paid. There are three ways to approve vouchers:
Matching vouchers to purchase order, receiver, and inspection information.
Matching occurs automatically based on the match rules—a set of rules and tolerances—that you define for a purchase order transaction. If the voucher successfully matches, it is available for payment. If the voucher does not successfully match and requires an adjustment, the system can automatically create a debit memo.
If a voucher does not pass matching, you can still pay it if you have selected the Pay Unmatch Voucher option on the User Preference - Procurement: Payables page for your user ID. If do not select the Pay Unmatch Voucher option, you can only pay vouchers with a Matched or No Match match status.
Routing vouchers through worklists and email using Workflow.
Workflow approval is most often used for vouchers that are not related to purchase orders, but it is not limited to that use. If you want, you can record a voucher as preapproved. The voucher is not routed for approval, and it is available for payment immediately—provided that it has been matched or that matching is not necessary.
Manually approving individual vouchers online.
The Voucher Posting Application Engine process (AP_PSTVCHR) creates balanced accounting entries for vouchers. The system combines information entered for a voucher with other control information—offset accounts stored on the accounting entry templates and ChartField inheritance rules—to create the balanced entries. Vouchers do not have to be approved for accounting entries to be created.
You post vouchers through a batch process that you run periodically using Process Scheduler. You can continue to process new transactions online during posting.
PeopleSoft Payables also enables you to unpost vouchers—that is, you can back out the accounting entries made to accrue the liability and reopen the vouchers for amendment or closure.
Once vouchers are posted, the information created is available for distribution to other business processes, such as the Journal Generator Application Engine process (FS_JGEN), which converts payables accounting entries to general ledger journal entries.
See Also
Understanding Financial Sanctions Validation
Entering Invoice Information for Online Vouchers
Running the Voucher Posting Process
Payment Processing
The payment processing included in PeopleSoft Payables enables you to create disbursements for transactions that flow through PeopleSoft Payables.
PeopleSoft Payables supports a number of payment formats: system check, automated clearing house (ACH), electronic funds transfers (EFTs), wire transfers, giros, drafts, direct debits, and letters of credit. The system is delivered with several, ready-to-use EFT formats particular to local needs.
The PeopleSoft Payables Payment Interface also supplies a means for processing payments for transactions outside the PeopleSoft Payables system. This interface is used by PeopleSoft Treasury to make settlement payments and by PeopleSoft Expenses to make expense payments. The interface integrates with the PeopleSoft Financial Gateway functionality, enabling another means of electronic payment processing for EFT, ACH, and wire transfers. You can also use the interface to process payments for other in-house systems.
As part of the voucher entry process, the system schedules vouchers to be paid based on the pay terms and holiday options. If pay terms include discounts, the system also calculates a discount due date. You create pay cycles to group types of vouchers to be paid in a single payment run. For example, you might want to have one payment cycle for regular vendors and another for employee reimbursements or check requests.
Each pay cycle that you create is essentially a reusable payment selection template that specifies the selection criteria the system uses to determine which approved vouchers should be paid. For example, you can select payments based on business unit, bank and bank account, vendor pay group, pay through date, and payment method, among others.
Note. During payment processing the system validates your vendors against financial sanctions lists if financial sanctions validation is required. The system does not allow payments to vendors who are potential matches to the financial sanctions lists.
The creation of accounting entries for payments occurs during payment posting. As you post payments, the system generates corresponding accounting entries to relieve the liability, account for discounts earned (or lost), and generate an offset either to the designated cash account or to a PeopleSoft Payables clearing account if so designated at the bank account level. Like the Voucher Posting process, the Payment Posting Application Engine process (AP_PSTPYMNT) is a batch process that runs in the background.
See Also
Understanding Financial Sanctions Validation
Running the Payment Posting Process
Pay Cycle Processing Using the PeopleSoft Financial Gateway
Establishing FTP Servers for Attachments
To set up attachments to use with customers, products, buying agreements, sales orders, quotes, and RMAs, use the File att. admin (file attachments administration) component.
This section discusses how to set up file attachment servers.
Page Used to Set Up Attachments for Transactions
|
Page Name |
Definition Name |
Navigation |
Usage |
|
SAC_ATT_ADMIN |
Set Up Financials/Supply Chain, Common Definitions, File Attachments, Administer File Attachments |
Identify servers on which to store attachments and define component names and paths where the attachments are stored. |
Setting Up File Attachments
Access the Administer File Attachments page (Set Up Financials/Supply Chain, Common Definitions, File Attachments, Administer File Attachments).
Attachments to PeopleSoft Payables transactions are stored and retrieved from the locations defined here. System administrators can configure one or more servers to store attachments.
Using this page, system administrators can set up new servers and identify the active server. Administrators can add or modify the FTP root folder and the component specific subfolder for FTP servers.
Note. Users using an FTP server for attachment should keep in mind that upload time will be affected by both the connection from the file location to the database, and the connection from the database to the FTP server. The number of possible simultaneous connections is limited, which will increase the upload time for any upload that has to wait.
File Attachment Servers
|
Pick Active Server |
Select the server ID of the active (or default) server where all newly created attachments are stored. You can switch the active server at any time. All previously created attachments are still retrieved from the server where they were originally stored. The attachments keep a reference to the original server. This field is required. |
|
Add FTP Server (add file transfer protocol server) |
Click to insert a new row in the grid to define a new FTP server for attachments. |
|
Add Database Server |
Click to insert a new row in the grid to define a new database server for attachments. |
|
ID |
Displays the system-assigned ID number for each server on this page. When an attachment is stored to the server, the server ID is inserted into the attachment record. When you give a request to download (view) this attachment, the system retrieves it from the original server based on this server ID. |
|
Identifies the type of server based on whether you click the Add FTP Server button or the Add Database Server button. Once you save the row and exit the component, you cannot change the server type. Values are:
|
|
|
Login |
Enter or change the login name. This value is required for FTP servers only. |
|
Password |
Enter or change the password corresponding to the Login Name. The password is required for FTP servers only. |
|
Server Name/Record Name |
Enter the machine name for the FTP server. Once you save the information, change the machine name only if the same FTP server is renamed. To add a different FTP server, click the Add FTP Server button to insert a new row into the grid and define the new server. You cannot delete servers because attachments could already be stored on them. |
|
Path |
Enter the subdirectory path under the root of the server FTP, where all attachments are to be stored. This value is required for FTP servers only. |
Note. You cannot delete a server after you save the row and exit the component. After you exit the component, the system assumes that attachments can be stored at this server location.
Component Subdirectories
System administrators use this page to specify a subdirectory under the FTP root for any component. When uploading files, the system looks to this record and uses any subdirectory defined. The component subdirectory can be modified at any time. Define the component (in the installed applications) with a subdirectory under the FTP root (FTP servers only).
|
Component |
Enter the component for the installed application. |
|
Subdirectory |
Enter the subdirectory path. |