 Understanding Methods of Order Creation
This chapter provides an overview of how orders are created and discusses how to:
Create order numbers.
Create or modify orders online in PeopleSoft Inventory.
Create online orders using express issue in PeopleSoft Inventory.
Create orders using data from a third-party system.
Create sales orders using PeopleSoft Order Management.
Source demand from PeopleSoft Purchasing.
Create Return to Vendor (RTV) Stock Requests
Use par location management to create orders.
Accept stock requests from PeopleSoft Supply Planning.
Process work orders from PeopleSoft Maintenance Management.
Approve stock requests.
Monitor order fulfillment status.
Understanding Methods of Order Creation
The word orders is a generic term that covers all of the possible sources of demand managed by PeopleSoft Inventory. Orders can come from a variety of sources, including:
Material stock requests (MSRs) entered into PeopleSoft Inventory.
MSRs created from third-party data that was processed through the PeopleSoft Integration Broker.
Sales orders from PeopleSoft Order Management.
Sourced demand from PeopleSoft Purchasing.
Return to vendor stock requests based on RTV transactions in PeopleSoft Purchasing.
Orders created by the Create Par Replenishment Requests process (INPGCDMD) for stocked items.
Planning messages from PeopleSoft Supply Planning.
Work orders from PeopleSoft Maintenance Management.
Understanding Demand
Each order that is inserted into the demand table (IN_DEMAND) is identified by eight fields that make up its demand key: inventory business unit, demand source, source business unit, order number, order line, schedule line number, demand line number and item ID.
 Demand Sources
Because many interfacing PeopleSoft applications can assign sequential order numbers to its own orders passed to PeopleSoft Inventory fulfillment, order numbers may no longer be unique when PeopleSoft Inventory accepts the requests. To ensure that the system stores unique order information, PeopleSoft Inventory requires that you identify each order with the Inventory business unit, demand source (the PeopleSoft application creating the order), source business unit (the business unit that created the order), and the order number. For example, a sales order that is sent to PeopleSoft Inventory for fulfillment would be uniquely identified within the inventory business unit by the inventory business unit, the demand source code of OM, the order management business unit, and the order number assigned in the PeopleSoft Order Management.
These abbreviations indicate valid sources of demand:
|
IN |
Demand entered in PeopleSoft Inventory using the Create/Update Stock Request component, the Express Issue component (except for return-to-vendor), the Create Par Replenishment Requests process, or the following demand fulfillment EIPs; Inventory_Create_Stock_Request, Inventory_Front_End_Shipping, and Inventory_Shipping. |
|
OM |
Demand originating from sales orders in PeopleSoft Order Management. |
|
PL |
Demand created by the Apply Planning Updates process for new planned messages originating from PeopleSoft Supply Planning. |
|
PR |
Demand created from requisitions in the PeopleSoft Purchasing sourcing processes. |
|
RT |
Demand to return stock to a vendor. This demand source is based on a return-to-vendor request created using the Express Issue component, the Create/Update Stock Request component, the Inventory_Create_Stock_Request EIP, or the Inventory_Shipping EIP. |
|
WM |
Demand created by a work order from PeopleSoft Maintenance Management |
Creating Order Numbers
You can enter order numbers for sales orders and material stock requests manually or set up automatic numbering. If you use automatic numbering and you accept NEXT as the order number, PeopleSoft Inventory generates an order number based on the default sequence defined on the User Preferences - Inventory page. If no default sequence exists, the system generates a number based on the default sequence specified for material stock requests on the Automatic Numbering page. For sales orders, you can also set up a default sequence for a user on the User Preferences - Orders - Sales page and the Automatic Numbering page.
Here is how to use prefixes with automatic order numbering:
Set up automatic numbering for sales order and material stock request number types on the Automatic Numbering page.
For each number type, add rows to define three-character start sequences to use as prefixes for automatically generated order numbers.
Use the User Preferences component to define the default sequence for a specific user.
Enter a sales order or material stock request, accept NEXT to use the default sequence or select another sequence from the available options.
Save the sales order or MSR to append an automatically generated number to the selected prefix.
Remember, if you're using automatic numbering, you define the start sequences (prefixes) for sales orders and MSRs. Order number prefixes help you distinguish the order source or control order processing sequence for processes that sort order lines by order number. For example, if you opt on the Setup Fulfillment-Reservation page to sort demand lines by order number, the system processes higher alpha-value prefixes first. Thus, orders starting with AAA are processed before orders starting with XXX.
See Also
Understanding Order Fulfillment Processing
Defining Inventory User Preferences
Setting Up Automatic Numbering
Creating or Modifying Orders Online in PeopleSoft
Inventory
The Create/Update Stock Request component is an online method that enables you to create new stock requests, modify requests that have not yet been reserved, and add new order lines or schedules to existing requests, regardless of the status of the other lines on the request.
To create orders using the Create/Update Stock Request component, you can:
Create a complete material stock request (MSR) on the Stock Request Summary page.
Enter basic information on the Stock Request Summary page, and then add additional line details on the other pages in the Create/Update Stock Request component.
When creating a material stock request in the Create/Update Stock Request component, you can perform many tasks, including:
Enter required stock request information.
Enter line-level details.
Add shipment details.
Enter interunit transfer and accounting information.
Create a RTV stock request by retrieving data from a Return to Vendor transaction in PeopleSoft Purchasing.
Review or change reservation and backorder rules.
Enter transaction comments.
Modify order addresses.
Override ChartFields and information for PeopleSoft Project Costing.
Select configuration codes.
Selecting the Request Type for a Material Stock Request
When you add a new online material stock request in PeopleSoft Inventory, the system presents you with a search dialog in which you must specify the type of order that you are entering. Your selection determines which fields appear in the Create/Update Stock Request component. Values are:
External Order: Select to enter an MSR for an external order. While this request type enables you to identify the individual receiving the stock by using a ship to customer rather than a location, it is not intended to replace the features of a sales order. To complete a full billing and invoice transaction, create a sales order in PeopleSoft Order Management.
InterUnit Transfer: Select to enter a MSR that transfers stock from one PeopleSoft Inventory business unit to another. PeopleSoft Cost Management does not support interunit pricing for non-cost items.
Internal Issue: Select to enter a MSR for an internal order (an order for a department or location within your organization).
Vendor Returns: Select to enter a MSR for an return to vendor order (an order based on an RTV transaction for PeopleSoft Purchasing).
See Also
Changing, Canceling, and Holding Orders
Understanding Order Fulfillment Processing
Common Elements Used in This Section
|
Unit or Business Unit |
Within PeopleSoft Inventory, this field is the inventory business unit issuing the stock request. |
|
Order No |
The combination of inventory business unit, demand source, source business unit, and order number will identify a specific order in fulfillment. If you're using auto-numbering and adding a new order, the order number is either NEXT or the starting sequence that you entered. |
|
Line or Order Line |
Enables you to override the default order line value. This field is unavailable for entry in Update/Display mode. |
|
Schedule or Sched Line |
Enables you to override the default schedule line number. This field is unavailable for entry in Update/Display mode. |
|
Demand or Demand Line |
Displays the demand line number for the current line. This field is system-controlled. |
|
Item Search/Item Links |
Click the button located next to the Item ID field to access a transfer page of item-related links. On the transfer page, click the various links to search for items, select item substitutes, or change item definitions. Note. Link options on transfer pages vary depending on the component and the item with which you are working. Note. Only items with a status of Active or Discontinue are valid options. |
|
State |
The state of the order is displayed to the right of the Order No. field; this is the farthest downstream state of any demand line on the order, short of canceled. The state of the individual demand line is displayed to the right of the Demand Line field. |
|
Available to Promise |
Click to access the Item/Product Availability inquiry page, where you can ascertain the availability of the selected item. |
|
Config Code |
Click to access the Configuration Code Information page, where you can select a configuration code for this configured item. Items are defined as configured on the Define Item-Configuration page. |
|
Kit ID |
This field displays the product kit ID when the demand line contain a component of a product kit. Select the link on the product kit ID to access the Kit Display page where you can view all the components within this kit. |
|
Manage Loads |
Select this link to access the Manage Loads page for a saved order. Using this page, you can combine order lines into a load for shipping and view actual load weight and volume against the ship via maximum weight and volume capacity. See Managing Loads. |
|
Stock Requests |
Select this link to access the Stock Requests inquiry page where you can review the status of the order. |
|
Report Manager |
Select this link to access the Report Manager page where you can view the status of processes and reports that you have launched from the Create/Update Stock Request page. |
See Also
Transferring Stock Between Business Units
Pages Used to Create Material Stock Requests
|
Page Name |
Definition Name |
Navigation |
Usage |
|
EZ_ISSUE_INV |
Inventory, Fulfill Stock Orders, Stock Requests, Create/Update Stock Request |
Enter the required information for a material stock request. |
|
|
MATERIAL_ISS2_INV |
Click the Quantity/Date Detail link in the Create/Update Stock Request component. |
Add line-level detail to a stock request. |
|
|
MATERIAL_ISS1_INV |
Click the Shipment Detail link in the Create/Update Stock Request component. |
Add destination and shipping information to a stock request. |
|
|
MATERIAL_ISS3_INV |
Click the Accounting/ IUT Detail link in the Create/Update Stock Request component. |
Enter interunit transfer information and associate the transaction with its appropriate override general ledger accounting debit ChartFields. |
|
|
IN_DEMAND_TPRC_SP |
|
For interunit transfers only, this page displays the detailed information about the estimated transfer price for this demand line. The transfer price can be broken out into multiple cost elements based on the calculation of the transfer price. Before the Depletion process, the transfer price is an estimate based on past transactions. PeopleSoft Cost Management does not support interunit pricing for non-cost items. |
|
|
Reservation / Backorder Rules Reservation / Backorder Rules page |
MATERIAL_ISS4_INV |
Click the Reservation / Backorder Rules link in the Create/Update Stock Request component. |
Review or change the reservation and backorder rules defaulting from the Setup Item Fulfillment-Reservation/Backorder Rules page and the Setup Fulfillment-Reservation page. |
|
MATERIAL_ISS5_INV |
Click the Comments link in the Create/Update Stock Request component. |
Enter comments for a specific stock request line. |
|
|
MATERIAL_ISS6_INV |
Click the Custom link in the Create/Update Stock Request component. |
Enter values in the user-defined fields for the material stock request. |
|
|
INV_ADDRESS |
Click the Override Address link in the Create/Update Stock Request component. |
View and modify the ship to address for the order or order line. |
|
|
RTV Selection (return-to-vendor selection) |
EXPRESS_ISSUE_RTV |
Click the Fetch RTV link on the Stock Request Summary page. |
Select RTV orders to issue. Note. This page is available only for vendor return requests. |
|
EZ_ISSUE_CFH_INV, EZ_ISSUE_CFL_INV |
Click the Override ChartFields link in the Create/Update Stock Request component. |
Override the debit ChartFields defined for the distribution type for the order or order line. In addition, enter PeopleSoft Project Costing information for the order or order line. |
|
|
MSR_OPT_INV_SP |
Click the Copy to Existing Demand Lines link on the Stock Request Summary page. |
Select the information to copy to the currently defined order lines for the stock request. |
|
|
CP_CFGCDE_SEC_PNL6 |
Select the Config Code link in the Create/Update Stock Request component. |
Select a configuration code for a lot-controlled, configured item. Items are defined as configured on the Define Item-Configuration page. |
Entering Required Stock Request Information
Access the Stock Request Summary page (Inventory, Fulfill Stock Orders, Stock Requests, Create/Update Stock Request).
|
Destination Unit |
If you are entering an interunit transfer, indicate which business unit is requesting the stock. The ship to customer and location information defined for the destination business unit appears in the Line Defaults group box. Note. An interunit transfer can go to only one destination business unit. In addition, if you change the destination unit and the new unit requires closure calendar validation and processing for receiving activities as defined on the Closure Calendar page, the system validates the recalculated scheduled arrival date against the calendar. If the new date is a closure date, a warning message appears. Either accept the closure date by selecting No, or reschedule by selecting Yes. If you select Yes, the system returns the first future valid date for receiving operations. |
|
Override GL |
If this is an internal order, you can create an interunit expensed issue by overriding the PeopleSoft General Ledger business unit against which the transaction is costed. The system validates the destination business unit's ChartFields against the new value, costs the issue using the defined interunit transfer price, and records interunit accounting entries for an interunit expensed issue. If an override value was entered on the stock request, that value appears here; otherwise, the field is blank when the page opens. Note. This field is displayed or hidden based on your selection in the Display GL BU Override check box on the Inventory Display Options page. This field is available only for internal requests, not for interunit transfers or external requests. |
|
Fetch RTV (fetch return to vendor) |
Click to access the RTV Selection page, where you can select RTV IDs for processing. |
|
Export |
Indicates that the order is an intercompany transfer requiring export documentation. This field is populated at the order header level for the ship to customer defined for the destination business unit. If you override the setting here, the system transfers your selection to the line level, where you cannot change it. |
|
Increment Demand Line |
Determines which value increases when you click the Add button to insert a new stock request line. Select one of these options: Order Line: Creates another order line for the same stock request. The system automatically copies the address information defined on the Stock Request Summary page (along with the customer, ship to, location, load ID, carrier ID, and ship via) to the new order line when you enter an item ID. If no address information is defined on the Stock Request Summary page, the system copies the information from the previous order line to the new line. Sched Line: Creates a new shipment schedule line for the current order line. The system copies the information from the previous schedule line to the new line, with the exception of request date, schedule ship date, and requested quantity. |
|
Partial Orders Can Ship |
If your setup does not include reservation and backorder rules, then select this check box to permit shipment of the stock request without fulfillment of the entire order. If you do not select this option, you cannot ship the request until all order lines are reserved, picked, and confirmed. |
|
Reserve |
Click this button to launch the online reservations process or the Reserve Materials process (IN_FUL_RSV) for a specific order. The Reserve button on this page displays if you have not selected the Auto Process at Save check box on the Auto-Processing Options tab of the Fulfillment Engine Options page. If the check box was selected, then this button is hidden and the online reservations process or the Reserve Materials process is launched when you save this component. On the Setup Fulfillment-Reservation page:
|
|
|
In the Create/Update Stock Request component, click this button to print the Material Issue Document report (INC6501). This report is written in Oracle BI Publisher using the XMLP report name INX6501. |
|
In Process |
Displays yes if any demand line in the order is currently locked by a batch process. No updates are allowed for in process demand lines. |
Line Defaults
Enter high-level order line information for the stock request. When you enter an item ID for a new order line (on this page or on other pages in the Create/Update Stock Request component), the system copies this information to the line.
Note. The entries made here affect only newly created order lines. To change the values for existing order lines, use the Demand Line Override Options page.
|
Customer, Ship To, and Location |
Available if the stock request is for an external order or an interunit transfer requiring intercompany processing. These three fields work together to define correct shipping information for a stock request. If the stock request is an interunit transfer requiring intercompany processing, the default values come from the ship to customer assigned to the destination business unit, and you cannot override them. If the request is an interunit transfer not requiring intercompany processing, the system treats it as an internal order. For an external order, you can select the customer first, and the ship to and location information associated with the customer appear by default. |
|
Name, Ship Cust and Location |
Available if the stock request is for an internal order. If you enter the location first, the system enters the ship to customer automatically. |
|
Override Address |
Select this link to access the Order Address page, where you can view or override the ship to address for the order. You cannot delete the override address for a return to vendor stock request; however, you can alter the address. |
|
Detail |
Click this link to access the Load Capacity Inquiry page, where you can view the weight and volume capacity of the order, plus the load, carrier, and shipping information. |
|
Carrier ID and Ship Via |
The system automatically populates these fields with the information associated with the load and displays the Load Schedule (the scheduled date for the load). If you have not specified a load, enter the appropriate carrier ID and ship via. For external issues or intercompany transfer orders, the default values for these two fields come from the ship to customer. |
|
Distrib. Type (distribution type) |
Enter or change the distribution type used to create accounting entries for this transaction. A default value displays if you have defined one on the Default Distribution Type page. The default value is based on the request type that you selected when creating this order:
|
|
Pre-Allocate |
Click this button to save the order and automatically create a pre-allocation for all the demand lines in the order. The system selects the material storage locations to allocate to the demand lines. The Pre-Allocate button is only displayed if the user has been granted access to the Allocation Workbench using standard PeopleSoft security. This button launches the pre-allocations process for any applicable demand lines in the unfulfilled or releasable fulfillment states that have some un-allocated quantity (requested quantity less allocated quantity). Lines which were originally not allocated are greyed out during processing. |
|
Request Kit |
Select this link to access the Kit Request page where you can add a product kit to this material stock request. |
|
Override ChartFields |
Select to access the ChartField Overrides page where you can override the debit ChartFields defined for the distribution type. In addition, enter any PeopleSoft Project Costing information. |
|
Copy to Existing Demand Lines |
Select to access the Demand Line Override Options page, where you can specify the data to copy from the header level to the currently defined order lines on this stock request. |
Demand Lines
|
Line |
View or change the default order line value. This field is unavailable for entry in Update/Display mode. |
|
Schedule |
View or change the default schedule line number. This field is unavailable for entry in Update/Display mode. |
|
Demand |
View the system-defined demand line number. |
|
Qty Requested |
Enter the shipment order quantity. |
|
UOM |
Enter a unit of measure defined as an ordering UOM for this item ID on the Units of Measure page (Items, Define Items and Attributes, Units of Measure). A default value can populate this field using the following default hierarchy:
Note. In order to have the default sequence proceed to the second step (the item's Units of Measure page), you must define all units of measure on the Units of Measure page with the value of Whole Nbr in the Quantity Precision field. |
|
Schedule Date and Schedule Time |
The date and time that the order is scheduled to ship in order to arrive by the request date. Note. The default scheduled ship date for MSRs is the current date and time. If the business unit requires closure-calendar validation and processing for shipping operations as defined on the Closure Calendar page, and if the scheduled shipment date is an exception shipping date, the system uses the first valid future shipping date. |
|
In Process |
Displays yes if the demand line is currently locked by a batch process. No updates are allowed for in process demand lines. |
Note. You can add multiple lines to the order using this section of the Stock Request Summary page; just click the Add button to the right of the line.
Note. To enable the user to launch the online reservations process or the Reserve Materials process by saving the Stock Request Summary page, go to the Auto-Processing Options tab of the Fulfillment Engine Options page and select the Auto Process at Save check box. Then, on the Setup Fulfillment-Reservation page select the Online option for the MSR Entry Reservations field to launch the online reservations process or the Background option to launch the Reserve Materials process.
Line Menu
Using the Line Menu field, you can go to several different pages. To view or change information for a particular demand line, select the line using the radio buttons to the left of the line, then use the Line Menu field to select your option. You can view or change the order using the following choices:
|
Allocations |
Select to create a pre-allocation for the selected demand line using the Allocation Workbench. Using the Allocation Workbench, you can create a pre-allocation, lot-allocation, or move the demand line to the Released state and create a standard allocation. This option is only displayed if the user has been granted access to the Allocation Workbench using standard PeopleSoft security. |
|
Allocate Lot |
Select to access the Lot Allocation Detail page, where you can allocate quantity by lot. This option is only displayed if the user has been granted access to the Allocate Lots component using standard PeopleSoft security. This option is only available for lot-controlled items whose demand lines are eligible for lot allocation. The business unit associated with the demand line must be set up using the Allow Lot Allocation option on the Inventory Definition - Business Unit Options page. In addition, the demand line must already have been approved either manually using the Approve Stock Request page or by selecting the Auto Stock Approval option on the Setup Fulfillment page. If a backorder exists for a demand line, the Allocate Lot button is unavailable, even if the demand line is eligible for lot allocation. To lot-allocate demand lines with associated backorders, use the Allocate Lots component. |
|
Available to Promise |
Select to access the Item/Product Availability inquiry page, where you can ascertain the availability of the selected item. |
|
Config Code |
Select to access the Configuration Code Information page, where you can select a configuration code for a configured item. Items are defined as configured on the Define Item-Configuration page. |
|
Peg to Demand |
(interunit orders only) Select to access the Pegging Workbench page where you can link demand to this interunit order. An interunit order is sent to a receiving inventory business unit where it is supply to fulfill demand. Use this link to peg this interunit order, as supply, to a demand, such as a sales order, in the receiving business unit. You can only peg an order when the line is in an unfulfilled state. This link is only available if the Auto Stock Approval option on the Setup Fulfillment page has been set or pegging security has been defined for the user on the User Security page. |
|
Show Pegged Demand |
(interunit orders only) If this line has been pegged to supply stock for a demand (such as, an outgoing MSR or sales order), then select to access the Pegging Inquiry page where you can view the pegging information without changing it. This link only displays if this line is currently pegged. |
|
Peg to Supply |
Select to access the Pegging Workbench page where you can link to incoming supply to fulfill this order. You can only peg an order when the line is in an unfulfilled state. This link is only available if the Auto Stock Approval option on the Setup Fulfillment page has been set or pegging security has been defined for the user on the User Security page. |
|
Show Pegged Supply |
If this line has been pegged to fulfill the demand from a supply (such as, a purchase order or an incoming interunit transfer), then select to access the Pegging Inquiry page where you can view the pegging information without changing it. This link only displays if this line is currently pegged. |
|
Update Kit Quantity |
If this line contains a product kit component, then select this value to access the Update Kit Quantity page where you can increase or decrease the product kit quantity on this material stock request. Each demand line containing a kit component on the stock request is updated to match the new product kit quantity. |
See Also
Defining Reservation and Backorder Rules
Allocating Orders in Demand Fulfillment
Creating Shipping Documentation
Understanding Order Fulfillment Processing
Defining PeopleSoft Inventory Business Unit Display Options
Setting Up the Accounting Rules Structure
Managing Interunit Transfer Pricing and Additional Costs
Entering Line-Level Details
Access the Quantity/Date Detail page (Click the Quantity/Date Detail link in the Create/Update Stock Request component).
|
Kit ID |
This field displays the product kit ID when the demand line contain a component of a product kit. Select the link on the product kit ID to access the Kit Display page where you can view all the components within this kit. |
|
Qty Requested |
The quantity requested for the order line. If this order line contains a product kit component and you override this value:
|
|
UOM |
Enter a unit of measure defined as an ordering UOM for this item ID on the Units of Measure page (Items, Define Items and Attributes, Units of Measure). A default value can populate this field using the following default hierarchy:
Note. In order to have the default sequence proceed to the second step (the item's Units of Measure page), you must define all units of measure on the Units of Measure page with the value of Whole Nbr in the Quantity Precision field. |
|
Allocate Lot |
Click to access the Allocate Lots page, where you can allocate quantity by lot. This button is only available for lot-controlled items whose demand lines are eligible for lot allocation. The business unit associated with the demand line must be set up using the Allow Lot Allocation option on the Inventory Definition - Business Unit Options page. In addition, the demand line must already have been approved either manually using the Approve Stock Request page or by selecting the Auto Stock Approval option on the Setup Fulfillment page. If a backorder exists for a demand line, the Allocate Lot button is unavailable, even if the demand line is eligible for lot allocation. To lot-allocate demand lines with associated backorders, use the Allocate Lots page. |
|
Qty Requested Base (base quantity requested) |
Displays the requested quantity for the order line, converted to the item's standard UOM. |
|
Qty Promised Base (base quantity promised) |
Displays the quantity promised for ATP-reserved items. |
|
Qty Reserved Base (base quantity reserved) |
Displays the quantity reserved for soft-reserved items. |
|
Qty to Ship (quantity to ship) |
Displays the Qty Requested plus any transfer yield that was defined for the interunit transfer item and ship via. |
|
Reservation Status |
Displays the result of the reservations process. The status is reset to pending reservations when the line or order reservations rule is changed on an unfulfilled demand line. |
|
Request Date |
The date that the customer has requested that the stock arrive. The default value is the current date. |
|
Schedule Date |
Enter the date and time that the order is scheduled to ship in order to arrive by the request date. Note. The default scheduled ship date for MSRs is the current date and time. If the business unit requires closure-calendar validation and processing for shipping operations as defined on the Closure Calendar page, and if the scheduled shipment date is an exception shipping date, the system uses the first valid future shipping date. |
|
Earliest Ship Date |
Determines when the order line is available to load into the Shipping/Issues component. The default is the scheduled date and time, but if you select the Ship Prior to Sched Date (ship prior to scheduled date) option, you can specify a new date. |
|
Latest Ship Date |
This field is for informational purposes only. |
|
Schedule Arrival |
The date that the order should arrive at its destination. The scheduled arrival date is linked to the scheduled shipment date. If the transfer is an interunit transfer and the user adds intransit time for the appropriate source business unit, destination business unit, and ship via, the system adds this extra time to the scheduled shipment date to determine the scheduled arrival date. In the Shipping/Issues component, the arrival date is linked to the actual shipment date and time. Note. For interunit transfers, if you change the scheduled arrival date and time, and if the destination business unit requires closure-calendar validation and processing for receiving operations as defined on the Closure Calendar page, the system validates the new scheduled arrival date and time against the closure calendar. If the arrival date coincides with a receiving closure date at the destination business unit, the system issues a warning and provides the option to keep the date or move the scheduled arrival date to the next valid date. |
|
Partial Qtys Can Ship (partial quantities can ship) |
Select to release partial quantities of stock request lines to the releasable state. If sufficient stock is not available to reserve, promise, or lot-allocate the entire requested quantity of the line, then the line is split into two demand lines and a partial quantity is reserve, promise, or lot-allocate and then set to the releasable state. If you do not select this option, the system does not process stock request lines until the quantity can be completely fulfilled. Note. This check box is overridden by any reservation rules for this order on the Reservation / Backorder Rules page of this Create/Update Stock Request component. |
|
Ship Prior to Sched Date |
Select to enable the system to ship this order as early as the Earliest Ship Date. If this check box is not selected then the line cannot ship until the current date is equal to or later than the scheduled shipment date. This check box is only valid if the Verify Ship Date check box has been selected on the Setup Fulfillment- Shipping page. If the Verify Ship Date check box is not selected, then the system can ship an order on any date. If both the Verify Ship Date and Verify Ship Time check boxes are selected on the Setup Fulfillment- Shipping page, then the current date and time must match the Earliest Ship Date or Schedule Date. |
|
Cancel Backorder |
Select this check box to cancel any backordered demand line created by the Reserve Materials process or the online reservation processes. Note. This check box is overridden by any backorder rule for this order on the Reservation / Backorder Rules page of this Create/Update Stock Request component. |
Kit Component Details
This group box displays if the demand line contains a component of a product kit.
|
Qty Per Kit |
Review or change the number of items per product kit. The default value comes from the product kit definition on the Product Kit Summary page but can be changed for this order. This number is multiplied by the number of product kits ordered to determine the total number of items on this demand line. If you change this quantity:
|
|
Per |
Displays how the component quantity should be applied.
|
|
OK to Ship Without |
Select if the product kit can ship without this component. The default value comes from the product kit definition on the Product Kit Summary page. If you change this value then the Kit Protected check box is automatically selected to prevent the Kit Re-Explode process from changing your selection. Note. Every product kit must have at least one per assembly component that is required to ship. |
|
Kit Protected |
Select to prevent to the demand line from being changed by the Kit Re-Explode process. This check box is automatically selected if you alter the Qty Per Kit field or the OK to Ship Without check box. Deselect the Kit Protected check box if you want the Kit Re-Explode process to change these fields to match the current product kit definition. |
Pegging
The following links are used for pegging this order to incoming supply or as demand.
|
Peg to Supply |
Select to access the Pegging Workbench page where you can link to incoming supply to fulfill this order line. You can only peg an order line when the line is in an unfulfilled state. This link is only available if the Auto Stock Approval option on the Setup Fulfillment page has been set or pegging security has been defined for the user on the User Security page. |
|
Show Pegged Supply |
If this line has been pegged to fulfill the demand from a supply (such as, a purchase order or an incoming interunit transfer), then select to access the Pegging Inquiry page where you can view the pegging information without changing it. This link only displays if this line is currently pegged. |
|
Peg to Demand |
(interunit orders only) Select to access the Pegging Workbench page where you can link demand to this interunit order line. An interunit order is sent to a receiving inventory business unit where it is supply to fulfill demand. Use this link to peg this interunit order, as supply, to a demand, such as a sales order, in the receiving business unit. You can only peg an order when the line is in an unfulfilled state. This link is only available if the Auto Stock Approval option on the Setup Fulfillment page has been set or pegging security has been defined for the user on the User Security page. |
|
Show Pegged Demand |
(interunit orders only) If this line has been pegged to supply stock for a demand (such as, an outgoing MSR or sales order), then select to access the Pegging Inquiry page where you can view the pegging information without changing it. This link only displays if this line is currently pegged. |
See Also
Allocating Orders in Demand Fulfillment
Adding Shipment Details
Access the Shipment Detail page (Click the Shipment Detail link in the Create/Update Stock Request component).
|
Customer, Ship To, and Location |
Available if the stock request is for an external order or an interunit transfer requiring intercompany processing. These three fields work together to define correct shipping information for a stock request. If the stock request is an interunit transfer requiring intercompany processing, the default values come from the ship to customer assigned to the destination business unit, and you cannot override them. If the request is an interunit transfer not requiring intercompany processing, the system treats it as an internal order. For an external order, you can select the customer first, and the ship to and location information associated with the customer appear by default. |
|
Name, Ship Cust and Location |
Available if the stock request is for an internal order. If you enter the location first, the system enters the ship to customer automatically. |
|
Override Address |
Select this link to access the Order Address page, where you can view or override the ship to address for the order line. |
|
Freight Terms |
Select the appropriate freight terms for the order line. Freight terms are established on the Freight Terms page. |
|
Packaging |
Define any specific packaging requirements for the item. Packaging codes are established on the Packing Codes page. This information appears on the Packing Instructions page when packing shipping containers. |
|
Load ID |
Select the appropriate load ID for the order line. The system automatically enters the carrier and ship via information, and you cannot modify it. |
|
Detail |
Click to access the Load Capacity Inquiry page, where you can view the weight and volume capacity of the order, plus the load, carrier, and shipping information. |
|
Route Code |
If the business unit is set up to use routes, you can assign a transportation route for delivery of the order. |
|
Reason Code |
Displays a user-defined reason code selected from the values that have a reason type of Shipments. |
See Also
Assigning Order Lines to Routes
Entering Interunit Transfer and Accounting
Information
Access the Accounting/ IUT Detail page (Click the Accounting/ IUT Detail link in the Create/Update Stock Request component).
|
Distrib. Type (distribution type) |
The default value is based on the request type that you selected when creating this order.
|
|
Override ChartFields |
Select to access the ChartField Overrides page where you can override the debit ChartFields defined for the distribution type. In addition, enter any PeopleSoft Project Costing information. |
|
FERC Code |
If you use Federal Regulatory Energy Commission (FERC) codes in the inventory processing, select the appropriate code. |
|
Charged Out |
Select if the stock request is for internal use and the inventory is expected to be returned. This field is for informational purposes only. |
|
Item Alias |
If the item is recognized by another name at the destination business unit, you can identify that name here. This field is not applicable for external or internal material stock requests. |
The Intrastat Interunit Returns and Replacement fields are available only for intrastat interunit transfers. If both the source and destination business units are members of the European Union and require intrastat reporting, mark the interunit receipt as a replacement or a return. Your selections populate the Receipt Line page when the destination business unit receives the transfer order.
|
Intrastat InterUnit Returns |
The interunit or intercompany transfer contains goods that were previously sent to another business unit but are now being returned. The transfer is reported on the intrastat return with a Nature of Transaction code indicating that it is a return. (If you clear this option, the transfer is a normal transfer and is reported on the intrastat return with a Nature of Transaction code indicating that it is a purchase. If you select this option, the Replacement field value is NA (not applicable). A transfer can be a return or a replacement, but not both. |
|
Replacement |
This field works in conjunction with the Intrastat InterUnit Returns field. Values are: NA: The interunit transfer is a normal transfer order or a return. This is the default value when the Intrastat InterUnit Returns option is selected. RN (replacement of goods not returned): The transfer replaces an order that had been previously received but was scrapped or otherwise disposed of. The transfer order is reported on the intrastat return with a Nature of Transaction code indicating that it is a replacement of goods that have not been returned. RR (replacement of returned goods): The transfer replaces an order that was returned to the source business unit. The transfer order is reported on the intrastat return with a Nature of Transaction code indicating that it is a replacement of goods that have been returned. |
Transfer Price Overrides group box
The Transfer Price Overrides group box applies to an interunit MSR or an interunit expensed issue. The transfer price defaults to the material stock request using the transfer pricing default hierarchy. If you have selected the Allow Price/Markup Overrides check box on the Setup Fulfillment page of the source business unit, you can change the transfer price here. To display the current estimated transfer price, click the Estimate Transfer Price button on this page.
Note. PeopleSoft Cost Management does not support interunit pricing for non-cost items.
|
Transfer Price Override |
Enter an override value for the transfer price. This value is stored in the IN_DEMAND table in the TRANSFER_COST field. The override transfer price is not stored in the IN_DEMAND_TRPC table until after the Depletion process has been run. |
|
Price Markup % Override |
Enter an override markup percentage to be used instead of the markup percentage defined in the transfer pricing default hierarchy. Define the percentage increase to the item's transfer price (or cost) in order to create a new transfer price. For example if you enter a value of 25 in this field and the item cost is 100 USD, then the transfer price is 125 USD. Be sure to enter a 25% markup as 25, not .25. Note. Both a transfer price override and a price markup percentage override can be applied to the same demand line. The markup percentage is applied on top of the transfer price. When you enter an override value in this field, the system records the markup using the cost element in the Default Markup Cost Element field in the Setup Fulfillment page. |
|
Transfer at Zero Price Over. |
Select to ship interunit transfers at zero cost. The source business unit records a loss for the entire cost of the shipped items. This feature enables you to ship promotional or sample items at no cost to the destination business unit. The default value comes from the transfer pricing default hierarchy, but you can override the returned value for each line of the material stock request. |
|
Total Price |
Displays the transfer price calculated for the overrides entered in this group box. |
See Applying Transfer Prices to a Material Stock Request.
Estimated Transfer Price group box
The Estimated Transfer Price group box applies to an interunit MSR or an interunit expensed issue. Any value displayed here is an estimate, since the transfer price is calculated during the Deplete On Hand Qty (Depletion) process.
|
Estimate Transfer Price |
Click this button to calculate the current estimated transfer price based on the transfer pricing default hierarchy. |
|
Estimated Transfer Price |
Displays the estimated transfer price for one unit of the item. This value displays after you have clicked the Estimate Transfer Price button. |
|
Estimated Total Price |
Displays the estimated total transfer price for this demand line by multiplying the estimated transfer price by the quantity requested. This value displays after you have clicked the Estimate Transfer Price button. |
|
Transfer Price Details |
Click this link to display the Transfer Price Details page where you can view the estimated transfer price broken out by cost elements. This page is populated after you have clicked the Estimate Transfer Price button. |
See Applying Transfer Prices to a Material Stock Request.
See Also
Managing Interunit Transfer Pricing and Additional Costs
Setting Up and Running Intrastat Reports
Managing Inventory by Item Status
Reviewing or Changing Reservation and Backorder Rules
Access the Reservation / Backorder Rules page (Click the Reservation / Backorder Rules link in the Create/Update Stock Request component).
Reservation and backorder rules are used by the system to determine when the demand line is ready to be moved downstream to the releasable state and how to handle stock shortages during the reservations and shipping processes. These rules can default to this demand line from the Setup Item Fulfillment-Reservation / Backorder Rules page (the item/business unit level). If the item/business unit level does not contain all the rules then the system looks for defaults at the Setup Fulfillment-Reservation page (the business unit level). Using this page you can enter or change the necessary rules.
Note. Reservation and backorder rules override the Partial Quantities Can Ship check box and the Cancel Backorder check box on the Quantity/Date Detail page of this component.
The rules are evaluated in the following order:
Line Reservation Rule (line-level reservation rule)
Line Reservation-Backorder (backorder line reserve rule)
Order Reservation Rule (order-level reservation rule)
Line Backorder Rule (backorder rule)
|
Line Backorder Rule |
Once the line reservation rule, line reservation-backorder rule, and the order reservation rule determine that the demand line is ready to move downstream to releasable status, then the line backorder rule determines, if there is insufficient demand to reserve, what should be done about the shortage. This rule can define criteria at both reservation time and shipping time. The rule can create a backorder, cancel a backorder, send the shortage downstream to be handled in a later fulfillment step, or hold the demand line back and notify an individual through email. |
|
Line Reservation Rule |
Defines the specific criteria that must be satisfied by this individual demand line before the demand line is moved to the releasable state. For example, a line reservation rule might be that the reserved quantity must equal or exceed 90 percent of the requested quantity on the line before it is set to the releasable state. |
|
Line Reservation-Backorder |
Defines the specific criteria that must be satisfied by a previously backordered demand line before the demand line is moved to the releasable state. For example, a line reservation-backorder rule might be that the reserved quantity for an already backordered line must equal 100 percent of the requested quantity before it is set to the releasable state. If no line reservation-backorder rule exists, then the system uses the line reservation rule to evaluate previously backordered lines. |
|
Order Reservation Rule |
Defines the specific criteria that must be satisfied by the entire order or grouping that this individual demand line is in, before the demand line is moved to the releasable state. For example, an order reservation rule might be that all the lines in an order must reserve 100 percent of their reserved quantity before the order can move downstream. |
See Also
Defining Reservation and Backorder Rules
Entering Transaction Comments
Access the Transaction Comments page (Click the Comments link in the Create/Update Stock Request component).
|
Comments |
Enter any comment about the demand line using up to 254 characters. |
|
Custodian |
Enter the name of the person or entity relevant to this demand line. This field is informational only. |
|
Return Date |
Enter the expected return date. This field is informational only. |
|
RTR Date (request to receive date) |
The projected date that the PeopleSoft Inventory business unit can obtain the item if a purchasing requisition is placed with today's date. The request to receive (RTR) date is calculated as the item's replenishment lead time (measured in days) added to the current date. If the item does not have a replenishment lead time defined, no RTR date appears. |
See Also
Managing Inventory by Item Status
Custom PageAccess the Custom page (Click the Custom link in the Create/Update Stock Request component).
Enter values in the user-defined fields for the material stock request. These fields are stored in the IN_DEMAND_USER table, a child table of IN_DEMAND. When a backorder gets created, these fields will be propagated to the backorder. Users will be able to view and change these fields using this component and the Maintain Stock Request component.
Modifying Addresses
Access the Order Address page (Click the Override Address link in the Create/Update Stock Request component).
|
Address Ungray |
Click this button to modify the shipping address for internal orders, external orders, or vendor returns. |
|
Delete Address |
Click this button to refresh the original shipping address and make the field unavailable for entry. This button cannot be used for a vendor return MSR. |
Note. You cannot use this page to override the shipping address for interunit transfers that require intercompany processing unless you have selected the Allow Address Override for the business unit on the Setup Fulfillment page and you have also selected Use GL BU Setting Only for the InterUnit Transaction Options field on the Installation Options-Inventory page.
Modifying Addresses for InterUnit Transfers
You cannot use this page to override the shipping address for interunit transfers that require intercompany processing unless you have selected both of these check boxes:
Selected the Allow Address Override for the business unit on the Setup Fulfillment page.
Selected Use GL BU Setting Only for the InterUnit Transaction Options field on the Installation Options-Inventory page.
If the InterUnit Transaction Options field on the Installation Options-Inventory page is defined for inventory settings only or both inventory and GL, then the system looks at the Allow Address Override check box at the InterUnit Ownership page.
Overriding ChartFields
Access the ChartField Overrides page (Click the Override ChartFields link in the Create/Update Stock Request component).
|
Override GL |
(interunit expensed issue only) Displays the override of the PeopleSoft General Ledger business unit entered on the Stock Request Summary page. The system validates any ChartField override entries against the destination business unit's ChartFields structure. |
|
SpeedType Key |
Use for quick entry of ChartField information. This field appears only if the SpeedType Level on the Business Unit Options page is active. |
|
ChartFields |
Any change that you make overrides the ChartFields debited by the stock request. You cannot override ChartFields for interunit transfers, intercompany transfers, or RTV orders. |
See Also
Defining and Using ChartFields
Transferring Stock Between Business Units
Copying Demand Line Information
Access the Demand Line Override Options page (Click the Copy to Existing Demand Lines link on the Stock Request Summary page).
Indicate which information should be copied to the existing order lines on the Stock Request Summary page.
|
Override Shipto/Address |
Select to copy the address information associated with the location. Any address overrides entered at the Line Defaults level are also copied. |
|
Override Loads |
Select to copy the load ID entered on the Stock Request Summary page. Note. Unless you also select the Override Carrier IDs/Ship Vias, option, the system copies the load ID to order lines for which no carrier ID and ship via are specified or for which the existing carrier ID and ship via are the same as those for the load ID specified on the Stock Request Summary page. |
|
Override Carrier IDs/Ship Vias |
Select to copy the carrier ID and ship via values on the Stock Request Summary page. Note. If you override the ship via or carrier, PeopleSoft Inventory cancels any existing transportation route assignment for the demand line. |
|
Override Accounting Data |
Select to copy the distribution type and debit ChartField and project information defined on the Stock Request Summary page. |
|
Override Sched Date/Time |
Select to copy the Schedule Date and time information defined on the Stock Request Summary page. |
|
Override Non-Blank Values |
Select to apply the specified overrides to the order lines regardless of any existing values. If you do not select this option, only order lines with blank values are overridden. Note. ChartField information is overridden as a whole or not at all. If at least one ChartField override value exists at the line level and you have not selected the Override Non-Blank Values option, no ChartField information is copied to the line. |
See Also
Assigning Order Lines to Routes
Selecting Configuration Codes
Access the Configuration Code Information page (Select the Config Code link in the Create/Update Stock Request component).
If your installation includes PeopleSoft Product Configurator, then use this page to select a configuration code for your configured item.
|
Config Codes With Qty Only (configuration codes with quantity only) |
Select to display only configuration codes that are used with items currently stocked in PeopleSoft Inventory. If you leave this option blank, all valid configuration codes appear. |
See Also
PeopleSoft Product Configurator 9.1 PeopleBook
Creating Online Orders Using Express Issue
in PeopleSoft Inventory
Use the Express Issue page to create an order online and reserve, pick, and ship the stock in one step. You can create internal orders, external orders, interunit transfers, and RTV orders from this page. There are significant advantages to using express issues. Because of the amount of automatic processing involved, however, this fulfillment method is not appropriate for high-volume environments. In addition, you cannot enter product kits on the Express Issue page.
A few notes about using the Express Issue page:
Use this page in Add mode only.
The entire fulfillment process (reserving, picking, and issuing) occurs automatically for the items on the order after you save. If you change your mind, cancel the page without saving the changes. For RTV express issues only, you can cancel the order after saving the page and before the issue is depleted.
To ensure that you can fulfill the order, PeopleSoft Inventory limits the display of storage locations and lots under the following circumstances:
When you enter an item that is not lot- or serial-controlled, only storage locations that have quantity greater than 0 appear, unless negative inventory is enabled in the business unit.
When you enter a lot-controlled item, only lots with available quantity greater than 0 appear, unless negative inventory is enabled in the business unit.
If negative inventory is enabled, all eligible storage locations and lots appear, regardless of quantity. You can use multiple lots to fulfill a single order line when you click the Add button.
The schedule date and time apply to the entire order.
Because PeopleSoft Inventory decreases storage location balances immediately after you save the page, you cannot enter a future schedule date and time; you can, however, enter a past date and time.
If you run the Deplete On Hand Qty (Depletion) process (IN_FUL_DPL) immediately by:
Clicking the Deplete On Hand Qty link on the Express Issue page.
Selecting the Auto Process at Save check box on the Auto-Processing Options tab of the Setup Fulfillment-Fulfillment Task Options page. When you save the Express Issue page, the Deplete On Hand Qty process is launched.
Selecting the Request Type for an Express Issue
When you add an express issue in PeopleSoft Inventory, the system presents you with a search dialog in which you must specify the type of order that you are entering. Your selection determines which fields appear on the Express Issue page. Values are:
External Order: Select to enter an express issue for an external order. While this request type enables you to identify the individual receiving the stock by using a ship to customer rather than a location, it is not intended to replace the features of a sales order. To complete a full billing and invoice transaction, create a sales order in PeopleSoft Order Management.
InterUnit Transfer: Select to enter an express issue that transfers stock from one PeopleSoft Inventory business unit to another.
Internal Issue: Select to enter an express issue for an internal order (an order for a department or location within your organization).
Vendor Returns: Select to enter an express issue for a return-to-vendor (RTV) order.
See Also
Canceling or Holding Orders Within PeopleSoft Inventory
Understanding Order Fulfillment Processing
Pages Used to Create Express Issue Stock
Requests
|
Page Name |
Definition Name |
Navigation |
Usage |
|
EXPRESS_ISSUE1_INV |
Inventory, Fulfill Stock Orders, Stock Requests, Express Issue |
Record express issue stock requests. |
|
|
RTV Selection (return-to-vendor selection) |
EXPRESS_ISSUE_RTV |
Click the Fetch RTV link on the Express Issue page. |
Select RTV orders to issue. Note. This page is available only for vendor return requests. |
|
INV_ADDRESS |
Click the Override Address link on the Express Issue page. |
View and modify the ship to address for the order or order line. See Modifying Addresses. |
|
|
EXPRESS_ISSUE6_INV EXPRESS_ISSUE8_INV |
|
Override the debit ChartFields defined for the distribution type for the order or order line. |
|
|
EXPRESS_ISSUE5_INV |
Click the Detail Override/Exceptions link on the Express Issue page. |
Enter specific attributes for an order line or override shipping information and (for non-RTV orders) ChartField accounting information. You can also enter a configuration code for configured items. |
|
|
EXPR_ISS_RTV_PRO |
Click the RTV Pro Numbers link on the Detail Override/Exceptions page. |
Capture multiple pro numbers for an RTV line being shipped from the Express Issue page. When the Express Issue component is saved, the system updates the RTV Line Shipped (RTV_LN_SHIP) table in PeopleSoft Purchasing with the updated pro number information. |
|
|
SHIP_SERIAL_INV |
Click the Ship Serial ID link on the Detail Override/Exceptions page. |
Enter ship serial IDs for items using ship serial control. |
|
|
EXPRESS_ISSUE4_INV |
Click the Choose Containers link on the Express Issue page. |
Select storage containers to issue. |
|
|
EXPRESS_ISSUE2_INV |
Inventory, Fulfill Stock Orders, Stock Requests, Express Issue, Express Issue Detail |
If you are shipping an item with staged-date tracking, select the staged-dated quantity to ship. |
Entering Express Issues
Access the Express Issue page (Inventory, Fulfill Stock Orders, Stock Requests, Express Issue).
|
Unit |
The inventory business unit issuing the stock request. |
|
Order No |
If you're using auto-numbering, the order number is either NEXT or the starting sequence that you entered. The combination of inventory business unit, demand source, source business unit, and order number will identify a specific order in fulfillment. For express issues, the demand source is IN except for return to vendor issues that use RT. |
|
Shipping ID |
Select a shipping ID or select NEXT to generate a new ID automatically. |
|
Schedule Date and Schedule Time |
Displays the date and time the order is due to ship. The default is the current date and time, but you can change this to another date. Note. If the business unit requires closure-calendar validation and processing for shipping operations as defined on the Closure Calendar page, and if the scheduled shipment date is a closure date, the system uses the first valid future shipping date. |
|
Override GL |
If this is an interunit expensed issue, you can override the PeopleSoft General Ledger business unit against which the transaction is costed. The system validates the destination business unit's ChartFields against the new value, costs the issue using the defined interunit transfer price, and records interunit accounting entries for an interunit expensed issue. Note. This field is displayed or hidden based on your selection in the Display GL BU Override check box on the Inventory Display Options page. This field is available only for internal requests, not for interunit transfers or external requests. |
|
Dest Unit (destination business unit) |
If the stock request is for an interunit transfer, select the destination business unit. Note. An interunit transfer can only go to one destination business unit. You cannot assign different destination business units at the line level. If you change the destination unit and the new unit requires closure-calendar validation and processing for receiving activities as defined on the Closure Calendar page, the recalculated scheduled arrival date and time are validated against the calendar. If the system encounters a closure date, you receive a warning message. Either accept the exception by selecting No, or reschedule by selecting Yes. If you select Yes, the system returns the first future valid scheduled arrival date and time. |
|
Distribution Type |
Enter or change the distribution type used to create accounting entries for this transaction. A default value displays if you have defined one on the Default Distribution Type page. The default value is based on the request type that you selected when creating this order:
|
|
Ship To Customer, Sold To Customer, and Location |
These fields are available if the express issue is for an external order or an internal issue. These three fields work together to define the correct shipping information. If the express issue is an interunit transfer requiring intercompany processing, these fields are populated from the ship to customer assigned to the destination business unit and are unavailable for entry. |
|
InterUnit ID |
If this is an interunit transfer, select an existing interunit ID, or select NEXT to generate a new one automatically. |
|
Export |
Indicates that the order is an intercompany transfer requiring export documentation. This field value appears by default from the order header level (on the Additional Ship To Options page) for the ship to customer defined for the destination business unit. If you override the setting here, the system transfers the selection to the line level, where you cannot change it. Note. You cannot override the ship to customer address if the Intercompany Processing option is selected on the Interunit Ownership page. |
|
Direct Invoicing |
Indicates that an intercompany transfer requires direct invoicing. The system automatically creates an invoice for the order when PeopleSoft Inventory sends accounting information to the PeopleSoft Billing business unit defined on the Inventory Definition-Business Unit Definition page or on the Order Management Definition - Order Management Setup page in PeopleSoft Order Management. |
|
Fetch RTV (fetch return to vendor) |
Click to access the RTV Selection page, where you can select RTV IDs for processing. |
|
Use Default Location |
Select to have PeopleSoft Inventory enter the default putaway storage location automatically for any items that are not lot- or serial-controlled. If there is not quantity available in the default putaway location, the system prompts you to enter another storage location. To enter the storage location as you enter order lines, leave this check box clear. |
|
|
In the Express Issue component, click this button to print the Shipping Document report (INC6503) for the entered order. This report is written in Oracle BI Publisher using the XMLP report name INX6503. |
|
Report Manager |
Select this link to access the Report Manager page where you can view the status of processes and reports that you have launched using the Deplete On Hand Qty link. |
|
Add |
For internal issues, external orders, and interunit transfers, click this button to add order lines. For vendor returns, select only lines that appear on the RTV Selection page. All lines selected must be from the same RTV ID. |
|
Item ID |
Enter the item for this order line. |
|
Item Search/Item Links |
Click the button located next to the Item ID field to access a transfer page of item-related links. On the transfer page, click the various links to search for items, select item substitutes, or change item definitions. Note. Link options on transfer pages vary depending on the component and the item with which you are working. Note. Only items with a status of Active or Discontinue are valid options. |
|
Quantity |
Enter the item quantity for this schedule line. You can add additional schedule lines to this same order line by using the Add button within this group box (Quantity/Location Information group box). |
|
UOM |
Enter a unit of measure defined as a shipping UOM for this item ID on the Units of Measure page (Items, Define Items and Attributes, Units of Measure). A default value can populate this field using the following default hierarchy:
|
|
Area, Lev 1, Lev 2, Lev 3, and Lev 4 |
Enter the material storage location (MSL) identifying the picking location for the stock. |
|
Lot ID |
Select a lot ID instead of a material storage location for lot-controlled items. Note. If the scheduled ship date for an order line is before the lot becomes available or after it expires, a warning message appears upon entry of the lot ID. |
|
Serial ID |
For serial-controlled items, indicate which serial ID you are issuing. Because serial-controlled items are already uniquely identified, no further information is needed for the order line. |
|
Deplete On Hand Qty |
Click this link to save this page and to run the Deplete On Hand Qty (Depletion) process. After saving the page, you cannot continue to add lines to the order. For interunit transfers, this link also initiates auto-putaway processing in the destination business unit if you also selected the Flag Items for Auto-Putaway option on the Interunit Ownership page. For intercompany transfers that are set up for direct invoicing, this link also initiates the Interunit Transfer Billing job (BIINIU). |
Select the storage location information for non-lot-controlled and non-serial-controlled items, if appropriate. If you specified that default locations are to be used for this order, PeopleSoft Inventory automatically enters the default putaway location for the item's storage location information for items that are not lot- or serial-controlled.
Note. If you selected the Auto Process at Save check box on the Auto-Processing Options tab of the Setup Fulfillment-Fulfillment Task Options page, then saving the Express Issue page initiates the Deplete On Hand Qty (Depletion) process as well as direct invoicing for any order lines requiring this option. Be aware, however, that clicking the Deplete On Hand Qty link disables the auto-process option for the current issue. Similarly, saving an issue with the auto-process option selected and then subsequently clicking the Deplete On Hand Qty link does not schedule a new depletion.
See Also
Understanding Receiving and Putaway Processing
Creating Shipping Documentation
Transferring Stock Between Business Units
Defining PeopleSoft Inventory Business Unit Display Options
Understanding Order Fulfillment Processing
Setting Up the Accounting Rules Structure
Understanding the Direct Invoicing Jobs
Managing Interunit Transfer Pricing and Additional Costs
Entering Order Line Details and Exceptions
Access the Detail Override/Exceptions page (Click the Detail Override/Exceptions link on the Express Issue page).
|
Distrib Type (distribution type) |
Select if you want the order line to have a different distribution type than that specified for the order. |
|
Configuration Code |
If your installation includes PeopleSoft Product Configurator, enter a configuration code for your configured item. |
|
Packaging Code |
Define any specific packaging requirements for the item. Packaging codes are established on the Packing Codes page. This information appears on the Packing Instructions page when packing shipping containers. |
|
Reason Code |
Displays a user-defined reason code selected from the values that have a reason type of Shipments. |
|
Export |
Indicates that the order is an intercompany transfer requiring export documentation. This field is populated at the order header level for the ship to customer defined for the destination business unit. If you override the setting here, the system transfers the selection to the line level, where you cannot change it. |
|
Schedule Arrival |
Displays the date that the order should arrive at its destination. The scheduled arrival is linked to the scheduled shipment date. If the transfer is an interunit transfer and the user adds intransit time for the appropriate source business unit, destination business unit, and ship via, then this extra time is added to the scheduled shipment date to determine the scheduled arrival date. In the Shipping/Issues component, the arrival date is linked to the actual shipment date and time. Note. For interunit transfers, if you change the scheduled arrival date and time, and if the destination business unit requires closure-calendar validation and processing for receiving operations as defined on the Closure Calendar page, the system validates the new scheduled arrival date and time against the closure calendar. If the arrival date coincides with a receiving closure date at the destination business unit, the system issues a warning and provides the option to keep the date or move the scheduled arrival date to the next valid date. |
|
Ship Serial ID |
Click to access the Serial ID page, where you can enter shipping serial numbers. |
|
Defer Depletions |
Select an option to override the default value for the Defer Depletions field on the demand line. The Defer Depletions value is applied when the demand line is successfully placed in the Shipped fulfillment state. The options are:
When this field is left blank, the default value is derived from the Carrier page; if there is no default value on the Carrier page then the system uses the default value on the Setup Fulfillment-Shipping page. For a complete discussion of the Defer Depletions feature, go to the "Shipping Inventory" chapter, "Delaying the Billing and Costing of Inventory Shipments" section. See Delaying the Billing and Costing of Inventory Shipments. |
Note. If you override the ship via or carrier, PeopleSoft Inventory cancels any existing transportation route assignment for the demand line.
The Intrastat Interunit Returns and Replacement fields are only available for intrastat interunit transfers. If both the source and destination business units are members of the European Union and require intrastat reporting, mark the interunit receipt as a replacement or a return. Your selections populate the Receipt Line page when the destination business unit receives the transfer order.
|
Replacement |
This field works in conjunction with the Intrastat InterUnit Returns field. Values are: NA: The interunit transfer is a normal transfer order or a return. This is the default value when the Intrastat InterUnit Returns option is selected. RN (replacement of goods not returned): The transfer replaces an order that had been previously received but was scrapped or otherwise disposed of. The transfer order is reported on the intrastat return with a Nature of Transaction code indicating that it is a replacement of goods that have not been returned. RR (replacement of returned goods): The transfer replaces an order that was returned to the source business unit. The transfer order is reported on the intrastat return with a Nature of Transaction code indicating that it is a replacement of goods that have been returned. |
|
Intrastat InterUnit Returns |
The interunit or intercompany transfer contains goods that were previously sent to another business unit but are now being returned. The transfer is reported on the intrastat return with a Nature of Transaction code indicating that it is a return. (If you clear this option, the transfer is a normal transfer and is reported on the intrastat return with a Nature of Transaction code indicating that it is a purchase. If you select this option, the Replacement field value is NA (not applicable). A transfer can be a return or a replacement, but not both. |
Transfer Price Overrides group box
The Transfer Price Overrides group box applies to an interunit MSR or an interunit expensed issue. The transfer price defaults to the material stock request using the transfer pricing default hierarchy. If you have selected the Allow Price/Markup Overrides check box on the Setup Fulfillment page of the source business unit, you can change the transfer price here. To display the current estimated transfer price, click the Estimate Transfer Price button on this page.
|
Transfer Price Override |
Enter an override value for the transfer price. This value is stored in the IN_DEMAND table in the TRANSFER_COST field. The override transfer price is not stored in the IN_DEMAND_TRPC table until after the Depletion process has been run. |
|
Price Markup % Override |
Enter an override markup percentage to be used instead of the markup percentage defined in the transfer pricing default hierarchy. Define the percentage increase to the item's transfer price (or cost) in order to create a new transfer price. For example if you enter a value of 25 in this field and the item cost is 100 USD, then the transfer price is 125 USD. Be sure to enter a 25% markup as 25, not .25. Note. Both a transfer price override and a price markup percentage override can be applied to the same demand line. The markup percentage is applied on top of the transfer price. When you enter an override value in this field, the system records the markup using the cost element in the Default Markup Cost Element field in the Setup Fulfillment page. |
|
Transfer at Zero Price Over. |
Select to ship interunit transfers at zero cost. The source business unit records a loss for the entire cost of the shipped items. This feature enables you to ship promotional or sample items at no cost to the destination business unit. The default value comes from the transfer pricing default hierarchy, but you can override the returned value for each line of the material stock request. |
|
Total Price |
Displays the transfer price calculated for the overrides entered in this group box. |
See Applying Transfer Prices to a Material Stock Request.
Estimated Transfer Price group box
The Estimated Transfer Price group box applies to an interunit MSR or an interunit expensed issue. Any value displayed here is an estimate, since the transfer price is calculated during the Deplete On Hand Qty (Depletion) process.
|
Estimate Transfer Price |
Click this button to calculate the current estimated transfer price based on the transfer pricing default hierarchy. |
|
Estimated Transfer Price |
Displays the estimated transfer price for one unit of the item. This value displays after you have clicked the Estimate Transfer Price button. |
|
Estimated Total Price |
Displays the estimated total transfer price for this demand line by multiplying the estimated transfer price by the quantity requested. This value displays after you have clicked the Estimate Transfer Price button. |
|
Transfer Price Details |
Click this link to display the Transfer Price Details page where you can view the estimated transfer price broken out by cost elements. This page is populated after you have clicked the Estimate Transfer Price button. |
See Applying Transfer Prices to a Material Stock Request.
See Also
Managing Interunit Transfer Pricing and Additional Costs
Setting Up and Running Intrastat Reports
Creating Shipping Documentation
Assigning Order Lines to Routes
Transferring Stock Between Business Units
Selecting Storage Containers to Issue
Access the Choose Containers page (Click the Choose Containers link on the Express Issue page).
Select a container ID to associate with the order line selected on the Express Issue page. When you return to the Express Issue page, the system automatically determines the items and quantities in each container and creates an order line for each item. If the item exists in more than one container, this information appears on the main page as an additional row.
You cannot ship partial containers using this method. To ship only one item or a partial quantity within the container, use the normal method of entering order lines on the main page.
Note. If you add a container and then decide not to ship it, return to this page to delete the row.
Creating Orders Using Data From a Third-Party System
Using the Enterprise Integration Points (EIPs) available through the PeopleSoft Integration Broker, you can create materials stock requests (MSR) based on data from a third-party source. Use the following service operations to create a new MSR or add a new demand line to an existing MSR in PeopleSoft Inventory:
Inventory_Create_Stock_Request: Using transaction code 0360 (Create Stock Request), your message transaction can create an MSR in the Unfulfilled state. For non-soft reserve, non-ATP items, you can have the new MSR demand line placed in the Releasable state by:
Selecting the Auto Stock Approval check box on the Setup Fulfillment page.
Selecting the value of Releasable in the Non-Soft Reserved State field of the Setup Fulfillment page.
Inventory_Front_End_Shipping: Using the transaction code 0365 (Front-end Ship), your message transaction can create an MSR and then place it in the Shipped state. This EIP is commonly used to move existing MSRs from the Unfulfilled or Releasable states to the Shipped state. To use this EIP to create an MSR, you must enter Y (yes) in the Create Demand field (IN_CREATE_DMD_FLG) of your transaction. In addition you can enter 70 (advance to depleted) in the Auto Release Option field (AUTO_RELEASE_OPT) of your transaction to move your new MSR to the Depleted state.
Inventory_Shipping: Using the transaction code 0366 (Ship), this message transaction can create an MSR and then place it in the Shipped state. This EIP is commonly used to move existing MSRs from the Unfulfilled, Releasable, or Confirmed states to the Shipped state. To use this EIP to create an MSR, you must enter Y (yes) in the Create Demand field (IN_CREATE_DMD_FLG) of your transaction. In addition you can enter 70 (advance to depleted) in the Auto Release Option field (AUTO_RELEASE_OPT) of your transaction to move your new MSR to the Depleted state.
The third-party data is processed as follows:
The PeopleSoft Integration Broker receives an inbound XML message into the INVENTORY_FULFILLMENT queue. The Fulfillment Request Handler, a PeopleTools application class, formats the incoming data and populates the staging tables. For each request, the Fulfillment Request Handler assigns a unique ID called the EIP_CTL_ID. Some validations are performed by the Fulfillment Request Handler, if the inbound message fails these validations then an error is generated and the message is not inserted into the staging tables.
The Fulfillment Requests process (IN_FUL_BCT) retrieves the transaction requests from the staging tables, processes them, and applies them to the PeopleSoft Inventory demand tables. You can:
Run this process manually.
Schedule this process to run in the background on a regular basis.
Have the system automatically launch the process when transaction requests are posted to the staging tables. To automatically launch the Fulfillment Requests process, select the Auto Schedule Processing check box on the Setup Fulfillment-Fulfillment Tasks page.
If the transaction requests are successfully processed, then they are set to a status of complete. If the transaction requests are not processed successfully, they are given an error status, and the appropriate error message is provided. The Maintain Transactions component enables you to view and correct requests that contain errors. Once corrected, you can relaunch the Fulfillment Requests process. This is an optional step, you can choose to have the request errors canceled automatically, and then you could create another request.
The Inventory_Create_Stock_Request, Inventory_Front_End_Shipping, and Inventory_Shipping EIPs can create all four types of orders:
External Order: Creates an MSR for an external order. While this request type enables you to identify the individual receiving the stock by using a ship-to customer rather than a location, it is not intended to replace the features of a sales order. To complete a full billing and invoice transaction, create a sales order in PeopleSoft Order Management.
InterUnit Transfer: Creates an MSR that transfers stock from one PeopleSoft Inventory business unit to another. This includes the ability to create an intercompany transfer. For an interunit transfer, if you have selected the Allow Price/Markup Overrides check box on the Setup Fulfillment page of the source business unit, you can use this EIP to override the transfer price calculated from the Transfer Pricing Definition component. When you enter an override value for the price markup percentage, the system records the markup using the cost element in the Default Markup Cost Element field in the Setup Fulfillment page. PeopleSoft Cost Management does not support interunit pricing for non-cost items.
Internal Issue: Creates an MSR for an internal order (an order for a department or location within your organization). This includes the ability to create an interunit expensed issue. For an interunit expensed issue, if you have selected the Allow Price/Markup Overrides check box on the Setup Fulfillment page of the source business unit, you can use this EIP to override the transfer price, price markup percentage, or the transfer at zero price check box. When you enter an override value for the price markup percentage, the system records the markup using the cost element in the Default Markup Cost Element field in the Setup Fulfillment page.
Vendor Returns: Creates an MSR for a return-to-vendor (RTV) order. Based on your setup, the Inventory_Create_Stock_Request EIP and the Inventory_Shipping EIP can be launched when the RTV transaction is saved in PeopleSoft Purchasing.
The following rules apply when creating MSRs using these service operations:
The transaction request can be used to add a new demand line to an existing stock request, but it cannot be used to update data on an existing demand line; for example, it cannot update an item ID, a date, or a quantity on an existing line. If the transaction request contains an MSR demand line that already exists, then the transaction is given a status of error.
You can only create MSRs with a demand source of IN (inventory) or RT (return to vendor). These EIPs cannot be used to generate orders with a demand source of OM, PL, PR, or WM. For example, you cannot create sales order from PeopleSoft Order Management, work orders from PeopleSoft Maintenance Management, orders based on requisitions from PeopleSoft Purchasing, or planning updates from PeopleSoft Supply Planning.
You cannot enter a parent product ID, for product kits, on the transaction request. The Create Stock Requests application engine program does not process a parent product ID and explode it into the individual kit component demand lines.
You can pre-allocate a demand line that is being created in the unfulfilled state using the Inventory_Create_Stock_Request service operation. To create a pre-allocation, you can either:
Enter the material storage location (MSL) on the header, group, or detail level of the transaction.
Define an LLS level of the transaction; entering the material storage location (MSL) or lot ID.
You cannot create new MSRs or new demand lines to existing MSRs using the Inventory_Reservation EIP or the Inventory_Pick_Confirm EIP.
You cannot create a pegged demand line.
When the Inventory_Create_Stock_Request, Inventory_Front_End_Shipping, or Inventory_Shipping EIP is used to create a material stock request or new demand lines, the system uses the pass-through level of Request. The Request level insures that any errors in the transaction request prevent the entire request from being processed. However, pass-through processing does not apply to pre-allocation errors; any demand line that fails pre-allocation is still created and no other segments of that demand line's request will error. For complete information on the pass-through feature and the default hierarchy of these fields, see the PeopleSoft Inventory PeopleBook, "Utilizing the Fulfillment Engine" chapter, "Setting Up the Fulfillment Engine Processing Options" section.
The transaction requests do not use the processing feature (processing count and processing level) and the commit feature (commit count and commit level).
See Also
Processing Inbound EIPs for the Fulfillment Engine
Pages Used to Create Orders Using Third-Party Data|
Page Name |
Definition Name |
Navigation |
Usage |
|
Service Operations-General |
IB_SERVICE |
PeopleTools, Integration Broker, Integration Setup, Service Operations, General |
Define and activate a service operation. Before transmitting data, you must perform the setup steps to activate the service operations. This is a setup step that is not repeated for each transaction request. |
|
Message Definition |
IB_MESSAGE_BUILDER |
PeopleTools, Integration Broker, Integration Setup, Messages, Message Builder |
View the fields to be used by the service operation within PeopleSoft Integration Broker. In order to correctly populate the incoming data, we are going to review the message definition. This is a setup step that is not repeated for each transaction request. |
|
Fulfillment Requests |
BCT_INV_REQFUL |
SCM Integrations, Process Transactions, Inventory, Fulfillment Requests |
Establish run control parameters for the Fulfillment Requests process to retrieve the transaction requests from the staging tables, process them, and apply them to the PeopleSoft Inventory demand tables. |
|
Transaction Maintenance |
BCT_CTL_UPD |
SCM Integrations, Transaction Error Handling, Maintain Transactions |
View all electronic transactions in the transaction log (inbound staging tables) and access the detail pages that enable you to correct transaction errors. |
|
Transaction Maintenance- Create Stock Request |
BCT_INV_UPD_MSR |
Click the EIP Control ID link on the Transaction Maintenance page |
View header-level information of a create stock request transaction. You can view the status of the entire transaction request and view any error messages found during the Fulfillment Requests process. |
|
Transaction Maintenance- Create Stock Request: Group Records |
BCT_INV_UPD_MSRGRP |
Click the Group Records link on the Transaction Maintenance-Create Stock Request page. |
Displays the MSRs (orders) within this transaction request. Using the group-level, you can view or edit fields related to the order header; such as, order number or customer ID. |
|
Transaction Maintenance- Create Stock Request: Detail Records |
BCT_INV_UPD_MSRDTL |
Click the Detail Records link on the Transaction Maintenance-Create Stock Request: Group Records page. |
Displays a single order line within this transaction request. Using the detail-level, you can view or edit information related to one order line within an MSR on the transaction request. |
|
Transaction Maintenance- Create Stock Request: Location, Lot, Serial Records |
BCT_INV_UPD_MSRLLS |
Click the Loc, Lot, Serial Records link on the Transaction Maintenance-Create Stock Request: Detail Records page. |
Displays the LLS levels of a single order line within a transaction request. Using the LLS-level, you can view or edit information related to lot ID, serial ID, or material storage locations (MSL) along with container IDs and stage dates. |
|
Transaction Maintenance- Create Stock Request: Group Level User-Defined Fields |
BCT_INV_UPD_MSRGUD |
Click the User-Defined Fields link on the Transaction Maintenance-Create Stock Request: Group Records page. |
Displays the user-defined field of the MSR. |
|
Transaction Maintenance- Create Stock Request: Detail Level User-Defined Fields |
BCT_INV_UPD_MSRDUD |
Click the User-Defined Fields link on the Transaction Maintenance-Create Stock Request: Detail Records page. |
Displays the user-defined fields of the order line. |
Using the Inventory Create Stock Request Message in PeopleSoft Integration
BrokerAccess the Message Definition page in PeopleSoft Integration Broker for the INVENTORY_CREATE_STOCK_REQUEST message (PeopleTools, Integration Broker, Integration Setup, Messages, Message Builder).
In order to correctly populate the incoming data, we are going to review the message definition. Message definitions provide the physical description of the data that is being sent, including; fields, field types, and field lengths. Messages do not contain any processing logic. All processing logic is defined in service operations, using service operation handlers. In this section, we are looking at some of the important fields in the INVENTORY_CREATE_STOCK_REQUEST message.
This message structure contains:
INV_MSR_HDR_EVW: The header level containing fulfillment transaction request header information.
INV_MSR_GRP_EVW: The group level containing order (MSR) level information.
INV_MSR_DTL_EVW: The detail level containing the order line information.
INV_MSR_LLS_EVW: The LLS level containing the location/lot/serial of a demand line. You can pre-allocate a demand line by using the LLS level of the transaction request to specify the picking location or lot ID.
The following fields are required on the incoming transaction request:
Business Unit (BUSINESS_UNIT)
Request Type (REQUEST_TYPE)
Item ID (INV_ITEM_ID)
Quantity Requested (QTY_REQUESTED)
Unit of Measure (UNIT_OF_MEASURE) Enter a unit of measure defined as an ordering UOM for this item ID on the Units of Measure page (Items, Define Items and Attributes, Units of Measure).
One of the following:
Destination Business Unit (DESTIN_BU) for interunit transfers, including intercompany transfers.
Customer (CUST_ID), Ship-To Customer (SHIP_TO_CUST_ID), and Address Sequence Number (ADDRESS_SEQ_NUM) for external orders.
Location (LOCATION) for internal issues.
Location and GL Business Unit Override (DESTIN_GL_BU) for interunit expensed issues.
Purchasing Business Unit (BUSINESS_UNIT_PO), RTV ID (RTV_ID), RTV Line Number (RTV_LN_NBR), and RTV Distrib Number (RTV_DISTRIB_NUM) for vendor returns.
If the fields are left blank on the detail level and the same fields are populated at the group level, then the values will default to the detail level. For example, if the Carrier ID field is populated at the group level but left blank at the detail level, then all of the detail lines are populated with the group level value.
For more information, see the "Managing Messages" chapter of the PeopleTools PeopleBook: PeopleSoft Integration Broker.
See Also
PeopleTools PeopleBook: PeopleSoft Integration Broker
Creating MSRs Using the Inventory Shipping Messages in PeopleSoft Integration
BrokerAccess the Message Definition page in PeopleSoft Integration Broker for the INVENTORY_SHIPPING message or the INVENTORY_FRONT_END_SHIPPING (PeopleTools, Integration Broker, Integration Setup, Messages, Message Builder).
In order to correctly populate the incoming data, we are going to review the message definition. Message definitions provide the physical description of the data that is being sent, including; fields, field types, and field lengths. Messages do not contain any processing logic. All processing logic is defined in service operations, using service operation handlers. In this section, we are looking at some of the important fields in version 2 of the INVENTORY_SHIPPING message. These same fields are also on version 2 of the INVENTORY_FRONT_END_SHIPPING message.
|
IN_CREATE_DMD_FLG |
To create an MSR, you must enter Y (yes) in the Create Demand field of your transaction. |
|
AUTO_RELEASE_OPT |
To advance the demand line to the Depleted state, enter 70 (advance to depleted) in the Auto Release Option field of your transaction. |
The following fields are required on the incoming transaction request:
Create Demand flag (IN_CREATE_DMD_FLG) must be Y (yes).
Business Unit (BUSINESS_UNIT)
Request Type (REQUEST_TYPE)
Item ID (INV_ITEM_ID)
Quantity Requested (QTY_REQUESTED)
Unit of Measure (UNIT_OF_MEASURE)
One of the following:
Destination Business Unit (DESTIN_BU) for interunit transfers, including intercompany transfers.
Customer (CUST_ID), Ship-To Customer (SHIP_TO_CUST_ID), and Address Sequence Number (ADDRESS_SEQ_NUM) for external orders.
Location (LOCATION) for internal issues.
Location and GL Business Unit Override (DESTIN_GL_BU) for interunit expensed issues.
Purchasing Business Unit (BUSINESS_UNIT_PO), RTV ID RTV_ID), RTV Line Number (RTV_LN_NBR), and RTV Distrib Number (RTV_DISTRIB_NUM) for vendor returns.
For more information, see the "Managing Messages" chapter of the PeopleTools PeopleBook: PeopleSoft Integration Broker.
See Also
PeopleTools PeopleBook: PeopleSoft Integration Broker
Processing MSRs From a Third-Party SystemAccess the Fulfillment Requests process page (SCM Integrations, Process Transactions, Inventory, Fulfillment Requests).
The Fulfillment Requests process retrieves the transaction requests from the staging tables, processes them, and applies them to the PeopleSoft Inventory demand tables. Within the Fulfillment Request process, the Create Stock Requests application engine is launched when the following transaction requests are found; the transaction code 0360 (Create Stock Request), the transaction code 0365 (Front-end Ship) with Y in the Create Demand field, and the transaction code 0366 (Ship) with Y in the Create Demand field. The Create Stock Request application engine validates the transaction, creates the new demand lines, and applies any default values to the new demand lines.
|
|
Click the Add a New Row icon to add another request to this run control ID. A new row enables you to add requests for additional transaction codes (0360, 0365, and 0366) to the same run control page. |
See Also
Processing Fulfillment Transaction Requests from the Staging Tables
Viewing the Transaction RequestsAccess the Transaction Maintenance page (SCM Integrations, Transaction Error Handling, Maintain Transactions).
The Transaction Maintenance page displays transactions from the inbound staging tables and is used to view the status of the incoming transactions. If errors are found during the Fulfillment Request process, the transaction status in the transaction log is changed to Error, and rows are inserted into error tables for each error message.
|
Unit |
Select the Inventory business unit for your search. |
|
Transaction |
Select the type of transaction to be viewed in your search results. Leave the field blank to view all transaction types within an Inventory business unit. Use the value Create Stock Request to view transaction requests creating MSRs. |
|
Status |
Select the status of the transaction requests to be viewed in your search results. Leave the field blank to select all statuses. Your options are:
|
|
Search |
Click the search button to display results in the Transaction Details group box. |
|
EIP Control ID |
When displaying a Create Stock Request transaction, click this link to access the Transaction Maintenance- Create Stock Request page. |
|
Trans Code and Description |
Displays the transaction code and description for the transaction request. In order to create an MSR or a new demand line for an existing MSR, you must use one of the following transaction codes:
|
|
Status |
Displays the current status of the transaction request. You can edit this field and change the status. The rules for changing a transaction status are:
|
|
Error |
Displays the number of errors within the transaction request. |
See Also
Correcting Errors in a Create Stock Request TransactionsUse the Transaction Maintenance- Create Stock Request component to view and correct any errors within a transaction request for creating stock request. All fulfillment transaction requests have this structure:
Header Level: Contains fulfillment transaction request header information.
Group Level: Contains fulfillment transaction request group level information. For the create stock request transaction, this represents the order.
Detail Level: Contains fulfillment transaction request detail level information within a group. For the create stock request transaction, this represents the order line.
LLS Level: Contains picking location, lot ID, serial ID, and staged-date information. For the create stock request transaction, this represents the location/lot/serial of a demand line.
Errors can occur at any level of the transaction request. For example, if a create stock request transaction is loaded with an item ID that does not exist, then the file generates an error. The item ID is located at the detail level so you can use the Transaction Maintenance- Create Stock Request: Detail Records page to correct the error. Once you have corrected the information and saved the component, the transaction request is ready to be reprocessed using the Fulfillment Requests process.
The Transaction Maintenance pages for the Inventory_Front_End_Shipping transaction and the Inventory_Shipping transaction have a similar format to the Inventory_Create_Stock_Request transaction.
Header Level
Access the Transaction Maintenance- Create Stock Request page (Click the EIP Control ID link on the Transaction Maintenance page).
Transaction Maintenance-Create Stock Request page displays header-level information of a create stock request transaction. You can view the status of the entire transaction request and view any error messages found during the Fulfillment Requests process.
The Transaction Details group box displays the MSRs (orders) within this transaction request. There could be one or more MSRs within a transaction request.
|
Status |
For the transaction request, this field displays the current BCT detail status on INV_MSR_HDR_VW record. The statuses are:
|
|
Group Recs in Error |
Displays the number of groups (that is, MSRs) within this transaction request that are in error status. |
Group Level
Access the Transaction Maintenance- Create Stock Request: Group Records page (Click the Group Records link on the Transaction Maintenance-Create Stock Request page).
Displays the MSRs (orders) within this transaction request. Using the group-level, you can view or edit fields related to the order header; such as, order number or customer ID.
Detail Level
Access the Transaction Maintenance- Create Stock Request: Detail Records page (Click the Detail Records link on the Transaction Maintenance-Create Stock Request: Group Records page).
The Transaction Details group box displays one order line within this transaction request. Use the Transaction Details scroll bar to view another order line within the same MSR. Using this page, you can view or edit information related to one order line within an MSR on the transaction request.
LLS Level
Access the Transaction Maintenance- Create Stock Request: Location, Lot, Serial Records page (Click the Loc, Lot, Serial Records link on the Transaction Maintenance-Create Stock Request: Detail Records page).
The Transaction Maintenance- Create Stock Request: Location, Lot, Serial Records page displays the LLS levels of a single order line within a transaction request. Using the LLS-level, you can view or edit information related to lot ID, serial ID, or material storage locations (MSL) along with container IDs and stage dates.
You can pre-allocate a demand line by using the LLS level of the transaction request to specify the picking location or lot ID.
User Defined Fields
Enter values in the user-defined fields for the material stock request. These fields are stored in the IN_DEMAND_USER table, a child table of IN_DEMAND. If a backorder is created, these fields are propagated to the backorder. You can view and edited user-defined fields at the:
Group Level
Detail Level
Access the Transaction Maintenance- Create Stock Request: Group Level User-Defined Fields page (Click the User-Defined Fields link on the Transaction Maintenance-Create Stock Request: Group Records page).
Access the Transaction Maintenance- Create Stock Request: Detail Level User-Defined Fields page (Click the User-Defined Fields link on the Transaction Maintenance-Create Stock Request: Detail Records page).
See Also
Handling Errors with the Fulfillment Engine
Creating Sales Orders Using PeopleSoft Order Management
Sales orders created in PeopleSoft Order Management that contain items stocked in inventory are passed to PeopleSoft Inventory for shipment. PeopleSoft Order Management processes the shipment of non-inventory (non-stock) items and passes the shipping information to the inventory shipping history tables.
In addition, when entering a sales order in the Order Entry Form component of PeopleSoft Order Management, the user can:
View the stocked item's quantity available in the PeopleSoft Inventory business units.
Lot-allocate demand lines to lot-controlled items in PeopleSoft Inventory.
Launch ATP processing to promise order demand lines.
Soft-reserve demand lines against PeopleSoft Inventory stock.
See Also
Creating and Maintaining Sales Orders
Sourcing Demand from PeopleSoft Purchasing
PeopleSoft Purchasing creates requisitions internally as well as receiving requisitions and other requests for stock from multiple PeopleSoft applications and external systems. The sourcing feature within PeopleSoft Purchasing can checks to see if the demand can be fulfilled by inventory rather than creating a purchase order to be sent to the vendor. The Build Inventory Demand process (PO_REQINVS) in PeopleSoft Purchasing can create material stock requests in PeopleSoft Inventory when stock exists to fulfill a requisition or other demand.
Sources of demand that could be created as stock requests by the Build Inventory Demand process include:
Requisitions created in PeopleSoft Purchasing.
Requisitions created in PeopleSoft eProcurement.
Replenishment requests from another PeopleSoft Inventory business unit.
See Also
Creating Return to Vendor (RTV) Stock Requests
The return to vendor (RTV) feature in PeopleSoft Purchasing can generate a material stock request (MSR) in PeopleSoft Inventory in order to return stock to a vendor. The MSR can be created automatically by the system or entered manually by a user. This MSR can be created:
In the unfulfilled state. You have the option to create a pre-allocation to the returned stock.
In the shipped state.
There are a variety of business reasons for initiating a vendor return. You may receive defective materials, too many items, items shipped in error, or items that you no longer require. When you return goods or services purchased from a vendor, you enter a Return to Vendor (RTV) transaction in PeopleSoft Purchasing. Typically, this RTV transaction specifies the purchase order from which the materials were acquired; however, returns can be processed in PeopleSoft Purchasing without referencing the original purchase order if this detail is no longer available. Once you've created an RTV ID in PeopleSoft Purchasing, steps are taken in PeopleSoft Inventory to remove any stock that has already been put away and update the inventory quantity balances. Note that if the stock is rejected upon receipt and does not get put away in PeopleSoft Inventory, then it does not impact inventory balances and is handled exclusively in PeopleSoft Purchasing. If the stock was put away into a PeopleSoft Inventory business unit, then the RTV transaction (Purchasing, Return To Vendor, Add/Update RTV) determines what actions are taken in PeopleSoft Inventory:
When the RTV line disposition is Ship, inventory personnel retrieve the stock from the current material storage location and ship the stock back to the vendor. A MSR is created to record this action.
When the RTV line disposition is Destroy, inventory personnel retrieve and destroy the stock. An inventory adjustment is used to record this action.
In this section, we discuss shipping inventory back to the vendor when the RTV line disposition is Ship. For information on scrapping inventory, when the RTV line disposition is Destroy,, see the "Making Stock Quantity Adjustments and Transfers Within the Business Unit" chapter of this PeopleBook.
See Understanding Adjustments for Return to Vendor Stock.
Keep in mind the following information when working with a return to vendor MSR:
You can only return stock for which the RTV line disposition is Ship.
You cannot add product kits to a return to vendor MSR.
You cannot use item substitutes on a return to vendor MSR.
The demand line must be pre-allocated before it is processed by the Order Release Request process.
During the picking stage in PeopleSoft Inventory demand fulfillment, you cannot over-pick stock on the MSR line tied to the RTV line. For example, if the RTV line has 25 units and the corresponding MSR line is to ship 25 units, then you cannot exceed 25 units during picking.
The return to vendor MSR is created as approved. No approval process is performed using the Approve Stock Request page or the Shortage Workbench.
The return to vendor MSR cannot be pegged.
The return to vendor MSR cannot be lot allocated.
As the return to vendor MSR flows through the fulfillment steps, you cannot increase the requested quantity to be greater than the original RTV quantity less quantities already in process.
As the return to vendor MSR flows through the fulfillment steps, you cannot change the ship-to customer ID or delete the address override.
Process Flow of RTV Inventory Shipping Options
The following diagram illustrates the process flow for shipping inventory back to the vendor. The RTV transaction is entered on the Return to Vendor page in PeopleSoft Purchasing. If the RTV line disposition is Ship, then an MSR is created in PeopleSoft Inventory using the Request Type of Vendor Returns. The RTV Inventory Ship Option field, also on the RTV transaction in PeopleSoft Purchasing, determines how the MSR is created in PeopleSoft Inventory. This MSR can be created by an EIP or entered manually by a user. The MSR can be created in the shipped state or created in the unfulfilled state to be released, picked, confirmed, and shipped. Once the Deplete On Hand Qty (Depletion) process is run, the RTV transaction in PeopleSoft Purchasing is updated with the shipping quantity.
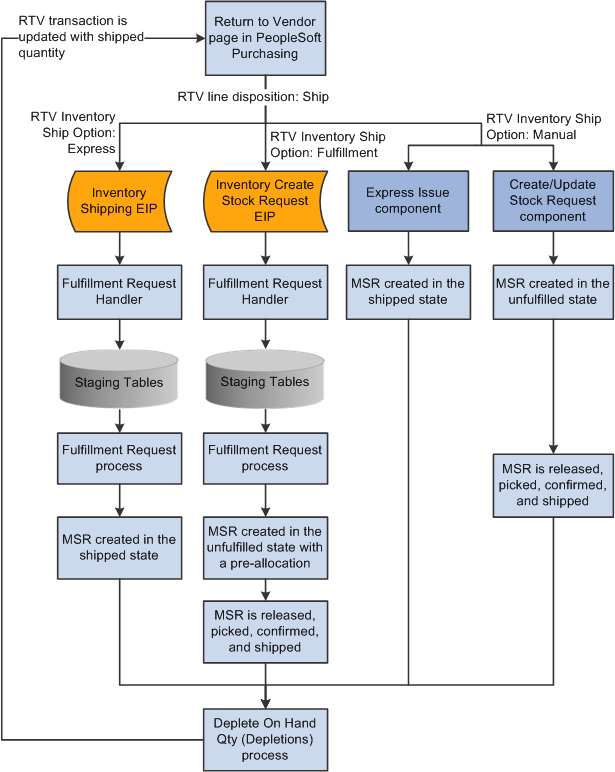
Process Flow for RTV Inventory Shipping
The process flow for RTV inventory shipping includes:
The RTV Inventory Ship Option field is Express. This option enables a user to complete the shipment of RTV stock by simply entering and saving the RTV using the Return to Vendor page in PeopleSoft Purchasing.
When the RTV is saved on the Return to Vendor page, the Fulfillment Request Handler generates an XML message using the INVENTORY_SHIPPING EIP and populates the inbound staging tables. This message transaction contains the data to build an MSR based on the information in the RTV. The Fulfillment Requests process retrieves the data from the staging tables and applies it to the PeopleSoft Inventory demand tables creating the MSR in the shipped state.
Based on your fulfillment engine setup, the Fulfillment Requests process and the Deplete On Hand Quantity process can be launched automatically so that the user saves the RTV using the Return to Vendor page (one step) and then sees the shipped quantities display on the page.
The RTV Inventory Ship Option field is Fulfillment. This option enables a user to use one step to record the RTV and create the MSR in the unfulfilled fulfillment state. Once the MSR has been created, your warehouse personnel follow your organization's standard routine for warehouse shipments, such as, generating a pick plan, confirming picking, generating shipping documents, and so on.
When the RTV transaction is saved on the Return to Vendor page in PeopleSoft Purchasing, the Fulfillment Request Handler generates an XML message using the INVENTORY_CREATE_STOCK_REQUEST EIP and populates the inbound staging tables. This message transaction contains the data to build an MSR based on the information in the RTV. The Fulfillment Requests process retrieves the data from the staging tables and applies it to the PeopleSoft Inventory demand tables creating the MSR in the unfulfilled state. To insure that the correct stock is returned to the vendor, you can have the system pre-allocate this MSR to identify the exact material storage location, lot, and serial ID of the rejected stock. The pre-allocate process can select stock from materials storage locations that are non-nettable, WIP, inspection, and on hold. The MSR then follows your normal shipping process to release, pick, confirm and ship the stock.
Similar to the express option, your fulfillment engine setup enables you to streamline your fulfillment steps so that user input is only required where your organization desires it. For example, you can use auto-processing to take the order to the released state so that, from the end-user's perspective, the picking plan prints when a user enters the RTV transaction.
The RTV Inventory Ship Option field is Manual. The manual option splits the RTV creation and the MSR creation into separate steps. In this method, a user must create the RTV transaction in PeopleSoft Purchasing and then a user must create the MSR to ship the rejected stock back to the vendor using either the Express Issue component or the Create/Update Stock Request component.
The Express Issue component copies the information from the RTV and then creates the MSR in the shipped state. This component also updates the RTV Line Shipped (RTV_LN_SHIP) table in PeopleSoft Purchasing with the updated pro number information.
The Create/Update Stock Request component copies the information from the RTV and then creates the MSR in the unfulfilled state. The MSR can then follow your organization's standard routine for warehouse shipments by generating a pick plan, confirming picking, generating shipping documents, and so on. To insure that the correct stock is returned to the vendor, you can pre-allocate this MSR to identify the exact material storage location, lot, and serial ID of the rejected stock. The pre-allocate process can select stock from materials storage locations that are non-nettable, WIP, inspection, and on hold.
Similar to the express and fulfillment options, your fulfillment engine setup enables you to streamline your fulfillment steps so that user input is only required where your organization desires it.
The MSR is released, picked, confirmed, and shipped. As the MSR flows through the fulfillment steps that you have enabled in your environment, RTV MSRs can be kept separate from non-RTV orders. Processes, pages, and inquiry pages within the fulfillment process contain options to select just RTV order or just non-RTV orders.
The Depletion process is run. The Deplete On Hand Quantity process moves the MSR to the depleted state and reduces the inventory business unit quantity balances for the shipment. For RTV transactions, the Deplete On Hand Quantity process updates the RTV Line (RTV_LN) and RTV Line Distribution (RTV_LN_DISTRIB) tables in PeopleSoft Purchasing with the shipment quantities and dates. The process also changes the RTV line shipment status to Shipped if the shipped quantity is greater than or equal to the return quantity.
Note. The entire return-to-vendor feature includes elements of PeopleSoft Purchasing, Payables, Cost Management, and Inventory. For a complete understanding of RTV, see the PeopleSoft Purchasing PeopleBook.
Pages Used to Create Return to Vendor Stock Requests|
Page Name |
Definition Name |
Navigation |
Usage |
|
EXPRESS_ISSUE1_INV |
Inventory, Fulfill Stock Orders, Stock Requests, Express Issue |
Select the Request Type of Vendor Returns to create a return-to-vendor MSR in the shipped fulfillment state. |
|
|
EZ_ISSUE_INV |
Inventory, Fulfill Stock Orders, Stock Requests, Create/Update Stock Request |
Select the Request Type of Vendor Returns to create a return-to-vendor MSR in the unfulfilled fulfillment state. |
|
|
EXPRESS_ISSUE_RTV |
|
Enter search criteria and select an RTV transaction from PeopleSoft Purchasing. The data is copied to the material stock request to ship stock back to the vendor. Note. This page is available only for vendor return requests. |
|
|
INV_ADDRESS |
|
View and modify the ship to address for the order or order line. See Modifying Addresses. |
|
|
EXPR_ISS_RTV_PRO |
Click the Detail Override/Exceptions link on the Express Issue page. Click the RTV Pro Numbers link on the Detail Override/Exceptions page. |
Capture multiple pro numbers for an RTV line being shipped from the Express Issue page. When the Express Issue component is saved, the system updates the RTV Line Shipped (RTV_LN_SHIP) table in PeopleSoft Purchasing with the updated pro number information. |
Setting Up Return to Vendor Stock Requests in PeopleSoft Inventory
Before creating MSRs to return stock to a vendor, you must complete the following setup steps:
Define a material storage location (MSL) as a default RTV location using the Return to Vendor Default Location page (Inventory, Maintain Storage Locations, Default RTV Location). This default MSL is used to populate the stock request when the RTV transaction created in PeopleSoft Purchasing does not contain the picking location for the rejected stock. In most cases, this default RTV location is defined as your inspection area or the location where you place rejected stock. This MSL can be can a non-nettable location, inspection location, or on hold.
Define a customer ID to be used on the return to vendor stock requests. This customer ID is placeholder that enables you to ship returned stock to your vendors without having to define each of them as customers on the customer table. When the MSR is created, the RTV customer ID defaults to the customer ID fields, the name of the vendor (from the RTV) is put in the customer name fields, and the vendor address is put in the IN_DEMAND_ADDR record as an override to the stock request. For a return to vendor stock request, the address override is required. As the return to vendor MSR flows through the fulfillment steps, you cannot change the ship-to customer ID or delete the override address; however you can change the override address. To define the default RTV customer, complete the following steps:
Define a new ship-to customer using the Customer Information-General Information component (Customers, Customer Information, General Information, General Info). The customer ID should be easily identified as a dummy ID for RTV, such as, RTVID.
Enter the customer ID in the Default RTV Customer ID field on the Installation Options-Inventory page (Set Up Financials/Supply Chain, Install, Installation Options, Inventory). If the default RTV customer ID has not been defined, then an error displays when saving the RTV transaction in PeopleSoft Purchasing.
See Defining Application-Specific User Preferences.
Note. If the vendor is defined in the PeopleSoft system as a customer, then this customer ID is used rather than the default RTV customer ID.
Activate the new index to the IN_DEMAND table with the keys RTV_ID and RTV_LINE. This index is delivered in the list of recommended indexes but has not been activated.
Activate the necessary service operations (INVENTORY_SHIPPING EIP and INVENTORY_CREATE_STOCK_REQUEST EIP).
Choose your RTV inventory ship option and define the default hierarchy.
Choosing the RTV Inventory Ship Option
Based on your organization's needs, select an RTV Inventory Ship Option. This option determines how users record an RTV MSR to ship stock back to the vendor from the Inventory business unit. The options for the RTV Inventory Ship Option field are:
Express The express option enables a user to use one step to record the RTV and create the MSR in the shipped fulfillment state. When the RTV transaction is saved in PeopleSoft Purchasing, the system generates an XML message using the INVENTORY_SHIPPING EIP.
Note. For RTV lines using an inventory business unit that utilizes a warehouse management system (WMS) for their warehousing processes, the express option cannot be used because it could cause the stock quantities between the PeopleSoft Inventory business unit and the WMS to become out of balance. The Use External Warehouse Control check box on the Inventory Definition - Business Unit Options page controls the integration to a WMS.
Fulfillment The fulfillment option enables a user to use one step to record the RTV and create the MSR in the unfulfilled fulfillment state. When the RTV transaction is saved in PeopleSoft Purchasing, the system generates an XML message using the INVENTORY_CREATE_STOCK_REQUEST EIP. To insure that the correct stock is returned to the vendor, you can pre-allocate this MSR to identify the exact material storage location, lot, and serial ID of the rejected stock.
Manual The manual option splits the RTV creation and the MSR creation into separate steps. In this method, a user must create the RTV transaction in PeopleSoft Purchasing and then a user must create the MSR to ship the rejected stock back to the vendor using either:
The Express Issue component to create the MSR in the shipped state.
The Create/Update Stock Request component to create the MSR in the unfulfilled state. To insure that the correct stock is returned to the vendor, you can pre-allocate this MSR to identify the exact material storage location, lot, and serial ID of the rejected stock. The pre-allocate process can select stock from materials storage locations that are non-nettable, WIP, inspection, and on hold.
The RTV Inventory Ship Option field has the following default hierarchy to the individual RTV line:
The RTV Inventory Ship Option field can be defined for the Purchasing business unit using the Purchasing Definition - Business Unit Options page (Set Up Financials/Supply Chain, Business Unit Related, Purchasing, Purchasing Definition, Business Unit Options). The values of Express, Fulfillment or Manual can be used in this RTV Inventory Ship Option field.
The RTV Inventory Ship Option field can be defined for the user using the Procurement - Receiver Setup page of the Define User Preferences component (Set Up Financials/Supply Chain, Common Definitions, User Preferences, Define User Preferences, Procurement, select the Receiver / RTV Setup link). The value at the user-level overrides the business unit-level. The values of Express, Fulfillment, Manual or Default to Business Unit can be used in this RTV Inventory Ship Option field.
The default value for the RTV Inventory Ship Option field is placed in the line level of the RTV transaction in the Inventory Process field (Purchasing, Return To Vendor, Add/Update RTV, Source Information tab). The values of Express, Fulfillment or Manual can be changed for the individual RTV line. The RTV line disposition field must have the value of Ship in order to display the RTV inventory ship options.
Returning Stock to Vendors by Manually Adding an MSR
Access the Express Issue page (Inventory, Fulfill Stock Orders, Stock Requests, Express Issue).
Access the Stock Request Summary page (Inventory, Fulfill Stock Orders, Stock Requests, Create/Update Stock Request).
To create a return to vendor MSR using the Express Issue component or the Create/Update Stock Request component:
When entering the Express Issue page or the Create/Update Stock Request component, add the new MSR with a Request Type of Vendor Returns.
On the Express Issue page or the Stock Request Summary page, click the Fetch RTV link to access the RTV Selection page where you can select RTV IDs for processing. Your selection populates this MSR with information from the RTV, including; item and quantity to be returned, the material storage location where the stock is located, lot IDs, serial IDs, vendor name, and vendor address.
(Optional) On the Express Issue page or the Stock Request Summary page, you can view or change the vendor shipping address using the Override Address link to access the Order Address page. If the vendor is defined in the PeopleSoft system as a customer, then this customer ID is used. If the vendor is not defined as a customer then the MSR uses the default RTV customer ID defined on the Installation Options-Inventory page (Set Up Financials/Supply Chain, Install, Installation Options, Inventory) and this ship-to customer cannot be changed on the MSR. The name and address fields are then overridden by the vendor name and address from the RTV transaction. This stock request must contain an address override, however, you can change it. Keep in mind that changing information on the Order Address page can cause your information to conflict with the RTV transaction in PeopleSoft Purchasing. Caution should be used when changing information here or on the RTV transaction.
(Optional) To make any changes to the shipping information:
On the Stock Request Summary page, you can use the Shipment Detail link to access the Shipment Detail page.
On the Express Issue page, you can use the Detail Override/Exceptions link to access the Detail Override/Exceptions page. In addition, from the Detail Override/Exceptions page you can select the RTV Pro Numbers link to access the RTV Pro Numbers page. Use the RTV Pro Numbers page to add multiple pro numbers to an RTV line. This enables you to keep track of every package that is shipped. When the Express Issue component is saved, the system updates the RTV Line Shipped (RTV_LN_SHIP) table in PeopleSoft Purchasing with the updated pro number information.
(Optional) On the Stock Request Summary page, you can use the Pre-Allocate button to create a pre-allocation to the specific material storage location where the RTV stock is located. This information comes from the RTV transaction or the default RTV location is used (Inventory, Maintain Storage Locations, Default RTV Location). The pre-allocate process can select stock from materials storage locations that are non-nettable, WIP, inspection, and on hold. RTV stock cannot be lot allocated, only pre-allocated.
Save the MSR. When a return to vendor stock request is saved on the Express Issue component or the Create/Update Stock Request component, the RTV transaction in PeopleSoft Purchasing is updated with information from the MSR. Another line within this same MSR cannot be created for the same RTV line; however, you can create a new MSR for the same RTV line as long as the total quantity is less or equal to the RTV quantity.
Keep in mind the following information when working with a return to vendor MSR:
You can only return stock for which the RTV line disposition is Ship.
You can only manually add the MSR using this page, if the RTV Inventory Ship Option is Manual. This value is located in the line level of the RTV transaction in the Inventory Process field. If the value is Express or Fulfillment then the INVENTORY_SHIPPING EIP or the INVENTORY_CREATE_STOCK_REQUEST EIP creates the MSR. In addition, you cannot use the Express Issue component to create the MSR if it has already been created for the RTV using the Create/Update Stock Request component.
You cannot override ChartField values for RTV express issues because the accounting information is taken from the RTV ID.
Selecting Return to Vendor Transactions
for an MSR
Access the RTV Selection page (Click the Fetch RTV link on the Express Issue page or the Stock Request Summary page).
Enter the appropriate parameters, and click the Search button. Items matching the criteria appear in the lower portion of the page. Select the check box next to a line, or click the Select All RTV (select all return to vendor) button to select all lines from an RTV ID. Click the Unselect All RTV (unselect all return to vendor) button to clear all lines.
A RTV line is unavailable if it has already been used to create another MSR line using an Express Issue page, Create/Update Stock Request component, the Inventory Shipping EIP, or the Inventory Create Stock Request EIP.
Processing Return to Vendor Stock Requests in Demand Fulfillment
If you choose to create your RTV stock requests in the unfulfilled state, then the stock requests flow through your customized shipping process. You can release, generate pick plans, enter picking feedback, record the shipment, and then deplete the shipped stock. The fulfillment steps that you choose are based on your organization's needs to control or streamline stock shipments. In this section, we discuss the features throughout the demand fulfillment cycle that assist you with RTV MSRs.
Maintain Stock Request Component
Use the Maintain Stock Request Component to view or modify orders in PeopleSoft Inventory. For return to vendor MSRs:
Use the Demand Source of Material Return to search for RTV MSRs.
On the Maintain Stock Request page, the Ship To field cannot be changed and item substitutes cannot be used.
On the Order Address page of this component, the address override cannot be deleted; however, you can change the address. If you change the address on a return to vendor MSR, a warning is displayed since the address on the RTV transaction could be different and could cause PeopleSoft Purchasing to report an incorrect shipping address.
On the Update Quantity page, you cannot increase the quantity field to be greater than the original RTV quantity less quantities already in process. In addition, any increase in the quantity is not pre-allocated even if the return to vendor MSR contains a pre-allocation.
Pre-allocation and Reservation Processes
The reservation process moves the MSR to the releasable state and retains any pre-allocation created in the unfulfilled state. Keep in mind that return to vendor stock is normally stocked in a non-nettable material storage location (such as inspection, hold, or WIP), therefore, the Inventory business unit's total available quantity is not reduced by RTV stock and there is no soft-reserve.
On the Reserve Materials process page, use the demand source of RT to select just RTV MSRs.
On the Correct Demand Errors component:
You cannot change the quantity fields.
You cannot delete the address override.
You cannot change the ship to customer ID.
On the Allocation Workbench, use the demand source of Material Return to select just RTV MSRs. The Allocation Type of Lot Allocation cannot be used since an RTV MSR cannot be lot allocated.
The Allocate Lots component cannot be used with RTV MSRs since no lot allocation is allowed.
Picking Processes
When picking RTV MSRs, the picking processes can select stock from materials storage locations that are non-nettable, WIP, inspection, and on hold.
On the Order Release Request process page:
You can use the Exclude RTVs check box to exclude return to vendor MSRs from the process run. This check box enables you to release orders and generate picking plans that do not include RTV MSRs.
You can include just return to vendor MSRs, by selecting Advanced Search Criteria in the Selection Criteria group box and then entering the value of Material Return in the Demand Source field.
You cannot use the Make Suggestions value in the Action field for return to vendor MSRs.
The RTV MSR line must be pre-allocated in order to be processed by the Order Release Request process.
All return to vendor MSRs are processed as Release Only in the Action field.
For an RTV MSR, the Material Picking Plan report (INS6000) includes the following information about the original RTV transaction; PeopleSoft Purchasing business unit, RTV ID, line, and distribution line.
In the search criteria on the Shortage Workbench page, enter RT in the Source field and enter any additional search criteria. The action of Accept Override Quantity cannot be used with a return to vendor MSR.
For a return to vendor MSR, on the Material Picking Feedback component:
Use the source of RT to select just RTV MSRs.
You cannot use item substitutes.
You cannot overpick the quantity.
See Overpicking.
On the Picking Confirmation process page, use the demand source of RT to select just RTV MSRs.
Shipping/Issues component
On the Shipping/Issues component:
Use the Demand Source of Material Return to select just RTV MSRs.
You cannot delete the shipping address override.
You cannot change the ship to customer ID.
Cancelling a Return to Vendor MSR
If necessary, you can cancel a return to vendor MSR before it is depleted, using the Cancel/Hold Stock Request page. You cannot apply holds to an RTV MSR; you can only cancel these orders. If you cancel a return to vendor MSR using the Cancel/Hold Stock Request component:
In the search criteria on the Stock Request Cancel/Hold Order Selection page, enter Material Return in the Demand Source field and enter any additional search criteria.
On the Cancel/Hold Stock Request page, cancel the return to vendor MSR and save the page.
Once you save the changes, the system cancels the order line in PeopleSoft Inventory, updates the quantity and scheduled shipment date in the PeopleSoft Purchasing RTV Line (RTV_LN) and RTV Line Distribution (RTV_LN_DISTRIB) tables, and changes the RTV line status to Open.
Note. An RTV transaction line in PeopleSoft Purchasing cannot be cancelled if there is an un-cancelled MSR line tied to the RTV.
See Canceling or Holding Orders Within PeopleSoft Inventory.
Depletion process
On the Deplete On Hand Qty Requests process page, use the demand source of RT to select just RTV MSRs.
The Deplete On Hand Quantity process moves the MSR to the depleted state and reduces the inventory business unit quantity balances for the shipment. For RTV transactions, the Deplete On Hand Quantity process updates the RTV Line (RTV_LN) and RTV Line Distribution (RTV_LN_DISTRIB) tables in PeopleSoft Purchasing with the shipment quantities and dates. The process also changes the RTV line shipment status to Shipped if the shipped quantity is greater than or equal to the return quantity.
Since return to vendor stock is normally stocked in a non-nettable material storage location (such as inspection, hold, or WIP), therefore, the Inventory business unit's total available quantity is not reduced when RTV stock is depleted.
Using Par Location Management to Create Orders
The par location functions in PeopleSoft Inventory enable you to establish stock locations that can be replenished without tracking item on-hand quantities and material movement transactions. With par inventory management, you stock par locations with defined optimal item quantities, consume items as necessary, conduct periodic inventory counts to determine replenishment needs, and then run the Create Par Replenishment Requests process (INPGCDMD) to generate orders for items that require replenishment. Using the stock replenishment method, the Create Par Replenishment Requests process creates a material stock request, or order, in the PeopleSoft Inventory business unit to replenish items that are defined as stocked in your inventory.
See Also
Accepting Stock Requests from PeopleSoft
Supply Planning
Recommendations for adding or rescheduling external stock requests, internal stock requests. and interunit transfers can be generated in PeopleSoft Supply Planning using inventory planning messages. Once a plan has been created and recommendations have been made, planning messages are placed into the DEM_CHG_INF_INV interface table using the Post Updates process (PL_POST). This process generates inventory recommendations, updates, and post errors. At that time, you can review, analyze, approve, and apply those inventory updates to PeopleSoft Inventory.
To process PeopleSoft Inventory updates:
Review the errors that occurred during the Post Updates process using the Review Planning Post Errors component.
When you run the Post Updates process, the system finds errors. The system generates error messages when the situation in PeopleSoft Inventory has changed from the last time that the PeopleSoft Supply Planning update was initiated. For example, you'll receive an error message if PeopleSoft Supply Planning suggests canceling an interunit order but the interunit order has already been completed in PeopleSoft Inventory.
(Optional) Review and approve the recommended PeopleSoft Inventory updates using the Approve Planning Updates component.
Use this component to manually approve the updates that you want to apply to PeopleSoft Inventory. You can automatically approve all of the changes during the Post Updates process.
Apply the approved PeopleSoft Inventory updates to PeopleSoft Inventory by initiating the Apply Planning Updates COBOL process (INPAPLAN).
Review the errors that occurred from the Apply Planning Updates process using the Review Apply Planning Errors component.
When you apply the PeopleSoft Inventory updates and the system finds data errors, the system generates error messages. These error messages might have been generated because a change in the production data occurred since you ran the Apply Planning Updates process or because a business rule violation occurred (example violation: an invalid intercompany setup).
See Also
Committing PeopleSoft Supply Planning Updates
Pages Used to Accept Stock Requests from
PeopleSoft Supply Planning
|
Page Name |
Definition Name |
Navigation |
Usage |
|
PL_POST_REQ |
Supply Planning, Commit Plan, Planning, Post Updates |
Extract new orders and changes to existing orders from the planning instance. Validate and stage orders for application to the transaction system. |
|
|
DEM_EXC_SRC_INV |
|
Define the search criteria for the inventory post errors that you want to review. |
|
|
DEM_EXC_SUM_INV |
|
Review the details of inventory post errors. |
|
|
DEM_CHG_SRC_SPL |
|
Define the search criteria for the PeopleSoft Inventory updates that you want to review. |
|
|
DEM_CHG_SUM_SPL |
|
Review and approve PeopleSoft Inventory updates that you want to apply to PeopleSoft Inventory. |
|
|
DEM_CHG_MSD_INV |
Click the Details button next to an update on the Approve Planning Updates - Inventory Messages page. |
View the message details for a particular PeopleSoft Inventory update. |
|
|
DEM_CHG_REQ_INV |
|
Initiate the Apply Planning Updates process to apply the approved updates to PeopleSoft Inventory. |
|
|
DEM_CHG_EXC_INV |
|
Review the PeopleSoft Inventory updates that have been applied to the system through the Apply Planning Updates process. This page displays the errors that occurred for a particular update and also displays the updates that were processed successfully. |
|
|
DEM_CHG_EXD_INV |
Click the Details link next to an update on the Review Apply Planning Errors - Review Planning Exceptions page. |
View the order details of a specific PeopleSoft Inventory error or processed update. |
Processing Work Orders from PeopleSoft Maintenance Management
PeopleSoft Maintenance Management is used to maintain assets. A work order is created to repair or perform scheduled maintenance on an asset. The work order could list parts needed that are stocked in PeopleSoft Inventory. When work orders contain items stocked in PeopleSoft Inventory, then the work order schedule is passed to PeopleSoft Inventory for fulfillment.
A work order does not flow through the standard order fulfillment processes of PeopleSoft Inventory. The order is kept in a pending state in demand fulfillment table (IN_DEMAND) and processed under the Fulfill Work Order menu.
See Fulfilling Work Orders from Maintenance Management.
Approving Stock Requests Manually
Before you can reserve inventory to fulfill an order from any source, you must approve it. If you do not want to use the approval process, make sure that you have selected the Auto Stock Approval check box on the Setup Fulfillment page. If you receive stock requests from a third-party application, ensure that all demand rows are marked as Approved.
You can approve stock requests manually using the Approve Stock Request page or the Shortage Workbench.
See Also
Defining Basic Fulfillment Defaults
Page Used to Approve Stock Requests Manually|
Page Name |
Definition Name |
Navigation |
Usage |
|
DEMAND_APPV_INV |
Inventory, Fulfill Stock Orders, Stock Requests, Approve Stock Request |
Approve stock requests manually. |
|
|
Shortage Workbench |
IN_SW_SELECTION |
Inventory, Fulfill Stock Orders, Shortage Workbench |
Approve stock requests manually. |
Approving Stock RequestsAccess the Approve Stock Request page (Inventory, Fulfill Stock Orders, Stock Requests, Approve Stock Request).
|
Approved |
Select to approve an individual stock request demand line. |
|
Select All and Deselect All |
Click to approve all demand lines or to withdraw approval for all lines. Note. The Select Alloption appears only when there are multiple demand lines. |
Monitoring Order Fulfillment Status
This section discusses how to search for and review information about your stock requests.
Note. If your installation includes PeopleSoft Order Management, begin your inquiry with the Order Tracking component. Click the Quantity Reserved amount to access the Fulfillment Status page for more detailed information.
See Also
Understanding Order Fulfillment Processing
Pages Used to Monitor Order Fulfillment
Status
|
Page Name |
Definition Name |
Navigation |
Usage |
|
FUL_HIST_INQ_INV2 |
|
Enter search criteria to retrieve orders for viewing on the Fulfillment Status page. You can enter numerous search criteria to find the needed orders, including; demand source, source business unit, order number, fulfillment state, hold status, backorder status, item attributes, interunit ID, picking and shipping attributes. You can also view defer depletion demand lines. |
|
|
FUL_HIST_INQ_INV |
Inventory, Fulfill Stock Orders, Review Fulfillment Information, Fulfillment Status |
View the fulfillment status of one or more orders for a business unit. |
|
|
FUL_HIST_INQ_INV3 |
Click a linked order number on the Fulfillment Status page. |
View order line information for the orders that appear on the Fulfillment Status page. |
|
|
SHIP_DETAIL_INV2 |
Click the View Details link on the Order Line Detail page. |
View additional information for the order lines that appear on the Order Line Detail page. |
|
|
ORDER_INQ_INV2 |
|
Specify search criteria for the order that you want to view on the Stock Requests page. |
|
|
ORDER_INQ_INV |
Inventory, Fulfill Stock Orders, Review Fulfillment Information, Stock Requests |
Review the status of a specific order. |
|
|
ORDER_INQ_IDS_SP |
Click the Order Details link on the Stock Requests page. |
View additional shipment information for an order line, including; pick batch ID, shipping ID, interunit ID, bill of lading, shipping manifest, TMS information, and other shipping statuses. |
|
|
SHIP_DETAIL_INV |
Click the Picking Details link on the Stock Requests page. |
View lot, serial, or container details for the stock picked or the lot allocated for the order line. Use the locations tab on this page to view the material storage location for picking, the stocking quantity, and the type of allocation (pre-allocation, lot allocation, or standard allocation). |
|
|
REPLEN_REQUIST_INV |
|
View orders generated by ad hoc requisitions. |
|
|
CP_CFGCDE_SEC_PNL3 |
Click the Configuration Code link on the Stock Requests page. |
View the configuration code for a configured item. |
|
|
ORDER_INQ_INV3 |
Click the Reservation and Backorder Rules link on the Stock Requests page. |
View the reservation and backorder rules assigned to this order demand line. |
|
|
ORDER_INQ_INV4 |
Click the Comments link on the Stock Requests page. |
View any comments added to this line. |
|
|
Stock Requests-Pegging Inquiry |
IN_PEG_DETAIL_SP |
Click the Show Pegged Supply link on the Stock Requests page. |
Displays information about the supply that is pegged to this order (demand), including the type of supply (interunit transfer, purchase order, requisition, or production ID), the order number, schedule date, peg status, and open peg quantity. In addition, there is a link to the Details - Pegging Workbench page (IN_PEG_DETAIL) where you can view additional information about this peg. |
Viewing Fulfillment Status
Access the Fulfillment Status page (Inventory, Fulfill Stock Orders, Review Fulfillment Information, Fulfillment Status).
This page displays the fulfillment state of the demand lines on an order, such as; pending, unfulfilled, releasable, released, confirmed, shipped, depleted, cancelled, or on hold. You can view the total number of demand lines for each order, as well as the number of demand lines in each fulfillment state. In the Totals group box, you can also see the grand totals for all orders selected by your search criteria.
Note. The value in the On Hold field includes demand lines with sales order holds, as well as inventory holds.
|
|
Click this button for an order to transfer to the Stock Requests page, where you can view more details about the order. |
|
Order No |
Click a linked order number to access the Fulfillment Status - Order Line Detail page. |
|
Nbr of Deferred |
Displays the number of demand lines with the Defer Depletions field set to Y (yes). These demand lines are not selected by the Deplete On Hand Qty (Depletions) process until later. For a complete discussion of the Defer Depletions feature, go to the "Shipping Inventory" chapter, "Delaying the Billing and Costing of Inventory Shipments" section. See Delaying the Billing and Costing of Inventory Shipments. |
Viewing Order Line Information
Access the Fulfillment Status - Order Line Detail page (Click a linked order number on the Fulfillment Status page).
|
Delivery ID |
This field displays the delivery ID assigned to the order lines. Deliveries are logical groupings of order lines that can be shipped together. PeopleSoft Inventory and Order Management can use these groupings for pricing sales orders, adding freight charges, and packing shipping containers. Each delivery is assigned a unique delivery ID. See Understanding PeopleSoft Delivery Management and Freight Calculations. |
|
Kit ID |
This field displays the product kit ID when the demand line contain a component of a product kit. Select the link on the product kit ID to access the Kit Display page where you can view all the components within this kit. |
|
Ship Containers |
Click to access the Ship Container Hierarchy - Ship Container inquiry page, where you can view information pertaining to any shipping containers associated with a demand line. (PeopleSoft Inventory automatically populates the Shipping Containers inquiry page with all containers associated with this demand line.) |
|
Transfer Price Details |
Click this link to display the Transfer Price Details page where you can view the estimated transfer price broken out by cost elements. This page is populated after you have clicked the Estimate Transfer Price button. PeopleSoft Cost Management does not support interunit pricing for non-cost items. |
Reviewing the Status of a Particular Order
Access the Stock Requests page (Inventory, Fulfill Stock Orders, Review Fulfillment Information, Stock Requests).
The Stock Request inquiry component give you detailed information about each demand line within an order. Using this component, you can review orders received from PeopleSoft Order Management, PeopleSoft Purchasing, PeopleSoft Planning, and PeopleSoft Maintenance Management, as well as material stock requests within PeopleSoft Inventory. This page enables you to track the fulfillment status of each demand line within an order and to confirm the settings of the different options governing parameters, such as whether the order is approved or on backorder, whether partially fulfilled stock requests can be shipped, and whether requests can be shipped ahead of schedule.
|
Kit ID |
This field displays the product kit ID when the demand line contain a component of a product kit. Select the link on the product kit ID to access the Kit Display page where you can view all the components within this kit. This field only displays if the demand line is part of a product kit. |
|
Delivery ID and To Delivery ID |
Displays the delivery ID assigned to this order line. Deliveries are logical groupings of order lines that can be shipped together. PeopleSoft Inventory and Order Management can use these groupings for pricing sales orders, adding freight charges, and packing shipping containers. Each delivery is assigned a unique delivery ID. See Understanding PeopleSoft Delivery Management and Freight Calculations. |
|
Order Details |
Click to access the Stock Requests - Order Details page where you can view additional shipment information for an order line including; pick batch ID, shipping ID, interunit ID, bill of lading, shipping manifest, TMS information, and other shipping statuses. |
|
Picking Details |
Click to transfer to the Stock Requests-Picking Details page, where you can view information about lot, serial, or container details for the stock picked or the lot allocated for the order line. |
|
Requisition Details |
Click to transfer to the Stock Requests-Requisition Details page, where you can view orders created by ad hoc requisitions. |
|
Configuration Code |
Click to transfer to the Stock Requests - Configuration Code page, where you can view the configuration code for a configured item. |
|
Reservation / Backorder Rules |
Click to transfer to the Stock Requests - Reservation and Backorder Rules page, where you can view the reservation and backorder rules assigned to this order demand line. |
|
Comments |
Click to transfer to the Stock Requests - Comments page, where you can view any comments added to this line. |
|
Track by Order |
Click to view the status of a shipped order using the external carrier's web tracking system if the external carrier has a URL specified for it on the Carrier URL page. |