Your implementation team can set up business process assistant (BPA) scripts to walk you through business processes. Once scripts have been set up, you can initiate a script using any of the following methods:
- You can define a list of your "favorite scripts" on your user preferences. You can then invoke any of the scripts from the Favorite Scripts zone on the dashboard portal. You can also invoke any of your first 9 favorites by pressing Ctrl + Shift + a number (where the number corresponds with the relative position of the script in your list of favorites). For example, if you press Ctrl+Shift+2 and you've setup your "favorite scripts" to be Start Autopay and Stop sending marketing information; the Stop receiving marketing information script is invoked. Note that the numeric keypad on your keyboard cannot be used to implement this function.
- You can configure a menu item to launch a script by referencing a navigation option that is a script navigation option type.
- The system creates To Do entries to highlight tasks that require attention (e.g., bills in errors, accounts without bill cycles, etc.). Users can complete many of these tasks without assistance. However, you can set up the system to automatically launch a script when a user selects a To Do entry. For example, consider a To Do entry that highlights a bill that's in error due to an invalid mailing address. You can set up the system to execute a script when this To Do entry is selected. This script might prompt the user to first correct the customer's default mailing address and then re-complete the bill. Refer to Executing A Script When A To Do Is Launched for more information.
- You can indicate that a script should be launched upon entering the system. This functionality enables an external system to launch the system and immediately launch a script.
- If you press Ctrl+Shift+S, an interactive menu is displayed:
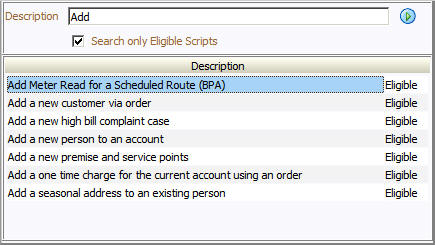
The menu allows you to search for a script using any word in its description. Note, if you've turned on Search only Eligible Scripts, your search is limited to eligible scripts. Note, the system displays an indication if each script in the grid is Eligible or Ineligible in this section.
You can initiate a script from this area by clicking on it.
When a script is initiated, this menu closes and the object display area shifts down to make room for the script area.
The information in the script area takes you through the steps in the selected business process (note, your implementation team controls the information that appears in the script area).
The following points highlight useful information common to all scripts:
- Return focus to script area. Often during a script the focus moves from the script area to another section of the page. For example, you might be required to fill in data for a new record being added. When you are ready to return to the script area, rather than using the mouse to return to the area, you can press Ctrl+Shift+F. The focus returns you to either the first available input field or to a "default" button if no input field is available.
- The Continue button. Many steps in a script ask you to click the Continue button when you're ready to restart a script. For example, a step may ask you to confirm a customer's automatic payment information and then click Continue when you're ready for the script to restart. Rather than using the mouse to click this button, you can press Ctrl+Shift+C.
- Selected button changes color. When you click a button in the script area, the button selected changes color so that you can easily see which option you selected.