26 Securing Pages and Components
You are authorized to specify who can access any page on which you also have Edit Page permission. Among those you authorize to access the page, you can assign varying levels of access, so that some users can edit the page while others can merely view it. If you prefer, you can specify that the page inherits its access settings from the application.
You may want to open a page to many users, but limit the exposure of a particular page component to a specific user, a user group, or to users who are assigned a specific application role. You can accomplish this by associating a security-related EL expression with the component instance.
This chapter provides information about securing pages and page components. It includes the following sections:
This chapter is intended for space moderators and participants and for page editors with the create, edit, and delete permission on pages and on the services that provide the components to be secured. For more information about application roles and permissions, see Section 24.2, "Managing Application Roles and Permissions."
26.1 Setting Access on a Page Through Page Properties
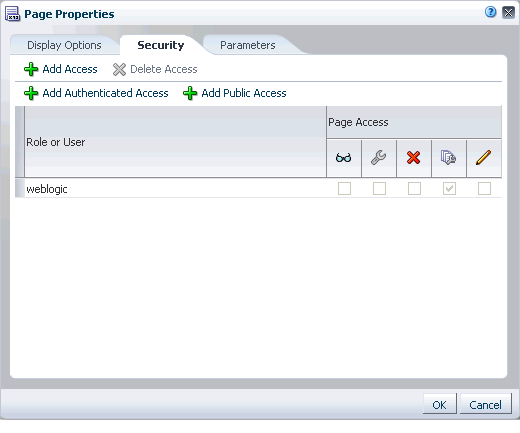
Page properties include a Security tab with controls for specifying access permissions on the current page (Figure 26-1).
The options that appear on the Security tab vary according to whether you are accessing the tab from a space page or a Home space page (Figure 26-1 shows the options for a Home space page).
When you set page security on a space page, you have the additional option of inheriting page access permissions from the application or setting custom page access permissions.
This section describes how to set page access through page properties. It is also possible to set page access through the Personalize Pages page, as discussed in Section 17.7, "Controlling User Access to a Page."
Note:
Page access permissions set through the Page Properties dialog in Composer are committed after you click OK in the Page Properties dialog. Closing Composer without saving does not discard such changes.
Page access permissions set through the Personalize Pages page take effect after you click OK in the Set Page Access dialog.
To access the Security tab in the Page Properties dialog:
-
Go to the page you want to secure, and open it in Composer.
See Also:
To open a page in edit mode (Composer), press Ctrl+Shift+E.
-
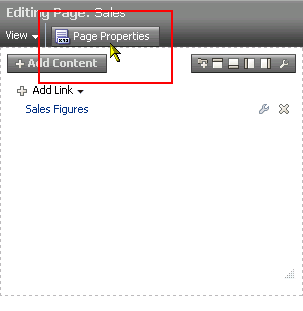
Click Page Properties (Figure 26-2).
Figure 26-2 Page Properties Button in Page Edit Mode

Description of "Figure 26-2 Page Properties Button in Page Edit Mode"
-
In the Page Properties dialog, click the Security tab (Figure 26-3).
Figure 26-3 Home Space Page: Security Tab in Page Properties Dialog

Description of "Figure 26-3 Home Space Page: Security Tab in Page Properties Dialog"
-
Follow the general steps for setting page access in Section 17.7, "Controlling User Access to a Page", beginning with Step 3.
26.2 Setting Access on a Page Component
There may be pages you want to expose to many users that have components you want only a select set of users—or even only one other user—to see. For example, imagine that you have created a space for all sales people. The space's home page includes two Announcements task flow instances: one for all sales people and one for sales managers only. You can secure the second Announcements instance so that only those users assigned the custom role sales_manager can see it.
Any component that has an associated Show Component property can be secured in this way. Those components that do not have an associated Show Component property can be placed inside a component that does, and in this way be secured. For example, you can place an Announcements task flow, which does not have an associated Show Component property, inside a Box component, which does. You can set the property on the Box, and that setting will also affect the display of Announcements.
See Also:
You can also set security on the custom components that you import through the Resource Manager. For more information, see Section 11.4.4, "Setting Security for a Resource."
To set access on a component instance:
-
Go to the component instance you want to secure and access its Display Options properties.
See Also:
For information about accessing component properties, see Section 18.6, "Modifying Page Components."
-
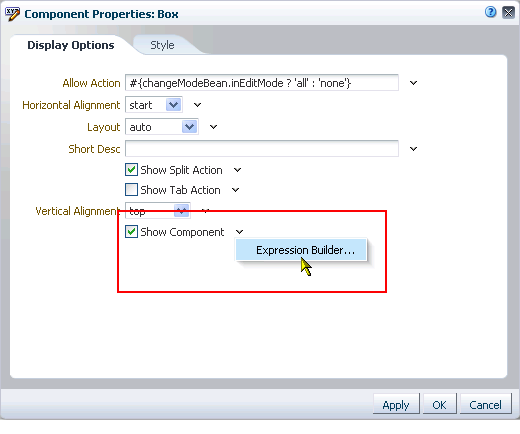
Open the Expression Builder by clicking the Edit icon to the right of the
Show Componentproperty and selecting Expression Builder (Figure 26-4).Figure 26-4 Expression Builder Option Next to Show Component

Description of "Figure 26-4 Expression Builder Option Next to Show Component"
-
Under Type a Value or Expression, enter one of the following EL expressions:
-
To expose a component only to members of a particular scope who are assigned a particular role in that scope, enter:
#{WCSecurityContext.userInScopedRole['role']}where
roleis a role name, such asModerator.The scope is implicitly resolved to be the current scope:
-
If you use this EL in the Home space, it resolves to Home space GUID and roles defined at the application level.
-
If you use this EL in a space scope, it resolves to roles defined for the space.
-
-
To expose a component only to members of a group, enter:
#{WCSecurityContext.userInGroup['group_name']}In lieu of
group_name, enter the name of the group, for exampleAdministrators. -
To expose a component only to a specific user, enter:
#{WCSecurityContext.currentUser['user_name']}In lieu of
user_name, enter the user name, for examplejdoe.
See Also:
For more information about EL expressions, see Appendix B, "Expression Language (EL) Expressions." For information about EL expressions relevant to security, see Section B.4.3, "EL Expressions Relevant to Application Security."
-
-
Click OK to exit the Expression Builder, and click OK to save your changes and exit the Component Properties dialog.
-
Click Save and then Close to exit Composer.
The secured component appears only to those users with the name, role, or group you specified.