17 Creating and Managing Pages
No matter how you structure your portal, there is always a need for new pages in addition to those that are available out-of-the-box. WebCenter Portal: Spaces provides a variety of prebuilt page styles to simplify page creation. It also offers an embedded page editor for in-place page revision and easy content placement.
This chapter describes how to create and manage your own pages in a space. It includes the following sections:
This chapter is intended for users with the space-level permission Basic Services: Edit Page Access, Structure, and Content. The users with this permission are typically tasked with creating and editing pages, revising page properties, adding page content, and deleting pages from a space.
17.1 What You Should Know About Pages
The Spaces application provides a variety of page types to suit the requirements of your portal. Some pages are seeded, such as system pages. These offer a ready set of customizable, utilitarian pages, such as the Login page and the Self Registration page. Additionally, the services offered by WebCenter Portal: Spaces each have an associated system page to provide a user interface to the service, such as the Documents page. system pages are prepopulated with relevant input fields and boilerplate text (for more information about system pages, see Section 7.3, "Working with System Pages").
Another page type, the business role page, can be populated with information of relevance to a particular business role, such as salesperson, accountant, or marketing associate, and then pushed into the Home space views of all users who are assigned that role (for more information about business role pages, see Section 7.1, "Working with Business Role Pages").
Personal pages are the pages users create for themselves in their views of the Home space (for more information about personal pages, see Section 32.4, "Working with Pages in the Home Space").
This chapter covers information about pages that are designed to contribute to the knowledge base of the portal. Such pages provide greater flexibility than seeded pages (such as system pages and business role pages), in that you have more control over their content and their availability. You can control user access to such pages and change their properties.
The Spaces application also provides a variety of page layouts (called styles) that you can use to create different types of pages with different layouts. A page style may restrict the type of content that you can add to a page, such as web content only, wiki only, blog only, and the like. Page styles also provide layout information that defines the number of columns and content areas on a page. Layouts are initially determined by the style you select when you create the page. Most page styles produce pages with features that enable recrafting the layout through page parameters or page layout tools (for example, Add Tab and Add Box icons). Web Page and Wiki page styles are the exceptions: the default Wiki page style provides neither parameters nor page layout tools; the default Web Page style provides no page layout parameters, but it does include page layout tools in edit page mode. For more information about page styles, see Chapter 15, "Working with Page Styles."
In addition to the preseeded layouts available through page styles, you can create your own layouts using the components available through the Resource Catalog. This chapter provides an overview of that process.
17.2 Creating a Page
If you are granted permission in a space to create pages (see Table 54-2, "Space Permissions - Simple Permission Model"), you can add pages to the space. The pages you create can be viewed by you and anyone to whom you grant access (see Section 17.7, "Controlling User Access to a Page").
-
Click Create Page.
Tip:
The location of the Create Page link depends on the page template in use. For example, in a side navigation template, you may access it through an Actions menu. You can also find it on the Personalize Pages page.
Spaces will either:
-
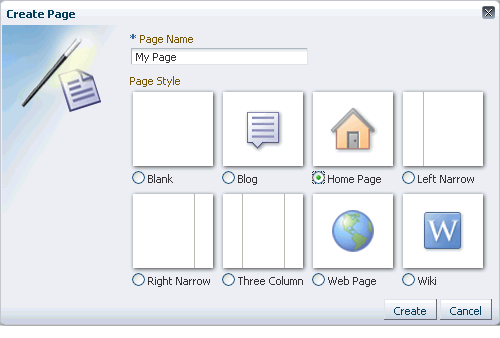
Open the Create Page dialog (Figure 17-1).
-
Immediately create a new page with a default style, if specified in the Set Page Defaults dialog (see Section 32.5, "Setting Page Creation Defaults for Personal Pages" for your personal pages in the Home space and Section 53.7.1, "Setting Page Creation Defaults for a Page in a Space" for space moderator settings for all pages in a space).
Note:
Application administrators can control the options that appear in the Create Page dialog. So, your view may differ from that depicted in Figure 17-1. For more information, see Section 15.4.1, "Showing and Hiding a Page Style in the Create Dialog." Additionally, the application administrator can set an attribute on a custom page style that determines whether a newly created page that is based on that style opens in page edit mode or page view mode. For more information, see Section 15.4.2, "Setting Properties on a Custom Page Style."
-
-
If the Create Page dialog opens, provide a name for the page.
Note:
When naming wiki pages, the following characters are not allowed:
\ / : [ ] * ' " | ?
Letters, numbers, spaces, and periods (.) are allowed.
-
Select a page style to define the page structure.
For detailed information about the seeded page styles, see Section 15.1, "What You Should Know About Page Styles." Note, however, that your application administrator may provide additional custom page styles or restrict page styles to a shorter list.
-
Click Create.
The new page opens in page edit mode (Composer), where you can add content, then Save and Close the page.
See Also:
For information about editing a page, see Chapter 18, "Editing a Page."
17.3 Managing Your Pages
Space moderators and members with page management permissions (see Table 54-2, "Space Permissions - Simple Permission Model") can manage all of the pages in a space on the Pages page in the administration settings for the space. For more information, see Section 53.7, "Managing Space Pages."
If you own or have privileges to manage a page, you can edit, delete, or set access privileges on a page, However, be aware that performing these actions affects all members in the space as these actions alter the page itself, not only your personalized view. Actions such as reordering or showing and hiding pages is reflected in your "personal" view of the space only.
To manage a page that you own or have permission to manage:
-
In the space, display the Personalize Pages page (Figure 17-2).
Tip:
The way you access this page depends on the page template in use. For example, you may access it through an Actions
 menu.
menu. -
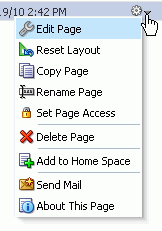
On the Personalize Pages page, select a page, then select any of the actions available to you on the Actions menu for the page (Figure 17-3):
-
Edit Page. Open a page that you own or have privileges to edit in the page editor, Composer. See Section 17.4, "Editing a Page."
-
Reset Layout. Remove all of your user customizations from a selected page. This action removes such personal changes as rearrangement, resizing, or collapsing of task flows in only your view of the page. See Section 51.11.5, "Removing All of Your User Customizations from a Page."
-
Copy Page. Make a personal copy of a page. See Section 17.5, "Copying a Page."
-
Rename Page. Rename a page that you own or have privileges to manage. See Section 17.6, "Renaming a Page."
-
Set Page Access. Add or remove access to a page by user name or role. See Section 17.7, "Controlling User Access to a Page."
-
Delete Page. Delete a page that you own or have privileges to manage. See Section 17.8, "Deleting a Page."
-
Add to Home Space. Add a page to your personal view of the Home space. See Section 17.9, "Exposing a Space Page in Your View of the Home Space."
-
Send Mail. Send a link to a page that you own or have privileges to manage. See Section 17.10, "Sending Mail with a Link to a Page."
-
About This Page. View information about a page. See Section 17.11, "Viewing Information About a Page."
-
17.4 Editing a Page
When you edit a page, you can add or remove content, set properties on content and on the page itself, and perform additional customizations that affect the view of everyone who has access to the page.
Depending on how the Home space or space is designed, you can enter page edit mode from a page Actions menu or an Actions menu next to a page on the Personalize Pages page. Or, the page template used for the page may provide an Edit Page link.
To edit a page:
-
Open the page in edit mode.
-
Edit the page as desired.
See Also:
For more information, see Chapter 18, "Editing a Page."
-
Click Save and Close to save your changes and exit page edit mode.
17.5 Copying a Page
When you copy a page, all content from the original page is also copied. The copy opens in page edit mode (Composer) so that you can start immediately making the adjustments you planned for the copy.
Note that a copy does not also include the original page's access settings. You must set access on the copy as if it were a new page (see Section 17.7, "Controlling User Access to a Page").
To copy a page in a space for your own purposes:
-
In the space, display the Personalize Pages page.
Tip:
The way you access this page depends on the page template in use. For example, you may access it through an Actions
 menu.
menu. -
On the Personalize Pages page, click the Actions icon for the page, and select Copy Page to open the Copy Page dialog.
-
Enter a name for the page copy in the Page Name field, and click OK.
The copied page opens in page edit mode (Composer).
-
Edit the copy as desired than click Save and Close to exit Composer.
The new page is available only to you, unless you make it available to others (see Section 17.7, "Controlling User Access to a Page").
17.6 Renaming a Page
If you own or have privileges to manage a page, you can rename the page. However, be aware that renaming a page affects all members in the space as this action alters the page itself, not only your view.
When you rename a page, any pretty URLs that use the old name will be broken. Also note that system pages, such as the Announcements, Lists, and Events pages, cannot be renamed.
See Also:
For information about pretty URLs, see Appendix A, "Spaces User Interface URLs."
To rename a page that you own or have privileges to manage:
-
In the space, display the Personalize Pages page.
Tip:
The way you access this page depends on the page template in use. For example, you may access it through an Actions
 menu.
menu. -
On the Personalize Pages page, click the Actions icon for the page, and select Rename Page to open the Rename Page dialog.
-
Enter a new name for the page, and click the Save icon.
17.7 Controlling User Access to a Page
By default, the pages you create in a space are viewable by all space members. In the Home space, the personal pages you create are accessible only to you and the Spaces administrator. You can use page access settings to enable others to view and work with your space pages and personal pages and to remove that access.
When you grant access to one of your personal pages to another user, they must deliberately show the page in their view. The user must take this step for each session because shared pages are not automatically shown on login.
See Also:
For information about how to show a hidden page, see Section 51.11.1, "Showing or Hiding Pages in Your View."
This section covers the steps to control the access space members and other users have to a page that you own or have permissions to manage. For more information about establishing security on different types of pages, refer to the following sections:
-
Section 7.1.4, "Specifying the Target Audience for a Business Role Page"(application level)
-
Section 7.2.3, "Changing Access Permissions on a Personal Page" (application admin level)
-
Section 26.1, "Setting Access on a Page Through Page Properties"
-
Section 53.7.8, "Changing Access Permissions on a Page in a Space" (space level)
To control the access space members and other users have to a page:
-
In a space or the Home space, display the Personalize Pages page.
Tip:
The way you access this page depends on the page template in use. For example, you may access it through an Actions
 menu.
menu. -
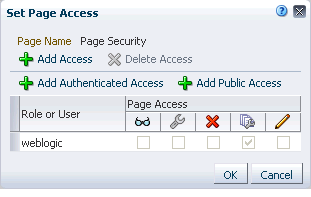
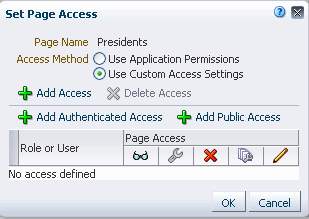
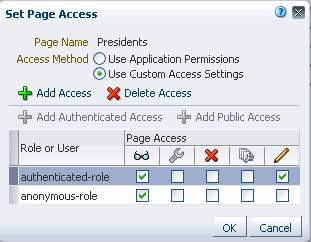
On the Personalize Pages page, click the Actions icon for the page, and select Set Page Access to open the Set Page Access dialog (Figure 17-4 and Figure 17-5).
-
For pages in a space, select the Access Method:
-
To specify that the page should inherit access settings from the permissions established for the space, select Use Application Permissions, then click OK to save your changes and exit the dialog.
See Also:
For information about setting global space permissions, see Section 54.2, "Managing Roles and Permissions for a Space."
-
To set custom access on the current page, select Use Custom Access Settings, and continue with the next steps.
-
-
To grant page access permissions to all authenticated users (that is, to users who are logged in to Spaces), click Add Authenticated Access.
The role
authenticated-roleis added under Role or User with default Read access to the page. -
To grant page access permissions to all public users (hat is, users who have not logged in to Spaces) click Add Public Access.
The role
anonymous-roleis added under Role or User with default Read access to the page (Figure 17-6).Note:
To grant page access to the
anonymous-role(that is, to enable users who are not logged in to access the space) the space must be public. The space cannot be private or hidden. See Section 53.14.5, "Granting Public Access to a Space." -
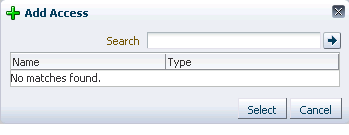
To grant page access permissions to selected users, groups, and application roles, click Add Access to open the Add Access dialog (Figure 17-7).
-
In the Search field, enter a search term or the name of the user, group, or role for whom you want to enable access, and click the Search icon. For tips on searching for a user or group in the identity store, see Section 54.3.4.1, "Searching for a User or Group in the Identity Store."
Note:
In the Add Access dialog for pages in a space, you can add the default roles
Moderator,Participant, andViewer, and any custom roles that have been created for the space.For more information about space roles, see Section 54.2, "Managing Roles and Permissions for a Space"
-
Select a user, group, or role by clicking in its row.
Note:
When you select a user name, the permissions you set are granted to that specific user. When you select a group or application role, the permissions you set are granted to all users who are members of that group or who are assigned that role.
To make multiple selections:
-
Ctrl-Click to select multiple rows.
-
Shift-Click to select a range of rows.
-
-
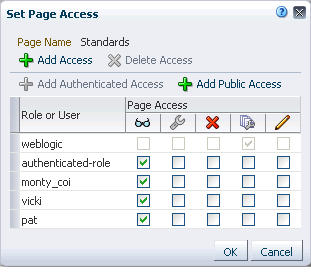
Click Select to close the Add Access dialog, and populate the Set Page Access dialog with the selected users, group, or roles (Figure 17-8).
-
In the Set Page Access dialog, set the Page Access permissions as desired for each user, group, or role (Table 17-1).
Table 17-1 Page Access Privileges in the Set Page Access Dialog
Icon Page Access Role, Group, or User Permissions 
View Page
Access the page for viewing, but cannot perform any other actions on the page.

Edit Page
Edit the page using Composer. This includes adding, rearranging, and deleting content; renaming the page; and changing page properties, such as the page scheme.

Delete Page
Delete the page.

Perform All Page Actions
Perform all actions on the page.

Personalize Page
Rearrange page content and personalize their own view of task flows on the page, provided the task flow includes personalization settings.
Tip:
By default, all authenticated users and user roles that you add to the Set Page Access dialog are granted page view access. The other access privileges must be explicitly granted.
-
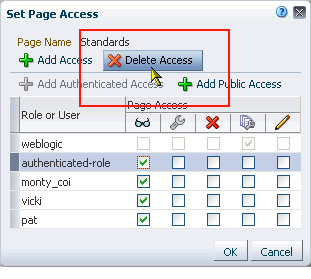
If you wish to delete access to the page for a user role, select the user or role from which to revoke page access, and click Delete Access (Figure 17-9).
-
Click OK to save your changes and close the Set Page Access dialog.
17.8 Deleting a Page
If you own or have manage permissions on a page, you can delete the page. However, you should be aware that deleting a page affects all members of the space.
To delete a page that you own or have permission to manage:
-
In the space, display the Personalize Pages page.
Tip:
The way you access this page depends on the page template in use. For example, you may access it through an Actions
 menu.
menu. -
On the Personalize Pages page, click the Actions icon for the page, and select Delete Page to display the Delete Page dialog.
-
Confirm deletion of the page, and click Delete.
17.9 Exposing a Space Page in Your View of the Home Space
You can make a space page available for viewing and revising from your view of the Home space according to your permissions on the page. The space name is prepended to the page name, so the Sales Results page in the space Finance becomes Finance - Sales Results in your view of the Home space.
Note:
System pages that are exposed in a space, such as Events, Lists, and Announcements, do not provide the option of being exposed in the Home space.
If you delete such a page from your view of the Home space, it remains in its original space. In other words, deleting it simply removes it from your view of the Home space; it does not actually delete the page. If the page is deleted from its parent space, it is unavailable in your view of the Home space. To clear it from your view, you must refresh the page list on the Personalize Pages page.
To add a space page to the list of pages in the Home space, visible only to you in your personalized view of the Home space:
-
In the space, display the Personalize Pages page.
Tip:
The way you access this page depends on the page template in use. For example, you may access it through an Actions
 menu.
menu. -
On the Personalize Pages page, click the Actions icon for the page, and select Add to Home Space.
When you add a space page to your view of the Home space, the page scope remains that of the space.
17.10 Sending Mail with a Link to a Page
If you own or have manage permissions on a page, you can send other space members a link to the page.
To send mail to other space members populated with a link to a page:
-
In the space, display the Personalize Pages page.
Tip:
The way you access this page depends on the page template in use. For example, you may access it through an Actions
 menu.
menu. -
On the Personalize Pages page, click the Actions icon for the page, and select Send Mail to open your mail application compose window, showing a URL link to the page.
17.11 Viewing Information About a Page
To view information about a page:
-
In the space, display the Personalize Pages page.
Tip:
The way you access this page depends on the page template in use. For example, you may access it through an Actions
 menu.
menu. -
On the Personalize Pages page, click the Actions icon for the page, and select About This Page to open the Page Information dialog, which shows Name, Created By, Date Created, Last Modified, and Direct URL.
17.12 Personalizing Pages
WebCenter Personalization provides a way to tailor page content and templates to the current user. Using Personalization-related Expression Language (EL) expressions, you can present targeted content or shape the way content is presented by selecting and applying a page template based on whoever is the current user. For example, one user role sees a page through template A, while another user role sees the same page through template B.
There is a wide variety of user and application context that can determine the content a user sees. For example, content can be restricted by role through a security mechanism, such as page hierarchy security. Content can be targeted based on more dynamic user and application context, such as user profile values and session information.
When you use Personalization EL, you personalize the content that is shown based on the user or application context that is being pulled by the EL from a Personalization Conductor Scenario. The Personalization Conductor in turn is dynamically pulling the actual content or page template from a provider source; that is, a content repository, such as Content Server.
For more information about personalization in WebCenter Portal: Spaces, see Chapter 9, "Using Personalization for WebCenter Portal."
The ELs related to the Personalization Conductor are cataloged in Section B.4.11, "EL Expressions Relevant to the Personalization Conductor." The Personalization Conductor is discussed in more detail in the chapter, "Personalizing WebCenter Portal Applications" in Oracle Fusion Middleware Developer's Guide for Oracle WebCenter Portal.
