 Maintaining Interview Facilities
This chapter describes how to:
Maintain interview facilities.
Schedule interviews.
Complete interview evaluations.
Finalizing interviews and sending evaluation reminders.
Make final recommendations.
Review interview schedules and evaluations.
Maintaining Interview FacilitiesInterview facilities are specific locations such as meeting rooms where interviews take place. In the context of an applicant's interview schedule, the facility is referred to as the venue. If integration with Microsoft Outlook calendaring is active, the interview facility corresponds to a Microsoft Outlook resource.
 Page Used to Maintain Interview Facilities
|
Page Name |
Definition Name |
Navigation |
Usage |
|
HRS_VENUE_PG |
Recruiting, Administration, Interview Facilities, Interview Facilities |
Maintain information about interview venues. |
Maintaining Interview FacilitiesAccess the Interview Facilities page (Recruiting, Administration, Interview Facilities, Interview Facilities).
Venue Information
|
Venue ID |
Displays a unique identifier that the system assigns when you create the venue. |
|
Status |
Select Active or Inactive to indicate whether the venue is available for use on the Interview Schedule page. |
|
Description |
Enter the description that users see when selecting this venue to use for an interview. |
|
|
Enter the email address that is assigned to the Microsoft Outlook resource that corresponds to this venue. If you use full calendar integration, the system uses this email address to identify the venue, confirm its availability, and reserve it for the interview meeting. If you use partial calendar integration or no calendar integration, the email address is informational only. |
|
Location |
Enter the specific location of the venue. When a recruiter adds a venue to an interview, the system copies the location information to the interview schedule. If the recruiter modifies the location text in the actual interview schedule, the changes are replicated to the venue definition. Interviewers can see the location information on the Interview Calendar page. Applicants can see the location information on the Interview Detail page in Candidate Gateway. Applicants access this page using the interview notification link that the system generates if the Notify Applicant check box is selected when the interview is submitted. Under partial calendar information, location information is also included in the iCalendar attachment that the system sends. |
|
Directions |
Enter directions to the venue. Applicants can see the directions on the Interview Detail page in Candidate Gateway. Applicants access this page using the interview notification link that the system generates if the Notify Applicant check box is selected when the interview is submitted. |
|
Notes and Room Details |
Enter any additional useful information about the venue. Information in these fields does not appear on the Interview Schedule page. However, users can access the Interview Facility page from the Interview Schedule page if they want to review this information. |
Attachments
Upload any useful attachments such as maps or room-specific instructions. The attachments grid includes a link to the document along with information about who uploaded the file and when it was uploaded.
Attachments do not appear on the Interview Schedule page. However, users can access the Interview Facility page from the Interview Schedule page if they want to review this information.
Scheduling Interviews
This section provides overviews of applicant interviews, calendar integration options, and interview letters and notifications. This section then discusses how to:
Schedule applicant interviews.
Check participant availability.
Modify interview notification text
Set notification options for interview changes.
Modify interview notification text.
Review and print an interview summary.
Understanding Applicant InterviewsUse the Interview Schedule page to schedule interviews at any time in the recruiting process, whether or not the applicant is associated with a job opening. The Interview Schedule page always shows data for a single job opening (or for no job opening, if applicants have applied without selecting a job opening).
Navigation and the Manage Interviews Action
To access the Interview Schedule page, use the Manage Interviews action.
See Actions in the Take Action Field.
The Manage Interviews action is available in these locations:
Find Applicants page: Search Results grid (individual action or group action).
To schedule interviews using a group action, all selected rows in the search results must be for the same job or must all have no job opening selected.
Manage Applicant page: Applicant Activity grid (individual action).
This grid shows the jobs that an applicant is linked to, so performing the action brings you to the Interview Schedule page for a single applicant and a single job opening.
Job Opening page: Manage Applicants grid (individual action or group action).
You can also access the Interview Schedule page these ways:
On the Disposition Details - Interview page, click the Manage Interviews link.
On the Job Opening page, click the Interview Schedule link under the Manage Applicants tab.
On the Manage Applicant page, access interview summary information by clicking the Interview Schedule/Evaluation link under the Applicant Activity tab, then click the Manage Interviews link or click the date of an already-scheduled interview.
When you click the Manage Interviews link, the system prompts you to select the job opening for which you are scheduling an interview.
Page Layout for Multiple Interviews and Multiple Applicants
The Interview Schedule page always shows interviews for a single job opening, but depending on how you access the Interview Schedule page, it can show schedules for one applicant or multiple applicants. The page includes a collapsible section for each included applicant, even if there is only one.
Within the section for a single applicant, there are collapsible sections for each scheduled interview. In this context, a single interview refers to a single block of time that is associated with one or more interviewers. To schedule separate time slots for different interviewers, recruiters need to set up multiple interviews.
For each applicant whose schedule appears on the page, the final collapsible section, after all of the interview sections, is for sending the applicant a consolidated interview letter. This is a letter that provides information about multiple interviews. (The individual interview sections have separate page elements that you can use to mark them for inclusion in the consolidated letter or to generate a letter with information about just that one interview.)
See Interview Letters and Notifications.
Links at the bottom of the page enable you to expand or collapse all sections with a single click.
This diagram illustrates the data hierarchy on the Interview Schedule page, where one job opening can have one or more applicants, and each applicant can have one or more interviews.
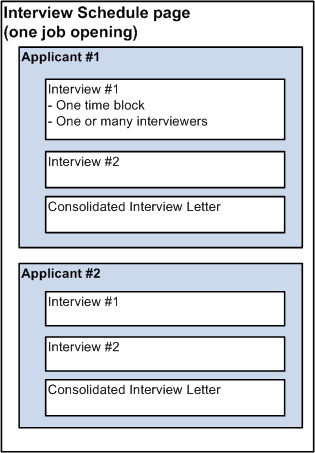
Interview Schedule page layout
Interview Information
When you schedule an interview, you provide the following information:
General interview information such as the status and the interview type.
The date a and time of the interview.
A list of interviewers.
Location information, including both an overall location (such as a particular office building) and specific venues (such as conference rooms) in that location.
Understanding Calendar Integration OptionsThis section provides an overview of calendar integration for interviews.
Integration Setup
To activate calendar integration for interviews in Talent Acquisition Manager, use the Recruiting Installation – General page, where you select the level of calendar integration for your system:
Full integration uses PeopleSoft Desktop Integration functionality to integrate with Microsoft Outlook 2007.
PeopleSoft Desktop Integration provides integration between Talent Acquisition Manager and Microsoft Office. The integration enables you to pass interview data to Microsoft Outlook and receive updated information when changes are made in Microsoft Outlook. Oracle delivers the framework for this integration as part of the PeopleSoft Enterprise Components that are bundled with every PeopleSoft application.
A PeopleSoft plug-in for Microsoft Outlook (required for recruiters who schedule interviews) enables Microsoft Outlook to maintain a link between the invitation and the original Talent Acquisition Manager transaction.
Partial integration sends interview schedules to applicants and interviewers as iCalendar attachments.
An email with an iCalendar attachment is sent only when the user explicitly chooses to send a notification. The email with the attachment is sent in addition to a standard text-only PeopleSoft email notification.
The iCalendar file contains only the information that is required for creating a meeting request in an external calendar. The participant can import the iCalendar meeting request and act on it. This is a one-way integration and TAM does not get any response back from the participant.
None indicates that you do not want to integrate with external calendaring systems.
Users can still choose to send notifications to applicants and interviewers, but the notifications are standard text-only PeopleSoft notification.
See Defining General Settings for Templates, Approvals, and Integrations.
Full Calendar Integration
When you enable full calendar integration with Microsoft Outlook, recruiters still create the interview schedule using the PeopleSoft system. When the recruiter submits the interview data, the system sends the information to Microsoft Outlook via the Desktop Integration queue. The recruiter or meeting organizer can then send the meeting invitation from Microsoft Outlook.
The Microsoft Outlook meeting owner is the user who originated the interview in the PeopleSoft system. The users who schedule interviews must have the PeopleSoft plug-in for Microsoft Outlook properly installed. People who receive the meeting invitations but do not schedule them do not need the plug-in; to them, the invitation is identical to a standard Microsoft Outlook meeting invitation.
Until the invitations are sent from Microsoft Outlook, users can still make updates to the interview schedule in Talent Acquisition Manager. But after the invitations are sent from Microsoft Outlook, changes to the interview date and time must originate in Microsoft Outlook, not in Talent Acquisition Manager, which makes the relevant fields read-only. A link on the Interview Schedule page enables recruiters to open the meeting in Microsoft Outlook; any changes or cancellations made there are sent back to the PeopleSoft system and reflected on the Interview Schedule page.
Although recruiters cannot modify the interview schedule in the PeopleSoft system after the invitations have been sent from Microsoft Outlook, they can cancel the interview from the Interview Schedule page. The cancellation is sent to Microsoft Outlook, which deletes the corresponding meeting invitation.
The information that the system sends to Microsoft Outlook includes email addresses (not names or aliases) for all participants, including interviewers, venues (which correspond to resources in Microsoft Outlook), and applicants. These participants must have valid email addresses in their personal data records.
Internal participants, including internal applicants, receive Microsoft Outlook invitations.
External applicants are not included in the original meeting invitation, but after all internal participants have accepted the invitation, the PeopleSoft system sends an email with an iCalendar attachment to the external applicant. The system also creates an applicant contact note for the email.
As Microsoft Outlook receives replies to the meeting invitation, it sends the information to the PeopleSoft system, which updates the Interview Schedule page to show the attendees' responses. When all participants have accepted the invitation, the Interview Status changes to Confirmed.
See PeopleSoft 9.1 PeopleBook: Integration Interfaces
Partial Calendar Integration
Under partial calendar integration, Notify check boxes for the applicant and the interviewers enable the user to send notifications to interview participants. If these check boxes are selected at the time an interview is submitted or cancelled, the system sends each recipient an email with a formatted iCalendar attachment. Recipients can open the iCalendar attachment in their calendaring software to add, modify, or remove the meeting request entry from their calendar.
Under partial calendar integration, the email with the iCalendar attachment is sent in addition to a standard text-only PeopleSoft email notification.
Interview Letters and NotificationsThis section provides an overview of interview letters and notifications
Interview Letters
When you enter interview information, you can optionally generate template-based interview letters to send to the applicant.
Each collapsible interview section includes a group box to use for producing an interview-specific letter, or you can mark the interview for inclusion in a consolidated interview letter. A separate Consolidated Interview Setter collapsible section appears after the last interview in the applicant's schedule, and you use this section to produce the consolidated letter.
The same letter templates are available for selection for individual interview letters and the consolidated interview letter. The delivered templates are valid for both scenarios because the letters list interviews in a table format even there is only one interview.
When the system generates interview letters, it also creates a contact note for the applicant.
Letter Generation
Talent Acquisition Manager uses Oracle Business Intelligence Publisher (BI Publisher) to generate recruitment letters, including interview letters.
You can generate interview letters manually on the Interview Schedule page. If you do not generate letters manually, then when you submit the interview schedule, individual interview letters that you defined but did not generate are added to the next run of the HRS Letter Generation process (HRSLETTR). This process generates all queued letters in batch.
Only individual interview letters can be generated in batch. Consolidated interview letters must be generated manually on the Interview Schedule page. This behavior ensures that there are no changes to the list of interviews to be included between the time you mark interviews for inclusion and the time the letter is generated.
To generate a letter from the interview schedule, use these links, which appear both for individual interviews and for the consolidated interview letter:
Generate Letter
Click this link to generate an interview letter based on the selected template. The letter opens in a new browser window where you can review and optionally update it. If you make changes, save the modified letter to your local disk so that you can upload the revised version.
When you generate the letter, the system enters the current date in the Date Printed field and generates a contact note for the applicant.
Email Applicant
Click this link to access the Send Correspondence page. If you manually generated an interview letter using the Generate Letter link, then the Send Correspondence page includes the interview letter as a default attachment to the email. When you send the correspondence, the system generates a contact note for the applicant. The contact note includes any attachments that were in the email.
Upload Letter
Click this link to upload a letter file from a local disk. Typically, you are uploading a modified copy of the letter that you created by clicking the Generate Letter link.
When you upload a letter, the system creates a contact note for the applicant. The contact note includes the interview letter attachment.
These links become available for a new interview only after the user saves the interview. The links remain available even if the user makes changes to the interview, but the letter generation process uses the saved data, so users must remember to save changes to ensure that the letter includes the most current information.
Interview Notifications
Under partial calendar integration or no calendar integration, the Interview Schedule page includes Notify check boxes for the applicant and the interviewers. When a user submits, resubmits, or cancels an interview, the system sends notifications to participants whose Notify check box is selected. Any time the system sends a notification to an applicant, it also creates a contact note in the applicant's record.
Note. The system sends notifications only when the Notify check box is selected.
The following table summarizes the types of notifications that the selected interview participants receive under each integration option:
|
Notification Type |
Full |
Partial |
None |
|
Email with iCalendar Attachment |
Not applicable |
Yes |
No |
|
Text-only email notification |
Not applicable |
Yes |
Yes |
|
Candidate Gateway notification (applicant only) |
Not applicable |
Yes |
Yes |
Candidate Gateway notifications are links on the Careers Home page. The applicant can click the interview notification link to access more complete interview details.
If an applicant already has a Candidate Gateway notification for the interview, and a recruiting user makes a change and sends a new notification, the system does not create an additional Candidate Gateway notification. Instead, the detail page that is accessed from the notification shows the updated interview data. If the applicant deleted the previous Candidate Gateway interview notification, then the notification process creates a new one.
See Using the Careers Home Page.
When a participant's appointment status changes, the system sends a notification to the user who created the interview.
Notification Templates
To provide appropriate notification text for different scenarios, the system uses different notification templates depending on the action that triggered the notification and depending on whether the interview is for an application that is associated with a job opening or for an application with no job opening.
The following table lists the notification templates that the system uses to send notifications to interviewers:
|
Recipient |
User Action |
Job Opening or None |
Interviewer Notification |
|
Interviewer |
Submit or resubmit interview |
Job opening |
HRS_INTVW_SCHED_TEAM |
|
Interviewer |
Submit or resubmit interview |
No job opening |
HRS_INTVW_SCHED_TEAM_NOJO |
|
Interviewer |
Cancel interview |
Job opening |
HRS_INTVWSCHED_TEAM_CANCEL |
|
Interviewer |
Cancel interview |
No job opening |
HRS_INTVWSCHED_TEAM_NOJO_CANCEL |
|
Applicant |
Submit or resubmit interview |
Job opening |
HRS_INTVWSCHED_APPL |
|
Applicant |
Submit or resubmit interview |
No job opening |
HRS_INTVWSCHED_APPL_NOJO |
|
Applicant |
Cancel interview |
Job opening |
HRS_INTVW_APP_CANCEL |
|
Applicant |
Cancel interview |
No job opening |
HRS_INTVW_CANCEL_APP_NOJO |
See Also
Sending Correspondence and Recruitment Letters
Pages Used to Schedule Applicant InterviewsScheduling Applicant Interviews
Access the Interview Schedule page (select Manage Interviews from the Take Action field on the Find Applicants page, the Manage Applicant page, or the Manage Job Opening page).
Page Elements That Vary According to the Integration Option
The following table lists the page elements that are hidden under certain integration settings:
|
Page Element |
No Calendar Integration |
Partial Calendar Integration |
Full Calendar Integration |
|
Interview Status field (Interview section) |
Hidden |
Visible |
Visible |
|
Scheduler Status field (Interview section) |
Hidden |
Hidden |
Visible |
|
Notify check boxes for the applicant, for individual interviewers, and for the interview team (Interview section) |
Visible |
Visible |
Hidden |
|
Preview/Edit Meeting Request group box (Interview section) |
Hidden |
Visible |
Visible |
|
Launch Scheduler link (Applicant section) |
Hidden |
Hidden |
Visible |
Note. The preceding page illustrations show the Interview Schedule page as it appears under partial calendar integration, where everything is visible except for the Scheduler Status field and the Launch Scheduler link. Those two page element are visible only under full calendar integration.
Page-Level Action Buttons
|
Print Job Opening |
Click to access the Select Job Openings page, where you configure and generate a printed version of the job opening data. |
|
Submit |
Click when you have finished entering the information for scheduling interviews. If you use the system's delivered statuses and status change effects, submitting an interview updates the applicant's disposition to Interview. Note. This update occurs because system assigns the interview its default status, Interview, which triggers the change to the applicant's disposition. The interview status in question is not the Interview Status field that is visible on the Interview Schedule page, which does not have configurable values. Instead, the status update process involves the Interview status area that you configure on the Statuses and Reasons page. This configurable status is used to make recommendations for interviewed applicants, and it is visible only on the Disposition Details: Interview page, where it is labeled Final Recommendation. If full calendar integration is active, submitting the interview schedule triggers the integration, and the system creates the Microsoft Outlook meeting. For partial or no calendar integration, submitting the interview generates notifications for the participants whose Notify check boxes are selected. |
|
Save for Later |
Click to save your changes without generating notifications, updating the applicant's disposition, or creating calendar meetings. Note. Under full calendar integration, the interview is queued for Outlook only when submitted. Clicking the Save for Later button does not queue the interview. |
|
Cancel and Return to Previous Page |
Click either of these to return to the previous page without saving any changes. |
<Applicant Name>
The system displays a collapsible section for each applicant for whom you are scheduling interviews. The applicant's name appears in the section heading.
|
Applicant Name, Applicant ID, Applicant Type, and Preferred Contact |
These fields display identifying information about the applicant. The applicant types are Employee, External Applicant, and Non-Employee. |
Interview-Level Page Elements
For each applicant included on the page, the system displays one or more collapsible sections representing separate interview times. The interview date and time appear in the section heading.
The header information for each interview includes these fields:
|
Interview Status |
Note. This field appears only under full or partial calendar integration. Values in this status field represent the stages of the interview process. Users can always update the interview status manually. Additionally, under full calendar integration, certain situations cause the system to update the status automatically. These are the possible statuses:
Note. This field is not associated with the Interview status area that is configured on the Statuses and Reasons page. The configurable statuses, which are not visible on this page, are used to make recommendations for how to disposition the applicant after the interview. |
|
Scheduler Status |
Note. This field appears only under full calendar integration. Displays the interview's status with regard to creating a Microsoft Outlook calendar invitation. The available statuses are:
|
|
Interview Type |
Select one of the interview types that your organization defined on the Interview Types page. The specific values depend on how your organization chooses to classify interviews. |
|
Initiator |
Displays the name of the user who originally created the interview. |
|
Applicant Appointment Status |
Under partial or no calendar integration, users can manually set the appointment status to Accepted, Declined, None (no response), or Tentative (tentatively accepted). Under full calendar integration, the system sets the appointment status based on the applicant's reply to the Microsoft Outlook meeting invitation. Because only internal applicants are included in Microsoft Outlook meeting invitations, recruiters must update this field manually for external applicants, who do not receive meeting invitations. |
|
|
Click to access the Comments page where you can enter applicant-specific comments. These comments appear on the interview details that the applicant views in Candidate Gateway. |
|
|
Click to access the Interview Schedule - Applicant Availability page, which displays all interview dates and times for the applicant. This page does not display information from the applicant's Microsoft Outlook calendar; it displays only interview data from the PeopleSoft system. |
|
Note. This check box appears only under partial or no calendar integration. By default, this check box is initially deselected. Select this check box to have an email notification sent to the applicant when the interview is submitted. Under partial calendar integration, the system sends both a standard notification email and a separate email with an iCalendar attachment. If the applicant is a registered user of Candidate Gateway, the system also sends a Candidate Gateway notification. This check box does not appear under full calendar integration. Under full calendar integration, the system sends the application a notification email when the interview status changes to Confirmed. |
Interview Details
|
Date |
Enter the date on which the interview is to take place. |
|
Time Zone, Start Time and End Time |
Enter the start and end times for the applicant's interview. This time applies to all interviewers. To schedule different interviewers at different times, create multiple interviews for the applicant. Under full calendar integration, each interview (including consecutive or overlapping interviews) becomes a separate Microsoft Outlook invitation. The default time zone is the recruiter's own time zone. |
Interview Schedule
Use the Interview Schedule grid to schedule specific interviewers during the overall interview time block.
|
Interviewer ID and Interviewer Name |
Identify interviewers by entering their employee IDs; the system then displays the interviewers' name. |
|
Date, Start Time, End Time, and Time Zone |
Displays the date and time for the interview in the interviewer's own time zone. Every interviewer is scheduled for the entire block of time. To schedule different times for different interviewers, create additional interviews. |
|
Appointment Status (interviewer appointment status) |
If you use full calendar integration, and if the initiator receives a Microsoft Outlook calendar response to the invitation, the system updates the interviewer's appointment status accordingly. Otherwise, manually set the appointment status to Accepted, Declined, None (no response), or Tentative (tentatively accepted). |
|
Notify |
Note. This check box appears only under partial or no calendar integration. Select this check box to have an email notification sent to an individual interviewer when the interview is submitted, resubmitted, or cancelled. The system uses the email addresses from the interviewers' Personal Data records (not the email addresses from their User ID security profiles). |
|
|
Click the Delete icon to remove a particular interviewer from the interview schedule. |
|
|
Access the More tab in the Interview Schedule grid to view the Comments icon. Click the icon to access the Comments page and enter interviewer-specific comments. If interviewer-specific comments exist, the interviewer sees a comments icon alongside the interview on the Interview Calendar page. |
|
|
Access the More tab in the Interview Schedule grid to view the Availability icon. Click the icon to access the Interview Schedule - Interviewer Availability page, where you can view the interviewer's current interview schedule. This page does not display information from the interviewer's Microsoft Outlook calendar; it displays only interview data from the PeopleSoft system. |
|
Add Interviewer |
Click this link to add another row to the Interview Schedule grid. Under partial or no calendar integration, click the Notify check box for the new row if you want the system to send notifications to the newly added interviewer when you submit the interview. Under full calendar integration, if the Microsoft Outlook meeting invitation has already been sent, you must use Microsoft Outlook rather than Talent Acquisition Manager to add additional interviewers; Microsoft Outlook then sends a meeting invitation to the new interviewer. Microsoft Outlook also sends information about the new interviewer to the PeopleSoft system so it can add the interviewer to the schedule. |
|
Note. This check box appears only under partial or no calendar integration. Select this check box to make the system select all of the Notify check boxes for individual interviewers. This check box is simply a data entry shortcut: the system does not use this setting to determine who should receive a notification. If you select the Notify Interview Team check box and then deselect the Notify check box for an individual interviewer, the Notify Interview Team check box remains selected, but the system does not send a notification the deselected interviewer. |
Venue Information and Location
|
Venue and Add/Maintain Venue Information |
In the Venue field, select a physical location for the interview. Under full calendar integration, venues correspond to Microsoft Outlook resources. The available values are those that you set up in the Interview Facilities page. To modify venue details, or to add a new venue, click the Add/Maintain Venue Information link to access the Interview Facilities page. |
|
|
When you select a venue, its email appears in the grid. This is relevant only if you use full calendar integration, in which case the ability to book the venue using Microsoft Outlook depends on the venue email matching the corresponding resource email in Microsoft Outlook. |
|
Appointment Status (venue appointment status) |
If you use full calendar integration, and if the initiator receives a Microsoft Outlook calendar response to the invitation, the system updates the venue appointment status accordingly. Otherwise, users manually set the appointment status to Accepted, Declined, None (no response), and Tentative (tentatively accepted). |
|
Location |
If there is location information in the venue definition, the system enters that location information here, replacing any existing location text. You can modify the location text, and any changes that you make are saved to the venue definition. |
Preview/Edit Meeting Request
Use the links in this section to access the Interview Request page, where you can personalize the text of the meeting invitation for this interview.
Note. This section appears only under partial calendar integration.
|
Interview Meeting Request and Applicant Meeting Request |
Click the appropriate link to review and optionally modify the text of notifications that the system sends to interviewers or applicants. You can also add attachments to the notification. As long as you do not make any changes to the default notification, changes that you make to the interview date, time and location are automatically reflected in the notification. However, after you save any changes to the default text, the system no longer makes any updates to the text. Note. If you change the interview date, time, or location after you modify the notification text, you must make any necessary changes to the notification text manually. |
Letter
|
Letter |
Select a letter that you want to send to the applicant when an interview is scheduled. Talent Acquisition Manager delivers three templates: HRS_INT_LETTER_IS1, HRS_INT_LETTER_IS2, and HRS_INT_LETTER_IS3. |
|
Date Printed |
Displays the date that you printed the letter. The system populates the field when you click the Generate Letter link or when the letter is generated by the HRS Letter Generation batch process. |
|
Generate Letter |
Click this link to generate the letter immediately. The system opens the generated letter in a new browser window, where you can print it or save it locally. Once the letter is generated, the Generate Letter link is no longer available and the letter is removed from the HRS Letter Generation batch process. When you generate a letter, the system creates a contact note entry on the Manage Applicant page: Contact Notes tab. The letter is an attachment to the note. If you click the Email Applicant link after generating a letter, the system automatically attaches the generated letter to the email. |
|
Email Applicant |
Click this link to display the Send Correspondence page, where you can send the applicant email. If you have generated or uploaded a letter, the Attachments grid on the Send Correspondence page includes the letter (although you can remove or replace it if you wish). After accessing the Send Correspondence page, enter the email subject and message, then send it to the applicant. When you send the email, the system creates a contact note on the Manage Applicant page: Contact Notes tab. The email attachments are saved as note attachments. |
|
Upload Letter |
Click this link to upload a saved letter as an attachment. Most commonly, you use this link to upload a modified version of the original generated letter. However, it is not necessary to generate a letter before uploading one. When you upload a letter, the system creates a contact note entry on the Manage Applicant page: Contact Notes tab. The letter is an attachment to the note. If you click the Email Applicant link after generating a letter, the system automatically attaches the modified letter (rather than the original) to the email. |
|
Include in Consolidated Letter |
Select this check box to mark the interview for inclusion in a consolidated interview letter that lists all selected interviews. Selecting this check box makes the interview-specific fields and links inactive to suppress generation of a individual interview letter. If you select this check box for any interview, be sure to also generate the consolidated interview letter using the Consolidated Interview Letter group box that appears after the applicant's last interview section on this page. |
Attachments and Notes
|
Attachments |
Use the Attachments grid to attach external documents, such as interview scripts, to the interview schedule. Click the Add Attachment link to add file attachments to the grid; the system prompts you to identify the file to be uploaded. When a file is uploaded, the default description is the file name. You can modify this description until you save or submit the interview, at which point it becomes read-only. To view an existing attachment, click its file name. The attachment opens in a new browser window. |
|
Notes |
Use the Notes grid to add notes related to the interview. You can also add attachments to individual notes. These notes are specific to the interview; they are not associated directly to either the job opening or the applicant. |
|
Load JO Attachment (load job opening attachment) and Load JO Notes (load job opening notes) |
Click these links to copy selected attachments and notes from the job opening to the interview. Job opening attachments and notes appear on the Activity & Attachments tab on the Job Opening page. Job opening attachments and notes are associated with specific audiences (Private, Public, or Interview), and when you load job opening attachments or notes into the interview, the system copies only the notes and attachments where the audience is Interview. |
Buttons for Cancelling and Reinstating Interviews
|
Cancel Interview |
Click the Cancel Interview button, which appears only after an interview has been saved and submitted, to cancel the interview. When the interview is cancelled, the system changes the Interview Status to Cancelled, and all fields for the cancelled interview become read-only. Although these changes appear to occur immediately, you still need to submit or save the interview to complete the cancellation. Under full calendar integration, cancelling an interview also cancels the Microsoft Outlook meeting invitation. Under partial or no calendar integration, cancelling an interview triggers notifications to participants whose Notify check boxes are selected. You cannot cancel interviews that have attached evaluations or where the applicant has proceeded past the Interview disposition. |
|
Reinstate Interview |
After an interview is cancelled, the Reinstate Interview button replaces the Cancel Interview button. Click the Reinstate Interview button to change the interview status to Unconfirmed and make the interview fields editable again. The system will not allow you to submit a reinstated interview without first changing the interview date or time or adding or deleting at least one interviewer. Under full calendar integration, reinstating an interview creates a new Microsoft Outlook meeting invitation. |
Consolidated Interview Letter
This group box appears after the last interview listed for the applicant. Use it to generate an interview letter that lists all of the interviews where the Include in Consolidated Letter check box is selected.
|
Letter, Date Printed, Generate Letter, Email Letter, and Upload Letter |
Use these fields to select a template and generate a consolidated interview letter using that template. These page elements work similarly to the ones that appear for individual interviews, except that when you generate the letter, the system brings in data from multiple interviews. Note. Unlike individual interview letters, the consolidated interview letter cannot be generated by the HRS Letter Generation batch process. To produce a consolidated interview letter, you must use the Generate Letter link on this page. |
|
Select All Interviews and Deselect All Interviews |
Click these buttons to select or deselect the Include in Consolidated Letter check box for all of the applicant's interviews that appear on the page. These buttons are simply a data entry shortcut. You can still change the settings for individual interviews after clicking these buttons. |
|
Exclude Past Dated Interviews |
Select this check box before clicking the Select All Interviews button to prevent the button from selecting interviews on days before the current date. Interviews scheduled for the current date are not considered to be in the past; the system does not consider the interview time in making this determination. The Exclude Past Dated Interviews check box does not deselect past dated interviews, it just prevents them from being selected by the Select All Interviews button. For example, if you click the Select All Interviews button, then you subsequently select the Exclude Past Dated Interviews check box, any past dated interviews remain selected. To prevent those interviews from appearing in the consolidated interview letter, you need to deselect them either manually or by clicking the Deselect All Interviews button. |
Applicant-Level Actions
These page elements appear at the end of each applicant section.
|
Add Interview |
Click this button, which appears once per applicant (at the bottom of the Interview Schedule page) to add an additional interview section for the applicant. |
|
Launch Scheduler |
Note. This link appears only under full calendar integration. Click this link to open Microsoft Outlook so that you can review and update interview meeting invitations. Recruiters who schedule interviews and therefore originate the Microsoft Outlook meeting invitations must have the PeopleSoft plug-in for Microsoft Outlook installed. The plug-in adds PeopleSoft-specific features to Microsoft Outlook, including the ability to send meeting changes back to Talent Acquisition Manager. |
Checking Participant Availability
Access the Interview Schedule page (click the applicant availability or interviewer availability icon on the Interview Schedule page) or the Venue Availability page (click the venue availability icon on the Interview Schedule page).
Modifying Interview Notification Text
Access the Interview Request page (click the Interviewer Meeting Request or Applicant Meeting Request link on the Interview Schedule page).
|
Subject and Message |
Review the subject and text of the message and make any necessary modifications. |
|
Access |
The system saves the message as a contact note for the applicant; choose whether the note is to be Public (the default) or Private. Anyone can view a public contact note; only the creator of the note can view a private note. |
|
Add Attachment |
You can optionally add attachments to the message. For example, you could attach a map to the interview venue. |
Reviewing and Printing an Interview Summary
Access the Interview List page (click the View/Print All Interviews link on the Interview Schedule page).
This page summarizes the data on the Interview Schedule page in a simple printer-friendly format. The page lists all the interviews for one or more applicants for a single job.
Click the Print this Page link to print the interview list exactly as it appears on screen.
Completing Interview Evaluations
This section provides an overview of interview evaluations, lists prerequisites, and discusses how to:
Complete an interview evaluation.
Update a submitted evaluation.
Note. Only the scheduled interviewers (as entered on the Interview Schedule page) can create evaluations. Only administrators can update submitted evaluations.
Understanding Interview EvaluationsTo complete an interview evaluation, you use the Interview Evaluation (HRS_INT_EVAL) component.
Creating Evaluations
To create a new interview evaluation, use the Create Interview Evaluation action, which displays the Interview Evaluation page and is available from these locations:
The search results grid on the Find Applicants page (individual action).
The Manage Applicants grid on the Job Opening page (individual action or group action).
When you use a group action, the Interview Evaluation page includes collapsible sections for each included applicant.
The Applicant Activity grid on the Manage Applicant page (individual action).
You can also create an interview evaluation from the Interview Evaluations grid that appears on the Disposition Details - Interview page and on the Manage Applicant page: Applicant Activity tab: Interview Schedule/Evaluations section.
Completing Evaluations
The evaluation categories that appear on the Interview Evaluation page come from the interview evaluation template that is associated with the job opening's recruitment template.
Evaluators assign ratings to the individual categories, give an overall rating and recommendation, and enter any comments.
There are two options for saving an evaluation:
The Save button saves data without submitting the evaluation; the evaluator can continue to work on the evaluation later.
The Submit Evaluation button saves and submits the data and returns the user to the previous page; the evaluator cannot make any further changes unless an administrator reverses the submission using Send Back functionality.
When you submit an interview evaluation, the system sends a notification to all of the recruiters and hiring managers for the job opening.
Reviewing Evaluation Progress and Accessing Existing Evaluations
To view a list of interview evaluations for an application, use the Interview Evaluations grid. This grid appears in two places:
On the Disposition Details - Interview page that appears when you click the disposition Interview on the same three pages where you perform the Create Interview Evaluation action.
On the Manage Applicant page, under the Applicant Activity tab, in the Interview Schedule/Evaluation section.
The Interview Evaluations grid lists all scheduled interviewers and, for submitted evaluations, the overall rating and recommendation. The grid also includes an Action column with links that the user clicks to access the Interview Evaluation page. The link text indicates whether the link is used to create a new evaluation, complete an already-started evaluation, or view a completed evaluation.
Updating Submitted Applications
When you set up your recruiting system, you can give administrators the ability to edit, delete, and send back submitted interview evaluations. To do this, select Yes in the Administrator Evaluation Edit field on the Recruiting Installation - Applicants page.
See Defining Applicant-Related Settings.
When you grant administrators these additional privileges, administrators see an Edit Evaluation link rather than a View Evaluation link next to completed evaluations. Clicking this link displays the Interview Evaluation page, but in this mode, the Save and Submit Evaluation buttons are replaced by buttons that the administrator can use to:
Edit the completed evaluation.
When an administrator edits an evaluation, additional fields show who edited the evaluation and when it was edited. The administrator can also enter comments regarding the changes.
Delete the completed evaluation.
Send back the evaluation, an action that reverses the evaluation submission as if the original evaluator had saved it without submitting it.
PrerequisitesBefore you can interview applicants, you must set up the interview evaluation template.
See Setting Up Interview Evaluation Templates.
Before administrators can update submitted evaluations, you must select Yes in the Administrator Evaluation Edit field on the Recruiting Installation - Applicants page.
See Defining Applicant-Related Settings.
Pages Used to Complete Interview Evaluations|
Page Name |
Definition Name |
Navigation |
Usage |
|
HRS_REC_SCHAPP |
Recruiting, Find Applicant, Find Applicant |
Search for and select applicants. |
|
|
HRS_INT_EVAL HRS_VIEW_INT_EVAL |
|
Create, update, or review interview evaluations. |
|
|
Interview Evaluations |
HRS_INT_EVAL_LST |
Self Service, Recruiting Activities, Interview Evaluations, Interview Evaluations |
Create, update, or review interview evaluations using self-service. |
|
HRS_INT_EVAL_SEC |
Click the Comments icon for a rating category on the Interview Evaluation page. |
Enter evaluation comments for a specific category. |
Creating an Interview Evaluation
Access the Interview Evaluation page (select Create Interview Evaluation in the Take Action or Group Action field on the Find Applicants page, on the Manage Applicant page, or on the Job Opening page).
Evaluator Actions
|
Save |
Click this button to save your work without submitting evaluations or navigating away from this page. If the page includes sections for multiple applicants, the system saves all sections except those for which no rankings have been entered. |
|
Submit Evaluation |
Click this button to submit your completed evaluations and return to the previous page. All evaluations on the page must be complete before you can submit them; the system displays error messages if there is any missing data. |
|
Cancel and Return to Previous Page |
Click to return to the previous page without saving or submitting your work. |
<Applicant Name>
The page displays an expandable section for each applicant you are evaluating. Several read-only fields at the top of this section give basic information about the applicant and the job opening. Additional fields identify the user who submitted the evaluation and the date that the evaluation was submitted.
|
Interview Date and Interview Type |
Displays the date and interview type that were entered when the interview was scheduled. You can override the data in these fields if necessary. If there is no interview scheduled for the applicant, you can still create an evaluation. The default interview date is the current date. |
Rate Applicant
|
Category |
The grid lists the rating categories that are associated with the interview template for the job opening. |
|
Interview Rating and Score |
Select a rating for the given category. The system displays the score that is associated with the rating you select. Ratings are associated with scores in the interview evaluation template for the job opening. |
|
|
Click the Comments icon to access the Evaluation Rating Comments page and enter a comment for the specified category. |
Recommendation and General Comments
|
Overall Rating |
Enter an overall rating. Select from the values that were defined in the Interview Evaluation Ratings page. |
|
Recommendation and Reason |
Enter an overall recommendation. Select from the statuses are defined for the Interview recruitment phase. See Defining Statuses and Reasons Codes. If the interview evaluation template is configure to require a reason for the rating you select, the Reason field appears. The available values are the reasons that are associated with the status that you selected as the recommendation. |
|
General Comments |
Enter freeform text comments about the applicant. |
Updating a Submitted EvaluationAccess the Interview Evaluation page in administrative update mode (click the Edit Evaluation link in the Interview Evaluations grid on the Disposition Details - Interview page).
Note. Only administrators can update submitted evaluations. The option for administrators to edit evaluations is available only if activated in the Recruiting Installation - Applicants page.
Administrator Actions
|
Edit |
Click the Edit button to make a submitted evaluation editable. When the page changes to editable mode:
|
|
Send Back |
Click this button to send the evaluation back to the original evaluator. Sending an evaluation back reverses the evaluation submission; it is as if the original evaluator saved it without submitting it. If the administrator edited the evaluation before sending it back, changes to the original evaluator's data is kept, but the Edited By,Date Edited, and Edit Evaluation Comments fields are cleared. |
|
Delete |
Click this button to delete the evaluation entirely. All data is cleared, and the system displays the page from which you accessed the evaluation. The Interview Evaluations grid no longer displays data for the deleted evaluation. Instead, the Action field displays Evaluate Applicant, the text that appears when no evaluation data exists. |
Edit Mode Page Elements
These page elements appear after an administrator clicks the Edit button. If the administrator saves changes, these fields remain visible to anyone else who views the evaluation. These fields provide the only audit trail for modified evaluations. If the administrator later sends the evaluation back to the original evaluator, the system clears these fields, but retains any changes to the evaluation itself.
|
Edited By and Date Edited |
These fields display system-generated information about who edited the evaluation and when it was edited. |
|
Edit Evaluation Comments |
An administrator who edits an evaluation uses this field to enter comments related to the edit. |
Finalizing Interviews and Sending Evaluation Reminders
This section provides an overview of interview evaluation reminders and discuss how to send interview evaluation reminders.
Understanding Interview Finalization and Evaluation Reminders
The Interview Evaluation Reminder (HRS_INT_EVAL) Application Engine process performs these two tasks:
Applies the interview status Completed when all evaluations for an interview have been completed.
(Optional) Sends a notification (HRS_INTVW_EVAL_RMNDR) to interviewers who have not yet submitted evaluations for interviews that are complete.
The run control page for the process includes a check box that you use to indicate whether to perform this task.
To prevent the system from processing every interview in the system, you must specify a date range for the interviews to be processed. You can enter actual dates, or you can specify the number of days to look back from the current date.
Page Used to Finalize Interviews and Send Evaluation Reminders|
Page Name |
Definition Name |
Navigation |
Usage |
|
HRS_RUN_INT_REM |
Recruiting, Administration, Interview Evaluation Reminder, Interview Evaluation and Final |
Run a process to mark interviews complete and to optionally send interview evaluation reminders. |
Finalizing Interviews and Sending Evaluation Reminders
Access the Interview Evaluation and Final page (Recruiting, Administration, Interview Evaluation Reminder, Interview Evaluation and Final).
|
Interviews Scheduled From and To |
Enter specific dates to be used when processing interviews. The system processes interviews that are scheduled on or between the dates you enter. |
|
Between and And <number of > days prior to today |
Enter two numbers that define how many days to look back when processing interviews. For example, enter 1 and 7 to process interviews that are scheduled for one to seven days before the day that the process runs. |
|
Send Evaluation Reminders |
Leave this check box selected if you want the Interview Evaluation Reminder process to send reminder notifications to interviewers who have not completed evaluations for the interviews that the system processes. Deselect this check box to skip reminder processing. Note. The Interview Evaluation Reminder process always applies the Completed status to completed interviews that it processes. There is no option to deactivate this part of the process. |
Making Final Recommendations
This section provides an overview of final recommendations, lists a prerequisite, and discusses how to make final recommendations.
Understanding Final RecommendationsAfter all of an applicant's interview evaluations are complete, the recruiter can make a final recommendation regarding the applicant. To make a final recommendation, use the Manage Applicant - Disposition Details: Interview page.
To make a final recommendation, enter a recommendation and an optional reason. These values come from the statuses that are defined for the Interview recruitment phase.
You can specify which letter you want sent to the applicant telling them of your recommendation. However, you must save the entered data and then return to the Disposition Details - Interview page to print the letter immediately or send it using email. Otherwise, the letter can be printed using the HRS Letter Generation batch process.
PrerequisiteBefore you make a final recommendation, you must have interview evaluations forms completed.
See Completing Interview Evaluations.
Page Used to Make Final Recommendations|
Page Name |
Definition Name |
Navigation |
Usage |
|
HRS_APP_RCMNT |
Recruiting, Find Applicants, Find Applicants In the applicant search results grid, click the Interview link in the Disposition column. |
Recommend a disposition for an applicant after interviews are complete. |
Making Final Recommendations
Access the Disposition Details: Interview page (on the Find Applicants page, click the Interview link in the Disposition column).
Final Recommendation
|
Final Recommendation |
Select a final recommendation. |
|
Reason |
Select a reason for the final recommendation. |
Interview Evaluations
This grid lists all scheduled interviewers and, for submitted evaluations, the overall rating and recommendation.
|
Action |
Displays text that indicates the status of the evaluation. When appropriate, the Action column text is a link that the user clicks to access the Interview Evaluation page. Values in this column include:
|
Interview Schedule
This group box displays the applicant's scheduled interviews.
Disposition History
This group box displays the applicant's disposition history.
Edit Disposition Details
Use this group box to edit the applicant's disposition status.
See Reviewing Disposition Details.
Reviewing Interview Schedules and Evaluations
This section discusses how to:
Review applicant interview schedules and evaluations.
Review personal interview calendars.
Review team interview schedules.
Pages Used to Review Interview Schedules and EvaluationsReviewing Applicant Interview Schedules and Evaluations
Access the Manage Applicant page: Applicant Activity tab: Interview Schedule/Evaluation section (on the Manage Applicant page, click the Applicant Activity tab and then the Interview Schedule/Evaluation link).
Interview Schedule
|
Date |
Click this link to display the Interview Schedule page, where you can edit this interview. |
|
Job |
Click this link to display the Job Opening page. |
|
Manage Interviews |
Click this link to access the Select Job Opening for Interview page, where you select one of the applicant's associated job openings before continuing to the Interview Schedule page to create or edit interviews. |
Interview Evaluations
This grid lists all scheduled interviewers and, for submitted evaluations, the overall rating and recommendation.
|
Action |
Displays text that indicates the status of the evaluation. When appropriate, the Action column text is a link that the user clicks to access the Interview Evaluation page. Values in this column include:
|
Reviewing Personal Interview Calendars
Access the Interview Calendar page (Recruiting, Interview Calendar, Interview Calendar).
Note. This is a partial screen shot.
|
Display Week Of |
Enter a date. The calendar shows the calendar for the week (Monday through Sunday) of the date you enter. |
|
Previous Week andNext Week |
Click these links to move forward or backwards through the interview calendar. |
|
<Day of Week> |
Each weekday has its own group box on the calendar; Saturday and Sunday appear together in the last group box on the page. Interview data that appears on the calendar includes the applicant's name, the interview start and end time, the job opening, and the interview location. The applicant name and the job opening ID appear as links if the user has security access to the Manage Applicant page and the Job Opening page, respectively. As long as they have access to the Job Opening page, interviewers can access the job opening from the interview calendar, even if they would not normally have row-level access to the specific job opening. If you use full or partial calendar integration, the interview status also appears for each interview. |
|
|
If interviewer-specific comments exist, the interviewer sees a comments icon alongside the rest of the interview information. Clicking the icon opens a page with the complete text of the comment. |
Reviewing Team Interview SchedulesAccess the Interview Team Schedule page (Self Service, Recruiting Activities, Interview Team Schedule, Interview Team Schedule).
This page has links for two subsections:
Schedule With Job Opening
In this subsection, the Team Schedule grid lists the jobs where the user is scheduled to interview applicants.
Schedule Without Job Openings
In this subsection, the Team Schedule grid lists the applications without job openings where the user is scheduled to interview the applicant.
In both subsections, the Team Schedule grid provides a link to the relevant interview schedule.