 Understanding Applicant Management
This chapter provides an overview of applicant management and discusses how to:
Track applicant activity.
Manage contact notes.
Review applicant data.
Link applicants to job openings.
Print application details.
Send correspondence and recruitment letters.
Forward applicants.
Reject applicants.
Change applicant statuses.
Manage applicant lists.
Create applicant checklists.
Add persons of interest.
Process duplicate applicants.
Use the job search agent.
Generate recruitment reports.
Understanding Applicant ManagementThere are different mechanisms for performing different types of applicant management tasks. This section briefly describes the following mechanisms and the tasks for which they are used:
The Manage Applicant page.
Actions in the Take Action field
Processes and reports.
 The Manage Applicant Page
The Manage Applicant page provides a central location for reviewing applicant data and performing applicant-related tasks. For the most part, the page summarizes data and provides links to other pages where users can add or update the data, but there are a few sections on the page where users enter data directly.
The Manage Applicant page has three tabs, two of which are divided into subsections for different types of data. The tabs are:
Applicant Activity tab.
The Current Data section summarizes the applicant's disposition for each job to which the applicant is linked. If the applicant applied without selecting a job, there is a row of data to track that disposition as well. Links in this section provide access to the disposition details and to job opening information.
The Interview Schedule/Evaluation section summarizes interview activity for the applicant. Links in this section provide access to the Schedule Interview component where users create and update interviews.
The Expenses section summarizes applicant-related expenses. Links in this section enable you to create expense records and view expense details.
Contact Notes tab.
This tab summarizes interactions with the applicant by showing a contact note for each interaction. Contact notes can be system-generated or manually created. Links on this tab enable you to add contact notes and view note details. An additional grid on this page enables you to identify interested parties so that they can be easily copied on email correspondence.
Applicant Data tab.
The Applications and Resumes section summarizes the applications that the applicant has submitted. Links in this section enable you to view the complete application details and to add new applications.
The Contact section contains name, address, email, phone, and status information for the applicant. Users update these fields directly on the Manage Applicant page.
The Verification section summarizes the applicant's references. Links in this section enable you to add references and view reference details.
The Eligibility & Identity section contains both general and country-specific personal information, work eligibility information (such as citizenship), bank account information, and disability-related information. Users update these fields directly on the Manage Applicant page.
This diagram illustrates the hierarchical structure of the tabs and sections on the Manage Applicant page:
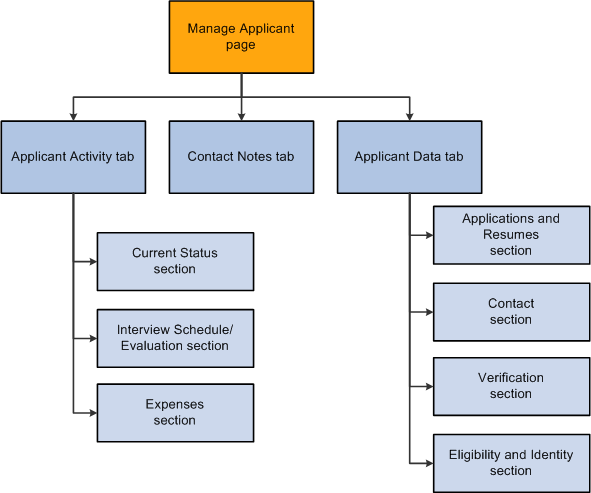
Information hierarchy on the Manage Applicants page
Actions in the Take Action FieldTalent Acquisition Manager provides many predefined recruiting tasks that you perform by selecting an action from the Take Action fields or Group Action fields that appear on several pages, including the Manage Applicant page.
Pages Where Actions are Available
Recruiting actions can be associated with either the overall applicant record or with a specific job application; the association determines which actions are available. For example, the action that prepares a job offer is only available for a specific job application, while the actions that merge duplicate applicant records are available only for the overall applicant. For convenience, some actions that apply to the overall applicant also available at the job application level.
Here is where you find action fields that are associated with specific job applications:
The Find Applicant page: Search Results grid.
The Manage Applicant page: Applicant Activity tab: Current Status section: Applicant Activity grid.
The Job Opening page: Manage Applicants tab: View Applicants section: Manage Applicants grid.
Here is where you find action fields that are associated with the overall applicant record:
The header of the Manage Applicant page.
The Applicant List page.
Individual Actions Vs. Group Actions
In grids, the Take Action field appears in each row so that you can act on an individual row of data. The system initiates the selected action as soon as it is selected (that is, there is not a separate step for initiating the selected action).
If you were to use the keyboard up and down arrows to scroll through items in the drop-down list, the system would initiate the first action that you reached and render it impossible to scroll further to perform other actions. Therefore, to use the keyboard to perform actions on individual rows, users must first press the Alt-Down Arrow keyboard combination to open the drop-down list, use the up and down arrows to scroll through the values in the list, then press the Enter key to select the action and initiate the action.
Some grids also offer a Group Action field that appears below the grid and enables you to act on multiple rows of data at once. You first select the grid rows that you want to include, then you select the action in the Group Action field, and finally you click the Go button to initiate the action. Because the system does not initiate the action until you press the Go button, keyboard users do not have to perform any extra steps before using the arrow keys to scroll through items in the drop-down list box.
The Group Action field generally lists a subset of the actions that are available to perform on individual rows.
Group actions area available in these locations:
The Find Applicant page: Search Results grid.
The Manage Applicant page: Applicant Activity tab: Current Status section: Applicant Activity grid.
The Applicant List page.
The Applicant List page is unique in that it has a field for performing group actions, but it does not have a Take Action field in each row of the grid that lists applicants. To act on a single row, select only the one row before initiating the group action.
Summary of Action Availability
The following table lists the actions that you use to manage applicants. For each page where you can perform actions, the table indicates whether you can perform the action on one row of data (using the Take Action field) or many (using the Group Action field).
Note. Group actions are not available on the Manage Applicant page. Actions performed at the header level apply to the overall applicant record, while actions performed in the Applicant Activity grid apply to the specific job application.
|
Action |
Manage Applicant Page: Header Level |
Manage Applicant Page: Applicant Activity Grid |
Find Applicants Page: Search Results Grid |
Job Opening Page: Manage Applicants Grid |
Applicant List page |
Reference |
|
Add Applicant to New List |
One row only |
Not available |
One or many rows |
One or many rows |
Not available |
|
|
Add Applicant to Saved List |
One row only |
Not available |
One or many rows |
One or many rows |
Not available |
|
|
Add Note |
Not available |
Not available |
Not available |
Not available |
Many rows. |
|
|
Add Person of Interest |
One row only Note. Applicant must be an external applicant. |
Not available |
Not available |
Not available |
Not available |
|
|
Add to Another List |
Not available |
Not available |
Not available |
Not available |
Many rows. |
|
|
Change Applicant Status |
One row only |
Not available |
One or many rows |
One or many rows |
Not available |
|
|
Copy Applicant To Employee |
Not available |
One row only |
One row only |
One row only |
Not available |
|
|
Create Interview Evaluation(s) |
Not available |
One row only |
One row only |
One or many rows |
Not available |
|
|
Create New List |
Not available |
Not available |
Not available |
Not available |
Many rows. |
|
|
Create Salary Package Model |
Not available |
One row only |
One row only |
One row only |
Not available |
|
|
Edit Application |
Not available |
Not available |
Not available |
Available only as group action |
Not available |
|
|
Forward Applicant |
One row only |
Not available |
One or many rows |
One or many rows |
Many rows. |
|
|
Link Applicant to Job |
One row only |
Not available |
One or many rows |
One or many rows |
Many rows. |
|
|
Manage Applicant Checklist(s) |
Not available |
One row only |
One row only |
One row only |
Not available |
|
|
Manage Applicant Contracts |
One row only |
Not available |
Not available |
Not available |
Not available |
|
|
Manage Interviews |
Not available |
One row only |
One or many rows |
One or many rows |
Not available |
|
|
Merge as Source |
One row only |
Not available |
Not available |
Not available |
Not available |
|
|
Merge as Target |
One row only |
Not available |
Not available |
Not available |
Not available |
|
|
Pre-Employment Check |
One row only |
Not available |
Not available |
One row only |
Not available |
|
|
Prepare for Hire |
Not available |
One row only |
One row only |
One row only |
Not available |
See Hiring Applicants. |
|
Prepare Job Offer |
Not available |
One row only |
One row only |
One row only |
Not available |
See Creating Job Offers. |
|
Print Application Details |
Not available |
One row only |
One or many rows |
One or many rows |
Not available |
|
|
Reject Applicant |
Not available |
One row only |
One or many rows |
One or many rows |
Not available |
See Rejecting Applicants. |
|
Route Applicant |
Not available |
One row only |
One or many rows |
One or many rows |
Many rows. |
See Routing Applicants. |
|
Send Correspondence |
One row only |
Not available |
One or many rows |
One or many rows |
Many rows. |
|
|
Withdraw From Hire |
Not available |
Not available |
Not available |
One row only Note. Valid only when the disposition is Ready to Hire and the job opening, if any, is in an Open status. |
Not available |
One additional action, Invite Application, is available from the Recruitment Profile Match page when you search for employees with profiles that match a particular job opening's profile. When you invoke this action, the system sends the employee an email invitation to apply for the job opening.
See Performing Profile Searches.
Processes and ReportsTo run a process or report, navigate to the appropriate run control page, enter any necessary parameters, and submit the process or report to the Process Scheduler.
Use this mechanism to perform these tasks:
Identify and merge duplicate applicants.
Run the job search agent.
This process notifies applicants of job openings that meet their specified criteria.
Generate recruiting reports.
See Also
Processing Duplicate Applicants
Tracking Applicant Activity
You track an applicant's activity using the Manage Applicant page: Applicant Activity tab: Current Status section, which shows the applicant is in the recruitment process for each associated job opening.
This section provides an overview how to track selectees for Japan, and discusses how to:
Review applicant dispositions.
Review disposition details.
Review interview schedules and evaluations.
Review applicant expenses.
Add applicant expenses.
(JPN) Understanding How to Track Selectees for Japan
The standard PeopleSoft recruitment process begins with posting job openings and ends with hiring, when applicants become employees. In between job opening posting and hiring, there are the other recruitment activities, such as screening, interviewing, and offering and accepting employment.
The recruitment process followed by most Japanese companies, however, uses selectee dispositions between applicant and employee when processing new graduates. The new graduates become known as selectees when they have one of these four user-maintained dispositions related to preliminary offers:
Preliminary offer decided.
Preliminary offer notified.
Preliminary offer accepted.
Preliminary offer rejected.
Hire Decided is a fifth user-maintained disposition; when it is applied, the applicant is no longer considered a selectee. You manually enter the Hire Decided disposition when an applicant who has accepted a preliminary offer is about to be hired. The disposition of Preliminary Offer Accepted remains until that decision is made because it is possible that an applicant who has accepted might not in fact graduate and may not, therefore, be hired. The Hire Decided disposition distinguishes between those who have accepted and might be hired and those who have accepted and will be hired.
This flowchart illustrates the common additional Japanese recruitment stages for preliminary offers within the context of the standard recruitment process. The flowchart represents an organization that includes an acceptance letter with its version of a preliminary offer letter for the selectee to use when responding:
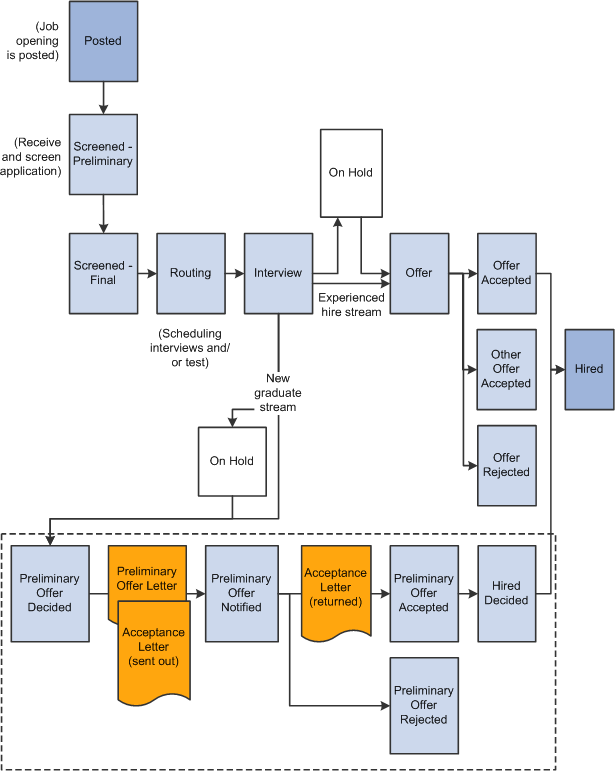
Japanese recruitment stages for preliminary offers within the overall recruitment flow
Pages Used to Track Applicant Activity|
Page Name |
Definition Name |
Navigation |
Usage |
|
HRS_MANAGE_APP |
Recruiting, Find Applicants, Find Applicants Click an applicant name link in the Search Results grid on the Find Applicants page. |
Review applicant recruitment data and perform various applicant related tasks. |
|
|
HRS_APP_RCMNT |
Click the link in the Disposition column in the Search Results grid on the Find Applicant page or on the Manage Applicant page: Applicant Activity tab: Current Status grid. |
Edit disposition details. The options on this page vary depending on the applicant's disposition. |
|
|
HRS_APP_RESUME |
|
View an applicant's resume. |
|
|
HRS_APP_EXP_SP |
Click the Add New Expense link or the Expense Details link on the Manage Applicant page: Applicant Activity tab: Expenses section. |
Enter applicant expenses. |
Reviewing Applicant Dispositions
Access the Manage Applicant page: Applicant Activity tab: Current Status section (on the Find Applicants page, click an applicant name link in the Search Results grid).
When you initially access the Manage Applicant page, the Applicant Activity tab is active. Click the Contact Notes tab or the Applicant Data tab to view additional applicant data.
When you initially access the Applicant Activity tab, the Current Status section is active. Click the Interview Schedule/Evaluation link or the Expenses link to view additional applicant activity information.
Page-Level Actions
|
|
Click the Add Applicant icon to display the Add New Applicant page. |
|
|
Click the Save icon to save changes to the page. |
|
Take Action and Go |
Use the Take Action field at the top of the page to perform actions that relate to the overall applicant record (without regard to any particular job opening). Select an action to perform, then click the Go button to initiate the action. In this context, the following actions are available: Add Applicant to New List, Add Applicant to Saved List, Add Person of Interest, Change Applicant Status, Forward Applicant, Link Applicant to Job, Manage Applicant Contracts, Merge as Source, Merge as Target, Pre-Employment Check, and Send Correspondence. |
Applicant Activity
This grid lists the job openings that the applicant is associated with. If the applicant applied without selecting a job opening, this application is included in the list as well.
|
Job Opening |
Click the job opening link to access the Job Opening page for that job opening. |
|
Disposition |
An applicant's disposition is the applicant's status with regards to a particular job opening. The values are the statuses that have been defined for the Recruitment Summary status area. These statuses track the progress of an applicant through the recruiting process. Click the disposition link to access the Disposition Details page. |
|
Click to open a new window that displays the applicant's resume. The window contents depend on the resume format:
If no resume exists for a particular applicant (for example, the applicant instead completed the work experience fields in the online application), then this column is blank. If none of the applicants in the grid have resumes, the entire Resume column is hidden. |
|
|
Take Action |
Use the Take Action field in the Applicant Activity grid to perform actions that relate to the specific job application. (However, some of the available actions affect the overall applicant record.) When you select an action, the system immediately initiates it; you do not need to click a separate Go button. In this context, the following actions are available: Create Interview Evaluation, Create Salary Package Model, Manage Applicant Checklists, Manage Interviews, Prepare for Hire, Prepare Job Offer, Print Application Details, Reject Applicant, and Route Applicant. |
|
Add New Disposition |
Click this link to create a new row in the Applicant Activity grid. The system displays the Disposition Details page, where you select the disposition to assign to the new row and you optionally identify a job opening for the new row. If you do not identify a job opening, the job opening field for the new row displays the text No Job Opening Selected. Note. Instead of using this link, you can use the Link Applicant to Job action to associate the candidate with a specific job opening. Using the Link Applicant to Job action provides the benefit of checking to see if the job opening has questions and, if it does, automatically generating an email requesting that the applicant use Candidate Gateway to answer the questionnaire. |
|
View Activity History and View Current Activities |
Only one of these links is visible at a time; use them to toggle the Applicant Activity grid between showing only the applicant's current dispositions and showing both current and past dispositions. When viewing activity history, the Applicant Activity grid displays the applicant's previous dispositions for those job openings where the disposition has changed over time. In this mode, the Applicant Activity grid does not have a Take Action field, the Job Opening and Disposition columns show only plain text, not links, and the Add New Disposition link is hidden. |
Reviewing Disposition Details
Access the Disposition Details page (on the Manage Applicant page: Applicant Activity tab: Current Status section, click the link in the Disposition column).
Note. Page appearance varies depending on the applicant's disposition. The basic version of the page pictured here appears for most dispositions.
Disposition-Specific Page Elements
Additional fields appear for the three following dispositions:
Route
See Routing Applicants.
Interview
Offer
See Creating a Job Offer.
Most of the disposition-specific page elements are associated with just one of these dispositions. However, there is one element, the Disposition History grid, that is common to all three. This grid displays the status applicant's status change history for the routings, interviews, and offers. The first column in the grid displays the status type: Route, Interview, or Offer. Clicking the link changes the page to the page to the mode for the indicated recruiting area.
Edit Disposition Details
Use this group box to manually change an applicant's disposition when there is not a predefined recruiting process that applies a particular disposition. Although the date field appears to be enterable, the system overrides any date that you manually enter with the current date.
Important! The best practice is to use the predefined recruiting processes to set the applicant's disposition. For example, the actions that you use to manage interviews, reject applicants, prepare offers, and so forth all set the disposition automatically. If you update the disposition manually, take care not to override dispositions for key actions.
Reviewing Interview Schedules and EvaluationsAccess the Manage Applicant page: Applicant Activity tab: Interview Schedule/Evaluation section (on the Manage Applicant page, click the Interview Schedule/Evaluation link under the Applicant Activity tab).
See Reviewing Applicant Interview Schedules and Evaluations.
Reviewing Applicant ExpensesAccess the Manage Applicant page: Applicant Activity tab: Expenses section (on the Manage Applicant page, click the Expenses link under the Applicant Activity tab).
Expenses
|
Expense Details |
Click to access the Add Expenses page, where you can edit expense details for the expense. |
|
Add New Expense |
Click to access the Add Expenses page, where you can add expense details for a new expense. |
Adding Applicant ExpensesAccess the Add Expense page (on the Manage Applicant page: Applicant Activity tab: Expenses section, click the Add New Expense link or the Expense Details link).
|
Expense Code |
Select an expense code, such as airfare, car rental, travel, or parking. |
|
Expense Amount |
Enter the expense amount and select a currency. |
|
Charge Date |
Enter the date on which the expense occurred. |
|
Business Unit |
Select the business unit to which the expense should be charged. |
|
Department |
Select the department to which the expense should be charged. |
Managing Contact Notes
This section provides an overview of contact notes and discusses how to:
Review contact notes and interested parties.
Add contact notes.
Understanding Contact NotesUse the Manage Applicant page: Contact Notes tab to review existing contact notes and add new contact notes.
System-Generated Contact Notes
Talent Acquisition Manager automatically creates contact notes when you generate letters or email during the recruiting process. For example, the system creates contact notes when you:
Generate an interview letter.
Create an offer letter.
Forward an applicant.
Generate ad hoc correspondence.
When creating notes for letters, the letter itself becomes an attachment to the note.
Manually-Created Contact Notes
Users can manually create notes (with optional attachments) to record interactions that have not been automatically captured. When creating a note, the user indicates the contact method by choosing from the values that your organization establishes on the Contact Methods page. For example, contact methods can include inbound or outbound phone calls, emails, faxes, and so on.
See Defining Contact Method Types.
Users can make contact notes public or private. Only the user who creates a private note can view that contact note. All recruiters and hiring managers can view public notes.
Page Used to Manage Contact Notes|
Page Name |
Definition Name |
Navigation |
Usage |
|
HRS_MANAGE_APP |
Recruiting, Find Applicants, Find Applicants Click an applicant name link in the Search Results grid on the Find Applicants page. Click the Contact Notes tab on the Manage Applicant page. |
Review and create contact notes for applicants. |
|
|
HRS_APP_NOTES |
In the Manage Applicant page: Contact Notes tab, click the Add Contact Note link or the Subject link for an existing note. |
Add notes, with optional attachments, to record about interactions with an applicant. |
|
|
HRS_APP_PROXY_SBP |
Click the Proxy Details link on the Add Contact Note page. This link appears only if the applicant was submitted through a recruitment service that is acting as the applicant's proxy. |
View the name, phone number, and email address of the contact for the recruitment service that is acting as the applicant's proxy. |
Reviewing Contact Notes and Interested Parties
Access the Manage Applicant page: Contact Notes tab (on the Manage Applicant page, click the Contact Notes tab).
Contact History
This grid lists the contact notes for an applicant. System-generated notes and manually-created notes appear together in the grid. Private notes are hidden from all users other than their creators.
|
Owner ID and Recruiter Name |
These columns display the user ID and name of the person who created the note. For system-generated notes, these columns display information about the person who performed the action that triggered the note creation. |
|
Subject |
Displays the subject of the communication. For example, if the system created the contact note when a recruiter used the Forward Applicant action, the subject text is the subject that the recruiter entered in the forwarding message. Contact notes for letters have the subject Interview Letter, Offer Letter, or Application Letter. Click the subject text to access the full text of the communication in the Add Note page or the Forward Applicant page. |
|
Add Contact Note |
Click to access the Add Note page, where you can add a new contact note. |
Use this group box to enter the names and email addresses of interested parties. When you send correspondence to an applicant, you can select the Include Interested Parties option on the Send Correspondence page to send email correspondence to the persons that you list here.
See Sending Ad Hoc Correspondence.
Adding Contact Notes
Access the Add Contact Note page (on the Manage Applicant page: Contact Notes tab, click the Add Contact Note link or click the Subject link for an existing contact note).
|
Proxy Details |
This link appears only if the applicant was submitted through a recruitment service. Click the link to display the Proxy Details page. |
|
|
Click this link to open the Send Correspondence page so that you can send email or a letter to the applicant. |
Applicant Notes
|
Contact Method |
Select a contact method, choosing from the methods that are defined on the Contact Method page. |
|
Note Audience |
Select Public or Private to control who can see the note. Only the user who creates a private note can view that contact note. All recruiters and hiring managers can view public notes. |
|
Subject |
Enter a subject. The subject that you enter appears in the Contact History group box on the Manage Applicant page: Contact Notes tab. |
|
Notes |
Enter the text of the note. |
Attachments
Use this group box for attachments that pertain to the interactions that you had with the applicant.
Click the Add Attachment link to display a browser window where you can search for the attachment to upload. Click the Delete Attachment link to remove the selected attachment from the note.
Reviewing Applicant Data
This section discusses how to:
Review the application summary for an applicant.
Review application details.
Review questionnaire details.
Pages Used to Review Applicant Data|
Page Name |
Definition Name |
Navigation |
Usage |
|
HRS_MANAGE_APP |
Recruiting, Find Applicants, Find Applicants Click an applicant name link in the Search Results grid on the Find Applicants page. Click the Applicant Data tab on the Manage Applicant page. |
View an applicant's applications, resumes, contact information, and eligibility and identity information. |
|
|
Application Details |
HRS_APP_PROFILE |
Click the Application icon on the Manage Applicant page: Applicant Data tab: Applications and Resumes section. |
Review application details, including the applicant's resume, preferences, and qualifications. |
|
View Questionnaire |
HRS_APP_QSTN_RSLT |
Click the View Questionnaire link on the Application Details page. |
Review an applicant's answers to screening questions that the applicant answered while preparing the application in Candidate Gateway. |
Reviewing the Application Summary for an Applicant
Access the Manage Applicant page: Applicant Data tab: Applications & Resumes section (click the Applicant Data tab on the Manage Applicant page).
Note. The Contact, Verification, and Eligibility & Identity sections under the Applicant Data tab correspond to the equivalent sections on the Add New Applicant page.
Applications
Use this group box to view all of an applicant's applications.
|
Application |
Click the icon in this column to open an existing application in the Application Details page, where you can view and edit the application. |
|
Add Application |
Click to access the Application Details page in add mode so that you can add a new application for the applicant. |
Reviewing Application DetailsAccess the Application Details page (click the Application icon on the Manage Applicants page: Applicant Data tab: Applications and Resume section).
The pages that you use to review and edit applicant data are the same as those you use to add new applicant data.
When you are reviewing an existing application (rather than creating a new one), this additional page element is available:
|
View Questionnaire |
This link appears in the Job Openings grid. Click to access the View Questionnaire page, where you can review the applicant's answers to questions to screening questionnaires that the applicant completed in Candidate Gateway. |
Reviewing Questionnaire DetailsAccess the View Questionnaire page (click the View Questionnaire link on the Application Details page).
This page shows questions that the applicant answered online.
For each multiple-choice question, the page displays the possible answers; a selected check box indicates the applicant's answer.
For each open-ended question, the page displays the question, the applicant's answer, and a grid that lists the evaluators for the answer. Evaluators can use this grid to award points to the answer.
Important! This page displays does not display questions from the Prescreening and Online Screening levels.
Linking Applicants to Job Openings
This section provides an overview of how to link applicants to job openings and discusses how to link applicants to job openings.
Understanding How to Link Applicants to Job OpeningsIf you find an applicant who is qualified for a specific job opening and should be considered, you can link the applicant to that job opening.
Establishing Links Between Applicants and Jobs
The link between an applicant and a job is what causes the job opening to appear on the Manage Applicant page and the applicant to appear on the Job Opening page.
Applicants are automatically linked to job openings when they apply for the job using Candidate Gateway or when a recruiter uses the Application Details page to add job openings to the applicant's application.
You can also link applicants to jobs by invoking the Link Applicant to Job action. When you link an applicant to a job using this method, the system displays the Link to Job Opening page. Use this page to specify one or more job openings to which the applicants is to be linked.
Questionnaires in Linked Jobs
When a user links an applicant to a job opening either by using the Link Applicant to Job action or by adding the job opening on the Application Details page, the system determines whether the job opening includes screening questions. If it does, the system sends an email informing the applicant of the link and asking the applicant to use Candidate Gateway to answer the questions. A link in the email takes the applicant to Candidate Gateway, where the applicant can sign in to an existing account or create a new account that will be automatically be associated with the existing applicant record.
The system also creates a contact note with a record of the outgoing email.
When multiple job openings are added to the application at once, the system sends only one email per applicant.
The request to answer questions is sent only to applicants who have provided an email address. Applicants without email addresses are still linked to the job opening, but no notification can be sent. When you link applicants to job openings using the Link to Job Opening action, the Link to Job Openings page displays information about which applicants do not have email addresses and therefore will not receive the notification.
When the candidate signs on to Candidate Gateway, the Welcome page displays a notification with the subject Questionnaire Completion <job opening ID>. The applicant can click the notification subject to complete an application for the job opening or openings; the application automatically includes the associated questions.
Because submitted applications are never editable in Candidate Gateway, the applicant will not be able to answer questions in an existing application. Instead, the applicant must create a new application, in effect reapplying for the job opening that is already linked to the applicant's record. As a result, an applicant who uses Candidate Gateway to complete the questionnaire ends up with two applications for the same job opening, and the applicant's name appears twice on the Manage Job Opening page.
Important! Be sure the text of your email notification gives the applicant clear instructions for reapplying.
The Recruiter Alerts pagelet (part of PeopleSoft HCM Portal Pack) includes an alert that displays the number of applicants who have not completed questionnaires for the job openings for which the user is on the recruiting team. Users can click the number to access the Questionnaire Request page, which lists each outstanding request and enables the user to send reminder notifications to selected applicants.
See Viewing Recruiter Alerts for Talent Acquisition Manager.
Pages Used to Link Applicants to Job Openings|
Page Name |
Definition Name |
Navigation |
Usage |
|
HRS_GACT_RCM_STS |
Recruiting, Find Applicants, Find Applicants Search for applicants, then in the Search Results grid, select Link Applicant to Job in the Take Action field or the Group Action field. (This action is also available on other pages.) |
Link an applicant to a job opening. |
Linking Applicants to Job Openings
Access the Link to Job Opening page (on the Find Applicants page, select Link Applicant to Job in the Take Action field for an applicant).
Applicants To Be Linked
This grid lists the applicants that you selected when you initiated the Link Applicant to Job action.
Enter Disposition Information
Use this group box to enter the initial disposition for the applicants with regard to the job openings to which they are being linked.
|
Status Code and Status Reason |
Select a status code (disposition) and status reason. The default disposition is the one with the identifier 015. The delivered label for this disposition is 015 Linked. If you are linking applicants to a job that has a questionnaire, change the disposition to status code 019. The delivered label for this disposition is 019 Linked Questionnaire. This disposition indicates that the applicant has not completed the questionnaire, which can only be completed by an applicant who submits an application using Candidate Gateway. The system allows you to choose any disposition, but using the 019 Linked Questionnaire disposition for a job opening that doesn't have a questionnaire, or using any other disposition for a job opening that does have a questionnaire, causes the system to issue a warning when you click the Submit button. |
|
Status Date |
Enter the date that the applicant is linked to the job. The default is the current date. |
Enter Job Openings
Select the job openings to which you want to link the applicant. Security prevents you from adding any job openings that you do not already have permission to access.
See Understanding Row-Level Security for Recruiting.
If the job opening is associated with any questions, the system sends the applicant an email with directions for signing on to Candidate Gateway and submitting an application for the job; the online application automatically includes the questions.
Applicants Without Email
This grid lists applicants who do not have an email address in the system.
These applicants will not receive an email notifying them that they need to complete questionnaires for newly-linked job openings.
Printing Application Details
This section provides an overview of how to print application details and discusses how to:
Print a single application.
Print multiple applications.
Understanding How to Print Application DetailsTo print application details for one or more applicants, use the Print Application Details action. This action is available in several contexts:
The Search Results section of the Find Applicants page (individual or group action).
The Manage Applicants section of the Job Opening page (individual or group action).
The Applicant Activity grid on the Manage Applicant page (one application only).
When you select the Print Application Details action for a single application, the system displays a read-only Application Details page that is formatted for printing. Data appears in collapsible sections. Initially, all sections are expanded, but you can selectively collapse sections before printing to control the amount of detail included in the printed output.
When you select the Print Application Details action for a group, the system displays the Print Application Details page. This is a standard run control page such as the ones you use to generate other reports. Use this page to submit a request to PeopleSoft Process Scheduler, which then generates the output for each selected application. When printing multiple applications, the system always includes all of the sections in the report.
Pages Used to Print Application Details|
Page Name |
Definition Name |
Navigation |
Usage |
|
HRS_APP_PRINT_PAGE |
|
Displays application data in one long printer-friendly page. |
|
|
HRS_RUN_HRS036 |
Recruiting, Find Applicants, Find Applicants Search for applicants, then in the Search Results grid, select Print Application Details in the Group Action field. (This action is also available on other pages.) |
Submit a PeopleSoft Process Scheduler request to print all of the selected applications in batch. |
Printing a Single Application
Access the Application Details (printer-friendly) page (select the Print Application Details action in the Take Action field in the Search Results grid on the Find Applicants page).
Note. Only part of the page is shown here.
This page displays all of the application data in a printer-friendly format. Scroll to review all of the data.
|
Print this Page |
Click this button to open a standard print dialog box and print the job opening. If you collapse any sections before printing, those sections appear collapsed on the final printout. The final print output is further optimized for printing and thus differs from what you would get if you simply used your browser's print command. For example, the navigation links at the top of the page do not appear on the printout, and the section titles are rendered as dark text rather than as white text in a colored bar. |
Printing Multiple ApplicationsAccess the Print Application Details page (select the Print Application Details action in the Group Action field under the Search Results grid on the Find Applicants page).
The system provides a run control ID for the Print Application Details process.
Select the language for the printouts, then click the Run button to generate the Application Details (HRS036) SQR report.
Sending Correspondence and Recruitment Letters
This section provides overviews of the Send Correspondence action and of context-specific recruitment letters, then discusses how to:
Send ad hoc correspondence.
Find email addresses.
Generate batch recruitment letters.
Understanding the Send Correspondence ActionThis overview describes the Send Correspondence action, which you use to produce ad hoc email and letters for applicants.
Send Correspondence
Use the Send Correspondence action to send the following types of correspondence:
An email with message text that you manually enter.
An email with message text that the system generates based on a template that you select.
A letter that the system generates based on a template that you select.
Recruiting Solutions uses Oracle Business Intelligence Publisher (BI Publisher) to generate recruitment letters. The BI Publisher is a template-based reporting solution that separates the data extraction process from the report layout and allows the reuse of extracted application data into multiple report layouts.
The Send Correspondence action is available for a single applicant from the Manage Applicant page, and it is available for one or more applicants on the Find Applicants page, the Job Opening page, and the Applicant List page.
Note. You cannot use this method to send offer letters or interview letters, which require the context of their specific pages.
Email Generation
When you invoke the Send Correspondence action, the Send Correspondence page appears with Email as the default contact method. You can enter freeform message text, or you can select from a list of available templates. If you select a template, the system creates the message text, merging applicant data into the template as necessary. You can preview the system-generated message, but you cannot modify it.
Both template-based and freeform email messages require you to enter the email subject. You can optionally add attachments to the email as well.
Note. To support freeform text messages, the system applies the delivered HRS_EMAIL_GENERIC template when no other template is selected. As delivered, this template places a greeting before your message text and a sign-off after your message text. To remove this wrapper, you can modify the template.
Letter Generation
If you change the contact method to Letter, you must select a letter template. Once you select a template, the Generate button appears. Clicking this button generates a merged letter and opens it in a new browser window so that you can print and send it. You can optionally preview the merged letter before generating it.
When you generate a letter, it is up to you to print and send it. Letters that you generate using Send Correspondence are not added to the queue of letters for the HRS Letter Generation process (HRSLETTER).
Contact Notes Created by Send Correspondence
When you send email or generate a letter using the Send Correspondence action, the system saves the message as a contact note.
You can view the note on the Manage Applicant page: Contact Notes tab. The note is designated as public or private based on the setting you choose when you create the correspondence. Anyone can view public notes, but only the sender can view private notes.
For email correspondence, the email subject becomes the note subject. When you click the subject to view the note details, the correspondence appears in the Send Notification page. You can modify the correspondence (though you cannot change the contact method) and then resent the correspondence. For template-based email, you can change the subject, the attachments, and the Cc and Bcc recipients, but you cannot change the template selection, nor can you modify the message.
For letter correspondence, the default note subject is Application Letter. When you click the subject to view the note details, the Add Contact Note page appears, and the letter appears as an attachment to the note. You can edit the note as necessary, including replacing the attachment if you modified the generated letter before printing and sending it.
Note. If you do not end up sending the letter, you should manually delete the contact note from the applicant's record. If you modify the letter before sending it, you should update the contact note accordingly.
Template Selection
The Send Correspondence action uses BI Publisher for PeopleSoft templates for both email and letter correspondence. The templates that are available for selection are those with the HRS_APP_LETTERS report definition.
See PeopleTools: BI Publisher for PeopleSoft PeopleBook
Understanding Context-Specific Recruitment LettersThis overview discusses the generation and delivery of context-specific recruitment letters.
Types of Recruitment Letters
PeopleSoft Talent Acquisition manager enables you to generate context-specific recruitment letters during these recruiting activities:
Entering or reviewing application information on the Application Details page
Scheduling applicant interviews on the Interview Schedule page.
Preparing job offers on the Prepare Job Offer page
The pages where you perform these recruiting activities all display a Letter field that you use to select a letter template.
Batch Letter Generation Vs. Manual Letter Generation
All of the pages that support recruitment letters include a Generate Letter link that you click to manually generate the letter. The system merges applicant data into the selected template and opens the resulting letter in a new browser window.
If you select a letter but do not generate it manually, the system automatically places the letter in a queue to be processed by the HRS Letter Generation (HRSLETTR) Application Engine process.
When a letter has been placed in the queue but has not yet been processed, manually generating the letter removes it from the queue. Because manually generating a letter prevents it from being processed by the HRS Letter Generation process, the person who manually generates the letter is responsible for delivering the letter.
Note. Applicant letters that you send from the Send Correspondence page are never added to the queue for the HRS Letter Generation process.
When you manually generate a letter, the system automatically creates a contact note with the letter as an attachment. The HRS Letter Generation process, on the other hand, creates a single file with all of the letters that were generated, so individual letter documents do not exist, and the system does not create a contact note or associate an attachment with the applicant record.
Letter Delivery
After generating a letter manually, users have two delivery options: hard copy and email.
For hard copy delivery, users can print the letter from the browser window where the letter is displayed. Users can also save the letter to a local disk and print it from there. The default file format for the generated letter is .rtf (rich text file), which is compatible with most word processing applications.
For email delivery, an Email Applicant link enables users to access the Send Correspondence page with the generated letter already attached. Users can enter their own email message text before sending. If there is no email address for the applicant, the system displays a warning.
Note. Only interview and job offer letters can be emailed. The Application Details page does not have the Email Applicant option.
Clicking the Email Applicant link before generating the letter displays the Send Correspondence page without any attachments. Although you can select letter templates from the Send Correspondence page, the available templates are not context-sensitive: choices are always the same as those on the Application Details page, even if you access the Send Correspondence page from the Interview Schedule page or the Prepare Job Offer page.
Modified Letters and the Upload Option
To modify a template-based letter, you must generate it, save it locally, and make your changes to the local copy. To ensure accurate records, you must then upload the modified document to the system.
For interview letters and offer letters, the system provides an Upload Letter link that you can click to upload the modified document to the correct context. If you subsequently click the Email Applicant link, the system automatically attaches the modified letter (rather than the original) to the email.
Contact Notes
Contact notes, which appear on the Manage Applicant page: Contact Notes tab, are automatically created for recruitment letters that you generate individually (The HRS Letter Generation process does not create contact notes for letters that it produces in batch.) By default, the automatically-generated contact notes are designated as public, but you can make a note private so that only the sender can see it.
The system generates contact notes when:
You generate a recruitment letter.
If you generate a letter but do not send it, you should manually delete the contact note from the applicant's record.
You upload a recruitment letter.
The Application Details page does not have an upload link. If you modify an application letter, you should manually replace the attachment in the related contact note.
You email a recruitment letter.
If you perform multiple letter-related actions, the applicant ends up with multiple contact notes that refer to the same interaction. For example, if you generate a letter, then upload a modified letter, then email the modified letter, the system creates three separate contact notes related to this one letter. To eliminate redundant contact notes, delete these extra contact notes manually on the Manage Applicant page: Contact Notes tab.
When you email a letter to the applicant, the email subject becomes the contact note subject. When you generate or upload a letter, the default subject text describes the letter context: Application Letter, Interview Letter, or Offer Letter.
Clicking the subject of a contact note opens a page that displays the note details; the actual letter appears as an attachment to the note. You can edit the note as necessary. If the contact note is for an email, the note details appear in the Send Notification page, where you can modify the email and then resend it.
Letter Selection
Recruitment letters use BI Publisher for PeopleSoft templates. The templates that are available for selection are those with the following report definitions:
Templates from the HRS_APP_LET report definition are available from the Application Details page.
Templates from the HRS_INT_LET report definition are available from the Interview Schedule page.
Templates from the HRS_OFF_LET report definition are available from the Prepare Job Offer page.
Delivered Letter Templates
Talent Acquisition manager delivers the following recruitment letter templates:
|
Report Definition |
Template ID |
Template File |
Purpose |
|
HRS_APP_LET |
HRS_APP_LETTER_ACQ |
LTRACQxml.rtf |
Acknowledges receipt of applicant's resume. |
|
HRS_APP_LET |
HRS_APP_LETTER_ANO |
Ltranoxml.rtf |
Notifies applicant of no current job openings. |
|
HRS_APP_LET |
HRS_APP_LETTER_CR1 |
LTRCR1xml.rtf |
Thanks applicant for interest in company and that their qualifications are being reviewed. |
|
HRS_APP_LET |
HRS_APP_LETTER_IR |
LTRIR.rtf |
Interview rejection letter. |
|
HRS_APP_LET |
HRS_APP_LETTER_LAQ |
Ltrlaqxml.rtf |
Thanks applicant for interest in company and that their qualifications are being reviewed. |
|
HRS_INT_LET |
HRS_INT_LETTER_IS1 |
LTRIS1xml.rtf |
Notifies applicant of scheduled interview date and time. |
|
HRS_INT_LET |
HRS_INT_LETTER_IS2 |
LTRIS2xml.rtf |
Notifies applicant of scheduled interview date and time. |
|
HRS_INT_LET |
HRS_INT_LETTER_IS3 |
LTRIS3xml.rtf |
Notifies applicant of scheduled interview date and time. |
|
HRS_OFF_LET |
HRS_OFF_LETTER_OF1 |
LTROF1xml.rtf |
Notifies applicant of offer and compensation package. |
|
HRS_OFF_LET |
HRS_OFF_LETTER_OF2 |
LTROF2xml.rtf |
Notifies applicant of offer and compensation package. |
See Also
PeopleTools: BI Publisher for PeopleSoft PeopleBook
Pages Used to Send Correspondence and Recruitment Letters|
Page Name |
Definition Name |
Navigation |
Usage |
|
HRS_SEND_CRSP |
Recruiting, Find Applicants, Find Applicants Search for applicants, then in the Search Results grid, select Send Correspondence in the Take Action field or the Group Action field. (This action is also available on other pages.) |
Send ad hoc letters and emails to applicants. Letters must be template-based; email can be freeform or template-based. |
|
|
HRS_FWRD_APP_PRVW |
Click the Preview button on the Send Correspondence page when it is configured to send a freeform email. |
Preview the content of a freeform email. You must return to the Send Correspondence page before sending the email. Note. The default template that the system uses for freeform email adds text before and after the message that you create; use this page to see your message with the template text applied. |
|
|
HRS_FND_EMAIL_ADDR |
Click the Find link on the Send Correspondence page. |
Search for and select employees to whom you want to forward applicants. |
|
|
HRS_RUN_LETTERS |
Recruiting, Administration, Generate Recruitment Letters, Generate Recruitment Letters |
Run the process that generates letters from the recruiting letter queue. |
Sending Ad Hoc Correspondence
Access the Send Correspondence page (select the Send Correspondence action in the Take Action or Group Action field on the Find Applicants, Manage Applicant, or Job Opening page).
Message Type and Method
|
Contact Method |
Select Email or Letter. The default value is Email. In this mode, the page shows standard email fields. If you select Letter:
|
|
Letter |
Select a letter template to use. This field is optional when you send email and required when you send a letter. |
Recipient Information
|
To |
This field appears for both email and letter correspondence. It displays the names of the applicants to whom you are sending correspondence and is not editable. If you are sending the correspondence to multiple applicants, all names appear together. However, the system sends separate correspondence to each applicant: template-based messages are generated separately for each recipient, and the applicants do not see each other's names in the To field of the email they receive. |
|
Cc, Bcc, and Find |
These fields appear only for email correspondence. By default, the sender's preferred email address appears in the Cc field, and the Bcc field is empty. You can edit these fields directly to add or remove recipients, or you can look up recipients who are employees by clicking the Find link to access the Find Email Address page. |
|
Include Interested Parties |
Select this check box if you want the people listed as interested parties for the applicant to receive a copy of this email. An applicant's interested parties are listed on the Manage Applicant page: Contact Notes tab. The system sends the interested parties copies of the correspondence, but does not display their names or email addressed on this page. |
Sender Information
If the Contact Method is Email, the From field in this section displays the sender's name.
If the Contact Method is Letter, this entire section is hidden.
Message
|
Subject |
This field appears only for email correspondence. Enter the email subject. This field is required for email correspondence (whether freeform or template-based). |
|
Access |
This field appears for both email and letter correspondence. Select Public to allow any user to view the contact note for this correspondence. Select Private to allow only the sender access to the contact note. |
|
Message |
This field appears only for email correspondence. For freeform email, enter the text of the email message. If you select a template, this field disappears until you click the Preview button, at which point the field displays the non-editable template-based message text. Note. To support freeform text messages, the system applies the delivered HRS_EMAIL_GENERIC template when no other template is selected. As delivered, this template places a greeting before your message text and a sign-off after your message text. If your organization is using the delivered template, your message should not duplicate the greeting or sign-off text from the template. |
|
Notes |
This field appears only for letter correspondence. Enter any comments that should be saved in the contact note that the system creates when it generates the letter. |
Attachments
If the Contact Method is Email, use this section to add attachments to and remove attachments from the email.
If the Contact Method is Letter, this entire section is hidden.
Action Buttons
|
Preview |
Click to preview the email or letter. When you preview a letter or a template-based email, the message text appears directly on the Send Correspondence page. If you are not satisfied with what you see, select a different letter (or clear the Letter field) to make changes. When you preview a freeform email, the message text appears on the Send Correspondence Preview page. You can return to the Send Correspondence page without sending. |
|
Send |
Click to send the email and create the associated contact note. This button appears only when the Contact Method is Email. |
|
Generate |
Click to generate a letter and display it in a new browser window. The system creates the associated contact note immediately. If you don't print and send the letter, be sure to delete the contact note. When you generate the letter, the original browser window returns to the page from which you invoked the Send Correspondence action. |
|
Resend |
This button appears only if you access the page from the applicant's list of contact notes (under the Contact Notes tab on the Manage Applicant page). Click to resend email correspondence if there were delivery issues or if you have modified the email. You can always modify the subject, the attachments, and the Cc and Bcc recipients before resending, but you can modify the message text only for freeform correspondence. |
|
Cancel |
Click this button to return to the previous page without sending the correspondence. |
Finding Email Addresses
Access the Find Email Address page (click the Find link on the Send Correspondence page or the Forward Applicant page).
Find Employees
Enter a full or partial employee ID or name and click Search to display the search results.
Search Results
This group box displays the search results. Select one, several, or all employees in the search results and click the Add Selected button to add their email addresses to the appropriate fields on the page from which you initiated the email address lookup.
|
Indicates whether this is the preferred email address for the employee. If an employee has multiple email addresses, the system lists all email addresses and indicates which email address is the preferred email address so that you can select the email address that is most appropriate. |
Generating Batch Recruitment Letters
Access the Generate Recruitment Letters page (Recruiting, Administration, Generate Recruitment Letters, Generate Recruitment Letters).
|
Language |
Choose a language and select the Specified option to generate all letters using the language that you explicitly select. Select the Recipient's option to print each letter in the preferred language of its recipient. In this case, the language that you select in the Language field is used only when there is no record of the recipient's preferred language. |
|
Run |
Click to run the HRS Letter Generation job (HRSLETTER) using PeopleSoft Process Scheduler. |
Note. If you select Printer in the Type field on the Process Scheduler Request page, you must enter the URL address for your printer in the Output Destination field.
Forwarding Applicants
This section provides an overview of applicant forwarding and discusses how to:
Forward applicants.
Preview the email.
Understanding Applicant Forwarding
Recruiters can forward applicants to one or more persons to enable those persons to review the applicant. When recruiters forward an applicant, the system sends a notification (HRS_FORWARD_APPLICANT) to the people that the recruiter specifies on the Forward Applicant page.
Forwarding an applicant is similar to routing an applicant. However, when you forward an applicant, the system does not change the applicant disposition. The system does, however, add a contact note to the Manage Applicant page: Contact Notes tab.
When you forward an applicant action, the applicant's resume is attached to the notification email. If you forward an applicant who has multiple applications, only the resume from the most recently created application is sent. If the most recent application does not have a resume, there is no attachment.
Attached resume files are delivered in their original file format. If the resume text was pasted into the Resume page rather than uploaded as an attachment, the resume text is sent as a text (.txt) file, which does not retain formatting. If an application has both online resume text and a file attachment, only the file attachment is sent.
Pages Used to Forward Applicants|
Page Name |
Definition Name |
Navigation |
Usage |
|
HRS_FWRD_APPL |
Recruiting, Find Applicants, Find Applicants Search for applicants, then in the Search Results grid, select Forward Applicant in the Take Action field or the Group Action field. (This action is also available on other pages.) |
Forward applicants. |
|
|
HRS_FWRD_APP_PRVW |
Click the Preview button on the Forward Applicant page. |
Preview a message. |
Forwarding Applicants
Access the Forward Applicant page (on the Find Applicants page, select Forward Applicant in the Take Action field for an applicant).
Page-Level Actions
|
Preview |
Click to access the Forward Applicant Preview page, where you can preview the email before you send it. Before you can preview the message, you must enter an email address and a message subject. |
Forward Applicant
This group box displays the names and IDs of the applicants that you selected to forward.
Recipient Information
Use this group box to enter email addresses of the people to whom you want to forward these applicants.
|
Find |
Click to access the Find Email Address page, where you can search for and select employees to whom you want to forward these applicants. |
Message
Use this group box to enter a subject for the message that you are sending and the actual message.
|
Access |
Select Public to allow any user to view the contact note for this correspondence. Select Private to allow only the sender access to the contact note. |
Previewing the EmailAccess the Forward Applicant Preview page (click the Preview button on the Forward Applicant page).
This page displays the message as it appears after the message that you enter is merged into the message template for forwarded email.
Rejecting ApplicantsThis section discusses how to reject applicants.
Pages Used to Reject Applicants|
Page Name |
Definition Name |
Navigation |
Usage |
|
Reject Applicant |
HRS_GACT_APP_REJ |
Recruiting, Find Applicants, Find Applicants Search for applicants, then in the Search Results grid, select Reject Applicant in the Take Action field or the Group Action field. (This action is also available on other pages.) |
Update an applicant's disposition to show that the applicant has been rejected. |
Rejecting Applicants
Access the Reject Applicant page (on the Find Applicants page, select Reject Applicant in the Take Action field for an applicant)
Applicants Being Rejected
This grid lists the applicants who were selected when you performed the Reject action.
Select Status
|
Status Code |
If you use the delivered status definitions, the field displays 110 Reject, which is the disposition that will be applied after you submit the status change. |
|
Status Reason |
Select a reason for applying the Reject disposition. |
|
Submit and Cancel |
Click the Submit button to complete the disposition update, or click the Cancel button to return to the Job Opening page without updating the applicant's disposition. |
|
Submit & Send Correspondence |
Click to complete the disposition update and send correspondence to the rejected applicant. |
Changing Applicant Statuses
This section discusses how to change applicant statuses.
Note. Applicant statuses are the statuses that you define for the Applicant recruitment area, which deals with the overall availability of the applicant. This differs from the applicant's disposition, which is the applicant's status relative to a particular job opening.
See Also
Setting Up Recruiting Statuses
Pages Used to Change Applicant Statuses|
Page Name |
Definition Name |
Navigation |
Usage |
|
HRS_GACT_RCM_STS |
Recruiting, Find Applicants, Find Applicants Search for applicants, then in the Search Results grid, select Change Applicant Status in the Take Action field or the Group Action field. (This action is also available on other pages.) |
Change an applicant's status. |
Changing Applicant Statuses
Access the Select New Applicant Status page (on the Find Applicants page, select Change Applicant Status in the Take Action field for an applicant).
|
Status Code |
Select a status code. The delivered statuses are 010 Active, 020 Hired, 030 Inactive, and 040 Queued. These are the status codes that are defined for the Applicant recruitment area on the Statuses and Reasons page. |
Managing Applicant Lists
This section provides an overview of applicant lists and discusses how to:
View existing applicant lists.
Create applicant lists.
Manage applicant lists.
Edit primary applicant list data.
Add applicants to an existing list.
Understanding Applicant ListsApplicant lists are manually-constructed groups of applicants that recruiters can use to facilitate the recruiting process. Recruiters can add applicants to a list and then perform tasks for one, several, or all applicants on the list at the same time. For example, a recruiter can create a list of applicants to contact, a list of applicants that are hot prospects but for whom there is no current job opening, or a list of college students who expressed interest in employment during an on-campus recruiting event.
Lists can be public or private. The creator of an applicant list is the owner of the list. All recruiters and hiring managers have access to public lists. They can view public lists, take actions on the applicants in the lists, add applicants to the lists, and view primary list information, but they cannot make changes to the primary list information. Only the list owner can edit primary list information for public lists. For private lists, only the list owner can view and make changes to the lists.
Pages Used to Manage Applicant Lists|
Page Name |
Definition Name |
Navigation |
Usage |
|
HRS_APPL_LIST |
Recruiting, Applicant Lists, Applicant Lists |
View existing applicant lists. |
|
|
HRS_CREATE_LIST |
|
Create an applicant list. |
|
|
HRS_LIST_MEMBER |
Click a list name on the Applicant Lists page. |
Manage an applicant list and its membership. |
|
|
HRS_CREATE_LIST |
Click the Edit Primary List Data link on the Applicant List page. |
Edit information about the list such as its name and whether it is private or public. |
|
|
HRS_SELECT_LIST |
|
Select the applicant list to which you want to add an applicant. |
Viewing Existing Applicant Lists
Access the Applicant Lists page (Recruiting, Applicant Lists, Applicant Lists).
|
Display |
Select which applicant lists you want to view and click the Refresh icon to view those lists. Values are: Only My Lists: Select to view only lists that you own. All Lists: Select to view all public lists along with any private lists that you own. |
|
Find List and Go |
Enter a partial or full list name to search for that list and click Go to display the search results. |
List Details
|
List |
Click a link to access the Applicant List page, where you can view details for all applicants on the list. |
|
Access |
Displays whether the list is public or private. |
|
Date Created and Owner |
Displays the name of the user that created the list and the date that the list was created. |
Page-Level Actions
|
Create New List |
Click this button to access the Create New List page so that you can create a new applicant list. |
|
Find Applicants |
Click this link to navigate to the Find Applicants page, where you can search for applicants and use the Add Applicant to New List or Add Applicant to Saved List action to add the applicants to lists. |
Creating Applicant Lists
Access the Create New List page (on the Applicant Lists page, click the Create New List button).
Name Your New List
|
List Name and Description |
Enter identifying information about the new list. The name appears on the Applicant Lists and Applicant List pages; the description appears on the Edit Primary Applicant List Data page. |
|
Status |
Select Active or Inactive. When a list is inactive, only the list owner can view the list, even if it is a public list. You cannot add applicants to inactive lists. |
|
Public |
Select to make the list a public list. Deselect this check box if you want this list to be private. |
Managing Applicant Lists
Access the Applicant List page (on the Applicant Lists page, click the Add Applicants button).
|
Add Applicants |
Click to access the Find Applicants page, where you can search for and select applicants to add to the list. |
|
Delete List |
Click to delete the list. Only the list owner can delete the list. |
|
Edit Primary List Data |
Click to access the Edit Primary List Information page, where you can change the list name, description, status, and availability (public or private). |
|
Find Applicant and Go |
Enter the partial or full name of the applicant that you are searching for and click Go to display the search results. |
Applicants
|
Name |
Click an applicant's name to access the Manage Applicant page for that applicant. |
|
Preferred Contact |
Displays the email address, phone number, or mailing address of the applicant, depending on the applicant's preferred contact method. You can update an applicant's preferred contact method on the Manage Applicant page: Applicant Data tab: Contact section. |
|
<Select Action> and Go |
Use the unlabeled group Action field at the bottom of the page to perform actions that relate to the overall applicant record (without regard to any particular job opening). Select an action to perform, then click the Go button to initiate the action. In this context, the following actions are available: Add Note, Add to Another List, Create New List, Forward Applicant, Link Applicant to Job, Route Applicant, and Send Correspondence. |
Editing Primary Applicant List Data
Access the Edit Primary List Information page (on the Applicant List page, click the Edit Primary List Data link).
|
List Name and Description |
Enter identifying information about the new list. The name appears on the Applicant Lists and Applicant List pages; the description appears only on this page. |
|
Active |
Select Active or Inactive. When a list is inactive, only the list owner can view the list. You cannot add applicants to inactive lists. |
|
Public |
Select to make the list a public list. deselect this check box if you want this list to be private. |
Adding Applicants to an Existing List
Access the Select Applicant List page (on the Find Applicants page, select Add Applicant to Saved List in the Take Action or Group Action field).
|
Select List |
Select the applicant list to which you want to add the applicant. All public lists are available, as are private lists that the user owns. |
Creating Applicant Checklists
This section provides an overview of checklists and discusses how to create applicant checklists.
Understanding ChecklistsA checklist helps you remember all the details that you need to get applicants through recruiting and hire processes. You can use standard checklists that you create in the Checklist component, or you can create an individualized checklist for a particular applicant. When you hire an applicant, the checklists for that applicant are passed to PeopleSoft Human Resources.
See Also
Pages Used to Create Applicant Checklists|
Page Name |
Definition Name |
Navigation |
Usage |
|
HRS_APP_CHKLST |
Recruiting, Find Applicants, Find Applicants Search for applicants, then in the Search Results grid, select Manage Applicant Checklist in the Take Action field. (This action is also available on other pages.) |
Create a checklist for an applicant. |
Creating Applicant Checklists
Access the Applicant Checklist page (on the Find Applicants page, select Manage Applicant Checklist in the Take Action field).
The fields on this page are a subset of those on the Employee Checklist page in PeopleSoft HR: Administer Workforce.
See Creating a Person Checklist.
Adding Persons of Interest
This section provides an overview of persons of interest and discusses how to:
Select person of interest types and add persons of interest.
View Search/Match results.
See Also
Setting Up and Working with Search/Match
Understanding Persons of Interest
Many organizations must add applicants to the human resources system as persons of interest before the applicants are actually hired. For example, you might want to add an applicant to the system as an external trainee so that you can enroll the applicant in training prior to being hired. When you add an external applicant as a person of interest, the system adds the applicant to the human resources system and assigns human resources ID to the applicant.
To add an applicant as a person of interest, use the Add Person of Interest action. This action is available only for external applicants. You cannot add internal applicants (employees or non-employees) as persons of interest because they already exist in the HR system.
Depending on whether the Person of Interest field on the Recruiting Installation - Applicants page is set to Yes or No, you may be required to check whether the applicant is already in the human resources database. When checking is required, submitting an applicant as a person of interest causes the system to search the HR system and display a list of potential matches. You review this list and, if you find a true match, you identify the record so that the system can associate the applicant with the existing record rather than creating a new record.
See Defining Applicant-Related Settings.
After you add an applicant as a person of interest, you can confirm the transaction by verifying that the system has added an EmplID field to the Manage Applicant page: Applicant Data tab: Contact section.
Pages Used to Add Persons of Interest|
Page Name |
Definition Name |
Navigation |
Usage |
|
HRS_ADD_EXT_TRN |
Recruiting, Find Applicants, Find Applicants Search for applicants and click an applicant name to access the Manage Applicant page. On the Manage Applicant page, select Add Person of Interest in the Take Action field at the top of the page, then click the Go button. |
Select the person of interest type for the applicant and submit the applicant to the human resources system. |
|
|
HCR_SM_RESULTS |
Click the Submit button on the Add Person of Interest page. The Search Results page appears if the system is configured to search the system to see if the person you are adding already exists in the system. |
View Search/Match results and investigate potential matches. |
Selecting Person of Interest Types and Adding Persons of Interest
Access the Add Person of Interest page (on the Manage Applicant page, select Add Person of Interest in the Take Action field at the top of the page, then click the Go button).
|
Select Type |
Select the person of interest type that you want to assign to the applicant. Define person of interest types on the Person of Interest Type Tbl (person of interest type table) page. |
Viewing Search/Match Results
Access the Search Results page (click the Submit button on the Add Person of Interest page).
See Reviewing Search/Match Results.
Processing Duplicate Applicants
This section provides an overview of duplicate applicant processing and discusses how to:
Initiate duplicate applicant processing.
Define search criteria and running the Find Applicant Duplicates process.
Identify and merge duplicate applicant records.
Manually merge applicants from the target record.
Manually merge applicants from the source record.
Understanding Duplicate Applicant Processing
Sometimes an applicant has more than one record, each with its own applicant ID. Duplicate applicant records can occur when applicants register in Candidate Gateway more than once or when they submit their applications using different methods. For example, an applicant who was hired for short-term seasonal work might create a new Candidate Gateway account when applying to return to your organization the following year, resulting in both an active applicant record and a hired applicant record.
Talent Acquisition Manager provides two mechanisms for merging duplicate records:
Automated processes that help recruiters identify potential duplicates and merge selected records.
A manual merge process that recruiters can initiate from within an applicant record.
Target and Source Records
The following diagram illustrates the process of merging duplicate records. In the diagram, there are initially two different applicant IDs representing the same applicant. One record is marked as the Target record; this record will be updated with data from the other records and will remain active after the merge process. The other record is marked as the Source record; its data will be copied over to the target record and it will become inactive after the merge process. Each record is associated with a different job opening. When the records are merged, the surviving applicant record is automatically associated with both job openings.
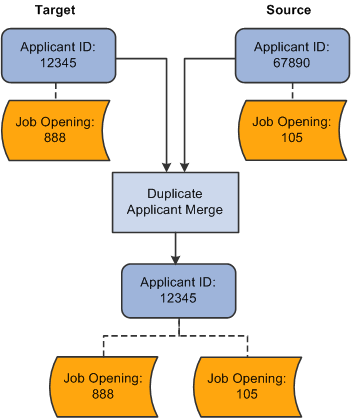
The Applicant Merge process joins multiple applicant and relates all associated job openings to the surviving applicant.
Source records still exist after being merged, but they are assigned an inactive status. Use the Recruiting Installation component to configure the inactive status to assign to the duplicate records.
See Defining Applicant-Related Settings.
Automated Processes for Managing Duplicate Records
The system provides two Application Engine processes that work together to help you manage duplicate records:
The Find Applicant Duplicates (HRS_DUP_PRC) process uses search criteria that you specify to find potential duplicates.
For example, if you search on first and last name, the process results will include groups of potential duplicates whenever there are multiple applicants with the same first and last name. The process does not automatically merge these potential duplicates; you must review the results and identify targets and sources when you determine that there is, in fact, duplication.
The Duplicate Applicant Merge process (HRS_DUPE_MRG) completes the data merge for the records that you have marked.
To use these processes for duplicate applicant processing:
Access the Process Duplicate Applicants page (Recruiting, Administration, Process Duplicate Applicants, Process Duplicate Applicants).
This page lists previous instances of the Find Applicant Duplicates process. All instances except the most recent have a Closed status, and the most recent instance will automatically be closed when you create a new instance.
Click the Create New Search button to access the Find Duplicate Applicants page, where you specify criteria to be used in identifying potential duplicates.
Select your search criteria and click the Run button to initiate the Find Applicant Duplicates process.
This process finds potential duplicate applicant records that match the search criteria that you define. Email, address, and middle name searches are case-sensitive.
For the system to consider two applicants a match, all search criteria that you define on the Find Duplicate Applicants page must match exactly. Records with duplicate email addresses, phone, and national ID numbers, regardless of type, are identified as potential duplicate records. For example, if one applicant record has a home email address that matches the business email address from another applicant record, the system counts this as a potential match regardless of the fact that the address types are different.
The process runs against active applicant records only: it does not include applicant records in the status that the Recruiting Installation - Applications page identifies as the inactive status for duplicates. This restriction prevents records that were inactivated during previous merges from reappearing in your search results.
See Defining Applicant-Related Settings.
Note. If you need to merge an inactive applicant record, use the manual merge process.
Return to the Process Duplicate Applicants page and click the View Duplicates link to access the Review Duplicate Applicants page, then review the process results and identify records to merge.
The system groups each set of potential duplicate applicants into duplicate sets. If you determine that the applicants in a duplicate set are in fact duplicates, identify which applicant records will survive the merge and mark them as target records. Mark records that are to be merged into the target as source records, and explicitly identify the matching target record. For each duplicate set, there can be multiple source and target records.
To determine which records should be merged, you might need to review detailed information about a record. To do this, click the applicant record ID to access the Manage Applicant page.
Click the Run button on the Review Duplicate Applicants page to run the Duplicate Applicant Merge process and complete the merge for any records that you have marked for merging.
If you return to the Review Duplicate Applicants page after the process is complete, the merged applicant records are read-only. Unmerged applicant records, however, are still editable. You can continue to identify target and source records and run the Duplicate Applicant Merge process as long as there are still unmerged applicants on the page.
Manual Merges
If you have already identified duplicate records, you can manually merge them without running the search process that finds potential duplicates for you. To do this, access the Manage Applicant page for one of the duplicate records, then use the Take Action field to initiate the merge. There are two merge actions available:
Merge as Target uses the current applicant record as the target and opens the Merge as Target page where you identify one or more sources records before completing the merge.
Merge as Sourceuses the current applicant record as the source and opens the Merge as Source page where you identify the target record before completing the merge.
Note. Manual merges also use the Duplicate Applicant Merge Application Engine process (HRS_DUPE_MRG), however, you do not use the Process Scheduler Request page to initiate the process. Rather, the system automatically initiates the process when you click the Merge button.
Data Merging
When you merge applicant records, the following data changes occur:
The status for the non-surviving applicant records is set to the status entered in the Inactive State for Duplicates field on the Recruiting Installation - Applicants page.
The system updates the target record with the most current contact information (first name, middle name, last name, address, phone numbers, email addresses) and identity and eligibility data.
If there is no data on the target record, but there is data on the source record, the system uses the data on the source record to update the target record. If data on the source and target records has the same effective date, the system does not change the data on the target record.
All unique recruitment rows from the source records are added to the target record so that there is no loss of data.
This includes interview schedules, interview evaluations, contact notes, expenses, interested parties, references, and referral sources.
Note. If you merge records for internal applicants (employees and non-employees), the system deletes or modifies the applicant record only. Information held in Personal Data tables is never modified or deleted.
Pages Used to Process Duplicate Applicants|
Page Name |
Definition Name |
Navigation |
Usage |
|
HRS_DUPE_PRCS |
Recruiting, Administration, Process Duplicate Applicants, Process Duplicate Applicants |
Create new instances of the duplicate applicant search process and access the results of those searches. |
|
|
HRS_DUPE_FIND |
|
Select fields for duplicate matching and initiate the process of searching for duplicates. |
|
|
HRS_DUPE_REVIEW |
|
Review the results of the process that searches for duplicate applicants, identify records to merge, and initiate the merge process. |
|
|
Merge As Target |
HRS_APP_MERGE |
Recruiting, Find Applicants, Find Applicants Click an applicant name to access the Manage Applicant page. On the Manage Applicant page, select Merge As Target in the Take Action field at the top of the page, then click the Go button. |
Merge the applicant record with one or more other applicants that you identify. The applicant whose record you use to initiate the action will be the surviving applicant. |
|
Merge As Source |
HRS_APP_MERGE |
Recruiting, Find Applicants, Find Applicants Search for applicants and click an applicant name to access the Manage Applicant page. On the Manage Applicant page, select Merge As Source in the Take Action field at the top of the page, then click the Go button. |
Merge the applicant record with a target applicant that you identify. The target applicant will be the surviving applicant. |
Initiating Duplicate Applicant Processing
Access the Process Duplicate Applicants page (Recruiting, Administration, Process Duplicate Applicants, Process Duplicate Applicants).
Page-Level Actions
|
Create New Search |
Click this button to access the Find Duplicate Applicants page, where you can select new duplicate applicant search criteria and run the Find Applicant Duplicates process. |
|
Refresh |
Click to refresh the status links with the current status of the process. |
Review Duplicate Processes
|
Status |
Displays the status of the process instance. Click a status link to access the Find Duplicate Applicants page, where you can review the duplicate applicant search criteria used for the process. Values are:
|
|
View Duplicates |
Click to access the Review Duplicate Applicants page, where you can identify duplicate sets and merge duplicate applicant records. This link appears after the Find Applicant Duplicates process is complete. |
Defining Search Criteria and Running the Find Applicant Duplicates
Process
Access the Find Duplicate Applicants page (on the Process Duplicate Applicants page, click the Create New Search button or click a link in the Status column).
Note. Once you initiate the Find Applicant Duplicates process, this page becomes read-only. You must then create a new search to establish new search criteria.
Select the data that must be identical for applicants to be considered as duplicates.
Note. Email, address, and middle name searches are case-sensitive. Records with duplicate email addresses, phone, and national ID numbers, regardless of type, are identified as potential duplicate records. For example, if one applicant record has a home email address that matches the business email address from another applicant record, the system counts this as a potential match regardless of the fact that the address types are different.
When you first access this page for new duplicate processing, the search settings are copied from the settings for the previous search.
Click the Run button to access the Process Scheduler Request page, where you initiate the duplicate search process.
Identifying and Merging Duplicate Applicant Records
Access the Review Duplicate Applicants page (on the Process Duplicate Applicants page, click the View Duplicates link).
|
Run |
After you have reviewed potential duplicates and identified records that you want to merge, click the Run button to initiate the Duplicate Applicant Merge process and complete the merge for the indicated records. You can process subsets of the potential duplicates. For example, you can run the process for the first 10 duplicate sets and then the rest at a later time. Note. After you start the Duplicate Applicant Merge process, you cannot cancel it. You must be certain that you want to merge the applicant records before you schedule the process. |
Duplicate Review
Use this group box to specify how the system merges duplicate applicant records. Applicants with matching data are grouped into duplicate sets. Review each set and decide if the applicant records are duplicates.
|
Duplicate Set ID |
Displays the ID number for the duplicate set. Refer to the group box header to see how many total duplicate sets exist. |
|
Duplicate Set Status |
Displays the status of the merge process. Values are: No Merges: Indicates that the system has not merged duplicate applicant records for the duplicate set. Merged: Indicates that the system has merged duplicate applicant records in the duplicate set. |
Review Duplicate Applicants
|
Applicants |
Click the applicant ID link to access the Manage Applicant page, where you can view additional details for the applicant. (On the Manage Applicant page, clicking the Applicant List link returns you to the Review Duplicate Applicants page.) |
|
Relationship |
Specify how the applicant records are merged. Values are Source and Target. For each duplicate set, there can be multiple source and target records. You cannot edit these fields after you run the Duplicate Applicant Merge process and merge the applicants. Leave these fields blank if you determine that the applicants in a duplicate set are not duplicates or if you have not yet made a determination. |
|
Target |
Select the target for each source record. The drop-down list box lists the applicant IDs for applicants in the same duplicate set who have been identified as targets. This column appears on the page only after you select Source in the Relationship column for an applicant. |
Manually Merging Applicants from the Target RecordAccess the Merge As Target page (on the Manage Applicant page, select Merge As Target in the Take Action field at the top of the page, then click the Go button.)
|
Person ID |
Identify one or more applicant records that will be merged into the current record. |
|
Merge |
Click to run the Duplicate Applicant Merge process and complete the merge. |
Manually Merging Applicants from the Source RecordAccess the Merge as Source page (on the Manage Applicant page, select Merge As Target in the Take Action field at the top of the page, then click the Go button.)
|
Target Person |
Identify the applicant record into which the current record will be merged. |
|
Merge |
Click to run the Duplicate Applicant Merge process and complete the merge. |
Using the Job Search Agent
This section provides an overview of the Job Agent (HRS_JOB_AGNT) Application Engine process and discusses how to run the Job Agent process.
See Also
Reviewing and Searching for Job Postings
Understanding the Job Agent Process
Job Agent functionality enables the system to notify applicants of job postings that meet the applicants' saved criteria.
Applicants establish their criteria in Candidate Gateway by saving searches with the criteria for the types of jobs in which they are interested in applying. These saved searches are processed whenever an administrators runs the Job Agent (HRS_JOB_AGNT) process.
During the Job Agent process, the system:
Deleted expired job search agents in HRS_AGNT_PROF.
The system determines whether the job search agent has expired by taking the date that the job agent was created and adding the number of days that you enter in the Days Job Search Agent Active field on the Recruiting Installation - Applicants page. The process compares the resulting date to the system date. If the resulting date is less than the system date, the system deletes the job search agent.
See Defining General Settings for Templates, Approvals, and Integrations.
Searches for job postings that match the job agent search criteria, and writes the results to a file called HRS_AGNT_RSLT.
In addition to meeting the applicant's search criteria, job postings must meet certain general requirements:
The job opening status is Open.
The posting destination is a Company type recruitment source.
The posting type, External or Internal, is correct for the applicant who created the job agent.
There is at least one section of the posting that is visible to the applicant who created the job agent.
Each section of a job posting has a visibility of Internal Only, External Only, or Internal and External.
Posts a notification in the Notifications grid on the Careers Home page in Candidate Gateway.
Applicants can click on the subject link for the notification to view the message, which contains links to the job postings that meet the applicant's criteria.
If the applicant has multiple job search agents, the system posts a separate notification for one.
Sends the applicant an email notification using the JobAgentNotification template.
This occurs only if the applicant's contact information includes an email address. The email includes links to the job openings that match the applicant's criteria, up to the maximum number of job openings specified in the Max Job Posts Per Notification field in the Recruiting Installation - Jobs page. If the number of matches exceeds the maximum, the notification email also directs the applicant to visit Candidate Gateway to access complete search results.
Prerequisites
Enter values for these fields in the Recruiting Installation component:
Max Job Posts per Notification (Recruiting Installation - Jobs page).
Days Job Search Agent Active (Recruiting Installation - Applicants page).
Maximum Job Agents (Recruiting Installation - Applicants page).
See Apply Online.
Page Used to Run the Job Agent Process|
Page Name |
Definition Name |
Navigation |
Usage |
|
HRS_RUN_JOBAGNT |
Recruiting, Administration, Run Job Search Agent, Job Search Agent |
Run the Job Agent process. |
Running the Job Agent Application Engine Process
Access the Job Search Agent page (Recruiting, Administration, Run Job Search Agent, Job Search Agent).
This run control page does not have any parameters.
Click Run to access the PeopleSoft Process Scheduler Request page, where you schedule the Job Agent process.
Note. Best practice is to set up the request so that the Job Agent process runs at regular intervals.
Generating Applicant ReportsThis section lists the pages used to generate certain applicant-related reports.
See Also
PeopleSoft Talent Acquisition Manager Reports
Pages Used to Generate Applicant Related Reports|
Page Name |
Definition Name |
Navigation |
Usage |
|
PRCSRUNCNTL_LC_HR |
Recruiting, Reports, Applicant Listing, Applicant Listing |
Generate an Applicant Listing report, which you can use to view job opening information with a list of the candidates being interviewed for the positions. The report groups job openings by department ID. |
|
|
PRCSRUNCNTL_LC_HR |
Recruiting, Reports, Applicant Summary by Job, Applicant Summary by Job |
Generate the Applicant Summary by Job report, which you can use to view the number of applicants and percentage of total applicants that applied to a job opening, sorted by source type and specific source. |
|
|
PRCSRUNCNTL_LC_HR |
Recruiting, Reports, Applicant Summary by Source, Applicant Summary by Source |
Generate the Applicant Summary by Source report, which you can use to view the number of applicants and percentage of total applicants sorted by source type and specific source (regardless of job opening). |
|
|
RUN_CNTL_REG_INTRO |
Recruiting, Reports, Job Group Movement Analysis, Job Group Movement Analysis |
Generate the Job Group Movement Analysis report, which you can use to generate racial and gender demographic data regarding the hiring process. This report provides an analysis of the number of males and females by ethnic group who were applicants, hires, promotions, or terminations during a specified time period. The report shows which sex and ethnic groups are moving in and out of the organization and which groups are offered opportunities for advancement. |