 Creating Job Offers
This chapter discusses how to:
Create job offers.
Approve job offers.
Edit or delete job offers.
Creating Job OffersThis section provides an overview of job offers, lists prerequisites, and discusses how to create job offers.
 Understanding Job Offers
This section provides an overview of job offers.
Offer Creation
To prepare a job offer, use the Prepare Job Offer page.
Note. After you save or submit the job offer, the page title changes to Disposition Details: Offer.
Access the page by selecting the Prepare Job Offer action for an applicant. This action is available from multiple locations:
The results grid on the Find Applicants page.
The Manage Applicant page.
The Applicants grid in the Manage Applicants section of the Job Opening page.
When you prepare an offer, the system provides default values when possible. For example, if the job opening has a primary hiring manager and primary recruiter, the system uses these as default values in the Hiring Manager and Recruiter fields on the Prepare Job Offer page. The system also enters the current date as the offer date. You can override these values.
You need to enter offer-specific details such as the start date for the job offer, the components of pay that you are offering the applicant, and the template to use for the offer letter.
Position and Job Code Information
The Prepare Job Offer page displays job information that comes from the job opening, including the business unit, position number, and job code. If the job opening is associated with multiple positions or job codes, you can select the one to which the offer applies.
There are two situations where position and job code data are not available to be brought into the job offer:
If you initiate the offer process for an applicant who is not linked to a job opening.
If you initiate the offer process for an applicant who is linked to a continuous job opening that doesn't have position or job code data.
In these situations, you must enter the necessary data on the Prepare Job Offer page. The requirements for position and job code data depend on your position management settings:
Full position management: All offers must include a position number.
When you enter a position number in the job offer, the system brings in the associated job code.
Partial position management:
Offers that are not associated with any job opening must include a job code; a position number is optional.
Offers that are related to continuous job openings can be submitted without a position or job code, but you will not be able to prepare the applicant for hire without at least a job code.
Online Job Offers
In the Recruiting Installation - Applicants page, you can configure the system to support online job offers for employees and for external applicants who are registered users of PeopleSoft Candidate Gateway. When this functionality is active, you can post offers to Candidate Gateway, and applicants can review the posted offers and then accept or reject the offer online.
When you post a job offer, the system sends the applicant an email notification with a link to Candidate Gateway. If the applicant's contact information doesn't have an email address, you cannot post the job offer online. The system also creates a contact note for the applicant, noting that the offer was posted.
When online job offer functionality is active, the Prepare Job Offer page displays several additional page elements that support the online job offer process, including:
An Applicant section that displays certain applicant profile information, including the applicant type and whether the applicant is a registered user of Candidate Gateway.
This section also shows the applicant's preferred contact method and includes a Notify check box that must be selected before you post an offer online. Selecting the Notify button (which is selected by default for applicants whose preferred contact method is Email) causes the system to send the email notification to the applicant when you post the offer.
An offer expiration date.
The system provides a default date that it calculates based on the system setting (in the Recruiting Installation - Applicants page) that specifies how many days online job offers remain active. You can override the default value.
When an online offer expires, it becomes read-only.
An Attachments section for the files, URLs, and notes that you want to make available to the applicant along with the offer.
The offer letter that you generate is always added to the attachments grid. You can also manually add additional attachments, including both applicant-specific attachments that you manually upload and generic organizational documents that have been made available.
Buttons for posting and unposting offers to Candidate Gateway.
You might unpost job offers if they have been withdrawn or modified. When you modify a job offer, saving the changes does not update the online offer in Candidate Gateway. Instead, you must unpost the offer and then repost it.
Offer Letters
Talent Acquisition Manager uses Oracle Business Intelligence Publisher (BI Publisher) to generate recruitment letters, including offer letters.
When you enter job offer information, you choose a template to use for the offer letter. After the offer is submitted (and, if necessary, approved), you can then generate the letter manually on the Disposition Details: Offer page. If you do not generate a letter manually, then the system adds the letter to the queue for the HRS Letter Generation process (HRSLETTR). This process generates all queued letters in batch.
The links that you use to generate a letter from the job offer are not available when the offer is in an editable state, even if the offer has been submitted and approved. If you edit an offer, you must resubmit it before generating the letter. Submitting makes the offer fields read-only, thus activating the links for generating the letter. This behavior ensures that any changes to the offer are saved before the letter is generated, so the letter always brings in the most current offer amounts.
To generate a letter from the job offer, use these links:
Generate Letter
Click this link to generate an offer letter based on the selected template. The letter opens in a new window where you can review and optionally update it. If you make changes, save the modified letter to your local disk so that you can upload the revised version.
When you generate the letter, the system enters the current date in the Date Printed field, generates a contact note for the applicant, and removes the letter from the HRS Letter Generation process queue.
Note. The system does not create notes for offer letters that are generated in batch.
Email Applicant
Click this link to access the Send Correspondence page. If you manually generated an offer letter, then the Send Correspondence page includes the offer letter as an attachment to the email. You can manually remove it from the Attachment grid. When you send the correspondence, the system generates a contact note for the applicant; the contact note includes any attachments that were in the email.
Upload Letter
Click this link to upload a letter file from a local disk. Typically, you are uploading a modified copy of the letter that you created by clicking the Generate Letter link.
When you upload a letter, the system creates a contact note for the applicant. The contact note includes the offer letter attachment.
Components of Pay
The offer must include compensation information. This takes the form of one or more components of pay such as base salary, bonuses, car and meal allowances, and so forth. When you enter components of pay, you select from components that you set up in the Offer Component Type and Offer Component pages.
See Setting Up Job Offer Components.
Offer Statuses
Offer statuses are one of the six types of statuses that you configure when you set up recruiting statuses. The status change effects that are defined for the system will automatically update the offer status as appropriate, but you can also manually set the offer status except during the approval process.
When you create a new job offer, the system assigns the initial offer status. If approval processing is active, the initial status is Pending Approval. Once all approvals are complete, the status is Extend.
If approval processing is not active, the initial status is Extend.
If you use the Save for Later button to save your work without submitting the job offer, the system sets the status to Draft.
PrerequisitesBefore you prepare a job offer, you must:
Set up the offer component type on the Offer Component Type page.
Set up the offer component on the Offer Component page.
Set up any organization-level attachments.
(Optional) Activate job offer approvals on the Recruiting Installation - General page.
Pages Used to Prepare Job Offers|
Page Name |
Definition Name |
Navigation |
Usage |
|
HRS_REC_SCHAPP |
Recruiting, Find Applicant |
Search for and select applicants. |
|
|
HRS_APP_RCMNT |
Select Prepare Job Offer in the Take Action field in the Search Results group box on the Find Applicants page. |
Create a job offer. |
|
|
HRS_OFF_SELATC_SEC |
In the Attachments section of the Prepare Job Offer page, select Organizational Level Document in the Source field and then click the Add Attachment link. |
Select items from your organization's library of existing attachments, and attach them to the job offer. |
|
|
HRS_OFFER_SEND_SEC |
Click the Post button on the Prepare Job Offer page. |
Post a job offer to Candidate Gateway. |
Creating a Job Offer
Access the Prepare Job Offer page (on the Find Applicants page, select Prepare Job Offer in the Take Action field in the Search Results group box).
|
Print Job Opening |
Click to access the Select Job Openings page, where you configure and generate a printed version of the job opening data. |
Offer Details
|
Job Opening |
Displays the job opening ID and posting title. |
|
Business Unit |
Displays the business unit that is associated with the job opening. |
|
Position Number |
This field appears only if the system is configured for full or partial position management. Under full position management, a position number is required. Under partial position management, it is optional. Initially, this field displays the position number, if any, that is associated with the job opening. If the job opening is associated with multiple positions, you can select any of the associated positions. If the offer is not associated with a job opening, or if it is associated with a continuous job opening that doesn't have position data, you can manually enter a value (and must do so under full position management). |
|
This field appears if the Optional Works Council option is selected on the Recruiting Installation - General page. The system automatically displays the works council ID associated with the job opening. If there is no job opening associated with the job offer you can enter one. |
|
|
Job Code |
Initially, this field displays the job code that is associated with the job opening. If the job opening is associated with multiple jobs, you can select any one of the associated job codes. If the offer includes a position number (required under full position management), the system enters the associated job code. If the offer is not associated with a job opening, then you must manually enter either a job code or position number. If the job opening is a continuous job opening without job code data, then the job code is optional. However, a job code will be required before you can prepare the applicant for hire. |
|
Offer Date |
Enter the date the offer is effective. |
|
Commencement Date |
Enter the date that the applicant is to report for work. Although you can submit a job offer and generate an offer letter without entering a date, a valid job offer should include a commencement date. |
|
Offer Expiration Date |
This field appears only if the system is configured to allow online job offers for this job opening's regulatory region. The field initially displays a default expiration date that is derived from the system-level default number of days that a job offer remains active (as configured on the Recruiting Installation - Applicants page). You can override the default date. The applicant's offer page in Candidate Gateway immediately reflects any changes that you make after the offer is posted. |
|
Hiring Manager |
Displays the primary hiring manager for the job opening. |
|
Recruiter |
Displays the primary recruiter for the job opening. |
|
Created By |
Displays the originator of the job opening. |
Applicant
This section appears only if the system is configured to allow online job offers for this job opening's regulatory region.
|
Applicant Type |
Displays Employee, External Applicant, or Non-Employee. Non-employees are applicants who, although not current employees, already have data in the PeopleSoft HCM system. |
|
Registered |
If the applicant type is External Applicant or Non-Employee, this check box is selected if the applicant is a registered user of Candidate Gateway. Only registered applicants can see online job offers. Employees do not need to register to use Candidate Gateway, and therefore this check box is not selected if the applicant type is Employee. |
|
Preferred Contact and Notify |
The Preferred Contact field displays the preferred contact method as established in the applicant's profile. If the preferred contact method is Email, the Notify check box is selected and the system automatically sends an email notification when the job offer is posted. If the preferred contact method is anything else, the Notify check box is initially not selected, and you must manually select this check box before posting an online job offer. (If the applicant does not have an email address on file, the system cannot send a notification, and the Notify check box is read-only.) Note. The setting for the Notify check box does not get saved. Each time you access this page, the check box setting gets set based on the applicant's preferred contact method. |
Status
|
Status |
Job offer statuses are configured in the Statuses and Reasons page. Oracle delivers a complete set of statuses and recommends that you use these delivered values. Although you can manually select an offer status (except during approval processing), generally you can let the system set the value based on the actions you perform. For example, if you use the delivered statuses and you require approval for job offers, the default value for a new offer is Pending Approval. If offer approval is not required, the default value is Extend. The delivered offer statuses are:
|
|
Reason |
If your organization has set up reasons for a particular status, you can select a reason for putting the offer in a status. For example, reasons for the Offer Rejected status might include Salary, Benefits, or Personal. When a job offer's status code changes, the presence of identical reason codes causes the system to bring in a default reason code for the new status. For example, suppose the Draft and Pending statuses both have a reason code 100. The descriptions might be different, but the code itself is the same for both. If an offer in Draft status has reason code 100, then when it goes into Pending status, the system assigns the Pending reason code 100. If the Pending status doesn't have a reason code 100, then when the offer goes into Pending status, the Reason Code field will display Invalid Value. |
Offer Letter
Use this group box to create an offer letter.
See Sending Correspondence and Recruitment Letters.
|
Letter |
Select a letter to send to the applicant. Talent Acquisition Manager delivers two templates: HRS_OFF_LETTER_OF1 and HRS_OFF_LETTER_OF2. |
|
Date Printed |
Displays the date that you printed the offer letter. The system populates the field when you click the Generate Letter link or when the offer letter is generated by the HRS Letter Generation process . |
|
Generate Letter |
This link is available only if the offer status equals Extend, the offer has been submitted, and a letter has not been generated. Click this link to generate the letter immediately. The system opens the generated letter in a new browser window, where you can print it or save it locally. Once the letter is generated, the Generate Letter link is no longer available and the letter is removed from the HRS Letter Generation process. To make the link available again, clear the date in the Date Printed field. When you generate a letter, the system creates a contact note entry on the Manage Applicant - Contact Notes page. The letter is an attachment to the note. If you subsequently click the Email Applicant link, the system automatically attaches the generated letter to the email. |
|
Email Applicant |
Click this link to display the Send Correspondence page, where you can send the applicant email. If you have generated or uploaded an offer letter, the Attachments grid on the Send Correspondence page includes the offer letter (although you can remove or replace it if you wish). After accessing the Send Correspondence page, enter the email subject and message, then send it to the applicant. When you send the email, the system creates a contact note on the Manage Applicant - Contact Notes page; the email attachments are saved as note attachments. |
|
Upload Letter |
Click this link to upload a saved letter as an attachment. Most commonly, you use this link to upload a modified version of the original generated letter. However, it is not necessary to generate a letter before uploading one. Uploading a letter does not remove the original generated letter from the attachments grid, but you can remove the original letter manually if necessary. When you upload a letter, the system creates a contact note entry on the Manage Applicant - Contact Notes page. The letter is an attachment to the note. If you subsequently click the Email Applicant link, the system automatically attaches the modified letter (rather than the original) to the email. |
Recommended Salary Range
Expand this section, which is initially collapsed, to see the salary range associated with the job opening.
Job Offer Components
The compensation package for an offer is made up of one or more job offer components. Every offer must include at least one offer component.
|
Component |
Select an offer component. |
|
Offer Amount |
Enter an amount. The system warns you if the amount is above or below the recommended salary range. |
|
Currency |
Select the currency. The currency defaults to currency associated with the component. |
|
Frequency |
Select a pay frequency. The frequency defaults to the frequency associated with the component. |
Attachments
This section appears only if the system is configured to allow online job offers for this job opening's regulatory region. Use this section to manage the three kinds of job offer attachments: file attachments, links, and notes. If you post a job offer on Candidate Gateway, the applicant will see all of the attachments that you include here.
|
Job Offer Documents |
The grid under this tab shows the file attachments for the job offer. The systems creates rows for any offer letters that you generate or upload on this page. Offer letters that the HRS Letter Generation process creates do not get added to the grid. In the grid, the editable Document Description column and the non-editable Attached File column display identifying information for the document. The default description for offer letters is Offer Letter. |
|
Related Links |
The grid under this tab shows links that you attach to this job offer. Links are always organizational-level attachments. In the grid, the editable Link Description column and the non-editable URL column display identifying information for the link. |
|
Notes |
The grid under this tab shows notes that you attach to this job offer. Notes are always organizational-level attachments. In the grid, the editable Note Description column displays identifying information for the note. |
|
Action Required |
Select this check box for any job offer documents or links that the applicant must complete and return if the offer is accepted. In Candidate Gateway, an icon appears next to these documents, along with instructions to review the marked documents. This check box does not appear in the Notes grid. |
|
|
Click this icon to display the job offer documents or related links in a new browser window, or to display notes in the Job Offer Attachment Notes page. |
|
|
You can delete rows from the attachment grids only when the offer is editable. When you access an existing offer, you must click the Edit Offer button to make the Delete icon appear in the attachment grids. |
|
Source |
Select the type of attachment to add to the job offer:
|
|
Add Attachment |
If the source is Applicant Specific Document, clicking the Add Attachment link displays a Choose File dialog box, where you select a local file to upload. If the source is Organizational Level Document, clicking the Add Attachment link displays the Organizational Level Document page, where you can select existing attachments to add to the offer, or you can add ad hoc attachments to placeholders known as document definitions. The attachments and document definitions that appear on the Organizational Level Document page are context-dependent. For example, if an attachment is valid only for a particular business unit, then it is available only for job offers in that business unit. |
Comments
Enter any comments that help explain the reasons behind the job offer details. Offer comments are only visible on the Prepare Job Offer page.
Action Buttons
|
Save for Later |
Saves the job offer and sets the status to Draft. |
|
Submit |
Saves the job offer and sets the status to Pending Approval if approval is required or sets the status to Extend if approval is not required. If approval is required, the page refreshes with a new title, Disposition Detail, the approval path, and links for Offer Details and Approvals. If the offer that you are submitting brings the total number of offers and hires over the number of target openings for a standard requisition, the system displays a warning. You can submit the offer anyway, but doing so can cause problems. The best practice is to promptly record rejected and withdrawn offers to avoid having too many offers active at once. See Approving Job Offers. |
|
Post |
This button appears only if the system is configured to allow online job offers for this job opening's regulatory region. Click this button to access the Post Online Job Offer page, where you complete the process of posting the job offer to Candidate Gateway. If the applicant is an external applicant who has not registered in Candidate Gateway, you will not be able to post the offer. |
|
Add Revised Offer |
This button is available if the offer has a status of Rejected. Click this button to add new job offer when the previous offer was rejected. |
|
Unpost |
This button appears only if the system is configured to allow online job offers for this job opening's regulatory region and the applicant is a registered Candidate Gateway user. Click this button to remove a posted offer from Candidate Gateway. You might unpost job offers if they have been withdrawn or modified. |
|
Delete Offer |
Users with Recruiting Administrator privileges on the Recruiting Row Level Security page can click this button to delete the offer. If the job offer has been posted to Candidate Gateway, deleting the offer also removes the posted offer. |
|
Cancel and Return to Previous Page |
Click the Cancel button to reverse any unsaved changes on the page without leaving the page. Click he Return to Previous Page link to reverse any unsaved changes and return to the page from which you accessed the job offer. |
|
Edit Offer |
When you initially access this page for an existing offer (in which case the name is Disposition Details: Offer), the offer is not editable. Click this button to make the fields on the page editable. When you modify a job offer, saving the changes does not update any online offer that has been posted to Candidate Gateway. Instead, you must unpost the offer and then repost it. If the posted offer has already been accepted, you will not be able to make material changes to the offer, but you can add additional attachments and add them to the online offer. |
Disposition History
This grid displays the applicant's status change history for routings, interviews, and offers. These three recruiting areas have their own sets of statuses, separate from the applicant's overall disposition. For example, the delivered statuses for offers are the values that you select in the Status field on this page.
The first column in the grid displays the status type: Route, Interview, or Offer. Clicking the link changes the page to the Disposition Details page for the indicated recruiting area.
See Reviewing Disposition Details.
Attaching Organizational Level Documents
Access the Organizational Level Documents page (in the Attachments section of the Prepare Job Offer page, select Organizational Level Document in the Source field and then click the Add Attachment link).
Job Offer Attachment Choices
This grid lists the organizational attachments and URLs that are valid for the job opening. For example, certain attachments might be valid for some business units but not others.
|
Select and Attach Selected Documents |
Select one or more documents that you want to attach to the job offer, then click the Attach Selected Documents button. The documents are attached to the job offer immediately, but you remain on the current page until you click the OK button to return to the Prepare Job Offer page. Note. The page does not indicate which attachments, if any, you have already attached to the document. If you accidentally add the same document multiple times, you can delete it from the job offer when you return to the Prepare Job Offer page. |
Job Offer Document Definition Attachment Choices
This grid lists placeholders for specific types of documents that you can add to the offer.
|
Attach Document Definition |
Select one of the document types that appear in the grid, then click the Attach Document Definition button to access the Existing Document Definitions page, where you can either select and attach preexisting attachments of this type or you can create a new one. Different types of documents support different combinations of attachment type (file attachment, URL, and note). When you attach a document from the Existing Document Definitions page, the system attaches the document immediately. |
Posting Job Offers to Candidate Gateway
Access the Post Online Job Offer page (click the Post button on the Prepare Job Offer page).
Review the offer details on this page, then click the Submit button to post the offer.
When the offer is posted, the system generates a notification that appears on the applicant's Candidate Gateway Welcome page, sends an email to notify the applicant of the job offer, and creates a contact note.
You cannot post online job offers for applicants who have not provided an email address.
Approving Job Offers
This section provides an overview of job offer approvals, lists prerequisites, and discusses how to:
View pending approvals.
Approve job offers.
Add another approver or reviewer.
See Also
Setting Up and Working with Approvals
Understanding Job Offer Approvals
This overview discusses the job offer approval process.
Approval Process Activation
To use the approval process for job offers, select the Job Offers check box in the Approvals Required group box on the Recruiting Installation - General page.
If your organization requires works council approval when the offer is for a job that is associated with a works council, also select the Optional Works Council check box in the Approvals Required group box on the Recruiting Installation - General page.
Approval Statuses
This section refers to specific offer statuses that are applied during approval processing. These references assume that you are using the delivered status configuration for offers.
If you have changed this configuration, the system uses the statuses that you have defined for each stage of the approval process.
Approver Actions
Each approver can take action on the request on the Disposition Details: Offer page, which they can access by using the link in the email notification that they receive or through the Pending Approvals component. Approvers can also add additional approvers or reviewers to an individual job offer by clicking on the Insert Approver icon on the Manage Applicants - Disposition Details page and entering information for the additional approver or reviewer on the Insert additional approver or reviewer page.
Approvers have the option of either:
Approving the job offer.
Denying the job offer.
The system sets the job offer status to Denied, stops the progress of the job offer, and notifies the hiring manager.
Pushing back the job offer.
The system notifies the previous approver that the job offer has been pushed back and needs his or her attention.
Note. The first approver cannot push back the job offer.
Approvers in the Delivered Approval Process
PeopleSoft software delivers a default approval process for job offers. This process includes up to three approvers:
The first approver is the primary hiring manager's supervisor.
To identify the supervisor of the hiring manager, the system uses the Target Information page.
If the job offer is not associated with a job opening, you can specify a hiring manager on the Prepare Job Offer page when you create the job offer. If there is no hiring manager, then the first approval step is skipped. If the primary hiring manager's supervisor is inactive, the first approver is the supervisor of the inactive employee.
The second approver is the recruiter or recruiters entered on the Job Opening or Prepare Job Offer page.
When multiple recruiters are specified, only one recruiter must approve the job offer.
If the job offer is not associated with a job opening, you can enter the recruiter on the Prepare Job Offer page when you create the job offer. If you do not specify a recruiter, the system routes the approval request to the recruiting solutions approval administrator.
If works council approvals are activated on the Recruiting Installations - General page, and if the job opening is associated with a works council ID, then the works council spokesperson is the third and final approver.
The works council spokesperson is specified in the Spokesperson field on the Works Council Table page.
See Setting Up Works Councils.
If there isn't a works council ID tied to the job offer, or if there is no one entered in theSpokesperson field, the system skips this approval step.
Note. You can modify this delivered approval process to fit your organization's business needs.
Approval Processing
When offer approvals are active, submitting an offer sets the job offer status to Pending Approval. At this point, the Disposition Details: Offer page includes an Approvals link that users can click to see the entire approval chain.
If any approver denies the offer, then the offer status changes to Denied. Otherwise, the offer remains in Pending Approval status until all approvals are complete, at which point the offer status changes to Extend.
Changes to the offer status can also trigger changes to other statuses. If you use the delivered status change effects, when the offer status changes to Extend, the applicant's disposition changes to Offer.
The following diagram illustrates the delivered approval process, which includes three approvers when works council approval is needed and two approvers otherwise. As shown in the diagram, the process starts when the system sends the first approver a notification at the time the offer is submitted. As each approver approves the offer, the system sends notifications to the next approver.
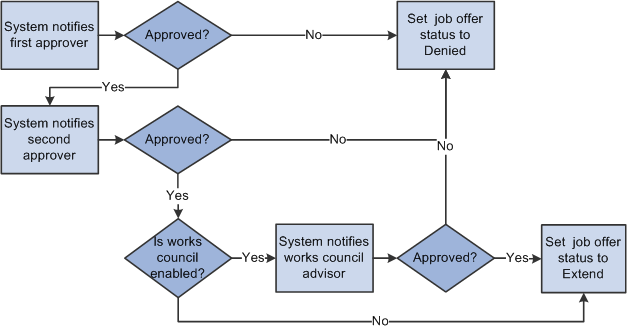
Delivered job offer approval process with three approvers.
Job Offer Changes
During the approval process, an approver can change information on the job offer itself. If certain fields are changed that might require the job offer to be evaluated again, a trigger is created and the system sends a notification back to the first approver to start the approval process over. The fields that can cause a trigger to occur are:
Offer Component
Offer Amount
Offer Currency
Offer Frequency
Approval Delegation
If you enable delegation for job offer approval, approvers can delegate approval authority to proxies for specified amounts of time. The system gives the proxy access to the Pending Approvals component, which displays the job openings for which approval has been delegated.
See Also
Understanding Approval Delegation in Talent Acquisition Manager
Prerequisites
To use the works council step in the job offer approval process, you must:
Set up works council IDs.
Select the Optional Works Council option on the Recruiting Installation - General page.
See Defining General Settings for Templates, Approvals, and Integrations.
Add the Works Council Information section to job opening templates.
Add a works council ID to job opening or job offer.
See Entering Basic Job Information.
See Creating a Job Offer.
Pages Used to Approve Job Offers|
Page Name |
Definition Name |
Navigation |
Usage |
|
HRS_RECRUIT_CONSOL |
Recruiting, Pending Approvals, Pending Approvals |
View pending approvals and approve job offers. |
|
|
HRS_APP_RCMNT |
Click the subject link on the Pending Approvals page. |
Approve, deny, or push back a job offer. |
|
|
NA |
|
Add approvers or reviewers to the approval process. |
Viewing and Approving Pending Approvals
Access the Pending Approvals page (Recruiting, Pending Approvals, Pending Approvals).
Select the check box next to approval that you wish to approve or deny. Select either Approve or Deny from the Select box and click Go.
Approving Job Offers
Access the Manage Applicant - Disposition Details page (click the subject link for a job offer approval on the Pending Approvals page).
On the Manage Applicant - Disposition Details page, click the Approvals link to display approval information.
Note. The Approvals link appears on the Disposition Details: Offer page only after the offer is submitted for approval.
Job Offer: <Approval Status>
This group box displays a graphical representation of the approval process. There is a box for each approver. The box title shows the approver's status, while the box contents include the approver's name, the approver's role in the approval process (for example, the hiring manager's supervisor), and the date, if any, when the approver took action on the approval request.
Additional graphical elements in this group box include color-coding the approver boxes according to the approver's status, and status icons next to the approver's user ID.
|
<approver User ID> |
Click the approver's user ID to display additional information about the approver. |
|
|
Click to add another approver or reviewer. A secondary page appears, where you select a user ID and indicate whether you are adding an Approver or Reviewer. |
|
Submit |
Click to save any changes to the job offer. |
Approval Controls for Assigned Approvers
The following buttons are visible only to the current approver.
|
Approve |
Click to approve the job offer. When final approval is reached the system changes the job offer status from Pending Approval to Extend. |
|
Pushback |
This is available only to approvers other than the first approver. Click to send a notification to the previous approver telling them the job offer needs to be changed. |
|
Deny |
Click to reject the job offer and set the job offer status to Denied. |
Approval Control for Administrators
|
Status |
When an administrator views the approval chain, the buttons that the assigned approvers use are not visible. Instead, there is a Status drop-down list box that the approver can use to override the approval process. The administrator can select either Extend or Denied. The override takes effect when the administrator submits the job offer. After an administrator overrides the approval process, the approval process status is Terminated, regardless of whether the administrator approved or denied the job opening. |
Adding Another Approver or Reviewer
Access the Insert additional approver or reviewer page (click the Insert Approver icon on the Job Opening - Job Approvals page or the Manage Applicant - Disposition Details page).
See Adding Another Approver or Reviewer.
Editing or Deleting Job Offers
This section discusses how to edit or delete job offers.
Pages Used to Edit or Delete Job Offers|
Page Name |
Definition Name |
Navigation |
Usage |
|
Find Applicants |
HRS_REC_SCHAPP |
Recruiting, Find Applicants, Find Applicants |
Search for and select applicants. |
|
HRS_APP_RCMNT |
For an applicant with the disposition Offer, click the disposition link next to the applicant name in the Results group box on the Find Applicants page. |
Edit or delete the job offer. Note. User must first click the Edit Offer button to edit the offer. |
Editing or Deleting Job Offers
Access the Disposition Details: Offer page (For an applicant with the disposition Offer, click the disposition link next to the applicant name in the Results group box on the Find Applicants page).
The information that appears is the same as when you created the job offer. Update any relevant details of the job offer.
See Creating Job Offers.
Note. If the job offer has been posted to Candidate Gateway, you must unpost it before editing or deleting it.