 Understanding the Screening Process
This chapter provides an overview of the screening, process, lists prerequisites, and discusses how to:
Evaluate answers to open-ended screening questions.
(USF) Run the priority placement process
Review and rate applicants
Run screening levels and apply results.
(USF) Rank applicants and generate the certificate of eligibles
Route applicants.
Understanding the Screening ProcessScreening is the process used by recruiters to evaluate a list of potential candidates and narrow the list to a few qualified applicants.
Process Overview
The basic screening process involves these steps:
Review and rate applicants.
Review the list of applicants.
Review applicant competency and accomplishment ratings, and add ratings where they don't yet exist.
An applicant who is not rated does not meet the screening criteria.
Note. If you use open-ended questions during the screening process, you must also ensure that applicants' answers have been evaluated. Although the evaluation process takes place outside of the screening pages and therefore is not included in this list, it is a necessary prerequisite for optimum screening results, similar to adding ratings for competencies.
Run and apply screening levels:
Review the screening levels for the job
You can review both the overall list of screening levels and the detailed screening criteria and processing rules for individual screening levels. You can optionally update the screening level details.
Run the screening levels.
This process applies the screening level settings to specific applicants to produce a pass/fail result and an overall score. You can change screening criteria and rerun the screening levels as many times as you like before continuing to the next step.
Review and apply the results.
Review the pass/fail results, the overall score, and detailed information about how the score was figured. When you are satisfied with the results, applying them updates applicant dispositions according to the screening level rules.
The following diagram illustrates these steps:
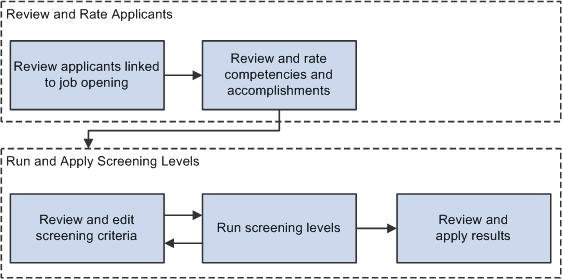
Basic process flow for applicant screening
At the conclusion of this process, you are ready to continue to the routing process, where you can seek an opinion from any person in the system regarding suggested future actions.
(USF) Extended Process for Federal Users
The screening process for U.S. federal government jobs involves some additional steps:
At the beginning of the process, you run the RS - Priority Placement (HRS_PRI_PLCM) Application Engine process to automatically add priority placement applicants to the job opening.
The RS - Priority Placement process adds applicants with a priority placement code and salary grade and level that match the job opening. The priority placement code by itself is not sufficient.
After you finish running screening levels and applying results, you rank applicants and generate the Certificate of Eligibles.
To accomplish this, you need to:
Assign competitive/non-competitive statuses to applicants.
Applicants without a competitive/non-competitive status are excluded from the ranking process.
Rank applicants according to their cumulative screening scores, augmented by preference items.
Generate a Certificate of Eligibles listing the ranked applicants.
The following diagram shows the additional steps in the U.S. federal screening process:
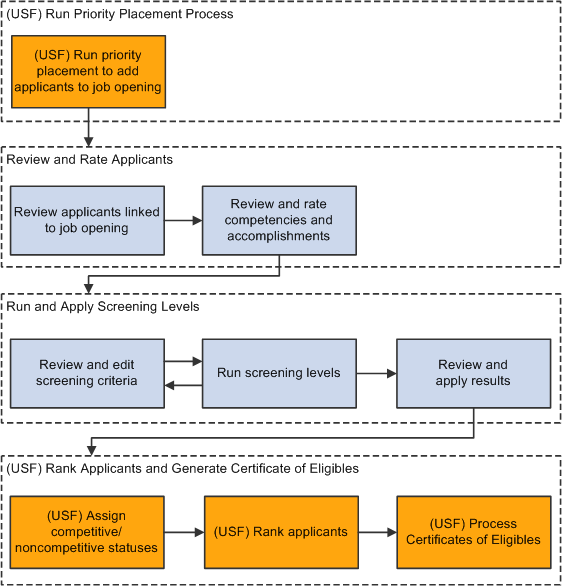
Additional steps for U.S. federal screening processes
PrerequisitesThere are two types of prerequisites for screening processing.
First, there are implementation tasks, during which you create reusable definitions that are referenced in individual job openings and applications.
Screening-related implementation tasks include:
(USF) Defining veteran preference codes.
(USF) Defining priority placement codes.
Creating screening level definitions.
Creating screening templates and linking them to recruitment templates.
Then, at runtime, you need to add job-specific screening criteria to each screening level that will be used.
This process involves selecting specific qualifications, questions, and job attributes to look at when assessing applicants. When you define screening criteria for a job opening, you can also review and override default settings from screening level definitions.
See Also
Setting Up Screening Processes
Setting Up Recruiting Templates
Defining Screening Level Rules and Criteria
Evaluating Answers to Open-Ended Screening QuestionsThis section provides an overview of open-ended question evaluations and discusses how to:
Review questions to evaluate.
Assign scores to answers.
 Understanding Open-Ended Question Evaluations
When you associate an open-ended question with a job opening, you also assign evaluators for the question.
When the system receives an application with answers to open-ended questions, it sends notifications to the assigned evaluators, advising them of the need to assess the answers. Only the assigned evaluators can award an applicant points for the answer.
Unevaluated answers do not receive any points during screening. When reviewing screening results, you can review an applicant's questionnaire to ascertain whether there are unevaluated open-ended questions that affected screening results.
Note. If your organization uses PeopleSoft HCM Portal Pack, recruiters can also use the Recruiter Alerts pagelet and the Unevaluated Answers page to send reminder notifications to evaluators.
See Also
Viewing Recruiter Alerts for Talent Acquisition Manager
Pages Used to Evaluate Open-Ended Questions|
Page Name |
Definition Name |
Navigation |
Usage |
|
HRS_EVAL_ANS_LST |
Self-Service, Recruiting Activities, Evaluate Open Ended Questions, Evaluate Open Ended Questions |
Review a list of open-ended questions whose answers you have been assigned to evaluate. |
|
|
HRS_EVAL_ANS_SEC |
Click the Reference Number link in the Answers to be Evaluated grid on the Evaluate Open Ended Questions page. |
Assign scores to answers for open-ended questions. |
Reviewing Questions to EvaluateAccess the Evaluate Open Ended Questions page (Self-Service, Recruiting Activities, Evaluate Open Ended Questions, Evaluate Open Ended Questions).
The Answers to Be Evaluated grid includes a row for each answer that the user has been assigned to evaluate. Once the evaluator has submitted an evaluation, the row disappears from the grid.
|
Reference Number |
The system identifies answers to be evaluated using a reference number rather than providing identifying information for the applicant or job opening. This helps ensure non-biased evaluations. Click the reference number to access the Evaluate OE Answers page, where the evaluator assigns points to the answer. |
|
Points Given |
If an evaluator has saved points but not yet submitted them, the point value appears in this column. The column is empty for questions where the evaluator has not saved a point value. |
|
Evaluated |
Displays a deselected check box to indicate that the evaluation is not complete. |
|
Recruiter |
Displays the primary recruiter, if any, for the job opening with which the question is associated. |
Assigning Scores to AnswersAccess the Evaluate OE Answers page (click the Reference Number link in the Answers to be Evaluated grid on the Evaluate Open Ended Questions page).
|
Question and Applicant Answer |
Displays the full text of the question along with the applicant's answer to provide context for the evaluator's assessment. |
|
Maximum Points |
Displays the maximum points that the evaluator can award the applicant for this answer. |
|
Enter Evaluation Points |
Enter the number of points to be awarded to the applicant for this answer. Refer to the Maximum Points for the question to determine the rating scale for points. |
|
Save, Submit, and Cancel |
Click Save to save the evaluation points without submitting the evaluation. Return to the page later to submit a final evaluation. Click Submit to submit evaluation points. Once you submit an evaluation, the answer no longer appears in the Answers to Be Evaluated grid on the Evaluate Open Ended Questions page. Click Cancel to return to the Evaluate Open Ended Questions page without saving changes. |
(USF) Running the Priority Placement ProcessThis section provides an overview of the priority placement process and discusses how to:
Run the priority placement process for one or many jobs openings.
Run the priority placement process from the context of a specific job opening.
Understanding the Priority Placement ProcessApplicants with priority placement are entitled to automatic consideration for job openings that meet certain criteria, even if the applicant hasn't specifically applied for the job opening. Use the RS - Priority Placement (HRS_PRI_PLCM) Application Engine process to identify those applicants and link them to job openings that have the same priority placement code.
The Priority Placement process identifies priority placement applicants that have the same Pay Plan and Occupational Series as the job opening that is being processed. It also ensures that the applicant's Salary Grade is equal to or greater than the grade specified on the job opening. The process then compares those applicants with active job openings that have that priority place code.
When an applicant has two priority placement codes for a particular job, and only one priority placement code method can be considered for that job series, the process determines which code to use by looking at the recruiting type (Internal, Merit Promotion, or Open Competition) that was defined on the job opening.
The Priority Placement process links applicants to job openings with an initial disposition of Applied. Once linked to the job opening, the applicant goes through the same screening process as other applicants.
Note. Run the Priority Placement process after the closing date of the job posting and before running other screening processes.
Pages Used to Run the Priority Placement Process|
Page Name |
Definition Name |
Navigation |
Usage |
|
HRS_RUN_PR_PL |
Recruiting, Administration, Process Priority Placement, Process Priority Placement |
Run the RS-Priority Placement process on one job opening or all open job openings. |
|
|
HRS_JO_SCR_LIST |
Recruiting, Find Job Openings, Find Job Openings Click the job opening link in the Search Results group box on the Find Job Openings page. Click the Screen Applicants link on the Job Opening page: Manage Applicants tab. |
Run the priority placement process for the job opening from which you accessed this page. |
Running the Priority Placement Process for One or Many Job Openings
Access the Process Priority Placement page (Recruiting, Administration, Process Priority Placement, Process Priority Placement).
|
All Open Job Openings |
Select this check box to run the RS - Priority Placement process on all job openings with an Open status. If you select this check box, the Job Opening ID field is unavailable. |
|
Job Opening ID |
If you do not select the All Open Job Openings check box, enter the ID for a single job opening that you want to process. |
|
Run |
Click to access the Process Scheduler Request page, where you schedule the process. |
Running the Priority Placement Process from the Context of a Specific
Job OpeningAccess the Screen Applicants page (click the Screen Applicants link on the Job Opening page).
See Reviewing Applicants Linked to Job Openings.
To run the Priority Placement (HRS_PRI_PLCM) process:
In the Run field, select Priority Placement.
Click the Go button,
After the process finishes, click the Refresh icon.
To see the progress of the process, click the Process Monitor link to access the Process Monitor page.
If the process identified applicants who are entitled to priority placement for this job opening, their names now appear in the Applicants grid.
Reviewing and Rating ApplicantsThis section provides an overview of applicant ratings and discusses how to:
Review applicants linked to job openings.
Rate applicants.
Understanding Applicant RatingsDuring the screening process, you can review the list of applicants linked to a job opening and, more specifically, see which applicants do not yet have ratings for competencies or other rated qualifications.
The system enables you to rate applicants at any time. For example, if your business process uses a preliminary screening level to filter out applicants who do not meet minimum requirements, then a second screening level that assesses rated qualifications, then it makes sense to rate applicants after running the first screening level so that you can avoid spending time rating applicants who do not meet your minimum qualifications.
Important! When a screening process includes qualifications that use ratings, unrated applicants do not receive any points for those qualifications.
The Rate Applicant page summarizes the applicant data for certain types of job qualifications—those that are implemented through the use of profile content types. The page displays a grid for each content type that is included in the job opening template, regardless of whether the job opening includes any related content items. For example, if the job opening template includes the Degrees content item, then the Rate Applicant page includes a Degrees grid regardless of whether you screen for degrees and regardless of whether the job opening even lists any degrees.
Within each grid, the page lists any specific qualifications that are being used as screening criteria. For example, the Competencies grid lists the specific competencies that are used in screening.
For each qualification, the page shows the related applicant data. This information is presented differently for rated and unrated content types:
For rated content types such as competencies, you see the applicant's rating and its screening point value.
If the rating field is empty, the applicant is unrated, and you should add rating information to the application.
When you access the application from the Rate Applicants page, the Copy Limited Items from Job Openings button enables you to quickly add all of the unrated competencies to the application. You still need to open each competency to enter a rating.
For unrated content types such as degrees, you see the points that the applicant will earn.
If the points field is empty, the applicant does not meet the criteria. This could be because the necessary information was not entered in the application, or it could be because the applicant truly does not have the qualification.
The Rate Applicant page provides direct access to the Application Details page, where you can add any necessary information to the application.
Pages Used to Review and Rate Applicants|
Page Name |
Definition Name |
Navigation |
Usage |
|
HRS_JO_SCR_LIST |
Recruiting, Find Job Openings, Find Job Openings Click the job opening link in the Search Results group box on the Find Job Openings page. Click the Screen Applicants link on the Job Opening page: Manage Applicants tab. |
Review applicants linked to a job opening and perform various tasks related to screening. |
|
|
HRS_RATE_APP |
Click the Rate link on the Applicants group box on the Screen Applicants page. |
Review applicant data that corresponds to the criteria for a specific screening level. |
Reviewing Applicants Linked to Job OpeningsAccess the Screen Applicants page (click the Screen Applicants link on the Job Opening page: Manage Applicants tab).
|
Print Job Opening |
Click to access the Select Job Opening Sections page, where you configure and generate a printed version of the job opening data. |
|
View All Applicants, View Screening Levels and View Screening Results |
Use these links to access the indicates screening pages. The link for the current page is disabled. Note. The View Screening Results link is visible only after a screening level has run successfully and the page has been refreshed. |
|
Run and Go |
The drop-down list box for the Run field lists the screening levels for the job opening. Select the screening level you want to run and click the Go button to begin running it. The system uses the RS-Job Opening Screening (HRS_JO_SCR) Application Engine process to screen applicants using the screening criteria for the selected screening level. To monitor the progress of the screening process, click the Process Monitor link to open the Process Monitor page. It is convenient to be able to see when the process is complete because after the process finishes, you need to refresh the page to make the process results appear. Note. (USF) In U.S. federal implementations, you can also use these fields to run the priority placement process for this job opening. The Run field includes a Priority Placement option that you can select and run. The Priority Placement process identifies applicants who are eligible for any of the job opening's priority placement programs and links them to the job opening. The federal screening process requires you to run the priority placement process before running any screening levels. |
|
|
Click the Refresh icon after a screening level finishes running. Refreshing the page is necessary to make the screening level results appear. |
|
(USF) Rank Applicants |
This button appears only if screening results exist. Click the button to display the Rank Applicants page. See Ranking Applicants. |
Applicants
This grid lists all applicants linked to the job opening.
|
Name and ID |
These fields display identifying information about the applicant. Click the name link to access the Manage Applicant page. |
|
Disposition and Status Date |
These fields display the applicant's disposition for the current job opening and the effective date of that status. After you apply the results of a screening level, the system updates the disposition to either the passing status or the failure status for the screening level. Note. When you run a screening level, the system process only applicants whose dispositions are configured as open statuses associated with either the 1-Review phase, the 2-Applied phase, or no phase at all. This prevents applicants in the later phases of the recruiting process (3-Screen, 4–Route, 5-Interview, 6-Offer, 7-Hire, or 8-Reject) from being processed. |
|
Type |
Displays Employee, External Applicant or Non-Employee. Non-employees are persons of interest who have records in your human resources system but are not employees. |
|
Resume |
Click to open a new window that displays the applicant's resume.
|
|
Application |
Click to access the Application Details page, where you can review or the applicant's application for this job opening. Before you run a screening level, you might need to update the application details with information such as competency ratings that the screening level is configured to evaluate. |
|
Rate |
Click to access the Rate Applicants page, where you can review applicant data for the criteria in each screening level. For example, if the screening level looks for a specific competency and a specific language skill, the Rate Applicant page displays the applicant's ratings for each area. If the applicant is unrated, you need to go to the Application Details page to add the ratings. |
Page Elements for Performing Applicant Actions
In the Applicants grid, the first column is a check box that you select to choose applicants to be included when you use these page elements.
|
Route Applicant |
Click this link to route the selected applicants. See Routing Applicants. |
|
Merge Applicant |
Click this link to access the Review Duplicate Applicants page, where the selected applicants appear as a set of duplicates for you to review and optionally merge. |
Note. When you run a screening level, the system does not limit screening to selected applicants.
Rating ApplicantsAccess the Rate Applicant page (click the Rate link on the Screen Applicants page).
Use this page to review the applicant's ratings for the those job opening qualifications that are included in a screening level.
Important! You cannot use this page to enter applicant ratings, only to review them and, importantly, to see if the ratings are missing. To enter applicant ratings, use the Application Details page, where you must add the content items that are used in screening.
|
|
Click the Application icon to access the Application Details page, where you can enter the missing ratings. |
|
Return to Previous Page |
Click to return to the Screen Applicants - View Applicants page. |
|
Previous Applicant and Next Applicant |
Use these links to scroll through the data for all of the applicants who are listed on the Screen Applicants page. |
Screening Levels
Use the links in the section title bar to scroll through the screening levels for the job opening.
This section contains grids for each content item that is included in the job opening template, regardless of whether the screening level includes any qualifications for that content item. For example, if the job opening template includes the Honors and Awards content item, then an Honors and Awards grid appears, regardless of whether you screen for honors and awards and regardless of whether the job opening even lists any honors or awards.
<Content Item>
The grid titles correspond to the name of each content type.
|
Item and Item Description |
Describes the specific qualification being used by the screening process. |
|
Application |
Click to access the Application Details page, where you can add missing qualifications or ratings. |
|
Rating |
If the content type uses a rating scale, this column displays the applicant's rating. This field is empty for content types that do not have a rating scale. |
|
Points |
Displays the number of points awarded for a qualification. The point value for a qualification comes from the Job Opening Screening Criteria page, where you configured job-specific requirements for a screening level. |
|
Required |
Displays a selected check box if the qualification is marked required on the Job Opening Screening Criteria page. The check box is deselected if the qualification is not required. |
Running Screening Levels and Applying ResultsThis section provides an overview of screening level processing and discusses how to:
Review screening levels.
Review and edit screening criteria.
Run screening levels.
Review and apply screening results.
Review score details for a screening level.
Review questionnaire details.
Apply results.
Understanding Screening Level ProcessingThis overview discusses how you run screening levels and apply the results.
Reviewing and Editing Screening Level Criteria
The applicant screening pages provide access to a detail page where you can review the criteria and processing rules for each screening level. You can also modify screening criteria on this page.
Running Screening Levels
You can run screening levels using the Screen Applicants, Screening Levels, and Screening Results pages. Make sure to run screening levels in the proper order (the order in which they appear on the Screen Applicants page).
Note. You cannot run screening levels for prescreening or online screening. These run automatically when applicants apply online using PeopleSoft Candidate Gateway. If the job opening has these screening levels, the system has already run these levels and applied the results for any applicant who applied online. (These levels are not relevant to applicants who apply using other methods.)
If the general screening settings for the job opening indicate that applicants must pass the previous level (this setting is in the Applicant Screening group box on the Job Opening page), the system filters out applicants who have not passed the previous screening level before performing any actual screening. The system also filters out applicants based on their dispositions. Specifically, the system process only applicants whose dispositions are configured as open statuses associated with either the 1-Review phase, the 2-Applied phase, or no phase at all. This prevents applicants in the later phases of the recruiting process (3-Screen, 4–Route, 5-Interview, 6-Offer, 7-Hire, or 8-Reject) from being processed.
See Defining Statuses and Reasons Codes.
When you run a screening level, the RS-Job Opening Screening (HRS_JO_SCR) Application Engine process uses the settings on the Job Opening Screening Criteria page as it performs the following tasks for each included applicant:
Evaluates whether the applicant has the attributes that you have selected as screening criteria.
Awards the specified number of points for each screening criterion that the applicant meets.
In U.S. federal implementations, the system keeps track of which attributes are marked as Augment or Selective so that the point subtotals for those types of criteria are available to use during the ranking process.
Adds the points earned for individual items to produce a cumulative point total.
This value represents the applicant's raw points for the screening level.
Evaluates whether the applicant passes or fails the screening level.
Applicant can fail a screening level if they have not earned enough points or if they do not meet criteria that was designated as required.
Screening levels can be configured to allow users to manually override the pass/fail status that the system assigns.
Assigns the applicant a final overall score for the screening levels.
Depending on the screening rules, the overall score might be the same as the raw points.
U.S. federal screening processes, however, use other scoring methods such as fixed scores for passing or failing or transmutation to a predetermined maximum based on the proportion of points earned to total available points.
See Defining Screening Level Rules and Criteria.
The following diagram illustrates the process flow for the RS - Job Opening Screening process:
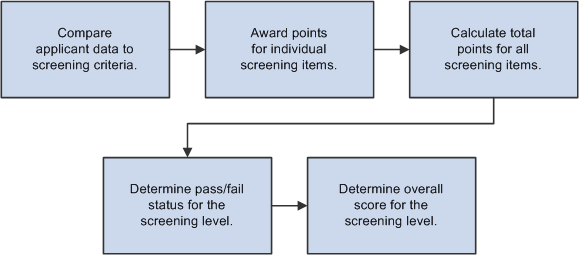
Screening level processing
Reviewing and Applying Screening Results
After the screening levels have been run, review the results on the Screening Results page. If you are satisfied, you can apply those results by clicking Apply Results button.
When you apply results, the system performs these actions:
Updates the applicants' dispositions according to the settings in the screening level definition.
There are separate settings for applicants who pass and who fail the screening level.
Creates rejection letters for applicants who fail the screening level.
This occurs if the screening level criteria identifies a letter to send. Depending on the screening level settings, the letter is either sent as an email attachment or added to the queue for the HRS Letter Generation (HRSLETTER) Application Engine process.
Updates the applicant data to show that the screening results have been applied.
Results are applied for every applicant who has screening results. If an applicant has results for multiple screening levels, the system uses the disposition settings and rejection letter settings from the last screening level.
Once results are applied for an applicant, that applicant is excluded from any subsequent runs of the screening level process. Therefore, after you apply results, the only reason to run additional screening levels is if new applicants have been linked to the job opening.
Note. Even after results are applied, you can continue to screen applicants who are subsequently added to the job opening.
Pages Used to Run and Apply Screening Levels|
Page Name |
Definition Name |
Navigation |
Usage |
|
HRS_JO_SCR_LVL |
Recruiting, Find Job Openings, Find Job Openings Click the job opening link in the Search Results group box on the Find Job Openings page. Click the Screen Applicants link on the Job Opening page: Manage Applicants tab. Click the View Screening Levels link on the Screen Applicants page. |
View screening levels associated with the job opening. |
|
|
HRS_JO_SCR_DTL |
Click a Screen Level Name link on the Screening Levels page. |
Edit the screening criteria. |
|
|
HRS_JO_SCR_RSLT |
Click the View Screening Results link on the Screen Applicants page. |
Review the results of the screening process. You can access this page only after running a screening level. |
|
|
HRS_APP_SCR_RSLT |
Click the value in the Score column on the Screening Results page. |
Review how many total points the applicant earned in the screening level and how many points were awarded for each type of screening criteria. |
|
|
Questionnaire Results page |
HRS_VIEW_QSTN_RSLT |
Click the View Questionnaire Results link on the Screening Details page. |
Review the applicant's answers to the online questionnaire that was completed during the online application process. |
Reviewing Screening LevelsAccess the Screening Levels page (click the View Screening Levels link on the Screen Applicants page).
Job Opening / Jobs
This group box displays information about the job opening. If there are multiple jobs associated with the job opening, you can scroll to see each one.
Screening Levels
|
Screen Level Name |
Identifies the screening level. Click the link to access the Screening Criteria page, where you can review and update the screening configuration. Note. If the screening level is for prescreening or online screening, and if any applicants have already applied, the name is no longer a link because you can no longer modify the criteria from the screening pages. |
|
Last Run Date and Submitted By |
These fields display information about the last time the screening level was processed. |
|
Results Applied |
For screening levels that have run at least once, this field displays Yes or No to indicate whether the screening results have been applied. The field is blank for screening levels that you have not yet run. |
Reviewing and Editing Screening Criteria
Access the Screening Criteria page (click a Screen Level Name link on the Screening Levels page).
This page is the same as the Job Opening Screening Criteria page where the screening level was originally configured.
You can also modify screening criteria on this page. However, to add additional qualifications to the screening criteria, you must first go to the Job Opening page and add the qualification to the job opening itself.
See Defining Screening Level Rules and Criteria.
Running Screening Levels
To run a screening level:
Access the Screen Applicants page, the Screening Levels page, or the Screening Results page.
Select Recruiting, Find Job Openings, Find Job Openings.
Click the job opening link in the Search Results group box on the Find Job Openings page.
Click the Screen Applicants link on the Job Opening page.
Optionally click the links to move to the Screening Levels page or the Screening Results page.
Select the screening level in the Run field
Click the Go button.
See Viewing Applicants Linked to Job Openings
Reviewing and Applying Screening Results
Access the Screening Results page (click the View Screening Results link on the Screen Applicants page).
Note. When multiple job codes are defined on the job opening, the Screening Results group box has multiple scroll levels, allowing each job code to be viewed after processing a given screening level. When a screening level is processed, it runs against all job codes that have screening criteria defined.
|
Run and Go |
Select the screening definition you want to run, and click the Go button to run it. |
|
(USF) Rank Applicants |
Click to access the Rank Applicants page. |
Screening Levels
Use this group box to view information and results for each screening level. Prescreening and online screening levels do not appear here.
|
Screening Level |
Click the screening level name link to access the Screening Criteria page, where you can review and optionally update the screening level configuration. |
|
Apply Results |
Click to apply the most recent screening results. When you apply results, the system updates the applicants' dispositions according to the settings in the screening level definition. If you apply results after running multiple screening levels, the system updates the applicants' dispositions based on the results of the last screening level. If there are multiple job codes associated with the job opening, the system updates the applicants' dispositions using the most advantageous disposition available. |
Applicants: Result Tab
This grid displays the screening results for each applicant linked to the job opening.
|
Score |
Displays the percent of the maximum possible score that the applicant earned. Click the link to access the Screening Details page, where you can see how many points the applicant earned for various types of screening criteria. |
|
Points |
Displays the overall screening points that the applicant earned for the screening level. Depending on the screening level configuration, this could be the raw points that the applicant earned, or it could be a fixed number that is associated with a pass or fail status. |
|
Disposition |
Displays the applicant's current disposition for the job opening. When you apply screening results, the system updates this disposition. |
|
Screening Result |
Indicates whether the applicant passed or failed the screening level. If Manually Assign Status is selected on the Screening Criteria page, then you can change the status. Otherwise, this field is read-only. |
|
Rate |
Click this link to access the Rate Applicant page, where you can review applicant ratings for rated content types. The Rate Applicant page provides links to the Application Details page so that you can add any missing ratings. |
|
Results Applied |
Displays Yes or No to indicate whether you have applied results. After you apply results, you cannot reprocess the same applicants. |
Applicants - Applicant Data Tab
Access the Applicant Data tab.
This grid displays additional information about the applicants for whom screening results exist, including the date the applicant was last screened.
Page Elements for Performing Applicant Actions
On the Result tab in the Applicants grid, the first column is a check box that you select to choose applicants to be included when you use these page elements.
|
Competitive Status and Go |
Use these fields to assign each applicant a competitive status. Select one or more applicants, choose the status to apply, then click the Go button. The available statuses are Competitive, Non-Competitive Other, or Noncompetitive VRA (noncompetitive veterans recruitment appointment). |
|
Route Applicant |
Click this link to route the selected applicants. See Routing Applicants. |
|
Merge Applicant |
Click this link to access the Review Duplicate Applicants page, where the selected applicants appear as a set of duplicates for you to review and optionally merge. |
Note. When you run a screening level, the system does not limit screening to selected applicants.
Reviewing Score Details for a Screening Level
Access the Screening Details page (click the value in the Score column on the Screening Results page).
This page provides the summary information about the points that an applicant earned for a specific screening level.
Screening Level Summary
This section has one row of data for each screening level that you've run for the applicant.
|
Screening Level |
Identifies the screening level whose results you are examining. Scroll to see results for other screening levels. |
|
Screening Points |
Displays the points that the applicant earned for meeting this screening level's criteria. |
|
Level Score |
Displays the applicants overall score for the screening level. For example, if a screening level awards 70 points for passing, this field displays 70. |
|
Screening Status |
Indicates whether the applicant Passed or Failed the screening level. |
|
Status Date |
Displays the most recent date that the applicant was screened with this screening level. |
|
Status Reason |
If the applicant failed the screening level, this field displays an explanation such as Applicant failed minimum screening level percent requirement. |
Level Points Detail
This group box breaks down the sources of the applicant's raw points.
|
General Requirements |
Displays the number of points that the applicant received for meeting General Information screening criteria. |
|
Education/Experience |
Displays the number of points that the applicant received for meeting Education & Experience screening criteria. |
|
JPM Content Score (job profile management content score) |
Displays the number of points that the system awarded to the applicant based on profile content type qualifications such as competencies, languages, and degrees. |
|
Screening Questions |
Display the number of points that the system awarded based on the applicant's responses to screening questions. Note. The system does not award any points for unanswered questions or for open-ended questions that have been answered but not yet evaluated. Click the View Questionnaire Results link to ascertain whether either of these conditions is true and whether you need to send reminders to applicants or evaluators. |
|
View Questionnaire Results |
Click to access the Questionnaire Results page, where you can view the applicant's responses to screening questions. |
(USF) Additional Federal Screening Data
These fields in the Level Points Detail group box appear only in federal systems.
|
(USF) Augmentation Points |
Displays the number of points that the applicant received for screening items that were marked as Augment on the Job Opening Screening Criteria page. These are included in the total point for the screening level. |
|
(USF) Selective Factor Points |
Displays the number of points that the applicant received for screening items that were marked as Selective on the Job Opening Screening Criteria page. These are included in the total point for the screening level. |
|
(USF) Veterans Preference Points |
Displays the number of veterans preference points that the system awards based on the applicant's veterans preference code. These points are not associated with any particular screening level, so although they are displayed in the summary for each screening level, they are not included in the total points for the screening level. They are added to the applicant's cumulative screening score on the Rank Applicants page. |
Reviewing Questionnaire DetailsAccess the Questionnaire Results page (click the View Questionnaire Results link on the Screening Details page).
Review the questions that were included in screening.
For multiple-choice questions, the page shows which answer or answers the applicant chose and how many points those answers are worth.
For open-ended questions, the page shows the applicant's answer and how many points the applicant earned for that answer. If there are no points shown, then no evaluations have been submitted.
Applying ResultsAccess the Screening Results page (click the View Screening Results link on the Screen Applicants page).
See Reviewing and Applying Screening Results.
Once you have reviewed the screening results and are satisfied with them, you can click the Apply Results button to finalize the result and update applicant dispositions accordingly.
Note. Only applicants that have been screened can have results applied.
(USF) Ranking Applicants and Generating the Certificate of EligiblesThis section provides an overview of the federal ranking process and discusses how to:
Assign competitive and noncompetitive statuses.
Rank applicants.
Review cumulative score details.
Generate the Certificate of Eligibles.
Print the Certificate of Eligibles.
Understanding The Federal Ranking ProcessThis overview describes the federal ranking process
Competitive/Noncompetitive Status
All applicants must have a competitive/noncompetitive status in order to be included in the final applicant ranking. Competitive/noncompetitive status is a person's basic eligibility for assignment to a position in the competitive service without having to compete with members of the general public in an open competitive examination.
The available statuses are Competitive, Non-Competitive Other, or Noncompetitive VRA (noncompetitive veterans recruitment appointment).
Assign statuses on the Screening Results page before you access the Rank Applicants page to begin the ranking process. The Rank Applicants page lists only applicants who have been assigned a status.
Applicant Classification
The Rank Applicants page displays a screening score for each applicant. The score is the sum of the applicant's scores for individual screening levels and any veterans preference points.
As you begin the ranking process, you determine the score thresholds that the system uses to classify candidates as qualified, well-qualified, or best-qualified.
The system then considers these qualification classifications along with the applicants's priority processing status and places applicants in these four categories:
Category 1: Qualified, well qualified, and best qualified applicants with Must Select priority placement.
Category 2: Well qualified and best qualified applicants with Must Consider priority placement.
Category 3: Best qualified applicants with no priority placement.
Category 4: Qualified and well qualified applicants with no priority placement.
The screening rules that you configure determine which categories of applicants are included in the final ranking.
There are separate rules for competitive applicants and noncompetitive applicants. So, for example, you might include all four categories for noncompetitive applicants, but only the first three categories of competitive applicants.
Tie-Breakers
If two or more applicants have the same score in the same category, you can apply one of three tie-breaker methods:
Augmenting Factors, which uses criteria identified as Augmenting on the screening criteria.
Name Request, which gives priority to applicants whose name are listed in the Candidate Name Request grid on the job opening.
Random Number, which uses an algorithm based on the number that you entered in the Tie Breaker Number field in the Federal group box in the screening options section of the job opening.
Certificate of Eligibles
After you have ranked the applicants, you are ready to certify the best-qualified applicants for the position. The OPM regulates the definition of eligibles and the order in which they should appear on the certificate. Once you create the certificate, use the Certificate of Eligibles component to print it.
Pages Used to Rank Applicants and Generate the Certificate of Eligibles|
Page Name |
Definition Name |
Navigation |
Usage |
|
HRS_JO_SCR_RSLT |
Recruiting, Find Job Openings, Find Job Openings Click the job opening link in the Search Results group box on the Find Job Openings page. Click the Screen Applicants link on the Job Opening page: Manage Applicants tab. Click the View Screening Results link on the Screen Applicants page. |
Review the results of the screening process. Note. You can access this page only after running a screening level. |
|
|
HRS_JO_RANK |
Click the Rank Applicants button on the Screening Results page. |
Rank applicants. |
|
|
HRS_APP_RNK_RSLT |
Click the value in the Score column on the Rank Applicants page. |
Review how many total points the applicant earned across all screening levels and through preference items, and review a breakdown of this number by screening level and by type of screening criteria. |
|
|
HRS_G_CRT_ELG |
Recruiting, Administration, Certificate of Eligibles, Certificate of Eligibles |
Set up a certificate of eligibles. |
|
|
Certificate of Eligibles |
HRS_RUN_HRS821 |
Recruiting, Reports, Certificate of Eligibles, Certificate of Eligibles |
Print a certificate of eligibles. |
Assigning Competitive and Noncompetitive Statuses
Access the Screening Results page (click the View Screening Results link on the Screen Applicants page).
See Reviewing and Applying Screening Results.
To assign competitive or noncompetitive statuses:
In the Competitive Status field, select the status to assign: Competitive, Non-Competitive VRA, (noncompetitive veterans recruitment appointment) or Non-Competitive Other
Click the check box in the rows for the applicants who are to be assigned the selected status.
Click the Go button next to the Competitive Status field.
The system assigns the statuses, which now appear in the Competitive Status column of the Applicants grid.
Ranking Applicants
Access the Rank Applicants page (click the Rank Applicants button on the Screen Applicants page).
Competitive and Noncompetitive
These grids list the applicants from the job opening; applicants are segregated according to the competitive status that you manually assigned on the screening pages. The Noncompetitive grid includes applicants with either of the two noncompetitive statuses.
|
Rank |
Initially this field is blank. When you qualify the applicants (by entering the thresholds for best qualified and well qualified and then clicking the Qualify Applicants button), the system assigns a ranking to the applicant. This field can be overridden. |
|
Score |
Displays the percent of the maximum points that the applicant attained. The maximum point value is manually entered on the screening section on the Job Opening page; there is no requirement for it to be the true maximum amount of points possible. Click the score to access a detail page that shows a breakdown of how the points were earned, both by screening level and by screening criteria type. |
|
Points |
Displays the total points that the applicant accumulated during the screening process, including veteran's preference points. |
|
Category |
Indicates which of four applicant categories the applicant belongs to. These categories are based on a combination of the applicant's priority placement status for the job opening and the applicant's qualification classification (best qualified, well qualified, or qualified). This column is blank when you begin the ranking process. This is because the qualification classification is not set until you enter score thresholds and click the Qualify Applicant button. After you click the Qualify Applicant button, the system updates the Competitive and Noncompetitive grids with each applicant's qualification determination and category. |
|
Weight |
Displays the weight factor from the applicant's priority placement code. The weight does not affect the score; it is used to prioritize which priority placement code to use when an applicant has more than one. |
|
Name and ID |
These fields identify the applicant. Click the name link to access the Manage Applicant page. |
|
Date |
Displays the date that the applicant was added to the list of competitive or noncompetitive applicants. |
|
Qualifications Determination |
Displays the applicant's qualification level. Before you click the Qualify Applicants button, the value is Eligible/Not Rated. After you click the Qualify Applicants button, the value is Qualified, Well Qualified, or Best Qualified, depending on where the applicant's score falls with regards to the thresholds that you enter in the Best Qualified Score and Well Qualified Score fields. |
Qualify Applicants
Use this group box to set score thresholds for best qualified and well qualified applicants and to assign applicants a qualification status based on these thresholds.
|
Best Qualified Score |
Enter the minimum score an applicant must achieve to be given a Best Qualified determination. |
|
Well Qualified Score |
Enter the minimum score an applicant must achieve to be given a Well Qualified determination. |
|
Qualify Applicants |
Click this button to assign qualification determinations to all applicants. Applicants with scores under the threshold for Well Qualified status are given the status Qualified. |
Create Certificates
This group box is used to process the Certificate of Eligibles.
|
Applicants to Consider |
Enter the number of applicants you want included in the certificate. |
|
Certificate Number |
Enter the number of the certificate. |
|
Create Certificate |
Click to process the certificate of eligibles. |
Tie Breaker
If any of the applicants are tied, use this section to apply a tie breaker method.
|
Tie Breaker Option |
Select one of these tie-breaker methods:
|
|
Apply Tie Breaker |
Click this button to update the applicant rankings based on the selected tie-breaker method. If there are still ties after you apply one tie-breaker method, you can select another method and apply it. |
Reviewing Cumulative Score DetailsAccess the Rank Applicants (details) page (click the value in the Score column on the Rank Applicants page).
This page, like the Screening Details page, shows the sources of the points that were awarded to applicants during the screening process. But whereas the Screening Details page shows details for a single screening level, this page includes a scroll area that you can use to access information for all screening levels. The first record in the scroll level, displays grand totals across all screening level.
Generating the Certificate of EligiblesAccess the Rank Applicants page (click the Rank Applicants button on the Screen Applicants page).
Click the Create Certificates button.
See Ranking Applicants.
Working With the Certificate of Eligibles
Access the Certificate of Eligibles administration page (Recruiting, Administration, Certificate of Eligibles, Certificate of Eligibles).
Printing the Certificate of EligiblesAccess the Certificate of Eligibles report page (Recruiting, Reports, Certificate of Eligibles, Certificate of Eligibles).
Enter the certificate number, then run the report.
Routing Applicants
This section provides an overview of applicant routing and discusses how to:
Route applicants.
Enter a routing recommendation and a final routing decision.
Understanding Applicant RoutingAfter the screening process has helped you evaluate applicants, you are ready to decide what to do next each applicant. Routing refers to both the decision about what do next with the applicant and the act of sending other recruiting users a request to provide input on that decision.
Routing Decisions
The system uses statuses from the Route status area to describe the possible actions you can take for an applicant.
As delivered, the system includes these statuses for the Route status area:
Routed indicates that the applicant has entered the routing phase and that you are seeking recommendations for further applicant processing.
Invite for Interview indicates that you intend to proceed to the next step in the recruiting process by inviting the applicant to interview.
Hold indicates that you do not intend to make a decision yet.
Reject indicates that you are not interested in the applicant.
Withdrawn indicates that the applicant is no longer available for the job opening.
The Route Applicant Action
Route Applicant is one of the predefined actions that Talent Acquisition Manager enables you to perform using the Take Action and Group Action fields that appear on several page.
When you initiate the Route Applicant action, the Route Applicant page appears. Use this page to list the people whose feedback you are requesting. When you submit the routing request, the system sends each recipient a notification with a link to the page where the recipient enters a response.
Routings have their own status, separate from the applicant's disposition. When you create a routing request, you also assign the initial routing status. As delivered, the default routing status is Routed, indicating that you have just begun the decision-making process.
See Actions in the Take Action Field.
Routing Recommendations and Final Decisions
The routing request page includes a Response field for each person to whom you are routing the applicant. This field is where the routing recipients select the routing status that they recommend. When creating a routing request, you leave this field blank for the routing recipient to complete.
The notification that the recipient receives includes a link to the Disposition Details - Route page, which displays the same recipient grid as the Route Applicant page. This is where the routing recipient enters a response.
The Disposition Details - Route page is also where a recruiter reviews the routing recommendations and updates the applicant's overall routing status when a final routing decision has been made.
When an applicant's overall routing status changes, rules for status change effects make related changes to the applicant's disposition.
Note. Only changes to the overall routing status trigger status change effects. The routing recommendations in the Response field do not have any effect on the applicant's disposition.
See Delivered Status Change Effects.
Pages Used to Route Applicants|
Page Name |
Definition Name |
Navigation |
Usage |
|
HRS_GACT_APP_RTE |
Recruiting, Find Applicants, Find Applicants Search for applicants, then in the Search Results grid, select Route Applicant in the Take Action field or the Group Action field. (This action is also available on other pages.) |
Route an applicant to another employee to get a recommendation regarding the next step in the recruiting process. |
|
|
HRS_APP_RCMNT |
|
Users who receive routing requests use this page to enter a response to the request. Others users use this page to review routing information and enter a final routing determination. |
Routing Applicants
Access the Route Applicant - Route Applicant page (on the Find Applicants page, select Route Applicant in the Take Action field or the Group Action field).
Applicants Being Routed
This grid lists the names and IDs of the applicants that you are routing.
Routing Details
|
Overall Routing Status |
Select the initial value for the Route status area. As delivered, the default status in this area is Routed. |
|
Status Date |
Enter the date that the selected routing status is to be applied. The default value is the current date. |
|
Status Reason |
Optionally, select a reason for assigning the selected routing status. Values are available only if the definition of the selected status includes associated reasons. |
Routings
Use this grid to identify the people whose feedback you are requesting.
|
Route Date |
The system enters the current date. |
|
Route To |
Enter the name of the person to whom you are routing the applicant. |
|
Response Due |
Enter a date by which the recipient should respond with a recommendation regarding the applicant. |
|
Response and Response Date |
When routing applicants, leave this field blank. The person who receives the routing completes these fields to enter a routing recommendation, but does so on the Disposition Details - Route page rather than here. |
Action Buttons
|
Click to complete the routing action. The system sends a notification (HRS_APP_RTE) to each person listed in the Routings grid. |
|
|
Cancel |
Click to cancel the routing action and return to the previous page. |
Entering Routing Recommendations and a Final Routing DecisionAccess the Disposition Details - Route page (on the Manage Applicant page: Applicant Activity tab: Current Status section, click the link in the disposition column when the disposition is Route.)
Note. Users who receive a routing request can access this page using the link in the email.
Routing Details
This group box is identical to the Routing Details section of the Route Applicant page.
|
Overall Routing Status |
Update the overall routing status when you decide what step to take next for this applicant. |
|
Response and Response Date |
The routing recipient named in the Route To field enters a recommended overall routing status and the date of the recommendation. The current date is the default response date. The system does not restrict access to these fields, so any user with the ability to update this page can enter a response on behalf of any routing recipient. |
|
|
Use the Add and Delete buttons to change the list of routing recipients. The system does not notify recruiters that you add to the list using these buttons. To ensure that the routing recipients receive the notification, you need to use the Route Applicant action to create an additional routing. |
Disposition History
This grid displays a row for each time the applicant has been routed. The data in the grid matches the data from the routing details for the routing. The text in the Disposition column is a link that you click to see the routing details associated with a specific routing action.
See Also