| Oracle® Enterprise Manager Cloud Control Administrator's Guide 12c Release 1 (12.1.0.2) Part Number E24473-16 |
|
|
PDF · Mobi · ePub |
| Oracle® Enterprise Manager Cloud Control Administrator's Guide 12c Release 1 (12.1.0.2) Part Number E24473-16 |
|
|
PDF · Mobi · ePub |
This chapter provides an overview of patching, and describes how you can patch the Enterprise Manager core components, mainly Oracle Management Service (OMS), Oracle Management Agent (Management Agent), and Oracle Management Repository (Management Repository).
A patch is an entity that contains one more bugs fixes. In order to transform a software product with a defect to a software product without a defect, you must apply patches, this process is called Patching. The patching cycle involves downloading patches, applying patches, and verifying the applied patch to ensure that the bug fixes present in the patch reflect appropriately.
Patching involves migrating from one version of the software product to another, within a particular release, unlike upgrading which involves moving from one release of a product to another newer release of the software product.
Oracle periodically releases the following types of patches to fix the bugs encountered in the core Enterprise Manager components:
Interim Patches are released to fix a bug, or a collection of bugs.
Interim Patches (for Security bug fixes) are released to provide customer specific security fixes.
Diagnostic Patches mainly help diagnose and verify a fix, or a collection of bug fixes.
Bundle Patch Updates are cumulative collection of fixes for a specific product or component.
Patch Set Updates (PSU), are cumulative patch bundles that contain well-tested and proven bug fixes for critical issues. PSUs have limited new content, and do not include any changes that require re-certification.
Security Patch Updates are cumulative collection of security bug fixes.
Patching OMS and Management Repository follows the Manual patching approach that requires you to follow step-by-step instructions to patch a target. This mechanism of patching expects you to meet certain prerequisites, manually validate the patch for applicability and conflicts, and patch only one target at a time.
This section contains the following topics:
OMS patches typically fix one or more OMS errors encountered. These patches can be downloaded from My Oracle Support portal. For information about the critical OMS patches released by Oracle that apply to your environment, see the Patch Recommendation region available on the Patches and Updates tab in My Oracle Support. Alternately, if you know the patch number of the OMS patch that you need to apply, go to the Patch Search region available on the Patches and Updates tab, enter the patch number, and click Search. The OMS patches are applied using the OPatch utility, or the emctl utility. For information on applying the patch see "Applying OMS and Repository Patches"
In Enterprise Manager 12c, OMS patches are available as OMS Core Patches and OMS Plugin Patches, required to patch the core component and plugins respectively. Ensure that you navigate to the correct directory location under <middleware_home> to patch OMS core or OMS plugin:
<middleware_home>
    |_____oms
    |_____plugins
         |_____oracle.sysman.db.oms.plugin_12.1.0.1.0
         |_____oracle.sysman.emas.oms.plugin_12.1.0.1.0
         |_____oracle.sysman.mos.oms.plugin_12.1.0.1.0
For example, to patch OMS core, you must navigate to <middleware_home>/oms and for plugins, navigate to <middleware_home>/plugins.
Enterprise Manager Repository patches typically update PL/SQL procedures, or other SQL content. They are patched using the emctl patching tool.
Note:
The Repository Patches are applied on the OMS targets. For location details of a core, and plugin patch, see "OMS Patches"For information on applying the patch see "Applying OMS and Repository Patches"
To apply OMS or repository patches, follow these steps:
Log into My Oracle Support (https://support.oracle.com) console with the necessary credentials.
Note:
Check the Patch Recommendation region to view the patches recommended for your environment. You can also provide the recommended patch number in the patch search region to download the recommended patch.On the My Oracle Support home page, click Patches and Updates.
Enter the patch number in the Patch Search region, then click Search.
Select the patch, and from the context menu, click Download.
After downloading the zip file, follow the instructions available in the Readme.html or Readme.txt to patch the target.
Note:
Depending on whether it is a core patch or a plugin patch you must log into the host machine, navigate to the directory location, and unzip the patch file.Oracle offers two approaches to apply the Agent patches: automated approach, and the manual approach. Oracle strongly recommends you to use the automated approach because it not only saves time and effort in mass-deploying patches but also reduces human intervention, thereby minimizing the errors involved while patching.
This section contains the following topics:
Management Agent Patches are released to fix one or more errors encountered in the agent targets. In addition to the Management Agent running on OMS, you can patch all the agent targets that report to the OMS running on your host machine.
A GUI based utility called Patches and Updates is used to patch the Agent targets. For information about accessing the tool, see "Accessing Patches and Updates".
In Enterprise Manager 12c, there are separate Agent patches for core components and for plugins. Ensure that you navigate to the correct directory location under <installation_base_directory> to patch Agent core or Agent plugin:
<installation_base_directory>
    |_____core
         |_____12.1.0.1.0
    |_____plugins
    |_____plugins.txt
    |_____plugins.txt.status
    |_____agent_inst
    |_____sbin
    |_____agentimage.properties
For example, to patch Agent core component, you must navigate to <installation_base_directory>/core/ and for plugins, navigate to <installation_base_directory>/plugins.
The Table 23-1 captures the advantages of using Enterprise Manager Cloud Console over My Oracle Support for Automated Patching:
Table 23-1 Advantages of using Enterprise Manager Cloud Console to My Oracle Support
| Enterprise Manager Cloud Control | My Oracle Support |
|---|---|
|
Enterprise Manager Cloud Control enables you to leverage existing Cloud Control Agents to perform configuration data collection without having to install individual configuration managers on each managed target. |
You must install Oracle Configuration Manager 10.3.2 (or higher) or Enterprise Manager Cloud Control for My Oracle Support configuration collection (Enterprise Manager harvester) on each of the managed target for the latest patch recommendations. |
|
Enterprise Manager Cloud console is inherently built with the intelligence to support the entire lifecycle of patching, it allows you to select the recommended patch for your environment, add to a plan, and deploy the patch on the selected targets after validating the patches for applicability and conflicts in your environment. |
MOS only supports adding the recommended patches to a plan, and validating the patch for conflicts. You cannot deploy the patch from MOS. |
|
In Enterprise Manager, once the patches are applied, they will not appear in the recommended patches list for the selected target. |
In MOS this is not an automated process, depending on the data collection by the configuration manager present on the patched targets, the patch recommendation region is automated. |
Automated Patching is a quick-and-easy, reliable, and a GUI-based patching mechanism that is facilitated using Patch Plans, a new concept introduced through the Patches and Updates functionality within the Enterprise Manager Cloud Control console (Cloud Control console).
Automated patching can be performed in the Online mode, and in the Offline mode. In the Online Mode, you can connect to My Oracle Support Web site to download the patches. However, if you are patching in the offline mode, then you must ensure that the patches to be applied are already available on the Software Library.
This section includes the following:
To access the Patches and Updates page, in Cloud Control, from the Enterprise menu, select Provisioning and Patching, then select Patches and Updates.
The following page appears:
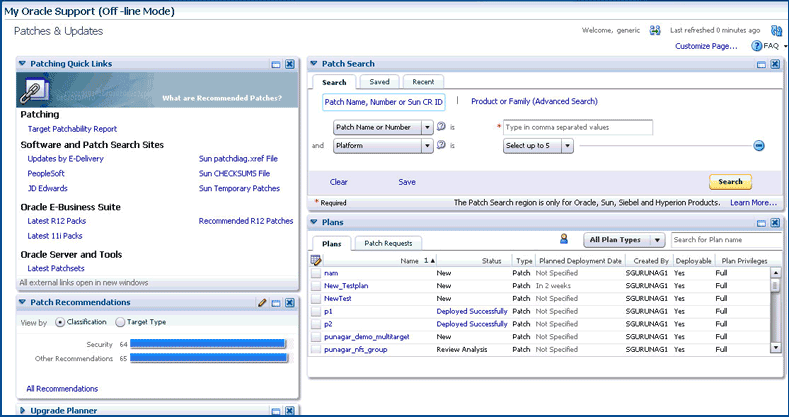
Some of the advantages of using the Patches and Updates page (Automated Patching approach) are:
Patching operations are more organized, done through a single window, and is always initiated only from the OMS.
Allow you to schedule jobs that will run periodically, and connect to My Oracle Support, check for the latest patches, and automatically download them. This relieves you of the manual effort involved in searching the latest patches and patch sets, and downloading them whenever they are available.
One patch plan can be used to add multiple patches to multiple sets of homogeneous targets. For example, both core and plugin agent patches can be added to the same plan.
The Patch Recommendation region is one of the regions in the patching domain that proactively communicates all the recommendations that are applicable to your environment. This region minimizes human effort in terms of searching for Oracle recommended patches, which may or may not apply to your environment.
Note:
Keep the following points in mind:Recommendations are not available for custom plugins. Oracle only supports the default plugins that ship with the product, and releases timely updates for them.
You must use the configuration manager release 10.3.2 or higher for Patch Recommendations to be enabled.
Figure 23-1 captures the Patch Recommendations region as it appears in the Patches and Updates page.
Patches are primarily classified as Security patches, and Other Recommended patches. For example, if you select Security from the graph, all the security related patches are displayed on the Patch Recommendation page. Alternately, you can also view the patches by their target types. Click the bar graph to drill down to a list of recommended patches, view details about those patches, download the patches, or add them to a patch plan. The bar graph summarizes the number of issues found (for example, if there is one issue, then there is one recommendation for one target).
Patch Recommendation region allows you to:
Compare the patches installed in your configuration with what Oracle recommends, and identifies any missing patches.
Identify and prioritize targets missing Critical Patch Updates.
Identify missing recommended patches issued by Oracle.
The Patch Search is a region in the patching domain that allows you to search for Oracle, Sun, Siebel, and Hyperion products. The primary purpose of searching a patch is to limit results to the exact patch name or number.
From Figure 23-2 you can see that the Patch Search region contains three tabs: Search, Saved, and Recent. The Search tab lets you apply the desired filters to drill down to the exact results. You can choose to save the search, and view it later. All the saved searches appear in the Saved region. A history of all the searches is registered in the Recent tab, and you can check the logs if you want to access them.
Use any of the following approaches to search for a patch:
To perform a Basic Search, follow these steps:
From the Enterprise menu, select Patching and Provisioning, then select Patches and Updates.
On Patches and Updates page, enter the Patch Name or Number, or Sun CR ID, if there are multiple values, then they must be separated by commas. You can select the platform name from the list in the Patch Search Region, and then click Search.
The Patch Search Results page displays the results based on the search criterion provided.
From the Patch Search results page, you can do the following:
You can highlight one or more patches in the search results and, from the inline tool bar, add the patches to a patch plan (if you use the collector), download the patches, or copy patch details to the system clipboard.
If a single patch is highlighted, you can view the patch readme.
To perform an Advanced Search, follow these steps:
From the Enterprise menu, select Patching and Provisioning, then select Patches and Updates.
On the Patches and Updates page, click Product or Family (Advanced Search).
Enter a Product name, and set the Release number to narrow down your search.
Additionally, if you are accessing Patches and Updates page in the Offline mode, then click (+) icon to add more filters like Type, Platform, or Language. In the Online mode, in addition to all the filters available in the Offline mode, you can use advanced search categories like: Classification, Description, Patch Target, or Updated to drill down to the desired results.
Note:
Advanced Search allows you to search for recommended patches for your environment through the Classification search category available when you are accessing Patches and Updates page in the online mode.Click Search.
After updating the appropriate search filters, you can save the search combination by clicking Save.
The Patch Search Results page displays the results based on the search criterion provided.
From the Patch Search results page, you can do the following:
You can highlight one or more patches in the search results and, from the inline tool bar, add the patches to a patch plan (if you use the collector), download the patches, or copy patch details to the system clipboard.
If a single patch is highlighted, you can view the patch readme.
To apply a Management Agent patch using patch plans, follow these steps:
Note:
Applying the core agent patch, or the plugin agent patch follows the same patching process (as listed in this section.)Ensure that the patches selected are applied on homogeneous set of targets, which means that the patches selected should have the same platform and version, as the targets being patched. For example, 12.1.0.1.0 Linux x86 patches can only be applied on 12.1.0.1.0 LinuxX86 targets, any mismatch will result in a patching error.
In Cloud Control, from the Enterprise menu, select Provisioning and Patching, then select Patches and Updates.
On the Patches and Updates page, select Management Agent patches from one of the following regions:
In the Patch Recommendation region, click the graph to drill down to the list of recommended patches for your environment.
For more information on Patch Recommendation, see "Viewing Patch Recommendations"
In the Patch Search region, enter the patch number of the Agent patch or perform an Advanced Search to search, and select the desired patch.
For more information on Basic and Advanced search, see "Searching Patches"
Select one or more patches, and from the context menu, click Add to a Plan.
Click Add to New to create a new plan, if not you can update an existing plan by selecting Add to Existing option.
If you select Add to New, then one of the following dialog box appears:
In the Create a New Plan dialog box, enter a unique name for your plan, and click Create Plan.
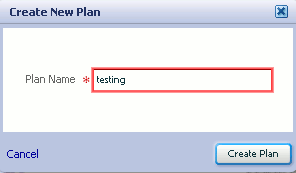
The patch selected along with the associated target gets added to the plan.
In the Add Patch to Plan dialog box as shown in Figure 23-3, enter a unique name for the plan, and select the targets. To search and select targets, follow one of these approaches:
If you know the target name, then enter the name of the target in the search field.
Click the search icon to view all the targets reporting to the OMS running on your host machine, group them by type Agent, and select the desired Agent targets.
Create a group of Agent targets, and provide the group name in the search field to add all the targets in that particular group to the plan. To create a group of targets, from Setup menu, select Add Target, and then click group. On the Create Group page, add all the Agent targets to the group, and create the group with a unique name.
After selecting the targets, click Create Plan. The selected patches and associated targets are added to the plan after validating for conflicts.
Note:
If you want to add to an existing plan, click Add to Existing and, then click More. From the Add Selected Patch to Plan dialog box, select the plan name and click Select Targets. From the Add Selected Patch to Plan <plan_name> dialog box, select the targets and click Add to Plan.If the selected patches are applied on homogeneous targets, then the plan gets successfully created with a link to View Plan. Click the link to view the plan details.

If any of the agent targets added to the patch plan are NFS-Agents, then you may see a warning message Issues with Adding Patch as shown in Figure 23-4. As a solution to this problem, a list of all the targets impacted appear, click Add All To Plan to add all the affected targets to the patch plan.
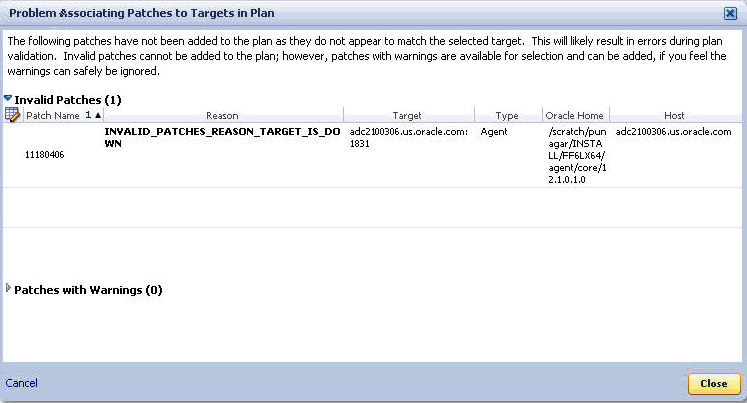
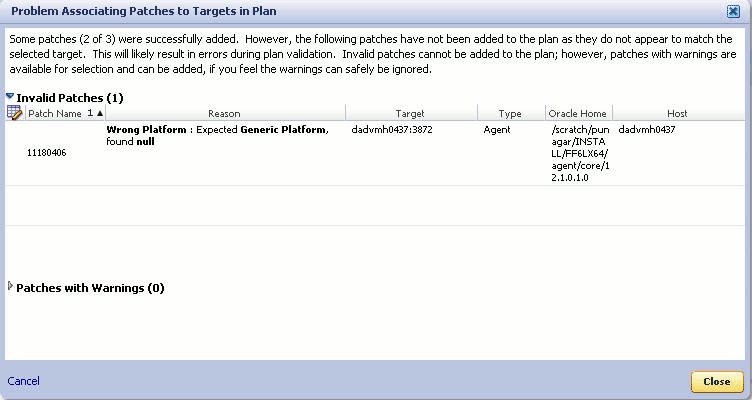
However, if there is a mismatch between the platform and version of the patch selected, and that of the target, you may see one of the following warnings:
Note:
Oracle recommends that you fix the warning before proceeding as it may result in an error during the plan validation. However, if you still want to proceed, you can select the patches, and click Ignore Warnings and Add to proceedTarget is Down: This warning message appears when the target added is not up and running. All the other homogeneous targets get added to the plan, and the plan is created without this target. Click View Plan to see the details.
Null Platform: This error occurs when the target selected appears with a null platform, the validation fails as there is a mismatch in the platform of the patch and that of the target. This could happen when a target is down, in this case the plan is not created until the error is fixed.
On the Patches & Updates page, in the Plans region, click the plan name you want to view, and from the context menu, click View.
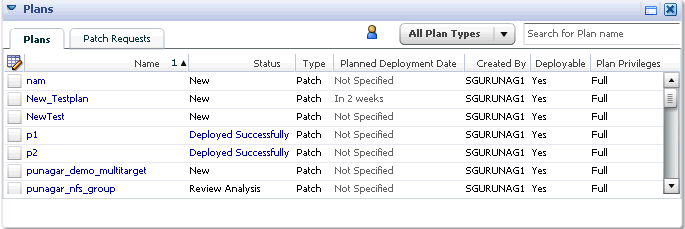
To filter the plans table, select All Plan Types or Patch depending on your preference. To search for a plan, enter a plan name or partial plan name in the search box, then click the search button.
In the Create Plan Wizard, on the Plan Information page, in the Overview section, validate the Patch Plan name. You can choose to edit it if you want.
(Optional) Select a date and time when you want to deploy the Patch Plan, and enter a short description to describe the Patch Plan.
Click Next.
On the Patches page, review the patches added to the Patch Plan.
To associate additional targets to a patch that is already in your Patch Plan, click Add Patch. In the Edit Search dialog box, enter the patch number and click Search. Select the patch, and click Add to This Plan. From Add Patch To Plan dialog box, select the targets, and click Add to This Plan.
Click Next.
In the Deployment Options page, retain the default location (%emd_emstagedir%) available on the target machine or edit the Stage Location to provide a new location for staging the Agent patches.
In the Credentials section, select Oracle Home Preferred Credentials if you have already set them earlier. You can otherwise click Override Oracle Home Preferred credentials and set the Normal Oracle Home Credentials and Privileged Oracle Home Credentials to access the Oracle home of the target.
Click Next.
On the Validation page, click Analyze to validate the patch before deploying it. A Validation job is submitted, that performs an exhaustive list of checks like: check for conflicts, check for the latest OPatch version, check if the version and platform of the targets and the patch match (homogeneity rule), and so on in the background.
To track the progress of the job, from Enterprise menu, select Job, and then click Activity. On the Job Activity Page, in the Advanced Search region, enter the name of the job, and then click Go. Select the job, and drill down to the steps by click Expand All. If the status is Succeeded, then the job is valid. If not, then review the issues, and try to resolve it according to the corresponding problem description available on the page. After resolving the issue, click Re-Analyze.
Upon validation, if there are conflicts between the two patches, then you might be recommended to request for replacement patches. In this case, click Request Patch.
If there is a Merge Patch already available, you can directly opt to replace the conflicting patches with the Merge Patch. In this case, click Replace Patch.
See Also:
For more information about the common errors during the Validation phase, see "Validating Agent Patch Errors"Click Next.
On the Review & Deploy page, review the details you have provided for the patch plan, then click Deploy.
A job is submitted, to track the progress of the job, from Enterprise menu, select Job, and then click Activity. On the Job Activity Page, in the Advanced Search region, enter the name of the job, and then click Go.
Note:
For a demonstration about how to apply patches on Enterprise Manager 12c Agents using Cloud Control Console, see My Oracle Support note 1359221.1.To verify the applied patches using Enterprise Manager, perform the following steps:
In Cloud Control, click Targets, then select All Targets
On the All Targets page, enter the target name in the Search Target Name field to search for the target you patched.
For example, enter adc2101818 in the search field, and click the search icon.
Click the target name to select Oracle home of the target that was patched.

A summary page with details about the target is displayed.
On the Summary page, in the Patch Advisories region, select Patches Applied tab to verify all the patches that have been successfully applied on the target.
Here are some of the errors that may appear during the Validation phase of patch plans:
Problems Associating the Patches To the Plan
This error occurs when patches do not match the targets selected.
For example if the patch is released for Linux x86 platform, and you are trying to apply the patch on a Linux x64 target, then the plan fails.
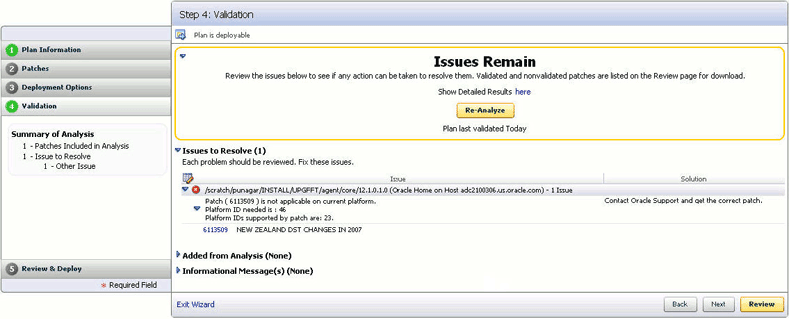
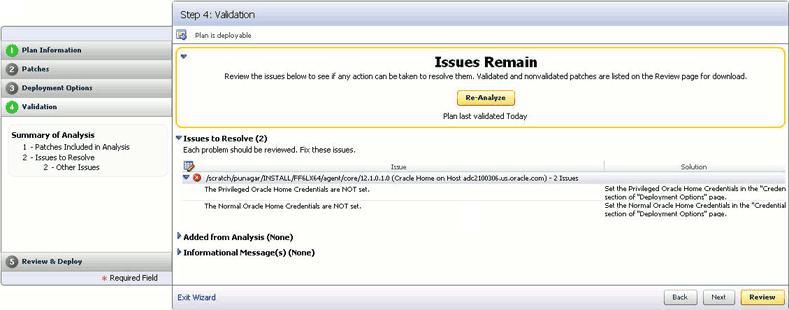
Oracle Home Credentials Not Set
This error occurs when the oracle Home credentials like Privileged Oracle Home credentials or the Normal Oracle Home credentials are not set.
Conflict Check Analysis Failure
This error occurs when there is a conflict in the patches added.
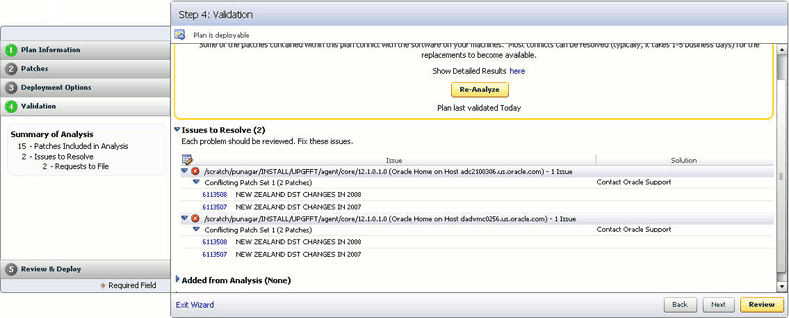
Manual patching is a patching mechanism that requires you to follow step-by-step instructions to patch a Management Agent manually. This mechanism of patching expects you to meet certain prerequisites, manually validate the patch for applicability and conflicts, and patch only one Management Agent at a time.
Note:
Oracle recommends you to use the automated patching mechanism because it not only saves time and effort in mass-deploying patches but also reduces human intervention, thereby minimizing the errors involved while patching.To patch manually, you must perform the following steps:
Log into My Oracle Support (https://support.oracle.com) console with the necessary credentials.
Note:
Check the Patch Recommendation region to view the patches recommended for your environment. You can also provide the recommended patch number in the patch search region to download the recommended patch.On the My Oracle Support home page, click Patches and Updates.
Enter the patch number in the Patch Search region, then click Search.
Select the patch, and from the context menu, click Download.
After downloading the zip file, follow the instructions available in the Readme.html or Readme.txt to install the patch.