20 Creating, Editing, and Managing Assets
This chapter describes the different assets that are available for you to use in WebCenter Portal and some of the common operations you can perform on those assets. Assets include navigation models, page templates, resource catalogs, and so on.
This chapter focuses on working with the assets available to individual portals. For information specific to shared assets; that is, assets that are available to all portals, see Chapter 59, "Working with Shared Assets."
This chapter includes the following topics:
-
Section 20.7, "Querying Assets Through the Expression Language (EL)"
-
Section 20.8, "Applying Assets Dynamically Using EL Expressions"
Tip:
For detailed information about a particular type of asset, see the asset-specific chapter listed in Section 20.1, "About Assets."
Permissions:
To perform the tasks in this chapter, you require the portal-level permission Assets: Create, Edit, and Delete Assets (standard permissions) or Create, Edit, and Delete on the asset type with which you want to work (advanced permissions). For example, users with the Create, Edit, and Delete Page Templates permission can create, edit, and delete page templates owned by a portal.
For more information about portal-level permissions, see Section 29.1, "About Roles and Permissions for a Portal."
20.1 About Assets
Assets are the objects that define the structure, look and feel, and the content of your portals. WebCenter Portal provides the following assets:
-
Page Templates define the interface that surrounds page content and help to apply a consistent look and feel across groups of pages. For more information, see Chapter 21, "Working with Page Templates."
-
Navigation Models define how to link together information from multiple sources, such as pages, content repositories, and external web pages. For more information, see Chapter 22, "Working with Portal Navigation."
-
Resource Catalogs define the components that users can add to their pages, page templates, and task flows. For more information, see Chapter 23, "Working with Resource Catalogs."
-
Skins define the appearance and look and feel, including colors and fonts, of a specific portal or the entire application. For more information, see Chapter 24, "Working with Skins."
-
Page Styles define the layout of a newly created page, and may also dictate the type of content the page supports. For more information, see Chapter 25, "Working with Page Styles."
-
Content Presenter Display Templates define templates for displaying content. For more information, see Chapter 26, "Working with Content Presenter Templates."
-
Task Flow Styles define the layout of task flows created in WebCenter Portal. For more information, see Section 28.4, "Working with Task Flow Styles."
-
Pagelets define sub-components of a web page accessed through the Oracle WebCenter Portal's Pagelet Producer that can be injected into any proxied application.
-
Task Flows define how to visualize data with Data Presenter. For more information, see Section 28.3, "Working with Task Flows."
-
Data Controls define how to connect to and read data from external repositories that can then be used as data sources by Data Presenter. For more information, see Section 28.2, "Working with Data Controls."
Shared Assets and Portal Assets
Assets can exist at the application level (shared assets) or at the portal level (portal assets). At both these levels, the assets available and their functionality are the same. The difference between shared assets and portal assets is that of scope:
-
Shared assets are available for use in all portals, unless a portal has been specifically excluded.
-
Portal assets are available for use only in the portal in which they are created.
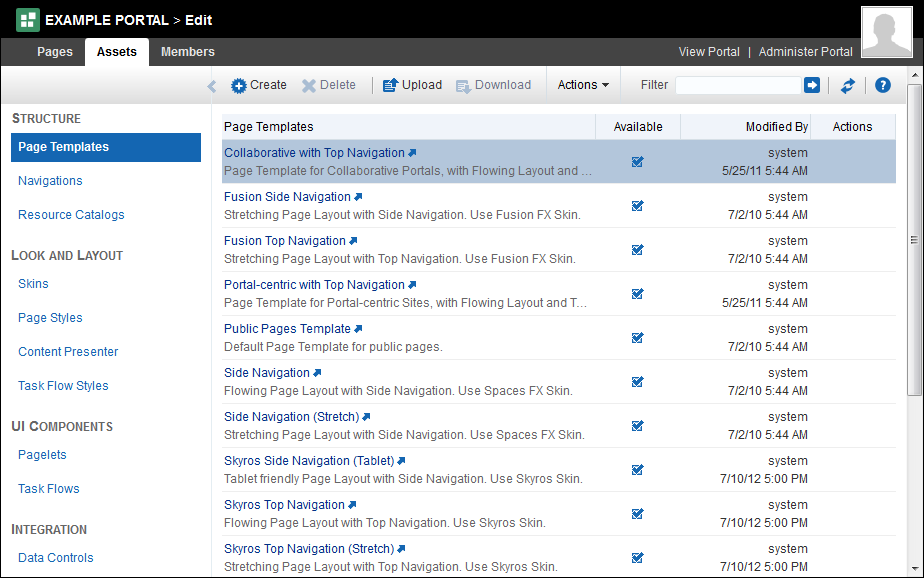
If a shared asset is available for use in a portal it is listed on the Assets page for that portal. The Shared icon (Figure 20-1) next to the asset's name indicates that it is a shared asset. However, shared assets can be edited only at the application level in the Shared Assets page.
This chapter focuses on how to work with portal assets. For information about shared assets, see Chapter 59, "Working with Shared Assets."
By default, global default asset settings, such as the page template, skin, resource catalog, and navigation model, are used by all portals (indicated by the use of [system default] in the portal-level settings). However, in a portal, you can choose to use specify portal-specific asset settings. If your portal uses global default settings, any changes to a global setting are reflected in your portal too. For example, consider that the global default skin is the WebCenter Portal skin, and you have two portals: PortalA and PortalB. By default, both your portals will use the WebCenter Portal skin. Consider that you change PortalB to use the Mist skin. PortalA still uses the global default WebCenter Portal skin. If you then change the global default skin to the Dew skin, PortalA is automatically updated to use the Dew skin; however PortalB continues to use Mist.
For information about configuring global default asset settings, see the "Configuring Global Defaults Across Portals" chapter in Oracle Fusion Middleware Administering Oracle WebCenter Portal.
For information about configuring portal-specific default asset settings, see Section 7.3, "Administering Look and Feel Settings for a Portal."
20.2 Accessing Portal Assets
You access portal assets from the Assets page for the portal that owns the assets. When you access the Assets page for a portal, it lists all the assets, including shared assets, available for use in that particular portal (Figure 20-2).
You can access the Assets page for a portal in any of the following ways:
-
Through the portal editor. For more information, see Section 6.2.2, "Accessing Assets in the Portal Editor."
-
Through portal administration. For more information, see Section 7.5.1, "Accessing Assets Administration for a Portal."
You can also enter the following URL in your browser to navigate directly to the Assets page:
http://host:port/webcenter/portal/portalName/admin/assets
Shared assets are indicated by the Shared icon (Figure 20-1). To work with shared assets, you must use the Shared Assets page.
See Also:
20.3 Creating Assets
You can create some assets from scratch, and there are some assets that you can create only by making a copy of an existing asset. For example, you can create a navigation model from scratch, but you can create a skin only by making a copy of an existing skin. Further, there are some assets, such as Content Presenter display templates, that you cannot create in the Assets page at all. To create these assets you must use a development tool, such as Oracle JDeveloper.
Table 20-1 describes the support available for creating the different assets in WebCenter Portal.
Table 20-1 Support for Creating Assets in a Browser
| Asset | Create in Browser? | How? | Further Information |
|---|---|---|---|
|
Page Templates |
Yes |
Only by extending another page template |
|
|
Navigation Models |
Yes |
From scratch or by extending another navigation model |
|
|
Resource Catalogs |
Yes |
From scratch or by extending another resource catalog |
|
|
Skins |
Yes |
Only by making a copy of another skin |
|
|
Page Styles |
Yes |
Only by making a copy of another page style |
|
|
Content Presenter Display Templates |
No |
(Not applicable) |
"Creating Content Presenter Display Templates" in Oracle Fusion Middleware Developing Portals with Oracle WebCenter Portal and Oracle JDeveloper |
|
Task Flow Styles |
Yes |
Only by making a copy of another task flow style and editing the source code |
|
|
Pagelets |
No |
(Not applicable) |
"Exporting and Importing Pagelet Producer Resources" in Oracle Fusion Middleware Administering Oracle WebCenter Portal |
|
Task Flows |
Yes |
Only from scratch |
|
|
Data Controls |
Yes |
Only from scratch |
20.4 Editing Assets
The Assets page enables you to edit the assets that have been created within a portal. It provides two options for editing assets:
-
Edit—Provides a means of editing an asset either with the page editor or in an Edit dialog.
-
Edit Source—Enables you to work with the source code of an asset.
You may want to edit an asset's source file to make advanced edits to its code without having to download the file, edit it in JDeveloper, and upload it back into WebCenter Portal. You can even use the Edit Source option to create an asset from scratch; by creating the asset and then replacing its default source code with your own original code. Note, however, that, due to the heavy hand-coding requirement, this scenario is not recommended.
You cannot edit built-in assets. If you want to modify a built-in asset, you must first create a copy of the asset and then edit the copy according to your requirements.
WebCenter Portal supports round-trip development of assets. To get enhanced functionality for your assets, you can download the asset, edit it in JDeveloper, and then upload it back into WebCenter Portal. For more information, see Section 20.6, "Working with Portal Assets in JDeveloper."
This section includes the following topics:
20.4.1 Editing an Asset Using the Edit Option
Depending on the asset being edited, choosing the Edit option either opens the asset in Composer or in an asset-specific Edit dialog. For information about editing an asset, refer to the asset-specific chapter, listed in Table 20-2.
Table 20-2 Editing Assets Using the Edit Option
| Asset | Edit Using | Documentation |
|---|---|---|
|
Page Templates |
Composer |
|
|
Navigation Models |
Edit dialog |
|
|
Resource Catalogs |
Edit dialog |
|
|
Skins |
Edit dialog |
|
|
Page Styles |
(Edit Source dialog only) |
|
|
Content Presenter Display Templates |
(Edit Source dialog only) |
|
|
Task Flow Styles |
(Edit Source dialog only) |
|
|
Pagelets |
(Not applicable) |
"Exporting and Importing Pagelet Producer Resources" in Oracle Fusion Middleware Administering Oracle WebCenter Portal |
|
Task Flows |
Composer |
|
|
Data Controls |
Edit dialog |
20.4.2 Editing the Source Code of an Asset
Use the Edit Source dialog to get more control over asset editing in WebCenter Portal. You can edit the underlying source code of any asset except data controls. Changes made to an asset are saved to the Oracle Metadata Services Repository (MDS Repository), and are made available immediately.
The content of the Edit Source dialog varies depending on the type of asset being edited. If there are multiple files associated with the asset, the dialog provides different tabs for editing the source code of each of these files.
You cannot edit the source code of built-in assets. If you want to modify the code of a built-in asset, you must first create a copy of the asset and then edit the copy according to your requirements.
Note:
Edit an asset's source files only when absolutely necessary. To ensure that you do not end up with an invalid asset that does not work properly, edit the source code very carefully.
To edit the source code of an asset:
-
Navigate to the Assets page for the portal that owns the asset.
For more information, see Section 20.2, "Accessing Portal Assets."
Tip:
For shared assets, see Section 59.2, "Accessing Shared Assets."
-
Click the type of asset that you want to edit, for example, Page Templates.
-
Select the asset that you want to edit.
-
In the toolbar, click Actions, and then select Edit Source.
-
In the Edit Source dialog, edit the code as required.
Tip:
For XML files, the XML syntax in the code is validated and an error message is displayed if you miss any tags or add them incorrectly. Validation is not performed for non-XML files, such as CSS files for skins.
Table 20-3 Editing Asset Source Code
Asset Tab Description Page Templates
Template
Edit the JSPX file that represents the page template.
Page Definition
Edit the page template's associated page definition XML file.
Navigation Models
Navigation Model
Edit the XML file that represents the navigation model.
Resource Catalogs
Catalog Definition
Edit the XML file that represents the resource catalog.
Skins
CSS
Edit the CSS file for the skin.
Page Styles
Page
Edit the JSPX file that represents the page style.
Page Definition
Edit the page style's associated page definition XML file.
Content Presenter Display Templates
Fragment
Edit the JSFF file that represents the Content Presenter display template.
Page Definition
Edit the page fragment's page definition XML file.
Task Flow Styles
Taskflow Definition
Edit the XML file that represents the task flow style.
Fragment
Edit the page fragment JSFF file.
Page Definition
Edit the page fragment's page definition XML file.
Pagelets
(Not applicable)
Source code cannot be edited in the browser.
Task Flows
Taskflow Definition
Edit the XML file that represents the task flow.
Fragment
Edit the page fragment JSFF file.
Page Definition
Edit the page fragment's page definition XML file.
Data Controls
(not applicable)
Source code cannot be edited in the browser.
-
When you are done, click Save and Close.
20.5 Managing Assets
In addition to creating and editing assets, there are other operations that you can perform on assets in the Assets page.
This section includes the following topics:
20.5.1 Viewing Information About an Asset
Each asset has an associated Show Properties dialog that summarizes useful information about it. You cannot edit the properties displayed in the Show Properties dialog of an asset. For information about editing these properties, see Section 20.5.5, "Setting Properties on an Asset."
To view information about an asset:
-
Navigate to the Assets page for the portal that owns the asset.
For more information, see Section 20.2, "Accessing Portal Assets."
Tip:
For shared assets, see Section 59.2, "Accessing Shared Assets."
-
Click the type of asset for which you want to view information, for example, Page Templates.
-
Select the asset for which you want to view information.
-
In the toolbar, click Actions, and then select Show Properties.
-
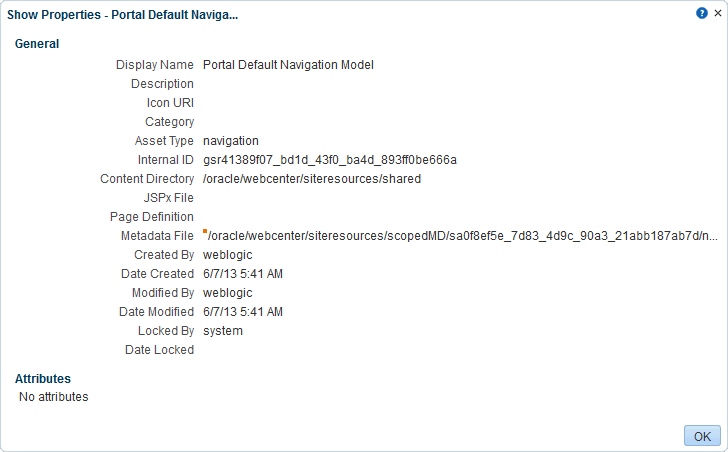
The Show Properties dialog (Figure 20-3) displays information about the selected asset.
Figure 20-3 The Show Properties Dialog for the Default Navigation Model
Description of "Figure 20-3 The Show Properties Dialog for the Default Navigation Model"
Table 20-4 lists the information provided for assets in the Show Properties dialog.
Property Description Display Name
The display name of the asset.
Description
The description of the asset.
Icon URI
The URI of the icon that is associated with the asset.
Category
The category to which the asset belongs.
Asset Type
The type of the asset. For example,
navigation,pageStyle, ortaskFlow.Internal ID
The unique internal identification number assigned to the asset.
Content Directory
The path where dependent objects of the asset, such as images, JavaScripts, style sheets, and HTML files, are stored on the portal server.
JSPx File
The path to the JSPX file for the asset.
Page Definition
The path where the page definition XML file of the asset is stored on the portal server.
Page definitions are used for page templates, page styles, task flow styles, and task flows.
Metadata File
The path where metadata files, if any, of the asset are stored on the portal server.
Created By
The name of the user who created the asset.
Date Created
The date and time when the asset was created.
Modified By
The name of the user who last edited the asset.
Date Modified
The date and time when the asset was last edited.
Locked By
The name of the user who most recently locked the asset.
Date Locked
The date and time when the asset was most recently locked.
Exclude From Home Portal
(Shared assets only) Whether the asset is available in the Home portal.
Exclude From Portal(s)
(Shared assets only) A list of portals in which the asset is not available.
Attributes
Additional attributes associated with the asset.
-
Click OK.
20.5.2 Previewing an Asset
WebCenter Portal provides a way to preview certain assets, namely page templates, page styles, task flow styles, and task flows. This enables you to quickly get an idea of how the asset looks, without having to publish it and go through the process of using it within the portal. This means that you can make adjustments quickly, if required.
To preview an asset:
-
Navigate to the Assets page for the portal that owns the asset.
For more information, see Section 20.2, "Accessing Portal Assets."
Tip:
For shared assets, see Section 59.2, "Accessing Shared Assets."
-
Click the type of asset that you want to preview, for example, Page Templates.
-
Click the name of the asset that you want to preview.
Note:
Not all assets can be previewed. If the name of the asset is not a hyperlink, then it cannot be previewed.
The asset is displayed as it would appear when used in a portal.
-
View and interact with the asset to determine whether it looks and behaves the way you want.
-
When you are done, click Close.
You can either edit the asset to make changes or publish it to make it available in the portal.
20.5.3 Showing and Hiding Assets
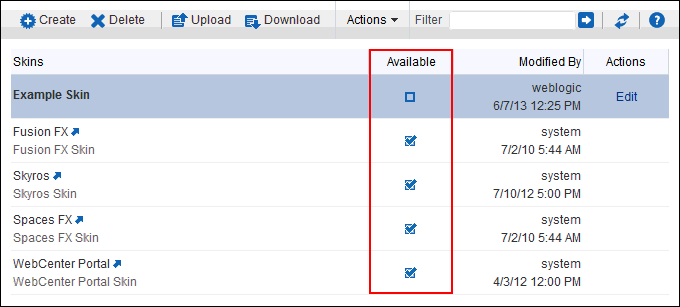
All assets, whether built-in or custom, can be marked as hidden or available. For all assets that are available to use, a check box marked with a green tick appears next to the asset's name. A deselected check box next to an asset's name indicates that the asset is marked as hidden. For example, Figure 20-4 shows three skins. The built-in Fusion FX and Spaces FX skins are available (indicated by the check mark in the Available column). The Example Skin custom skin is hidden (indicated by the empty check box in the Available column).
Figure 20-4 Available and Hidden Assets Indicators on the Assets Page
Description of "Figure 20-4 Available and Hidden Assets Indicators on the Assets Page"
When you first create or upload an asset, by default it is marked as hidden. A hidden asset is not available for selection in asset pickers. For an asset to become available in asset pickers, it must be published, that is, made available. For example, Figure 20-5 shows the list of skins that are available for selection as the portal's default skin. Note that the hidden skin Example Skin is not included in this list.
Figure 20-5 Hidden Asset Not Listed in Asset Picker
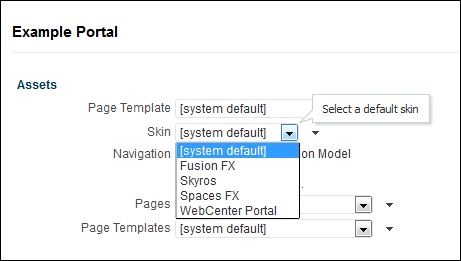
Description of "Figure 20-5 Hidden Asset Not Listed in Asset Picker"
You can, however, use a hidden asset as the starting point for creating a new asset. For example, Figure 20-6 shows that the hidden skin Example Skin is listed in the Copy From list when you create a new skin.
Figure 20-6 Hidden Asset Available for Selection
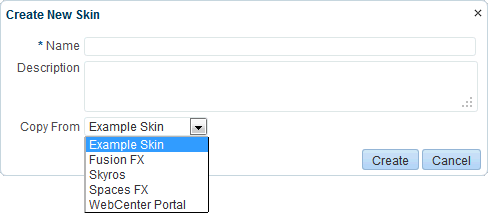
Description of "Figure 20-6 Hidden Asset Available for Selection"
This section includes the following topics:
20.5.3.1 Showing an Asset
You make a new asset available for use in your portal by marking it as shown.
To show an asset as available:
-
Navigate to the Assets page for the portal that owns the asset.
For more information, see Section 20.2, "Accessing Portal Assets."
Tip:
For shared assets, see Section 59.2, "Accessing Shared Assets."
-
Click the type of asset that you want to show, for example, Page Templates.
-
Select the check box in the Available column for the asset that you want to show.
20.5.3.2 Hiding an Asset
You can hide an asset to prevent users of your portal selecting it, for example, while you are making further refinements to it after its initial creation and publication.
To hide an asset:
-
Navigate to the Assets page for the portal that owns the asset.
For more information, see Section 20.2, "Accessing Portal Assets."
Tip:
For shared assets, see Section 59.2, "Accessing Shared Assets."
-
Click the type of asset that you want to hide, for example, Page Templates.
-
Deselect the check box in the Available column for the asset that you want to hide.
20.5.4 Copying an Asset
You can create copies of most assets, including the built-in assets. This is useful for when you want to:
-
Create a backup of an asset.
-
Update an asset while keeping the original in use.
-
Use a built-in asset as the starting point for creating a new asset. You cannot edit built-in assets, but you can create a copy to use as a starting point for further refinement.
When you create a copy of an asset, the copy is marked as hidden regardless of the status of the original asset.
Note:
You cannot create copies of Content Presenter display templates.
To copy an asset:
-
Navigate to the Assets page for the portal that owns the asset.
For more information, see Section 20.2, "Accessing Portal Assets."
Tip:
For shared assets, see Section 59.2, "Accessing Shared Assets."
-
Click the type of asset that you want to copy, for example, Page Templates.
-
Select the asset that you want to copy.
-
In the toolbar, click Actions, and then select Copy.
-
In the Copy dialog (Figure 20-7), in the Display Name field, enter a name for the copy.
Figure 20-7 The Copy Dialog for a Page Template

Description of "Figure 20-7 The Copy Dialog for a Page Template"
-
In the Description field, enter a description for the new asset.
-
Click OK.
20.5.5 Setting Properties on an Asset
Each asset has certain associated properties that define its display properties, availability, and attributes.
Use the Edit Properties dialog (Figure 20-8) to view and edit the properties associated with assets.
Figure 20-8 The Edit Properties Dialog for the Default Navigation Model
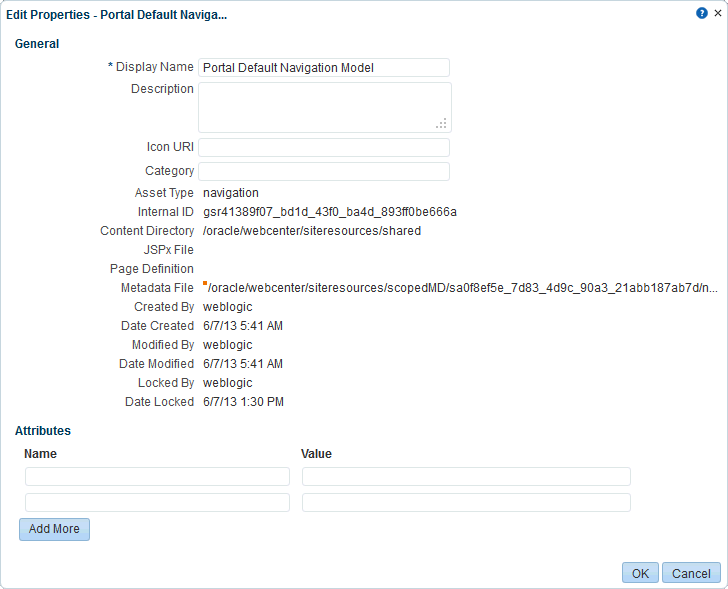
Description of "Figure 20-8 The Edit Properties Dialog for the Default Navigation Model"
The Edit Properties dialog contains the following sections:
-
General—This section displays details such as the asset's name, location, and internal ID. These properties are common across all asset types.
-
Attributes—This section lists the attributes associated with an asset. The attributes displayed in the Attributes section vary from asset to asset. For example, while a page template does not have any default attributes, skins have the following default attributes:
skinFamily,skinId, andskinExtends.For information about how to add, edit, or delete attributes, see Section 20.5.5.5, "Setting Asset Attributes."
Note:
The Edit Properties dialog for shared assets also includes an Exclude Asset Usage section for specifying in which portals a shared asset is available. For more information, see Section 59.6, "Setting the Availability of a Shared Asset."
This section includes the following topics:
-
Section 20.5.5.1, "Accessing the Edit Properties Dialog for an Asset"
-
Section 20.5.5.2, "Editing the Name or Description of an Asset"
20.5.5.1 Accessing the Edit Properties Dialog for an Asset
The Edit Properties dialog is accessed from the Actions menu in the Assets page.
To access the Edit Properties dialog for an asset:
-
Navigate to the Assets page for the portal that owns the asset.
For more information, see Section 20.2, "Accessing Portal Assets."
Tip:
For shared assets, see Section 59.2, "Accessing Shared Assets."
-
Click the type of asset that you want to edit, for example, Page Templates.
-
Select the asset that you want to edit.
-
In the toolbar, click Actions, and then select Edit Properties.
-
In the Edit Properties dialog (Figure 20-8), edit the properties as desired. For more information, see:
The Edit Properties dialog also includes display-only fields that provide additional useful information about the asset. For a list of all the fields in the Edit Properties dialog, see Table 20-4.
-
Click OK.
20.5.5.2 Editing the Name or Description of an Asset
To maintain a well-organized set of assets, consider developing a standard naming scheme and method of description. This is not a required step, but it may be useful in identifying your intended purpose for a given asset.
To edit the name or description of an asset:
-
Open the Edit Properties dialog for the asset that you want to edit, as described in Section 20.5.5.1, "Accessing the Edit Properties Dialog for an Asset."
-
In the Edit Properties dialog (Figure 20-8), in the Display Name field, edit the name of the asset, if desired.
-
In the Description field, enter a description for the asset.
-
Click OK.
20.5.5.3 Associating an Icon with an Asset
You can associate an icon with an asset. In the current version of WebCenter Portal, the associated icon is visible only for page styles when you create a page.
To associate an icon with an asset:
-
Open the Edit Properties dialog for the asset that you want to edit, as described in Section 20.5.5.1, "Accessing the Edit Properties Dialog for an Asset."
-
In the Edit Properties dialog (Figure 20-8), in the Icon URI field, enter a standard URI path to the icon.
You can specify either an absolute URL (where the URL should also work if entered in a browser address field), or a relative URL that points to an image located somewhere on the portal server. To store an image on the portal server, you must upload the required file, as described in the "Uploading Files" section in Oracle Fusion Middleware Using Oracle WebCenter Portal. You can then obtain the image's URL by copying the Download URL value as described in the "Retrieving the URL for a Folder or File" section in Oracle Fusion Middleware Using Oracle WebCenter Portal.
-
Click OK.
20.5.5.4 Categorizing an Asset
You can classify assets into relevant groups. For example, all page styles associated with Sales could have a sales category.
Note:
This value is available and exposed only in the Edit Properties dialog.
To categorize an asset:
-
Open the Edit Properties dialog for the asset that you want to edit, as described in Section 20.5.5.1, "Accessing the Edit Properties Dialog for an Asset."
-
In the Edit Properties dialog (Figure 20-8), in the Category field, enter a category name.
-
Click OK.
20.5.5.5 Setting Asset Attributes
Asset attributes determine the behavior of an asset. For example, editPageAfterCreation is a custom attribute of the page style asset and controls whether a newly created page of that style opens in Edit or View mode. It takes a value of true or false. When you associate this attribute with a particular page style, every time a user creates a page based on the selected style, the attribute value is considered and the page behaves accordingly.
To set asset attributes:
-
Open the Edit Properties dialog for the asset that you want to edit, as described in Section 20.5.5.1, "Accessing the Edit Properties Dialog for an Asset."
-
In the Attributes section of the Edit Properties dialog (Figure 20-8), in the Name field, enter the name of the attribute.
-
In the Value field, enter the value for the attribute.
-
Click Add More if you want to add more attributes. This adds a new row.
-
To remove an attribute associated with an asset, click the Remove icon displayed next to the attribute you want to remove.
-
Click OK.
20.5.6 Setting Security for an Asset
You can control whether all users or only specific users or groups can access assets. By default, asset access is controlled by application-level permissions. After you define asset-specific permissions, the permissions defined at the application or portal level no longer apply.
To set security for an asset:
-
Navigate to the Assets page for the portal that owns the asset.
For more information, see Section 20.2, "Accessing Portal Assets."
Tip:
For shared assets, see Section 59.2, "Accessing Shared Assets."
-
Click the type of asset for which you want to set access permissions, for example, Page Templates.
-
Select the asset for which you want to set access permissions.
-
In the toolbar, click Actions, and then select Security Settings.
-
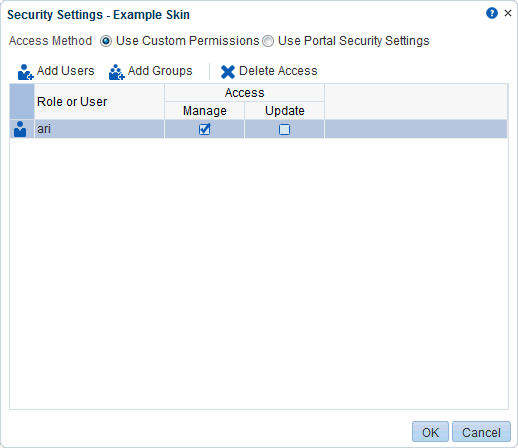
In the Security Settings dialog, select Use Custom Permissions to define who can access the selected asset and what level of access they have. When you select this option, the other controls in the dialog become available.
Tip:
If you select Use Custom Permissions, ensure that at least one user or group is granted the
Managepermission. -
Specify the user or group to whom you want to grant access.
-
Click Add Users to search for and select individual users available in your identity store.
-
Click Add Groups to search for and select groups of users available in your identity store.
Tip:
For help on searching for a user or group, see Section 30.5.1, "Searching for a User or Group in the Identity Store."
-
-
For each user or group selected, specify the level of access you want to grant. Select:
-
Manage to grant full access on the asset. Such users can perform tasks such as edit, delete, grant access, show or hide, and so on.
-
Update to grant the permission to edit the asset. Such users can edit the asset, but they cannot delete it.
-
-
If you want to revoke access from any user or group, select that entity and click Delete Access.
-
To revoke all custom permissions granted on the asset, select Use Portal Security Settings.
-
Click OK.
20.5.7 Deleting an Asset
When an asset is no longer required, you may want to remove it. You cannot delete built-in assets.
Note:
Before you delete an asset, you must ensure that the asset is not in use. If you mark an asset for deletion, it is deleted even if it is use.
To delete an asset:
-
Navigate to the Assets page for the portal that owns the asset.
For more information, see Section 20.2, "Accessing Portal Assets."
Tip:
For shared assets, see Section 59.2, "Accessing Shared Assets."
-
Click the type of asset that you want to delete, for example, Page Templates.
-
Select the asset that you want to delete.
-
In the toolbar, click Delete.
-
In the Delete dialog, click OK.
20.6 Working with Portal Assets in JDeveloper
You may find that you want to edit your assets beyond the capabilities of the browser-based interface offered by WebCenter Portal. To this end, WebCenter Portal provides you with the ability to download assets and import them into an IDE, such as JDeveloper, for further enhancement. You can then upload these edited assets back into WebCenter Portal. This process is sometimes referred to as round-trip development.
For more information, see the "Working with WebCenter Portal Resources" section in Oracle Fusion Middleware Developing Portals with Oracle WebCenter Portal and Oracle JDeveloper.
Note:
In JDeveloper, assets are referred to as portal resources.
The process for working with portal assets in JDeveloper works as follows:
-
Create an asset in WebCenter Portal.
Tip:
You can create new assets in JDeveloper for the purpose of using them in your portal. However, creating assets in WebCenter Portal first and then refining them in JDeveloper means that you do not have to worry about the prerequisites involved in creating assets for use in WebCenter Portal from scratch in JDeveloper.
-
Download the asset to an archive file.
For more information, see Section 20.6.1, "Downloading an Asset."
-
Import the archive file into JDeveloper.
For more information, see the "How to Import a Portal Resource into JDeveloper" section in Oracle Fusion Middleware Developing Portals with Oracle WebCenter Portal and Oracle JDeveloper.
-
Edit the imported asset in JDeveloper.
-
Export the asset to an archive file.
For more information, see the "How to Export a Portal Resource from JDeveloper" section in Oracle Fusion Middleware Developing Portals with Oracle WebCenter Portal and Oracle JDeveloper.
-
Upload the archive file to WebCenter Portal.
For more information, see Section 20.6.2, "Uploading an Asset."
20.6.1 Downloading an Asset
When you download an asset, its configuration is saved into an archive file. You can save the archive file either to your local file system or a remote server file system.
To download an asset:
-
Navigate to the Assets page for the portal that owns the asset.
For more information, see Section 20.2, "Accessing Portal Assets."
Tip:
For shared assets, see Section 59.2, "Accessing Shared Assets."
-
Click the type of asset that you want to download, for example, Page Templates.
-
Select the asset that you want to download.
-
In the toolbar, click Download.
-
In the Download dialog, in the Archive File Name field, enter a name for the archive file.
Figure 20-10 The Download Dialog for a Page Template
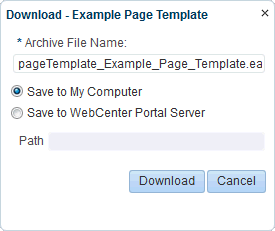
Description of "Figure 20-10 The Download Dialog for a Page Template"
-
Select:
-
Save to My Computer to save the archive file to your local file system. When you click the Download button you are prompted for the location on the file system where you want to save the file.
-
Save to WebCenter Portal Server to save the archive file to the portal server file system. In the Path field, enter the location on the portal server where you want to save the archive file.
-
-
Click Download.
-
If you selected to save the archive file to your local file system, you are prompted to specify the location where you want to save the file.
-
After downloading the asset, you can then import it into the IDE of your choice, for example JDeveloper.
Tip:
For information about how to import assets into JDeveloper, see the "How to Import a Portal Resource into JDeveloper" section in Oracle Fusion Middleware Developing Portals with Oracle WebCenter Portal and Oracle JDeveloper.
Note:
Artifacts used or referenced by assets, such as icons and images, are not included in the archive when an asset is downloaded. You must manage and move dependent artifacts manually. We recommend that you use a folder structure on your content server specifically for asset artifacts so that content is easy to identify and move, if required.
If you are managing legacy assets that store artifacts in MDS, we recommend that you relocate dependent artifacts to your content server. However, if you do need to move artifacts stored in MDS, you can use the MDS WLST commands exportMetadata and importMetadata.
20.6.2 Uploading an Asset
When you upload an asset to WebCenter Portal:
-
Existing assets, that is, assets with the same internal ID, are overwritten.
-
Portal assets are uploaded back only into their original portal. You cannot upload a portal asset into a different portal.
-
Assets must be in an archive file format on your local file system or a remote server.
Tip:
For information about how to export assets from JDeveloper, see the "How to Export a Portal Resource from JDeveloper" section in Oracle Fusion Middleware Developing Portals with Oracle WebCenter Portal and Oracle JDeveloper.
To upload an asset:
-
Navigate to the Assets page for the portal that owns the asset.
For more information, see Section 20.2, "Accessing Portal Assets."
Tip:
For shared assets, see Section 59.2, "Accessing Shared Assets."
-
Click the type of asset that you want to upload, for example, Page Templates.
-
In the toolbar, click Upload.
-
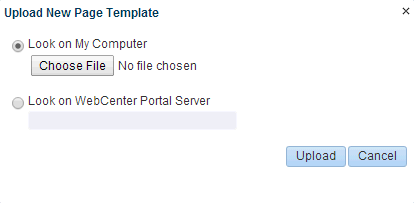
In the Upload dialog, select:
-
Look on My Computer to upload an archive file from your local file system. Click Choose File to locate the file.
-
Look on WebCenter Portal Server to upload an archive file from a remote server file system. In the field below, enter the location on the server where the file is located.
Figure 20-11 The Upload Dialog for a Page Template
Description of "Figure 20-11 The Upload Dialog for a Page Template"
-
-
Click Upload.
-
If the asset already exists in the portal, click Yes to confirm that you want to replace the asset with the contents of the archive file.
-
Click OK in the resulting success dialog.
Tip:
System administrators can upload assets using the WLST command,
importWebCenterResource. For more information, see the "importWebCenterResource" section in the Oracle Fusion Middleware WebLogic Scripting Tool Command Reference.Note:
Artifacts used or referenced by assets, such as icons and images, are not included in the archive when an asset is exported. When you upload the asset, you must manage and move dependent artifacts manually. We recommend that you use a folder structure on your content server specifically for asset artifacts so that content is easy to identify and move, if required.
If you are managing legacy assets that store artifacts in MDS, we recommend that you relocate dependent artifacts to your content server. However, if you do need to move artifacts stored in MDS, you can use the MDS WLST commands
exportMetadataandimportMetadata.
20.7 Querying Assets Through the Expression Language (EL)
You can access any asset anywhere in WebCenter Portal through Expression Language (EL) expressions.
For example, the following EL expression returns the first page template found with a display name of myPage:
#{srmContext.resourceType['siteTemplate'].displayName['myPage'].singleResult}
You must set query parameters in the format .property['value'], where property is the name of the asset property, for example, id, displayName, or resourceScope, and value is the value of that property you want to search for.
If you need EL assistance, an application developer can provide an EL expression; see the "Expression Language Expressions" appendix in Oracle Fusion Middleware Developing Portals with Oracle WebCenter Portal and Oracle JDeveloper.
20.8 Applying Assets Dynamically Using EL Expressions
WebCenter Portal provides a way to dynamically apply certain assets at runtime based on some criteria. For example, you can present content or shape the way content is presented by using personalization-related EL expressions to select and apply a page template based on whoever is the current user.
Consider an example where you want a top-navigation page template to be displayed to portal moderators, and a side-navigation page template to be displayed to other users. You could use the following EL expression to specify the page template:
#{WCSecurityContext.userInScopedRole['Moderator'] ? 'gsr3396194a_3a72_44d6_90b4_57fd6efe4ff1' : 'gsr3396194a_3a72_44d6_90b4_57fd6efe4ff7'}
The EL expression uses the internal IDs of the page templates.
Instead of using the exact internal ID of the asset that you want to apply, you can also include queries in an EL expression as shown in the following example:
#{WCSecurityContext.userInScopedRole['Moderator'] ? srmContext.resourceScope['space_name'].resourceType['siteTemplate'].displayName['Top'].singleResult.id :
 srmContext.resourceScope['space_name'].resourceType['siteTemplate'].displayName['Side'].singleResult.id}
To dynamically apply an asset at runtime:
-
Note down the internal ID of the required asset from its Show Properties dialog.
For more information, see Section 20.5.1, "Viewing Information About an Asset."
-
Access WebCenter Portal Builder administration and open the General page. Or access a specific portal's administration page as described in Section 7.1, "Accessing Portal Administration," and open the Settings page.
Tip:
You can also enter the following URLs in your browser to navigate directly to the appropriate administration pages:
-
Application-level:
http://host:port/webcenter/portal/builder/administration/general -
Portal-level:
http://host:port/webcenter/portal/portalName/admin/settings
-
-
Click the
 icon next to the desired asset field, then select Expression Builder to open the editor.
 -
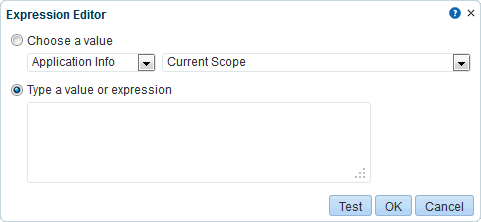
In the Expression Editor dialog, enter the required EL expression.
Figure 20-12 The Expression Editor Dialog
Description of "Figure 20-12 The Expression Editor Dialog"
For example, if you want to display different page templates depending on whether the page is rendered in a browser on a Windows platform or on a mobile device, you can use the following EL expression:
#{requestContext.agent.platformName=='windows' ? 'gsr3396194a_3a72_44d6_90b4_57fd6efe4ff7' : 'gsr1472d17b_8f10_4689_89fb_7431f561567f'}This EL expression is an
if-then-elsestatement. The ELrequestContext.agent.platformNameretrieves the platform information. The page template IDs are the ones noted down from the Show Properties dialog.If you need EL assistance, an application developer can provide an EL expression; see the "Expression Language Expressions" appendix in Oracle Fusion Middleware Developing Portals with Oracle WebCenter Portal and Oracle JDeveloper.
-
Click OK.
