31 Testing Deployed Community Widget Tags
This chapter provides you with instructions for verifying deployed community widget functionality.
This chapter contains the following sections:
-
Section 31.2, "Working with Comments and Reviews Widgets as an Authenticated Visitor"
-
Section 31.3, "Working with Comments and Reviews Widgets as an Anonymous Visitor"
-
Section 31.7, "Viewing Rating Details for Stars Ratings Widgets"
-
Section 31.9, "Sharing Comments and Reviews with Facebook, Twitter, and Google+"
31.1 Sample Site with Community Widgets Deployed
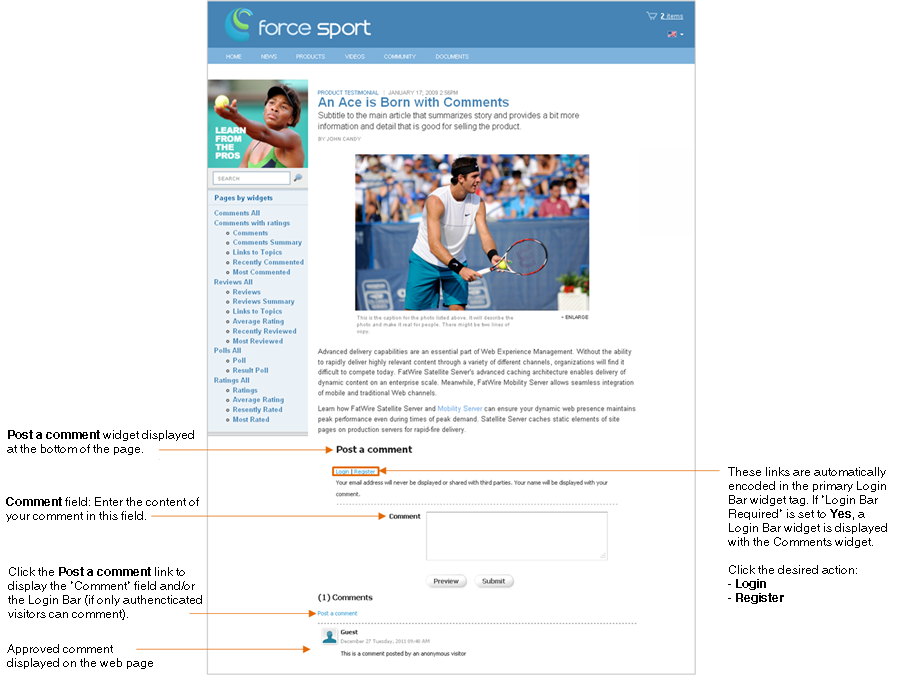
Figure 31-1 is an example of a web page on which a Comments widget tag is deployed. In this example, the Comments widget displays the Post a Comment link, which visitors can click to display the "Comment" field and/or the Login and Register links.
If moderators have configured the visitor permissions to allow anonymous visitors to post comments to the website, the comment field is displayed when you click the Post a Comment link. If the widget's visitor permissions are configured to allow only authenticated visitors to post comments, then visitors must log in to see the comment field.
Figure 31-1 Sample Web Page with Deployed Widgets
Description of "Figure 31-1 Sample Web Page with Deployed Widgets"
31.2 Working with Comments and Reviews Widgets as an Authenticated Visitor
This section provides instructions for logging in to the website on which community widget tags are deployed, and working with the widgets as an authenticated visitor.
Note:
The permissions authenticated visitors have to community widgets are determined by the configurations made to the widget tags in the Community interface. Therefore, certain instructions in this section may not be applicable to you.
This section contains the following topics:
-
Section 31.2.1, "Logging in to the Site as an Authenticated Visitor"
-
Section 31.2.2, "Posting Comments as an Authenticated Visitor"
-
Section 31.2.3, "Posting Reviews as an Authenticated Visitor"
-
Section 31.2.4, "Working with Comments as an Authenticated Visitor"
-
Section 31.2.5, "Working with Reviews as an Authenticated Visitor"
31.2.1 Logging in to the Site as an Authenticated Visitor
Logging in actuates the permissions and settings for authenticated visitors that were configured for the community widget tags in the Community interface.
-
Access the web page on which community widget tags are deployed.
-
Log in to the website.
-
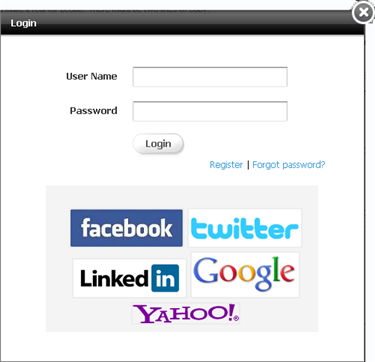
If the Login Bar is a standalone widget, navigate to the Login Bar widget and click the Login link.
-
If the Login Bar is embedded in the tag of the Comments or Reviews widget, navigate to the Comments or Reviews widget and click either Post a comment or Post a review. Then click Login.
Log in using your assigned credentials. Log in credentials are case-sensitive.
Figure 31-2 Community Widget Login Window
Description of "Figure 31-2 Community Widget Login Window"
Note:
If the Login Bar widget is configured to allow visitors to log in using credentials for third-party websites, visitors can log in to the website with credentials for social networks such as Facebook.
-
-
Click Login.
The "Comment" or "Review" field is displayed, as shown in Figure 31-3:
Figure 31-3 'Comment' and 'Review' Fields

Description of "Figure 31-3 'Comment' and 'Review' Fields"
-
Now that you are logged in, you can verify that the community widgets are configured with the appropriate permissions and moderation settings for authenticated visitors.
31.2.2 Posting Comments as an Authenticated Visitor
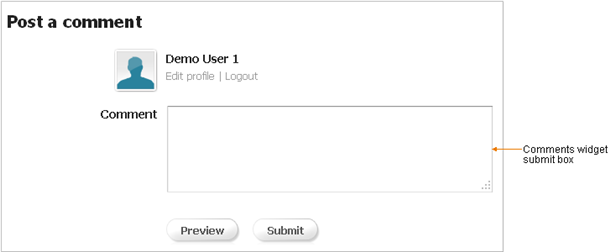
To determine whether the commenting permissions and moderation settings configured for authenticated visitors are deployed successfully, log in to the site and post a comment.
To post a comment as an authenticated visitor
-
Access a web page on which a Comments widget is deployed.
-
Log in to the website with your assigned credentials.
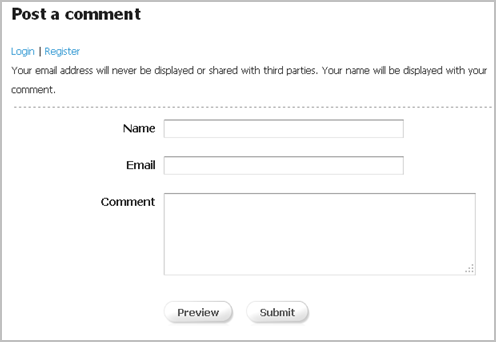
The "Comment" field is displayed, as shown in Figure 31-4:
-
In the Comment field, enter your comment.
-
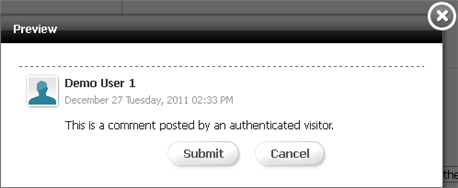
(Optional) Click Preview to preview your comment before posting it to the website.
-
Click Submit.
-
If pagination is enabled, and the sort order is Oldest at the top (specified in the Comments Appearance screen), the comment you posted is displayed as the last comment on the first page. This enables you to view the comment you just posted. Refreshing the page will place the comment in the appropriate order. For more information, see Section 25.3.1, "Reconfiguring the Comments Widgets' Appearance Settings."
-
The site's moderation settings (select Settings and then Moderation) determine whether an authenticated visitor's comment is automatically approved and displayed on the website, or if all comments must be manually approved before they are displayed on the website. For information about configuring moderation settings, see Section 30.2.5, "Working with the Moderation Screen."
-
If the comment is posted by a blacklisted visitor, then the comment must be manually approved before it is displayed to other visitors on the website. The comment is marked with a status of Inappropriate in the Community interface. For information about the Visitor Blacklist, see Section 30.2.3, "Working with the Visitor Blacklist Screen."
-
If the comment is posted by a whitelisted visitor, then the comment is automatically approved and displayed on the website. For information about the Visitor Whitelist, see Section 30.2.4, "Working with the Visitor Whitelist Screen."
-
31.2.3 Posting Reviews as an Authenticated Visitor
To determine whether the reviewing permissions and moderation settings configured for authenticated visitors are deployed successfully, log in to the site and post a review.
To post a review as an authenticated visitor
-
Access the web page on which the Reviews widget is deployed.
-
Log in to the website with your assigned credentials.
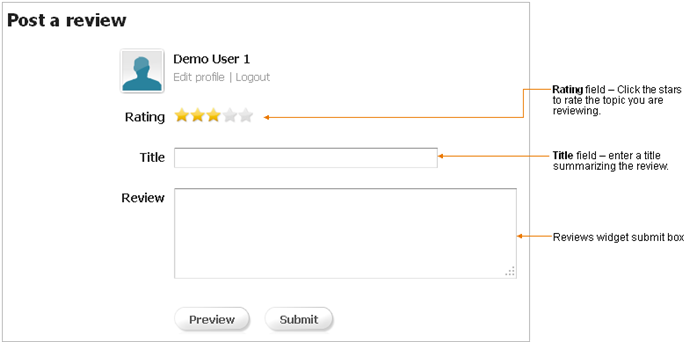
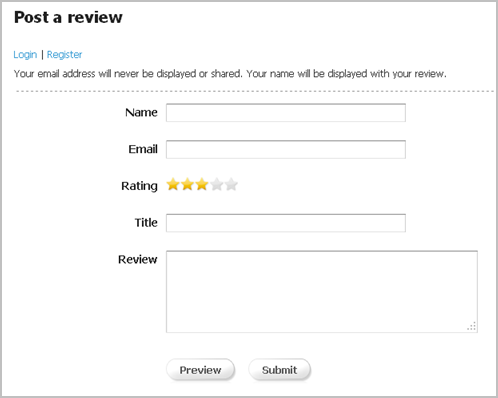
The "Review" field is displayed, as shown in Figure 31-6:
-
Fill in the fields. The fields you see are determined by the configurations made to the Reviews widget tag before deployment:
-
Rating field – Rate the topic by clicking the desired amount of stars.
-
Title field – Enter a title for your review. The title will be displayed above the content of your review.
-
Review field – Enter the content of your review in this field.
-
-
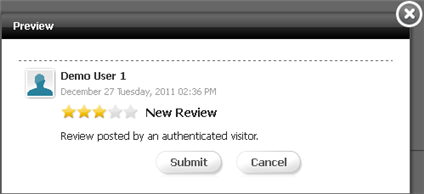
(Optional) Click Preview to preview your review before posting it to the website.
-
Click Submit.
-
If pagination is enabled, and the sort order is Oldest at the top (specified in the Reviews Appearance screen), the review you post is displayed as the last review on the first page. This enables you to view the review you just posted. Refreshing the page will place the review in the appropriate order. For more information, see Section 26.3.1, "Reconfiguring the Reviews Widgets' Appearance Settings."
-
The site's moderation settings determine whether an authenticated visitor's review is automatically displayed on the website, or if all reviews must be manually approved before they are displayed on the website. For information about configuring moderation settings, see Section 30.2.5, "Working with the Moderation Screen."
-
If the review is posted with a low rating (two stars or less), and the moderation settings are set to mark all reviews given a rating of two stars or less as Inappropriate, then the review is marked with a status of Inappropriate in the Community interface and must be manually approved before it is displayed on the website.
-
If the review is posted by a blacklisted visitor, then the review must be manually approved before it is displayed on the website. The review is marked with a status of Inappropriate in the Community interface. For information about the Visitor Blacklist, see Section 30.2.3, "Working with the Visitor Blacklist Screen."
-
If the review is posted by a whitelisted visitor, then the review is automatically approved and displayed on the website. For information about the Visitor Whitelist, see Section 30.2.4, "Working with the Visitor Whitelist Screen."
-
31.2.4 Working with Comments as an Authenticated Visitor
The actions authenticated visitors can perform on comments displayed on the website are determined by the visitor permissions, appearance settings, and moderation settings configured for the Comments widget tag.
This section contains the following:
31.2.4.1 Modifying Comments on the Website
If the Comments widget is configured to enable authenticated visitors to modify the comments they post, then authenticated visitors can modify their own comments directly on the website.
To modify a comment on the website
-
Access the web page on which you posted the comment and log in with your assigned credentials.
-
Mouse over the comment you wish to modify. In the menu that appears, click Edit (shown in Figure 31-8).
Figure 31-8 'Edit' Link Displayed Under a Posted Comment

Description of "Figure 31-8 'Edit' Link Displayed Under a Posted Comment"
-
In the "Edit" box, modify the comment.
Figure 31-9 'Edit' Dialog Box Displaying the 'Comment' Field
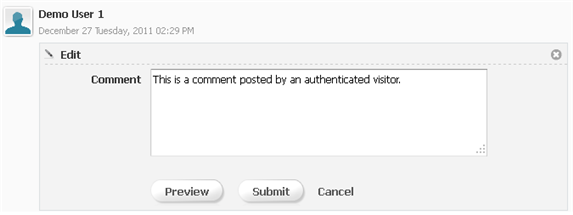
Description of "Figure 31-9 'Edit' Dialog Box Displaying the 'Comment' Field"
-
(Optional) Click Preview to preview how the modified comment will look on the website.
-
Click Submit.
The site's moderation settings determine whether the modified comment is automatically approved and displayed on the website, or if it must be manually approved before being displayed. For information about configuring moderation settings, see Section 30.2.5, "Working with the Moderation Screen."
31.2.4.2 Deleting Comments from the Website
If the Comments widget tag is configured to enable authenticated visitors to delete the comments they post, then authenticated visitors can delete their own comments directly from the website.
To delete a comment from the website
-
Access the web page on which you posted the comment and log in with your assigned credentials.
-
Mouse over the comment you wish to delete. In the menu that appears, click Delete (shown in Figure 31-10).
Figure 31-10 'Delete' Link Displayed Under a Posted Comment

Description of "Figure 31-10 'Delete' Link Displayed Under a Posted Comment"
-
Click Yes to delete the comment.
Figure 31-11 Delete Comment: Confirmation Box

Description of "Figure 31-11 Delete Comment: Confirmation Box"
The comment is deleted from both the website and the Community interface.
31.2.5 Working with Reviews as an Authenticated Visitor
The actions authenticated visitors can perform on reviews displayed on the website are determined by the visitor permissions, appearance settings, and moderation settings configured for the Reviews widget tag.
This section contains the following topics:
31.2.5.1 Modifying Reviews on the Website
If the reviews widget tag is configured to enable authenticated visitors to modify the reviews they post, then authenticated visitors can modify their own reviews directly on the website.
To modify a review on the website
-
Access the web page on which you posted the review and log in with your assigned credentials.
-
Mouse over the review you wish to modify. In the menu that appears, click Edit (shown in Figure 31-12).
Figure 31-12 'Edit' Link Displayed Under a Posted Review

Description of "Figure 31-12 'Edit' Link Displayed Under a Posted Review"
-
Modify the content in the desired fields.
Figure 31-13 'Edit' Dialog Box Displaying the 'Title' and 'Review' Fields
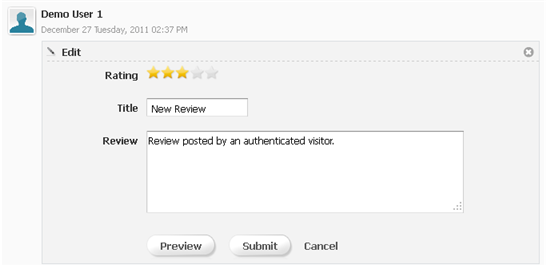
Description of "Figure 31-13 'Edit' Dialog Box Displaying the 'Title' and 'Review' Fields"
-
(Optional) Click Preview to preview how the modified review will look on the website.
-
Click Submit.
The site's moderation settings determine whether the modified review is automatically approved and displayed on the website, or if it must be manually approved before being displayed on the website. For information about configuring moderation settings, see Section 30.2.5, "Working with the Moderation Screen."
31.2.5.2 Deleting Reviews from the Website
If the Reviews widget tag is configured to enable authenticated visitors to delete their own reviews, then authenticated visitors can delete their own reviews directly from the website.
To delete a review from the website
-
Access the web page on which you posted the review you wish to delete, and log in with your assigned credentials.
-
Mouse over the review you wish to delete. In the menu that appears, click Delete (shown in Figure 31-14).
Figure 31-14 'Delete' Link Displayed Under a Posted Review

Description of "Figure 31-14 'Delete' Link Displayed Under a Posted Review"
-
Click Yes to delete the review.
Figure 31-15 Delete Review: Confirmation Box

Description of "Figure 31-15 Delete Review: Confirmation Box"
The review is deleted from both the website and the Community interface.
31.3 Working with Comments and Reviews Widgets as an Anonymous Visitor
This sections provides instructions for working with community widgets as an anonymous visitor. The actions you can perform as an anonymous visitor are determined by the configurations made to the community widget tags in the Community interface.
This section contains the following topics:
31.3.1 Posting Comments as an Anonymous Visitor
To ensure that the commenting permissions (configured in the "Commenter Permissions" screen) for anonymous visitors are configured and deployed successfully, post a comment to the website as an anonymous visitor.
To post a comment as an anonymous visitor
-
Access the web page on which the Comments widget tag is deployed.
-
Navigate to the "Comments" section and click the Post a Comment link.
If anonymous visitors can post comments, a "Post a comment" field is displayed (as shown in Figure 31-16):
-
Fill in the required fields. The fields you see are determined by the configurations made to the Comments widget tag in the Community interface:
-
Name and Email fields – If a name or email address is required, enter your information into the field(s) provided.
-
Comment field – Enter the content of your comment.
-
-
Click Submit.
-
If pagination is enabled, and the sort order is Oldest at the top (specified in the Comments Appearance screen), the comment you post is displayed as the last comment on the first page. This enables you to view the comment you just posted. Refreshing the page will place the comment in the appropriate order. For more information, see Section 25.3.1, "'Comments Appearance' Screen."
-
The site's moderation settings determine whether all comments are automatically approved and displayed on the website, or if comments posted by anonymous visitors must be manually approved before they are displayed on the website. For information about configuring moderation settings, see Section 30.2.5, "Working with the Moderation Screen."
-
If the comment is posted by an anonymous visitor whose IP address is blacklisted, then the comment must be manually approved before it is displayed on the website. The comment is marked with a status of Inappropriate in the Community interface. For information about the Visitor Blacklist, see Section 30.2.3, "Working with the Visitor Blacklist Screen."
-
31.3.2 Posting Reviews as an Anonymous Visitor
To ensure that the reviewing permissions for anonymous visitors are configured and deployed successfully, post a review to the website as an anonymous visitor.
To post a review as an anonymous visitor
-
Access a web page on which the Reviews widget tag is deployed.
-
Navigate to the "Reviews" section of the page and click the Post a Review link.
-
In the "Post a review" field, fill in the required fields. The fields you see are determined by the configurations made to the Reviews widget tag in the Community interface:
-
Name and Email fields – If a name and/or email address is required, enter your information into the field(s) provided.
-
Rating field – Rate the topic you are reviewing by clicking the desired amount of stars.
-
Title field – Enter a title summarizing the content of your review.
-
Review field – Enter the content of your review.
-
-
Click Submit.
-
If pagination is enabled, and the sort order is Oldest at the top (specified in the Reviews Appearance screen), the review you post is displayed as the last review on the first page. This enables you to view the review you just posted. Refreshing the page will place the review in the appropriate order. For more information, see Section 26.3.1, "Reconfiguring the Reviews Widgets' Appearance Settings."
-
The site's moderation settings determine whether all reviews are automatically approved and displayed on the website, or if reviews posted by anonymous visitors must be manually approved before being displayed on the website. For more information about configuring moderation settings, see Section 30.2.5, "Working with the Moderation Screen."
-
If the review is posted with a low rating (two stars or less), and the moderation settings are set to mark all reviews given a rating of two stars or less as Inappropriate, then the review is marked with a status of Inappropriate in the Community interface and must be manually approved before it is displayed on the website.
-
If the review is posted by an anonymous visitor whose IP address is blacklisted, then the review must be manually approved before it is displayed on the website. The review will be marked with a status of Inappropriate in the Community interface. For information about the Visitor Blacklist, see Section 30.2.3, "Working with the Visitor Blacklist Screen."
-
31.4 Sorting Comments and Reviews
When browsing comments (or reviews) on a web page, you can choose the order in which the comments (or reviews) are displayed.
-
Access a web page on which the Comments (or Reviews) widget tag is deployed.
-
Navigate to the Comments (or Reviews) widget. Click the Sort by drop-down menu, and select one of the following options:
-
Newest at the top – Displays the most recently posted comments or reviews at the top of the list.
-
Oldest at the top – Displays the least recent comments or reviews at the top of the list.
-
Most ranked at the top – Displays the comments or reviews that site visitors rate frequently at the top of the list.
-
Least ranked at the top – Displays the comments or reviews that site visitors rate the least at the top of the list.
The comments (or reviews) are displayed in the order you specify.
-
31.5 Flagging Inappropriate Posts
If a comment or review contains inappropriate or inaccurate content, visitors can assist in the moderation process by flagging that particular post. The type of visitors (authenticated and anonymous) who can flag comments and reviews is determined by the flagging permissions configured in the Community interface.
To flag a comment or review on the website
-
Access the web page on which the comment (or review) you wish to flag is displayed.
-
If you are an authenticated visitor, log in using your assigned credentials. If you are an anonymous visitor, skip to step 3.
-
Mouse over the comment (or review) that contains the inappropriate or inaccurate content, and click Flag (as shown in Figure 31-18).
Figure 31-18 'Flag' Link Displayed Under a Posted Comment and Review

Description of "Figure 31-18 'Flag' Link Displayed Under a Posted Comment and Review"
-
In the "Flag Content" box, click Flag.
You have successfully flagged the comment (or review). Once a moderator accesses the Community interface, he will see Flagged next to the approved post's status, and can then take the appropriate actions to either remove or edit the post.
31.6 Replying to Posted Comments
If the comments widget tag is configured to support a threaded commenting structure, then visitors can post replies to comments that are displayed on the website. The type of visitors (authenticated and anonymous) who can reply to comments is determined by the visitor permissions configured in the Community interface.
-
Access the web page that contains the comment to which you wish to post a reply.
-
If you are an authenticated visitor, log in with your assigned credentials. If you are an anonymous visitor, skip to step 3.
-
Mouse over the comment to which you wish to post a reply. In the menu that appears, click Reply (as shown in Figure 31-20).
Figure 31-20 'Reply' Link Displayed Under a Posted Comment

Description of "Figure 31-20 'Reply' Link Displayed Under a Posted Comment"
-
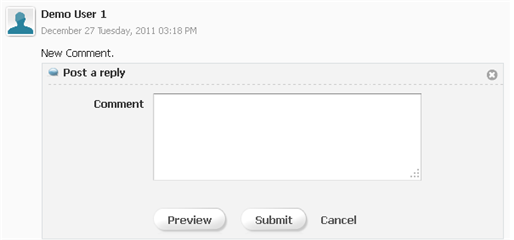
In the "Post a Reply" section (shown in Figure 31-21), enter your reply to the comment. If you are posting a reply as an anonymous visitor, you may have to enter your name, email address, and/or a verification code depending on the configurations made to the Comments widget tag in the Community interface.
-
(Optional) Click Preview to preview how the response will look on the website.
-
Click Submit.
The reply is posted underneath the comment, as shown in Figure 31-22.
Figure 31-22 Reply Displayed Under the Comment

Description of "Figure 31-22 Reply Displayed Under the Comment"
Your post is displayed under the comment to which you replied. If this is a moderated discussion, then the reply must be approved before it is displayed on the website.
31.7 Viewing Rating Details for Stars Ratings Widgets
If the Stars Ratings widget is deployed on a web page (as either a standalone widget or with a Reviews widget), you can view the "Details" pop-up which displays the total number of stars each visitor who submitted a rating gave to the web page.
To view rating details for Stars Ratings widgets
-
Access a web page on which a Stars Ratings widget is deployed (standalone or with a Reviews widget).
-
Navigate to the Stars Ratings widget and point to the stars (which display the average rating given to the web page).
The "Details" pop-up box is displayed (as shown in Figure 31-23).
Figure 31-23 Stars Ratings 'Detail' Pop-Up Box

Description of "Figure 31-23 Stars Ratings 'Detail' Pop-Up Box"
31.8 Ranking Visitor Comments and Reviews
If the Comments and Reviews widgets are configured to support individual rankings by visitors, then visitors can rank the content of an individual comment or review by indicating whether the comment or review is helpful.
Note:
For information about enabling visitors to rank individual comments and reviews, see the description of the "Comment Ranking" field in Table 25-4 and the description of the "Review Ranking" field in Table 26-4.
To rate individual comments or reviews
-
Access the web page to which the comment or review you wish to rank is posted.
-
If you are an authenticated visitor, log in with your assigned credentials. If you are an anonymous visitor, skip to step 3.
-
Navigate to the comment or review you wish to rank. In the "Was this helpful?" field (shown in Figure 31-24), select either Yes or No.
31.9 Sharing Comments and Reviews with Facebook, Twitter, and Google+
If the Login Bar widget is configured to allow visitors to share comments and reviews via Facebook, Twitter, and Google+, and a visitor has an account with any of these social network providers, then that visitor can share a link on Facebook, Twitter, or Google+ to the web page on which the comment or review is posted.
To share a comment or review via Facebook, Twitter, or Google+
-
Access the web page to which the comment or review you wish to share is posted.
-
Point to the comment or review you wish to share via Facebook, Twitter, or Google+. In the menu that appears, click one of the icons in the Share to field. In Figure 31-25, you can click either the Facebook, Twitter, or Google+ icon.
-
In the pop-up window, enter your credentials for the social network provider with which you chose to share the comment or review.
A link to the web page is posted to your Facebook, Twitter, or Google+ news feed. Clicking this link opens the web page to which the comment or review is posted.
31.10 Creating and Sharing a Permalink
A permalink is a URL that is used to refer to a specific comment or review on a web page. When you access this URL, a static version of the web page opens displaying the desired comment or review as the main focus of the page. Visitors can view and copy the link for a particular comment or review by clicking the Permalink option, located below the desired comment or review.
-
Access the web page to which the desired comment or review is posted.
-
In the menu that appears, click Permalink (as shown in Figure 31-26).
The address bar displays the URL of the web page with the appended ID of the desired comment or review.
-
Copy the URL displayed in the address bar.
You can share this URL by posting it to a news feed, sending it to a contact through email, and so on.
31.11 Working with Ratings Widgets
If the widgets related to rating functionality are configured to enable authenticated visitors to rate topics on the website, only authenticated visitors can use the ratings widgets deployed on the pages of the website. Otherwise, all visitors (authenticated and anonymous) can use the ratings widgets. To determine whether the visitor permissions for rating content on the website are deployed successfully, follow the instructions in this section.
To submit a rating for a web page
-
Access the web page on which a ratings widget is deployed. The type of ratings widgets you may see are: Stars Ratings, Thumbs Up/Down Ratings, Like It Ratings, and Recommend Ratings.
If the ratings widget requires visitors to log in to the website in order to submit a rating, see step 2. If all visitors can rate the content of an asset, skip to step 3.
-
Log in to the ratings widget by clicking the widget to open the "Login" pop-up box. In the "Login" pop-up box, enter your assigned credentials and then click Login.
-
Submit a rating for the topic. The type of rating field that is displayed to you is determined by which ratings widget tag was deployed on the web page. The following is a list of rating fields you may see on a web page:
-
Stars Ratings – (Complex rating) This widget (shown in Figure 31-27) allows you to rate the content of a topic by selecting from a range of one to five stars. One star represents the lowest rating that can be given to a topic and five stars represents the highest rating.
Note:
If the rating you post is low (two stars or less), and the moderation settings are set to mark all ratings of two stars or less as Inappropriate, the rating is marked with a status of Inappropriate in the Community interface and must be manually approved before it is accounted for in the total number of votes posted to the web page. For information about enabling manual moderation, see Section 30.2.5, "Working with the Moderation Screen."
-
Thumbs Up/Down Ratings – (Binary rating) This widget (shown in Figure 31-28) displays thumbs up and thumbs down icons. Click one of the icons to indicate whether the content of the topic is informative.
-
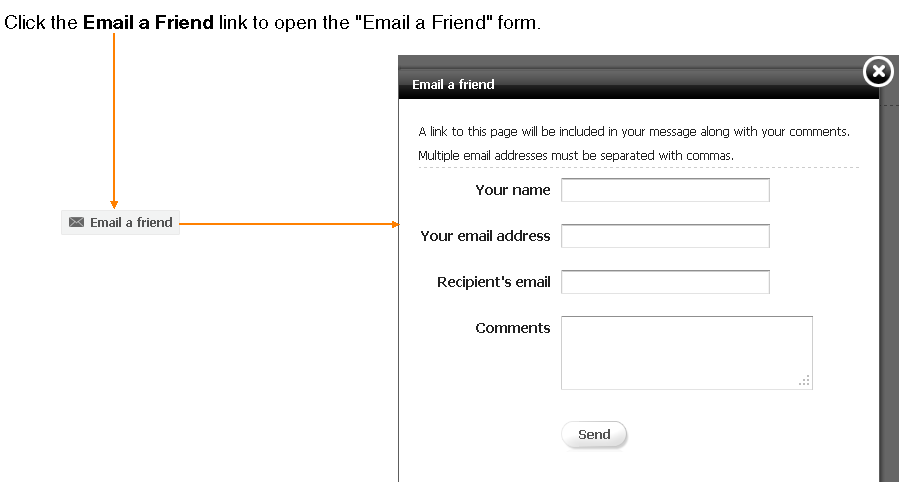
Recommend Ratings – (Unary rating) This widget (shown in Figure 31-29) displays an Email a Friend link which you can click to email the URL of the web page to a contact who may find the content useful.
-
Like It Ratings – (Unary rating) This widget (shown in Figure 31-30) displays a Like link which you can click to indicate that you liked the content of a given topic.
-
31.12 Working with Poll Widgets
Poll widgets are used to survey site visitors on a particular topic. Each visitor can submit one vote per poll.
-
Access the web page on which a Poll Tag is deployed.
-
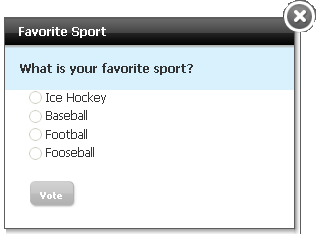
Navigate to the poll widget and select an answer for the poll's question. (For example, Figure 31-31 displays the "Favorite Sport" poll deployed on a web page.)
-
Click Vote.
-
If Show Results is disabled (Section 29.3, "Creating a New Poll"), then the visitor will not see the summary of the poll's results. Instead, the poll and its answer options are re-displayed to the site visitor. However, the answer options are greyed out, ensuring that each visitor submits only one vote.
-
If Show Results is enabled and the Results View field is set to PopUp (Section 29.3, "Creating a New Poll"), the View Poll Results button is displayed inside the Poll widget. Click the View Poll Results button to view a summary of the poll's results in a pop up box.
-
If Show Results is enabled and the Results View field is set to In-Site (Section 29.3, "Creating a New Poll"), a summary of the poll's results is displayed inside the Poll widget.
-
To work with the poll Results widget
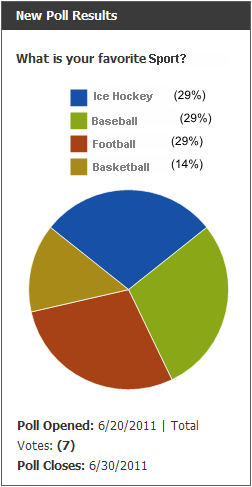
Access the web page on which the poll's Results Tag is deployed and navigate to the poll Results widget. Figure 31-32 is an example of a poll results widget configured to display the summary of the poll's results as a pie chart.
