16 Workflow
Most websites are produced by a team of people in which different individuals assemble content, edit and review it, and decide what goes where and when to update the pages. Work flows from one person to the next in a predictable way, and that process is called workflow.
This chapter presents a brief overview of workflow concepts followed by procedures on how to perform specific tasks related to workflow. It includes the following sections:
16.1 Overview
The following sections describe basic workflow concepts and terminology.
Note:
In addition to the functionality described in this chapter, WebCenter Sites provides the following workflow functionality through the WebCenter Sites Admin interface:
-
Workflow groups – allow you to manage a defined set of assets in a coordinated manner that allows those assets to reach the end of the workflow process together, prior to publishing.
-
Workflow reports – allow you to track the progression of assets and user assignments in workflow.
For information on workflow groups and reports, see the Oracle Fusion Middleware WebCenter Sites Administrator's Guide.
16.1.1 Workflow and Assets
Assets can (but do not have to) be assigned to a workflow. A workflow routes an asset through a series of editorial tasks (states) by assigning the tasks to the appropriate users at the appropriate times. Either specific assets or all assets of a certain type can be assigned to a workflow.
Depending on how your site is configured, assets might be assigned to a workflow either automatically (for example, when you create a new asset) or manually. The workflow system lets WebCenter Sites direct and track the assignment of assets to users and specifies what users can do with those assets through permissions.
The flow of the editorial tasks performed on the asset, as well as who is authorized to perform those tasks at each point in the workflow is defined by a workflow process. The workflow administrator can define as many workflow processes per asset type as needed.
Note:
During workflow, the asset is not electronically transferred from one person to the next. What is transferred is permissions to the asset. The asset itself remains in its original location in the database throughout the workflow process and throughout its existence in WebCenter Sites.
16.1.2 States and Steps
A workflow process defines a series of states. A state is a point in the workflow process that represents the status of the asset at that point, for example, "Ready to Edit" or "Ready for Approval."
States are linked together in a specific order by steps. A step is the movement of the asset between states. Because creating workflow steps links workflow states in a specific order, creating steps in a workflow process is what organizes the process. In each step, the asset goes from a start ("from") state to an end ("to") state. When creating the workflow process, the administrator defines the states and links them via the appropriate steps.
Steps and states have names; for example, in the FirstSite II sample site, "Send for Approval" is a step originating from the "Ready to Edit" state and resulting in the "Ready for Approval" state. An asset can move from one state to another via more than one step. For example, an asset that is ready for approval can be rejected because of factual errors or stylistic problems, each type of rejection having its own step.
Assets are assigned to users by roles. As an asset progresses through the workflow, each step assigns it to users holding roles authorized to work on the asset in the next state. For each step, there is at least one role authorized to complete work on an asset and allow it to continue moving through the workflow. In certain cases, a user holding the appropriate role can choose between steps; for example, a user holding the Approver role can either approve or reject an asset assigned to him/her for approval.
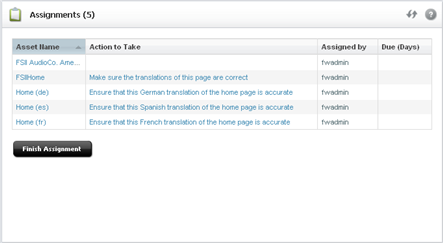
When you log in to WebCenter Sites, the "Assignments" section of the dashboard (Home tab) provides a summary of your present workload, from which you can access the assets assigned to you. When your work on the asset is complete, you use the Finish Assignment function to invoke the next step in the workflow; the workflow process then moves the asset to the next state and assigns the asset to the appropriate users. Note that a step can be conditional; that is, certain users or all users can be prevented from taking a step until some condition is met.
16.1.3 Users, Roles, and Participants
A user in WebCenter Sites is a person who is assigned a WebCenter Sites user name which he/she uses to identify him/herself and to log in to WebCenter Sites. What a user can or cannot do is determined by the role (or roles) assigned to that user by the administrator.
A role describes and determines the function(s) of a user in a CM site by granting him/her permissions to perform specific functions; in the context of workflow, these permissions are called function privileges.
The workflow process grants roles (not individual users) the appropriate function privileges. The function privileges are enforced only when an asset has been assigned to a workflow. Function privileges depend not only on the user's role, but also on the state of the asset and whether or not the asset has been assigned to the user.
Note:
Because function privileges are granted to a user through his/her role(s), they function independently of the access permissions assigned by the administrator at the user level.
For example, a user might not normally have the permission to edit "Content" assets, but he/she can have the function privilege to do so if he/she has the Editor role, is participating in a workflow process for "Content" assets, and the asset he/she wants to edit is in the appropriate workflow state.
Each role required by a particular workflow state in a workflow process is a participating role. Participating roles are chosen for each state in a workflow process by the administrator. Each user whose assigned role(s) match those required by that workflow state is therefore a participant for that state in the workflow process and is authorized to take the workflow step leading from that state to the next state.
Unless the administrator decides otherwise, assets placed in workflow are assigned to all available participants for a given role. However, depending on how your administrator configured a given workflow step, you may be able to limit which users can work with a particular asset by choosing the desired assignees from among the participants available in each participating role.
An assignee is a workflow participant chosen to work on a specific assignment. Assignees are set when an asset is assigned to a workflow, but you may have the ability to choose different assignees when the asset is already in a workflow process. How assignees are chosen for a workflow process is determined by the configurations your administrator made to the steps in the workflow process. Workflow steps can be configured to allow users assigned specific roles to choose assignees. However, workflow steps can also be configured to automatically assign an asset to all users with a specified role or to assign an asset to only the user who created it.
When assignees are set for a given asset in the workflow, only the chosen assignees will see the asset in their assignment lists, and only they can complete the assignment before the workflow process changes the state of the asset.
16.1.4 Workflow Assignments
An assignment is an asset that a chosen participant (an assignee) is (or is supposed to be) working on. An asset appears on the participant's assignment list as soon as the asset enters a state for which the participant has a role to fulfill.
A typical workflow design generates an e-mail notification when you are given a workflow assignment. You can see an updated list of your assignments at any time in the "Assignments" section of your dashboard (located on the Home tab).
16.1.4.1 Assignment Duration
Each workflow state has an associated estimated time of completion (deadline) for an assignment. If the administrator has granted you the appropriate permission, you can override the default estimate for the next assignment.
As the assignment deadline nears, associated assignment actions in the form of e-mail notifications can be triggered as timed events relative to the estimated time to completion. For example:
-
You receive a reminder the day before your assignment is due.
-
You and the workflow initiator receive a warning the day the assignment is due.
-
The initiator receives notification the day after the due date that the assignment has not been completed.
16.1.4.2 Voting Your Assignments
If you participate in workflow, you have a vote. Voting means taking a workflow step that moves the asset from its current state to the next, after you have completed the task required by the current workflow state (such as editing an article) and committed the changes to the WebCenter Sites database (saved the asset), if applicable. You cast your vote by either using the Finish Assignment function (available in the "Assignments" section of the dashboard) or by viewing the status of an asset and finishing your assignment using the Workflow commands drop-down menu (accessible by selecting View and then selecting Status in the menu bar when working with the asset). If more than one participant with a given role has the assignment, either one, or all of them must vote before the asset moves to the next state, depending on how the workflow was set up by the administrator.
Depending on your role in the workflow process, when you vote to finish the assignment you may be given a choice of steps to take; for example, if you are an approver and your current assignment is to either approve an asset for publishing or reject it, when you finish your assignment you can invoke either a step that approves the asset for publishing, or a step that rejects it due to factual error, depending on your choice. When you vote, the asset moves to the next workflow state unless the step you chose is in disagreement with the step chosen by other assignees with the same role as you.
If, for some reason, you are unable to complete your assignment, you can abstain from voting, as long as yours is not the last (or only) vote for that particular role and/or step. When you abstain, you still have the assignment, but the asset can continue through workflow. If you change your mind, you can reverse your abstention by voting again, as long as the asset has not already moved to the next state.
16.1.4.3 Delegating Your Assignments
Another way of handling an assignment is to delegate it to another participant holding the same role as you, assuming the asset you are delegating is not already assigned to that person for the current workflow state.
Your function privileges (set by the administrator) determine whether you can delegate your assignments. Also, the administrator can delegate assignments on your and other assignees' behalf, if necessary.
Delegating an assignment can trigger associated delegate actions in the form of e-mail notifications. For example:
-
The recipient of the new assignment is notified.
-
The workflow administrator is notified of the assignment delegation.
16.1.5 Deadlocks
An asset moves from one state to the next when assignees cast their votes (that is, take a step) for a given workflow state. When defining the workflow process, the administrator decides whether each step is all-voting, that is, whether all assignees must vote (take the step) for the asset to move to the next state. By default, steps are not all-voting, which means that the first assignee to vote in a given workflow state determines the flow of the asset, and the assignments for the remaining assignees for that workflow state are cancelled. If the administrator set the step to be all-voting, the asset is held in its current workflow state until all assignees have voted, at which time the asset moves to the next state.
If there is a choice of steps and each step is all-voting, the potential for a deadlock exists. A deadlock occurs when all of the assignees must vote, and the voting is not unanimous on which step to take. A workflow process typically includes a deadlock action to generate e-mail notifications to all assignees, showing the vote tally and advising all assignees to vote again in favor of the majority. Deadlocks cause additional work for all the users involved, and should be avoided whenever possible. They should also be resolved as quickly as possible so that the flow of work is not hindered.
16.2 Sample Workflow
The FirstSite II sample site includes six sample workflow processes which guide assets of different types from creation to approval for publishing. The sample workflows are simple, transitioning through three states via five possible steps, but they serve to illustrate how a workflow process works. This section is based on the FSII: Approval for Content sample workflow process included in the FirstSite II sample site.
The FSII: Approval for Content sample workflow process has the following roles participating: author, editor, approver, and administrator. Each role has only a single participant (your organization will most likely have more complex processes, with several users participating in each role). A participant from any of the roles can create a new "Content" asset, which automatically assigns it to the FSII: Approval for Content workflow. By creating the asset, workflow is initiated. The asset then moves from author to editor to approver. The approver can either approve or reject the asset. If the approver rejects the asset, it goes back to the editor. The administrator can perform the functions of author, editor, and approver at any point in the workflow, as well as return an already approved asset back to the editor for additional changes.
16.2.1 Sample Workflow States and Steps
The FirstSite II sample site includes a sample workflow process called FSII: Approval for Content. The flow of the process is shown in Figure 16-1:
The steps and states from this workflow process are described in Table 16-1:
| Asset in State... | Step | Description | Asset Moves to State... |
|---|---|---|---|
|
none |
Create |
A user with the ContentAuthor role creates a "Content" asset, which automatically assigns it to the FSII: Approval for Content workflow. |
Ready to Edit |
|
Ready to Edit |
Send for Approval |
A user with the ContentEditor role receives an e-mail notification of the assignment. The editor revises the asset to complete the assignment. |
Ready for Approval |
|
Ready for Approval |
Reject |
A user with the Approver role receives an e-mail notification of the assignment. The approver completes the assignment by rejecting the asset because of factual errors. The rejection triggers a notice to the editor, who must make some corrections and resubmit the asset for approval. |
Ready to Edit |
|
Ready for Approval |
Approve and Lock |
The approver completes the assignments by approving the asset. The asset is flagged in the WebCenter Sites database as "ready to publish" for selected destinations. |
Approved and Locked |
|
Approved and Locked |
Return for Edit |
The workflow administrator (holding the Workflow Admin role) reviews the asset and determines that the content needs to be updated with additional information. The workflow administrator then uses votes to return the asset to the editor for revision. |
Ready to Edit |
16.2.2 Sample Workflow Scenario
This section describes the typical flow of a "Content" asset through the FSII: Approval for Content workflow process.
1. The author creates the asset and writes the content
The process starts when Conrad the author creates the "Content" asset. Since the "Content" asset type in the FirstSite II sample site is configured to automatically place each new "Content" asset in workflow, Conrad's asset is automatically placed into the FSII: Approval for Content workflow process. Conrad writes the content and saves the "Content" asset.
When Conrad saves the asset, the workflow process automatically changes the state of the asset to "Ready to Edit," assigns it to Connie the editor, and sends Connie an e-mail notice about the new assignment.
2. The editor edits the asset and sends it for approval
Connie the editor logs in, checks her assignment list, and opens the "Content" asset for editing. She reads the content and fixes some punctuation. When done, Connie saves her changes and then votes to send the asset on for approval.
The workflow process changes the state of the asset to "Ready for Approval," assigns it to Napoleon the approver, and sends Napoleon an e-mail notice about his new assignment.
3. The approver approves the asset
Napoleon the approver is already logged in, so when he receives his e-mail, he accesses the "Assignments" section of the dashboard to view his assignment list. Napoleon opens the newly assigned "Content" asset and examines it. It looks fine, so he can vote to either approve or reject the asset for this workflow process. The workflow process presents both options to him.
Note:
If two or more users with the same role have the same assignment in a given workflow state, the first vote cast determines the next state for the asset.
For example, if the FSII: Approval for Content workflow process included two approver users who both had a vote when approving the asset for publishing, a rejection by either of them would cancel the assignment of the other person and return the asset to the editor.
Your administrator might set up a workflow in which a disagreement like this causes a deadlock (see Section 16.1.5, "Deadlocks") that has to be resolved before the asset is returned to the previous state or moved to the next one.
Since Napolean voted to approve the asset, the workflow process changes the state of the asset to "Approved and Locked," and flags it in the database as "ready to publish." The asset will be published to the website during the next publishing session.
4. The workflow administrator returns to the editor
When new information becomes available, it has to be added to the asset. When that happens, the workflow administrator can vote in the workflow process to return the asset to Connie for review and updating.
The workflow process automatically changes the state of the asset to "Ready to Edit," assigns it to Connie the editor, and sends Connie an e-mail notice about the new assignment.
When Connie finishes her assignment, the updated asset will need to be re-approved before it can be re-published to the website.
16.3 Viewing Your Assignments
To manage your workload, you can view a list of your current assignments and their status by accessing the "Assignments" section of your dashboard (located on the Home tab).
Note:
As you work in the interface, new assignments might be given to you, and you may complete some of your current assignments, causing your assignment list to change. Check your assignment list periodically to make sure you stay up to date with your assignments.
To view a list of your workflow assignments
-
Log in to WebCenter Sites, select the site you want to work with and select the icon for the WebCenter Sites Contributor interface.
-
Access your dashboard by clicking the Home tab. Then navigate to the "Assignments" section of your dashboard.
The "Assignments" section of your dashboard displays a list of your workflow assignments.
The list provides information about the asset's name, the action to take in the workflow process, the name of the user who assigned the asset to you, and the amount of days left until the assignment is due for completion.
-
Click an asset's name to open it in its Inspect view (in either Form Mode or Web Mode). You can also right-click an asset in the list to open the asset's Edit view or to preview the asset.
16.4 Using Workflow Functions
The following sections describe the workflow functions you use in the Contributor interface. These functions are available from the menu bar (select View, and then select Status) when you are working with an asset. Depending on your function privileges, some of the described functions may not be available to you.
This section provides information about the following topics:
-
Section 16.4.9, "Viewing an Asset's Participant (Assignee) List"
-
Section 16.4.11, "Examining the Workflow Progress of an Asset"
16.4.1 Assigning an Asset to a Workflow
An asset can be assigned to a workflow either automatically or manually.
Automatic workflow assignment is set up by the administrator for selected asset types. When you create a new asset of such type, the asset is automatically placed in the workflow process assigned to that asset type. Consult your administrator to find out which asset types are set up for automatic workflow assignment.
Manual workflow assignment is available to users with appropriate permissions, assuming a workflow process is assigned to the selected asset type.
To manually assign an asset to a workflow
Note:
Before an asset can be assigned to a workflow, the administrator must first assign one or more workflow processes to the asset type of the asset in question; otherwise, the option to assign the asset to a workflow is not available. Consult your administrator to find out which workflow processes are available to which asset types on your system.
-
Log in to WebCenter Sites, select the site you want to work with and select the icon for the WebCenter Sites Contributor interface.
-
Find and open the asset you want to place in workflow. Do one of the following:
-
Search for and open the desired asset:
-
In the Search field, enter search criteria identifying the asset and click the magnifying glass button.
A "Search" tab opens displaying the results of your search.
-
In the list of search results, click the name of the desired asset.
-
-
If you previously bookmarked the asset, open it from the Bookmarks node in the My Work tree:
-
In the My Work tree, expand the Bookmarks node. (If the My Work tree is collapsed, expand it by clicking the My Work bar.)
A list of bookmarked assets is displayed underneath the Bookmarks node.
-
In the list of bookmarked assets, double-click the name of the desired asset.
For more information on searching, see Chapter 6, "Finding and Organizing Assets."
A tab opens displaying the asset's Inspect view (in either Form Mode or Web Mode).
-
-
-
In the menu bar, select View, then select Status.
-
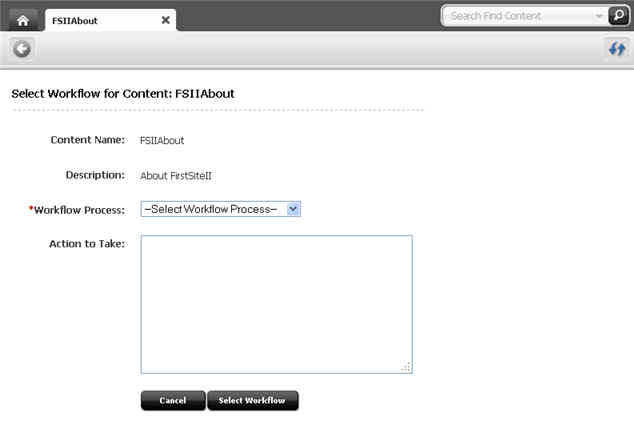
In the "Workflow commands" drop-down menu, choose Select Workflow.
The tab displays the "Select Workflow" form, shown in Figure 16-3:
-
In the "Workflow Process" drop-down menu, select a workflow process.
-
If the workflow process is configured in such a way that you must select assignees for each role involved in the workflow process, you will see the Set Participants... button. Do the following:
-
Click Set Participants...
The tab displays the "Set Participants" form.
-
Select at least one user for each role and then click Set Participants.
Each participant you select becomes an assignee in the respective role(s) for this asset.
-
-
(Optional) In the "Action to Take" field, enter brief instructions for the person receiving the assignment.
-
Click Select Workflow.
-
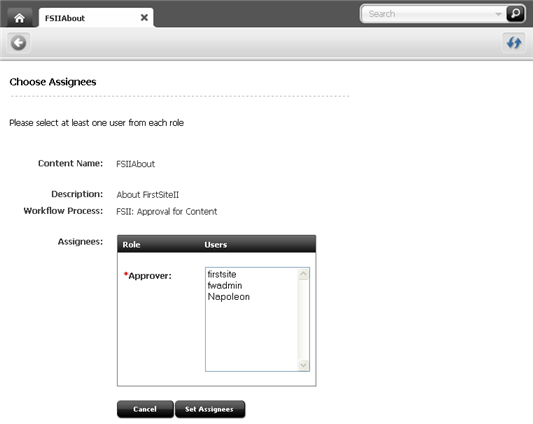
If the administrator enabled the selection of assignees for the first step in the workflow process, the tab displays the "Choose Assignees" form (shown in Figure 16-4):
In such cases, select at least one user for each role, then click Set Assignees.
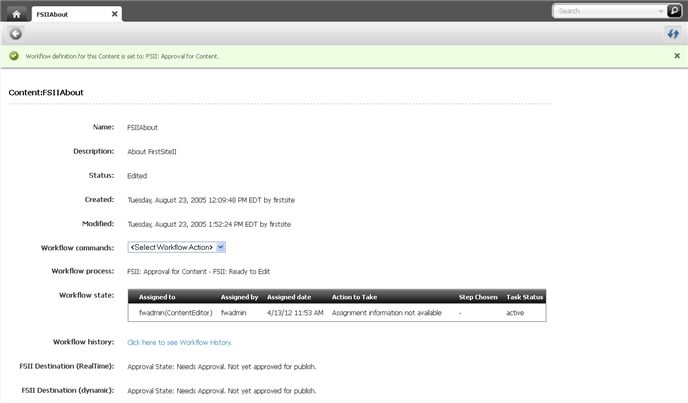
The tab re-displays the asset's status summary screen (as shown in Figure 16-5).
At this point, the asset is in workflow; participants with roles required by the next state typically receive e-mail notifications of their assignments.
16.4.2 Setting a Process Deadline
A process deadline is the overall time allotted for an asset to pass through a workflow process. By default, no process deadline is set. This deadline is independent of the assignment deadline described later in this section; that is, the total of the individual assignment deadlines does not necessarily add up to a process deadline.
Note:
Deadlines are informational only – the system does not impose any sort of penalty or issue error messages when a deadline is exceeded.
Before you can set a process deadline, the workflow administrator must first have done the following:
-
Allowed a process deadline to be set for this workflow process.
-
Assigned you a workflow administrator role for the workflow process, or otherwise provided you with the right function privileges.
The option to set a process deadline is available only if both of the above conditions are met. Contact your administrator to find out if you have the appropriate privileges and whether setting a process deadline is enabled for the workflow process in question.
-
Log in to WebCenter Sites, select the site you want to work with and select the icon for the WebCenter Sites Contributor interface.
-
Find and open the asset for which you want to set a process deadline:
-
Access your dashboard by clicking the Home tab.
-
Navigate to the "Assignments" section of the dashboard.
-
In the list of assets, click the name of the asset for which you want to set a process deadline.
A tab opens displaying the asset in its Inspect view (in either Form Mode or Web Mode).
-
-
In the menu bar, select View, then select Status.
The tab displays the asset's status summary screen.
-
In the "Workflow commands" drop-down menu, select Set Process Deadline.
Note:
If you do not see the Set Process Deadline function in the drop-down menu, stop here. The function was not enabled by the administrator or you do not have the right permissions to access it.
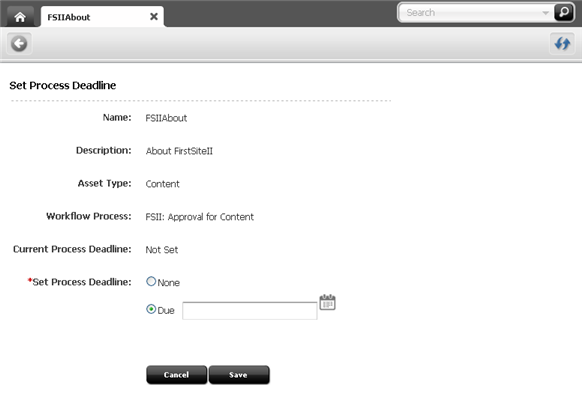
The tab displays the "Set Process Deadline" form (as shown in Figure 16-6):
-
In the "Set Process Deadline" field, select the Due radio button and then use the date picker to select a date.
When setting a process deadline, you should consider where the asset is in the workflow process, and the cumulative time of the remaining steps. The default is to have no process deadline.
-
Click Save.
The tab re-displays the asset's status summary screen.
16.4.3 Setting an Assignment Deadline
An assignment deadline is the time allotted to the assignee to complete an assignment as an asset advances through workflow. This deadline is independent of the process deadline described earlier in this section; that is, the total of the individual assignment deadlines does not necessarily add up to a process deadline.
Note:
Deadlines are informational only — the system does not impose any sort of penalty or issue error messages when a deadline is exceeded.
Before you can set an assignment deadline, the workflow administrator must first have done the following:
-
Allowed an assignment deadline to be set for this workflow state.
-
Assigned you a workflow administrator role for the workflow process, or otherwise provided you with the right function privileges.
The option to set the assignment deadline is available only if both of these conditions are met. Contact your administrator to find out if you have the appropriate privileges and whether an assignment deadline is allowed for the workflow state in question.
Note:
This procedure describes how to set an assignment deadline from an asset's Inspect view. You can also set an assignment deadline when you complete an assignment for an asset. In such case, the "Finish My Assignment" form will include an Assignment Deadline field.
-
Log in to WebCenter Sites, select the site you want to work with and select the icon for the WebCenter Sites Contributor interface.
-
Find and open the asset for which you want to set an assignment deadline:
-
Access your dashboard by clicking the Home tab.
-
Navigate to the "Assignments" section of the dashboard.
-
In the list of assets, click the name of the asset for which you want to set an assignment deadline.
A tab opens displaying the asset in its Inspect view (in either Form Mode or Web Mode).
-
-
In the menu bar, select View, then select Status.
-
In the "Workflow commands" drop-down menu, select Set Assignment Deadline.
Note:
If you do not see the Set Assignment Deadline function in the drop-down menu, stop here. The function was not enabled by the administrator or you do not have the right permissions to access it.
The tab displays the "Set Assignment Deadline" form (shown in Figure 16-7):
Figure 16-7 'Set Assignment Deadline' Form
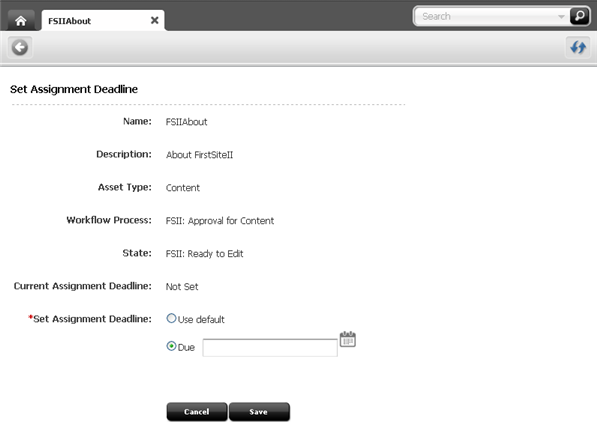
Description of "Figure 16-7 'Set Assignment Deadline' Form"
-
In the "Set Assignment Deadline" field, enter a date using the date picker. The default assignment deadline is set by the administrator in the workflow state definition. For example, in the FSII: Approval for Content sample workflow, each state has a duration of one year from the current date and time.
-
Click Save.
The tab re-displays the asset's status summary screen.
16.4.4 Finishing Your Assignments
After you complete your work for an assignment, you need to notify the system that you are finished so the asset can continue to move through the workflow.
To finish your assignment for an asset
-
Log in to WebCenter Sites, select the site you want to work with and select the icon for the WebCenter Sites Contributor interface.
-
Access the desired asset's "Finish My Assignment" form. Do one of the following:
-
If you are currently working with the asset:
-
In the menu bar, select View, then select Status.
The tab displays the asset's status summary screen.
-
In the "Workflow commands" drop-down menu, select Finish My Assignment.
-
-
If the asset is not already open:
-
Access your dashboard by clicking the Home tab.
-
Navigate to the "Assignments" section of your dashboard.
-
In the list of assets assigned to you, select the desired asset's row and then click Finish Assignment.
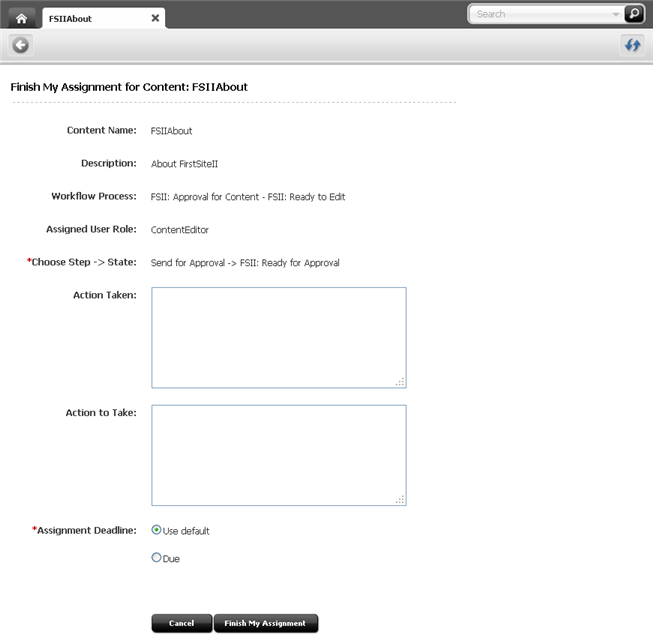
The "Finish My Assignment" form is displayed (shown in Figure 16-8).
-
-
-
Complete the form as follows:
Note:
You can cancel this procedure at any time by clicking either Cancel (next to the Finish My Assignment button) or Go Back (in the asset's toolbar).
-
If you hold multiple participant roles in the workflow process, in the "Assigned User Roles" field, select the role for which you are finishing this assignment.
-
(Optional) In the "Action Taken" field, enter a short description of the work you completed on the asset.
-
(Optional) In the "Action to Take" field, enter a short suggestion for the next person who will work with the asset.
-
If setting the assignment deadline is enabled for the next step in the workflow process, you will see the "Assignment Deadline" field.
If you want to override the time allotted for the next assignment, in the "Assignment Deadline" field, select the Due radio button and then use the date picker to enter a date. If you do not specify a date, the assignment is due within the time determined by the next workflow state.
Note:
This feature appears only if enabled by the workflow administrator.
To set the assignment deadline, you must hold an administrative role in the workflow process or otherwise have the right privileges. For more information, see Section 16.4.3, "Setting an Assignment Deadline."
-
-
If the administrator has set up the workflow process in a way that requires you to choose assignees for the next step when you finish your assignment, WebCenter Sites displays the "Choose Assignees" form (Figure 16-9):
Select at least one user for each displayed role, then click Set Assignees.
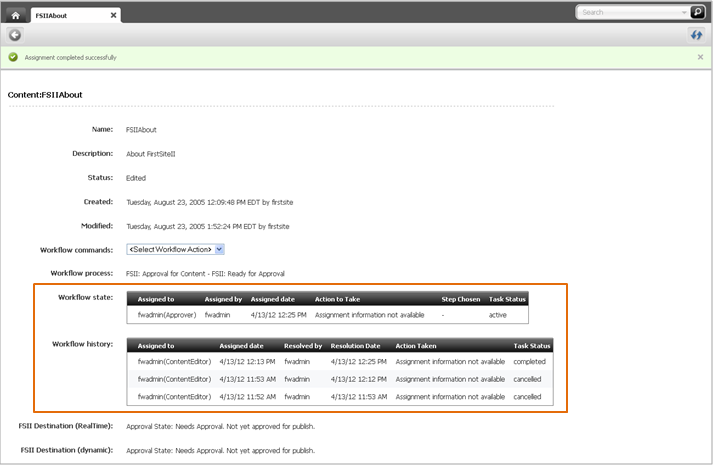
The tab displays the asset's status summary screen (Figure 16-10), showing the changes in the "Workflow State" and "Workflow history" fields. For more information about these fields, see Section 16.4.11, "Examining the Workflow Progress of an Asset."
What happens after you complete your assignment depends on the way the administrator set up the next workflow step. There are five possible options:
-
Assign From a List of Participants – when you (or another user with the appropriate privileges) assign an asset to a workflow, you have the option to decide which participants in each role get the assignment when the asset enters a workflow state requiring those roles. This is the default mechanism for moving an asset through a workflow.
-
Choose Assignees When Step is Taken – this option, described in step 5 is similar to the "Assign From a List of Participants" option described earlier, but instead of predetermining at the beginning of the workflow who will get the assignment during which workflow state(s), you choose assignees for the next workflow state in real-time each time you take a step.
-
Retain "From" State Assignees – you keep the assignment as the asset moves to the next state; this allows you to continue working on the asset in that state. You probably know why it is appropriate for you to keep the assignment, but if you do not, ask your WebCenter Sites or workflow administrator.
-
Assign To Everyone – the asset is assigned to all users holding roles participating in the current workflow process.
-
No Assignments – as the asset moves to the next state, it remains in the workflow so that function privileges defined for the workflow process are enforced. However, the asset is assigned to no one and participant roles alone (through their assigned function privileges) determine who can work on the asset, and how.
16.4.5 Delegating Your Assignments
As you review your assignment list, you might find that you will be unable to complete certain assignments. For example, you might notice that an assignment's due date falls during your scheduled vacation time. In such situations, you can delegate your assignment to another user who has the same role as you, assuming that the user does not already have an identical assignment for the asset; that is, if both you and another user have the Editor role, you cannot delegate the asset to the other user if he/she already has the asset assigned through the Editor role. (The asset can still be assigned to the user through a different role or another workflow process.)
-
Log in to WebCenter Sites, select the site you want to work with and select the icon for the WebCenter Sites Contributor interface.
-
Find and open the asset you wish to delegate to another user:
-
Access your dashboard by clicking the Home tab.
-
Navigate to the "Assignments" section of the dashboard.
-
In the list of assets, click the name of the desired asset.
A tab opens displaying the asset in its Inspect view (in either Form Mode or Web Mode).
-
-
In the menu bar, select View, then select Status.
-
In the "Workflow commands" drop-down menu, select Delegate Assignment.
Note:
If you do not see the Delegate Assignment function in the drop-down menu, stop here. You do not have the right permissions to access the function or there are no other users in your role to whom you can delegate your assignment.
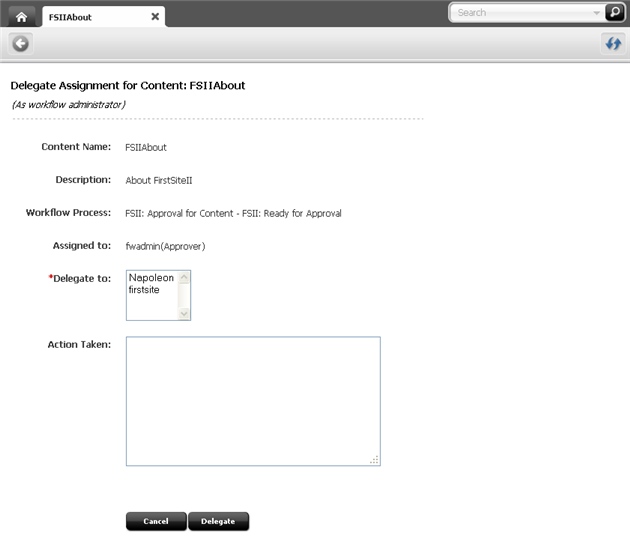
The tab displays the "Delegate Assignment" form, shown in Figure 16-11.
-
If you hold a workflow administrator role and multiple users with the same role are assigned to this step in the workflow process, the "Assigned to" field displays a drop-down menu. In the "Assigned to" drop down list, if you are delegating the assignment on behalf of another user, select the user who wishes to delegate the assignment. Otherwise, select your own user name.
-
In the "Delegate to" field, select the user to whom you want to delegate the assignment.
-
(Optional) In the "Action Taken" field, enter a comment about your action.
-
Click Delegate.
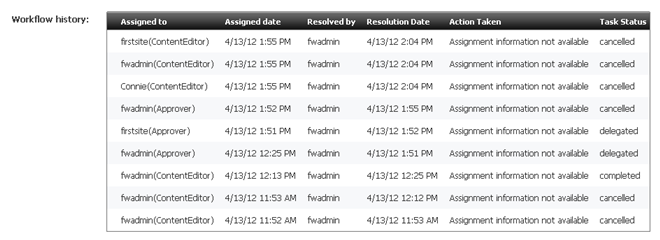
The tab displays the asset's status summary screen. If the "Workflow History" table is not displayed in the field, click the Click here to see Workflow History link. The delegation is denoted in the "Task Status" column for the assignment you delegated.
This action also triggers a notification e-mail to the new assignee, assuming your site is configured to do so.
16.4.6 Abstaining from Voting
Sometimes, you are unable to deal with a particular assignment: your workload is too heavy, or perhaps you have been miscast in your role. In such situations, you can abstain from voting (that is, waive your participation), as long as yours is not the last (or only) vote for that particular role and/or step. When you abstain, you still have the assignment, but the asset can continue through workflow.
To abstain from voting on an assignment
-
Log in to WebCenter Sites, select the site you want to work with and select the icon for the WebCenter Sites Contributor interface.
-
Find and open the asset for which you want to abstain from voting:
-
Access your dashboard by clicking the Home tab.
-
Navigate to the "Assignments" section of the dashboard.
-
In the list of assets, click the name of the asset for which you wish to abstain from voting.
A tab opens displaying the asset in its Inspect view (in either Form Mode or Web Mode).
-
-
In the menu bar, select View, then select Status.
The tab displays the asset's status summary screen.
-
In the "Workflow commands" drop-down menu, select Abstain From Voting.
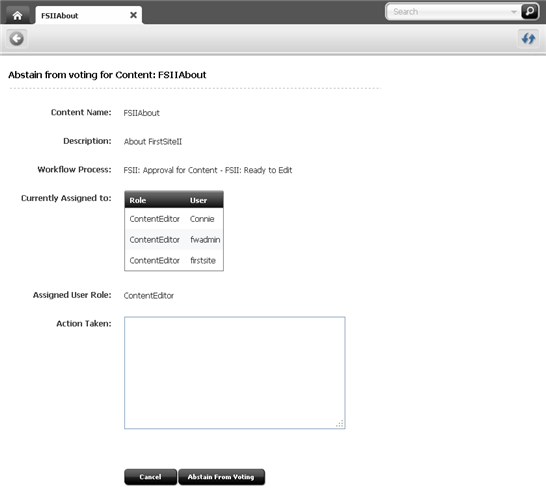
The tab displays the "Abstain from voting" form (Figure 16-12):
-
If you hold multiple participant roles in the workflow process, select the role for which you are abstaining from voting on this assignment in the "Assigned User Role" field.
-
(Optional) In the "Action Taken" field, enter a brief explanation for your abstention and click Abstain from Voting.
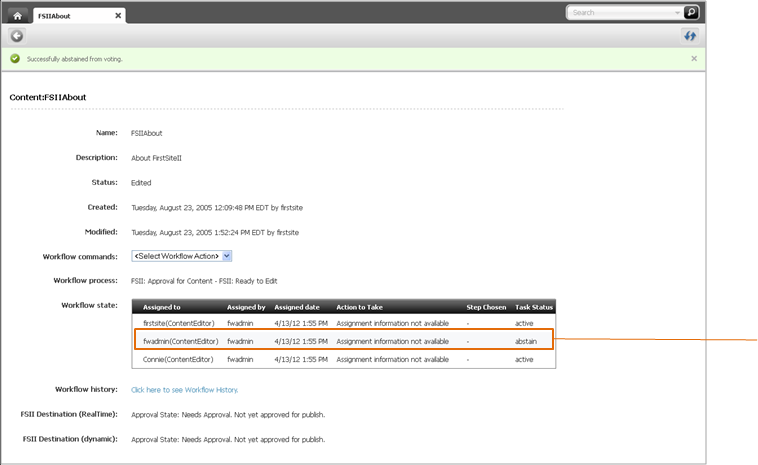
The tab displays the asset's status summary screen (Figure 16-13). The abstention is denoted in the "Workflow state" field. Keep in mind that abstaining does not cancel your assignment.
16.4.7 Resolving Deadlocks
A deadlock can occur when there is a choice of steps to move the asset to the next state, and each step requires all assignees to vote. If the vote is not unanimous in favor of a single step, there is a deadlock.
Frequently, resolving deadlocks involves offline communication and negotiation among assignees to achieve consensus; as such, deadlocks cause additional work for everyone involved and should be avoided whenever possible. If a deadlock occurs, it should be resolved as quickly as possible so that the flow of work suffers minimal delay.
To resolve a deadlock, certain participants must change their votes to achieve unanimity. If you receive an e-mail notification that your vote is the one causing the deadlock, you must vote again to break the deadlock.
To resolve a deadlock, do one of the following:
-
Vote again on the assignment and select to finish it, as described in Section 16.4.4, "Finishing Your Assignments".
-
In some cases, you can also resolve the deadlock by changing your vote to an abstention, which clears the way for the asset to move to the next workflow state (see Section 16.4.6, "Abstaining from Voting").
16.4.8 Removing an Asset from Workflow
You can remove an asset from workflow assuming you have the permissions to do so. When you remove an asset from workflow, all assignments for the asset are cancelled.
To remove an asset from workflow
-
Log in to WebCenter Sites, select the site you want to work with and select the icon for the WebCenter Sites Contributor interface.
-
Find and open the asset you wish to remove from workflow:
-
Access your dashboard by clicking the Home tab.
-
Navigate to the "Assignments" section of the dashboard.
-
In the list of assets, click the name of the desired asset.
A tab opens displaying the asset in its Inspect view (in either Form Mode or Web Mode).
-
-
In the menu bar, select View, then select Status.
The tab displays the asset's status summary screen.
-
In the "Workflow commands" drop-down menu, select Remove from Workflow.
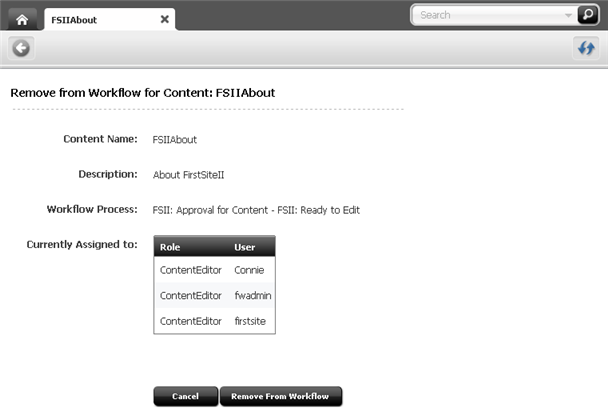
The tab displays the "Remove from Workflow" form (shown in Figure 16-14):
-
If you are sure you want to remove the asset from workflow, click Remove From Workflow. (Otherwise, click Cancel.)
The tab re-displays the asset's summary screen. The "Workflow process" field denotes the removal. All assignments for the asset are automatically cancelled.
16.4.9 Viewing an Asset's Participant (Assignee) List
To examine an asset's participant (assignee) list
-
Log in to WebCenter Sites, select the site you want to work with and select the icon for the WebCenter Sites Contributor interface.
-
Find and open the asset whose participant list you wish to view:
-
Access your dashboard by clicking the Home tab.
-
Navigate to the "Assignments" section of the dashboard.
-
In the list of assets, click the name of the desired asset.
A tab opens displaying the asset in its Inspect view (in either Form Mode or Web Mode).
-
-
In the menu bar, select View, then select Status.
-
In the "Workflow commands" drop-down menu, select Show Participants.
Note:
If you do not see the Show Participants function in the drop-down menu, stop here. The administrator has not enabled the function or you do not have the right permissions to access it.
The tab displays the "Show Participants" summary screen (shown in Figure 16-15):
For each step in the workflow process, the "Show Participants" summary displays the following:
-
Step – steps involved in the current workflow process for the asset.
-
Users Authorized – users authorized to take the next step in the workflow process when they hold the assignment for the asset.
-
Users Notified – users who will get the next assignment for the asset.
-
-
When you are finished viewing the list, click the Go Back icon in the asset's toolbar to return to the asset's Inspect view.
16.4.10 Setting Workflow Participants
Once you have placed an asset in a workflow and chosen the assignees for each role in the workflow process, you might find that you forgot to include a certain user as an assignee for a particular role. Or perhaps you realized that you gave the assignment to a certain user by mistake. In such cases, you can modify the list of participants for an asset while the asset is in workflow.
-
Log in to WebCenter Sites, select the site you want to work with and select the icon for the WebCenter Sites Contributor interface.
-
Find and open the asset for which you want to set participants:
-
Access your dashboard by clicking the Home tab.
-
Navigate to the "Assignments" section of the dashboard.
-
In the list of assets, click the name of the desired asset.
A tab opens displaying the asset in its Inspect view (in either Form Mode or Web Mode).
-
-
In the menu bar, select View, then select Status.
The tab displays the asset's status summary screen.
-
In the "Workflow commands" drop-down menu, select Set Participants.
Note:
If you do not see the Set Participants function in the drop-down menu, stop here. The administrator has not enabled the function or you do not have the right permissions to access it.
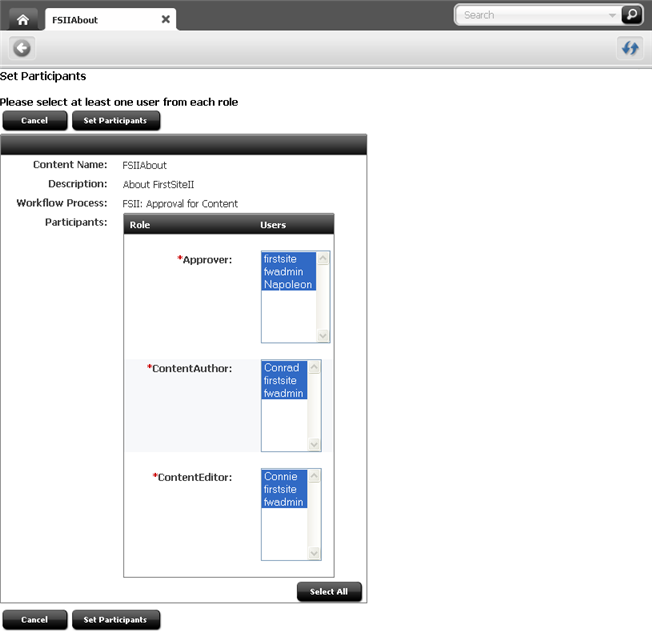
The tab displays the "Set Participants" form (shown in Figure 16-16):
Each participant you select in this form becomes an assignee in the respective role(s) for this asset.
-
Choose the desired assignees for this assignment by selecting the names of the users in each of the role lists.
-
When you have selected the desired assignees, click Set Participants.
The tab displays the asset's status summary screen. The newly selected assignees are denoted in the "Workflow state" field.
Note:
The participants list updates as the asset passes through each step in the workflow process. However, added users get the assignment only if the workflow state assigned to their role has not yet been reached.
16.4.11 Examining the Workflow Progress of an Asset
To examine the workflow progress of an asset
-
Log in to WebCenter Sites, select the site you want to work with and select the icon for the WebCenter Sites Contributor interface.
-
Find and open the asset whose workflow progress you want to view:
-
Access your dashboard by clicking the Home tab.
-
Navigate to the "Assignments" section of the dashboard.
-
In the list of assets, click the name of the desired asset.
A tab opens displaying the asset in its Inspect view (in either Form Mode or Web Mode).
-
-
In the menu bar, select View, then select Status.
The tab displays the asset's status summary screen.
-
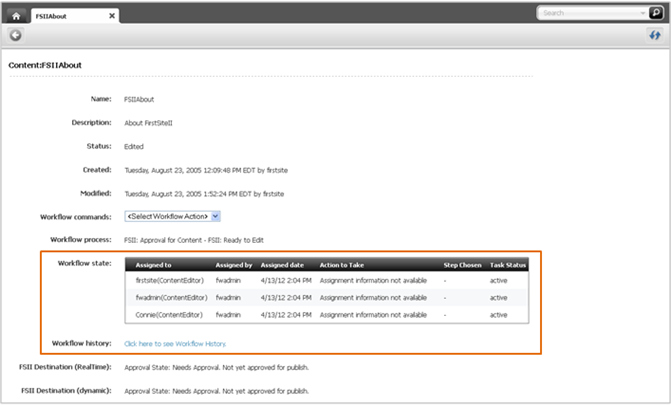
Navigate to the fields containing the asset's workflow summary (shown in Figure 16-17):
-
The Workflow process field indicates the workflow process which the asset is currently passing through.
-
The Workflow state field (Figure 16-18) displays a table that indicates where the asset currently is in the workflow process and to whom the asset is currently assigned.
-
The Workflow history field (Figure 16-19) displays a table that shows the assignments completed on the asset so far, and the result of each assignment. Each row in the list represents a single assignment. Items are ordered with the most recently completed assignment at the top of the list.
If you do not see the "Workflow history" table, click the Click here to see Workflow History link to display the table.
Table 16-2 defines all of the columns in the "Status" and "Workflow history" lists.
Table 16-2 Columns in the 'Status' and 'Workflow history' Lists
Column Definition Assigned To
The user name(s) of the assignee(s) for each assignment. Note that the user's role appears in parentheses following the user name.
Assigned By
The user name of the assignee who finished working with the asset and assigned it to the next participant. In the "Workflow history" list, the very first entry in this column (at the bottom of the list) shows the user name of the person who assigned the asset to the workflow process.
Assigned Date
The date and time the asset was assigned to the user.
Action to Take
Instructions from the user who assigned the asset, assuming that person entered instructions in the "Finish Assignment" form when they finished their assignment (see Section 16.4.4, "Finishing Your Assignments"). If the text is longer than the width of the column, click the text to view its entirety.
Step Chosen
The step indicated by the user who completed the assignment, when there is a choice of next step in the "Finish Assignment" form.
Action Taken
Information about the work this user did with the asset (if information was entered on the form). If the text is longer than the width of the column, click the text to view its entirety.
Resolved By
The person whose action moved the asset to the next state.
Resolution Date
The date and time the action was taken to move the asset to the next state.
Task Status
The status of the assignment. Possible values are as follows:
-
Abstain - the assignee has abstained from voting.
-
Active - the asset is currently assigned to someone.
-
Cancelled - the first vote moved the asset to the next state, so the assignment has been cancelled for the other assignees, or the asset has been removed from workflow.
-
Completed - the assignee has completed the step.
-
Delegated - the assignment has been delegated to another user in the same role.
-
Queued - the asset has multiple assignees for the current state, the next step is all-voting, and not everyone has voted yet. (Also appears if the asset is deadlocked.)
-

