6 Finding and Organizing Assets
WebCenter Sites provides an easy and effective way to find assets you want to work on. Once you find them, you can both save the search criteria you used to find the assets and organize the assets into a personalized list for easy future access.
This chapter describes the basic procedures for finding and organizing assets, illustrated with examples from the avisports sample site.
This chapter contains the following sections:
6.1 Overview of Finding Assets
WebCenter Sites allows you to easily find assets matching the criteria you specify. Note that search results will include only assets that you have permissions to work with. (Permissions are set by your administrator.)
6.1.1 Search Behavior in the WebCenter Sites Contributor Interface
The WebCenter Sites Contributor interface is integrated with the Lucene search engine. Because of this integration, the search behavior in the Contributor interface is as follows:
-
Before you can perform searches in the Contributor interface, the administrator must enable search indexing on your system (through the WebCenter Sites Admin interface).
-
The Contributor interface allows you to search across all asset types in a given site. You do not have to know the asset type of the asset(s) you want to find in order to begin a search. You do, however, have the option to limit your search to a specific asset type.
-
The Contributor interface searches through the names and values of all fields within all assets. For example, you can search for all assets that contain the word flowers without having to select specific attribute names to search through.
-
The Contributor interface allows you to customize your searches by formulating your search queries, as described in Section 6.1.2, "Search Guidelines."
6.1.2 Search Guidelines
When performing searches in the Contributor interface, use the guidelines in the following table to formulate your search queries. Customizing your search queries allows you to perform more precise searches.
Note that searching is not case-sensitive. For example, searching for Jack will return assets that contain Jack and assets that contain jack.
| To find... | ...do the following | Example |
|---|---|---|
|
Assets that contain a phrase. |
Enclose the phrase in quotes. |
To find assets that contain the phrase blue flowers, enter "blue flowers" as your search query. |
|
Assets that contain variations of a term and match the character length of the term. |
Use the ? (question mark) symbol to indicate a single-character wildcard. A search term cannot begin with a wildcard. |
To find assets that contain test or text, enter te?t as your search query. To find assets that contain either book or back, enter b??k as your search query. |
|
Assets that contain variations of a term, but may not match the character length of the term. |
Use the * symbol to indicate a multi-character wildcard. A search term cannot begin with a wildcard. |
To find assets that contain test, tester, or testing, enter test* as your search query. To find assets that contain jeanne or jeanine, enter jea*e as your search query. |
|
Assets that contain all of the specified terms. |
Join the terms with the AND operator. |
To find assets that contain both jack and jill, enter jack AND jill as your search query. |
|
Assets that contain a specific term but do not contain another term you specify. |
Exclude the unwanted terms using the NOT operator. |
To find assets that contain jack but do not contain jill, enter jack NOT jill as your search query. |
|
Assets that must contain a specific term and may contain another term you specify. |
Precede a term with the + (required) operator to indicate it is a required term. |
To find assets that must contain jack and may contain jill, enter +jack jill as your search query. |
|
Assets that contain a specific term, excluding assets that also contain another term you specify. |
Precede a term with the - (prohibited) operator to indicate the exclusion. |
To find assets that contain jack but exclude those that also contain jill, enter jack -jill as your search query. |
|
Assets that contain terms similar in spelling to the term you specify. |
Append the ~ (tilde) operator to a term to perform a fuzzy search on that term. |
To find assets that contain jack, including occurrences that are misspelled, enter jack~ as your search query. |
6.1.3 Types of Searches You Can Perform in the Contributor Interface
When searching for assets in the Contributor interface, you can perform either a simple search or an Advanced search:
-
Simple searches allow you to search for a keyword or phrase across names and values of all fields within all assets. Simple searches also enable you to narrow down the results of your search to a specific asset type. For instructions on performing a simple search, see Section 6.2, "Performing a Simple Search."
-
Advanced searches allow you to search for assets by attributes: creation date, start and end date, locale, unique identifier, name, description, tags, author, and type – or any combination of these items. For instructions on performing an advanced search, see Section 6.3, "Performing an Advanced Search."
You can also save the search criteria you used to perform a search (simple or Advanced). You can either save your search criteria as a Saved Search so that you can run the search at another time, or as an asset (of type ContentQuery) which can then be placed on a page and the results of the query are displayed to site visitors who access that page.
6.2 Performing a Simple Search
Note:
The asset types for which you can search are determined by your permissions and the asset types available from the Contributor interface.
-
Log in to WebCenter Sites, select the site you want to work with and select the icon for the WebCenter Sites Contributor interface.
-
Specify your search criteria as follows:
-
In the Search field, enter the desired search criteria. Refer to Section 6.1.2, "Search Guidelines" to find out how to formulate your search query to narrow the scope of your search.
-
(Optional) In the Search field, click the down-arrow to render the "Search Type" drop-down box. Select the asset type to which you want to limit your search. If you do not make a selection, WebCenter Sites will search across all asset types in the current site.
-
-
Click the magnifying glass button.
Note:
In the Contributor interface, your search results are based on information drawn from a database index which is updated at regular intervals. After creating or editing an asset, there might be a short delay before those changes are reflected in the search results. If you have questions, consult your WebCenter Sites administrator.
-
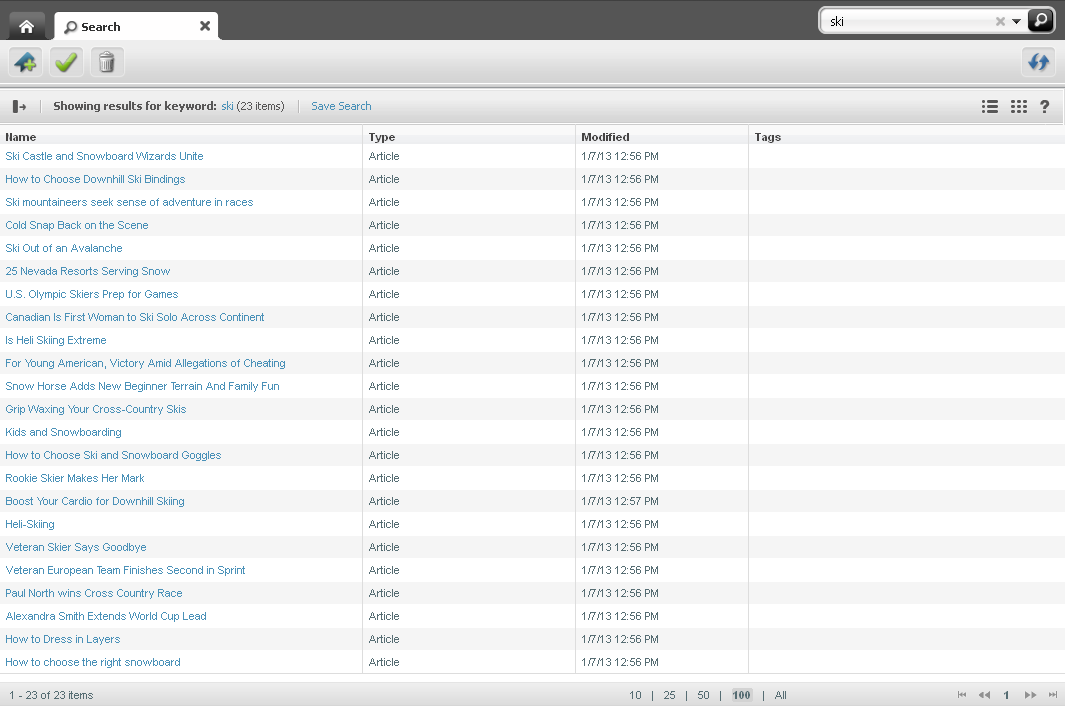
If you are not currently working with any assets, WebCenter Sites displays the search results list in a "Search" tab.
-
If you are working with an asset, the search results list is automatically docked to the right of the workspace.
Figure 6-2 Search Results Docked to the Right of an Asset
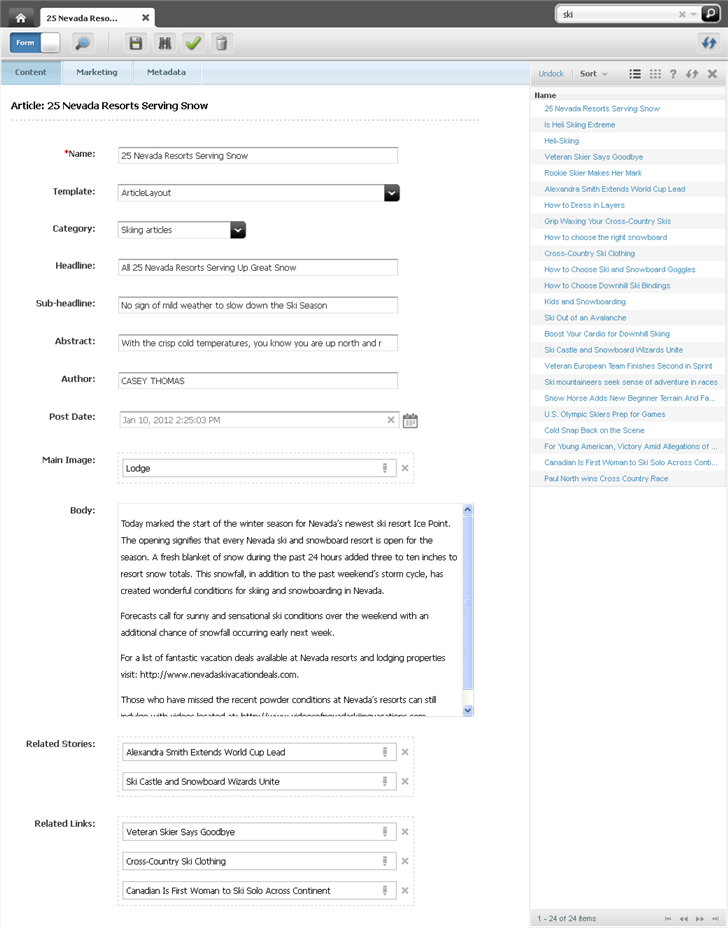
Description of "Figure 6-2 Search Results Docked to the Right of an Asset"
-
-
In the search results list, select the asset(s) you wish to work with. To more easily find specific assets within the search results list, you can navigate through the list, sort the results of your search, dock or undock the results list, and display each asset listed in the results list as thumbnail images.
For instructions on working with search results list, see Section 6.4, "Working with the Search Results List."
6.3 Performing an Advanced Search
Advanced searches enable you to search for assets by creation date, start and end date, locale, unique identifier, name, description, author, and type – or any combination of these items.
To perform an advanced search for an asset
-
Log in to WebCenter Sites, select the site you want to work with and select the icon for the WebCenter Sites Contributor interface.
-
In the Search field, select the down-arrow and then click Advanced Search.
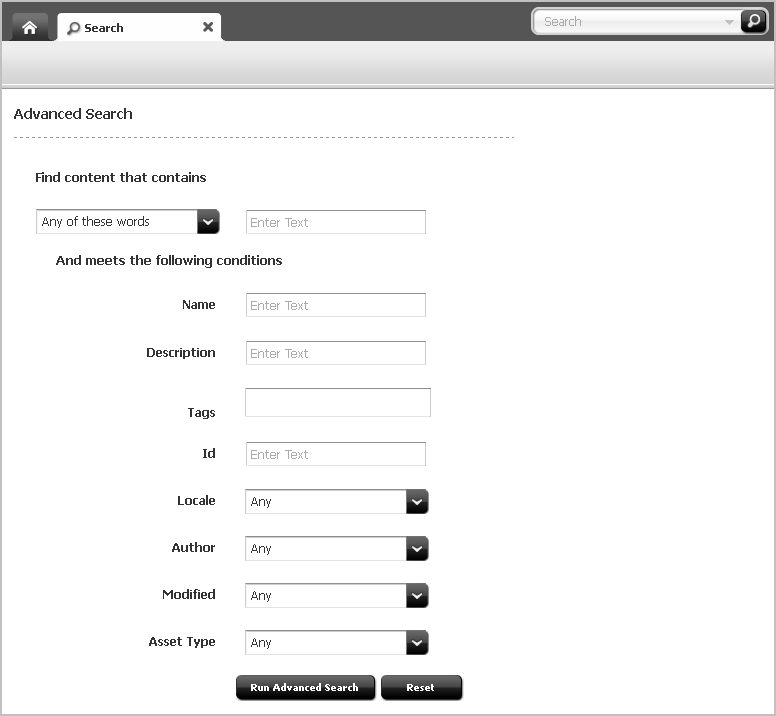
The "Search" tab displays the "Advanced Search" screen.
-
In the "Advanced Search" screen, specify criteria in as many of the fields that follow as you need to narrow your search:
-
In the "Find content that contains" section, specify how to match search conditions:
-
In the text box, enter words or phrases for which to search. The same options described in Section 6.1.2, "Search Guidelines," may be used in this field.
-
Specify conditions that the results of the search must match:
To have your search results match all the search criteria you specify, select All of these words from the drop-down list.
To have your search results match any one of the search criteria you specify, select Any of these words from the drop-down list.
-
-
In the "And meets the following conditions" section, specify any other criteria that the results of the search must meet:
-
Search for assets whose names contain criteria specified in the Name field.
-
Search for assets whose descriptions contain criteria specified in the Description field.
-
Perform a tag-based query on assets that have been tagged with a specific word or phrase.
-
Search for assets whose unique identifiers contain criteria specified in the Id field.
-
If your company tracks multilingual content using Locales, you can limit your search to assets in a selected location by choosing an option from the Locale drop-down list. For more information about managing multilingual content and about the Locale field, see Section 11, "Working with Multilingual Assets".
-
Search for assets created by a specific user by selecting the name of the desired content provider from the Author drop-down list.
-
Search for a range of time in which assets were created by selecting a time from the Modified field. If you select Custom Range, enter the date you want to search from and to in the "From" and "To" fields.
-
Search only assets of a particular type by selecting an item from the Asset Type drop down list. You may see one or both of the following fields depending on the configurations made to the Lucene search engine by your site administrator:
If the asset type you chose has multiple subtypes associated with it, narrow your asset type search to a specific subtype, by specifying a subtype in the Asset Subtype field.
If the site administrator configured the Asset Type Search and Attributes for Asset Type Index search in the WebCenter Sites Admin interface, you will see the "Enter search keyword for asset attributes" section. Limit a search to specific attributes of an asset type by selecting the attribute from the drop-down menu and clicking Add.
Note:
For information about configuring search features in the WebCenter Sites Admin interface, see the Oracle Fusion Middleware WebCenter Sites Administrator's Guide.
-
-
-
Click Run Advanced Search to perform a search using the criteria you specified. To reset the fields in the "Advanced Search" screen, click Reset.
-
If you are not currently working with any assets, WebCenter Sites displays the search results list in a "Search" tab.
-
If you are working with an asset, the search results list is automatically docked to the right of the workspace.
-
-
In the search results list, select the asset(s) you wish to work with. To more easily find specific assets within the search results list, you can navigate through the list, sort the results of your search, dock or undock the results list, and display each asset listed in the results list as thumbnail images.
For instructions on working with search results list, see Section 6.4, "Working with the Search Results List."
6.4 Working with the Search Results List
After you run a search, the results of your search are displayed as a list in either a "Search" tab or docked to the right of your workspace. To more easily find specific assets within the search results list, you can navigate through the list (limiting the number of results that are shown at the same time), sort the results of your search in a number of ways, dock or undock the search results list, and display each asset listed in the search results as thumbnail images.
This section contains the following:
-
Section 6.4.1, "Docking or Undocking the Search Results List"
-
Section 6.4.2, "Switching Between List View and Thumbnail View"
6.4.1 Docking or Undocking the Search Results List
If are working with an asset while performing a search, your search results will automatically be docked to the right of your workspace. If you are not currently working on an asset when you perform a search, the results of your search will be displayed in a "Search" tab.
-
To display the results of your search to the right of your workspace, in the toolbar displayed at the top of the search results, click Dock.
-
To view the search results list in the "Search" tab, in the toolbar displayed at the top of the search results, click Undock.
6.4.2 Switching Between List View and Thumbnail View
Select whether you want to view your search results in List View or Thumbnail View.
Figure 6-4 Docked Search Results List Toolbar

Description of "Figure 6-4 Docked Search Results List Toolbar"
-
To display your search results as a list, click the List View option at the top of the search results list.
-
To display each asset in your search results as a thumbnail image, click the Thumbnail View option at the top of the search results list.
6.4.3 Sorting Your Search Results
If your search results are displayed in the "Search" tab (undocked) in List View, sort your search results by clicking one of the columns:
-
Name
-
Type
-
Locale
-
Modified
-
Tags
Note:
Once your results are sorted, click the same column again to reverse the sort order.
If the search results list is displayed to the right of the workspace (docked) or if the search results are displayed in the Thumbnail View, click the Sort option at the top of the search results list and select one of the following options (depending on how you want to sort the results):
-
Name (A – Z)
-
Name (Z – A)
-
Asset Type
-
Locale
-
Modified (Newest First)
-
Modified (Oldest First)
Your search results are listed in the order you specify.
6.4.4 Navigating Through Your Search Results
The search results list displays 100 assets per page of results. To easily navigate through the results of your search, you can:
-
Limit the number of search results that are displayed in the list. At the bottom of the search results list, click All to display all search results in the list at the same time.
Figure 6-5 Filter for Limiting the Number of Results Listed

Description of "Figure 6-5 Filter for Limiting the Number of Results Listed"
-
Go to the next page of search results by clicking the Next Page icon at the bottom of the search results list.
-
Go back to the previous page of search results by clicking the Previous Page icon at the bottom of the search results list.
-
Skip to the last page of search results by clicking the Last Page icon at the bottom of the search results list.
-
Skip to the first page of search results by clicking the First Page icon at the bottom of the search results list.
-
Go to a specific page of results by selecting the desired page number, located at the bottom of the search results list.
Figure 6-10 Go to a Specific Page of Results

Description of "Figure 6-10 Go to a Specific Page of Results"
6.5 Saving Your Search Criteria
WebCenter Sites allows you to save your search criteria either as a Saved Search or as a ContentQuery asset. This section provides instructions for saving your search criteria both ways.
This section contains the following:
-
Section 6.5.1, "Saving Your Search Criteria as a Saved Search"
-
Section 6.5.2, "Saving Search Criteria as an Asset (of Type 'ContentQuery')"
6.5.1 Saving Your Search Criteria as a Saved Search
WebCenter Sites provides the Saved Search feature which allows you to save the search criteria you used to perform a search. The search criteria you save is accessible from the "Saved Searches" section of your dashboard (Home tab). A Saved Search can either be made public (shared with users assigned certain roles) or kept private (accessible only to the user who saved the search criteria) depending on how the search criteria is saved.
To save your search criteria as a Saved Search
-
Log in to WebCenter Sites, select the site you want to work with and select the icon for the WebCenter Sites Contributor interface.
-
In the Search field, enter the criteria you wish to search for. For more information about running a simple search, see Section 6.2, "Performing a Simple Search." If you want to perform an advanced search, see Section 6.3, "Performing an Advanced Search."
-
Click the magnifying glass button. If you are performing an advanced search, click Run Advanced Search.
The search results list is displayed either in a tab named "Search" or docked to the right of your workspace.
-
Ensure the search results list is displayed in the "Search" tab. If the search results list is docked, click Undock.
-
Click Save Search.
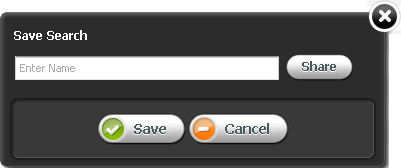
The following dialog is displayed:
-
In the "Enter Name" field, enter a name to uniquely identify the search criteria you wish to save.
-
If you want to share this Saved Search with other WebCenter Sites users, click Share. In the "Available" list box, select the roles with which you wish to share this Saved Search and move them to the "Selected" list box.
Figure 6-12 'Save Search' –Share with Other Sites
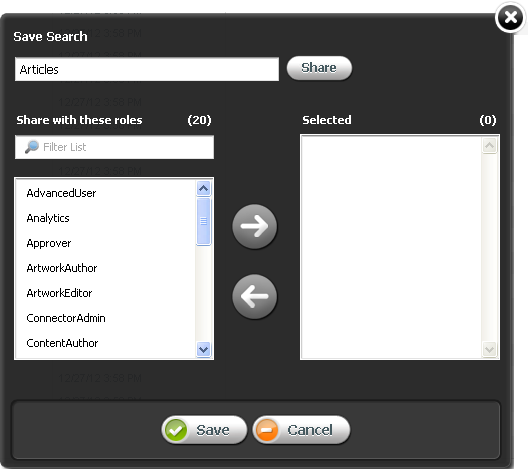
Description of "Figure 6-12 'Save Search' –Share with Other Sites"
-
Click Save.
The saved search is displayed in the "Saved Searches" section of your dashboard (Home tab). If you shared the Saved Search, any users with the roles you specified will also see the Saved Search in their dashboards.
Figure 6-13 Dashboard – 'Saved Searches' Widget
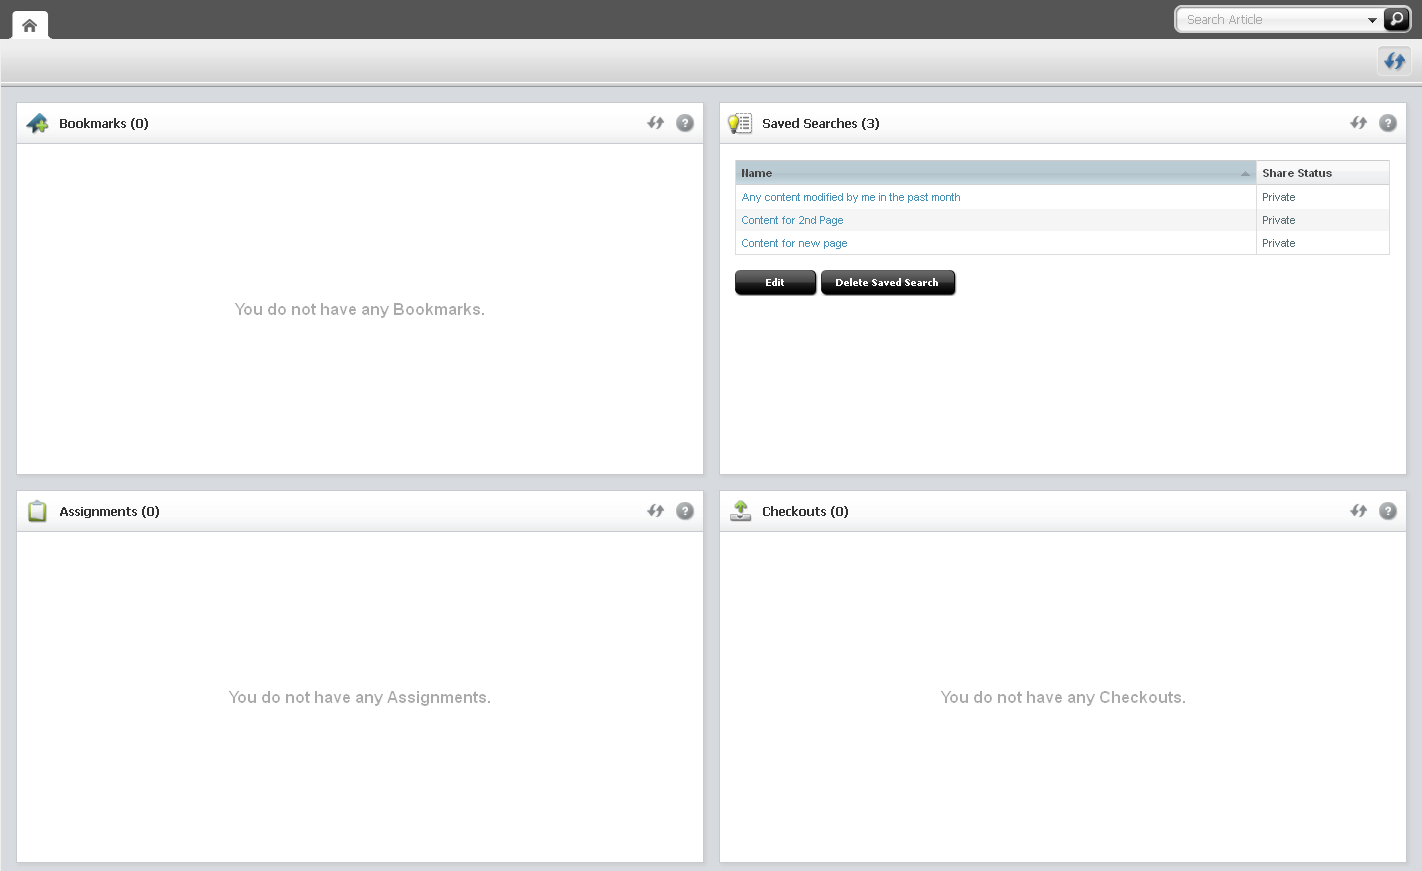
Description of "Figure 6-13 Dashboard – 'Saved Searches' Widget"
-
-
If you want to perform a search using the same search criteria you specified when you created the Saved Search:
-
Access the dashboard by clicking the Home tab.
-
In the "Saved Searches" section of the dashboard, select the Saved Search containing the criteria for which you wish to search.
The "Search" tab opens displaying up-to-date results matching the saved search criteria.
-
6.5.2 Saving Search Criteria as an Asset (of Type 'ContentQuery')
WebCenter Sites provides a ContentQuery asset type, which combines the Advanced Search feature with the ability to save search criteria, thus enabling you to save your search criteria as an asset of type ContentQuery. A ContentQuery asset differs from other types of assets. It does not contain any content or a list of other assets. Instead, a ContentQuery asset contains only a query. When a ContentQuery asset is placed on a page and that page is published, the query executes and renders the results to site visitors.
To create a ContentQuery asset
-
Log in to WebCenter Sites, select the site you want to work with and select the icon for the WebCenter Sites Contributor interface.
-
Create the ContentQuery asset. In the menu bar, select Content, then select New, and then select New ContentQuery.
Note:
If the administrator configured the ContentQuery asset type such that all new ContentQuery assets are placed into workflow upon creation, a tab opens displaying the "Choose Assignees" form.
Select at least one user for each required role and click Set Assignees. Any of these users can complete the next step in the workflow process. For more information, see Chapter 16, "Workflow."
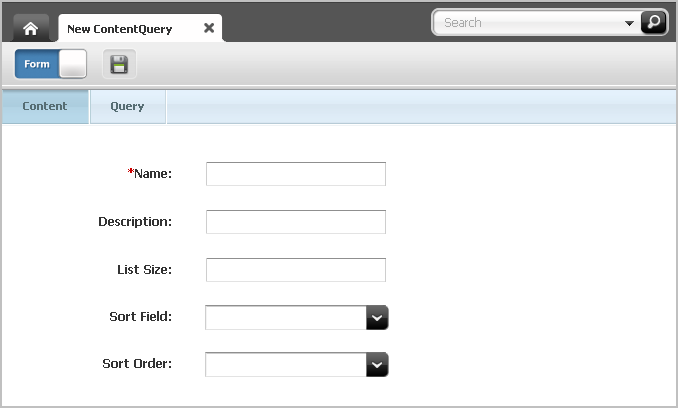
A tab opens displaying the asset's content entry form (Form Mode).
-
In the ContentQuery asset's content entry form, do the following:
-
Fill in the "Content" section:
-
In the Name field, enter a name for the ContentQuery asset.
Note:
Naming conventions are the following:
-
The name must be between 1 and 64 alphanumeric characters.
-
The following characters are not allowed: single quote ('), double quote ("), semicolon (;), colon (:), question mark (?), percent sign (%), less-than sign (<), and greater-than sign (>).
-
The name can contain spaces, but cannot start with a space.
-
-
In the Description field, enter a brief description for the asset.
-
In the List Size field, enter the number of search results to be displayed by the ContentQuery asset. If you want the maximum number of results to be displayed to site visitors, leave this field blank.
-
In the Sort Field drop-down field, select the order in which the results of the query will be rendered. By default, you can sort the results by: Name, Asset Type, Locale, or the date the assets included in the results were last Modified.
-
In the Sort Order drop-down field, select the order in which the query results will be displayed. The options are: Ascending and Descending.
-
-
Create a query. In the form section selector, click Query.
The "Query" section of the form opens displaying the "Advanced Search" form. Fill in the "Query" section with the search criteria you wish to save as an asset. For information about filling in the fields, see step 3 in Section 6.3, "Performing an Advanced Search."
-
-
Test the results of the query. In the "Query" section, click Run Advanced Search.
Note:
You can test the results of the query from either the Edit view or Inspect view of the ContentQuery asset.
The results of the query are displayed (docked) to the right of the ContentQuery asset.
Figure 6-15 Query Results Displayed to the Right of the Asset
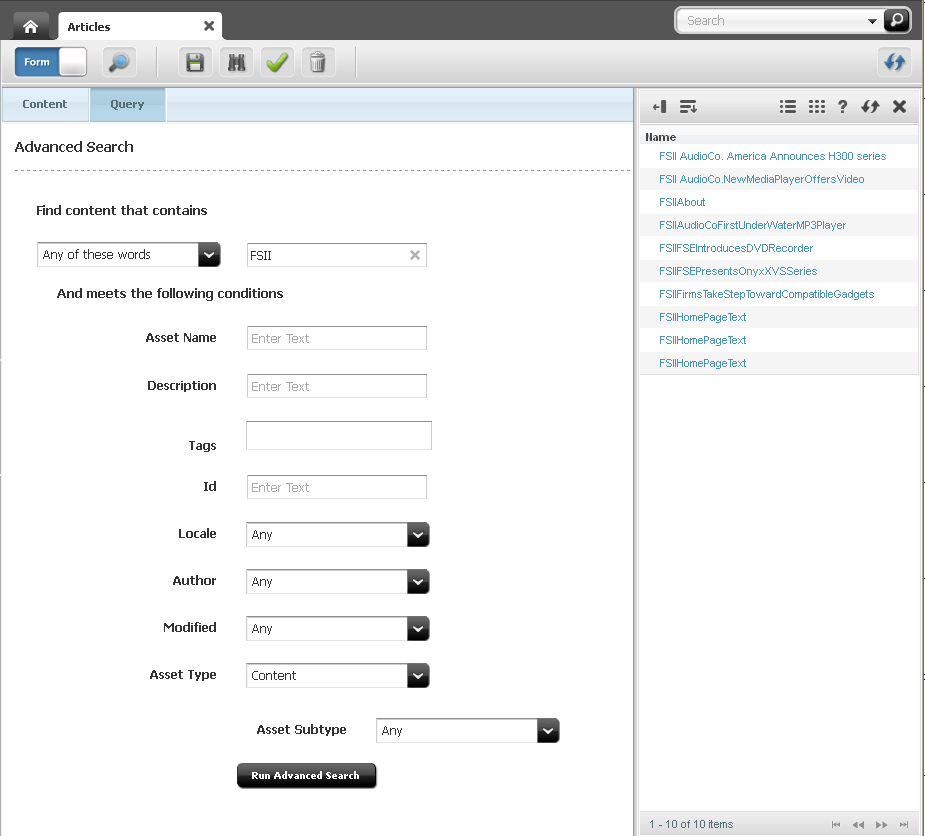
Description of "Figure 6-15 Query Results Displayed to the Right of the Asset"
-
Save the asset by doing one of the following:
-
In the asset's toolbar, click the Save icon.
-
In the menu bar, select Content, then select Save.
-
-
(Optional) Inspect the ContentQuery asset. In the asset's toolbar, click the Inspect icon.
-
To preview the results of the query:
-
In the asset's toolbar, click the Preview icon.
The "Select Layout" dialog box opens.
-
In the "Select Layout" dialog box, select the desired layout and then click Apply. (By default, the
FSIIDetailandFSIISummarytemplates of the FirstSite II sample site are both coded to render query results.)The tab displays a preview of the query results.
-
-
Place the ContentQuery asset on a page and then publish the page to the website.
For instructions on placing an asset (ContentQuery asset in this example) into another asset's association field or slot, see Chapter 8, "Associating Assets." For instructions on publishing assets, see Chapter 14, "Approval for Publishing."
When a site visitor accesses the web page, the ContentQuery asset executes its query and renders the results to site visitors.
6.6 Organizing Assets
WebCenter Sites allows you to organize assets and keep track of your workload to help you easily find the assets you wish to work with.
This section contains the following information:
6.6.1 Working with the 'My Work' Tree
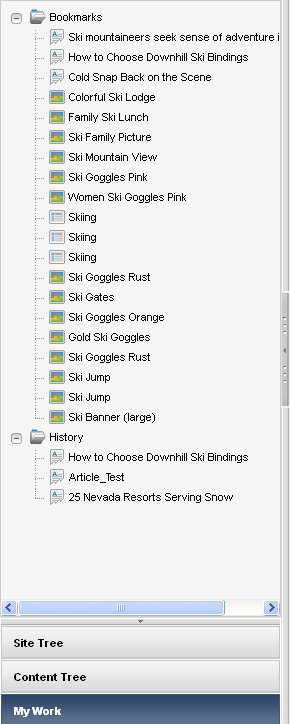
WebCenter Sites allows you to keep track of your workload with the My Work tree (located in the navigation pane). The My Work tree contains the Bookmarks and History nodes, as follows:
-
Bookmarks – returns a list of assets that you have bookmarked. Bookmarked assets are also listed in the "Bookmarks" section of the dashboard (located in the Home tab). For instructions about bookmarking assets, see Section 6.6.1.1, "Bookmarking Assets."
-
History – returns a list of assets you have worked on during the current session in the current site. This list is cleared every time you log out of WebCenter Sites.
You cannot create, modify, or delete the nodes in the My Work tree. However, you can control which assets are added to the Bookmarks node. By adding assets to the Bookmarks node, you create a personalized list of assets that you can easily retrieve in the future. You can add and delete assets from the Bookmarks node at any time. On the other hand, the History node keeps track of the assets you work with in the current session. This allows you to refer back to these assets at any time during your session. When you expand a node (Bookmarks or History), the assets contained within that node are listed underneath. An asset can be included in both tree nodes at the same time.
Note:
The My Work tree is used only for managing and organizing your work. You cannot use the My Work tree to group assets for delivery purposes.
This section contains the following information:
6.6.1.1 Bookmarking Assets
Bookmarking allows you to add select assets to the Bookmarks node in the My Work tree, which makes those assets easy to retrieve at a later time. Bookmarked assets are also listed in the "Bookmarks" section of your dashboard (located in the Home tab). You can bookmark an asset you are currently working with and bookmark multiple assets from a search results list.
-
Log in to WebCenter Sites, select the site you want to work with and select the icon for the WebCenter Sites Contributor interface.
-
Perform a search, as described in Section 6.2, "Performing a Simple Search." If you wish to conduct an advanced search, see Section 6.3, "Performing an Advanced Search."
-
If the search results list is docked to the right of the workspace, click Undock to display the search results list in the "Search" tab.
-
Bookmark the desired asset(s). Do one of the following:
-
To inspect the asset's content before you bookmark it:
-
In the search results list, navigate to and click the name of the desired asset.
A tab opens displaying the asset's Inspect view in either Form Mode or Web Mode.
-
In the menu bar, select Content, then select Bookmark.
-
-
To bookmark multiple assets directly in a search results list:
-
In the search results list, select (Ctrl+ click) the assets you want to bookmark.
-
In the "Search" tab's toolbar, click the Bookmark icon.
A message is displayed stating the number of bookmarks that were created. WebCenter Sites adds the selected asset(s) to the Bookmarks node (in the My Work tree) and the "Bookmarks" section of the dashboard (located in the Home tab).
-
-
-
Verify that the assets you selected have been added to the list of bookmarked assets. For instructions, see Section 6.6.1.2, "Accessing Bookmarked Assets."
6.6.1.2 Accessing Bookmarked Assets
Bookmarked assets can be accessed in the following ways:
-
From the "Bookmarks" section of the dashboard (in the Home tab).
-
From the My Work tree under the Bookmarks node.
To access bookmarked assets from the dashboard
-
Log in to WebCenter Sites, select the site you want to work with and select the icon for the WebCenter Sites Contributor interface.
-
In the Home tab, navigate to the "Bookmarks" section of the dashboard.
Figure 6-17 Dashboard – 'Bookmarks' Widget
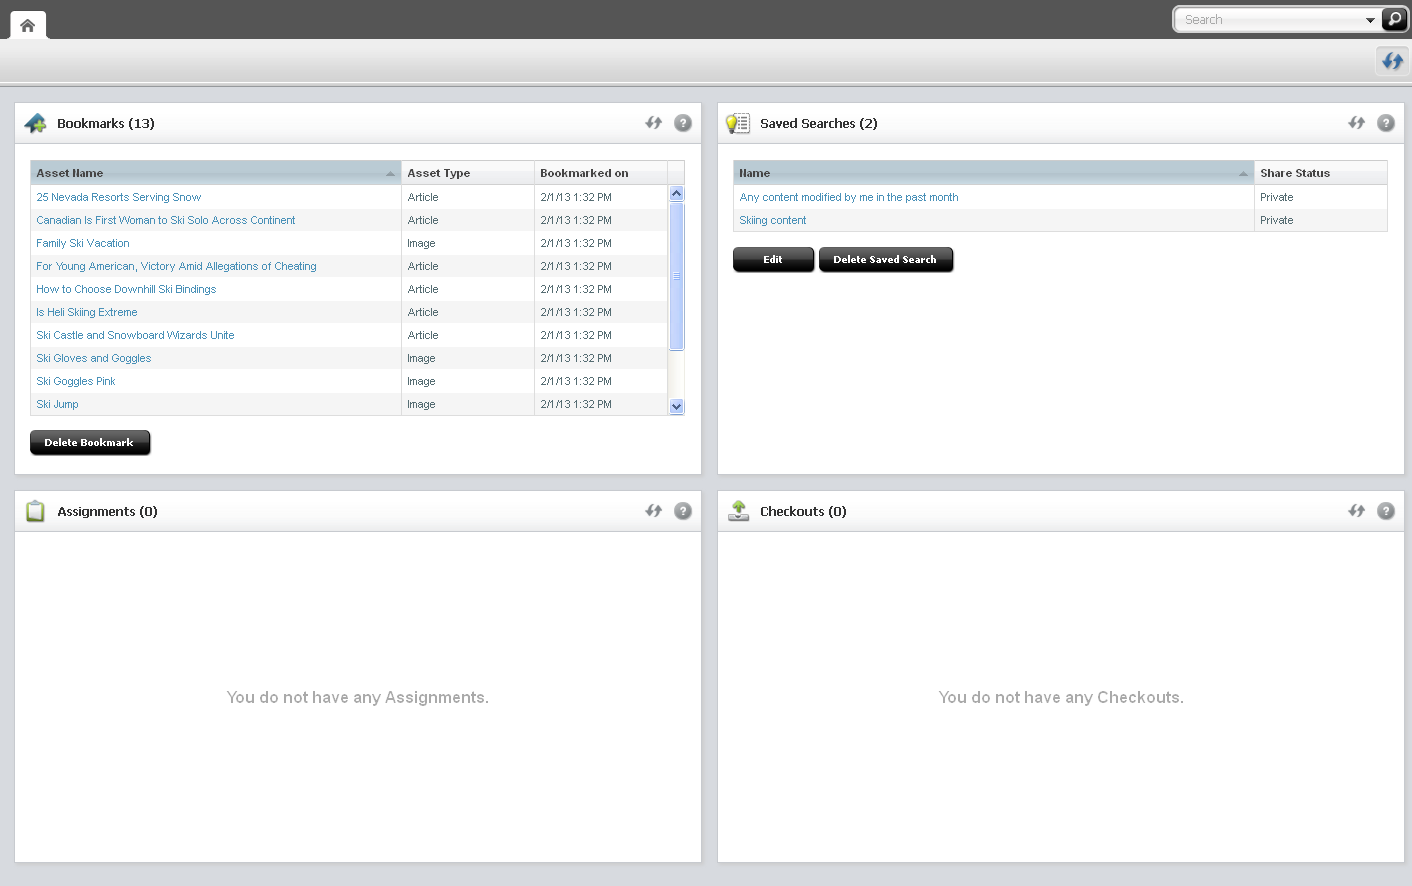
Description of "Figure 6-17 Dashboard – 'Bookmarks' Widget"
-
In the "Bookmarks" section of the dashboard, navigate to and click the name of the desired asset.
A tab opens displaying the Inspect view of the asset in either Form Mode or Web Mode.
To access bookmarked assets from the 'My Work' tree
-
Log in to WebCenter Sites, select the site you want to work with and select the icon for the WebCenter Sites Contributor interface.
-
In the navigation pane, click the My Work bar.
-
In the My Work tree, expand the Bookmarks node by clicking the plus-sign next to it.
A list of bookmarked assets is displayed underneath the Bookmarks node.
-
Navigate to and double-click the desired asset.
A tab opens displaying the Inspect view of the asset in either Form Mode or Web Mode.
6.6.1.3 Unbookmarking Assets
If you no longer want an asset to be bookmarked, you can remove the asset from the bookmarked assets list. When you unbookmark an asset, the asset is removed from the Bookmarks node in the My Work tree and from the "Bookmarks" section of your dashboard.
To unbookmark assets from the 'My Work' tree
-
Log in to WebCenter Sites, select the site you want to work with and select the icon for the WebCenter Sites Contributor interface.
-
In the navigation pane, if the My Work tree is collapsed, expand it by clicking the My Work bar.
-
In the My Work tree, expand the Bookmarks node by clicking the plus-sign.
A list of bookmarked assets is displayed underneath the Bookmarks node.
-
In the list of bookmarked assets, double-click the asset you wish to unbookmark.
A tab opens displaying the asset's Inspect view in either Form Mode or Web Mode.
-
In the menu bar, select Content, then select Unbookmark.
A message is displayed under the asset's toolbar stating that the bookmark was successfully removed. WebCenter Sites removes the asset from the Bookmarks node in the My Work tree and from the "Bookmarks" section of the dashboard (in the Home tab).
To unbookmark assets from the dashboard
-
Log in to WebCenter Sites, select the site you want to work with and select the icon for the WebCenter Sites Contributor interface.
-
Access the dashboard by clicking the Home tab.
-
Navigate to the "Bookmarks" section of the dashboard.
Figure 6-18 Dashboard – 'Bookmarks' Widget

Description of "Figure 6-18 Dashboard – 'Bookmarks' Widget"
-
In the list of bookmarked assets, select the row containing the asset you wish to remove from the list of bookmarked assets.
-
Click Delete Bookmark.
A pop-up window opens displaying the following message:
-
Click Yes.
WebCenter Sites removes the asset from the "Bookmarks" section of the dashboard and from the Bookmarks node in the My Work tree.
6.6.1.4 Accessing Assets from the 'History' Node
The History node, in the My Work tree, keeps track of all the assets you have worked with in the current session, which allows you to quickly refer back to those assets during the session.
Note:
Assets cannot be manually removed from the History node. Instead, the list of assets contained within the History node is cleared every time you log out of WebCenter Sites.
To access assets from the History node
-
Log in to WebCenter Sites, select the site you want to work with and select the icon for the WebCenter Sites Contributor interface.
-
In the navigation pane, click the My Work bar.
-
In the My Work tree, expand the History node by clicking the plus-sign.
-
In the History node, navigate to and double-click the desired asset.
Figure 6-20 History Node on the 'My Work' Tree
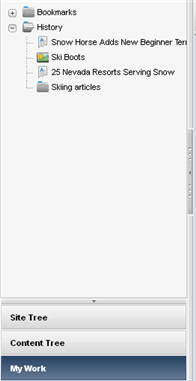
Description of "Figure 6-20 History Node on the 'My Work' Tree"
A tab opens displaying the Inspect view of the asset in either Form Mode or Web Mode.
6.6.2 Working with Tags
WebCenter Sites allows you to organize assets by adding tags to them. A Tag is a single word or short phrase that you apply to assets that share one or more common factors (for example, a theme or topic). When an asset is tagged, you can conduct an advanced search to find all the assets that have been tagged with the same content.
Tags can be added to basic assets, flex assets, and page assets. You can add a tag to an asset either from the asset's content entry form or from a search results list. This section shows you how to tag assets from a search results list. For instructions on adding tags to an asset directly in the asset's content entry form, see step 6c in Section 3.1.2, "Creating a New Asset in Form Mode."
To tag assets from a search results list
-
Log in to WebCenter Sites, select the site you want to work with and select the icon for the WebCenter Sites Contributor interface.
-
Perform a search, as described in Section 6.2, "Performing a Simple Search." If you wish to conduct an advanced search, see Section 6.3, "Performing an Advanced Search."
-
Ensure that the search results are displayed in the "Search" tab. If the search results list is docked to the right of your workspace, click Undock.
-
In the search results list, select (Ctrl+click) the asset(s) you wish to tag.
-
Right-click one of the assets you selected.
A context-menu opens:
Figure 6-21 Asset's Context Menu in Search Results List
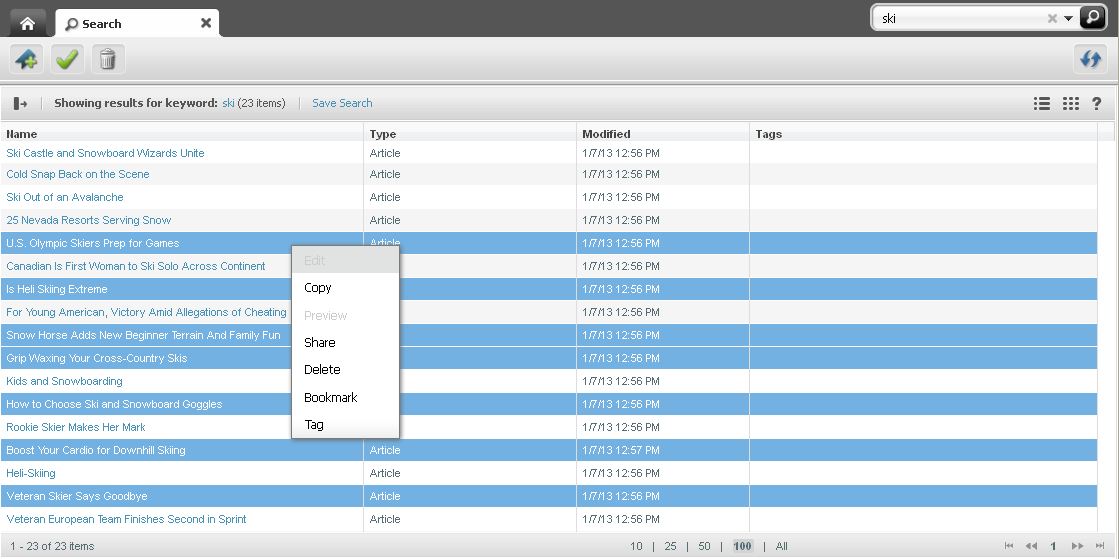
Description of "Figure 6-21 Asset's Context Menu in Search Results List"
-
In the context-menu, click Tag.
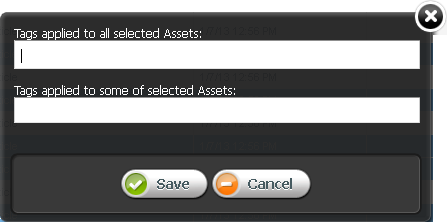
The following dialog box opens:
-
In the Tags applied to all selected Assets field, enter a single word or short phrase to attach to the selected assets.
Note the following conventions when adding tags to assets:
-
A tag must be between 1 and 32 alphanumeric characters. The only other characters allowed are: underscore (_) and hyphen (-).
-
To end a tag, use the semicolon (;) or press enter on your keyboard. For example, if you want to enter multiple tags into this field, each tag must be separated by a semicolon (;).
Note:
If some of the selected assets have already been tagged, those tags will be displayed in the Tags applied to some selected Assets field.
-
-
(Optional) If you wish to remove a tag that some of the assets you selected are tagged with, in the Tags applied to some selected Assets field, navigate to the tag you wish to remove and click the X button.
-
Click Save.
-
In the search results list toolbar, click the Refresh icon.
The tags you added to the selected assets are displayed in the Tags column of the search results list.
Figure 6-23 Tags Displayed in the 'Tag' Column of the Search Results List
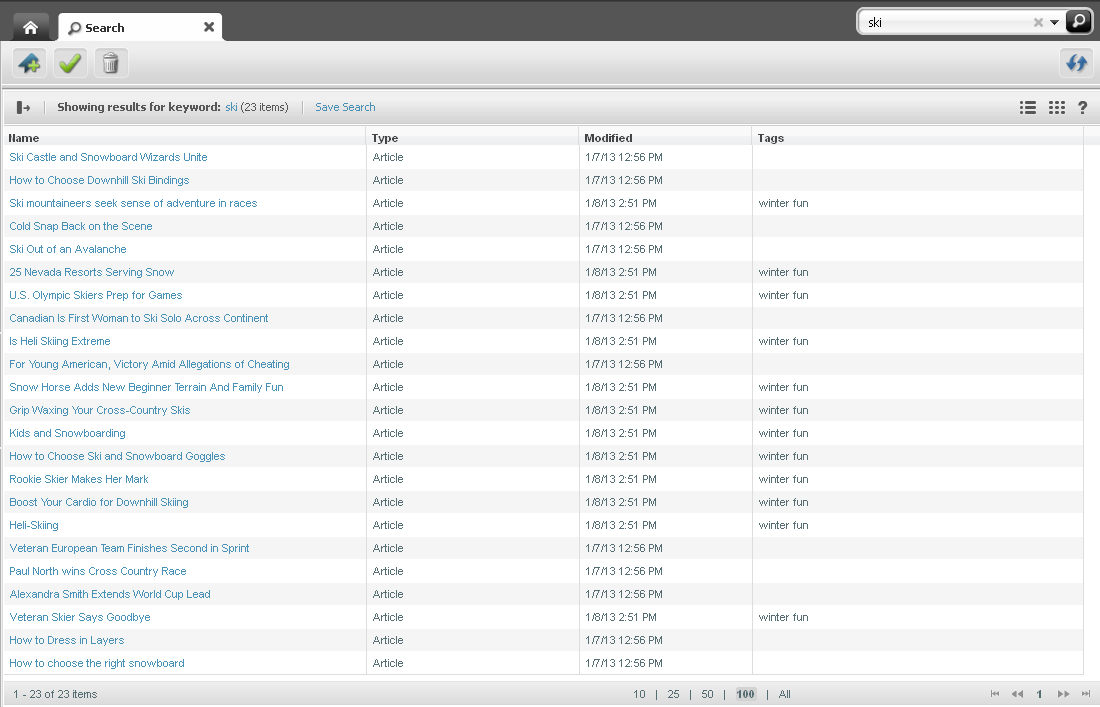
Description of "Figure 6-23 Tags Displayed in the 'Tag' Column of the Search Results List"
