14 Approval for Publishing
The goal of using WebCenter Sites is to publish content to a website where site visitors can read and interact with that content. Before an asset can be published, it has to be approved for publishing.
This chapter describes the procedures used to approve assets for publishing. It includes the following sections:
14.1 Overview
Before an asset can be published, it must be approved for publishing. Requiring approval is a safeguard against publishing an asset whose dependent assets are not ready to be published. This prevents broken links on the delivery system. You approve assets for one or more destinations that the administrator sets up on your site. Having multiple destinations allows for the use of multiple publishing methods. (For more information on destinations and available publishing methods, see the Oracle Fusion Middleware WebCenter Sites Administrator's Guide.)
Asset approval can be either manual or automatic. You can manually approve content assets and page assets by clicking the Approve icon in an asset's toolbar. You can also manually approve these types of assets directly from a search results list. Form Mode enables you to approve the primary asset (asset with which you are working). Web Mode enables you to approve the primary asset and all assets displayed in the primary asset's web page view. If any of the assets you are approving have dependent assets that need approval, WebCenter Sites displays a list of dependent assets which you can then approve in bulk. Additionally, you can manually approve site plans and navigation pages (page assets) from the Site Tree.
Asset approval can also be automated. For example, your administrator can configure a workflow process in such a way that its final step automatically approves assets in the workflow for publishing to one or more destinations.
14.1.1 Dependencies
Dependencies are conditions that determine whether an asset can be published. An asset dependency exists when there is an association of some kind between assets. For example, a "Product" asset has an association with a "Datasheet" asset. The "Datasheet" asset has an association with three "Image" assets. Two of these images have associations with "Article" assets. This tree hierarchy forms a set of parent/child dependencies among all these assets.
The approval status of an asset indicates whether the asset can be safely published; that is, whether any dependency conflicts exist. An asset's approval status is determined by its dependency relationships, which include the approval status of all assets associated with a particular asset, as well as the dependency relationships of those associated assets.
Note:
Site plans do not have any dependent assets during the approval process.
For more information on how WebCenter Sites calculates asset dependencies during approval and publishing, see the publishing chapter of the Oracle Fusion Middleware WebCenter Sites Administrator's Guide.
14.1.2 Approval States
Because of the dependencies between assets, as well as the nature of the dependencies, approving an asset involves the concept of approval states. For example, "Held" is an approval state an asset enters when the asset is approved for publishing, but its dependent assets are not. In such case, the asset is then held from publishing until its dependents are approved.
The following table lists all the possible approval states of an asset and what each state means:
| State | Meaning |
|---|---|
|
Approved |
(Informational) The asset will be published during the next publishing session to this destination, unless the asset, or one of its dependent assets (in Exact dependencies), is edited. |
|
Held |
(Action required) The asset will be held until the dependents are approved. |
|
Needs Approval |
(Action required) The asset requires approval. Click Approve to initiate the approval process. |
If an asset enters an approval state that prevents publication, WebCenter Sites displays a list of dependent assets that require approval. Once all assets are approved, they can be published.
To learn more about the approval and publishing mechanisms employed by WebCenter Sites, see the Oracle Fusion Middleware WebCenter Sites Administrator's Guide.
14.2 Approval Tasks
This section provides information on the following approval tasks you can perform on an asset:
14.2.1 Approving an Asset for Publishing
The following procedure describes how to manually approve content assets and pages assets for publishing. Before approving an asset for publishing, you should preview it first.
To approve an asset for publishing
-
Log in to WebCenter Sites, select the site you want to work with and select the icon for the WebCenter Sites Contributor interface.
-
Find and open the asset you want to approve for publishing:
If the asset is currently assigned to you:
-
Access your dashboard by clicking the Home tab.
-
Navigate to the "Assignments" section of your dashboard.
The "Assignments" section of the dashboard displays a list of all the assets that have been assigned to you.
-
In the list of assets, click the name of the asset you wish to approve.
WebCenter Sites opens a tab displaying the asset's Inspect view.
If the asset is not currently assigned to you:
-
In the Search field, enter search criteria identifying the asset and click the magnifying glass button.
For more information on finding assets, see Section 6.1, "Overview of Finding Assets."
-
In the search results list, do one of the following:
-
If you wish to Inspect the asset before you approve it, navigate to the desired asset and click its name.
WebCenter Sites opens a tab displaying the asset's Inspect view (in either Form Mode or Web Mode).
-
If you wish to approve the asset from the search results list, select (Ctrl+click) the assets you wish to approve.
-
-
-
Select the desired publishing destination for the asset. Do one of the following:
-
In the asset or search tab's toolbar, click the Approve icon. In the menu that appears below the icon, select the desired publishing destination.
-
In the menu bar, select Content, then select Approve, and then select the desired publishing destination.
Note:
-
You can approve an asset for only one destination at a time; repeat this procedure to approve the asset for additional destinations.
-
Consult your administrator to find out where (to which destinations) and how (using which publishing method) your content is published from your system.
-
One of the following happens:
-
If you are approving an asset that is displayed in Form Mode or if you are approving assets from a search results list, the tab displays a table containing the details of the asset(s) you chose to approve for the selected destination (as shown in Figure 14-1).
Figure 14-1 Approval Table Displaying the Primary Asset's Publishing Details

Description of "Figure 14-1 Approval Table Displaying the Primary Asset's Publishing Details"
-
If you are approving an asset that is displayed in Web Mode, the tab displays a table containing the primary asset's details for the selected destination along with details of all the assets displayed in the primary asset's web page view (as shown in Figure 14-2).
Figure 14-2 Approval Table Listing All Assets Displayed in the Primary Asset's Web Page View
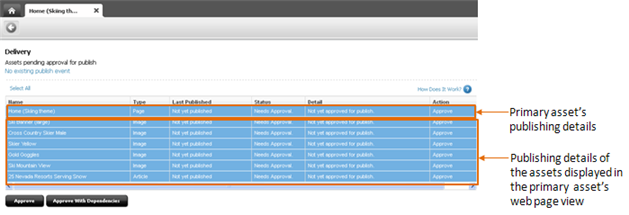
Description of "Figure 14-2 Approval Table Listing All Assets Displayed in the Primary Asset's Web Page View"
Continue with the steps below to approve the desired assets (and their dependencies). If you do not wish to approve any assets at this time, click Go Back.
-
-
In the table, select the assets you wish to approve.
-
To select all assets, click Select All.
-
To select only certain assets, Ctrl+click their rows.
-
-
Approve the selected asset(s). Do one of the following
-
Click Approve With Dependencies.
If the approval is successful, the asset and all of its dependencies are now approved for publishing to the selected destination and the status of the asset(s) changes to "Approved."
-
Click Approve.
One of the following happens:
-
If the asset has no dependencies, the status of the asset changes from "Needs Approval" to "Approved."
-
If the asset has dependencies that are preventing publication, the status of the asset (located in the "Status" column of the table) changes to "Held" and the "Detail" column displays the number of dependent assets. To approve the dependent assets, continue to step 6.
-
-
If the asset's dependencies are preventing publishing, do the following:
-
In the "Detail" column, click the n blocking assets link to display a list of dependent assets (as shown in Figure 14-3).
Figure 14-3 Dependencies Listed Under the Approval Table
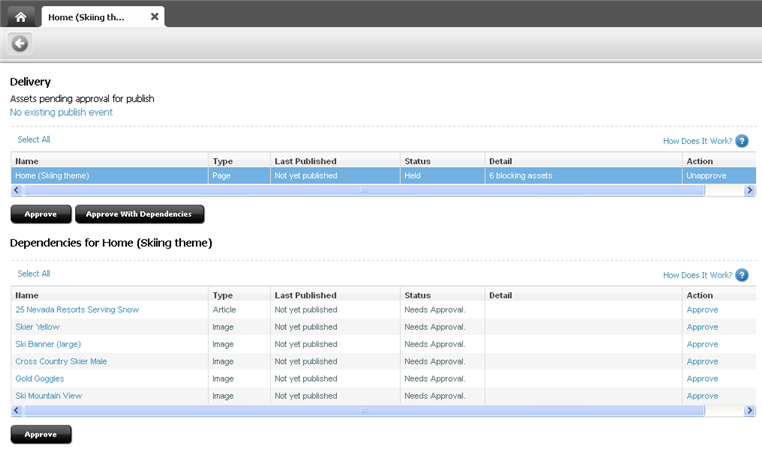
Description of "Figure 14-3 Dependencies Listed Under the Approval Table"
-
At the top of the list of dependent assets, click Select All to select all assets in the list. Then click Approve.
WebCenter Sites approves the dependent assets and calculates their dependencies. If any of the dependent assets have their own dependencies, WebCenter Sites displays a list of the dependent assets' dependencies; again, click Select All, and then click Approve. Continue this process until all dependencies for all assets are approved.
When all dependencies are approved, the status of the "Held" assets changes to "Approved." The assets and their dependencies are now approved for publishing to the selected destination.
-
-
(Optional) If the administrator configured a publishing event for the destination to which you approved the asset(s), you will see the "Publish event schedule for destination" link, as shown in Figure 14-4:
Figure 14-4 'Publish Event Scheduled for Destination' Link

Description of "Figure 14-4 'Publish Event Scheduled for Destination' Link"
Point to this link to view a summary of the publishing event schedule for the selected destination. For more information about publishing sessions, see the Oracle WebCenter Site Administrator's Guide.
14.2.2 Approving a Site Plan for Publishing
WebCenter Sites allows you to approve site plans (SitePlan assets), the Pages placed under a site plan, Device Groups, and Device assets directly from the Site Tree. The approval of SitePlan assets is not dependent on any other assets. However, for your site to be ready for publishing, you will have to approve all the Device Groups on your WebCenter Sites system as well as the Page assets that are placed under the site plan and the content assets associated with those Pages. If you are approving a site plan for publishing to a management system, you must also approve all Device assets associated with that site plan.
Note:
For more information about site plans, Device Groups, and Device assets, see Chapter 13, "Creating Mobile Websites" and the Oracle Fusion Middleware WebCenter Sites Developer's Guide.
To approve a site plan for publishing
-
Log in to WebCenter Sites, select the site you want to work with and select the icon for the WebCenter Sites Contributor interface.
-
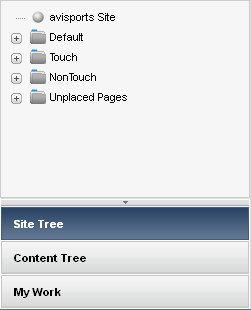
In the navigation pane, click the Site Tree bar.
The Site Tree is displayed in the navigation pane (as shown in Figure 14-5).
-
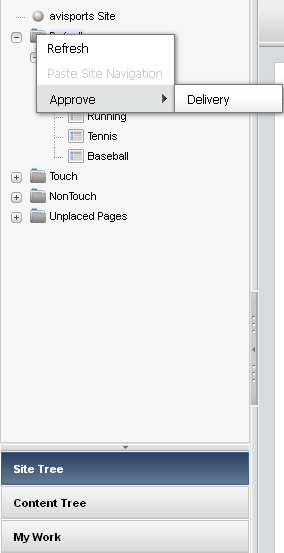
In the Site Tree, right-click the desired site plan or Page you wish to approve. If you are approving a placed Page, expand the site plan under which the page is placed by clicking the plus-sign next to it.
-
In the context menu, select Approve and then select the desired publishing destination.
A context menu opens, as shown in Figure 14-6.
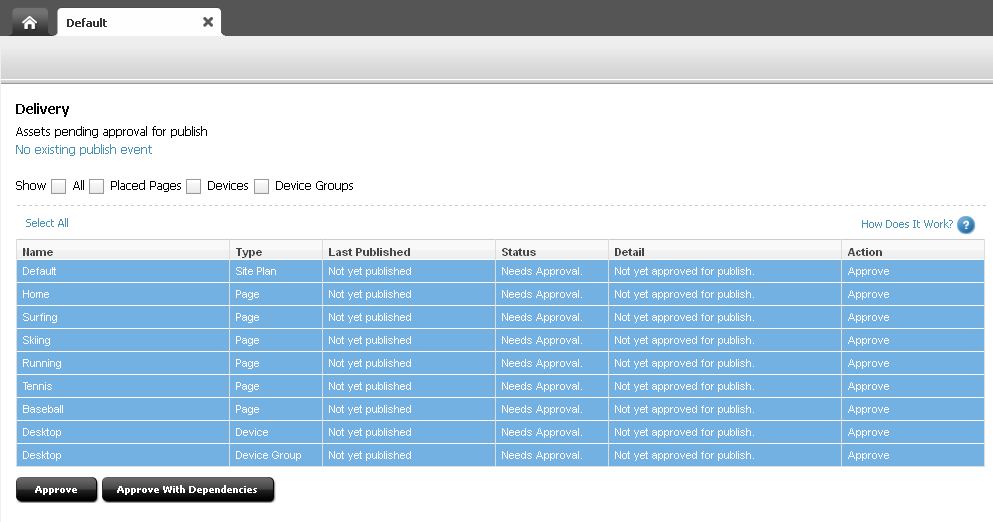
A tab opens displaying a table containing the publishing details of the site plan or placed Page you chose to approve for the selected destination (as shown in Figure 14-7):
Note:
If you are approving a SitePlan asset, you will see the following assets listed in the approval table:
-
Site Plan asset representing the site plan you chose to approve.
-
All Device Groups on your WebCenter Sites system.
Device assets associated with the site plan you want to approve.
-
Page assets placed under the site plan you chose to approve.
-
Content assets associated with the site plan's placed Pages.
If you are approving a placed Page, you will see only that Page asset listed in the approval table.
-
-
If you wish to narrow down the items displayed in the approval table, use the filter located at the top of the table. You can filter the list by selecting one or more of the following checkboxes:
-
Show All – Displays the publishing details of the site plan along with the placed pages, device images, and device groups associated with that site plan.
-
Placed Pages – Displays the publishing details of only the pages placed under the site plan you selected to approve.
-
Devices – Displays the publishing details of only the Devices associated with the site plan you chose to approve.
Note:
You are required to approve Device assets only if you are publishing the site plan to a management system.
-
Device Groups – Displays the publishing details of all the Device Groups on your WebCenter Sites system.
Note:
Device Groups are dependent on one another. If you approve one Device Group, you must approve them all.
-
-
Approve the SitePlan asset, Page assets, content assets, Devices, and Device Groups. Do one of the following:
-
Select all the items listed in the approval table and then click Approve With Dependencies.
If the approval is successful, the SitePlan, content assets, placed Pages, Devices, and Device Groups listed in the approval table are now approved for publishing to the selected destination and the status of the items changes to "Approved" (as shown in Figure 14-8).
Figure 14-8 Approval Table – Approved with Dependencies
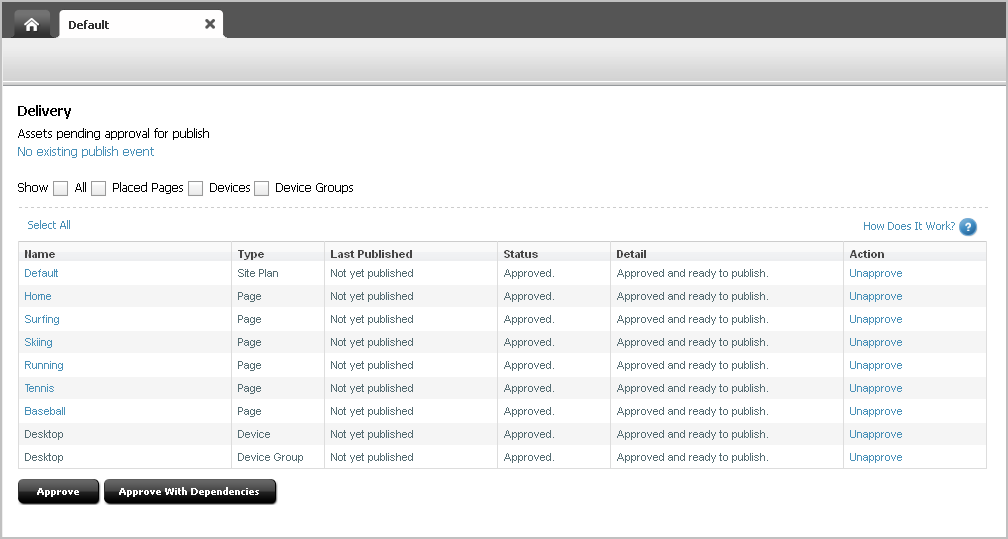
Description of "Figure 14-8 Approval Table – Approved with Dependencies"
-
Click Approve.
The SitePlan asset, Devices, content assets, placed Pages, Device Groups, and Device assets are approved for publishing (the status of these items changes from "Needs Approval" to "Approved").
If the Page or Device Group assets you want to approve have dependencies that are preventing them from publication, the status of those assets changes to "Held" and the "Detail" column displays the number of dependent assets blocking them from being approved (as shown in Figure 14-9).
Figure 14-9 Approval table – Approved Without Dependencies
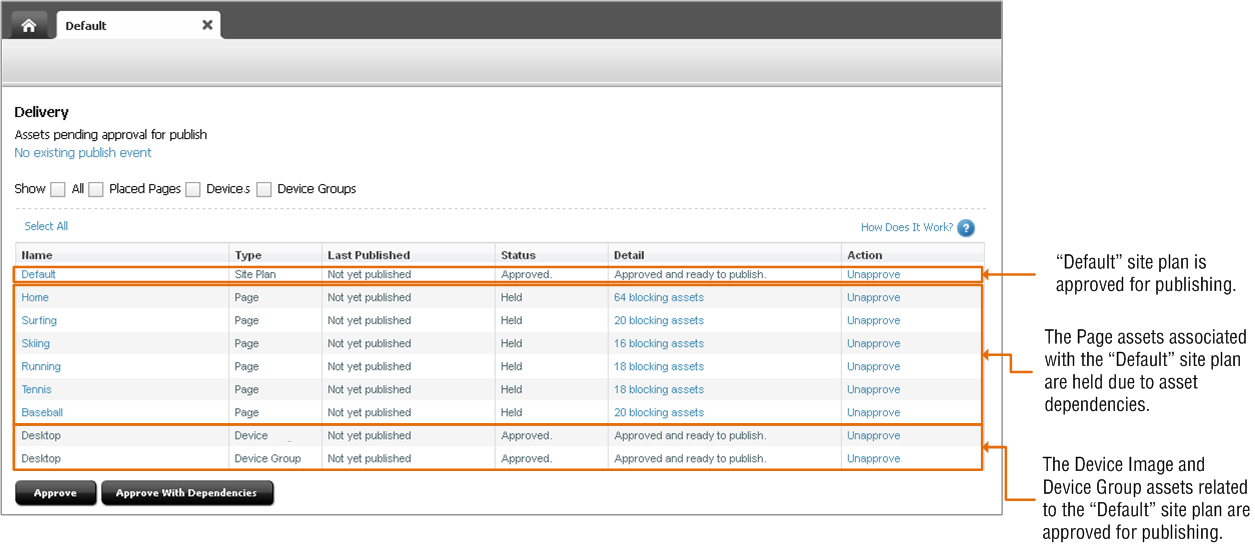
Description of "Figure 14-9 Approval table – Approved Without Dependencies"
To approve dependent assets, see step 7.
-
-
If the Page and Device Group assets you wish to approve have dependencies that are preventing approval, do the following:
-
In the "Detail" column, click the n blocking assets link, next to the asset that is held for approval, to display a list of dependent assets (as shown in Figure 14-10).
Figure 14-10 Dependencies Table Displayed Below Approval Table
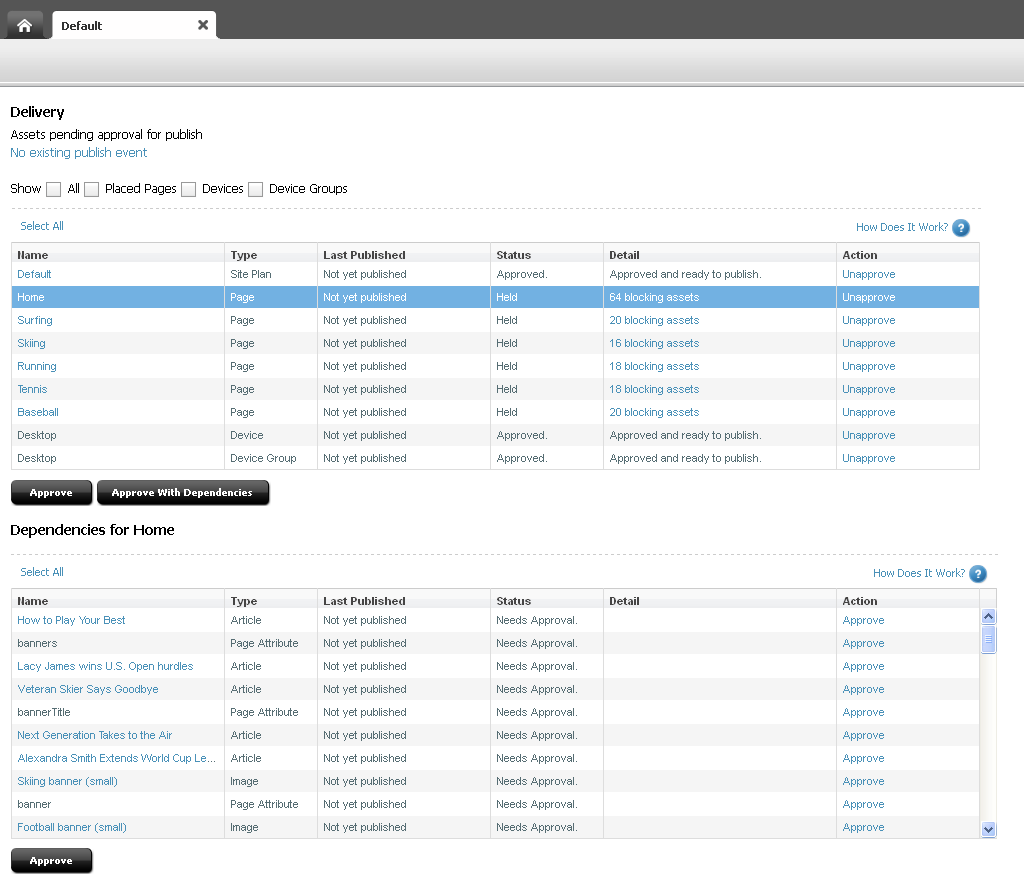
Description of "Figure 14-10 Dependencies Table Displayed Below Approval Table"
-
At the top of the list of dependent assets, click Select All and then click Approve.
WebCenter Sites approves the dependent assets and calculates their own dependencies. If any of the dependent assets have their own dependencies, WebCenter Sites displays a list of the dependent assets' dependencies; again click Select All, and then click Approve. Continue this process until all dependencies for all assets are approved.
-
Repeat steps a and b for each asset that is held for publishing.
When all dependencies are approved, the status of the "Held" assets changes to "Approved." The assets and their dependencies are now approved for publishing to the selected destination.
-
14.2.3 Checking an Asset's Approval Status
To check an asset's approval status
-
Log in to WebCenter Sites, select the site you want to work with and select the icon for the WebCenter Sites Contributor interface.
-
Find and open the asset whose approval status you wish to view:
-
To find the asset using the search feature:
-
In the Search field, enter search criteria identifying the asset and click the magnifying glass button.
For more information on finding assets, see Section 6.1, "Overview of Finding Assets."
-
In the search results list, navigate to the desired asset and click its name.
WebCenter Sites opens a tab displaying the asset's Inspect view.
-
-
To open an asset that is currently assigned to you:
-
Access your dashboard by clicking the Home tab.
-
Navigate to the assignments section of your dashboard.
The "Assignments" section of the dashboard displays a list of all the assets that have been assigned to you.
-
In the list of assets, click the name of the asset you wish to approve.
WebCenter Sites opens a tab displaying the asset's Inspect view.
-
-
-
In the menu bar, select View, then select Status.
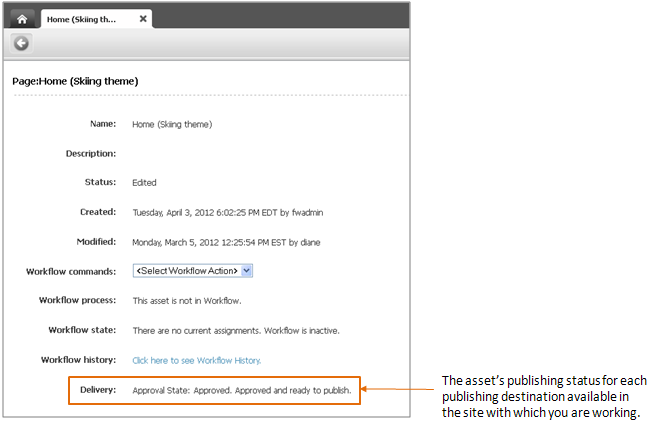
The tab displays the asset's status summary screen, which displays information about the asset's approval status, as shown in Figure 14-11.
Figure 14-11 Publishing Status in an Asset's Status Summary Screen
Description of "Figure 14-11 Publishing Status in an Asset's Status Summary Screen"
-
Navigate to the name of the desired publishing destination and check the asset's approval state. For information about an asset's approval state, see Section 14.1.2, "Approval States."
14.2.4 Removing Assets from the Publishing Queue
If you decide not to publish an approved asset, you can unapprove the asset. When you unapprove, WebCenter Sites removes the asset from the publishing queue (for the given destination) and changes its status to "Needs Approval." If the unapproved asset is a child (referenced asset) of one or more assets in the publishing queue, WebCenter Sites removes the parent (referring) assets from the publishing queue for the destination and changes their approval states to "Held."
To remove an asset from the publishing queue
-
Log in to WebCenter Sites, select the site you want to work with and select the icon for the WebCenter Sites Contributor interface.
-
Find and open the asset you want to remove from the publishing queue:
-
To find the asset using the search feature:
-
In the Search field, enter search criteria identifying the asset and click the magnifying glass button.
For more information on finding assets, see Section 6.1, "Overview of Finding Assets."
-
In the search results list, navigate to the desired asset and click its name.
WebCenter Sites opens a tab displaying the asset's Inspect view.
-
-
To open an asset that is currently assigned to you:
-
Access your dashboard by clicking the Home tab.
-
Navigate to the assignments section of your dashboard.
The "Assignments" section of the dashboard displays a list of all the assets that have been assigned to you.
-
In the list of assets, click the name of the asset you wish to approve.
WebCenter Sites opens a tab displaying the asset's Inspect view.
-
-
-
Unapprove the asset:
-
Do one of the following:
-
In the asset's toolbar, click the Approve icon. In the menu that appears below the icon, select the desired publishing destination.
-
In the menu bar, select Content, then select Approve, and then select the desired publishing destination.
The tab displays a table containing the asset's details for the selected destination.
Figure 14-12 Approval Table – Unapproving an Asset

Description of "Figure 14-12 Approval Table – Unapproving an Asset"
-
-
In the "Action" column of the table, click Unapprove.
WebCenter Sites removes the asset from the publishing queue. The asset's approval state in the "Status" column of the table changes to "Needs Approval." If the asset is a child (referenced asset) of one or more assets in the publishing queue, WebCenter Sites removes the parent (referring) assets from the queue and changes their approval states to "Held."
-
