15 Revision Tracking
Revision tracking is an optional feature and must be enabled by the WebCenter Sites administrator for the asset types on your sites. Revision tracking allows you to track and control the changes made to your assets.
With revision tracking, you can:
-
Enforce that only one person at a time can edit or delete an asset.
-
Track and view past versions of an asset and the user(s) who worked with the asset.
-
Restore (roll back) an asset to a previous version.
This chapter describes revision tracking and the procedures used to track assets, illustrated with examples from the avisports sample site. In the avisports sample site, revision tracking is not enabled by default.
This chapter contains the following sections:
-
Section 15.7, "Reverting to a Previous Version (Rollback)"
Note:
Contact your administrator if you have any questions or concerns about revision tracking as it applies to you.
15.1 Overview
Revision tracking allows you to check out, or lock, assets. When you check out an asset, you lock the asset, which prevents other users from editing or deleting it. When you are finished working with the asset, you can decide to check the asset back in with the changes you made or discard the changes you made to the asset by undoing the checkout. In either case, the asset is then again available for modification by other users. An asset that is checked out to you, however, can still be viewed and searched for by other users, as well as retrieved by queries or collections.
When revision tracking is enabled, you control whether other users can edit or delete an asset by checking it out and back in. You can either check assets out manually, or you can let WebCenter Sites handle the check out process automatically. If you allow WebCenter Sites to automatically check assets out to you, you will still have to manually check assets back in when you are done working with them.
15.1.1 Checkout and Checkin
When revision tracking is enabled, the following commands control access to assets:
-
Check out. Only one user can check out an asset at any given time. If other users try to check the asset out or modify it, WebCenter Sites informs them that the asset is locked by someone else.
If an asset is assigned to you in a workflow, and you have checked out the asset, then you cannot finish your assignment until you check the asset back in.
An asset that is checked out (locked by a user) cannot be approved for publishing until it is checked in (unlocked).
-
Undo Checkout. If you check out an asset and then decide that you do not want to save the changes you have made to it, cancel or "undo" the checkout. In this case, the asset is simply unlocked, changes are reverted back to the most current version of the asset, and no new version is saved.
-
Check in. You check in assets that you have checked out. After the asset is checked in, others can work with it, and if the asset is assigned to you in a workflow, you can finish your assignment.
When you check in an asset that you have checked out, a record is made of the checkin, and a copy of the last saved version of the asset is preserved as a new version (the number of versions kept is set by the administrator).
Another option is to check in the asset so that you have an archived version but to keep it checked out. This option enables you to create a version but keeps the asset checked out to you.
If you edit an asset that is not already checked out to you, WebCenter Sites checks it out to you automatically. When you save the edited asset, WebCenter Sites does not check the asset back in for you. Therefore, you will still have to manually check the new version of the asset back in after you save the changes you have made to it. Similarly, if you do not want to save the changes you made to an asset that is checked out to you, you will have to manually undo the checkout.
If you delete an asset that is not already checked out to you, WebCenter Sites checks it out to you for deletion. This ensures that no other users can work with the asset as you are deleting it from WebCenter Sites. Once the asset is deleted, it is no longer checked out to you because it no longer exists in the system.
15.1.1.1 Releasing Locked Assets
If you edit an asset when revision tracking is enabled, the asset is automatically checked out to you. Because of this, you may accidentally check out an asset while you work in the WebCenter Sites interface. When an asset is checked out to you, the asset is locked and prevents other users from working with it. To make sure that you are not preventing other people from working with assets that you have inadvertently checked out, review the assets checked out to you by viewing the "Checkouts" section of your dashboard (located in the Home tab) and check in (or, if you do not want to commit your changes to the database, undo the checkout of) any assets that you do not need to lock.
15.1.1.2 Functions That Automatically Checkout an Asset To You
The following table describes asset management functions that check assets out automatically:
| Function | Effect on Revision Control |
|---|---|
|
Create |
As soon as you create a new asset, the asset is checked out to you. |
|
Edit |
Checks out the asset and prohibits other users from editing or deleting it. |
|
Copy |
Creates a new copy of the asset. The source asset cannot be checked out during the copy operation. As soon as you create a copy of an asset, the copy is automatically checked out to you. |
15.1.2 Rollback and Revision History
When you check in an asset that you have checked out, WebCenter Sites stores a new version of the asset and adds it to a list of previous versions. You can later restore the asset to one of those previous versions and you can examine the asset's revision history.
Note:
The volume of revisions to be saved for a given asset may be limited (depending on your administrator's configurations). Therefore, earlier versions of the asset could be overwritten. In this case, the overwritten version will not be shown in the asset's revision history. An asset cannot be rolled back to a version that has been overwritten.
-
Rollback means restoring the asset to a previous version. When you have an asset checked out, you can roll it back to any previous version, (provided it was not overwritten and it is not the first, SYSTEM, version). Rollback restores the contents of the asset, but does not reset its status (created, edited, and so on) as of the previous version, nor does it affect workflow status. If the asset is part of a workflow, anyone who has the appropriate permissions can restore it to a previous version.
-
Revision History. You or any user can list and examine the revision history of an asset. The revision history also shows who, if anyone, currently has the asset checked out. You can also see comments entered by the user who checked the asset in at the time, if the user chose to enter a comment, by looking at the "Comments" section of the revision history table.
Figure 15-1 'Revision History Report' Table

Description of "Figure 15-1 'Revision History Report' Table"
15.2 Checking Out Assets
This section shows you how to manually check out an asset.
-
Log in to WebCenter Sites, select the site you want to work with and select the icon for the WebCenter Sites Contributor interface.
-
Find and open the asset you want to check out. Do one of the following:
-
Search for and open the desired asset:
-
In the Search field, enter search criteria identifying the asset and click the magnifying glass button.
-
In the list of search results, click the name of the desired asset.
-
-
If you previously bookmarked the asset, open it from the Bookmarks node in the My Work tree:
-
In the My Work tree, expand the Bookmarks node. (If the My Work tree is collapsed, expand it by clicking the My Work bar in the navigation pane.)
-
In the list of bookmarked assets, double-click the name of the desired asset.
-
For more information on finding assets, see Chapter 6, "Finding and Organizing Assets."
A tab opens displaying the Inspect view of the asset (in either Form Mode or Web Mode).
-
-
Check out the asset:
Note:
If the asset is checked out to another user, when you try to edit the asset or check the asset out, you will receive an error message like the one below:

-
If you are working in Form Mode, in the asset's toolbar, click the Check Out icon.
Note:
If you do not see the Check Out icon in the asset's toolbar, either revision tracking for that asset type is not enabled on your site or the asset is already checked out to you.
WebCenter Sites checks the asset out to you.
-
If you are working in Web Mode, do the following:
-
In the asset's toolbar, click the Checkin/Checkout icon.
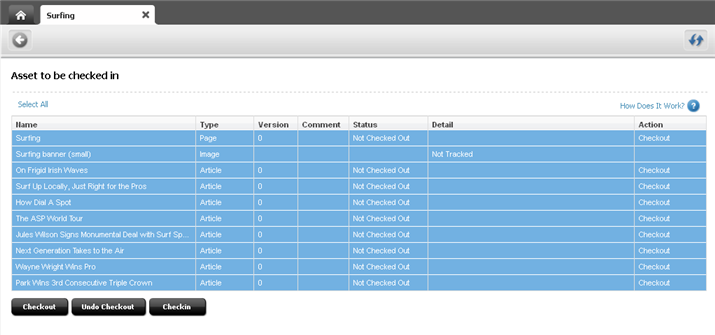
The tab displays the "Asset to be checked in" screen (shown in Figure 15-2). This screen contains a table with revision tracking details about the primary asset (asset you opened in Web Mode) and all of its associated assets (assets displayed in the primary asset's web page view), as shown below:
Figure 15-2 'Assets to be checked in' Screen'
Description of "Figure 15-2 'Assets to be checked in' Screen'"
The revision tracking action (if any) you can perform on an asset is indicated in the "Action" column of the desired asset's row. If the asset is not revision tracked, then the "Action" column for that asset's row is empty and the "Detail" column for that asset's row displays the message "Not Tracked."
-
In the revision tracking detail table, select (Ctrl+click) the asset(s) you wish to check out and then click the Checkout button. You can also check assets out one at a time by clicking the Checkout link in the "Action" column of the desired asset's row.
WebCenter Sites checks the asset(s) out to you.
-
-
15.3 Examining Your Checkouts
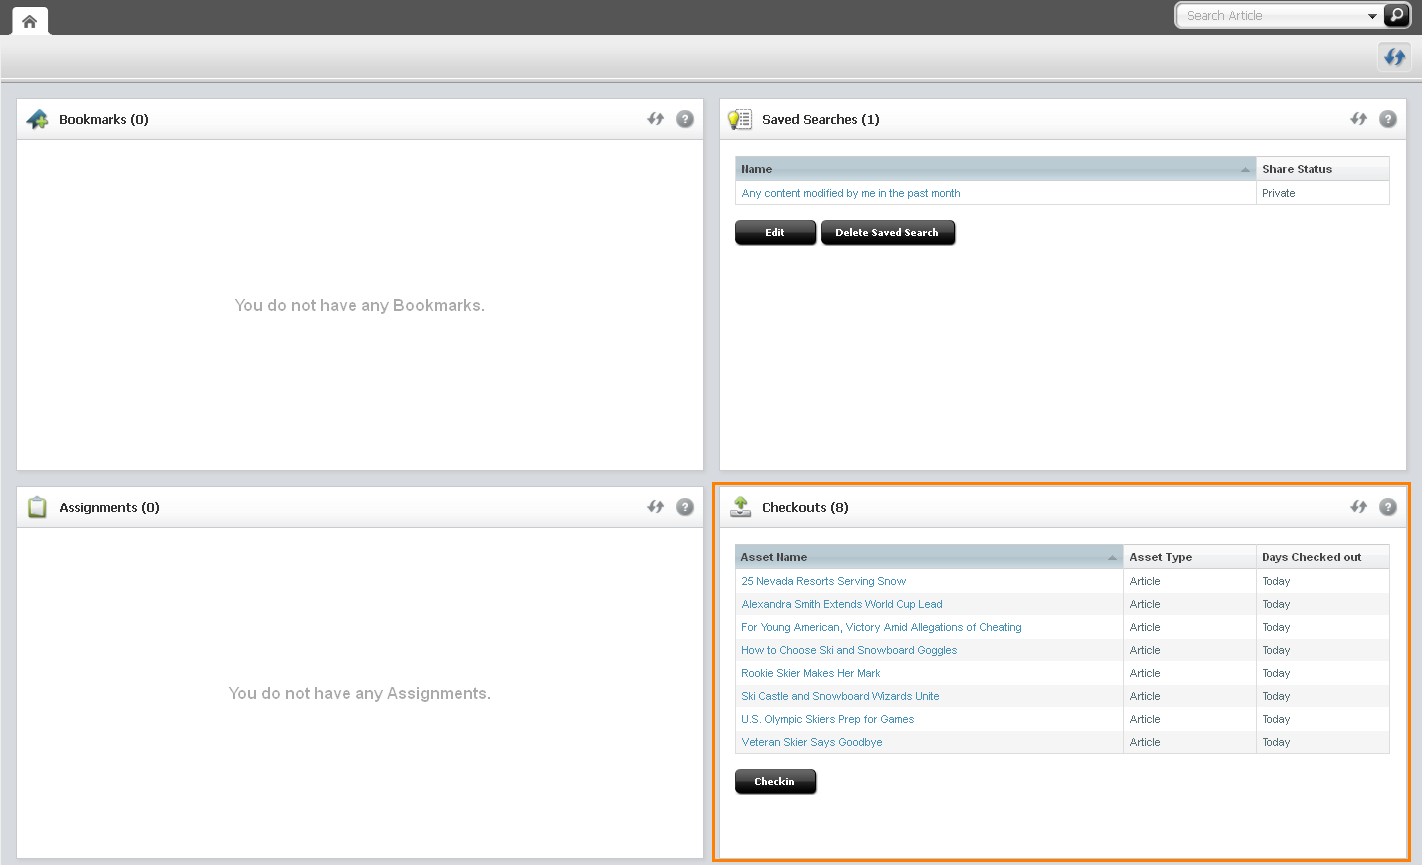
A list of assets that are currently checked out to you is accessible from your dashboard (in the Home tab).
To view a list of assets currently checked out to you
-
Log in to WebCenter Sites, select the site you want to work with and select the icon for the WebCenter Sites Contributor interface.
-
Access your dashboard by clicking the Home tab.
-
Navigate to the "Checkouts" section of the dashboard.
The "Checkouts" section of the dashboard (shown in Figure 15-3) lists all of the assets that are currently checked out to you.
Figure 15-3 'Checkouts' Section of the Dashboard
Description of "Figure 15-3 'Checkouts' Section of the Dashboard"
-
(Optional) If you want to open an asset, click its name in the list.
A tab opens displaying the asset's Inspect view (in either Form Mode or Web Mode).
15.4 Undoing a Checkout
This section shows you how to undo the checkout of an asset. Undoing a check out makes the asset available to other users who have permissions to work with it.
To undo the checkout of an asset
-
Log in to WebCenter Sites, select the site you want to work with and select the icon for the WebCenter Sites Contributor interface.
-
Find the asset for which you want to undo the checkout and open it:
-
Access the dashboard by clicking the Home tab.
-
Navigate to the "Checkouts" section of the dashboard.
The "Checkouts" section of the dashboard displays a list of assets currently checked out to you.
-
In the list of assets, navigate to the desired asset and click its name.
A tab opens displaying the asset's Inspect view (in either Form Mode or Web Mode).
-
-
Undo the check out. Depending on whether the asset opened in Form Mode or Web Mode, do one of the following:
-
If the asset opened in Form Mode:
-
In the asset's toolbar, click the Undo Checkout icon.
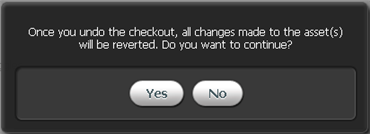
The following dialog box is displayed:
Figure 15-4 'Undo Checkout' Warning Message
Description of "Figure 15-4 'Undo Checkout' Warning Message"
-
In the dialog box, click Yes.
WebCenter Sites undoes the checkout of the asset.
-
-
If the asset opened in Web Mode:
-
In the asset's toolbar, click the Checkin/Checkout icon.
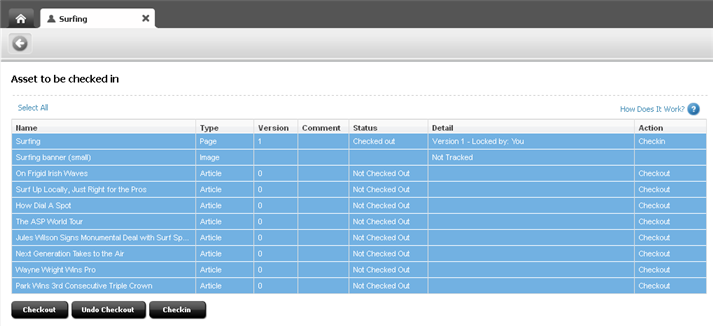
The tab displays the "Asset to be checked in" screen (shown in Figure 15-5). This screen contains a table with revision tracking details about the primary asset (asset you opened in Web Mode) and all of its associated assets (assets displayed in the primary asset's web page view), as shown below:
Figure 15-5 'Asset to be checked in' Screen for an Asset Displayed in Web Mode
Description of "Figure 15-5 'Asset to be checked in' Screen for an Asset Displayed in Web Mode"
The revision tracking action (if any) you can perform on an asset is indicated in the "Action" column of the asset's row. If the asset is not revision tracked, then the "Action" column for that asset's row is empty and the "Detail" column for that asset's row displays the message "Not Tracked."
-
In the revision tracking detail table, select (Ctrl+click) the asset(s) whose checkouts you wish to undo and then click the Undo Checkouts button.
WebCenter Sites undoes the check outs of the selected assets.
-
-
15.5 Checking In Assets
This section shows you how to check an asset in. Checking an asset in creates a new version of the asset and makes it available to other users who have permissions to work with the asset.
-
Log in to WebCenter Sites, select the site you want to work with and select the icon for the WebCenter Sites Contributor interface.
-
Find the asset you wish to check in and open it:
-
Access the dashboard by clicking the Home tab.
-
Navigate to the "Checkouts" section of the dashboard.
The "Checkouts" section of the dashboard displays a list of assets currently checked out to you.
-
In the list of assets, navigate to the desired asset and click its name.
A tab opens displaying the asset's Inspect view in either Form Mode or Web Mode.
-
-
Check in the asset. Depending on whether the asset opened in Form Mode or Web Mode, do one of the following:
-
If the asset opened in Form Mode:
-
In the asset's toolbar, click the Checkin icon.
The tab displays the "Assets to be checked in" screen (shown in Figure 15-6), which displays a table containing the asset's revision tracking details:
Figure 15-6 'Assets to be checked in' Screen for an Asset Displayed in Form Mode

Description of "Figure 15-6 'Assets to be checked in' Screen for an Asset Displayed in Form Mode"
-
Make sure the row containing the asset is highlighted, then click the Checkin button.
-
(Optional) In the Comment field, enter comments or instructions that pertain to the version you are checking in. The comments you enter here are displayed in the asset's revision history. If you are checking in multiple assets, the comment you enter will apply to all assets that you are checking in.
-
(Optional) If you want to create a new version of the asset and then continue working on the new version, select the Keep Checked Out box.
-
Click Checkin.
WebCenter Sites checks the asset in to the database.
-
-
If the asset opened in Web Mode:
-
In the asset's toolbar, click the Checkin/Checkout icon.
The tab displays the "Asset to be checked in" screen. This screen contains a table with revision tracking details about the primary asset (asset you opened in Web Mode) and all of its associated assets (assets displayed in the primary asset's web page view), as shown in Figure 15-7:
Figure 15-7 'Assets to be checked in' Screen for an Asset Displayed in Web Mode

Description of "Figure 15-7 'Assets to be checked in' Screen for an Asset Displayed in Web Mode"
The revision tracking action (if any) you can perform on an asset is indicated in the "Action" column of the desired asset's row. If the asset is not revision tracked, then the "Action" column for that asset's row is empty and the "Detail" column for that asset's row displays the message "Not Tracked."
-
In the revision tracking detail table, select (Ctrl+click) the asset(s) you wish to check in and then click the Checkin button. You can also check assets in one at a time by clicking the Checkin link in the "Action" column of the desired asset's row.
-
(Optional) In the Comment field, enter comments or instructions that pertain to the version you are checking in. The comments you enter here are displayed in the asset's revision history. If you are checking in multiple assets, the comment you enter will apply to all assets that you are checking in.
-
(Optional) If you want to create a new version of the asset and then continue working on the new version, select the Keep Checked Out box.
-
Click Checkin.
WebCenter Sites checks the selected asset(s) back in to the database.
-
-
15.6 Examining Revision History
Note:
You can examine an asset's revision history only if the asset is displayed in Form Mode. If the asset opens in Web Mode, you will have to switch to Form Mode
To examine an asset's revision history
-
Log in to WebCenter Sites, select the site you want to work with and select the icon for the WebCenter Sites Contributor interface.
-
Find and open the asset whose revision history you want to view:
-
Do one of the following:
-
If the asset is not currently checked out to you, in the Search field, enter search criteria identifying the asset and click the magnifying glass button.
For more information about finding assets, see Chapter 6, "Finding and Organizing Assets."
-
If the asset is currently checked out to you, access the dashboard by clicking the Home tab. Then, navigate to the "Checkouts" section of the dashboard.
-
-
In the list of assets, navigate to the desired asset and click its name.
A tab opens displaying the asset in its Inspect view (in either Form Mode or Web Mode).
-
-
If the asset opens in Web Mode, switch to Form Mode. In the asset's toolbar, click the Mode switch.
-
View the asset's revision history. Do one of the following:
-
In the asset's toolbar, click the Show versions icon.
-
In the menu bar, select Edit, then select Version, and then select Show versions.
The tab displays the asset's revision history, shown in Figure 15-8:
Figure 15-8 'Revision History Report' Screen

Description of "Figure 15-8 'Revision History Report' Screen"
-
-
Click the magnifying glass icon next to the version you want to view.
The tab displays the Inspect view of the version of the asset you selected (in Form Mode).
15.7 Reverting to a Previous Version (Rollback)
This section shows you how to roll an asset back to a previous version.
Note:
You can roll an asset back to a previous version only when the asset is displayed in Form Mode. If the asset opens in Web Mode, you will have to switch to Form Mode
-
Log in to WebCenter Sites, select the site you want to work with and select the icon for the WebCenter Sites Contributor interface.
-
Find the asset you want to roll back to a previous version and open it:
-
Do one of the following:
-
If the asset is not currently checked out to you, in the Search field, enter search criteria identifying the asset and click the magnifying glass button.
For more information about finding assets, see Chapter 6, "Finding and Organizing Assets."
-
If the asset is currently checked out to you, access the dashboard by clicking the Home tab. Then, navigate to the "Checkouts" section of the dashboard.
-
-
In the list of assets, navigate to the desired asset and click its name.
A tab opens displaying the asset in its Inspect view (in either Form Mode or Web Mode).
-
-
If the asset opens in Web Mode, switch to Form Mode. In the asset's toolbar, click the Mode switch.
-
Roll back to a previous version of the asset. Do one of the following:
-
In the asset's toolbar, click the Rollback icon.
-
In the menu bar, select Edit, then select Version, and then select Rollback.
Note:
You cannot revert to a previous version of an asset if:
-
Revision tracking is not enabled for the asset type.
-
The asset is already checked out by you or another user. To roll the asset back, it must be checked in.
-
The version to which you want to roll back is the first (SYSTEM) version of the asset.
If you have questions about revision tracking or your permissions, contact your WebCenter Sites administrator.
-
The tab displays the "Rollback" screen (as shown in Figure 15-9):
Figure 15-9 'Rollback Page: Surfing' Screen
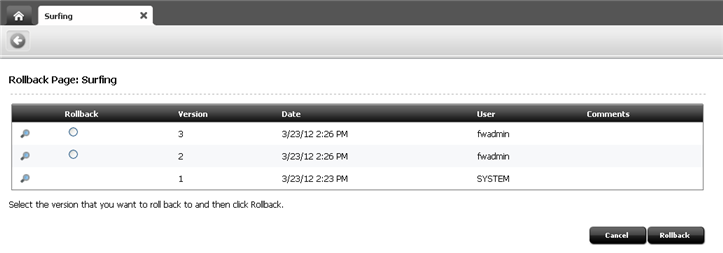
Description of "Figure 15-9 'Rollback Page: Surfing' Screen"
-
-
In the Rollback column of the table, select the radio button next to the version of the asset to which you want to roll back.
-
Click Rollback.
WebCenter Sites rolls the asset back to the version you selected. When you roll back an asset, WebCenter Sites creates another version of it.