8 Associating Assets
WebCenter Sites allows users to associate assets with one another. This chapter uses the avisports sample site to show you how to associate assets when you are working in the Contributor interface.
This chapter contains the following sections:
8.1 Working with Asset Associations
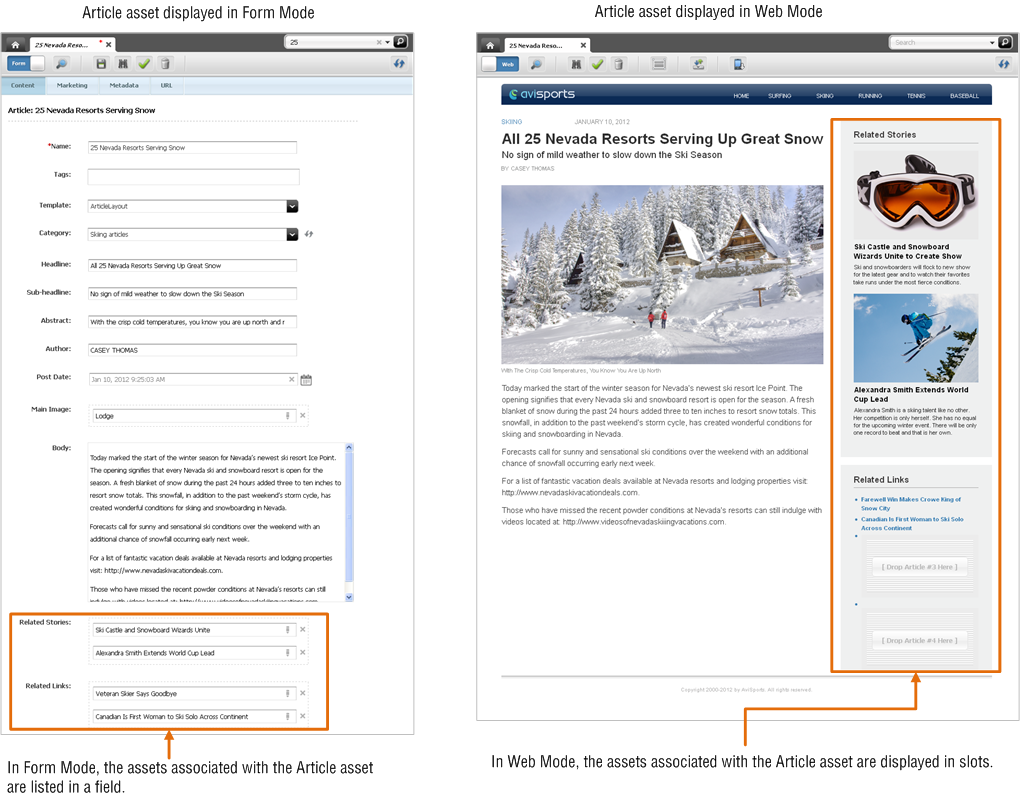
Some asset Create and Edit views include fields (Form Mode) or slots (Web Mode) where you link another asset to the one in which you are working. These types of fields are called "associations." Figure 8-1 shows an "Article" asset (from the avisports sample site), displayed in Form Mode and Web Mode, which is associated with five other "Article" assets.
Figure 8-1 Association Field Displayed in Form Mode and Web Mode
Description of "Figure 8-1 Association Field Displayed in Form Mode and Web Mode"
An association field can be used to create relationships between assets. When you associate one asset with another asset you define a dependency between those assets. When one asset is dependent on another, both assets must be published together.
For example, suppose an asset of type "Article" has an association field that accepts an "Image" asset. In this case, you might associate an article about baseball with a picture of a baseball field. By associating the "Image" asset with the "Article" asset, you are indicating which image appropriately illustrates the article text. The "Article" asset and its associated "Image" asset are now dependent on one another. If you publish the "Article" asset, you must also publish the "Image" asset.
Which assets can be associated is determined by the data model. How associations will be presented on the website is determined by content rendering templates. For example, a template can either display an associated asset or render it as a link.
8.1.1 Types of Associations
An association field allows you to do one of the following, depending on how it is set up:
-
Single-valued association field allows you to associate a single asset with the asset you are working with. For example, in the avisports sample site, assets of type "Article" contain a single-valued association field you can use to pair an "Article" asset with a single "Image" asset.
-
Mulit-valued association fields allow you to associate multiple assets with the asset you are working with. For example, in the avisports sample site, assets of type "Article" contain two multi-valued association fields that allow you to associate several different assets of type "Article" with the "Article" asset you are working with.
Depending on your site design, an association field may be restricted to accept either a specific type and/or sub-type of asset or it may be unrestricted, accepting different types of assets.
8.1.2 Associating Assets
This procedure uses the avisports sample site to show you how to associate one or more assets with another asset using either Form Mode or Web Mode. In Form Mode, an association field is displayed as a drag and drop field in a content entry form. In Web Mode, association fields are represented by slots that are displayed on the web page view of the asset with which you are working. This procedure covers both single and multi-valued associations.
To associate an asset with another asset
-
Log in to WebCenter Sites, select the site you want to work with and select the icon for the WebCenter Sites Contributor interface.
-
Do one of the following:
-
Begin creating an asset:
-
For instructions on creating assets in Form Mode, see Section 3.1, "Creating Assets in Form Mode."
-
For instructions on creating assets in Web Mode, see Section 4.2.3, "Creating a New Asset in Web Mode."
-
-
Open an existing asset for editing:
-
For instructions on editing assets in Form Mode, see Section 3.3, "Editing Assets in Form Mode."
-
For instructions on editing assets in Web Mode, see Section 4.4, "Editing Assets in Web Mode."
-
A tab opens displaying the asset's Create or Edit view in either Form Mode or Web Mode. (In this example, we open the 25 Nevada Resorts Serving Snow "Article" asset.)
-
-
Find the asset(s) you wish to associate:
-
In the Search field, enter the desired search criteria.
-
If the association field accepts only assets of a specific type, limit your search to the required asset type by clicking the down-arrow in the Search field and selecting the name of the asset type.
-
Click the magnifying glass button.
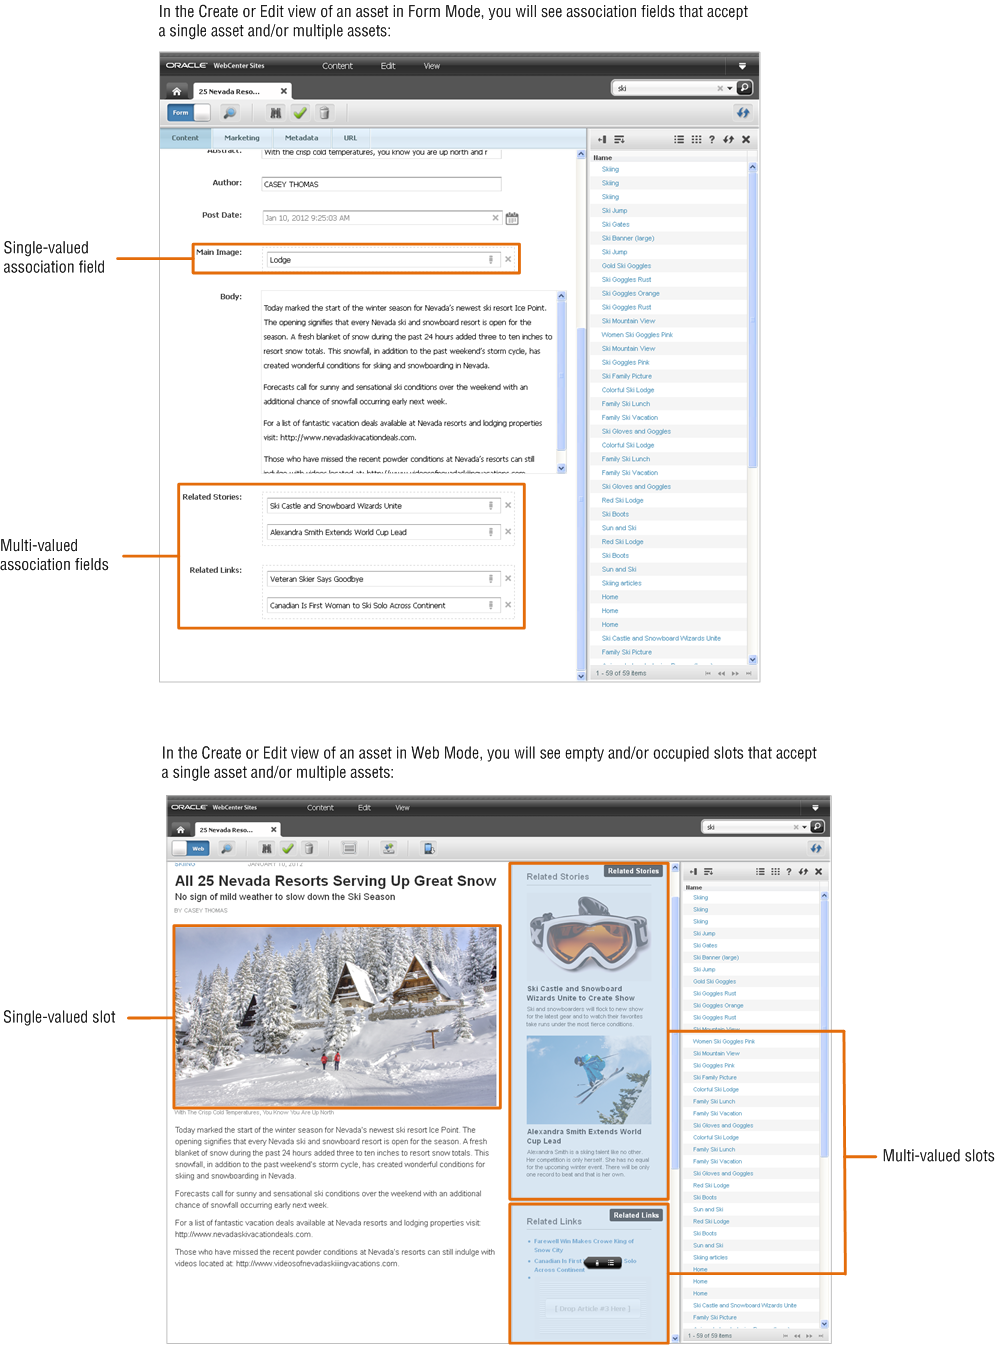
The search results list is docked to the right of the asset with which you are working. Below shows the Edit view of the 25 Nevada Resorts Serving Snow "Article" asset in Form Mode and Web Mode with the search results list docked to the right of the asset.
Figure 8-2 'Article' Asset Displayed in Form Mode and Web Mode (with a Docked Search Results List)
Description of "Figure 8-2 'Article' Asset Displayed in Form Mode and Web Mode (with a Docked Search Results List)"
-
-
Associate the desired asset(s) with the asset you are working with:
-
In the list of assets (docked to the right of the asset you are working with), click the name of the desired asset and drag the asset to the association field (Form Mode) or slot (Web Mode).
-
Drop the asset into the association field (or slot) by releasing the mouse button.
-
If you are working with a multi-valued association, repeat steps a – b, until you have associated all of the desired assets with the asset you are working with.
The selected assets are added to the association field.
-
-
(Optional) If you are working with a multi-valued association and have associated two or more assets, arrange the associated assets as follows:
Note:
The order in which the assets appear in the list (Form Mode) or in the slots (Web Mode), is the order they will display on the website.
-
If you are working in Form Mode, move an asset up or down in the list by clicking the name of the desired asset and dragging and dropping it into the appropriate position in the field.
-
If you are working in Web Mode, move an asset to a different slot. Do the following:
-
Click in the multi-valued slot.
The slot's toolbar is displayed.
-
In the slot's toolbar, click the Manage icon.
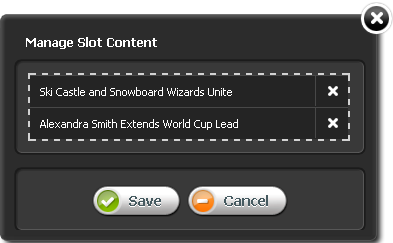
The "Manage Slot Content" dialog box is displayed:
Figure 8-3 'Manage Slot Content' Dialog Box
Description of "Figure 8-3 'Manage Slot Content' Dialog Box"
-
Click the name of the desired asset and move it either up or down in the list.Click Save.
-
-
-
When you are finished, click the Save icon in the asset's toolbar.
-
To inspect the asset, click the Inspect icon in the asset's toolbar.
The tab displays the asset in its Inspect view. You cannot modify the asset in its Inspect view.
8.1.3 Disassociating Assets
To disassociate an asset from another asset
-
Log in to WebCenter Sites, select the site you want to work with and select the icon for the WebCenter Sites Contributor interface.
-
Find and open the asset from which you want to disassociate one or more assets:
-
In the Search field, enter search criteria identifying the asset and click the magnifying glass button.
A "Search" tab opens displaying the results of your search.
For more information on finding assets, see Chapter 6, "Finding and Organizing Assets".
-
In the list of search results, navigate to the desired asset, right-click the asset's name and select Edit from the right-click menu.
A tab opens displaying the Edit view of the asset in either Form Mode or Web Mode.
-
-
Remove the desired asset from the list of associated assets:
-
If you are working in Form Mode, navigate to the field representing the asset's associations and click the Delete (X) button next to each asset you want to disassociate.
-
If you are working in Web Mode and you wish to remove an asset from a slot representing a single-valued association, click the slot containing the asset you wish to disassociate. In the slot's toolbar, click the X button.
-
If you wish to remove an asset from a slot representing a multi-valued association, do the following:
-
Click in the multi-valued slot.
The slot's toolbar is displayed.
-
In the slot's toolbar, click the Manage icon.
-
In the slot's toolbar, click the Manage icon.
The "Manage Slot Content" dialog box is displayed:
Figure 8-4 'Manage Slot Content' Dialog Box

Description of "Figure 8-4 'Manage Slot Content' Dialog Box"
-
Click the X next to the asset you wish to remove.
-
Click Save.
-
WebCenter Sites removes the asset(s) from the association field.
-
-
When you are finished, click the Save icon in the asset's toolbar.
-
To inspect the asset, click the Inspect icon in the asset's toolbar.
The tab displays the Inspect view of the asset. You cannot modify the asset in its Inspect view.
8.2 Parent-Child Relationships
When you designate an asset as a parent of another asset, you are creating a hierarchical relationship between the two assets. An asset that is linked to a parent is called a "child" asset.
A child asset inherits attribute values from its parent. This means that once a child asset is linked to a parent asset, it inherits the parent's attributes and values and retains the attributes it already has. If the parent and the child share the same multi-valued attribute, the child inherits the parent asset's values and retains its original values. If the parent and child share the same single-valued attribute, the child retains the attribute's current value and does not inherit the value of the parent.
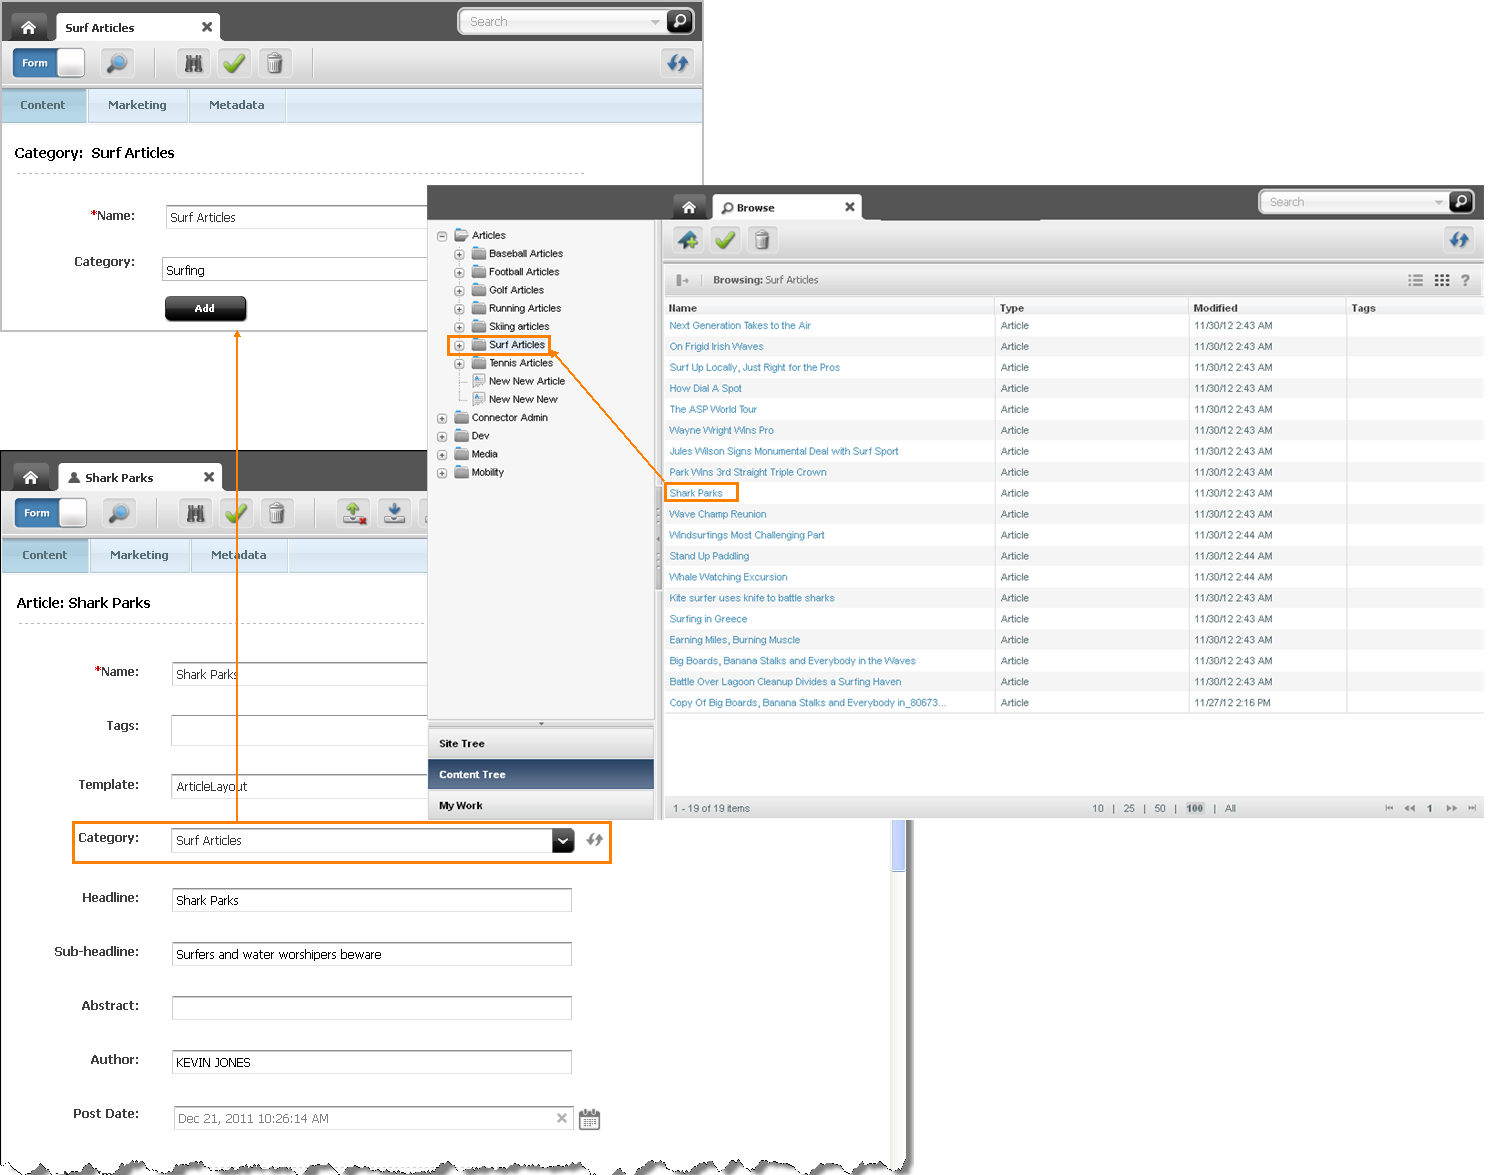
Parent-child relationships are shown in the Content Tree. Parent-child relationships are taken into account during approval for publishing so that no broken links result on the published site. More information on approval for publishing can be found in Chapter 14, "Approval for Publishing."
An asset can have more than one parent. When assigned multiple parents, the asset appears in multiple places in the Content Tree, as a child of every parent to which it is linked.
-
Log in to WebCenter Sites, select the site you want to work with and select the icon for the WebCenter Sites Contributor interface.
-
Do one of the following:
-
Begin creating an asset:
-
For instructions on creating assets in Form Mode, see Section 3.1.2, "Creating a New Asset in Form Mode."
-
For instructions on creating assets in Web Mode, see Section 4.2.3, "Creating a New Asset in Web Mode."
-
-
Open an existing asset for editing:
-
For instructions on editing assets in Form Mode, see Section 3.3, "Editing Assets in Form Mode."
-
For instructions on editing assets in Web Mode, see Section 4.4, "Editing Assets in Web Mode."
-
A tab opens displaying the asset's Create or Edit view in either Form Mode or Web Mode.
-
-
In the asset's Create or Edit view, locate the association field in which you will designate a parent asset.
Note:
If you are working in Web Mode, the association field may be displayed as a slot. If you do not see a slot that accepts a parent asset, stop here. The layout (template) assigned to the asset is not coded to display this type of field. To assign the asset to a parent, you will have to switch to Form Mode by clicking the Mode switch in the asset's toolbar.
-
Find the parent asset you wish to designate as the parent of the asset with which you are working.
-
Select the parent asset to associate from a search results list:
-
In the Search field, enter criteria that describes the desired parent asset.
-
(Optional) Limit your search to a specific asset type (for example, only assets of type "Article Category") by clicking the down-arrow in the Search field and selecting the name of the desired asset type.
-
Click the magnifying glass button.
-
-
Select the parent asset to associate from the Content Tree:
-
In the navigation pane, select the Content Tree bar.
-
In the Content Tree, expand the nodes to expose the parent assets related to each node.
-
-
-
Designate the parent asset.
Note:
The type of field you see depends on the configurations your developers made to the asset's definition. In this example, we are designating a parent asset for an "Article" asset, in the avisports sample site, which displays a drop-down menu. In the FirstSite II sample site, the field in which you designate a parent asset is a Drop Zone.
For example, if you are working in Form Mode, use the drop-down menu in the Category field to select the desired parent asset.
WebCenter Sites associates the asset with the selected parent assets. The name of the associated parent asset is displayed in the field.
-
When you are finished, click the Save icon on the asset's toolbar.
8.3 Working with Grouped Assets
When working with assets, you might want to organize them in groups and place them in a specific order. If you are a marketer and the "Collection" asset type is enabled for the site with which you are working, you can create lists of assets related to other assets in some way based on context, or lists of asset that change based on some variable, such as the current date, or time of day. You might also want to deliver different groups of assets depending on the demographic data of your visitors. In such cases, you would use "Collection" and "Recommendation" assets.
This section contains the following:
8.3.1 Working with Collections
Suppose you want to choose, rank in order, and deliver sets of content that your visitors will most likely want to see when viewing your site. For example, you might want to place five top political news stories, organized in the order of importance, on the home page of your site every morning. In a case like this, you can build your "Top Five" list of articles using a "Collection" asset.
A "Collection" asset stores a list of basic assets of a single asset type, organized in a specific order. The assets you can include in a collection come from the results returned by one or more queries. You choose the assets you want to include in the collection by ranking them in the order of your choice in the list of query results. This ranked, ordered list of assets is the collection.
Typically, site designers or administrators create "Collection" assets and assign the appropriate queries and templates to them. Your job is to choose the most suitable content to be included in the collection.
Keep in mind that once you build your collection, other users with the appropriate permissions can access the "Collection" assets you worked with and change your asset rankings within them.
Note:
"Collection" assets can store lists of basic assets only. For flex assets, functionality similar to that of "Collection" assets (and much more) is provided by "Recommendation" assets (described later in this section).
8.3.2 Building a Collection
A "Collection" asset must already exist in the site you are working with in order for you to be able to build the desired collection. Your site designer or administrator is usually the person responsible for creating new "Collection" assets and editing existing ones.
-
Log in to WebCenter Sites, select the site you want to work with and select the icon for the WebCenter Sites Contributor interface.
-
Find the collection you want to build:
-
In the Search field, enter search criteria identifying the asset.
-
(Optional) In the Search field, click the down-arrow to render the "Search Type" drop-down box. Select the "Collection" asset type to limit your search to only "Collection" assets. If you do not make a selection, WebCenter Sites will search across all asset types in the current site.
-
Click the magnifying glass button.
A "Search" tab opens displaying the results of your search.
For more information on finding assets, see Chapter 6, "Finding and Organizing Assets."
-
-
In the list of search results, navigate to the desired "Collection" asset and click its name.
A tab opens displaying the Inspect view of the "Collection" asset (in either Form Mode or Web Mode).
-
If the "Collection" asset open in Web Mode, switch to Form Mode by clicking the Mode switch in the asset's toolbar.
-
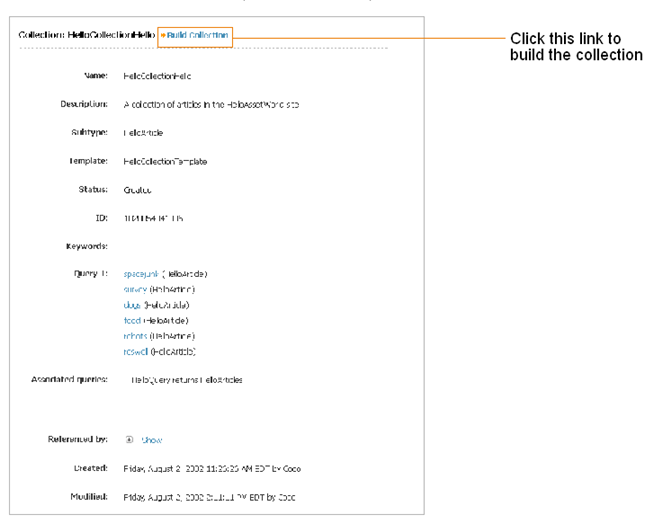
In the asset's Inspect view (in Form Mode), click Build Collection, located next to the name of the Collection asset (as shown in Figure 8-6).
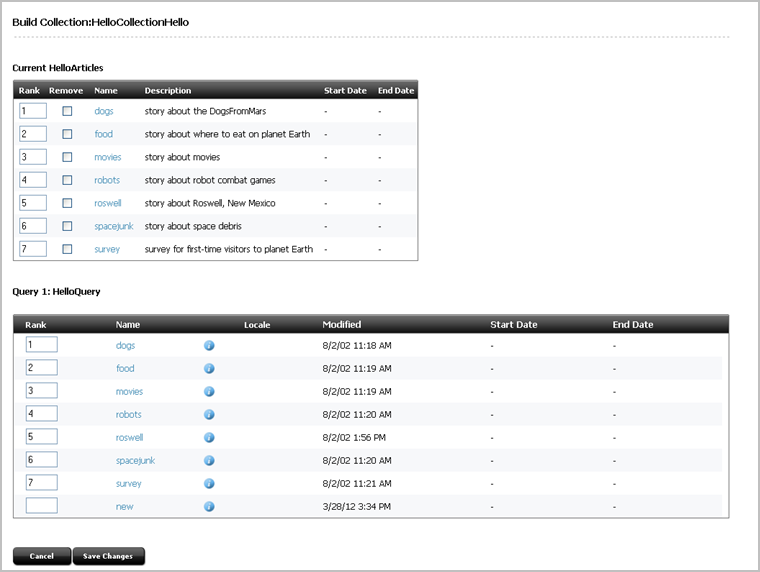
WebCenter Sites runs the query (or queries) in the collection and displays the results, as shown in Figure 8-7:
Figure 8-7 Collection Asset's Query Results
Description of "Figure 8-7 Collection Asset's Query Results"
-
Rank the assets by entering the appropriate number (up to three digits) in the "Rank" column of the table. If you want to remove an asset that is included in the top list, in the "Remove" column, select the checkbox next to the name of the asset you wish to remove. Deleting an asset's rank number from the query list will not remove it from the collection.
Note:
When you rank the assets in your collection, do so in an order that is appropriate to the template element that renders the page. For example, if your collection contains 50 assets, but the template that renders it is coded to display only five, only the first five highest-ranked assets in the collection will be displayed on the page. Consult your site developers if you are unsure about the properties of the templates you are using.
-
Click Save Changes.
WebCenter Sites builds the collection and displays the collection in its Inspect view.
8.3.3 Working with Recommendations
"Recommendation" assets allow you to personalize product placements and promotional offerings that are displayed for each site visitor. Recommendations determine which assets (products, for example) should be featured or "recommended" on a page, based on available information about your site visitors (such as age, or last viewed product).
You can personalize the content your visitors view in the following ways:
-
Create Static List recommendations. These are lists of assets that are displayed according to demographic criteria such as age, income, or other information in the site visitor's profile. (This criteria is defined in a "segment" and associated with a given static list recommendation.) For example, you can create a list of top dance clubs and show it only to visitors who specify their age range to be between 18 and 24. For visitors whose age falls outside this range, you can display another static list recommendation, for example, a list of top ten beach resorts.
-
Create Related Items recommendations. Related Items recommendations allow you to link to each other assets that bear some sort of relation to one another. This way, whenever a visitor views an asset that is linked to another asset via a Related Items recommendation, he/she will also see the related asset. You can thus create a "path" or a "link trail" for your visitors to follow by consecutively linking assets to one another using a Related Items recommendation.
The goal is to persuade your visitors to view additional content related to the content they are viewing at a given moment by showing them a teaser for the related content alongside the main content. Related Items recommendations are thus excellent for business tactics such as up-selling or cross-selling merchandise.
For example, you can link to one another a number of movies that share a common theme or genre, such as the Godfather trilogy. You link part I of the trilogy to part II, and part II to part III using a Related Items recommendation. This way, when a visitor looks at part I of the trilogy, Sites will also show part II. When the visitor then looks at part II, Sites will also show part III. Additionally, you could link parts II and III to part I so your visitors know they should watch part I first when they view part II or III.
-
Create Dynamic List recommendations. Unlike Static List and Related Items recommendations, the functionality of Dynamic List recommendations is defined by customized code written by your developers. Because of that, Dynamic List recommendations are the most flexible out of the three types of "Recommendation" assets in terms of fulfilling specific business needs. For example, your developers can code a Dynamic List recommendation to behave like a Related Items recommendation, but instead of requiring the related assets be linked manually, the recommendation can track the movies a visitor has bought in the past and recommend movies that most closely match his or her past purchases in terms of theme or genre. In such case, you would simply assign the recommendation to the assets you want to be included in the recommendation.
The choice regarding the type of recommendations used depends largely on how you or your site designers want your site to behave. For information about creating "Recommendation" assets, see Chapter 19, "Creating and Configuring Recommendations with Engage."
