3 Creating, Sharing, and Editing Assets in Form Mode
This chapter describes the basic procedures for creating and editing assets in Form Mode, illustrated with examples from the avisports sample site.
This chapter contains the following sections:
3.1 Creating Assets in Form Mode
Creating assets is permission based. If you have the right permissions, you can create brand new assets "from scratch." If the asset that you want to create is similar to an existing asset, you can copy the existing asset and make changes to the copy, which saves you a few steps. If an asset currently exists on one site and you need to create the same asset for a different site, you can share the asset so that you do not have to create it more than once. All of these methods are described later in this chapter.
If the administrator configured an asset type such that all assets of that type open in Form Mode, when you create an asset of that type, a content entry form containing predefined fields into which you can enter information for the asset being created is displayed.
Note:
The Contributor interface provides two modes for creating new assets – Form Mode and Web Mode. This section only provides information about creating assets in Form Mode. For information about creating assets in Web Mode, see Section 4.2, "Creating Assets in Web Mode."
3.1.1 How Many Ways Can You Create an Asset?
-
Create assets from scratch
-
Copy existing assets and then work with the copied asset
The assets you can create are determined by how the administrator has personalized the "New" menu (from the Content menu, select New) for your role. The purpose of personalizing the contents of the "New" menu is to make your job easier. For example, you will see only the asset types for which you can create assets.
3.1.2 Creating a New Asset in Form Mode
If the administrator configured an asset type to be created in Form Mode and listed in your "New" menu (from the Content menu, select New), you can create assets of that type by entering information into the fields of a content entry form.
-
Log in to WebCenter Sites, select the site you want to work with and select the icon for the WebCenter Sites Contributor interface.
-
Select the type of asset you want to create. In the menu bar, select Content, then select New, and then select the type of asset you wish to create. (In this example, we use the "Article" asset type).
Note:
In the avisports sample site, assets of type "Article" are configured to open in Web Mode. Therefore, when you select to create an "Article" asset, the "Create Article" dialog box is displayed.
To follow this procedure (and create an "Article" asset in Form Mode):
-
In the "Create Article" dialog box, fill in the following fields:
In the "Select Layout" field, select the layout you wish to assign to the asset.
In the "Name" field, enter a name for the asset. For information about naming the asset, see step 6a.
-
Click Continue.
The asset's Create view is displayed in Web Mode.
-
Switch to Form Mode. In the asset's toolbar, click the Mode switch.
The asset's Create view is displayed in Form Mode.
-
-
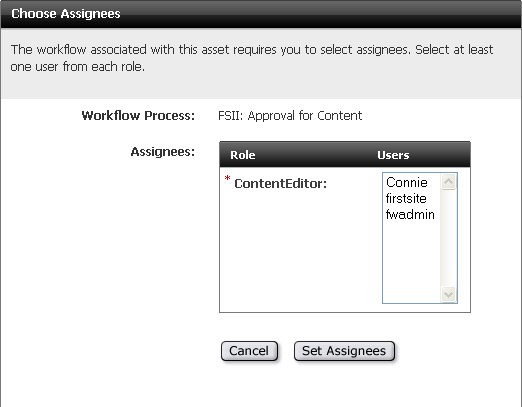
If the administrator configured the asset type such that all new assets of that type are placed into workflow upon creation, a tab opens displaying the "Choose Assignees" form:
Select at least one user for each required role and click Set Assignees. Any of these users can complete the next step in the workflow process. For more information, see Chapter 16, "Workflow."
The tab displays the asset's Create view as a content entry form ("Article" asset in this example).
Figure 3-2 New 'Article' Asset Displayed in Form Mode
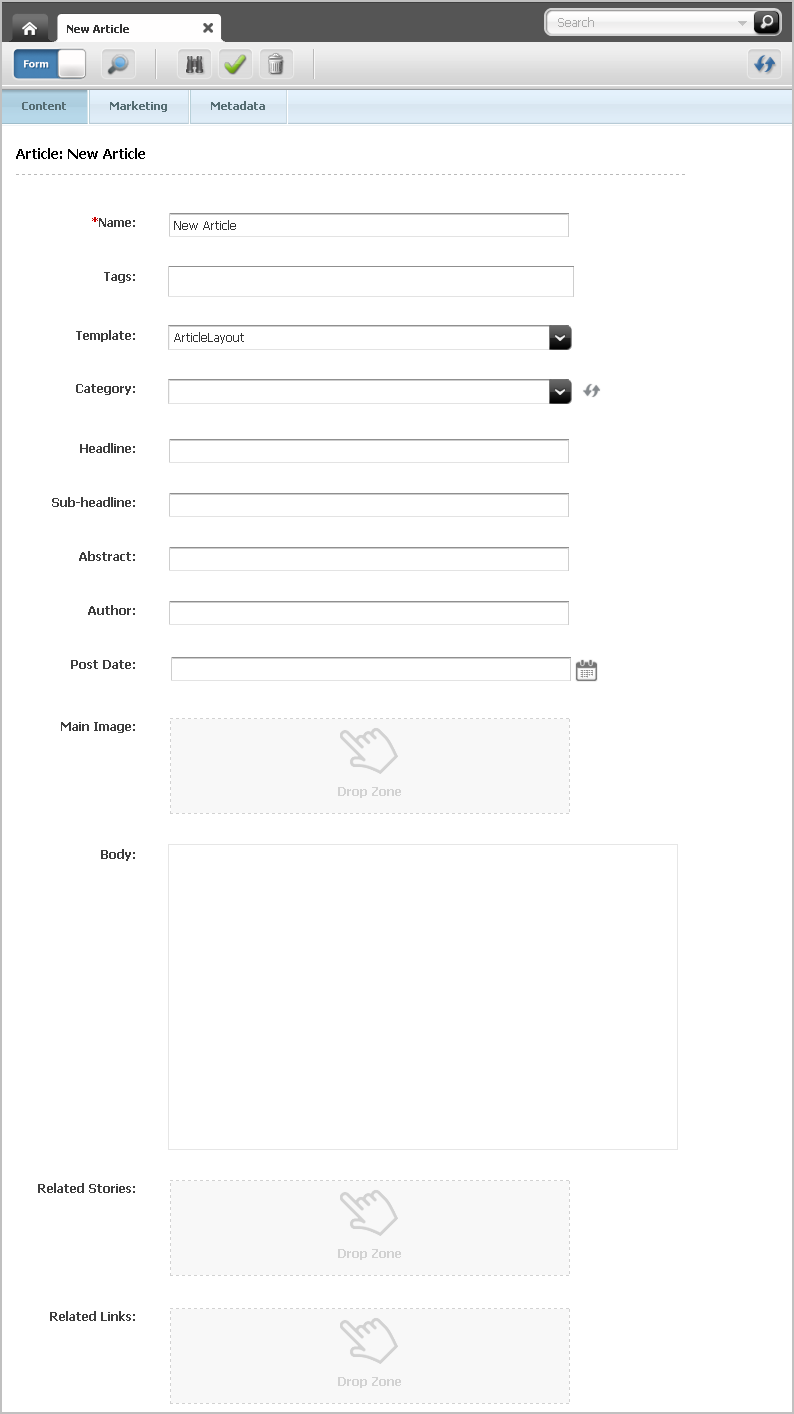
Description of "Figure 3-2 New 'Article' Asset Displayed in Form Mode"
-
In the asset's Create view, do the following:
-
In the "Name" field, enter a name for the asset. Note the following conventions when naming the asset:
-
The name must be between 1 and 64 alphanumeric characters.
-
The following characters are not allowed: single quote ('), double quote ("), semicolon (;), colon (:), question mark (?), percent sign (%), less-than sign (<), and greater-than sign (>).
-
The name can contain spaces, but cannot start with a space.
-
-
Fill in the asset's content entry form. When populating the form, take note of the following:
-
Required fields. You must fill in all required fields (marked with an asterisk) before you are permitted to save the asset. Fill in all other fields as necessary.
-
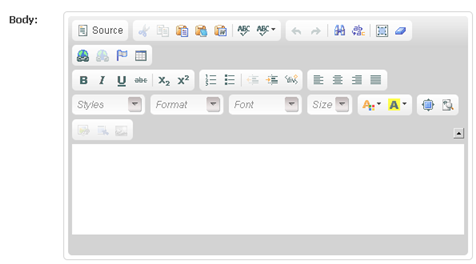
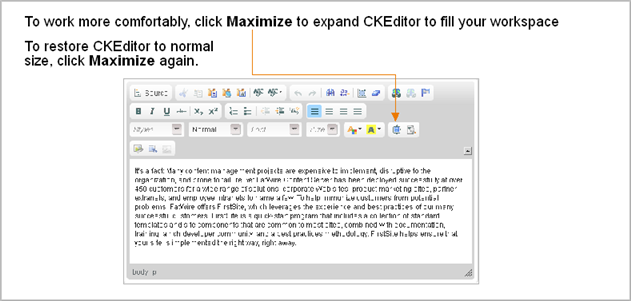
WYSIWYG text fields. You may see one or more text fields that are WYSIWYG-enabled via a WYSIWYG editor, such as CKEditor (as shown in Figure 3-3). These text fields allow you to enter and format your content using controls similar to those of Microsoft Word.
To work in a CKEditor-enabled field, you must initiate CKEditor for that field by clicking in the field. When you click in the field, the CKEditor toolbar opens. For more information, see Section 3.5.1, "Working with the CKEditor."
-
Date fields. You may see one or more fields that allow you to select a date. For example:
Clicking the Pick a date icon invokes the Date Picker attribute editor. For more information, see Section 3.5.1, "Working with the CKEditor."
-
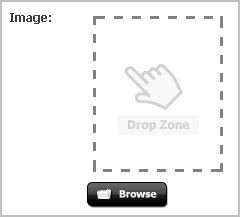
Image Picker fields. You may see one or more fields that prompt you to select an image asset (to be associated with the asset you are creating) through the Image Picker attribute editor. In such cases, you will see a Browse button under a Drop Zone, as shown in Figure 3-5:
Clicking the Browse button invokes the Image Picker, to the right of the tab displaying the asset, showing either names or thumbnails of the image assets from which you can select. For more information, see Section 3.5.2, "Working with the Image Picker."
-
Clarkii Online Image Editor fields. You may see one or more fields that allow you to edit images directly in the asset form, using Clarkii OIE (as shown in Figure 3-6).
Figure 3-6 Clarkii Online Image Editor Field
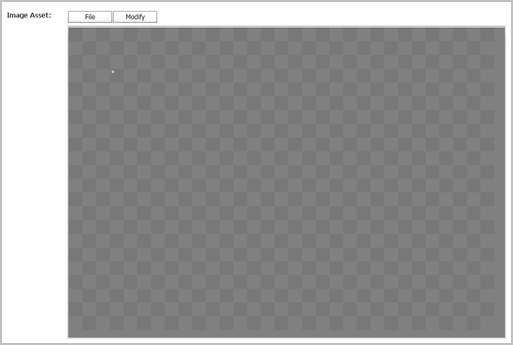
Description of "Figure 3-6 Clarkii Online Image Editor Field"
For detailed instructions, see Section 3.5.3, "Working with the Clarkii Online Image Editor."
-
Type Ahead fields. You may see one or more fields that display the text "Type Ahead" within a drop-down menu, as shown in Figure 3-7:
To populate this field with an asset, you can either start typing the name of the asset you wish to place into the field or use the drop-down menu to select the desired asset. Your developers determine the type of asset(s) this field supports.
-
Upload fields. You may see one or more fields that enable you to upload an image file from your local machine, as shown in Figure 3-8:
To populate fields such as this, click the Browse button to upload the desired image file from your local machine.
-
Asset association fields. You may see one or more fields that display a Drop Zone. These fields support drag and drop functionality and prompt you to select an asset, from a tree or search results list, to associate with the asset you are creating. To populate an association field, do the following:
In the Content Tree, My Work tree, or a search results list, click the name of an asset and hold down the button on the mouse while you drag the asset to the association field.
Figure 3-9 Asset Dragged Over an Association Field

Description of "Figure 3-9 Asset Dragged Over an Association Field"
When you hover an asset of an accepted type over the field, a green border is displayed around the field.
Release the button on the mouse to drop the asset into the field.
The populated association field will look similar to the following:
WebCenter Sites links the asset you dropped into the association field to the asset you are working with. The name of the associated asset is displayed in the association field. More information on associating assets can be found in Chapter 8, "Associating Assets."
-
-
(Optional) In the Tags field, enter a single word or short phrase to attach to the asset. You can either enter a new tag into this field or apply a pre-existing tag.
Note the following conventions when adding tags to an asset:
-
A tag must be between 1 and 32 alphanumeric characters. The only other characters allowed in the Tags field are: underscore (_) and hyphen (-).
-
To end a tag, use the semicolon (;) or press Enter on your keyboard. For example, if you want to enter multiple tags into the same Tags field, each tag must be separated by a semicolon (;).
Tags can be added to basic assets, flex assets, and page assets. When an asset is tagged, you can conduct an advanced search to find the tagged asset and all other assets that have been tagged with the same content. For example, a marketer who is creating a new recommendation can select the content of the recommendation based on a query of the desired tag.
Note:
For more information about:
-
tagging assets, see Section 6.6.2, "Working with Tags."
-
using tags to search for assets, see Section 6.3, "Performing an Advanced Search."
-
recommendation assets, see Chapter 19, "Creating and Configuring Recommendations with Engage."
-
-
Select the next section in the form section selector and fill in the fields as outlined in step 0 Continue until you have populated all required fields (marked with an asterisk). Populate other form sections as necessary.
-
If you plan to create translations of the asset, or if you are required to specify the language of the content you create, select the asset's target language in the "Locale" drop-down list (located in the Metadata section of the form). For more information, see Chapter 11, "Working with Multilingual Assets."
-
If you wish to create a vanity URL for the asset, select the URL section of the form. In the "URL" field, specify the desired vanity URL for the asset. For instructions, see Section 3.4.1, "Creating Vanity URLs for Assets."
-
-
Save the asset by doing one of the following:
-
In the asset's toolbar, click the Save icon.
-
In the menu bar, select Content, then select Save.
WebCenter Sites saves the asset to the database, unless:
-
You have left out one or more required fields in one or more sections
-
An entry or selection you have made in one or more sections is not permitted
If either of the above is true, WebCenter Sites displays an error message indicating the offending fields. Correct the errors, then save the asset.
-
-
Inspect the asset. Do one of the following:
-
In the asset's toolbar, click the Inspect icon.
-
In the menu bar, select Edit, then select Inspect.
The tab displays the asset's Inspect view in Form Mode. You cannot modify the asset's content when the asset is displayed in the Inspect view.
-
-
If the asset is not preassigned to a workflow and you want to use the workflow feature, you can assign the asset to a workflow process as described in Section 16.4, "Using Workflow Functions."
-
Preview the asset:
-
In the asset's toolbar, click the Preview icon.
-
If the asset does not have a template assigned to it, the "Select Layout" dialog opens. Select the desired layout and click Apply.
The tab displays the preview of the asset. For detailed instructions about previewing an asset, see Section 7.2, "How Do I Preview Assets?"
-
If you wish to make additional changes to the asset, do the following:
-
In the asset's toolbar, click the Go Back icon.
The tab displays the Inspect view of the asset.
-
In the asset's toolbar, click the Edit icon.
The tab displays the Edit view of the asset. For information about editing assets in Form Mode, see Section 3.3, "Editing Assets in Form Mode."
-
-
-
When you are finished working with the asset, save the asset and close the tab. In the menu bar, select Content, then select Save & Close.
WebCenter Sites saves the asset and closes the tab displaying the asset.
3.1.3 Creating Assets by Copying Existing Assets
You can create new assets by copying existing assets. You can then work on the copies, making changes to the content where necessary. You can copy assets even if they are checked out by another user. Assets can be copied using either Form Mode or Web Mode.
3.1.3.1 Create an Asset by Copying an Existing Asset
This section provides instructions for creating a new asset by copying an existing asset.
To create a new asset by copying an existing asset
-
Log in to WebCenter Sites, select the site you want to work with and select the icon for the WebCenter Sites Contributor interface.
-
Find and open the asset you wish to copy. Do one of the following:
-
Search for and open the desired asset:
-
In the Search field, enter search criteria identifying the asset and then click the magnifying glass button.
-
In the list of search results, navigate to and click the name of the desired asset.
-
-
If you previously bookmarked the asset, open it from the Bookmarks node in the My Work tree:
-
In the My Work tree, expand the Bookmarks node. (If the My Work tree is collapsed, expand it by clicking the My Work bar in the navigation pane.)
-
In the list of bookmarked assets, double-click the name of the desired asset.
For more information on finding assets, see Chapter 6, "Finding and Organizing Assets."
A tab opens displaying the Inspect view of the asset (in either Form Mode or Web Mode).
-
-
-
Copy the desired asset. In the menu bar, expand the Edit menu and then select Copy.
Note:
If you do not see a Copy option, stop here. You do not have the appropriate permissions to copy the asset. If you have questions about your permissions, contact your administrator.
A tab opens displaying the copied asset's Edit view in either Form Mode or Web Mode. The copied asset's name is displayed in the tab as "Copy of Asset Name_randomly generated number."
-
If the copy of the asset opens in Web Mode, do one of the following:
-
If you wish to work with the copied asset in Web Mode, see Section 4.4, "Editing Assets in Web Mode."
-
If you wish to work with the copied asset in Form Mode, switch to Form Mode.
-
In the asset's toolbar, click the Mode switch.
-
When the tab displays the asset in Form Mode, continue to the next step.
-
-
-
In the Edit view of the copied asset, replace the content in the fields with content for the new asset you are creating. Do the following:
-
In the Name field, replace the asset's system generated name with a name that uniquely identifies the copied asset. Note the following conventions when naming the asset:
-
The name must be between 1 and 64 alphanumeric characters.
-
The following characters are not allowed: single quote ('), double quote ("), semicolon (;), colon (:), question mark (?), percent sign (%), less-than sign (<), and greater-than sign (>).
-
The name can contain spaces, but cannot start with a space.
-
-
(Optional) Set or change the new asset's locale designation:
-
In the asset's form section selector, select Metadata.
-
In the "Metadata" section, navigate to the "Locale" drop-down list and select the desired locale designation for the asset.
If you do not make a selection, one of the following happens:
-
If the source asset has a locale designation, the new asset will retain the locale designation of the source asset.
-
If the source asset has no locale designation, the new asset will not have a locale designation until you manually assign one.
For more information, see Chapter 11, "Working with Multilingual Assets."
-
-
Populate the remaining fields with the desired content for the new asset. For information about the different fields you may see when working with an asset in Form Mode, see step 0
-
-
Save the asset. Do one of the following:
-
In the asset's toolbar, click the Save icon.
-
In the menu bar, select Content, then select Save.
WebCenter Sites saves the asset to the database, unless:
-
You have left out one or more required fields
-
An entry or selection you have made in one or more fields is not permitted
If either of the above is true, WebCenter Sites displays an error message indicating the offending fields. Correct the errors, then save the asset.
-
-
Inspect the asset by doing one of the following:
-
In the asset's toolbar, click the Inspect icon.
-
In the menu bar, select Edit, then select Inspect.
The tab displays the asset's Inspect view in Form Mode. You cannot edit the asset's content when the asset is displayed in the Inspect view.
-
-
(Optional) If the asset is not preassigned to a workflow and you want to use the workflow feature, you can assign the asset to a workflow process as described in the section Section 16.4.1, "Assigning an Asset to a Workflow."
-
-
In the asset's toolbar, click the Preview icon.
-
If the asset does not have a template assigned to it, the "Select preview template" dialog box opens. Select the desired layout and click Apply.
The tab displays the preview of the asset. For detailed instructions about previewing an asset, see Chapter 7, "Previewing Assets."
-
3.1.3.2 Copying Multiple Assets at the Same Time
This section provides instructions for creating multiple assets by copying more than one existing asset at the same time.
To copy multiple assets at the same time
-
Log in to WebCenter Sites, select the site you want to work with and select the icon for the WebCenter Sites Contributor interface.
-
Find the assets you wish to copy:
-
If you wish to search for the desired assets, in the Search field, enter search criteria identifying the assets you wish to copy and then click the magnifying glass icon.
A "Search" tab opens displaying the results of your search.
-
If you wish to access a list of assets via the Content Tree, do the following:
-
In the navigation pane, click the Content Tree bar.
-
In the Content Tree, double-click the parent node containing the assets you wish to copy.
A "Browse" tab opens displaying a list of assets associated with the parent you double-clicked.
-
-
-
In the list of assets, Ctrl+click or Shift+click the assets you wish to copy.
-
Right-click the highlighted assets and select Copy from the context menu.
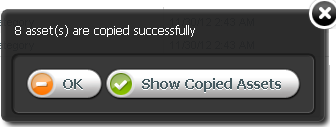
The following dialog box opens:
-
In the dialog box, do one of the following:
-
To close the dialog box and work with the copied assets at another time, click OK.
-
To view a list of the copied assets, click Show Copied Assets.
A "Browse" tab opens listing the names of the assets you copied.
Note:
The naming convention for copied assets is: "Copy of Asset Name_randomly generated number."
-
-
Open the copied assets and replace the content in the fields with content for the new assets you are creating. For instructions, see steps 5 – 9 in Section 3.1.3.1, "Create an Asset by Copying an Existing Asset." Repeat these steps until all copied assets have been renamed and their content has been replaced with content for the new assets.
3.2 Sharing Assets with Other Sites
If you are working with an asset that you want to use in more than one site, you can share it so that you do not have to create it more than once and maintain it across multiple sites.
Note:
To share an asset with another site, make sure that the asset's type is enabled on the site with which you wish to share it.
3.2.1 Which Assets Can You Share?
Before you share an asset, keep in mind the following:
-
You must have the permissions to share an asset.
-
You can share an asset only to sites that you have access to. If you have access to only one site, the Share option in the Content menu is not available to you.
-
You cannot share "Page" assets.
-
Share an asset only if the content it contains does not have to be unique to the target site. For example, you can share an asset containing your company's logo, because the same image can probably be used on all of the company's sites.
If the nature of the content requires a separate, unique version for each site, do not share the asset – instead, create a new asset for each site that requires a unique version of the content.
-
Because of the nature of asset sharing, if a shared asset is deleted, it is automatically removed from all of the sites it was shared to.
-
If the asset is in a workflow, you and others can change its workflow status only when you are working in the asset's native site.
-
It is good practice to share the asset only when you are ready to publish it; that is, wait to share the asset until it has been approved.
-
If you want to share a localized asset to another site, the asset's locale must be enabled on the target site.
-
If you share an asset that has dependencies, (for example, the shared asset is associated with an "Article" asset), you will have to share all of the asset's dependent assets to the target site in order for the primary shared asset to be successfully approved for publishing on the site to which you shared it.
If you wish to share an asset with another site, but you do not have the appropriate permissions, contact your WebCenter Sites administrator.
3.2.2 How Do You Share Assets with Other Sites?
-
Log in to WebCenter Sites, select the site you want to work with and select the icon for the WebCenter Sites Contributor interface.
-
Find and open the asset you want to share to another site. Do one of the following:
-
Search for and open the desired asset:
-
In the Search field, enter search criteria identifying the asset and then click the magnifying glass button.
-
In the list of search results, navigate to and click the name of the asset you wish to share.
Note:
If you wish to share the asset without first inspecting it, in the search results list, right-click the desired asset and select Share from the context menu. Continue to step 0
-
-
If you previously bookmarked the asset, open it from the Bookmarks node in the My Work tree:
-
In the My Work tree, expand the Bookmarks node. (If the My Work tree is collapsed, expand it by clicking the My Work bar in the navigation pane.)
-
In the list of bookmarked assets, double-click the name of the desired asset.
-
For more information on finding assets, see Chapter 6, "Finding and Organizing Assets."
A tab opens displaying the Inspect view of the asset (in either Form Mode or Web Mode).
-
-
In the menu bar, select Content, then select Share.
The "Share Selected Content" dialog box opens.
Figure 3-12 'Share Selected Content' Dialog Box
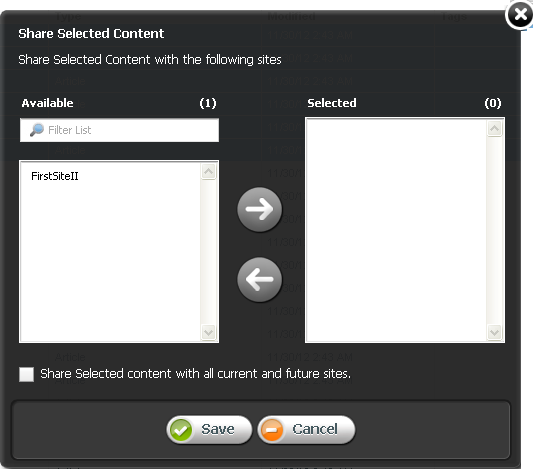
Description of "Figure 3-12 'Share Selected Content' Dialog Box"
-
In the "Share Selected Content" dialog box, do the following:
-
In the "Available" list box, select the site(s) to which you wish to share the asset and move the site(s) to the "Selected" list box.
-
If you wish to share this asset with all current and future sites, select the Share Selected content with all current and future sites checkbox.
-
Click Save.
The asset is now accessible on the site(s) to which you shared it.
-
3.2.3 How Do You Share Multiple Assets with Other Sites?
-
Log in to WebCenter Sites, select the site you want to work with and select the icon for the WebCenter Sites Contributor interface.
-
Find the assets you wish to share:
-
If you wish to search for the desired assets, in the Search field, enter search criteria identifying the assets you wish to share and then click the magnifying glass icon.
A "Search" tab opens displaying the results of your search.
-
If you wish to access a list of assets via the Content Tree, do the following:
-
In the navigation pane, click the Content Tree bar.
-
In the Content Tree, double-click the parent node containing the assets you wish to share.
A "Browse" tab opens displaying a list of assets associated with the parent you double-clicked.
-
-
-
In the list of assets, Ctrl+click or Shift+click the assets you wish to share.
-
Right-click the highlighted assets and select Share from the context menu.
The "Share Selected Content" dialog box opens:
Figure 3-13 'Share Selected Content' Dialog Box

Description of "Figure 3-13 'Share Selected Content' Dialog Box"
-
In the "Share Selected Content" dialog box, do the following:
-
In the "Available" list box, select the site(s) to which you wish to share the assets and move the site(s) to the "Selected" list box.
-
If you wish to share these assets with all current and future sites, select the Share Selected content with all current and future sites checkbox.
-
Click Save.
The assets are now accessible on the site(s) to which you shared them.
-
3.3 Editing Assets in Form Mode
Editing assets is permission based. Your site administrator determines which users can work with which assets. If you have the right permissions, you can edit assets in the WebCenter Sites Contributor interface. For more information about the permissions needed to edit assets, see your administrator.
If the asset type is configured such that all assets of that type open in Form Mode, a tab opens displaying the content entry form of the asset. In Form Mode, you can edit an asset's content by modifying or replacing the information displayed in the fields of the asset's content entry form.
Note:
If you need to edit a shared asset, you will have to edit the asset in its native site (the site on which the asset was originally created).
-
Log in to WebCenter Sites, select the site you want to work with and select the icon for the WebCenter Sites Contributor interface.
-
Find and open the asset. Do one of the following:
-
Search for and open the desired asset:
-
In the Search field, enter search criteria identifying the asset and then click the magnifying glass button.
-
In the list of search results, navigate to and click the name of the desired asset.
-
-
If you previously bookmarked the asset, open it from the Bookmarks node in the My Work tree:
-
In the My Work tree, expand the Bookmarks node. (If the My Work tree is collapsed, expand it by clicking the My Work bar in the navigation pane.)
-
In the list of bookmarked assets, double-click the name of the desired asset.
-
Note:
If you wish to edit the asset without first inspecting it, in the list of assets, right-click the desired asset and select Edit from the context menu. Continue to step 0 If the asset's Edit view is displayed in Web Mode, switch to Form Mode by clicking the Mode switch in the asset's toolbar.
For more information on finding assets, see Chapter 6, "Finding and Organizing Assets."
A tab opens displaying the Inspect view of the asset (in either Form Mode or Web Mode).
-
-
Access the asset's Edit view in Form Mode:
-
If the asset is displayed in Web Mode, switch to Form Mode. In the asset's toolbar, click the Mode switch.
-
In the asset's toolbar, click the Edit icon.
The tab displays the Edit view of the asset in Form Mode.
Figure 3-14 Edit View of an Asset in Form Mode
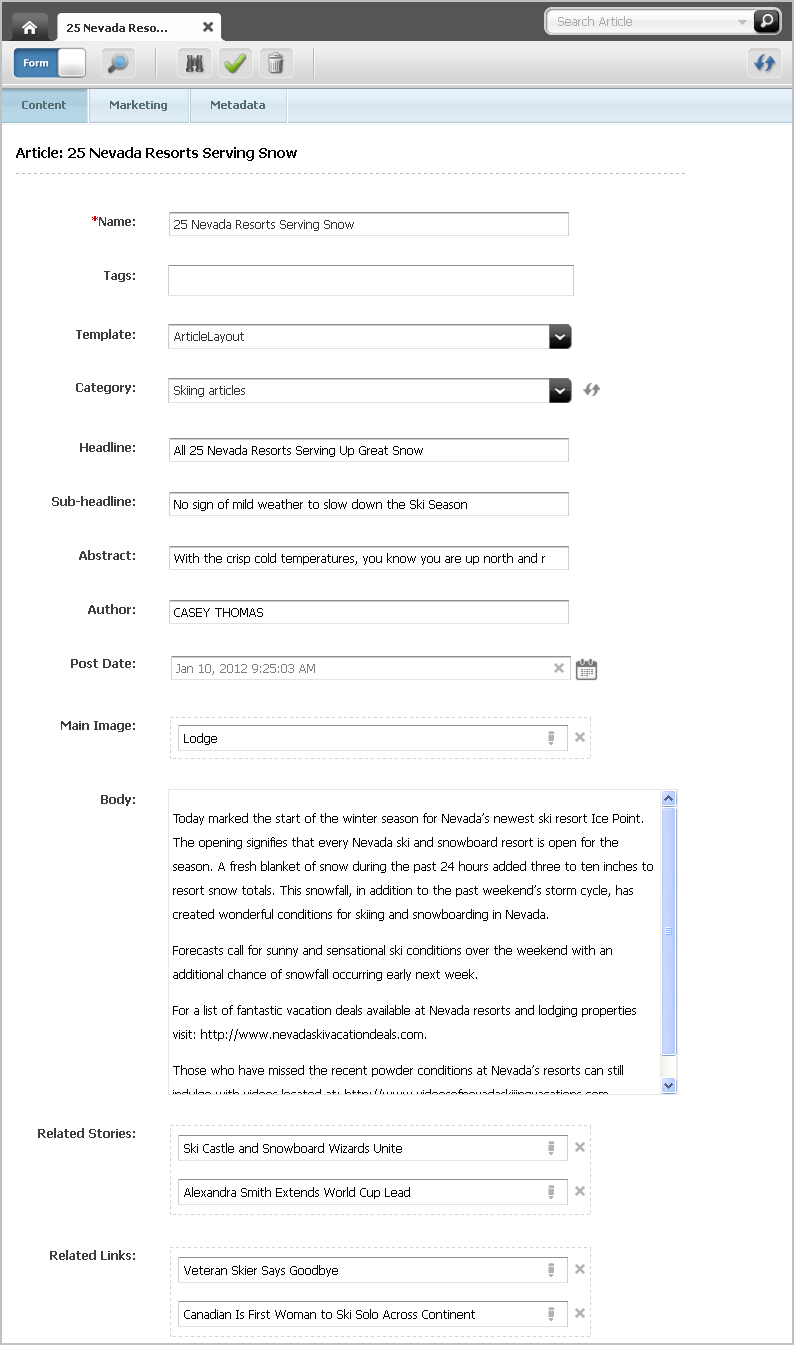
Description of "Figure 3-14 Edit View of an Asset in Form Mode"
-
-
Make the desired changes to the asset's content. See step 6 for details on filling in the fields you may see when working with an asset in Form Mode.
-
Save the asset by doing one of the following:
-
In the asset's toolbar, click the Save icon.
-
In the menu bar, select Content, then select Save.
WebCenter Sites saves the asset to the database, unless:
-
You have left out one or more required fields in one or more sections
-
An entry or selection you have made in one or more sections is not permitted
If either of the above is true, WebCenter Sites displays an error message indicating the offending fields. Correct the errors, then save the asset.
-
-
Inspect the asset by doing one of the following:
-
In the asset's toolbar, click the Inspect icon.
-
In the menu bar, select Edit, then select Inspect.
The tab displays the Inspect view of the asset in Form Mode. You cannot edit the asset's content when the asset is displayed in the Inspect view.
-
-
If the asset is not preassigned to a workflow and you want to use the workflow feature, you can assign the asset to a workflow process as described in Section 16.4.1, "Assigning an Asset to a Workflow."
-
Preview the asset:
-
In the asset's toolbar, click the Preview icon.
-
If the asset is not assigned a template, the "Select Layout" dialog opens. Select the desired layout and click Apply.
The tab displays the preview of the asset. For detailed instructions about previewing an asset, see Chapter 7, "Previewing Assets."
-
3.4 Working with Vanity URLs
Vanity URLs are short, readable, easy to control URLs that usually contain either the name of, or other descriptive content about the web page to which it points. WebCenter Sites supports two types of Vanity URLs – Asset URLs and Blob (File) URLs.
You, as a content contributors can create vanity Asset URLs for any type of asset. An Asset URL can be either auto-generated (based on a pattern defined by the administrator in the WebCenter Sites Admin interface) or created in the WebCenter Sites Contributor interface. A Blob (File) URL is created by your administrator in the WebCenter Site Admin interface for an asset's associated file (for example, a Blob URL is created for an Image asset's associated Image file). In the Contributor interface, you can view a Blob (File) URL from an asset's content entry form.
When a vanity URL is defined for an asset (or its associated file), and that asset is published to the website, the vanity URL points to the web page that renders the content of the asset. This section contains instructions for creating and managing Asset URLs. For information about creating and managing Blob (File URLs), see the Oracle Fusion Middleware WebCenter Sites Administrator's Guide.
This section contains the following information:
3.4.1 Creating Vanity URLs for Assets
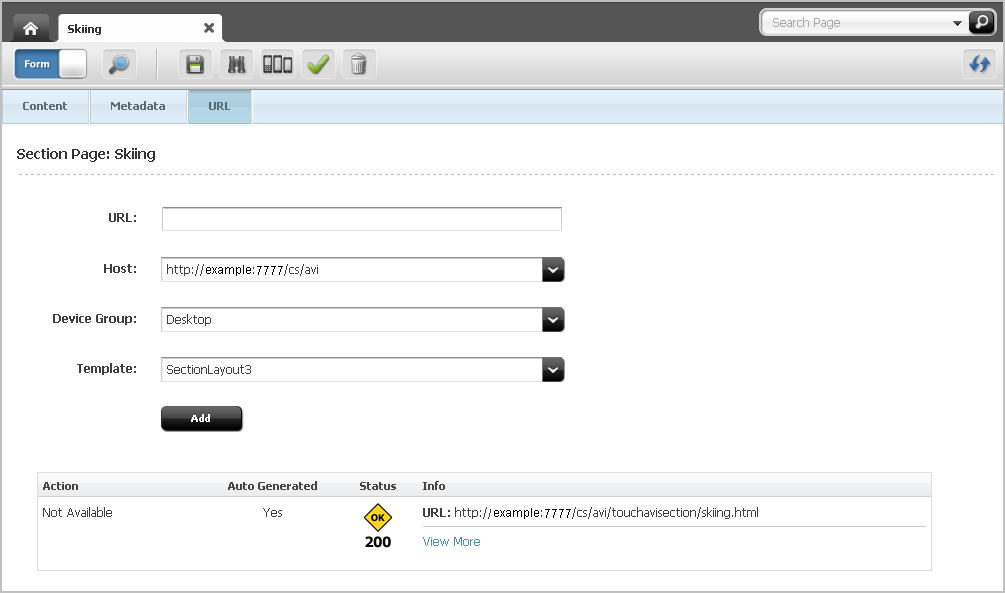
The URL section of an asset's form contains the URL field, which you can use to define one or more vanity URLs for the asset.
To create a vanity URL for an asset
-
Log in to WebCenter Sites, select the site you want to work with, and select the icon for the WebCenter Sites Contributor interface.
-
Find and open the asset for which you wish to create a vanity URL. Do one of the following:
-
Search for and open the asset for which you wish to create a vanity URL.
-
In the Search field, enter search criteria identifying the asset and then click the magnifying glass button.
-
In the list of search results, navigate to and click the name of the desired asset.
-
-
If you previously bookmarked the asset, open it from the Bookmarks node in the My Work tree:
-
In the My Work tree, expand the Bookmarks node. (If the My Work tree is collapsed, expand it by clicking the My Work bar in the navigation pane.)
-
In the list of bookmarked assets, double-click the name of the desired asset.
-
For more information on finding assets, see Chapter 6, "Finding and Organizing Assets."
A tab opens displaying the Inspect view of the asset (in either Form Mode or Web Mode).
-
-
Access the asset's Edit view in Form Mode:
-
If the asset is displayed in Web Mode, switch to Form Mode. In the asset's toolbar, click the Mode switch.
-
In the asset's toolbar, click the Edit icon.
The tab displays the Edit view of the asset in Form Mode.
-
-
In the form section selector, select URL.
The URL section of the form is displayed:
Figure 3-15 'URL' Section of a Content Entry Form
Description of "Figure 3-15 'URL' Section of a Content Entry Form"
-
Create a new vanity URL for the asset:
-
Fill in the following fields:
-
URL – Enter the desired path for the vanity URL you are creating for the asset. For example,
skiing/article.Note:
The path for the vanity URL must be unique. WebCenter Sites does not allow different assets to share the same vanity URL path.
-
Host – This field is displayed only if your administrator or developers configured a root (base) URL for assets of this type in the WebCenter Sites Admin interface. Use this field to select the root (base) URL.
-
Device Group – If your content management site is configured to support multiple device groups, select the device group for which this vanity URL will be used to render the asset on the website.
For more information about device groups, see Chapter 13, "Creating Mobile Websites," and the Oracle Fusion Middleware WebCenter Sites Developer's Guide.
-
Template – Select the layout with which to render the asset on the website.
If your developers have defined arguments for the template you selected, those arguments are displayed to the right of the Template field. Select or enter the desired values for the arguments.
-
Wrapper – This field is displayed only if your site has a wrapper. Select the wrapper for your site.
-
-
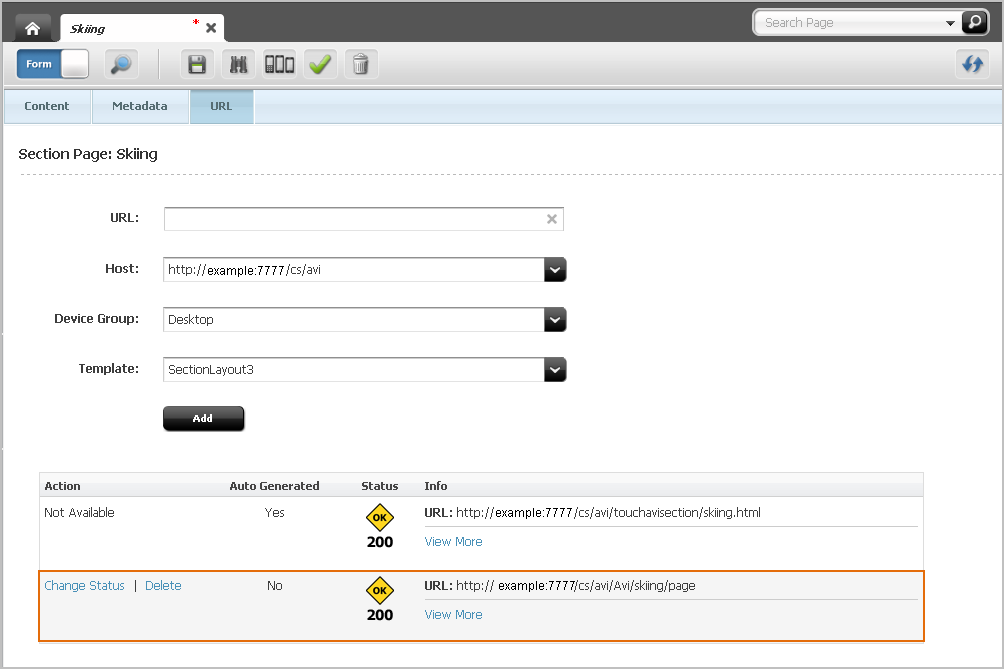
Click Add.
The vanity URL is displayed in a table, below the Add button.
Figure 3-16 'Vanity URL' Section of the Form
Description of "Figure 3-16 'Vanity URL' Section of the Form"
-
-
Save the asset by doing one of the following:
-
In the asset's toolbar, click the Save icon.
-
In the menu bar, select Content, then select Save.
-
-
Preview the asset in a new window. In the menu bar, select View, then select Preview in New Window.
If the template that is rendering the preview of the asset matches the template selected for the vanity URL, the browser's address bar shows that the vanity URL you created is rendering the preview of the asset.
-
Publish the asset. For instructions, see the publishing chapter in the Oracle Fusion Middleware WebCenter Sites Administrator's Guide.
Once the asset is published to the website, the vanity URL that you defined for that asset renders it on the website.
3.4.2 Viewing and Managing Vanity URLs
This section provides instructions for viewing and managing vanity URLs.
Note:
If your administrator has configured an auto-generated Asset URL or created a Blob (File) URL for an asset's associated file, you only have permissions to view that vanity URL.
-
Log in to WebCenter Sites, select the site you want to work with, and select the icon for the WebCenter Sites Contributor interface.
-
Find and open the asset whose vanity URL(s) you wish to view:
-
Search for and open the desired asset:
-
In the Search field, enter search criteria identifying the asset and then click the magnifying glass button.
-
In the list of search results, navigate to and click the name of the desired asset.
-
-
If you previously bookmarked the asset, open it from the Bookmarks node in the My Work tree.
-
In the My Work tree, expand the Bookmarks node. (If the My Work tree is collapsed, expand it by clicking the My Work bar in the navigation pane.)
-
In the list of bookmarked assets, double-click the name of the desired asset.
-
For more information on finding assets, see Chapter 6, "Finding and Organizing Assets."
A tab opens displaying the Inspect view of the asset (in either Form Mode or Web Mode).
-
-
In the asset's Inspect view, click the URL section of the form section selector.
The "URL" section of the asset's form opens.
-
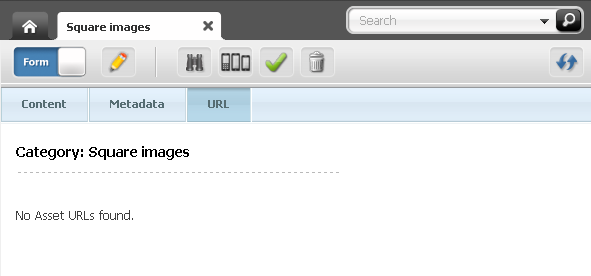
If the asset is not assigned any vanity URLs, the URL section of the form displays the message "No Asset URLs Found" (as shown in Figure 3-17).
Figure 3-17 URL Section of an Asset's Form – No Asset URLs Found
Description of "Figure 3-17 URL Section of an Asset's Form – No Asset URLs Found"
-
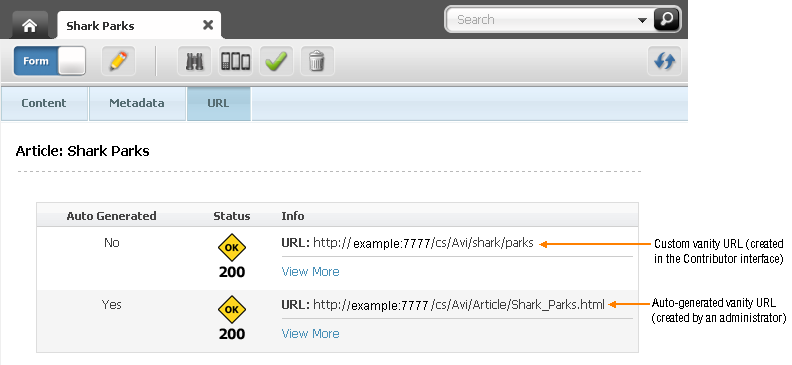
If a vanity URL has been created for the asset (auto-generated or custom), the URL section of the asset's form will look similar to Figure 3-18.
Figure 3-18 Vanity Asset URLs Displayed in the URL Section of an Asset's Form
Description of "Figure 3-18 Vanity Asset URLs Displayed in the URL Section of an Asset's Form"
-
If a Blob (File) URL has been created for the asset's associated file, the URL section of the asset's form will look similar to Figure 3-19:
Figure 3-19 Blob (File) URL Displayed in the URL Section of an Asset's Form
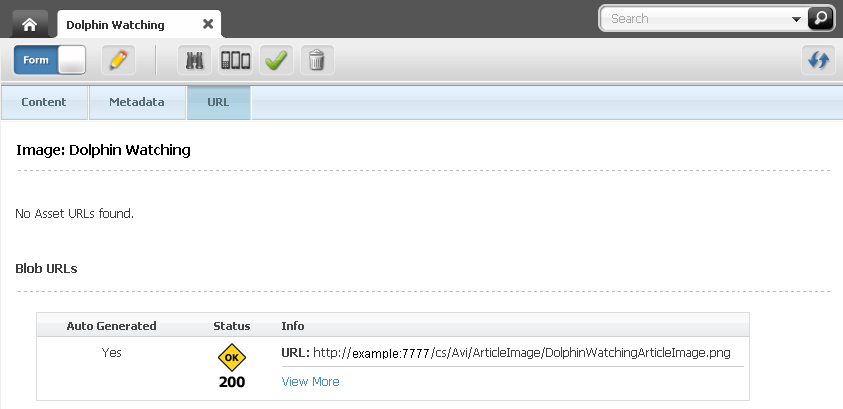
Description of "Figure 3-19 Blob (File) URL Displayed in the URL Section of an Asset's Form"
-
-
View the details of the URL (template, wrapper, device group, and so on) by clicking the View More link, located under the desired URL.
Click the View Less link to collapse the details of the URL.
To manage an asset's vanity URL
-
Log in to WebCenter Sites, select the site you want to work with, and select the icon for the WebCenter Sites Contributor interface.
-
Find and open the asset whose vanity URL you wish to edit or delete:
-
Search for and open the desired asset:
-
In the Search field, enter search criteria identifying the asset and then click the magnifying glass button.
-
In the list of search results, navigate to and click the name of the desired asset.
-
-
If you previously bookmarked the asset, open it from the Bookmarks node in the My Work tree.
-
In the My Work tree, expand the Bookmarks node. (If the My Work tree is collapsed, expand it by clicking the My Work bar in the navigation pane.)
-
In the list of bookmarked assets, double-click the name of the desired asset.
-
For more information on finding assets, see Chapter 6, "Finding and Organizing Assets."
A tab opens displaying the Inspect view of the asset (in either Form Mode or Web Mode).
-
-
Access the asset's Edit view in Form Mode:
-
If the asset is displayed in Web Mode, switch to Form Mode. In the asset's toolbar, click the Mode switch.
-
In the asset's toolbar, click the Edit icon.
The tab displays the Edit view of the asset in Form Mode.
-
-
In the form section selector, select URL.
The URL section of the form is displayed.
-
Navigate to the desired URL and either change its status or delete it:
-
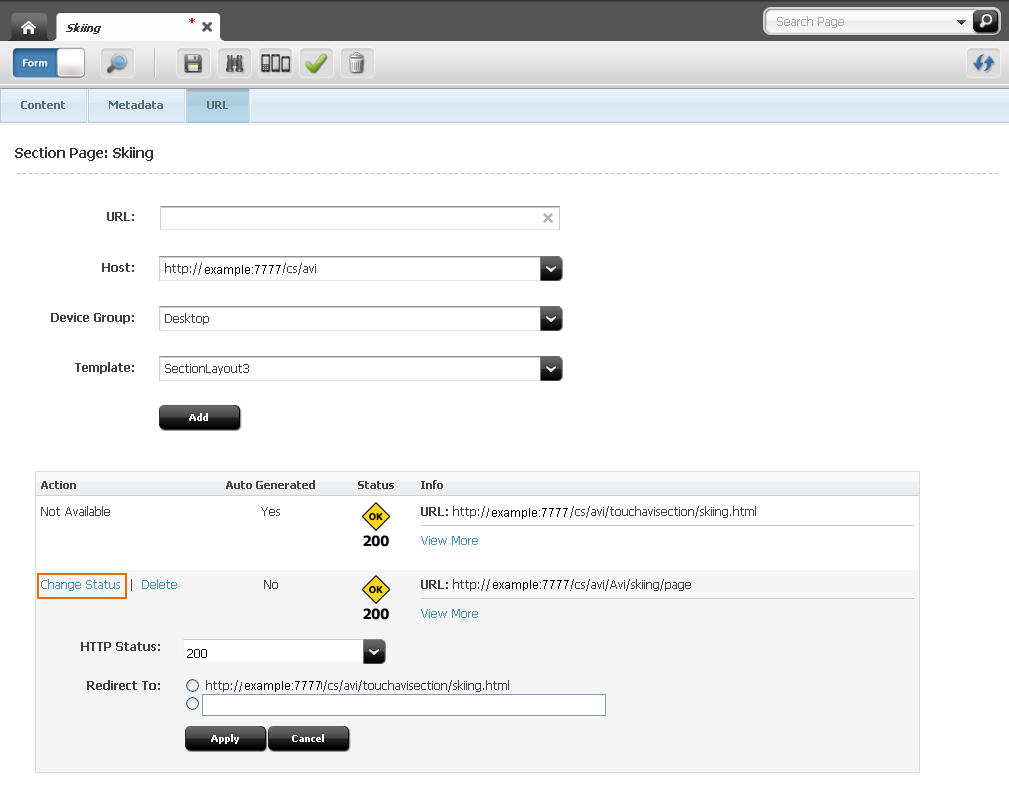
To edit the vanity URL defined for an asset, click the Change Status link (located in the "Action" column of the table) next to the URL you wish to edit.
Fill in the following fields:
-
In the HTTP Status drop-down menu, select one of the following HTTP statuses:
HTTP Status Description 200Standard response for a successful HTTP request. The visitor is directed to the requested web page to which the vanity URL points.
301The web page has been moved permanently. This and all future requests will be directed to the URL defined in the Redirect To field.
302Temporary redirect. The visitor is redirected to a temporary web page (for example, a web page containing content that will only be available for a month) defined in the Redirect To field.
-
In the Redirect To field, enter a URL that visitors will be redirected to when they attempt to access the asset from the vanity URL. If there is another vanity URL available for this asset, you can select to redirect the visitor to that URL.
-
Click Apply.
If you changed the HTTP Status of the URL, the change is reflected in the "Status" column of the table.
-
-
To delete a vanity URL defined for an asset, click the Delete link (located in the "Action" column of the table) next to the URL you wish to delete.
Note:
If you changed the status of a URL to
302and redirected it to the URL you wish to delete, you cannot delete the URL until its association to the redirected URL is removed – that is, change the status of the redirected URL back to200.
-
-
Save the asset by doing one of the following:
-
In the asset's toolbar, click the Save icon.
-
In the menu bar, select Content, the select Save.
-
-
Preview the asset in a new window. In the menu bar, select View, then select Preview in New Window.
-
If you edited the vanity URL, the browser's address bar shows the edited vanity URL that is pointing to the preview of the asset.
-
If you deleted the vanity URL, the browser's address bar shows the URL assigned to the asset by WebCenter Sites.
-
-
Publish the asset. For instructions, see the publishing chapter in the Oracle Fusion Middleware WebCenter Sites Administrator's Guide.
Once you publish the asset, the changes you made to the asset's URL are reflected on the website.
3.5 Working with Attribute Editors
This section contains information about the attribute editor enabled fields you may see when creating or editing an asset. This section contains the following:
3.5.1 Working with the CKEditor
CKEditor is a popular third-party WYSIWYG editor that is used as the default editor for WYSIWYG-enabled text fields. CKEditor allows you to apply a wide range of MS Word-style formatting to your content.
CKEditor also provides advanced features, such as access to your content's underlying HTML code, and the ability to accept pre-formatted content from MS Word documents.
Most features made available to you in the toolbar are native to CKEditor. To learn more about CKEditor and its capabilities, consult the editor's documentation, available at http://docs.cksource.com.
Several features on the CKEditor toolbar are specific to WebCenter Sites. The features are shown and explained below:
Figure 3-24 WebCenter Sites Specific Features in CKEditor
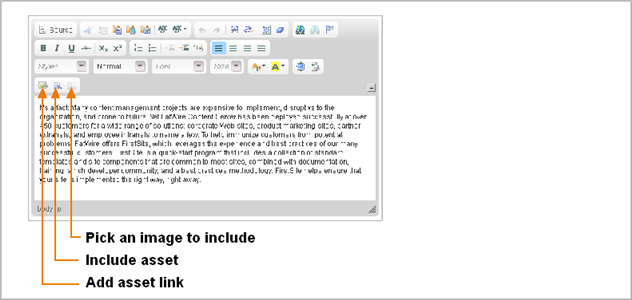
Description of "Figure 3-24 WebCenter Sites Specific Features in CKEditor"
-
Add asset link – Enables you to create a hypertext link from one asset to another asset. For more information, see Section 9.2, "Linking Two Assets Directly."
-
Include asset – Enables you to render an asset's previewable content in another asset. For more information, see Section 9.3.1, "To Link Two Assets by Inclusion."
Note:
If the included asset is an image, then you can link the image to another asset. For more information, see Section 9.4, "Linking Two Assets via an Image Asset."
-
Pick an image to include – Enables you to include an image from the "Image Picker," into the referring asset's CKEditor enabled field(s).
Once the image is included in the field, you have the option to link the image to another asset. For more information, see Section 9.4.3, "Linking via an Image from the Image Picker."
3.5.2 Working with the Image Picker
When working with assets that can be associated with one or more image assets, you may see fields that support the Image Picker attribute editor. The Image Picker enables you to visually choose an image asset to associate with the asset you are creating or editing.
Note:
When configuring the asset type of the parent asset, your developers decide the following:
-
The fields for which Image Picker is enabled
-
The type of image assets displayed by Image Picker
To associate an image asset with another asset using the Image Picker
-
In the Create or Edit view of an asset displayed in Form Mode, navigate to the field associated with the Image Picker and click Browse.
Image Picker opens in the search results list (to the right of the asset's form).
Figure 3-26 Search Results List Docked to the Right of an Asset
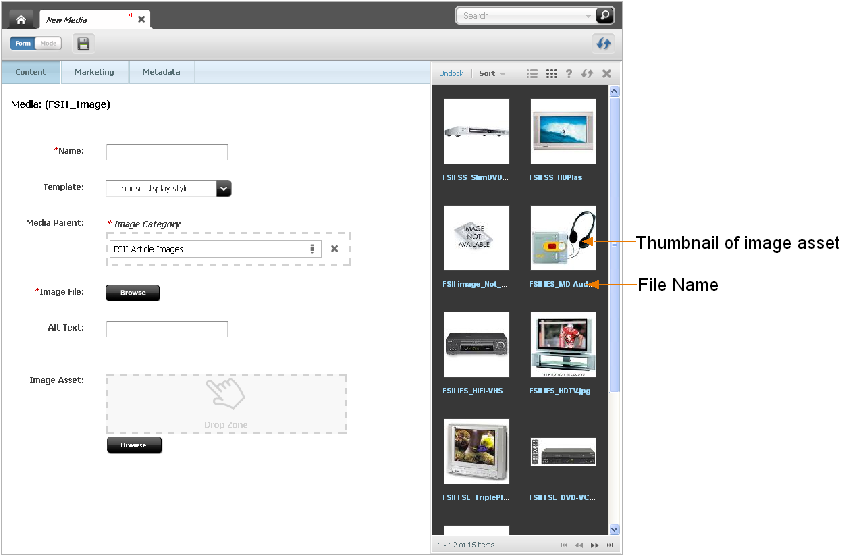
Description of "Figure 3-26 Search Results List Docked to the Right of an Asset"
For each image asset, Image Picker shows either a thumbnail of the image as well as its file name or only the asset's file name (depending on the configurations made by your developers).
-
Navigate to the desired image asset and drag and drop the image into the field.
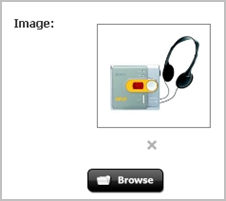
The image asset you selected is associated with the asset you are working with. If the field was already populated with an image asset, the newly selected asset replaces the previous one. A thumbnail of the corresponding image appears in the field.
-
Click the Save icon to save your changes to the asset.
3.5.3 Working with the Clarkii Online Image Editor
The Clarkii Online Image Editor (Clarkii OIE) allows you to edit an image directly in an asset's New or Edit view in Form Mode. For example, you can use Clarkii OIE to crop and rotate an image. You can also use Clarkii OIE to enhance an image by adding graphics and/or text to it.
Note:
When working with Clarkii OIE, keep in mind the following:
-
Clarkii OIE is supported only in Form Mode.
-
Your site developers enable Clarkii OIE on a per-field basis when configuring asset types. For more information, see "Configuring the Clarkii Online Image Editor" in the Oracle Fusion Middleware WebCenter Sites Developer's Guide.
Figure 3-28 shows an example view of the Clarkii OIE field rendered in an asset's Edit view in Form Mode.
Figure 3-28 Clarkii Online Image Editor Rendered in an Asset's Field
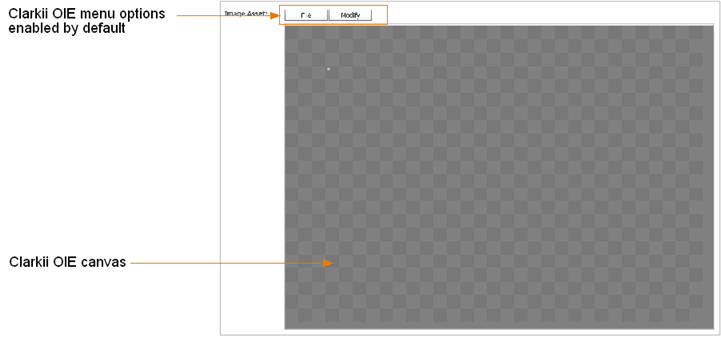
Description of "Figure 3-28 Clarkii Online Image Editor Rendered in an Asset's Field"
Clarkii OIE requires you to have Flash installed. If you do not have Flash installed, instead of Clarkii OIE you will see a link to download Flash. Click the link to download Flash. Once Flash is installed, Clarkii OIE loads in the appropriate field (as shown in the figure above).
When you work with an asset field using Clarkii OIE, you can do some or all of the following depending on how your developers configured Clarkii OIE:
-
Select an image to place on the Clarkii OIE canvas, or select an image that will replace the image currently on the canvas. Your developers determine which images will be available to you.
-
Use the toolbar and menu options available in the Clarkii OIE window to make other edits to the image on the canvas as necessary.
Your developers have the ability to customize the functions available to you in the Clarkii OIE toolbar and menu. These functions are strictly Clarkii OIE related and as such are not documented in this guide. For instructions about using the toolbar and menu options provided by Clarkii OIE, visit the following URL:
http://www.online-image-editor-clarkii.com/
To edit images with the Clarkii Online Image Editor
Note:
Keep in mind the following:
-
Before using this feature, make sure that you know which asset forms contain an attribute field associated with Clarkii OIE.
-
The instructions in step 2 are guidelines that provide you with examples of what you can do when using Clarkii OIE. The functions you can perform in this step are determined by how your developers configured the Clarkii OIE properties.
If you have any questions, contact your developers.
-
Access Clarkii OIE in the desired asset's Create or Edit view.
Clarkii OIE is displayed in the field and looks similar to the following:
-
The following instructions are only for the menu options available by default in the Clarkii OIE feature out-of-the-box when WebCenter Sites is installed. For example, inserting images and making other modifications (such as resizing an image on the canvas) as necessary:
-
If you wish to insert an image on the Clarkii OIE canvas, replacing any images currently existing on the canvas, do the following:
-
In the Clarkii OIE menu, select File, then select Open.
The "Select file to open" dialog box opens.
-
Select the image file you wish to insert on the Clarkii OIE canvas and click Open.
The image is placed on the canvas, and replaces any images that are currently existing on the canvas.
-
(Optional) If you wish to replace the image you chose with another one, select the desired image by repeating steps a and b.
-
-
If you want to modify the image displayed on the Clarkii OIE canvas (such as resizing the image and so on), click the Modify option in the Clarkii OIE menu. The following options are available in the Modify menu:
-
Rotate
-
Crop
-
Resample
For instructions on using these and other functions, visit the following URL:
http://www.online-image-editor-clarkii.com/ -
-
-
In the asset's toolbar, click the Save icon to save the changes you made in the asset's Clarkii OIE enabled field.
3.5.4 Working with the Date Picker
When working with assets whose forms include a date field (such as a post date, release date, start/end date, and so on), you may visually select a date using the Date Picker attribute editor, in addition to the standard text box.
The Date Picker is a calendar-like interface similar to date selectors found in many personal information management applications (for example, Microsoft Outlook).
To enter a date using the Date Picker
-
In the asset's Create or Edit view, scroll to the Date Picker enabled field and click the Pick a date icon.
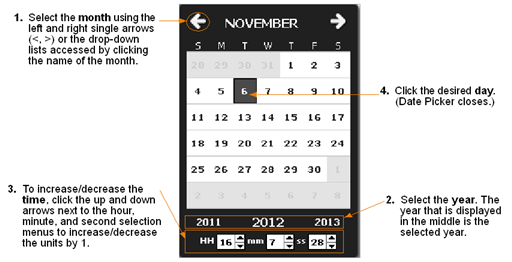
WebCenter Sites opens the Date Picker pop-up window:
-
In the Date Picker pop-up window, select the desired month, year, day, and time. Make sure you select the day last. When you click the desired day, the Date Picker pop-up window automatically closes and the date you selected is reflected in the corresponding field.
-
In the asset's toolbar, click the Save icon to save your changes to the asset.
