47 Overview of the Site Capture Application
This chapter introduces the Oracle WebCenter Sites: Site Capture application and shows you how to navigate its interface.
This chapter contains the following topics:
47.1 Site Capture Model
Crawls can be initiated manually from the Site Capture interface, or they can be triggered by the completion of a WebCenter Sites RealTime publishing session. In each scenario, the crawler downloads the website to disk in one of the following modes: static or archive, depending on how you choose to run the crawler.
This section contains the following topics:
47.1.1 Capture Modes
When a site is downloaded in either static or archive mode, the same files (html, css, and so on) are stored to disk, but with several differences. For example, statically downloaded sites are available only in the file system, whereas archived sites are available in both the file system and the Site Capture interface. Capture mode, then, determines how crawlers download sites and how you manage the results.
| Static Mode | Archive Mode |
|---|---|
| Static mode supports rapid deployment, high availability scenarios. | Archive mode is used to maintain copies of websites on a regular basis for compliance purposes or similar reasons. |
| In static mode, a crawled site is stored as files ready to be served. Only the latest capture is kept (the previously stored files are overwritten). | In archive mode, all crawled sites are kept and stored as zip files (archives) in time-stamped folders. Pointers to the zip files are created in the Site Capture database. |
| Static crawl sessions can be initiated manually from the application interface or at the end of a publishing session. However, the downloaded sites can be accessed and managed only from the Site Capture file system. | Archive crawl sessions, like static sessions, can be initiated manually from the Site Capture interface or at the end of a publishing session. However, because the zip files are referenced by pointers in the Site Capture database, they can be managed from the Site Capture interface. Here, you can download the files, preview the archived sites, and set capture schedules. |
For any capture mode, logs are generated at the end of the crawl session to provide such information as crawled URLs, HTTP status, and network conditions. In static capture, the logs must be obtained from the file system. In archive capture, they can be downloaded from the Site Capture interface. For any capture mode, you have the option of configuring crawlers to email reports as soon as they are generated.
47.1.2 Crawlers
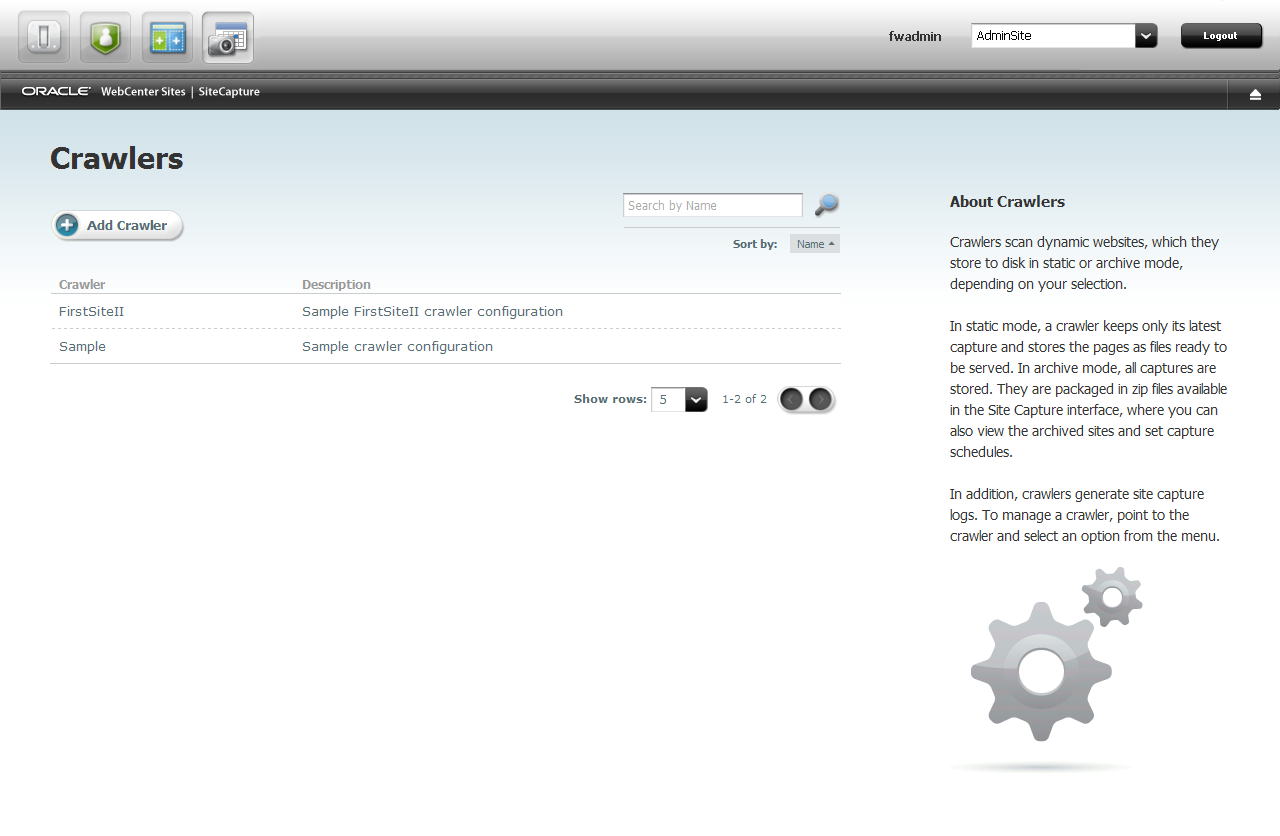
Starting any type of site capture process requires a crawler to be defined in the Site Capture interface. To help you get started quickly, Site Capture comes with two sample crawlers, Sample and FirstSiteII. We assume the crawlers were installed during the Site Capture installation process. This guide uses mainly the Sample crawler.
Creating your own crawler involves naming the crawler (typically, after the target site), and uploading a text file named CrawlerConfigurator.groovy, which controls the crawler's site capture process. The groovy file must be coded with methods in the BaseConfigurator class that specify at least the starting URI(s) and link extraction logic for the crawler. Although the groovy file controls the crawler's site capture process, the crawler's capture mode is set outside the file.
Using a crawler for publishing-triggered site capture requires taking an additional step – you will name the crawler and specify its capture mode on the publishing destination definition on the WebCenter Sites source system that is integrated with Site Capture, as described in the Oracle Fusion Middleware WebCenter Sites Installation Guide. (Bear in mind that on every publishing destination definition, you can specify one or more crawlers, but only a single capture mode.) Information about the success of crawler invocation is stored in the Site Capture file system and in the log files (futuretense.txt, by default) of the WebCenter Sites source and target systems.
The exercises in this chapter cover both types of crawler invocation scenarios: manual and publishing-triggered.
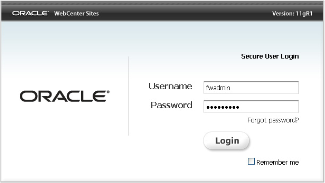
47.2 Logging in to the Site Capture Application
The Site Capture application runs on WebCenter Sites. You will access the Site Capture application by logging in to WebCenter Sites.
To log in to the Site Capture application
-
Access WebCenter Sites at the following URL:
http://<server>:<port>/<context>/login
where
<server>is the host name or IP address of the server running WebCenter Sites,<port>is the number of the WebCenter Sites application, and<context>is the name of the WebCenter Sites web application that was deployed on the server. -
Log in as a general administrator. Login credentials are case sensitive. In this guide, we use the default credentials:
Username:
fwadminPassword:
xceladmin -
Click Login.
-
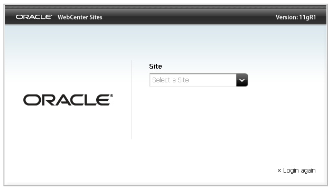
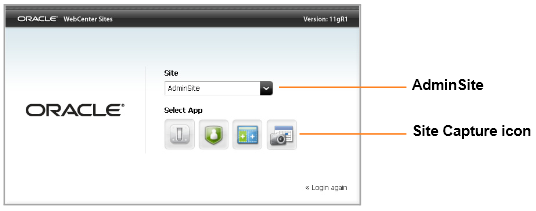
If you are logging in for the first time, the following dialog opens:
Select the AdminSite (to which the Site Capture application is assigned by default) and select the Site Capture icon.
-
The first page you see is named Crawlers. If the default crawlers were installed with Site Capture, you will see them listed under the names Sample and FirstSiteII.
-
Your next step can be any one of the following, depending on your requirements:
-
If you wish to learn more about the default crawlers, continue to Section 47.3, "Using the Default Crawlers."
-
To set up your own site capture operation and, in the process, learn to navigate the Site Capture interface, skip to Section 47.4, "Setting Up a Site Capture Operation."
-
To learn about crawler configuration code, see the Oracle Fusion Middleware WebCenter Sites Developer's Guide.
-
47.3 Using the Default Crawlers
In this guide, we assume that the default crawlers Sample and FirstSiteII were installed with the Site Capture application, and they are displayed in its interface (as shown in step 1 in Section 47.2, "Logging in to the Site Capture Application"). If you wish to define your own crawlers, see Section 47.4, "Setting Up a Site Capture Operation."
This section contains the following topics:
47.3.1 Sample Crawler
The Sample crawler can be used to download any site. The purpose of the Sample crawler is to help you quickly download the site and to provide you with required configuration code, which you will reuse when creating your own crawlers. The Sample crawler is minimally configured with the required methods and an optional method that limits the duration of the crawl by limiting the number of links to crawl.
-
The required methods are
getStartURiandcreateLinkExtractor(which defines the logic for extracting links from crawled pages). -
The optional method is
getMaxLinks, which specifies the number of links to crawl.
More information about these methods as well as crawler customization methods and interfaces is available in the Oracle Fusion Middleware WebCenter Sites Developer's Guide.
47.3.2 FirstSiteII Crawler
The FirstSiteII crawler is used to download WebCenter Sites' dynamic FirstSiteII sample website as a static site. The purpose of the crawler is to provide you with advanced configuration code that shows how to create a custom link extractor and resource rewriter, using the LinkExtractor and ResourceRewriter interfaces. More information about the interfaces is available in the Oracle Fusion Middleware WebCenter Sites Developer's Guide.
47.3.3 Running a Default Crawler
In this section, you will run either the Sample crawler or the FirstSiteII crawler. Using the FirstSiteII crawler requires WebCenter Sites' FirstSiteII sample site to be published.
-
On the Crawlers page, point to one of the default crawlers – Sample or FirstSiteII – and select Edit Configuration.
Note:
If the default crawlers are not listed, skip to Section 47.4, "Setting Up a Site Capture Operation" to define your own crawler. -
Set the crawler's starting URI by editing the crawler's configuration file. For instructions, skip to 1 in Section 47.4.2, "Defining a Crawler," and continue with the rest of the steps to run the crawler and manage its captured data.
47.4 Setting Up a Site Capture Operation
In this section, you will step through the process of creating and running your own crawler to understand how the Site Capture interface and file system are organized.
This section contains the following topics:
47.4.1 Creating a Starter Crawler Configuration File
Before you can create a crawler, you must have a configuration file that controls the crawler's site capture process. The fastest way to create a useful file is to copy sample code and recode, as necessary.
To create a starter crawler configuration file
-
Copy the Sample crawler's configuration file to your local machine in one of the following ways:
-
Log in to the Site Capture application. If the Crawlers page lists the Sample crawler, do the following (otherwise, skip to the item directly below):
-
Point to Sample and select Edit Configuration.
-
Go to the Configuration File field, copy its code to a text file on your local machine, and save the file as
CrawlerConfigurator.groovy.
-
-
Go to the Site Capture host machine and copy the
CrawlerConfigurator.groovyfile from<SC_INSTALL_DIR>/fw-site-capture/crawler/Sample/app/to your local machine.Note:
Every crawler is controlled by its own
CrawlerConfigurator.groovyfile. The file is stored in a custom folder structure. For example:When you define a crawler, Site Capture creates a folder bearing the name of the crawler (
<crawlerName>, orSamplein our scenario) and places that folder in the following path:<SC_INSTALL_DIR>/fw-site-capture/crawler/. Within the<crawlerName>folder, Site Capture creates an/appsubfolder to which it uploads thegroovyfile from your local machine.When the crawler is used for the first time in a given mode, Site Capture creates additional subfolders (in
/<crawlerName>/) to store sites captured in that mode. For more information about the Site Capture file system, see Section 48.1, "Managing Statically Captured Sites."
-
-
Your sample
groovyfile specifies a sample starting URI, which you will reset for the crawler you will be creating in the next step. (In addition to the starting URI, you can set crawl depth and similar parameters, invoke post-crawl commands, and implement interfaces to define logic specific to your target sites.)At this point, you have the option to either customize the downloaded
groovyfile now, or first create the crawler and then customize itsgroovyfile (which is editable in the Site Capture interface).-
To follow this exercise, continue to the next step Section 47.4.2, "Defining a Crawler."
-
For information about crawler configuration methods and interfaces, see the Oracle Fusion Middleware WebCenter Sites Developer's Guide.
-
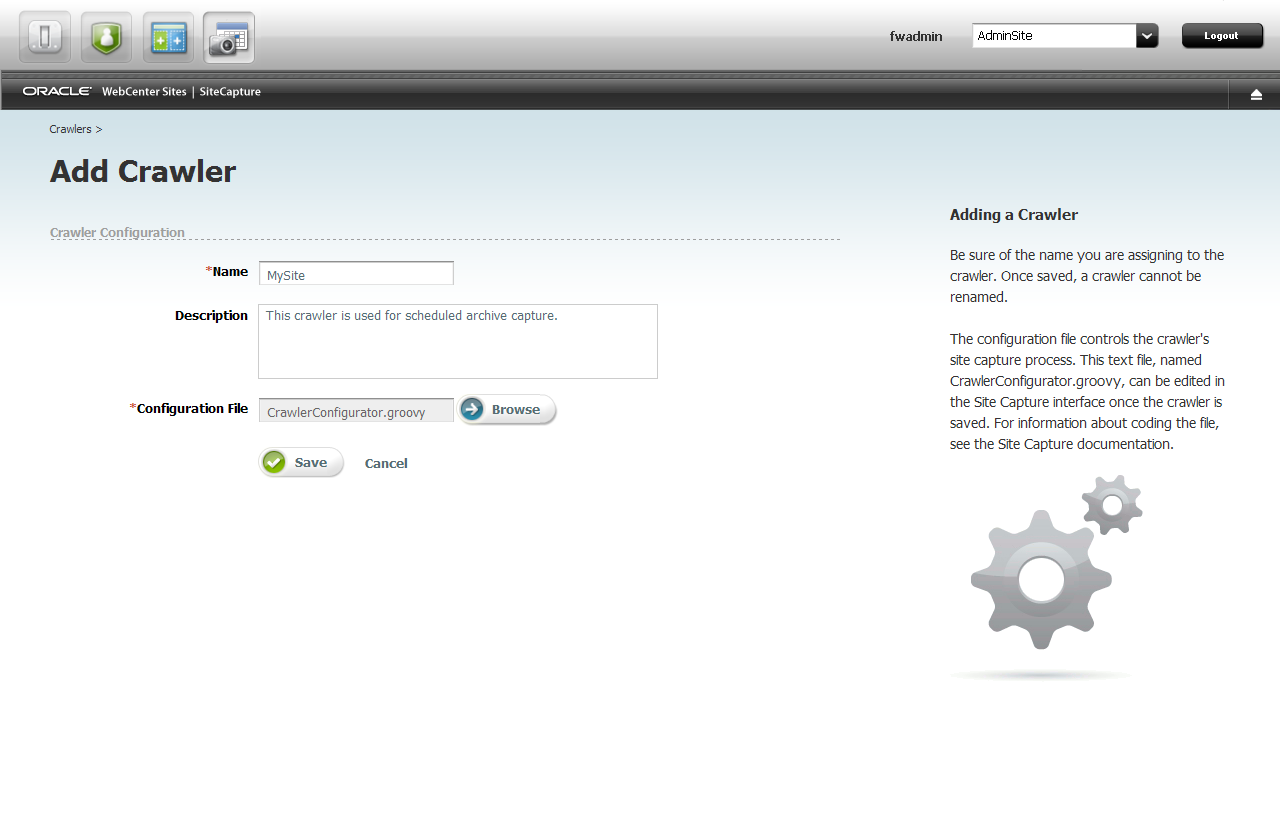
47.4.2 Defining a Crawler
-
Go to the Crawlers page and click Add Crawler.
-
On the Add Crawlers page:
-
Name the crawler after the site to be crawled.
Note:
-
Once saved, a crawler cannot be renamed.
-
Throughout this guide, we assume that every custom crawler is named after the target site and will not be used to capture any other site.
-
-
Enter a description (optional). For example: "This crawler is reserved for publishing-triggered site capture" or "This crawler is reserved for scheduled captures."
-
In the Configuration File field, browse to the
groovyfile that you created in Section 47.4.1, "Creating a Starter Crawler Configuration File." -
Save the new crawler.
Your
CrawlerConfigurator.groovyfile is uploaded to the<SC_INSTALL_DIR>/fw-site-capture/crawler/<crawlerName>/appfolder on the Site Capture host machine. The file can be edited directly in the Site Capture interface.
-
-
Continue to Section 47.4.3, "Editing the Crawler Configuration File.".
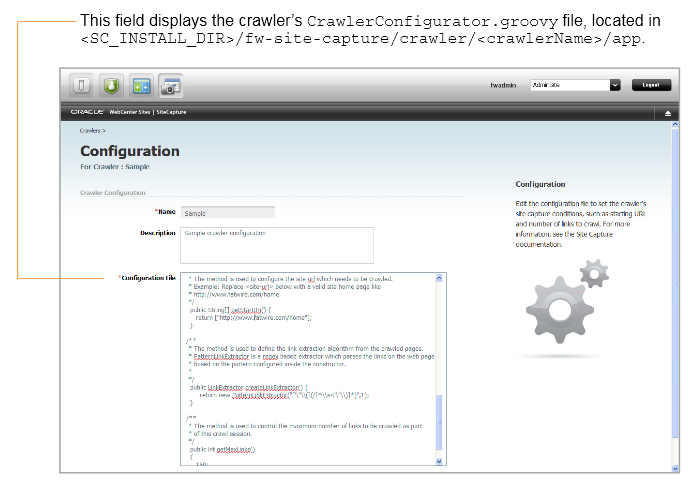
47.4.3 Editing the Crawler Configuration File
From the Site Capture interface, you can recode the entire crawler configuration file. In this example, we simply set the crawler's starting URI.
To edit the crawler configuration file
-
On the Crawlers page, point to the crawler you just defined and select Edit Configuration.
-
Set the crawler's starting URI in the following method:
public String[] getStartUri() {
  return ["http://www.mycompany.com/home"]
Note:
Take care of the following:You can set multiple starting URIs. They must belong to the same site. Enter a comma-separated array, as shown in the example below:
public String[] getStartUri() { return ["http://www.fatwire.com/product","http://www.fatwire.com/support"]; }Your configuration file includes the
createLinkExtractormethod, which calls the logic for extracting the links to be crawled. The links will be extracted from the markup that is downloaded during the crawl session. For additional information about this method and the extraction logic, see the Oracle Fusion Middleware WebCenter Sites Developer's Guide.Your configuration file also includes the
getMaxLinks()method, which specifies the number of links to crawl. Its default value is set to150to ensure a quick run. If for some reason you have to stop a static capture, you will have to stop the application server. Archive captures can be stopped from the Site Capture interface.For information about crawler configuration methods and interfaces, see the Oracle Fusion Middleware WebCenter Sites Developer's Guide.
-
Click Save.
-
Continue to Section 47.4.4, "Starting a Crawl."
47.4.4 Starting a Crawl
You can start a crawl in several ways:
-
Section 47.4.4.2, "Run the Crawler Manually in Archive Mode"
-
Section 47.4.4.3, "Schedule the Crawler for Archive Capture"
47.4.4.1 Run the Crawler Manually in Static Mode
-
On the Crawlers page, point to the crawler that you created and select Start Static Capture from the drop-down menu.
Figure 47-8 Crawlers Page Detail with Drop-Down Menu Expanded
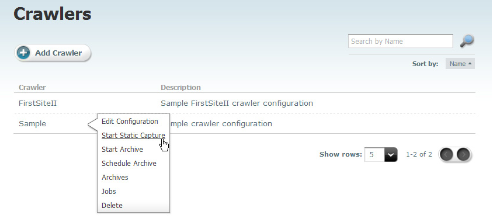
Description of ''Figure 47-8 Crawlers Page Detail with Drop-Down Menu Expanded''
The Crawlers page displays the following message when capture begins:
"Success.
Static capture started by crawler <crawlerName>."Figure 47-9 Crawlers Page Detail Showing Status Message
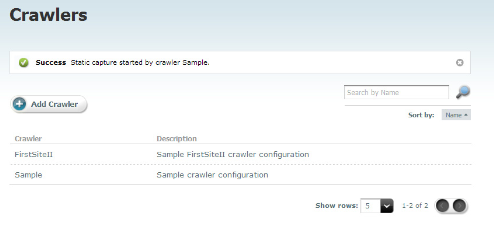
Description of ''Figure 47-9 Crawlers Page Detail Showing Status Message''
-
At this point, the Site Capture interface does not display any other information about the crawler or its process, nor will it make the downloaded site available to you. Instead, you will use the Site Capture file system to access the downloaded files and various logs:
-
To monitor the static capture process, look for the following files:
-
The
lockfile in<SC_INSTALL_DIR>/fw-site-capture/<crawlerName>/logs. Thelockfile is transient. It is created at the start of the static capture process to prevent the crawler from being invoked for an additional static capture. Thelockfile is deleted when the crawl session ends. -
The
crawler.logfile in<SC_INSTALL_DIR>/fw-site-capture/logs/. (This file uses the term "VirtualHost" to mean "crawler.") -
The
inventory.dbfile in<SC_INSTALL_DIR>/fw-site-capture/<crawlerName>. This file lists the crawled URLs. Theinventory.dbfile is used by the Site Capture system and must not be deleted or modified. -
The
audit.log,links.txtfile, andreport.txtfiles are available in/fw-site-capture/crawler/<crawlerName>/logs/yyyy/mm/dd.
-
-
To access the downloaded files, go to
<SC_INSTALL_DIR>/fw-site-capture/crawler/<crawlerName>/www.
For more information about the Site Capture file system, see Section 48.1, "Managing Statically Captured Sites."
-
47.4.4.2 Run the Crawler Manually in Archive Mode
If a crawler was used in one mode, it can be rerun in a different mode.
To run the crawler in archive mode
-
On the Crawlers page, point to the crawler that you created and select Start Archive.
A dialog box opens.
-
In the dialog, add a comment about the crawler's upcoming job:
Note:
A comment cannot be added once a crawler starts running.If you choose to add a comment in the dialog above, it will be displayed in the following places:
-
Job Comment field on the Job Details page (shown in the next step).
-
Job Comment field on the Jobs page.
-
Comment field on the Archives page.
-
-
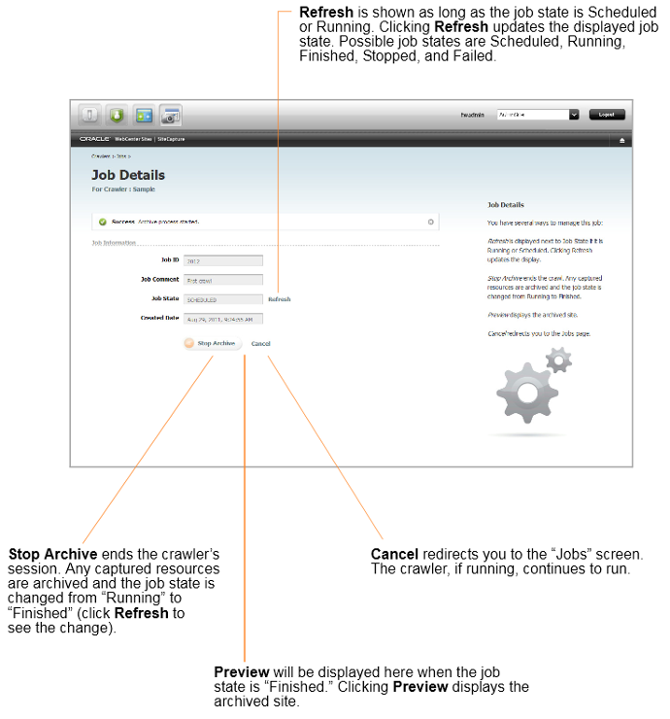
Click Start Archive.
The Job Details page is displayed, where you can manage the archive process in several ways, as shown in Figure 47-11. To follow this exercise, click Refresh (next to Job State) until Finished is displayed, then continue to the next step.
-
When the archive crawl ends, results are made available in the Site Capture interface. For example:
-
The crawler report is displayed on the Job Details page. The report lists the number of downloaded resources, their total size and download time, network conditions, HTTP status codes, and additional notes as necessary.
Figure 47-12 Job Details Page, Showing Crawler Report
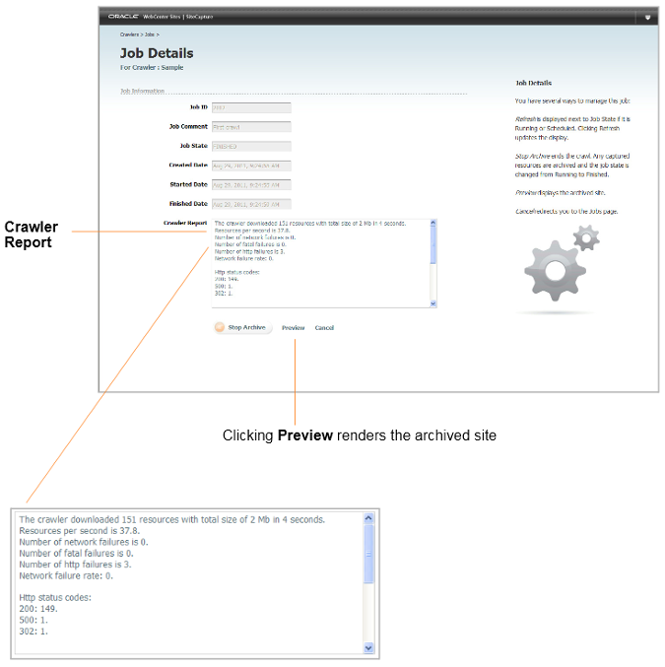
Description of ''Figure 47-12 Job Details Page, Showing Crawler Report''
-
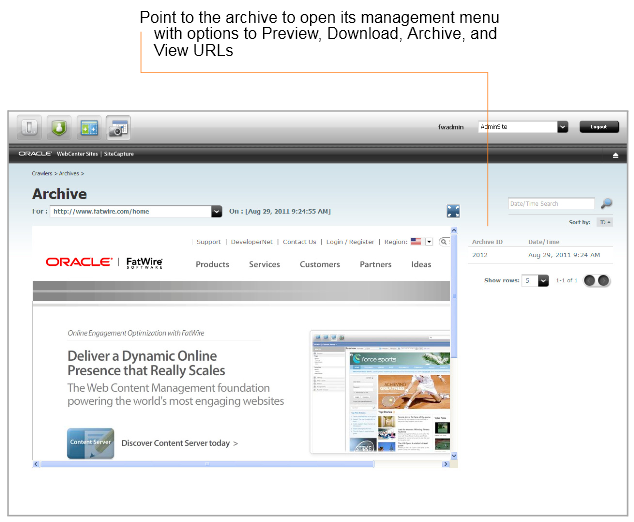
Clicking Preview on the Job Details page renders the archived site (as shown inFigure 47-13). Next to the site is the Archive ID table with archive management options, which are displayed when you point to an archive.
Note:
If your archived site contains links to external domains, its preview is likely to include those links, especially when the crawl depth and number of links to crawl are set to large values (in theCrawlerConfigurator.groovyfile). Although the external domains can be browsed, they are not archived. -
For a summary of pathways to various data, see Section 48.2, "Managing Archived Sites."
-

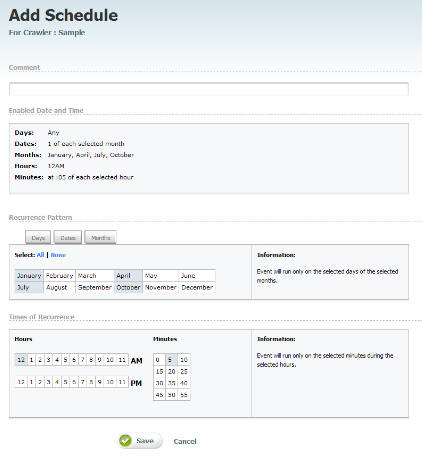
47.4.4.3 Schedule the Crawler for Archive Capture
Only archive captures can be scheduled. For a given crawler, you can create multiple schedules – for example, one for capturing periodically, and another for capturing at a particular and unique time.
Note:
If you set multiple schedules, ensure they do not overlap.To schedule a crawler for archive capture
-
Go the Crawlers page, point to the crawler that you created and select Schedule Archive.
-
Click Add Schedule and make selections on all calendars: Days, Dates, Months, Hours, and Minutes.
-
Click Save and add another schedule if necessary.
47.4.4.4 Publish a Site in RealTime Mode
If you configure your WebCenter Sites publishing systems to communicate with the Site Capture application, you can set up a RealTime publishing process to invoke one or more crawlers to capture the newly published site. For instructions, see Section 47.5, "Enabling Publishing-Triggered Site Capture."
47.4.5 Managing Captured Data
Information about accessing various data associated with static and archive captures can be found in Chapter 48, "Managing Downloaded Sites." Section 48.3, "Summary" presents a collection of notes and tips to bear in mind when managing crawlers and captured data. Topics include the following:
47.5 Enabling Publishing-Triggered Site Capture
Your main steps for enabling publishing-triggered site capture are the following:
-
Section 47.5.1, "Integrating the Site Capture Application with Oracle WebCenter Sites"
-
Section 47.5.2, "Configuring a RealTime Publishing Destination Definition for Site Capture"
An administrative user can configure as many publishing destination definitions for Site Capture as necessary and invoke as many crawlers as necessary.
47.5.1 Integrating the Site Capture Application with Oracle WebCenter Sites
You can enable site capture at the end of a RealTime publishing session only if the Site Capture application is first integrated with the WebCenter Sites source and target systems used in the publishing process. If Site Capture is not integrated, see the Oracle Fusion Middleware WebCenter Sites Installation Guide for integration instructions, then continue with the steps below.
47.5.2 Configuring a RealTime Publishing Destination Definition for Site Capture
When configuring a publishing destination definition, you will name the crawler(s) that will be invoked at the end of the publishing session. You will also specify the capture mode.
To configure the publishing destination definition
-
Go to the WebCenter Sites source system that is integrated with the Site Capture application (as shown in the Oracle Fusion Middleware WebCenter Sites Installation Guide).
-
Create a RealTime publishing destination definition pointing to the WebCenter Sites target system that is integrated with Site Capture. For instructions on creating a RealTime publishing destination, see Chapter 20, "Configuring the RealTime Publishing Process."
-
In the More Arguments section of the publishing destination definition, name the crawler(s) to be invoked at the end of the publishing session, and set the capture mode by using the following parameters to control crawler invocation:
-
CRAWLERCONFIG: Specify the name of each crawler. If you are using multiple crawlers, separate their names with a semicolon (;).Examples:
For a single crawler:
CRAWLERCONFIG=crawler1For multiple crawlers:
CRAWLERCONFIG=crawler1;crawler2;crawler3Note:
The crawler(s) that you specify here must also be configured and identically named in the Site Capture interface. Crawler names are case sensitive. -
CRAWLERMODE: To run an archive capture, set this parameter todynamic. By default, static capture is enabled.Example:
CRAWLERMODE=dynamicNote:
-
If
CRAWLERMODEmode is omitted or set to a value other thandynamic, static capture will start when the publishing session ends. -
Both crawler parameters can be set in a single statement as follows:
CRAWLERCONFIG=crawler1;crawler2&CRAWLERMODE=dynamic -
While you can specify multiple crawlers, you can set only one mode. All crawlers will run in that mode. To run some of the crawlers in a different mode, configure another publishing destination definition.
-
-
-
-
Continue to the next section.
47.5.3 Matching Crawlers
Crawlers named in the publishing destination definition must exist in the Site Capture interface. Do the following:
-
Verify that crawler names in the destination definition (step b in Section 47.5.2, "Configuring a RealTime Publishing Destination Definition for Site Capture") and Site Capture interface are identical. The names are case sensitive.
-
Ensure that a valid starting URI for the target site is set in each crawler's configuration file. For information about navigating to the crawler's configuration file, see Section 47.4.3, "Editing the Crawler Configuration File." For more information about writing configuration code, see the Oracle Fusion Middleware WebCenter Sites Developer's Guide.
47.5.4 Next Steps
-
Having enabled publishing-triggered site capture, you are ready to publish the target site. When publishing ends, site capture begins. The invoked crawlers capture pages in either static or archive mode, depending on how you set the
CRAWLERMODEparameter in the publishing destination definition (step b in Section 47.5.2, "Configuring a RealTime Publishing Destination Definition for Site Capture"). -
To monitor the site capture process.
-
For static capture, the Site Capture interface does not display any information about the crawl, nor will it make the captured site available to you.
-
To determine that the crawlers were invoked, open the
futuretense.txtfile on the source or target WebCenter Sites system.Note:
Thefuturetense.txtfile on the WebCenter Sites source and target systems contains crawler invocation status for any type of crawl: static and archive. -
To monitor the capture process, go to the Site Capture file system and review the files that are listed in step 2 in Section 47.4.4.1, "Run the Crawler Manually in Static Mode."
-
-
For dynamic capture, you can view the status of the crawl from the Site Capture interface.
-
Go to the Crawlers page, point to the crawler, and select Jobs from the pop-up menu.
-
On the Job Details page, click Refresh next to the Job State until you see "Finished." (Possible value for Job State are Scheduled, Running, Finished, Stopped, or Failed.) For more information about the Job Details page, see steps 3 and 4 in Section 47.4.4.2, "Run the Crawler Manually in Archive Mode."
-
-
-
Managing captured data.
When the crawl session ends, you can manage the captured site and associated data as follows:
-
For a statically captured site, go to the Site Capture file system. For more information, see Section 48.1, "Managing Statically Captured Sites."
-
For an archived site, use the Site Capture interface to preview the site and download the zip file and logs. For more information, see Section 48.2, "Managing Archived Sites."
-