52 Setting Up Content Synchronization
This chapter contains procedures for configuring your system to import content items from WebCenter Content into WebCenter Sites, and to keep the two systems synchronized as the content items are updated. Once the required items are imported as assets, you can work with content contributors to help them identify and work with the assets. Each of your steps is described in its own section.
Note:
Before starting the steps in this chapter:-
Read Chapter 50, "About WebCenter Content Integration" for information about the WebCenter Content data model, as well as the asset types and connector rules you will be configuring.
-
Ensure that all procedures in Chapter 51, "Enabling the WebCenter Content Integration Feature" have been completed.
-
Read this chapter to gain an understanding of the steps you will be following. Advance knowledge will help you plan.
-
If possible, set up a test WebCenter Sites system on which to configure and test content synchronization. Verify the results, make adjustments as necessary, and reproduce your final configurations on your actual system.
This chapter contains the following sections:
-
Section 52.1, "Step 1: Enabling Content Items for Synchronization"
-
Section 52.2, "Step 2: Determining Which Renditions to Synchronize"
-
Section 52.3, "Step 3: Selecting or Creating Target Asset Types"
-
Section 52.6, "Step 6: Prioritizing Active Rules and Managing Rules"
52.1 Step 1: Enabling Content Items for Synchronization
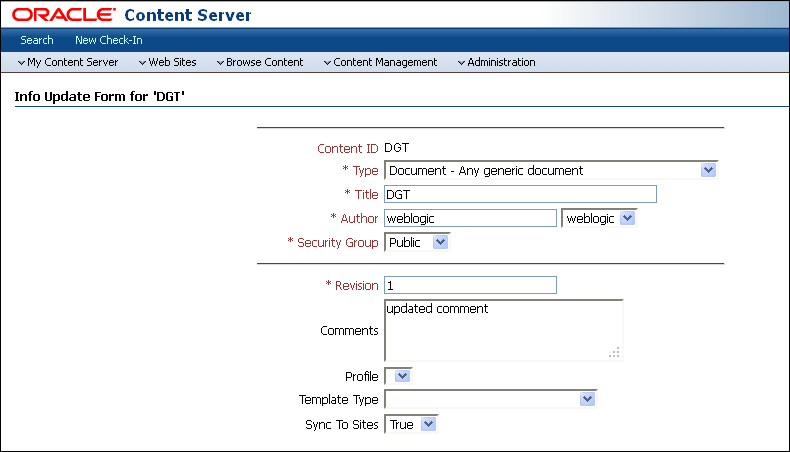
Content items are typically enabled for synchronization by WebCenter Content users. They set each item's Sync to Sites option to True, as shown in Figure 52-1. Valid content items are documents and digital assets.
Figure 52-1 Sync To Sites Option on the WebCenter Content Server Update Form
Description of ''Figure 52-1 Sync To Sites Option on the WebCenter Content Server Update Form''
Synchronization-enabled content items are available to the WCC connector for processing. However, they can be imported into WebCenter Sites only when the WCC connector is enabled to import them into the correct asset types. You will enable the connector in the next few steps. Continue to Section 52.2, "Step 2: Determining Which Renditions to Synchronize."
52.2 Step 2: Determining Which Renditions to Synchronize
Content items enabled for synchronization in Section 52.1, "Step 1: Enabling Content Items for Synchronization" have renditions. Default rendition types are primary and web:
-
A
primaryrendition is the native (original) file that was checked in to WebCenter Content (for example, a Microsoft Word document, before any renditions were created). -
The
webrendition of a content item is a web-viewable version of a native file. For example, a PDF version of a Microsoft Word document is a web rendition of the Word document.
Custom renditions may also be available. To determine which renditions to import into WebCenter Sites, consult with site designers who work with WebCenter Sites. You will specify the renditions for the connector in a later step (in Section 52.4, "Step 4: Connecting to WebCenter Content").
Continue to Section 52.3, "Step 3: Selecting or Creating Target Asset Types."
52.3 Step 3: Selecting or Creating Target Asset Types
Complete the following steps:
-
Ensure that your target asset types meet synchronization requirements:
-
Your asset types meet the minimum requirements outlined in Section 50.4.1, "Asset Type Mapping." For example, they must belong to the flex family.
-
Your asset types are configured to accept the content items that were enabled in Section 52.1, "Step 1: Enabling Content Items for Synchronization."
-
-
If you need to change the default mapping of the
dDocNamemetadata field (to an attribute other thanname), do so now by resetting thewcc.keyfieldparameter in thewcc-integration.inifile. Once the parameter is reset and synchronization has started, its value should not be edited again.For information about
dDocName, see Section 50.4.1.1, "Content Identifier Attribute." For information about thewcc.keyfieldparameter, see Section 54.2, "User Configurable Parameters." -
If your asset types have a template attribute, copy the display names of the templates exactly as they appear in the WebCenter Sites Admin interface and paste them into a text file. You will provide the template names when configuring connector rules, in Section 52.4, "Step 4: Connecting to WebCenter Content."
52.4 Step 4: Connecting to WebCenter Content
In this section, you will connect WebCenter Sites to WebCenter Content and specify which renditions (determined in Section 52.2, "Step 2: Determining Which Renditions to Synchronize") must be available for use in the attribute mapping part of the connector rules.
To connect to WebCenter Content
-
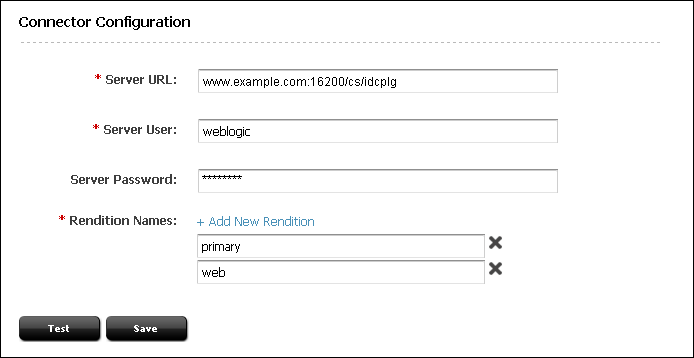
From the Connector Admin tab, select Configuration to open the Connector Configuration form (Figure 52-2).
Figure 52-2 Connector Configuration Form with Example Values
Description of ''Figure 52-2 Connector Configuration Form with Example Values''
-
In the Connector Configuration form, fill in the following fields:
-
In the Server URL field, provide the address of the WebCenter Content instance to connect to. The HTTP, HTTPS, or IDC protocols can be used. For more information on determining the URL path of a WebCenter Content instance, see Oracle Fusion Middleware Administering Oracle WebCenter Content.
-
In the Server User field, provide the name of a user with administration privileges for the WebCenter Content instance.
Note:
If you specified the IDC protocol in the Server URL field, the user name must be defined as that of a local user with administrative privileges (by default, sysadmin). -
In the Server Password field, provide a password for the administrative user only if you specified an HTTP or HTTPS connection in the Server URL field.
Note:
For IDC connections, a server password is not required. The IDC protocol uses a trusted port configured on the WebCenter Content server. -
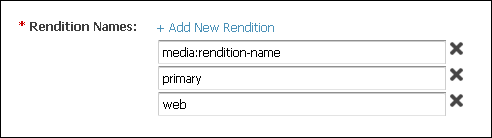
In the Rendition Names field, add the names of all renditions you plan to import (as determined in Section 52.2, "Step 2: Determining Which Renditions to Synchronize").
To add a rendition, click Add New Rendition and enter its name. If you are adding a video rendition, use a colon-separated format such as
media:rendition-name(see Figure 52-3). For example,media:flash8.The rendition types
primaryandwebare provided by default. They can be kept or deleted, depending on your requirements.
-
-
Click the Test button to test your entries. If your entries are valid, a confirmation message is displayed.
-
Click the Save button to save the entries. A confirmation message is displayed when the configuration has been saved successfully.
-
Continue to Section 52.5, "Step 5: Creating an Active Rule."
52.5 Step 5: Creating an Active Rule
An active rule is a set of instructions enabled for the connector to follow when it runs. The connector will use active rules to do the following:
-
Sample the content items that were enabled in Section 52.1, "Step 1: Enabling Content Items for Synchronization," and retrieve items that match your active rules.
-
Create receiving assets in the target asset types that you selected or created in Section 52.3, "Step 3: Selecting or Creating Target Asset Types" and named in your active rules.
-
Synchronize the renditions that you specified in Section 52.4, "Step 4: Connecting to WebCenter Content" and in your active rules.
Note:
Before creating rules, read Section 50.4.2, "Connector Rules" for planning and configuration guidelines.You can enable rules when you create them (in this step), or in a later step (in Section 52.6, "Step 6: Prioritizing Active Rules and Managing Rules").
-
From the Connector Admin tab, select Rules.
-
In the Connector Rules form, click Add New Rule (Figure 52-4).
-
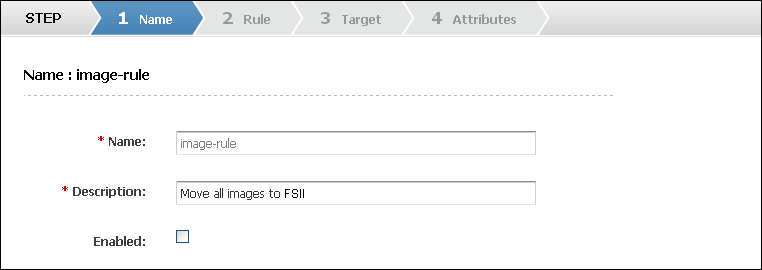
The rules wizard opens (Figure 52-5). Perform each step in the rules wizard, as described below.

Use this step to name your rule, add a description for this rule, and enable your rule.
Figure 52-5 Step 1: Name Page with Example Values
Description of ''Figure 52-5 Step 1: Name Page with Example Values''
-
Enter a name for this rule (required). Only alphanumeric characters and hyphens are allowed.
-
Enter a description for this rule (required).
-
Select the Enabled option to enable this rule.
Note:
If the Enabled option is not selected, the rule is not activated and the connector will not run the rule. The rule can be enabled or disabled at any time from the current wizard or the Connector Rules form, described in Section 52.6, "Step 6: Prioritizing Active Rules and Managing Rules." -
Continue to Step 2: Rule of the rules wizard.
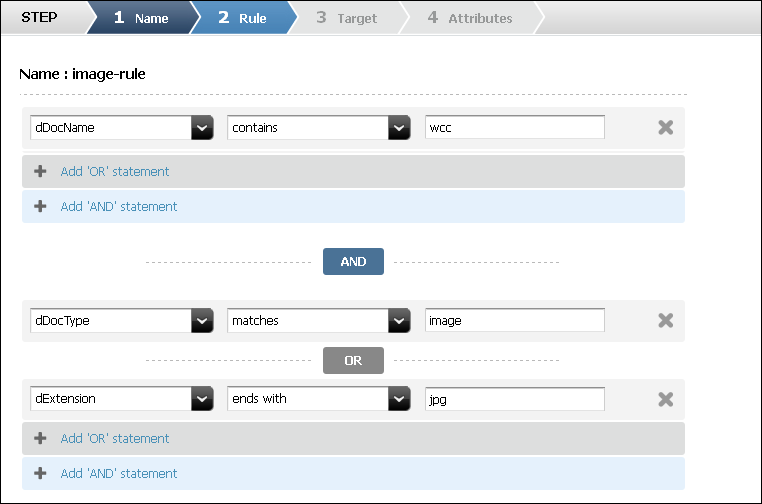
Use this step to set up a rule statement specifying which metadata the connector must sample when polling the content items you enabled in Section 52.1, "Step 1: Enabling Content Items for Synchronization."
In this step of the rules wizard, you will select a metadata name, choose an operator, and then specify the metadata value. You can specify many metadata names and values by adding AND/OR statements.
Figure 52-6 Step 2 Rule Page with Example Values
Description of ''Figure 52-6 Step 2 Rule Page with Example Values''
To specify which metadata the connector must sample
-
In the left-hand drop-down list, select a metadata name.
The list displays all metadata names defined in WebCenter Content. For descriptions of the metadata, refer to the Oracle Fusion Middleware Developing with Oracle WebCenter Content.
Common metadata names include, for example:
-
dDocName: The Content ID for the content item on WebCenter Content.
-
dDocType: The content item type on WebCenter Content.
-
dDocTitle: The content item title on WebCenter Content.
-
dExtension: The file extension (such as
txt,doc,pdf, andjpg) on WebCenter Content. -
xComments: The comment field on WebCenter Content.
-
-
In the middle drop-down list, select an operator:
-
matches: The connector will search for metadata values that match the entire string you provide in the right-hand field. For example, if your statement is dDocType matches image, the connector will recognize
image, but notimages. -
contains: The connector will perform a substring search on the metadata value you provide in the right-hand field. For example, if your statement is dDocName contains abc, the connector will recognize
abc,abcde, and any otherdDocNamethat containsabc. -
starts with: The connector will search for metadata values that begin with the string you provide in the right-hand field.
-
ends with: The connector will search for metadata values that end with the string you provide in the right-hand field.
-
is greater than: Applies to integers only (not valid for strings).
-
is less than: Applies to integers only (not valid for strings).
-
-
In the right-hand field, enter a value for your chosen metadata field.
-
Add as many
ORstatements as desired. -
Add as many
ANDstatements as desired. -
Continue to Step 3 Target of the rules wizard.
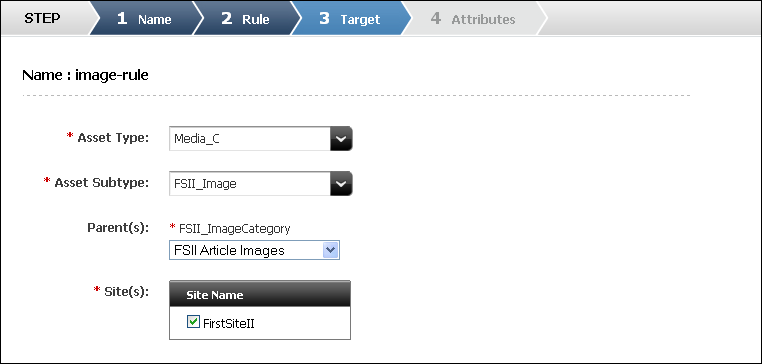
Use this step to select the target asset type, content management site(s) where the asset type is enabled, and any other information you may be prompted for.
Note:
The content of this step depends on the asset type.Figure 52-7 Step 3 Target Page with Example Values
Description of ''Figure 52-7 Step 3 Target Page with Example Values ''
To specify the target asset type and the content management site where it is enabled
-
Select the target asset type from the drop-down list.
Depending on the asset type you selected, different options are displayed on the form.
-
Select the asset subtype.
-
Enable the desired parent(s) from the list.
-
The Site(s) drop-down list names the content management site(s) on which your selected asset type is enabled. Select one or more sites. The connector will import content items and metadata into the target asset type on all of your selected sites.
-
Provide any other information you may be prompted for.
-
Continue to Step 4 Attributes of the rules wizard.
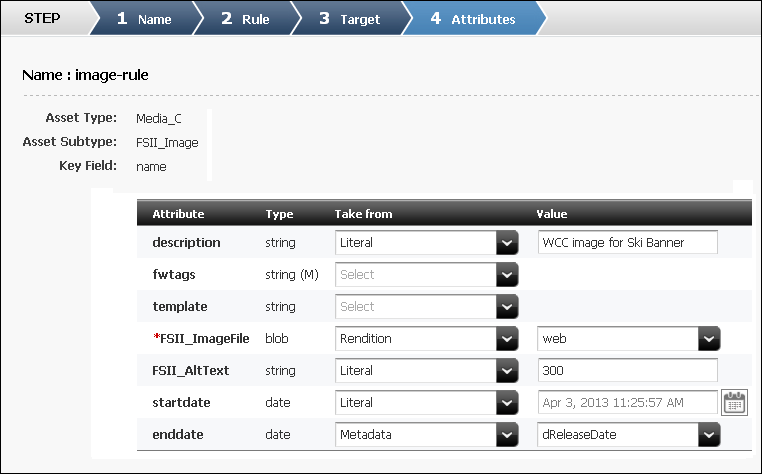
Rules Wizard: Step 4 Attributes
Use this step to map the metadata of the synchronization-enabled content items (from Section 52.1, "Step 1: Enabling Content Items for Synchronization") to the attributes of your target asset type.
The Step 4. Attributes page of the rules wizard (Figure 52-8) lists the attribute names and their data types in the asset type you selected in Step 3. Target of the rules wizard (Figure 52-7). Attributes marked with a red asterisk are required. Attributes whose data type contain (M) are multi-valued attributes. Such attributes can contain a single value or multiple values separated by a semicolon (;). For example: value1;value2;
Figure 52-8 Step 4 Attributes Page with Example Values
Description of ''Figure 52-8 Step 4 Attributes Page with Example Values''
To map content item metadata to asset type attributes
For each attribute, go to the Take From column and select an option from the drop-down list. Options depend on the attribute type. The options are:
-
Literal or Metadata: These options apply only to attributes of type other than
blob. -
Rendition or Conversion: These options apply only to attributes of type
blob.
-
Literal or Metadata: These options apply only to attributes of type other than
blob.-
If you select Literal, enter a standard text string in the Value column. Your selected attribute will display the same text for all content items that you import with this rule.
Also note the following:
-
If your asset type has a template attribute, enter the template name in the Value column, exactly as it appears in the WebCenter Sites Admin interface. We recommend copying the name and pasting it into the Value column (you can use the name that you pasted into the text file in Section 52.3, "Step 3: Selecting or Creating Target Asset Types").
-
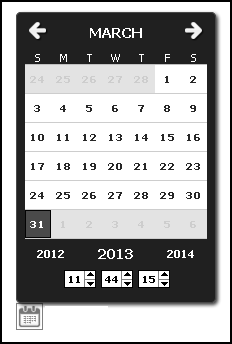
For attributes of type
date(for example, attributes namedstartdateorenddate), selecting Literal allows you to pick a date using the date-picker (see Figure 52-9).Figure 52-9 Date-picker for Attribute of Type Date with a Literal Value
Description of ''Figure 52-9 Date-picker for Attribute of Type Date with a Literal Value''
-
-
If you select Metadata from the drop-down list in the Take From column, select the metadata name from the Value column.
Note:
When you select Metadata, the drop-down list in the Value column lists metadata fields whose data type matches the data type of the attribute you are targeting. For example, if your attribute is of typedate, the Value column lists only metadata fields of typedate. For detailed descriptions of metadata types, refer to the Oracle WebCenter Content Services Reference Guide.
-
-
Rendition or Conversion: These options apply only to attributes of type
blob.-
If you select Rendition from the drop-down list in the Take From column, select the desired rendition type from the Value column (for example,
web,primary, or other rendition type).Note:
When you select Rendition, the drop-down list in the Value column names only the rendition types that you specified in the Connector Configuration form, in Section 52.4, "Step 4: Connecting to WebCenter Content." -
If you select Conversion from the drop-down list in the Take From column, select the desired conversion type from the Value column. Your only options are html and images (the Conversion option is strictly for HTML conversions).
For example, to import an HTML conversion, you can create a map such as the following (assuming the target attributes are named
HTMLandImages):
-
-
Click the Save icon in the toolbar to commit your rule to the WebCenter Sites database.
Note:
If you did not select the Enabled option in "Rules Wizard: Step 1 Name," the rule is saved but not enabled. It can be enabled or disabled at any time from the Connector Rules form. See Section 52.6, "Step 6: Prioritizing Active Rules and Managing Rules." -
Create additional rules, if necessary.
-
Continue to Section 52.6, "Step 6: Prioritizing Active Rules and Managing Rules."
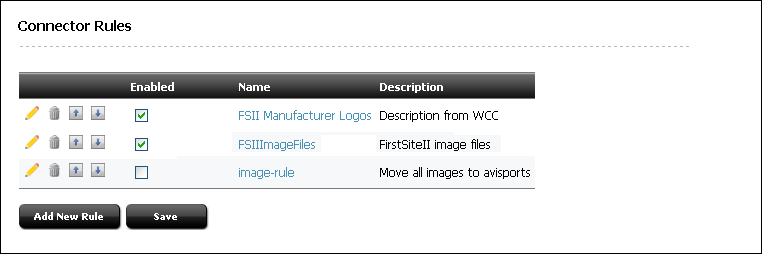
52.6 Step 6: Prioritizing Active Rules and Managing Rules
One of the most important aspects of managing rules is to enable them for the connector and prioritize them in order of execution. The order can determine how the connector distributes content items among the target asset types in a synchronization session. For more information about prioritization, see Section 50.4.2, "Connector Rules."
Other operations, such as editing, deleting, and adding rules can also be completed in the same form for enabling and prioritizing rules.
To prioritize and otherwise manage rules
-
From the Connector Admin tab, select Rules to open the Connector Rules form.
Figure 52-10 Connector Rules Form with Example Rules
Description of ''Figure 52-10 Connector Rules Form with Example Rules''
-
If your immediate need is to prioritize rules for the connector, continue with this step (otherwise, skip to step 3 for descriptions of all the rule management options, such as editing and deleting, in the Connector Rules form):
-
Ensure that the rules you need to prioritize have their Enabled check box selected.
-
Click the Move Up or Move Down arrows to change the rule order. Enabled rules are executed by the connector in the arranged order. If a content item matches one active rule, the content item will be synchronized according to that one rule. All other rules for synchronizing that content item will be ignored.
-
Click Save.
-
-
If you need to perform any of the possible operations listed on the Connector Rule form, see the list below for descriptions of your options:
-
Click the Edit icon (pencil) of a rule to edit that rule. The rules wizard is displayed. For information about configuring rules, see Section 52.5, "Step 5: Creating an Active Rule."
-
Click the Delete icon (trash can) of a rule to delete that rule.
-
Click the Move Up or Move Down arrows to change the rule order. Enabled rules are executed during connector polling in the arranged order. If a content item matches one active rule, it will be synchronized according to that one rule. All other rules for processing that content item are ignored.
-
Select or de-select the Enabled option of a rule to enable or disable that rule. Click Save after making any changes.
Note:
-
If a rule is disabled, that rule and its matching content items will be ignored by the connector when it runs.
-
If an active rule is executed and then disabled (or deleted), content items imported according to that rule remain in WebCenter Sites.
-
-
In the Name column, click the rule name to view or edit that rule. The rules wizard is displayed.
-
The Description column provides the rule description. This description is defined when you create a rule.
-
Click the Add New Rule button to add a new rule. The rules wizard is displayed.
-
Click the Save button to save any changes, such as enabling or disabling a rule.
-
-
Once you have optimized, enabled, and prioritized your active rules, continue to Section 52.7, "Step 7: Manually Running the Connector."
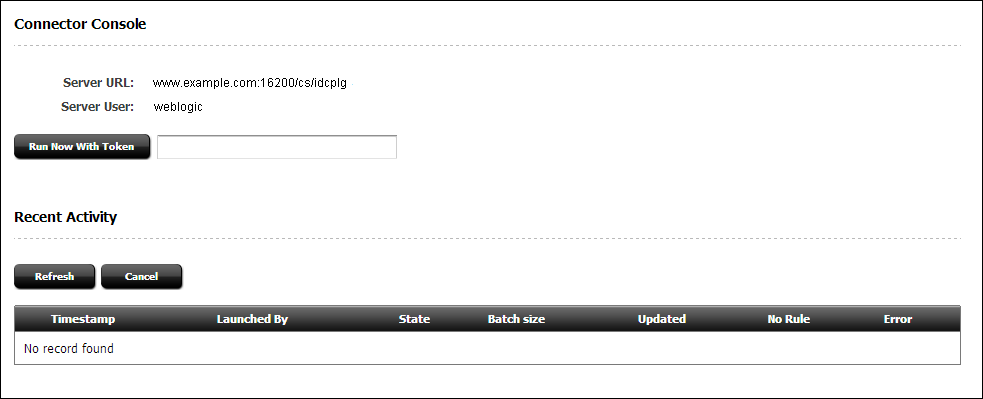
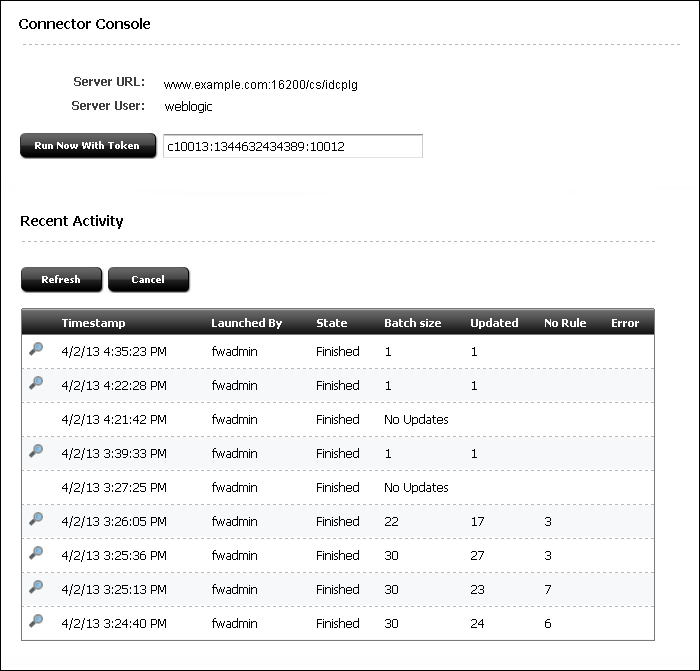
52.7 Step 7: Manually Running the Connector
In this step, you will manually run the connector to test the rules you configured and prioritized in Section 52.5, "Step 5: Creating an Active Rule" and Section 52.6, "Step 6: Prioritizing Active Rules and Managing Rules."
To run the connector
-
From the Connector Admin tab, select Console to open the Connector Console.
Figure 52-11 Connector Console with Example Server Information
Description of ''Figure 52-11 Connector Console with Example Server Information''
-
Verify that the Connector Console displays the information you specified in Section 52.4, "Step 4: Connecting to WebCenter Content":
-
The Server URL field lists the address of the WebCenter Content instance.
-
The Server User field lists the user with administration privileges for the WebCenter Content instance.
-
-
Click Run Now With Token.
The connector starts running and the token field displays the current token value. For more information about tokens, see Section 53.1, "Rolling Back the Synchronization Point."
Note:
The connector can be scheduled to run on a timed basis, as described in Section 52.12, "Step 12: Scheduling the Connector." -
While the connector runs, you can monitor its activity from the same form you are now using. For more information, continue to Section 52.8, "Step 8: Monitoring the Connector."
52.8 Step 8: Monitoring the Connector
When the connector runs, the Connector Console (populated in the previous step) displays the Recent Activity table, shown in Figure 52-12.
Figure 52-12 Connector Console Form with Filled Recent Activity Table
Description of ''Figure 52-12 Connector Console Form with Filled Recent Activity Table ''
The Recent Activity table lists ten rows at a time, within the last 24 hours. The table must be manually refreshed to provide up-to-date information. Each row represents a batch. By default, the connector processes content items in batches, up to 50 items per batch. Batch size can be changed, as described in Section 54.2, "User Configurable Parameters."
-
To determine whether the connector is importing any content items into WebCenter Sites, refresh the table and read the Updated column.
All options and statistics in the Recent Activity table are described below:
-
Clicking Refresh updates the table.
-
Clicking Cancel cancels the currently running connector. Note that processing of the next batch (if any) will be cancelled. The current batch will be processed to completion.
-
Click the Inspect this item icon (magnifying glass) to view connector history for the selected batch. See Section 52.9.2, "Viewing Connector History for a Single Batch" for more information.
-
The Timestamp column shows the date and time of batch processing.
-
The Launched By column lists whether batch processing was launched manually (from the Connector Console) by the named user, or launched automatically (AUTO) by the connector schedule in the
SystemEventstable. For information about connector scheduling, see Section 52.12, "Step 12: Scheduling the Connector." -
The State column lists batch processing status. Possible values are Submitted, Running, Cancelled, Error, Reset, or Finished. Click Refresh to view the updated state. This table does not auto-refresh.
-
The Batch size column lists the number of items in the batch. By default, the maximum is 50 items per batch. For information about changing maximum batch size, see Chapter 54, "WCC Connector Configuration Files."
-
The Updated column lists the number of items that were updated in WebCenter Sites during batch processing. The number includes assets that were created, updated, or deleted.
-
The No Rule column lists the number of content items that did not match any active rule.
-
The Error column lists the number of processing errors for this batch.
-
-
You can gather additional information about connector activity by viewing the connector's history (for all or selected batches). Continue to Section 52.9, "Step 9: Viewing Connector History."
If you prefer to spot-check the synchronized assets to ensure they are stored in the intended asset types, skip to Section 52.10, "Step 10: Verifying Imported Content."
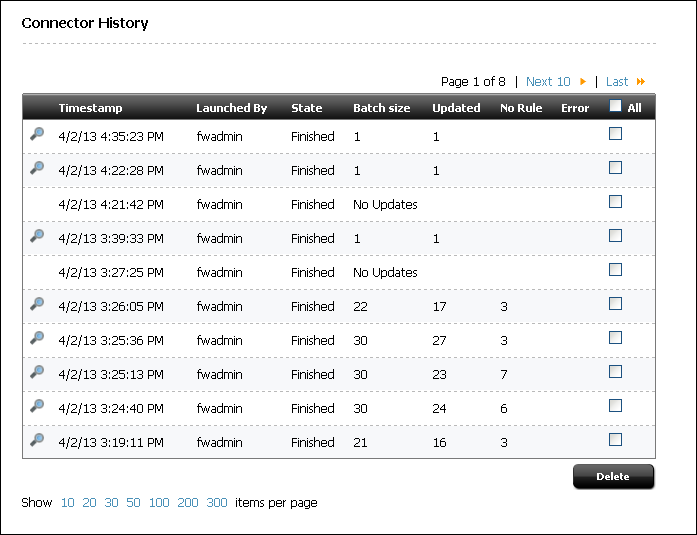
52.9 Step 9: Viewing Connector History
All connector sessions are archived. You can view the entire archive, or selected batches (one by one). You can also drill down to individual content items for detailed information about their processing. Archived information can be deleted.
This section contains the following topics:
52.9.1 Viewing the Entire Connector History
To view connector history for all batches
-
From the Connector Admin tab, select History to open the Connector History table.
Figure 52-13 Connector History Table with Example Activity
Description of ''Figure 52-13 Connector History Table with Example Activity''
-
The Connector History table displays the following information and options:
-
Each row of the Connector History table represents a batch. By default, the connector processes content items in batches, up to 50 items per batch.
-
Click the Inspect this item icon (magnifying glass) to view connector history for the selected batch. For more information, see Section 52.9.2, "Viewing Connector History for a Single Batch."
-
The Timestamp column shows the date and time of batch processing.
-
The Launched By column lists whether batch processing was launched manually (from the Connector Console) by the named user, or launched automatically (AUTO) by the connector schedule in the
SystemEventstable. For information about connector scheduling, see Section 52.12, "Step 12: Scheduling the Connector." -
The State column lists the batch processing state. Possible values are Submitted, Running, Cancelled, Error, Reset, or Finished. Click Refresh to view the updated state.
-
The Batch size column lists the number of items in the batch. By default, the maximum is 50 items per batch. For information about changing maximum batch size, see in Chapter 54, "WCC Connector Configuration Files."
-
The Updated column lists the number of items that were updated in WebCenter Sites during batch processing. The number includes assets that were created, updated, or deleted.
-
The No Rule column lists the number of items that did not match any rule.
-
The Error column lists the number of processing errors for this batch.
-
Select the All option and then click the Delete button to delete all activity listings.
-
Select a batch (a row) and click the Delete button to delete that batch.
-
-
To view connector history for a single batch, select the batch. The Connector History table lists all items that were processed in the batch. For an example, see Figure 52-14, in Section 52.9.2, "Viewing Connector History for a Single Batch."
52.9.2 Viewing Connector History for a Single Batch
-
From the Connector Admin tab, select History to open the Connector History table.
-
Locate the desired batch (a row), and click its Inspect icon (magnifying glass).
The Connector History table lists all items that were processed in the selected batch (see Figure 52-14 for an example).
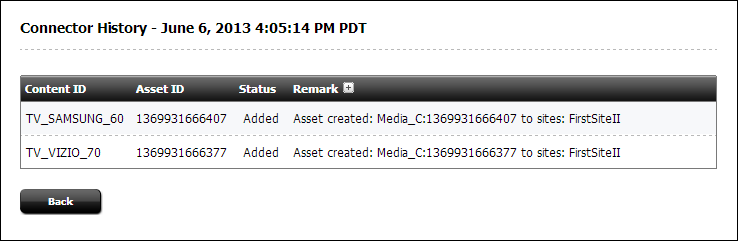
Figure 52-14 Connector History Details for a Single Batch
Description of ''Figure 52-14 Connector History Details for a Single Batch ''
-
The Connector History table for a single batch displays the following information and options:
-
Each row represents a single item in the batch.
-
The Content ID column lists Content ID for each item in the batch.
-
The Asset ID column lists Asset ID for each item in the batch.
-
The Status column lists the synchronization status for each item in the batch. Common status flags are
Added,Error,Updated,Not Matched(no rule matched),Not Present(asset not found), andDeleted(asset was deleted). -
The Remark column provides additional information for each item in the batch.Toggle its Show Details icon (plus sign) or Hide Details icon (minus sign). For an example and descriptions of commonly returned messages, skip to step 4.
-
Clicking the Back button takes you back to the previous table (which displays the history for all batches).
-
-
Figure 52-15 displays an example of possible messages in the Remark column. A more comprehensive list is available below the figure.
Figure 52-15 Connector History of a Single Batch with Details in the Remark Column
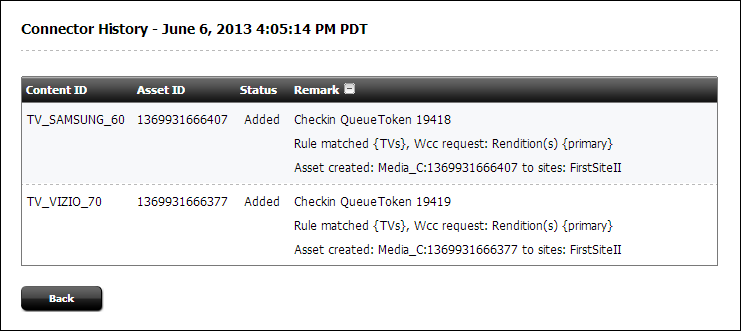
Description of ''Figure 52-15 Connector History of a Single Batch with Details in the Remark Column''
Some of the common messages are listed here:
-
No valid rule found—Indicates that either no rules are defined, or the defined rules are invalid. -
No record found—Indicates that no record could be found in the database table, meaning that there are no entries for the particular table being viewed. -
Delete QueueToken {0}—Value{0}is the token ID. This message indicates that the item from WebCenter Content is marked for removal from WebCenter Sites. -
Asset {0} deleted from site {1}—Value{0}is theassetType_assetID. Value {1} is the site name. This message confirms deletion of the listed asset from the specified content management site. -
Asset deleted—Confirms asset deletion. -
Asset not found—Typically, this message means that an attempt was made to locate an item to delete, but the item has already been deleted. -
Asset created: {0:1} to sites: {2}—Value{0:1}is the asset type and asset ID. Value {2} is the site name or a comma-separated list of site names. This message indicates that the listed asset was created in the listed site or sites. -
Asset updated: {0:1} to sites: {2}—Value{0:1}is the asset type and asset ID. Value{2}is the site name or a comma-separated list of site names. This message indicates that the listed asset was updated in the listed site or sites. -
Asset {0} delete failed from site {1} because: {2}—Value{0}is the asset ID. Value{1}is the site name. Value{2}is a message as to why the deletion failed. Typically, a deletion fails because the asset was modified since the last synchronization session and now has references to it. If deletion fails, the item is listed in the Orphaned Content form (see Section 52.13, "Step 13: Managing Synchronized Assets" for more information). -
Checkin QueueToken {0}—Value{0}is the token ID. This message indicates a queue token checkin request, that is, a new or updated item is ready to be imported into WebCenter Sites from WebCenter Content. -
Rule matched {0}, Wcc request: {1}—Value{0}is the rule name. Value{1}is the WebCenter Content rendition or conversion that was requested in the attribute mapping section of the rule. -
No rule matched—Indicates that no rule matched the item (compare withNo valid rule found). -
Rule matched {0}, but mappings not found—Value{0}is the rule name. This message indicates that a rule matched the item being imported from WebCenter Content, but no mappings of metadata to attributes were found. -
Rendition {0} was not returned—Value{0}is the rendition name. This message indicates that WebCenter Content did not return the requested rendition (often due to the rendition not being available). Compare withAvailable RenditionsandRequested Renditions not available. -
Available Renditions: {0}—Value{0}is a list of the item's available renditions on WebCenter Content. -
Requested Renditions not available—Indicates that the requested rendition is not available. Refer toAvailable Renditionsfor a list of available renditions. -
Error on field {0}, fieldDef: {1}:{2}—Values{0}and{1}are the attribute name (the values are identical). Value{2}is the error message for the exception. This message is returned when an unknown or unexpected exception occurs while the connector is mapping a content item metadata field to an attribute.
-
-
Before automating synchronization to run routinely, verify the imported content to ensure it is stored in the intended asset types and with the expected level of detail. Continue to Section 52.10, "Step 10: Verifying Imported Content."
52.10 Step 10: Verifying Imported Content
At this point, you are likely to have enough information about how well content synchronization meets your requirements. To confirm, spot check the imported content items to ensure they are stored in the intended asset types, that all metadata values are recorded in the correct attributes, and all other conditions that were specified in the attribute mapping part of the rules are met. To locate the content items and the assets, refer to the Connector History table for Content IDs and their counterpart Asset IDs.
Once verification is complete, do one of the following:
-
If adjustments are necessary, continue to Section 52.11, "Step 11: If You Need to Modify Your Setup."
-
If the results meet your requirements, continue to the following sections:
52.11 Step 11: If You Need to Modify Your Setup
If the results of your synchronization sessions do not meet your requirements, you have a number of ways to adjust system configuration. Before taking action, it is best to review your options. They are as follows:
-
You can return to some of the steps in this chapter; for example, enable more content items for synchronization, disable content items, modify rules, re-prioritize active rules, and so on.
Note:
If you choose to modify or re-prioritize active rules, first delete the synchronized assets from WebCenter Sites. Clearing asset types helps to simplify interpretation of synchronization results after the connector runs again. It also prepares your system for rollback of its synchronization point to the original starting point or to a particular update, should you decide to take that step. -
You can use the
wcc-integration.inifile to reconfigure various parameters, such as maximum batch size. For more information, see Section 54, "WCC Connector Configuration Files." -
You can roll back the synchronization point to the original starting point, or to a particular update by resetting the token.
Caution:
If you choose to reset the token, all content items at the new synchronization point will be re-examined by the connector and resynchronized to WebCenter Sites.Before rolling back, prepare your system by deleting the synchronized assets from WebCenter Sites. This step is especially important if you modified connector rules in any of the following ways: changed the target asset types, changed their content management sites, or re-prioritized the rules. Once the assets are deleted, you can reset the token. For more information about tokens, see Section 53.1, "Rolling Back the Synchronization Point."
Once you have successfully modified your setup, continue to the following sections:
52.12 Step 12: Scheduling the Connector
Once you have configured and verified content synchronization, you may want to schedule the connector to run on a timed basis. Use the Oracle WebCenter Sites: Explorer utility to add a timed entry to the SystemEvents table.
To schedule the connector
-
Launch the Sites Explorer executable file (
ContentServerExplorer.exe) located in theSitesExplorerdirectory of the distribution file.Note:
Sites Explorer is a Windows-only utility. -
Log in to Sites Explorer. (For information about login credentials, see the Oracle Fusion Middleware WebCenter Sites Developer's Guide.)
-
In Sites Explorer, do the following:
-
Expand the Tables node.
Figure 52-16 Oracle WebCenter Sites: Explorer with Expanded Tables Node
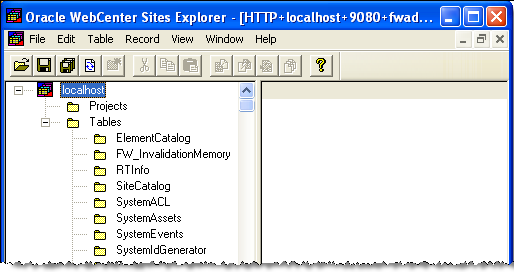
Description of ''Figure 52-16 Oracle WebCenter Sites: Explorer with Expanded Tables Node''
-
Select the SystemEvents table (see Figure 52-16).
-
From the main menu, select File, then New, and then Record.
-
Define the scheduling event for the WCC connector by entering the following information:
-
eventname:
WCCConnector -
type:
1 -
enabled:
1 -
times: Leave this field blank for now. You will set it in step e.
-
target:
ContentServer -
params:
pagename=WCC/Pull
-
-
Define the schedule for running the connector by entering a time pattern into the
timesfield, in the following format:h:m:s W/D/MFields of the time pattern and their legal values are defined in Table 52-2. Below the table is an example of a time pattern.
Table 52-2 Fields of a Time Pattern in the SystemEvents Table
Field Legal Values All Legal Values Single Value Format Inclusive Range Format List Format h(hours)0–23
*
hh-hh,hm(minutes)0–59
*
mm-mm,ms(seconds)0–59
*
ss-ss,sW(day of the week)0–6, where 0=Sunday
*
WW-WW,WD(day of the month)0–31
*
DD-DD,DM(month)1–12
*
MM-MM,MExample Time Pattern:
2,5-7:0:0 5/*\/*The first field,
2,5-7:0:0is a comma-separated list of times that includes a range. It means the event is triggered at 2 AM, 5 AM, 6 AM, and 7 AM at 0 minutes and 0 seconds for every specified hour. The next field (5/) specifies that the event is triggered every Friday. The next field (*\) ensures that the event is not triggered every day of the month. The last field (/*) ensures that the event will be triggered in all months.The specification of days can be made by two fields: day of the week (WD) and day of the month (DD). If both are specified, both take effect. For example,
1:0:0 1/15/*means the event is triggered at 1 AM, 0 minutes and 0 seconds, every Monday, and on the fifteenth day of each month. To specify days by only one field, set the other field to*.
-
-
Click Save.
-
Continue to Section 52.13, "Step 13: Managing Synchronized Assets" for information about helping content contributors identify and manage synchronized assets.
52.13 Step 13: Managing Synchronized Assets
Once the required content items are imported into WebCenter Sites, you can work with content contributors to help them identify and manage the synchronized assets, especially if synchronization sessions will be running on a regular basis. Administrators who publish also need to know how the assets are affected by synchronization sessions.
This section contains the following topics:
52.13.1 Mapped Attributes
If content contributors modify assets by changing the values of attributes that were explicitly mapped in the attributes mapping part of the connector rules, those values will be updated when the content items are updated and resynchronized. All other attributes will have their values preserved.
Note:
If the value of a mapped attribute is changed, it will be overwritten when its content item is updated and resynchronized. Keeping changes to mapped attributes requires copying the assets.52.13.2 Orphaned Content
One task that synchronization cannot accomplish is deleting synchronized assets that have dependents. This results in orphaned content.
Orphaned content is an asset that cannot be deleted when its counterpart content item is either deleted, expired, or disabled from synchronization (by having its Sync To Sites option set to False). The orphaned asset cannot be deleted because dependencies were created on that asset since the last synchronization session.
Note:
If a synchronized asset is shared across content management sites, it will be deleted, unless it has dependents.To determine orphaned assets
-
From the WebCenter Sites Admin interface, open the Connector Admin tab.
-
Select Orphaned Content to open the Connector Orphaned Content table (Figure 52-17).
Figure 52-17 Connector Orphaned Content Table with Example Information

Description of ''Figure 52-17 Connector Orphaned Content Table with Example Information''
The Connector Orphaned Content table displays the following columns, which identify the deleted source content items, the orphaned assets, and their dependent assets:
-
The Content ID column lists Content IDs for the content items that were deleted or disabled from synchronization in WebCenter Content.
-
The Connector Token column lists the token's
update_number, from which you can derive the date and time when the content items were processed by the connector. Date and time can be obtained from the WCS Queue Support Information table, described in Chapter 53, "Resynchronization Options." -
The Asset ID column lists the orphaned assets by their WebCenter Sites asset IDs.
-
The Referenced By column lists the dependent assets (which reference the orphaned assets).
-
The Remark column lists additional information (if any) for orphaned assets.
-
-
Use the Connector Orphaned Content table to locate the orphaned assets in WebCenter Content. More information about deleted content items is available in WebCenter Content.