59 Building Standards-Based Java Portlets Using JSR 286
This chapter describes how to build standards-based Java portlets using the Java Portlet Specification, JSR 286.
This chapter includes the following topics:
59.1 Introduction to Standards-Based Java Portlets
WebCenter Portal supports standards-based Java portlets built using the JSR 286 standard.
JSR 286 is a specification that defines a set of APIs to enable interoperability between portlets and portals, addressing the areas of aggregation, personalization, presentation, and security. JSR 286 defines container services that provide:
-
A portlet API for coding portlet functionality
-
The URL-rewriting mechanism for creating user interaction within a portlet container
-
The security and personalization of portlets
-
Interportlet communication using portlet events and public render parameters
For more information, see the JSR 286 specification at:
http://jcp.org/en/jsr/detail?id=286
WSRP is a web services standard that enables the plug-and-play of visual, user-facing web services with portals or other intermediary web applications. Being a standard, WSRP enables interoperability between a standards-enabled container and any WSRP portal. WSRP defines:
-
Web Services Definition Language (WSDL) interface for the invocation of WSRP services
-
Markup fragment rules for markup emitted by WSRP services
-
The methods to publish, find, and bind WSRP services and metadata
WSRP provides communication between a portlet client (for example, a WebCenter Portal Framework application) and a portlet container running on a remote server. JSR 286 describes the Java Portlet API for running portlet producer applications. Combining these standards enables developers to integrate their applications from any internal or external source as portlets with WSRP portals. Building pages becomes as simple as selecting portlets from the JDeveloper Resource Palette or Application Resources pane of the Application Navigator.
Figure 59-1 shows the architecture of the WSRP specification with JSR 286 portlets.
Figure 59-1 WSRP Specification Architecture
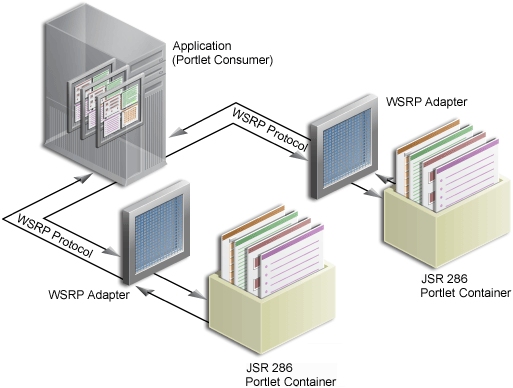
Description of "Figure 59-1 WSRP Specification Architecture"
For a description of how JSR 286 security concepts are exposed through WSRP, see Section 74.17, "Securing Identity Propagation Through WSRP Producers with WS-Security."
59.2 Creating a JSR 286 Java Portlet
WebCenter Portal provides a wizard, available in JDeveloper, for quickly and easily creating the initial framework of your JSR 286 standards-based Java portlets.
This section includes the following topics:
59.2.1 How to Create a JSR 286 Java Portlet
In the Create JSR 286 Java Portlet wizard, you can choose which portlet modes you want to implement and the implementation method (JSP, HTTP servlet, Java class, or HTML) to use for each mode. The wizard then creates a simple implementation for each of the selected modes.
To create a JSR 286 Java portlet using the JDeveloper wizard:
-
In JDeveloper, open the portlet producer application under which you want to create your portlet, or create a new portlet producer application.
For information about how to create a portlet producer application, see Section 57.4.1, "Portlet Producer Applications."
Note:
If you do not use the WebCenter Portal - Portlet Producer Application template to create the portlet producer application, you must manually add the appropriate portlet building technology scopes to the application.Applications built using the WebCenter Portal - Framework Application template are not scoped for portlet creation.
-
Right-click the project under which you want to create your portlet (for example Portlets), and choose New.
-
In the New Gallery (Figure 59-2), expand Web Tier, select Portlets and then Standards-based Java Portlet (JSR 286), and click OK.
Figure 59-2 The New Gallery with Standards-based Java Portlet (JSR 286) Selected
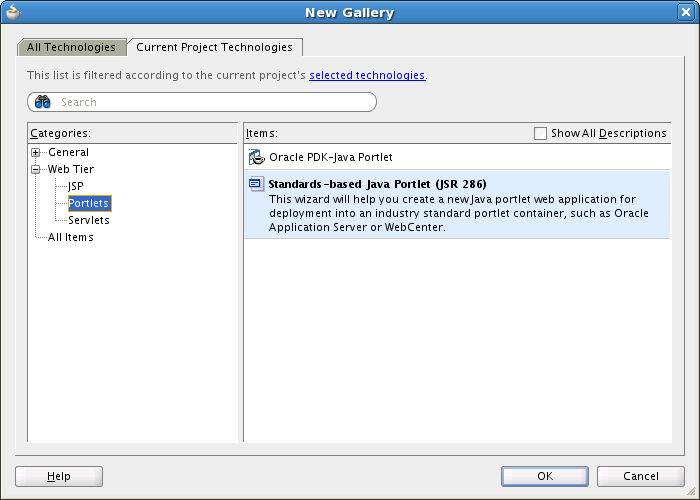
Description of "Figure 59-2 The New Gallery with Standards-based Java Portlet (JSR 286) Selected"
Tip:
If the project already contains JSR 286 portlets, you can also create a new portlet by:-
Right-clicking
portlet.xmland choosing Add Portlet. -
Opening
portlet.xml, clicking the Design tab, and clicking the Add icon on the Portlets tab.
-
-
On the General Portlet Information page of the Create JSR 286 Java Portlet wizard, replace the default name provided in the Name field with one that better describes the purpose of the portlet.
-
In the Class field, enter a name for the class for the portlet. You can accept the default name provided or supply your own. If you supply your own name, it must be a valid Java name.
-
From the Package drop-down list, select the package in which to create the class, or enter a package name.
Click the Browse button to find packages within the project, if required. If you do not select a specific package, the wizard uses the default package of the project.
-
From the Default Language drop-down list, select the default language that your portlet supports. The wizard uses English by default.
-
Select Enable users to edit portlet content if you want your portlet to support Edit mode. In the wizard, this option is selected by default.
Edit mode enables users to personalize the portlet at runtime. For more information, see Section 57.4.2.2, "Edit Mode."
If you select this option, you can specify implementation details for the portlet's Edit mode later on in the wizard.
-
Click Next.
-
On the Additional Portlet Information page, in the Portlet Title field, enter a descriptive title for your portlet.
The portlet title is displayed in the Resource Palette or Application Resources panel, so make the title something to help users decide whether the portlet is useful to them. The portlet title is also displayed on the portlet header when the portlet appears on a page.
Tip:
The Display Name, Short Title, Description, and Keyword attributes are not implemented in WebCenter Portal. You do not need to enter any values for these fields unless your portlet is likely to be consumed by other applications.For example, Oracle Portal uses the portlet display name in the Portlet Repository.
-
At this point in the wizard, you can click Finish to create the portlet immediately, using the default values for all remaining settings.
To provide additional details for your portlet, click Next and follow the remaining steps.
-
On the Content Types and Portlet Modes page, in the Content Types and Portlet Modes list, select view.
-
In the Implementation Method section, select how you want to implement View mode for your portlet (for more information about View mode, see Section 57.4.2.1, "View Mode"):
-
Select Generate JSP to generate a skeleton JSP file for the portlet mode. Enter a name for the JSP in the corresponding field, or accept the default.
When you complete the wizard, the generated JSP displays in the Application Navigator where you can select it for further development. This is the default selection for all portlet display modes.
-
Select Generate ADF-Faces JSPX to generate a page to which you can add ADF-Faces components. Enter a name for the JSPX in the corresponding field, or accept the default.
If you choose this option, the portlet implementation class is created as a subclass of
oracle.portlet.bridge.adf.application.ADFBridgePortlet, instead of as a subclass ofjavax.portlet.GenericPortlet. That is, the wizard generates a portlet producer application which uses the Oracle JSF Portlet Bridge. For more information about the Oracle JSF Portlet Bridge, see Chapter 58, "Creating Portlets from JSF Applications Using the Oracle JSF Portlet Bridge." -
Select Map to Path to map the portlet mode to a web resource in the portlet producer application, such as a page. The resource is not generated by the wizard. Enter the name and path in the corresponding field. You can create this resource after completing the wizard if necessary.
With this selection, you must write the targeted resource or file yourself. The target could be, for example, a JSP, a servlet, or an HTML file. This selection enters code in the generated portlet Java class that routes requests for the given mode to the specified target.
-
Select Custom Code to implement the portlet mode through a custom coded object. You must create this object later. This selection generates a skeleton method to render content (
private void doMODE_NAMECONTENT_TYPE) in the generated portlet java class. You must update this code to render useful content.
Tip:
If you want this portlet mode to support a different content type, for exampletext/xml, see Step 16. -
-
If you selected Enable users to edit portlet content on the first page of the wizard, select edit and then select the implementation method for Edit mode (for information about Edit mode, see Section 57.4.2.2, "Edit Mode"), as described in step 13.
-
To implement another portlet mode for your portlet:
-
In the Content Types and Portlet Modes list, select an existing mode (for example, view) under the appropriate content type (for example, text/html).
-
Click Add.
-
In the Portlet Modes dialog, move the required mode or modes to the Selected list and click OK.
The Portlet Modes dialog lists the standard modes supported by JSR 286 and the extended modes supported by WebCenter Portal.
For more information, see Section 57.4.2, "Portlet Modes."
-
Select each of the portlet modes and specify the implementation method to use for rendering content, as described in step 13.
Figure 59-3 Adding a Portlet Mode to a JSR 286 Java Portlet
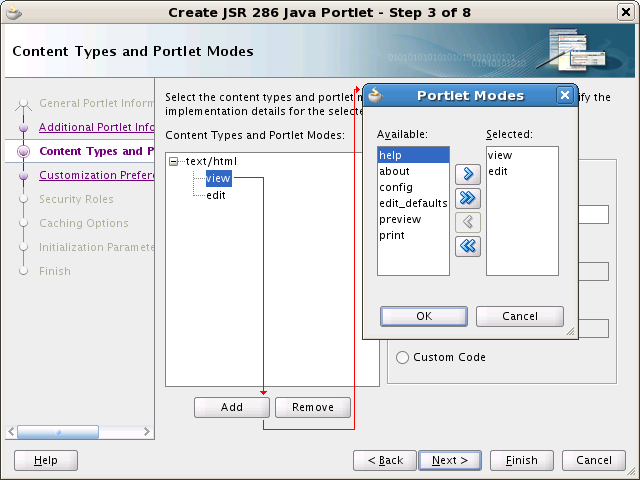
Description of "Figure 59-3 Adding a Portlet Mode to a JSR 286 Java Portlet"
-
-
The content type identifies what type of content the portlet supports. Portlets can support multiple content types. By default, portlets created using the Create JSR 286 Java Portlet wizard support the
text/htmlcontent type.To add a different content type:
-
In the Content Types and Portlet Modes list, select an existing content type (for example, text/html).
-
Click Add.
-
In the Content Types dialog, move the required content types to the Selected list and click OK.
-
text/html—The portlet supports text encoded with HTML. This is the default selection.
-
text/xml—The portlet supports text encoded with XML.
-
text/plain—The portlet supports plain, unencoded text.
-
text/vnd.oracle.mobilexml—The portlet supports text encoded with Oracle Mobile XML. Note, however, that WebCenter Portal does not support Oracle Mobile XML.
-
application/xhtml+xml—The portlet supports text encoded with XHTML.
-
application/xml—The portlet supports any XML content, including XHTML.
-
Figure 59-4 Adding a Content Type to a JSR 286 Java Portlet
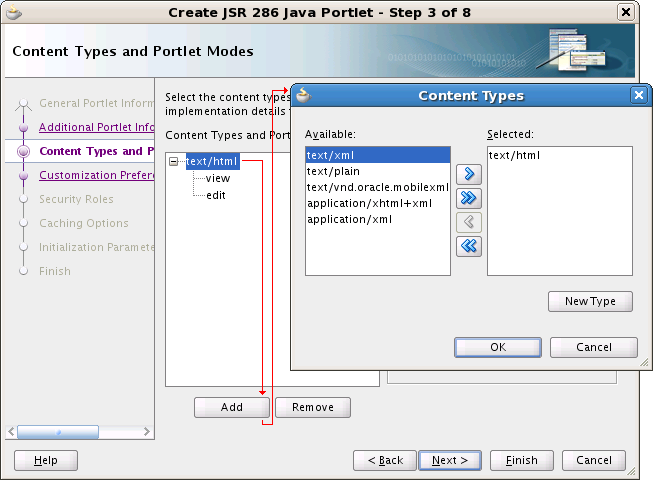
Description of "Figure 59-4 Adding a Content Type to a JSR 286 Java Portlet"
-
-
Click Next.
If you selected Enable users to edit portlet content on the General Portlet Information page earlier in the wizard, then you can create portlet preferences to enable users of the portlet to specify values for the portlet at runtime. Go to step 18.
If you did not select this option, go to step 24.
-
On the Customization Preferences page, click Add to add a new portlet preference to the portlet.
By default, the wizard includes a portlet preference to enable users to customize the portlet title.
-
In the Add New Preference dialog, in the Name field, enter a name for the new preference.
The name must be unique in the portlet and cannot contain spaces.
-
In the Default Values field, enter one or more default values for the new preference. Separate multiple values with commas.
-
Select the Translate Preference check box if you want to be able to make the preference available in different languages.
For example, if the portlet is likely to be consumed by a multilingual portal you want to ensure that the preference displays in the appropriate language.
If you enable this option, then entries for the preference are added to the resource bundle class that JDeveloper generates for the portlet.
Tip:
Edit the resource bundle to provide translations for the preference name and default values. The name will almost always require translating, but the default values may not, for example, if the value is an integer. -
Click OK.
-
Repeat the preceding steps to add more preferences. When you are done click Next.
-
On the Security Roles page, to add an existing security role to your portlet, select the security role and move it to the Selected list.
Security roles enable you to set tiered levels of access to the portlet. For example, a View user can view the portlet but cannot edit it; a Customize user can customize portlet settings; a Manage user can perform all available functions associated with the portlet.
The Available list displays the security roles defined for the application in which you are creating the portlet. Moving a security role to the Selected list creates a reference of the security role in the application's portlet deployment file (
portlet.xml) that refers to the security role in the application's web deployment file (web.xml).You can create new security roles for the application by editing
web.xml. For more information, see the JDeveloper online help. -
Click Next.
-
On the Caching Options page, select Cache Portlet to enable expiry-based caching for your portlet.
For more information about expiry-based caching, see Section 57.4.5, "Portlet Performance" and Section 59.3.9.1, "Implementing Expiry-Based Caching in JSR 286 Portlets."
Selecting this option indicates that portlet caching is managed by the portlet container. The portlet itself may choose to cache content for any given response. The settings on this page apply only when the portlet itself does not specify a caching condition for a response.
If you do not want any default caching for this portlet, choose Do Not Cache By Default. In this case, the wizard actually sets a cache duration of 0 seconds. As stated earlier, this cache setting only comes into play when the portlet itself does not specify a caching condition for a response.
If you choose no caching here and you later decide to implement default caching for the portlet, then you can change the cache duration value in the
portlet.xmlfile, which is generated by the wizard, to a number greater than zero.For information about how to implement validation-based caching, see Section 59.3.9.2, "Implementing Validation-Based Caching in JSR 286 Portlets."
-
If you chose to cache the portlet, in the Default Expiry Conditions section, select:
-
Cache Content Expires After [ ] seconds to expire the cached portlet content after a certain amount of time. Specify the time limit in the corresponding field.
-
Cache Content Never Expires to never expire the cached portlet content. You may want to select this option if the portlet contains static content that is unlikely to change.
-
-
Click Next.
-
On the Initialization Parameters page, you can add initialization parameters to your portlet.
Initialization parameters provide the application developer, who decides what goes into the WAR file, an alternative to JNDI variables for configuring the behavior of all of the different components of the application (for example, servlets and portlets) in a compatible way. These initialization parameters are added to the
portlet.xmlfile.For example, you might want to turn on some kind of debugging mode for the portlet or display different menu options in different environments.
-
Click New to add a new initialization parameter to the portlet.
-
In the newly added row, double-click each field to provide a Name, default Value, and Description for the parameter.
-
Repeat these steps to add more initialization parameters.
-
When you are done, click Finish to create the portlet.
-
59.2.2 What Happens When You Create a JSR 286 Portlet Using the JDeveloper Wizard
When you use the Create JSR 286 Java Portlet wizard, JDeveloper generates a default implementation of the portlet. Specifically, the following files are created:
-
Java classes:
-
portletName.javais invoked by the portlet container and contains all the methods required by the portlet standards. -
portletNameBundle.javacontains all the translation strings for the portlet. -
portletNameBacking.javacontains the JSF backing bean for the JSPX pages that implement portlet modes. This class is created if you implement portlet modes as ADF-Faces JSPX pages.
-
-
portlet.xmlis the portlet deployment descriptor file for the application. -
web.xmlis the web deployment descriptor file for the application. -
Files for each portlet mode you selected for the portlet:
-
If you selected Generate JSP for the portlet mode, a JSP page is created for the mode, for example,
view.jsp. -
If you selected Generate ADF-Faces JSPX, a JSPX page is created for the mode, for example,
view.jspx. You can add Faces components to this page. -
If you selected Map to Path, no additional files are created as the code for the portlet mode resides in an existing resource. Code is added to the portlet's Java class to route requests to the specified target.
-
If you selected Custom Code, no additional files are created, but the code for the portlet mode resides in the portlet's Java class.
-
-
faces-config.xmlis a configuration file that registers an application's resources, such as custom validators and managed beans and describes the page flow of the application. This file is created if you implement portlet modes as ADF-Faces JSPX pages. -
trinidad-config.xmlis a configuration file that contains information about the application skin family. This file is created if you implement portlet modes as ADF-Faces JSPX pages.
You can see all these files in the Application Navigator, as shown in Figure 59-5.
Figure 59-5 Files Generated for a JSR 286 Java Portlet
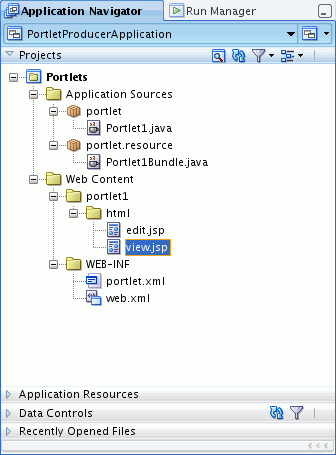
Description of "Figure 59-5 Files Generated for a JSR 286 Java Portlet"
59.3 Developing JSR 286 Java Portlets
When you have built your initial portlet implementation using the Create JSR 286 Java Portlet wizard, the next step is to create the code that drives the portlet content and behavior. Because JSR 286 portlets adhere to the Java standards, you can find substantial information about enhancing them from many different sources, such as third-party books and web pages, including:
http://jcp.org/en/jsr/detail?id=286
This section includes the following topics:
-
Section 59.3.1, "How to Edit the Portlet Deployment Descriptor File"
-
Section 59.3.2, "How to Add Custom Portlet Modes to JSR 286 Portlets"
-
Section 59.3.3, "How to Access User Information in JSR 286 Portlets"
-
Section 59.3.4, "How to Customize the Runtime Environment for JSR 286 Portlets"
-
Section 59.3.5, "How to Use Public Render Parameters in JSR 286 Portlets"
-
Section 59.3.6, "How to Use Portlet Events in JSR 286 Portlets"
-
Section 59.3.7, "How to Add Portlet Preferences to JSR 286 Portlets"
-
Section 59.3.8, "How to Use Portlet Filters in JSR 286 Portlets"
-
Section 59.3.9, "How to Enhance JSR 286 Portlet Performance with Caching"
-
Section 59.3.10, "How to Implement Rewritten URLs for Resource Proxy"
-
Section 59.3.11, "How to Implement Stateless Resource Proxying"
-
Section 59.3.12, "How to Implement Security for JSR 286 Portlets"
-
Section 59.3.13, "How to Manage the Persistence Store for JSR 286 Portlets"
-
Section 59.3.14, "How to Export and Import Portlet Producers at Design Time"
59.3.1 How to Edit the Portlet Deployment Descriptor File
The portlet deployment descriptor file for the application, portlet.xml, specifies the portlet resources in the application. Example 59-1 shows an example portlet deployment descriptor file.
Example 59-1 Example Portlet Deployment Descriptor File
<?xml version="1.0" encoding="UTF-8" standalone="yes"?>
<portlet-app version="2.0"
       xsi:schemaLocation="http://java.sun.com/xml/ns/portlet/portlet-app_2_0.xsd
                           http://java.sun.com/xml/ns/portlet/portlet-app_2_0.xsd"
       xmlns="http://java.sun.com/xml/ns/portlet/portlet-app_2_0.xsd"
       xmlns:xsi="http://www.w3.org/2001/XMLSchema-instance">
  <portlet id="1328624289503">
    <portlet-name>myPortlet</portlet-name>
    <display-name>Portlet1</display-name>
    <display-name>English Display Name</display-name>
    <portlet-class>portlet.Portlet1</portlet-class>
    <expiration-cache>300</expiration-cache>
    <supports>
      <mime-type>text/html</mime-type>
      <portlet-mode>edit</portlet-mode>
    </supports>
    <supported-locale>en-US</supported-locale>
    <resource-bundle>portlet.resource.Portlet1Bundle</resource-bundle>
    <portlet-info>
      <title>This Is My Portlet</title>
      <short-title>My Portlet</short-title>
      <keywords/>
    </portlet-info>
    <portlet-preferences>
      <preference>
        <name>portletTitle</name>
      </preference>
    </portlet-preferences>
  </portlet>
  <custom-portlet-mode>
    <portlet-mode>about</portlet-mode>
  </custom-portlet-mode>
  <custom-portlet-mode>
    <portlet-mode>config</portlet-mode>
  </custom-portlet-mode>
  <custom-portlet-mode>
    <portlet-mode>edit_defaults</portlet-mode>
  </custom-portlet-mode>
  <custom-portlet-mode>
    <portlet-mode>preview</portlet-mode>
  </custom-portlet-mode>
  <custom-portlet-mode>
    <portlet-mode>print</portlet-mode>
  </custom-portlet-mode>
</portlet-app>
After you have created your JSR 286 portlet using the wizard, you can edit the portlet.xml file to edit the portlet resources.
When you open the portlet.xml file in JDeveloper, you can edit the source code or you can use the Overview Editor to edit portlet resources without having to manually modify it in the Source view.
To edit the portlet deployment descriptor file:
-
In the Application Navigator, open the portlet producer application.
-
Expand the portlet project (for example, Portlets).
-
Expand the Web Content node and then the WEB-INF node.
-
Right-click portlet.xml and choose Open.
-
Click the Design tab to open the Overview Editor for
portlet.xml.Tip:
If you prefer to edit the source code directly, click the Source tab. -
The Overview Editor for
portlet.xmlcontains the following tabs:-
Application—Use to specify general information for the portlet producer application. These properties apply to all portlets within the application.
-
Portlets—Use to specify information for individual portlets within the application. For example, you can specify the portlet events and public render parameters supported by a portlet.
-
Events—Use to create and manage portlet events for use by all portlets in the application. For more information, see Section 59.3.6, "How to Use Portlet Events in JSR 286 Portlets."
-
Parameters—Use to create and manage public render parameters for use by all portlets in the application. For more information, see Section 59.3.5, "How to Use Public Render Parameters in JSR 286 Portlets."
-
Filters—Use to specify filter information for the portlets in the application. For more information, see Section 59.3.8, "How to Use Portlet Filters in JSR 286 Portlets."
-
Filter Mappings—Use to assign portlet filters to individual portlets. For more information, see Section 59.3.8, "How to Use Portlet Filters in JSR 286 Portlets."
-
59.3.2 How to Add Custom Portlet Modes to JSR 286 Portlets
In the Create JSR 286 Java Portlet wizard, you add portlet modes by adding them to a list on the Content Types and Portlet Modes page. For more information about using the wizard, see Section 59.2, "Creating a JSR 286 Java Portlet." The wizard enables you to implement the standard modes supported by JSR 286 and the extended modes provided by WebCenter Portal.
The standard modes supported by JSR 286 are:
-
View
-
Edit
-
Help
WebCenter Portal supports the following additional custom modes for JSR 286 portlets:
-
About
-
Config
-
Edit Defaults
-
Preview
-
Print
After the initial creation of the portlet, you can also define your own custom portlet modes.
The principles of implementing portlet modes are the same for all modes.
To add a custom portlet mode:
-
Open the Overview Editor for the
portlet.xmlfile.For more information, see Section 59.3.1, "How to Edit the Portlet Deployment Descriptor File."
-
Click the Application tab, if necessary.
-
Expand the Custom Modes section, if necessary.
This section lists all the custom modes available to the portlets within the application. It includes the WebCenter Portal extended portlet modes.
-
Click the Add Custom Mode icon to create a new row for the portlet mode.
-
In the Portlet Mode field, enter the name of the portlet mode.
The name must be unique within the application.
-
In the Description field, enter a brief description to explain the purpose of the mode.
-
Deselect the Portal Managed check box if applications that consume the portlet do not need to be aware of the portlet mode, that is, the mode is used internally by the portlet.
-
Save the
portlet.xmlfile. -
After adding the custom portlet mode to the application, you must then create the code for the mode in the portlet implementation file.
59.3.3 How to Access User Information in JSR 286 Portlets
You can create user attributes in the portlet producer application to access commonly used user information, such as user.login.id or user.name.family. At runtime, these user attributes are mapped to the actual attributes of the current user. Portlets can use this information to obtain information about the current user.
To access user information:
-
Open the Overview Editor for the
portlet.xmlfile.For more information, see Section 59.3.1, "How to Edit the Portlet Deployment Descriptor File."
-
Click the Application tab, if necessary.
-
Expand the User Attributes section, if necessary.
-
Click the Add User Attribute icon to create a new row for the attribute.
-
In the Name field, enter the name of the user attribute, for example
user.login.id.For a list of attribute names, see the "User Information Attribute Names" appendix in the Java Portlet Specification.
Tip:
For a list of the user information attributes supported by WebCenter Portal, see the "Mapping User Attributes to LDAP Directories" section in the Oracle Fusion Middleware Application Security Guide. -
In the Description field, enter a description for the user attribute.
-
Save the
portlet.xmlfile.At runtime, the portlet container maps the defined user attributes to the appropriate values. For example, if the current user is John Doe, then the
user.name.familyuser attribute is mapped to Doe. Portlets can obtain aMapobject containing the user attributes from thePortletRequestinterface.
59.3.4 How to Customize the Runtime Environment for JSR 286 Portlets
When a portlet is run, the portlet container provides the runtime environment and provides an interface between the portlet producer application and the portlet.
Container runtime options provide a way to customize the behavior of the portlet container and therefore customize the runtime environment.
This section includes the following topics:
-
Section 59.3.4.2, "Setting Container Runtime Options for All Portlets in an Application"
-
Section 59.3.4.3, "Setting Container Runtime Options for Individual Portlets"
59.3.4.1 Supported Container Runtime Options
Table 59-1 lists the container runtime options supported by the WebCenter Portal portlet container.
For more information about the JSR 286 container runtime options, see the JSR 286 specification at:
http://jcp.org/en/jsr/detail?id=286
Table 59-1 Supported Container Runtime Options
| Container Runtime Option | Supported by | JSR 286 Standard |
|---|---|---|
|
Application Portlet |
Yes |
|
|
Application Portlet |
Yes |
|
|
java.portlet.renderHeaders |
Not supported |
Yes |
|
Application Portlet |
Yes |
|
|
Application |
No |
|
|
Application |
No |
|
|
Application Portlet |
No |
|
|
com.oracle.portlet.defaultProxiedResourceRequiresWsrpRewrite |
Application Portlet |
No |
|
Application Portlet |
No |
|
|
Application Portlet |
No |
|
|
Application Portlet |
No |
|
|
Application |
No |
|
|
Application Portlet |
No |
|
|
Application Portlet |
No |
|
|
Application Portlet |
No |
|
|
Application Portlet |
No |
|
|
Application Portlet |
No |
|
|
Application Portlet |
No |
|
|
Application Portlet |
No |
|
|
com.oracle.portlet.renderHeaders |
Application Portlet |
No |
|
Application Portlet |
No |
|
|
Application Portlet |
No |
|
|
Application Portlet |
No |
|
|
Application Portlet |
No |
|
|
Application Portlet |
No |
|
|
Application |
No |
|
|
Application Portlet |
No |
|
|
Portlet |
No |
|
|
Portlet |
No |
|
|
Portlet |
No |
javax.portlet.actionScopedRequestAttributes
Specifies whether to store action-scoped request attributes so that they are available to portlets until a new action occurs.
You can use the WebCenter Portal-specific excludedActionScopeRequestAttributes container runtime option to limit which request attributes are stored in the scopes.
Valid values:
-
true—store request attributes starting atprocessActionuntil the nextprocessAction. You can specify a second value ofnumberOfCachedScopesand a third value indicating the number of scopes to be cached by the portlet container. -
false—do not store request attributes.
Specifies whether to XML encode URLs returned from actionUrl, renderUrl, and resourceUrl JSR 286 tag library tags.
You can override this option on a per-tag basis using the encodeXml attribute.
Valid values:
-
true—(default) the URLs returned by theactionUrl,renderUrl, andresourceUrltags are XML encoded (using ampersand entities for parameter separation). -
false—the URLs returned by the actionUrl, renderUrl, and resourceUrl tabs are not XML encoded (and use just ampersand characters).
Note:
This option does not have any effect on the return value ofPortletURL.toString() or ResourceURL.toString(). In both these cases, for JSR 286, the output uses only ampersand characters. To use ampersand entities or to be able to specify the XML encoding to use when generating URLs not using the tag libraries, see the BaseURL.write() methods.javax.portlet.servletDefaultSessionScope
Specifies the scope of the session object provided to servlets or JSPs that are included or forwarded from a Java portlet.
Valid values:
-
APPLICATION_SCOPE—(default) map the portlet session with application scope. -
PORTLET_SCOPE—map the portlet session with portlet scope.
com.oracle.portlet.allowEventPayloadsWithoutJAXBBinding
Allows event payload types declared in portlet.xml and event payloads sent from JSR 286 portlets to bypass the JSR 286 spec requirement that these types have a valid JAXB binding.
Valid values:
-
true—event payloads without valid JAXB bindings are allowed. -
false—event payloads without valid JAXB bindings are not allowed, per the JSR 286 specification.
com.oracle.portlet.allowWsrpExport
Specifies whether the WSRP export-portlets operation should be supported for the web application.
This option is used mainly for backward-compatibility; it is preferred to control the export-portlets operation through the wsrp-producer-config.xml setting.
Valid values:
-
true—(default) export-portlets is allowed. -
false—export-portlets is not allowed. This overrides the setting inWEB-INF/wsrp-producer-config.xml.
com.oracle.portlet.compatibilityMode
Set to owc168 to invoke the WebCenter Portal JSR 286 container JSR 168 compatibility mode.
This also automatically sets the disallowResourceServing runtime option to true if no other value for that option is specified.
com.oracle.portlet.defaultProxiedResourceRequiresWsrpRewrite
Specifies the default WSRP requiresRewrite flag to use when encoding URLs for resources not served by the portlet. This setting is used for all URLs returned by the PortletResponse.encodeURL() method, unless overridden by the presence of the oracle.portlet.server.resourceRequiresRewriting request attribute when the PortletResponse.encodeURL() method is called.
Valid values:
-
true—(default) therequiresRewriteflag is set totrue, indicating that the resource should be rewritten by the consumer. -
false—therequiresRewriteflag is set tofalse, indicating that the resource does not necessarily need to be rewritten by the consumer.
com.oracle.portlet.defaultServedResourceRequiesWsrpRewrite
Specifies the default WSRP requiresRewrite flag to use when generating resource URLs for portlet-served resources.
This setting is used for all resource URLs created by the portlet, unless overridden by the presence of the resourceRequiresRewriting request attribute when the resource URL methods write() or toString() are called. This setting is also used to specify the WSRP requiresRewriting flag on the served resource response, but can be overridden by the presence of the resourceRequiresRewriting request attribute when the portlet's serveResource() method returns.
Valid values:
-
true—therequiresRewriteURL flag andrequiresRewritingresponse flag are set totrue, indicating that the resource should be rewritten by the consumer -
false—therequiresRewriteURL flag andrequiresRewritingresponse flag are set tofalse, indicating that the resource does not necessarily need to be written by the consumer, although the consumer may choose to rewrite the URL.
If unspecified, the requiresRewrite URL flag is not given a value, and the requiresRewriting response flag for a serveResource operation is based on the MIME type of the response.
com.oracle.portlet.disallowResourceServing
Specifies whether portlets are allowed to serve resources. This is useful if JSR 168 portlets are run in the 286 container, as any JSR 168 portlet extending javax.portlet.GenericPortlet automatically inherits the JSR 286 functionality, which automatically forwards resource requests to a file in the web application named after the resource ID, creating a potential security problem. For the same security reason, JSR 286 portlets that do not serve resources are safest to disallow resource serving.
Valid values:
-
true—portlets are not allowed to serve resources. -
false—portlets are allowed to serve resources.
com.oracle.portlet.escapeXmlEncodeUrls
Specifies whether the JSR 286 container should XML-encode URLs generated from the PortletResponse.encodeURL() method.
Valid values:
-
true—URLs generated by thePortletResponse.encodeURL()method are XML-encoded. -
false—(default) URLs generated byPortletResponse.encodeURL()are not XML-encoded.
com.oracle.portlet.eventPayloadsXmlType
Specifies optional XML schema types for JAXB-bindable Java object event payloads if events are sent over WSRP. This is a multi-valued runtime option; each value consists of a Java class name and QName pair, separated by a colon (:). The QName should use the standard Java String representation of a QName ({namespace}localpart). For each value specified, the QName is used as the XML schema type to annotate WSRP event payloads of the specified Java object type after the object has been marshalled to XML. This may be useful when using events to communicate across portlets on multiple producers.
com.oracle.portlet.excludedActionScopeRequestAttributes
This is a multi-valued property with each value being a regular expression. Request attributes which match any of the regular expressions are not stored as action-scoped request attributes if the javax.portlet.actionScopedRequestAttributes container runtime option is used, in addition to any request parameters whose values match the regular expressions defined in the com.oracle.portlet.externalScopeRequestAttributes container runtime option.
com.oracle.portlet.externalScopeRequestAttributes
This is a multi-valued property with each value being a regular expression. Request attributes which match any of the regular expressions are considered outside of portlet scope, and are shared with the underlying portal request.
If the javax.portlet.actionScopedRequestAttributes option is used, any request attributes matching the regular expressions declared in externalScopeRequestAttributes are not stored in the action scope request attributes.
com.oracle.portlet.importCssToIFrame
Specifies to a portal consumer whether the CSS file should be imported to an IFRAME portlet.
Valid values:
-
false—(default) nothing is done. -
true—the CSS file from the consumer is applied to an IFRAME portlet.
com.oracle.portlet.minimumWsrpVersion
Specifies minimum required WSRP version for the portlet to work. If the WSRP version being used is less than the value specified, the portlet will not be included in a WSRP GetServiceDescription, GetPortletDescription, GetMarkup and other WSRP responses.
Valid values:
-
1 -
2
com.oracle.portlet.offerPortletOverWsrp
Specifies whether the portlet is offered in the WSRP producer's service description.
Any offerRemote setting in a .portlet file referencing the JSR 168/286 portlet overrides this container runtime option.
Valid values:
-
true—(default) the portlet is offered in the WSRP producer's service description. -
false—the portlet is not included in the service description.
If not specified at all, the default value specified in the WEB-INF/producer-config.xml is used.
com.oracle.portlet.portalInfoProvider
Specifies the class name of an optional implementation of com.bea.portlet.container.IPortalInfo interface. This implementation defines the value returned by the JSR 286 container's request.getPortalContext().getPortalInfo(). The default implementation returns the producer/local server name and version, but a custom implementation could pass both the consumer server information and the producer server information in a WSRP scenario.
com.oracle.portlet.redirectAfterAction
Causes the JSR 286 container to send a redirect to the browser to the portlet's render URL after a processAction is run (and after events are handled) so that reloading the resulting page will not result in another processAction.
Valid values:
-
true—a redirect is issued after every portlet action. -
false—no redirect is not automatically issued after portlet actions.
com.oracle.portlet.requireIFrame
Specifies whether the portlet must be rendered inside an IFRAME.
Valid values:
-
true—renders the portlet inside an IFRAME. -
false—does not force the portlet to be rendered inside an IFRAME.
com.oracle.portlet.streamingOptimized
Indicates the portlet is optimized to run in streaming mode, which may enhance performance.
Valid values:
-
true—the portlet is optimized to run in streaming mode. -
false—the portlet is not optimized to run in streaming mode.
com.oracle.portlet.suppressWsrpOptimisticRender
Suppresses the optimistic render of a portlet after the action and/or event lifecycles if the portlet is being run over WSRP.
Valid values:
-
true—optimistic render is always suppressed. -
false—optimistic render may be performed.
com.oracle.portlet.trapWsrpRenderExceptions
Specifies whether the JSR 286 container should send exceptions during render as WSRP SOAP faults, or render an exception message for the portlet markup instead.
Valid values:
-
true—(default) exceptions are not sent as SOAP faults but instead as rendered exception stack traces. -
false—exceptions generated by the portlet during render are treated as SOAP faults.
com.oracle.portlet.trimEncodeUrls
Specifies whether the JSR 286 container should trim whitespace from URLs passed to the PortletResponse.encodeURL() method.
Valid values:
-
true—(default) leading and trailing whitespace is trimmed from the URL passed intoPortletResponse.encodeURL(). -
false—whitespace is not trimmed from the URL passed intoPortletResponse.encodeURL().
com.oracle.portlet.useWsrpUserContextForUserAuthentication
Specifies whether the PortletRequest methods getRemoteUser(), getUserPrincipal() and isUserInRole() are based on the WSRP user context information or on standard J2EE security.
Valid values:
-
true—the user information is based on the WSRP user context, if the portlet is run over WSRP. This can be a security problem so use this option with care. -
false—(or the portlet is not being run over WSRP) the user information is based on the J2EE authenticated user.
com.oracle.portlet.wsrpHeaderMode
Used only when portlets are being rendered as WSRP remote portlets, to indicate where cookies and headers should be put in the WSRP SOAP response as a hint to the WSRP consumer for the header or cookie's intended final destination.
When portlets are run locally (not over WSRP), headers and cookies set by portlets are always assumed to go to the client. Setting this container runtime option sets a default value for the PortletRequest attribute com.oracle.portlet.wsrpHeaderMode, which can still be overridden by the portlet at runtime on a per-header basis.
Valid values:
-
client—headers and cookies set by the portlet are directed to go to the client (for example, the browser). -
consumer—headers and cookies set by the portlet are directed to go to the consumer and not passed on to the client. -
both—headers and cookies set by the portlet are directed to go to the client and the consumer.
If not set, the portlet container assumes the default value for the producer as specified in the WEB-INF/wsrp-producer-config.xml file.
com.oracle.portlet.wsrpLegacyPortletHandle
Allows the specification of a legacy WSRP portlet handle to be used for the portlet, which must be unique within the web application. This is useful for backward-compatibility with WebCenter Portal consumers that use the legacy, portlet-position-based WSRP portlet handles.
If specified, the legacy portlet handle is published in the WSRP serviceDescription as a legacy-handle extension on the portlet, and consumers are able to access the portlet using the legacy portlet handle, although the portlet will not be published in the WSRP serviceDescription under the legacy portlet handle.
com.oracle.portlet.wsrpPortletHandle
Allows the specification of the WSRP portlet handle to be used for the portlet, which must be unique within the web application.
oracle.portlet.bridge.adf.raiseUndeclaredContextualEvents
Allows the Oracle JSF Portlet Bridge to raise ADFm events that do not have corresponding portlet events declared in the portlet.xml file.
Valid values:
-
true—any ADFm event raised is forwarded on as a portlet event. -
false—only events with corresponding portlet event declarations are forwarded.
59.3.4.2 Setting Container Runtime Options for All Portlets in an Application
Setting container runtime options at the application level affects all the portlets in the application.
To set application-level container runtime options:
-
Open the Overview Editor for the
portlet.xmlfile.For more information, see Section 59.3.1, "How to Edit the Portlet Deployment Descriptor File."
-
Click the Application tab, if necessary.
-
Expand the Container Runtime Options section, if necessary.
-
Click the Add Container Runtime Option icon to display a list of available options.
The list includes all container runtime options supported by the WebCenter Portal portlet container, which are listed in Table 59-1.
If you are using a different portlet container that supports additional container runtime options that are not listed, select <Customize> and enter the name of the option in the Name field.
If you specify a container runtime option that is not supported by the portlet container, it is ignored.
-
In the Value field, enter a value for the container runtime option.
The container runtime option is added to the
portlet.xmlcode, for example:<container-runtime-option> <name>com.oracle.portlet.requireIFrame</name> <value>true</value> </containter-runtime-option>
-
Save the
portlet.xmlfile.
59.3.4.3 Setting Container Runtime Options for Individual Portlets
You can set container runtime options at the individual portlet level to override the application-wide settings.
To set portlet-level container runtime options:
-
Open the Overview Editor for the
portlet.xmlfile.For more information, see Section 59.3.1, "How to Edit the Portlet Deployment Descriptor File."
-
Click the Portlets tab, if necessary.
-
Click the Advanced tab.
-
Click the Add Container Runtime Option icon to display a list of available options.
The list includes all container runtime options supported by the WebCenter Portal portlet container, which are listed in Table 59-1.
If you are using a different portlet container that supports additional container runtime options that are not listed, select <Customize> and enter the name of the option in the Name field.
If you specify a container runtime option that is not supported by the portlet container, it is ignored.
-
In the Value field, enter a value for the container runtime option.
The container runtime option is added to the
portlet.xmlcode, for example:<container-runtime-option> <name>com.oracle.portlet.requireIFrame</name> <value>false</value> </containter-runtime-option>
-
Save the
portlet.xmlfile.
59.3.5 How to Use Public Render Parameters in JSR 286 Portlets
Public render parameters enable portlets to share parameter values, allowing a form of interportlet communication.
For example, if a Map portlet and a Weather portlet are both configured to use a Zipcode public render parameter, entering a zip code in the Map portlet updates the same parameter value in the Weather portlet.
Any public render parameters supported by a portlet must be declared in the application section of the portlet deployment descriptor file (portlet.xml). Public render parameters defined at the application level in this way are available to all the portlets in the application.
Individual portlets within the application can then specify which of these public render parameters they want to use.
If you declare and define public render parameters as described below, interportlet communication happens automatically, without any further coding required on your part. For more information, see Section 63.5.3, "What You May Need to Know About Interportlet Communication."
This section includes the following topics:
-
Section 59.3.5.1, "Declaring a Public Render Parameter at the Application Level"
-
Section 59.3.5.2, "Defining a Public Render Parameter for a Portlet"
For more information about public render parameters and how to implement them, see the JSR 286 specification at:
http://jcp.org/en/jsr/detail?id=286
59.3.5.1 Declaring a Public Render Parameter at the Application Level
For a public render parameter to be available to a portlet, it must first be declared in the application section of the portlet deployment descriptor file (portlet.xml).
To define a public render parameter at the application level:
-
Open the Overview Editor for the
portlet.xmlfile.For more information, see Section 59.3.1, "How to Edit the Portlet Deployment Descriptor File."
-
Click the Parameters tab.
-
Click the Add icon to create a new public render parameter.
-
From the drop-down list, select whether you are specifying a fully qualified name (QName) for the parameter, or just the local part of the name.
-
Qualified Name—A QName uniquely identifies the public render parameter across applications by specifying a namespace for the parameter as well as a local name. Within the portlet code, a public render parameter is accessed by its identifier, which identifies the parameter uniquely within the application. However, a page typically contains multiple portlets which may come from different applications. Using QNames ensures that public render parameters from one portlet do not unintentionally interfere with the other portlets on a page regardless of where those portlets come from.
-
Unqualified Name—If the namespace for the parameter is the same as the application default namespace, you can omit the namespace when defining the parameter by specifying an unqualified name. If the application default namespace has not been defined, a parameter with an unqualified name uses the XML default namespace.
Tip:
To check whether an application default namespace has been defined, click the Application tab and see if a value has been entered in the Default Namespace field.
-
-
Enter a name for the parameter.
-
If you selected Qualified Name—in the Namespace field, enter the namespace for the parameter and in the Name field, enter the local part of the parameter name.
-
If you selected Unqualified Name—in the Name field, enter the local part of the parameter name. The parameter uses the application default namespace as the namespace for the parameter (or the XML default namespace if no default namespace is defined for the application).
-
-
In the Identifier field, enter a name to identify the public render parameter within the application.
The identifier must be unique within the application and is used to identify the parameters used by a portlet and in the portlet code to access the parameter. Using the identifier means that portlet developers do not need to be aware of the parameter's fully qualified name; they simply need to know the simpler application-specific identifier.
-
In the Description field, enter a description for the public render parameter. The description should provide enough information so that portlet developers can determine how to use this parameter in their portlets.
-
(Optional) In the Aliases panel, you can provide a list of aliases so that the parameter can accept values from other public render parameters even if they have different QNames.
-
Click the Create icon to create a new alias for the parameter.
-
In the Namespace field, enter the namespace of the parameter to use for the alias.
-
In the Name field, enter the local part of the parameter to use for the alias.
Tip:
When creating aliases for public render parameters, it is a good idea to set up reciprocal aliases. So if a parameter in portlet A has an alias to a parameter in portlet B, you should also, if possible, create an alias for the parameter in portlet B to the parameter in portlet A. -
-
The public render parameter is added to the application definition section of the
portlet.xmlfile:<portlet-app ...> <portlet>...</portlet> <portlet>...</portlet> ... <public-render-parameter> <description>Parameter for zip code</description> <identifier>Zip</identifier> <qname xmlns:x="http://example.com/params">x:Zip</qname> <alias xmlns:x="http://example.com/params">x:ZipCode</alias> </public-render-parameter> ... </portlet-app>
-
Save the
portlet.xmlfile.
59.3.5.2 Defining a Public Render Parameter for a Portlet
If you want a portlet to support a public render parameter, add it to the portlet.
To add a public render parameter to a portlet:
-
Open the Overview Editor for the
portlet.xmlfile.For more information, see Section 59.3.1, "How to Edit the Portlet Deployment Descriptor File."
-
If the public render parameter has not yet been defined within the Portlet Producer application, you must do this first.
For more information, see Section 59.3.5.1, "Declaring a Public Render Parameter at the Application Level."
-
Click the Portlets tab and select the portlet in which you want to use the public render parameter.
-
Click the Parameters tab.
In the Publishing Events panel, the Available list shows all the portlet events that have been defined for the application.
-
Click the Parameters tab.
In the Public Render Parameters panel, the Available list shows all the public render parameters that have been defined for the application.
-
Select the public render parameter that you want to use in the portlet and click the Add icon to move it to the Selected list.
This adds the public render parameter to the portlet definition in
portlet.xml:<portlet-app ...> <portlet id="1234567890"> ... <supported-public-render-parameter>Zip</supported-public-render-parameter> ... </portlet> ... <public-render-parameter> <identifier>Zip</identifier> <name>Zip</name> </public-render-parameter> ... </portlet-app> -
Save the
portlet.xmlfile. -
You can now use this public render parameter in the code for your portlet.
59.3.5.3 Example: Public Render Parameters
The following example shows how to use public parameters to link the behavior of two portlets using parameters with different names. In the example, we take a generic Parameter Form portlet that allows us to update public render parameters, and show how that can be linked to a Stock Price portlet that renders stock prices, taking the stock symbol from a public render parameter. The generic name of the parameter from the Parameter Form portlet (parameter1) does not match the name of the parameter in the Stock Price portlet (stocksymbol), so the developer of the Stock Price portlet uses an alias to provide a link between the two parameters.
Example 59-2 shows an excerpt from the portlet.xml file for the portlet producer application that contains the Parameter Form portlet. The portlet producer application defines a public render parameter (parameter1) that is supported by the Parameter Form portlet.
Example 59-2 Parameter Definition for the Parameter Form Portlet
<portlet-app ...>
  <portlet id="1234567890">
    ...
    <supported-public-render-parameter>
      parameter1
    </supported-public-render-parameter>
    ...
  </portlet>
  ...
  <public-render-parameter>
    <description>First parameter set by portlet</description>
    <identifier>parameter1</identifier>
    <qname xmlns:op="http://xmlns.oracle.com/portlet/oracle-portlet-app">
      op:parameter1
    </qname>
  </public-render-parameter>
  ...
</portlet-app>
The code for the Parameter Form portlet sets the value of the parameter1 portlet when a value is entered in the portlet (Example 59-3).
Example 59-3 Parameter Processing for the Parameter Form Portlet
public void processAction(ActionRequest request,
                          ActionResponse actionResponse)
            throws PortletException, IOException
{
  //
  //  Read the new parameter value posted in the portlet form
  //
  String param1 = actionResponse.getParameter("form_param1");

  //
  // Set the new parameter values. These will be intepreted by the
  // container as public render parameters as the names match the names
  // of the declared parameters.
  //
  actionResponse.setRenderParameter("parameter1", param1);
}
Example 59-4 shows an excerpt from the portlet.xml file for the portlet producer application that contains the Stock Price portlet. This portlet producer application also defines a public render parameter (stocksymbol) that is supported by the Stock Price portlet. For the stocksymbol parameter to link to the Parameter Form portlet's parameter, an alias for parameter1 is added.
Example 59-4 Parameter Definition for the Stock Price Portlet
<portlet-app ...>
  <portlet>
    ...
    <supported-public-render-parameter>
      stocksymbol
    </supported-public-render-parameter>
    ...
  </portlet>
  ...
  <public-render-parameter>
    <description>The stock symbol</description>
    <identifier>stocksymbol</identifier>
    <qname xmlns:s="http://www.oracle.com/stocks/">s:stocksymbol</qname>
    <!-- Alias matches the Parameter Form portlet's first parameter name -->
    <alias xmlns:op="http://xmlns.oracle.com/portlet/oracle-portlet-app">
      op:parameter1
    </alias>
  </public-render-parameter>
  ...
</portlet-app>
The code for the Stock Price portlet reads the value of the public render parameter posted by the Parameter Form portlet (Example 59-5).
Example 59-5 Parameter Processing for the Stock Price Portlet
public void doView(RenderRequest request, RenderResponse response)
            throws PortletException, IOException
{
  response.setContentType("text/html; charset=UTF-8");
  PrintWriter out = response.getWriter();

  // Retrieve any values for the public render parameter.
  // The parameter is looked up in the request using its identifier in portlet.xml
  // (not it's name or alias).
  String symbol = request.getParameter("stocksymbol");
  ...
}
When these two portlets are dropped onto the same page, they are automatically linked together. Entering a value in the first parameter field of the Parameter Form portlet causes the Stock Price portlet to be updated with the new value.
59.3.6 How to Use Portlet Events in JSR 286 Portlets
Portlet events are a JSR 286 feature that enables interportlet communication by providing portlets with the ability to respond to actions that occur outside of the portlet itself, for example an action performed on the page that contains the portlet or on another portlet on the same page. Portlet events can be cascaded so that a portlet may respond to an event by triggering an event of its own, which in turn affects other portlets on the page.
Any portlet events supported by a portlet must be declared in the application section of the portlet deployment descriptor (portlet.xml). Portlet events defined at the application level in this way are available to all the portlets in the application.
Individual portlets within the application can then specify which of these portlet events they want to use. Portlets can declare events that they are interested in receiving, called processing events, and events that they trigger, called publishing events.
If you declare and define portlet events as described below, interportlet communication happens automatically, without any further coding required on your part. For more information, see Section 63.5.3, "What You May Need to Know About Interportlet Communication."
This section includes the following topics:
-
Section 59.3.6.1, "Declaring a Portlet Event at the Application Level"
-
Section 59.3.6.2, "Defining a Processing Event for a Portlet"
-
Section 59.3.6.3, "Defining a Publishing Event for a Portlet"
For more information about portlet events and how to implement them, see the JSR 286 specification at:
http://jcp.org/en/jsr/detail?id=286
59.3.6.1 Declaring a Portlet Event at the Application Level
For a portlet event to be available to a portlet, it must first be declared in the application section of the portlet deployment descriptor file (portlet.xml).
To define a portlet event at the application level:
-
Open the Overview Editor for the
portlet.xmlfile.For more information, see Section 59.3.1, "How to Edit the Portlet Deployment Descriptor File."
-
Click the Events tab.
-
Click the Add icon to create a new portlet event.
-
From the drop-down list, select whether you are specifying a fully qualified name (QName) for the portlet event, or just the local part of the name.
-
Qualified Name—A QName uniquely identifies the portlet event across applications by specifying a namespace for the event as well as a local name. A page typically contains multiple portlets which may come from different applications. Using QNames ensures that portlet events from one portlet do not unintentionally interfere with the other portlets on a page regardless of where those portlets come from.
-
Unqualified Name—If the namespace for the portlet event is the same as the application default namespace, you can omit the namespace when defining the event by specifying an unqualified name. If the application default namespace has not been defined, a portlet event with an unqualified name uses the XML default namespace.
Tip:
To check whether an application default namespace has been defined, click the Application tab and see if a value has been entered in the Default Namespace field.
-
-
Enter a name for the portlet event.
-
If you selected Qualified Name—In the Namespace field, enter the namespace for the portlet event and in the Name field, enter the local part of the event name.
-
If you selected Unqualified Name—In the Name field, enter the local part of the portlet event name. The event uses the application default namespace as the namespace for the event (or the XML default namespace if no default namespace is defined for the application).
-
-
In the Payload Type field, enter or browse for the data type of the payload provided by the portlet event.
-
In the Description field, enter a description for the portlet event.
-
(Optional) In the Aliases panel, you can provide a list of aliases so that a portlet event can be recognized by the portlet even if it has a different QName from the one defined by the portlet.
-
Click the Create icon to create a new alias for the portlet event.
-
In the Namespace field, enter the namespace of the portlet event to use for the alias.
-
In the Name field, enter the local part of the portlet event to use for the alias.
-
-
The portlet event is added to the application definition section of the
portlet.xmlfile:<portlet-app ...> <portlet>...</portlet> <portlet>...</portlet> ... <event-definition id="latLong"> <qname xmlns:x="http://xmlns.oracle.com/portlet/EventSample"> x:latLong </qname> <value-type>portlet.LatLong</value-type> </event-definition> ... </portlet-app>
-
Save the
portlet.xmlfile.
59.3.6.2 Defining a Processing Event for a Portlet
If you want a portlet to listen for a particular portlet event, define it as a processing event.
To add a processing event to a portlet:
-
Open the Overview Editor for the
portlet.xmlfile.For more information, see Section 59.3.1, "How to Edit the Portlet Deployment Descriptor File."
-
If the portlet event has not yet been defined within the Portlet Producer application, you must do this first.
For more information, see Section 59.3.6.1, "Declaring a Portlet Event at the Application Level."
-
Click the Portlets tab and select the portlet in which you want to use the portlet event.
-
Click the Events tab.
In the Processing Events panel, the Available list shows all the portlet events that have been defined for the application.
-
Select the portlet event that you want to use in the portlet and click the Add icon to move it to the Selected list.
This adds the portlet event as a processing event to the portlet definition in
portlet.xml:<portlet-app ...> <portlet id="map"> ... <supported-processing-event id="latLong"> <qname xmlns:x="http://xmlns.oracle.com/portlet/EventSample"> x:latLong </qname> </supported-processing-event> ... </portlet> ... <event-definition id="latLong"> <qname xmlns:x="http://xmlns.oracle.com/portlet/EventSample"> x:latLong </qname> <value-type>portlet.LatLong</value-type> </event-definition> ... </portlet-app> -
Save the
portlet.xmlfile.You can now use this portlet event in the code for your portlet.
59.3.6.3 Defining a Publishing Event for a Portlet
If you want a portlet to trigger a particular portlet event, define it as a publishing event.
To add a publishing event to a portlet:
-
Open the Overview Editor for the
portlet.xmlfile.For more information, see Section 59.3.1, "How to Edit the Portlet Deployment Descriptor File."
-
If the portlet event has not yet been defined within the Portlet Producer application, you must do this first.
For more information, see Section 59.3.6.3, "Defining a Publishing Event for a Portlet."
-
Click the Portlets tab and select the portlet in which you want to use the portlet event.
-
Click the Events tab.
In the Publishing Events panel, the Available list shows all the portlet events that have been defined for the application.
-
Select the portlet event that you want to use in the portlet and click the Add icon to move it to the Selected list.
This adds the portlet event as a publishing event to the portlet definition in
portlet.xml:<portlet-app ...> <portlet id="locations"> ... <supported-publishing-event> <qname xmlns:x="http://xmlns.oracle.com/portlet/EventSample"> x:latLong <qname> </supported-publishing-event> ... </portlet> ... <event-definition id="latLong"> <qname xmlns:x="http://xmlns.oracle.com/portlet/EventSample"> x:latLong </qname> <value-type>portlet.LatLong</value-type> </event-definition> ... </portlet-app> -
Save the
portlet.xmlfile.You can now use this portlet event in the code for your portlet.
59.3.6.4 Example: Portlet Events
The following example shows how to use portlet events to use the actions in one portlet to affect another portlet on the same page. In the example, we have a portlet, the Department Locations portlet, that lists the geographical locations of a company's various offices. The example shows how that portlet can be linked to another portlet, the Map portlet, which displays a Google map of the location selected in the Department Locations portlet.
Example 59-6 shows an excerpt from the portlet.xml file for the portlet producer application that contains the two portlets. The portlet producer application defines a portlet event (latLong) that is supported by the two portlets. The payload of the event is an object that encapsulates the latitude and longitude of a location.
Example 59-6 Portlet Event Definition
<event-definition id="latLong">
  <qname xmlns:x="http://xmlns.oracle.com/portlet/EventSample">x:latLong</qname>
  <value-type>portlet.LatLong</value-type>
</event-definition>
Example 59-7 shows that the Department Locations portlet uses the latLong event as a publishing event. That is, it raises the event under particular circumstances.
Example 59-7 Publishing Event Definition for the Location Portlet
<portlet id="locations">
  ...
  <supported-publishing-event>
    <qname xmlns:x="http://xmlns.oracle.com/portlet/EventSample">x:latLong<qname>
    </supported-publishing-event>
    ...
</portlet>
The Department Locations portlet raises the latLong event in its processAction method if a location is selected in the portlet (Example 59-8). It also sets the payload of the event to the latitude and longitude of the selected location.
Example 59-8 Event Processing for the Department Locations Portlet
public void processAction(ActionRequest request, ActionResponse response)
    throws PortletException
  {
    String locationId = request.getParameter("locationId");
    Location location = getLocation(Integer.parseInt(locationId));

    if (location != null)
    {
      // QName matches the event declared as a supported-publishing-event in
      // portlet.xml for this portlet.

      // LatLong event used by the Map portlet.
      response.setEvent(new QName("http://xmlns.oracle.com/portlet/EventSample", "latLong"),
                        new LatLong(location.getLatitude(), location.getLongitude()));

    }
 }
Example 59-9 shows that another portlet, the Map portlet, also uses the latLong event, but this time as a processing event. That is, it listens out for the event and takes a particular action if the event is raised elsewhere on the page.
Example 59-9 Processing Event Definition for the Map Portlet
<portlet id="map">
  ...
  <supported-processing-event id="latLong">
    <qname xmlns:x="http://xmlns.oracle.com/portlet/EventSample">x:latLong</qname>
  </supported-processing-event>
  ...
</portlet>
The processEvent method for the Map portlet receives the latLong event and uses the payload from that event to set the LAT_LONG_PARAMETER render parameter, which the portlet uses during rendering to determine the location to display in the Google map (Example 59-10).
Example 59-10 Event Processing for the Map Portlet
@Override
  public void processEvent(EventRequest request,
                           EventResponse response)
    throws PortletException, IOException
  {
    response.setRenderParameters(request);

    Event event = request.getEvent();
    if (event.getName().equals("latLong"))
    {
      response.setRenderParameter(LAT_LONG_PARAMETER, event.getValue().toString());
    }
  }
Tip:
In this case, the events used by the Department Locations and Map portlets have the same name (latLong). If the Map portlet listens for an event using a different name (for example, geolocation), the two portlets could still be automatically linked by defining an alias for the geolocation event in the portlet.xml file as follows:
<event-definition id="geolocation">  <qname xmlns:x="http://xmlns.oracle.com/portlet/Map">
    x:geolocation
  </qname>  <alias xmlns:x="http://xmlns.oracle.com/portlet/EventSample">
    x:latLong
  </alias>
  <value-type>portlet.LatLong</value-type>
</event-definition>
Note, however, that the payload type of the two events must be the same for automatic linking to work.
Note:
For an event payload to be passed between portlets it must be possible to form an XML payload from event payload. For this to be possible one of the following must be true:-
The payload must have a JAXB binding, for example by adding the
XmlRootElementannotation to the portlet class:package portlet; import java.io.Serializable; import javax.xml.bind.annotation.XmlRootElement; @XmlRootElement(namespace="http://xmlns.oracle.com/portlet/EventSample") public class LatLong implements Serializable { private final double _latitude; private final double _longitude; ... -
The
allowEventPayloadsWithoutJAXBBindingscontainer runtime option must be set totrueinportlet.xml.For more information, see Section 59.3.4, "How to Customize the Runtime Environment for JSR 286 Portlets."
59.3.7 How to Add Portlet Preferences to JSR 286 Portlets
Portlet preferences enable end users to personalize or customize portlets at runtime. Personalizations are visible only to the user that performs them; not to other users. Customizations are visible to all users who have not personalized the portlet.
By default, when you create a JSR 286 portlet using the JDeveloper wizard, a portlet preference is created to enable users to change the title of the portlet at runtime. You can create additional portlet preferences, either during portlet creation or by editing the portlet.xml file after portlet creation, to enable end users to make other modifications to the portlet at runtime.
The procedure below describes how to add a portlet preference to the portlet.xml file after portlet creation. For information about how to add a portlet preference during portlet creation, see Section 59.2.1, "How to Create a JSR 286 Java Portlet."
This section includes the following topics:
59.3.7.1 Adding a Portlet Preference to a JSR 286 Portlet
To enable users to modify portlet behavior or content at runtime, you must create portlet preferences for those attributes of the portlet that you want users to be able to modify.
To add a portlet preference to a portlet:
-
Open the Overview Editor for the
portlet.xmlfile.For more information, see Section 59.3.1, "How to Edit the Portlet Deployment Descriptor File."
-
Click the Portlets tab and select the portlet for which you want to add the portlet preference.
-
Click the Advanced tab.
The Preferences panel lists any existing portlet preferences that exist for the portlet, for example, the
portletTitlepreference. -
Click the Add icon to create a new portlet preference.
-
In the Name field, enter a name for the preference.
The name must be unique within the portlet.
-
In the Value field, enter one or more default values for the preference.
Separate multiple entries with commas.
-
Select Read-only if you do not want users to be able to update the value of the preference.
The portlet preference is added to the application definition section of the
portlet.xmlfile:<portlet-app ...> <portlet>...</portlet> <portlet>...</portlet> ... <portlet-preference> <name>portletTitle</name> </portlet-preference> <portlet-preference> <name>myPreference</name> <value>7</value> </portlet-preference> ... </portlet-app> -
Save the
portlet.xmlfile.You can now use this preference in your portlet code using the
getPreferencemethod.Tip:
If you want the preference to be translatable, you must add the appropriate key-value pairs to the resource bundle class.
59.3.7.2 Example: Simple Portlet Personalization
The following example provides a simple illustration of how you can enable personalization in portlets.
To add simple personalization to a portlet:
-
In JDeveloper, create a Portlet Producer application, accepting the default values.
-
Create a JSR 286 portlet, accepting the default values.
-
In the Application Navigator, expand the Portlets project.
-
Right-click
portlet.xmland choose Open. -
Click the Portlets tab and select portlet1.
-
Click the Advanced tab.
-
Click the Add icon to create a new portlet preference.
-
In the Name field, enter
portletContent. -
In the Application Navigator, right-click
view.jspand choose Open. -
In the visual editor, click the Source tab and add the code indicated in bold in Example 59-11 to display the
portletContentportlet preference:Example 59-11 view.jsp Sample Code
<%@ page contentType="text/html" import="javax.portlet.*,java.util.*,Portlets.Portlet1, Portlets.resource.Portlet1Bundle"%> <%@ taglib uri="http://java.sun.com/portlet" prefix="portlet"%> <portlet:defineObjects/> <% String[] str = {"Portlet Content"}; PortletPreferences prefs = renderRequest.getPreferences(); str = prefs.getValues("portletContent",str); for (int i=0; i<str.length; i++) { %><%=(i<str.length-1)?str[i]+", ":str[i]%><%}%> -
In the Application Navigator, right-click
edit.jspand choose Open.Notice that the JSP consists of a form field, a form input field, and two form button fields.
-
In the visual editor, click the Source tab and add the code indicated in bold in Example 59-12 to implement a form field for users to enter a value for the
portletContentcustomization preference:Example 59-12 edit.jsp Sample Code
<%@ page contentType = "text/html; charset=windows-1252" pageEncoding = "windows-1252" import = "javax.portlet.*, java.util.*, Portletenhance.Portletenhance, Portletenhance.resource.PortletenhanceBundle"%> @ <%@ taglib uri = "http://java.sun.com/portlet" prefix="portlet"%> <portlet:defineObjects/> <% PortletPreferences prefs = renderRequest.getPreferences(); ResourceBundle res = portletConfig.getResourceBundle(renderRequest.getLocale()); %> <form action="<portlet:actionURL/>" method="POST"> <table border="0"> <tr> <td width="20%"> <p class="portlet-form-field" align="right"> <%= res.getString(PortletenhanceBundle.PORTLETCONTENT) %> </p> </td> <td width="80%"> <input class="portlet-form-input-field" type="TEXT" name="<%= Portletenhance.PORTLETCONTENT_KEY %>" value="<%= Portletenhance.buildValue(prefs, Portletenhance.PORTLETCONTENT_KEY) %>" size="20"> </td> </tr> <tr> <td width="20%"> <p class="portlet-form-field" align="right"> <%= res.getString(PortletenhanceBundle.PORTLETTITLE) %> </p> </td> <td width="80%"> <input class="portlet-form-input-field" type="TEXT" name="<%= Portletenhance.PORTLETTITLE_KEY %>" value="<%= prefs.getValue(Portletenhance.PORTLETTITLE_KEY, res.getString("javax.portlet.title")) %>" size="20"> </td> </tr> <% String[] str = {"Portlet Content"}; str = prefs.getValues("portletContent",str); %> <tr><td width="20%"> <p class="portlet-form-field" align="right"> Content </p> </td><td width="80%"> <textarea rows="10" cols="60" class="portlet-form-input-field" name="portletContent"><% for (int i=0; i<str.length; i++) {%><%= (i<str.length-1) ? str[i]+", " : str[i] %><%}%> </textarea> </td></tr> <tr> <td colspan="2" align="center"> <input class="portlet-form-button" type="submit" name="<%=Portletenhance.OK_ACTION%>" value="<%=res.getString(PortletenhanceBundle.OK_LABEL)%>"> <input class="portlet-form-button" type="submit" name="<%=Portletenhance.APPLY_ACTION%>" value="<%=res.getString(PortletenhanceBundle.APPLY_LABEL)%>"> </td> </tr> </table> </form> -
In the Application Navigator, right-click
Portlet1.javaand choose Open. -
In the visual editor, click the Source tab and add the following two lines of code (indicated in bold) to the
processActionmethod:// Save the preferences. PortletPreferences prefs = request.getPreferences(); String param = request.getParameter(PORTLETTITLE_KEY); prefs.setValues(PORTLETTITLE_KEY, buildValueArray(param)); String contentParam = request.getParameter("portletContent"); if (contentParam != null) { prefs.setValues("portletContent", buildValueArray(contentParam)); } prefs.store();
When this portlet is available on a page, users can personalize it. The Edit mode of the portlet provides a Portlet Content field, where users can enter text. The text entered is then displayed as the content of the portlet.
59.3.8 How to Use Portlet Filters in JSR 286 Portlets
Portlet filters are a JSR 286 feature that enables you to alter the content of a portlet at runtime. A portlet filter is a reusable Java component that can transform the content of portlet requests and portlet responses. Filters do not generally create a response or respond to a request as portlets do, rather they modify or adapt the requests and responses.
This section includes the following topics:
For more information about portlet filters and how to implement them, see the JSR 286 specification at:
http://jcp.org/en/jsr/detail?id=286
59.3.8.1 Adding a Portlet Filter to an Application
For a portlet to be able to use a portlet filter, the filter must first be defined within the application.
To add a portlet filter to an application:
-
Open the Overview Editor for the
portlet.xmlfile.For more information, see Section 59.3.1, "How to Edit the Portlet Deployment Descriptor File."
-
Click the Filters tab.
-
Click the Add icon to create a new portlet filter.
-
In the Create Portlet Filter dialog you can either create a new portlet filter, or select a previously created portlet filter:
-
To create a new portlet filter:
-
Select New Portlet Filter.
-
In the Name field, enter a name for the portlet filter.
The name must be unique within the application and use only letters, numbers, and the underscore character.
-
In the Package field, enter or browse for the package to contain the new filter class.
-
Select one or more of the Lifecycle Phase check boxes to specify which of the
javax.portlet.filterinterfaces the filter class implements:Action—The filter class implements the
ActionFilterinterfaceEvent—The filter class implements the
EventFilterinterface.Render—The filter class implements the
RenderFilterinterface.Resource—The filter class implements the
ResourceFilterinterface.Tip:
When you create a new filter class using the Create Portlet Filter dialog, you can specify which of the filter interfaces the filter class implements. After the filter class has been created, you cannot add or remove filter interfaces through the Overview Editor. Instead, you must edit the source of the filter class directly to manually add or remove the interfaces and thedoFiltermethods defined for those interfaces.
-
-
To select an existing portlet filter:
-
Select Choose from Existing Class.
-
Enter or browse for the filter class.
-
-
-
Click OK.
-
In the Display Name field, enter a more user-friendly name for the portlet filter.
-
In the Description field, enter a description for the portlet filter.
-
In the Initialization Parameters panel, you can specify initialization parameters that pass values to the
init()method of the filter class.-
Click the Add icon to specify an initialization parameter for the portlet filter.
-
In the Name field, enter the name of the initialization parameter.
-
In the Value field, enter the value to pass to the initialization parameter.
-
In the Description field, enter a description of the initialization parameter.
The portlet filter is added to the application definition section of the
portlet.xmlfile:<portlet-app ...> <portlet>...</portlet> <portlet>...</portlet> ... <filter> <display-name>Test Filter</display-name> <filter-name>filter_1</filter-name> <filter-class>javaportlets.MyFilter</filter-class> <lifecycle>ACTION_PHASE</lifecycle> <lifecycle>RENDER_PHASE</lifecycle> </filter> ... </portlet-app>
-
-
Save the
portlet.xmlfile.
59.3.8.2 Applying a Portlet Filter to a Portlet
After the portlet filter has been defined in the application, you can then apply it to one or more portlets within the application. You can also specify the order in which portlet filters are applied to portlets.
To apply a portlet filter to a portlet:
-
Open the Overview Editor for the
portlet.xmlfile.For more information, see Section 59.3.1, "How to Edit the Portlet Deployment Descriptor File."
-
Click the Filter Mappings tab.
-
Click the Add icon to add a row to the filter mappings table.
-
From the Filter Name drop-down list, select the portlet filter that you want to apply to the portlet.
The drop-down list is populated with all the portlet filters that are defined in the
portlet.xmlfile. -
From the Portlet Name drop-down list, select the portlet to which you want to apply the portlet filter.
The drop-down list is populated with all the portlets that are defined in the
portlet.xmlfile.Alternatively, you can use wildcards to apply the portlet filter to more than one portlet. For example, you can enter
*to apply the portlet filter to all the portlets in the application.The filter mapping is added to the application definition section of the
portlet.xmlfile:<portlet-app ...> <portlet>...</portlet> <portlet>...</portlet> ... <filter> <display-name>My Filter</display-name> <filter-name>myFilter</filter-name> <filter-class>javaportlets.MyFilter</filter-class> <lifecycle>ACTION_PHASE</lifecycle> <lifecycle>RENDER_PHASE</lifecycle> </filter> <filter-mapping> <filter-name>myFilter</filter-name> <portlet-name>myPortlet</portlet-name> </filter-mapping> ... </portlet-app> -
Use the Top, Up, Down, and Bottom icons to order the portlet filters in the
portlet.xmlfile. The order of the portlet filters determines the order in which the filters are applied to the portlets.Note:
Portlet filters can be mapped to multiple portlets. If you have multiple portlets mapped to (sharing) a filter, arbitrarily changing the filter order can produce undesired side effects. That is, if you change the order in which filters are applied in one portlet, the reordering will apply to all other portlets that share the filter. -
Save the
portlet.xmlfile.
59.3.9 How to Enhance JSR 286 Portlet Performance with Caching
When you have completed the basic functionality of your portlet, you may want to turn your attention to portlet performance.
Caching is a common technique for enhancing the performance of web sites that include a great deal of dynamic content. JSR 286 portlets support expiry-based and validation-based caching.
For more information about caching, see Section 57.4.5, "Portlet Performance."
This section includes the following topics:
-
Section 59.3.9.1, "Implementing Expiry-Based Caching in JSR 286 Portlets"
-
Section 59.3.9.2, "Implementing Validation-Based Caching in JSR 286 Portlets"
59.3.9.1 Implementing Expiry-Based Caching in JSR 286 Portlets
You can choose to implement expiry-based caching when you first create a portlet using the Create JSR 286 Portlet Wizard. However, during the initial development of a portlet, you may prefer to turn portlet caching off and implement it later in the development cycle when the portlet content becomes more stable. You may also want to edit the expiration period, or change the cache scope.
To implement expiry-based caching:
-
Open the Overview Editor for the
portlet.xmlfile.For more information, see Section 59.3.1, "How to Edit the Portlet Deployment Descriptor File."
-
Click the Portlets tab and select the portlet for which you want to implement expiry-based caching.
-
Click the Advanced tab.
-
In the Cache Management panel, select Cache Portlet.
Note:
To disable portlet caching, deselect Cache Portlet. This sets the cache expiration period to0, meaning that the cached content is always expired. -
Select the Cache Scope:
-
Select Public to share the cached content across users
-
Select Private if the cached content should not be shared across users.
-
-
Specify the cache expiration period:
-
Select Cache Content Never Expires to set the cache expiration period to -1. This means that the cached content never expires and the content is always retrieved from the cache. Use this option if you are confident that the portlet contains static content that is unlikely to change. Setting this option results in the following code being added to the
portlet.xmlfile:<portlet> ... <expiration-cache>-1</expiration-cache> ... </portlet>
-
Select Cache Content Expires After to expire the cached portlet content after a specified number of seconds. Enter the expiration period (
n), in seconds, in the adjacent field. Setting this option results in the following code being added to theportlet.xmlfile:<portlet> ... <expiration-cache>n</expiration-cache> ... </portlet>
-
-
Save the
portlet.xmlfile.
59.3.9.2 Implementing Validation-Based Caching in JSR 286 Portlets
Implementation of validation-based caching takes place after the initial portlet creation and requires hand coding.
Example 59-13 shows how a GenericPortlet would typically implement its doView() method such that the consumer caches the markup using validation-based caching. The example also shows how expiry-based caching can be defined programmatically (using the CacheControl.setExpirationTime() method) and used in conjunction with validation-based caching to further reduce the load on the producer. This would work equally well for serveResource().
Example 59-13 A JSR 286 Portlet Implementing Validation-Based Caching
protected void doView (RenderRequest request, RenderResponse response)
  throws PortletException, IOException
{
  CacheControl cacheControl = response.getCacheControl();
  String eTag = request.getETag();
  if (isMarkupStillValid(eTag))
  {
    // Wait 30 seconds before checking ETag again
    cacheControl.setExpirationTime(30);

    // Tell consumer to use its cached content
    cacheControl.setUseCachedContent(true);
    return;
  }

  // ETag not valid so set a new one ...

  // Define a new ETag
  cacheControl.setETag(generateETag(...));

  // Wait 60 seconds before checking ETag again
  cacheControl.setExpirationTime(60);

  // ... and generate fresh portlet markup
  createMarkup(request, response);
}

private boolean isMarkupStillValid(String eTag)
{
  if (eTag == null)
  {
    return false; // No ETag was supplied
  }

  // Perform portlet specific checks for the consumer's cached
  // copy of the markup still being valid based on the given ETag
  ...
}

private String generateETag(...)
{
  // Portlet specific code to generate an ETag, for example, a hash
  // of the data on which the portlet's markup is based
  ...

  return eTag;
}
For more information about validation-based caching in JSR 286 portlets, see the JSR 286 specification at:
59.3.10 How to Implement Rewritten URLs for Resource Proxy
Resource proxying is the standard way to retrieve resources with WSRP. To avoid problems with URLs within your portlet, you can set a flag to rewrite all of the URLs within a specified resource. For example, if you have an HTML fragment that contains URLs, then you could set this flag to rewrite its URLs taking into account the WSRP resource proxying.
To indicate that URLs should be rewritten, set the PortletRequest attribute, oracle.portlet.server.resourceRequiresRewriting, to true. For example, you might include code similar to the excerpt in Example 59-14 to use resource proxying for a URL that you are encoding. Encapsulate this code within a method to avoid repeating it for every URL individually.
Example 59-14 Resource Proxy for WSRP
request.setAttribute("oracle.portlet.server.resourceRequiresRewriting",
     Boolean.TRUE);
String url = response.encodeURL(pathToResourceForRewriting);
request.removeAttribute("oracle.portlet.server.resourceRequiresRewriting");
If you do not specifically set oracle.portlet.server.resourceRequiresRewriting, then it defaults to false, meaning that URLs are not rewritten. You must explicitly activate the feature by setting this attribute to true.
You can use the defaultProxiedResourceRequiresWsrpRewrite container runtime option to specify the default WSRP requiresRewrite flag to use. The option specified by this container runtime option (which is set to true by default) is used unless overridden by the request attribute. For more information, see "com.oracle.portlet.defaultProxiedResourceRequiresWsrpRewrite."
59.3.11 How to Implement Stateless Resource Proxying
If you have out of protocol resources that do not require rewriting, you may want to use stateless resource proxying. Stateless resource proxying means that the URLs returned to the browser do not require portlet IDs or any other contextual information. This increases the cache hit ratio for such resources. You might find stateless resource proxying useful for functionality such as static JavaScript files, static images, and so on.
To indicate that stateless proxying is required, set the PortletRequest attribute oracle.portlet.server.useStatelessProxying to true. For example, you might include code similar to the excerpt in Example 59-15 to use stateless proxying for a URL that you are encoding. Encapsulate this code within a method to avoid repeating it for every URL individually.
Example 59-15 Stateless Resource Proxying
request.setAttribute("oracle.portlet.server.useStatelessProxying", Boolean.TRUE);
String url = response.encodeURL(pathToResource);
request.removeAttribute("oracle.portlet.server.useStatelessProxying");
If you do not specifically set oracle.portlet.server.useStatelessProxying, it defaults to false. You must explicitly activate the feature by setting this attribute to true.
59.3.12 How to Implement Security for JSR 286 Portlets
You can secure JSR 286 portlets that are deployed to a WSRP producer by configuring security at the WSRP producer end and the client end. For information about securing a JSR 286 portlet through its WSRP producer, see Section 74.17, "Securing Identity Propagation Through WSRP Producers with WS-Security."
59.3.13 How to Manage the Persistence Store for JSR 286 Portlets
The portlet persistence store is used for persisting consumer registration handles and portlet preference data. Portlet producers can use one of three types of persistence store:
-
Consumer—Ties the producer metadata to the consumer application. This is the recommended method.
-
Database—Persists data using a relational database. This is mainly provided for backward compatibility but may be useful if there is likely to be a large number of customizations.
-
File—Persists data using the file system. This is provided for backward compatibility. You should not use a file based persistence store in your production environment as it does not support multi-tier or high availability environments. You may, however, want to use a file based persistence store while testing your application using Integrated WLS.
For more information, see Section 57.4.4, "Portlet Personalization and Customization."
This section includes the following topics:
-
Section 59.3.13.1, "Setting Up a Persistence Store for a WSRP Producer"
-
Section 59.3.13.2, "Migrating a WSRP Producer Persistence Store"
-
Section 59.3.13.3, "Enabling Java Object Cache for Database Persistence Store Access"
59.3.13.1 Setting Up a Persistence Store for a WSRP Producer
WSRP portlet producers use a JNDI variable (persistentStore) to determine which type of persistence store to use. When you create a portlet for the first time in an application, by default this variable is set to Consumer. You can change the value of this variable in the web.xml file of the portlet producer application.
Note:
If you create a portlet in an application that already contains other portlets, the existing persistence store setting is maintained.If you use a File persistence store, you must also use the fileStoreRoot JNDI variable to specify the path to the root directory to be used by the persistence store.
Table 59-2 lists and describes the JNDI variables used to specify the persistence store for WSRP producers.
Table 59-2 WSRP Producer Database Preference Store-Related JNDI Variable
| Variable Name | Variable Value | Description |
|---|---|---|
|
|
|
Determines which data store (File, Database, or Consumer) is used for persisting a portlet producer application's consumer registration handles and portlet preferences. |
|
|
|
Defines the path to the root directory to be used by the file preference store. Absolute paths are interpreted relative to the file system root. Relative paths are interpreted relative to the Note that all producers running within the same WebLogic Server must use the same path for this variable. Otherwise, you get a |
To set up the persistence store for a WSRP portlet producer:
-
In JDeveloper, open the portlet producer application for which you want to set up the persistence store.
-
Expand the portlet project (for example, Portlets).
-
Expand the Web Content node and then the WEB-INF node.
-
Right-click web.xml and choose Open.
-
Click the Source tab.
-
To specify a Database persistence store, add the following code:
<env-entry>
  <env-entry-name>oracle/portal/wsrp/server/persistentStore</env-entry-name>
  <env-entry-type>java.lang.String</env-entry-type>
  <env-entry-value>Database</env-entry-value>
</env-entry>
To specify a File-based persistence store, add the following code:
<env-entry>
  <env-entry-name>oracle/portal/wsrp/server/persistentStore</env-entry-name>
  <env-entry-type>java.lang.String</env-entry-type>
  <env-entry-value>File</env-entry-value>
</env-entry>
<env-entry>
  <env-entry-name>oracle/portal/wsrp/server/fileStoreRoot</env-entry-name>
  <env-entry-type>java.lang.String</env-entry-type>
  <env-entry-value>myPrefStore</env-entry-value>
</env-entry>
To specify a Consumer persistence store, add the following code:
<env-entry> <env-entry-name>oracle/portal/wsrp/server/persistentStore</env-entry-name> <env-entry-type>java.lang.String</env-entry-type> <env-entry-value>Consumer</env-entry-value> </env-entry> -
Save the
web.xmlfile. -
Restart your WebLogic Server.
59.3.13.2 Migrating a WSRP Producer Persistence Store
If you want to change the type of persistence store used by your portlet producer, for example when moving from a testing to production environment, you can migrate the existing data from the old to the new persistence store.
This section includes the following topics:
-
Section 59.3.13.2.1, "Migrating a Database or File-Based Persistence Store"
-
Section 59.3.13.2.2, "Migrating to or from a Consumer Persistence Store"
59.3.13.2.1 Migrating a Database or File-Based Persistence Store
The WSRP portlet producer persistence store migration utility, PersistenceMigrationTool, enables you to migrate existing data between Database and File-based persistence stores (for example, from a File-based persistence store used for testing to a production Database persistence store). This utility also enables upgrading users to ensure that their existing locale-specific portlet preference data uses a naming format compatible with the latest JPS release. You can also use this utility to migrate between source and destination stores of the same type, enabling data to be moved from one database store to another.
Note:
There are several libraries that must be referenced in the classpath when running thePersistenceMigrationTool utility:
-
wcs-producer-spi.jar -
portlet-utils.jar -
portlet-producer-container-common.jar -
portlet-producer-container-persistence.jar -
oracle-portlet-api.jar -
wsrp-container.jar -
oracle-portlet-tags.jar -
ojdbc6.jar
The ojdbc6.jar library referenced in the classpath must be the same as the one used by your database.
To migrate a database or file-based persistence store:
-
Ensure that the appropriate libraries are referenced in the classpath:
./java  -classpath
ORACLE_COMMON_HOME/webcenter/modules/com.bea.wsrp_10.3.2.0/system/wcs-producer-spi.jar:
ORACLE_COMMON_HOME/webcenter/modules/oracle.portlet.server_11.1.1/portlet-utils.jar:
ORACLE_COMMON_HOME/webcenter/modules/oracle.webcenter.framework_11.1.1/portlet-producer-container-common.jar:
ORACLE_COMMON_HOME/webcenter/modules/oracle.webcenter.framework_11.1.1/portlet-producer-container-persistence.jar:
WC_ORACLE_HOME/webcenter/modules/oracle.portlet.server_11.1.1/oracle-portlet-api.jar:
WC_ORACLE_HOME/webcenter/modules/oracle.portlet.server_11.1.1/wsrp-container.jar:
WC_ORACLE_HOME/webcenter/modules/oracle.portlet.server_11.1.1/oracle-portlet-tags.jar:
DB_ORACLE_HOME/jdbc/lib/ojdbc6.jar
-
Run the
PersistenceMigrationToolusing the following syntax:java oracle.portlet.server.containerimpl.PersistenceMigrationTool -sourceType [file | db] -destType [file | db] {-sourcePath [dir | -sourceUsername username -sourcePassword password -sourceDatabase db -sourceDriver srcDriver]} {-destPath [dir | destUsername username -destPassword password -destDatabase db -destDriver dstDriver]} [-debug]where:
-
sourceTypeindicates whether the source store is in a file (file) or database (db). You can have source and destination stores of the same type. Hence, you can migrate from one database to another or one file system to another. -
destTypeindicates whether the destination store is in a file (file) or database (db). You can have source and destination stores of the same type. Hence, you can migrate from one database to another or one file system to another. -
sourcePathis the location of a file-based persistence store. This argument is required whensourceTypeisfile. -
sourceUsernameis the database user name for a persistence store database. This argument is required whensourceTypeisdb. -
sourcePasswordis the database password for a persistence store database. This argument is required whensourceTypeisdb. -
sourceDatabaseis the name of a persistence store database. This argument is required whensourceTypeisdb. -
sourceDriveris the name of a database driver to use. For example, for a SQL Server database, the database driver iscom.microsoft.sqlserver.jdbc.SQLServerDriver. If you do not specify a value for this argument, the migration tool attempts to determine the correct driver to use from thesourceDatabaseargument. -
destPathis the location of a file-based persistence store. This argument is required whendestTypeisfile. -
destUsernameis the database user name for a persistence store database. This argument is required whendestTypeisdb. -
destPasswordis the database password for a persistence store database. This argument is required whendestTypeisdb. -
destDatabaseis the name of a persistence store database. This argument is required whendestTypeisdb. -
destDriveris the name of a database driver to use. For example, for a SQL Server database, the database driver iscom.microsoft.sqlserver.jdbc.SQLServerDriver. If you do not specify a value for this argument, the migration tool attempts to determine the correct driver to use from thedestDatabaseargument. -
debugturns on full logging through standard output to enable users to diagnose issues that arise when the tool runs.
-
Example 59-16 demonstrates running the PersistenceMigrationTool utility. In this example, preferences from a File store are copied to a Database store.
Example 59-16 Running the PersistenceMigrationTool Utility
./java  -classpath
ORACLE_COMMON_HOME/webcenter/modules/com.bea.wsrp_10.3.2.0/system/wcs-producer-spi.jar:
ORACLE_COMMON_HOME/webcenter/modules/oracle.portlet.server_11.1.1/portlet-utils.jar:
ORACLE_COMMON_HOME/webcenter/modules/oracle.webcenter.framework_11.1.1/portlet-producer-container-common.jar:
ORACLE_COMMON_HOME/webcenter/modules/oracle.webcenter.framework_11.1.1/portlet-producer-container-persistence.jar:
WC_ORACLE_HOME/webcenter/modules/oracle.portlet.server_11.1.1/oracle-portlet-api.jar:
WC_ORACLE_HOME/webcenter/modules/oracle.portlet.server_11.1.1/wsrp-container.jar:
WC_ORACLE_HOME/webcenter/modules/oracle.portlet.server_11.1.1/oracle-portlet-tags.jar:
DB_ORACLE_HOME/jdbc/lib/ojdbc6.jar
oracle.portlet.server.containerimpl.PersistenceMigrationTool
-sourceType file \
-sourcePath /data/prefs
-destType db \
-destUsername scott \
-destPassword tiger \
-destDatabase abc.mycompany.com:1521:yourdatabase \
where:
-
ORACLE_COMMON_HOMEis your Oracle Common home -
WC_ORACLE_HOMEis your WebCenter Portal Oracle home -
DB_ORACLE_HOMEis your database Oracle home if it is on the same machine as the WebCenter Portal Oracle home. If the database Oracle home is on a separate machine, then you must copy theDB_ORACLE_HOME/jdbc/libdirectory into a temporary directory on the WebCenter Portal Oracle home and reference theojdbc6.jarlibrary from this temporary directory in the classpath.
59.3.13.2.2 Migrating to or from a Consumer Persistence Store
You cannot use the persistence store migration utility to migrate to or from a consumer persistence store. To migrate to or from a consumer persistence store, you must export the data from one producer from the consumer and import into another.
To migrate a consumer persistence store:
-
Export the producer metadata from your consumer application to an EAR file.
This contacts the remote producer to get customization data, and so on. You can use the following tools to do this:
-
JDeveloper—see Section 59.3.14.1, "Exporting Portlet Producers at Design Time."
-
WLST—see the "Exporting and Importing Portal Framework Applications for Data Migration" section in Oracle Fusion Middleware Administering Oracle WebCenter Portal.
-
-
Either remap the producer connection to another producer, which can be using any persistence store type, or change the preference store configuration of the current producer, and restart it.
For information about how to remap the producer connection, see Section 63.3.1, "How to Edit Portlet Producer Registration Settings."
-
Import from the exported EAR file back to your consumer application. This pushes the relevant metadata back to the producers, which then store it in their configured persistence store.
59.3.13.2.3 Moving a WSRP Portlet Producer
If you move a portlet producer to a different server, you may also have to move the persistence store for the producer.
After installing the new producer, move the persistence store according to the following:
-
Consumer persistence store—Because the data is stored with the consumer, there is no requirement to move the persistence store.
-
Database persistence store—Perform one of the following:
-
Configure the new producer to point the WebLogic Server data source to the same database as the original producer.
-
Migrate the persistence store using the Persistence Store Migration Utility (see Section 59.3.13.2, "Migrating a WSRP Producer Persistence Store" for more information).
-
-
File persistence store—Perform one of the following:
-
Configure the new producer to point the same file system location as the original producer.
-
Migrate the persistence store using the Persistence Store Migration Utility (see Section 59.3.13.2, "Migrating a WSRP Producer Persistence Store" for more information).
-
Finally, update the URL of the producer registration by using Enterprise Manager Fusion Middleware Control or the WLST commands: setWSRPProducerRegistration or setPDKJavaProducerRegistration.
59.3.13.3 Enabling Java Object Cache for Database Persistence Store Access
To improve persistence store performance, you can use Java Object Cache for persistence store access. This avoids the need to access the persistence store on each request. Enable Java Object Cache for the persistence store using the enableJavaObjectCache JNDI variable.
To enable Java Object Cache for persistence store access:
-
In JDeveloper, open the portlet producer application for which you want to set up the persistence store.
-
Expand the portlet project (for example, Portlets).
-
Expand the Web Content node and then the WEB-INF node.
-
Right-click web.xml and choose Open.
-
Click the Source tab.
-
Add the following code:
<env-entry> <env-entry-name> oracle/portal/wsrp/server/enableJavaObjectCache </env-entry-name> <env-entry-type>java.lang.Boolean</env-entry-type> <env-entry-value>true</env-entry-value> </env-entry> -
Save the
web.xmlfile.
59.3.14 How to Export and Import Portlet Producers at Design Time
You can export and import portlet producers at design time.
This section includes the following topics:
-
Section 59.3.14.1, "Exporting Portlet Producers at Design Time"
-
Section 59.3.14.2, "Importing Portlet Producers at Design Time"
59.3.14.1 Exporting Portlet Producers at Design Time
When you package an application for deployment, any portlet producers referenced by the application are contacted so that the producer data can be included in the MAR file. If any of the producers are not running, they cannot be contacted and the data cannot be included.
By creating an export archive of the producer data at design time instead, you can ensure that the producers are running, therefore all the producer data, including remote customizations and client-side metadata, can be retrieved. WebCenter Portal Framework can then use the export archive at deployment, instead of having to contact the remote producers.
To export portlet producers at design time:
-
Edit the
WC_ORACLE_HOME/jdeveloper/jdev/bin/jdev.conffile and set the following JVM flag:AddVMOption -Doracle.webcenter.portlet.dt.disableRemoteExport=true
Setting this flag ensures that, when the application is packaged for deployment, the export archive you create in the following steps is included in the MAR file, rather than the remote producers being contacted to retrieve producer data.
-
Restart JDeveloper to apply the new setting.
-
Open the application that consumes the producers to export.
-
From the menu, choose Application and then Export Portlet Producers.
This menu option appears only if the current application contains producers.
-
In the Export Portlet Producers dialog, in the Export Archive File Name (.ear) field, enter the absolute path and file name to use for the export set.
-
Click OK.
When the application is packaged for deployment, because you set the
disableRemoteExportflag totrue, WebCenter Portal Framework checks for the presence of the export archive at the location specified in the dialog. If the export archive exists, the contents of the archive are included in the MAR file instead of contacting the remote producers to retrieve producer data.Note:
If thedisableRemoteExportflag is set and there is no export archive, a default export archive, without the remote producer data, is created and included in the MAR file.
59.3.14.2 Importing Portlet Producers at Design Time
You can import producer data, including customizations made at runtime, from a deployed application into your application at design time.
Note:
The producers in the export archive (EAR file) must be the same as those in the application into which they are being imported.For information about how to create an export archive of producer metadata from a deployed application, see the "Exporting Portlet Client Metadata (Framework Applications)" section in Oracle Fusion Middleware Administering Oracle WebCenter Portal.
To import portlet producers at design time:
-
Edit the
WC_ORACLE_HOME/jdeveloper/jdev/bin/jdev.conffile and set the following JVM flag:AddVMOption -Doracle.webcenter.portlet.dt.enableImport=true
-
Restart JDeveloper to apply the new setting. This ensures that the Import Portlet Producers menu option is available.
-
Open the application into which you want to import the producers.
-
From the menu, choose Application and then Import Portlet Producers.
-
In the Import Portlet Producers dialog, in the Import Archive File Name (.ear) field, enter the absolute path and file name of the export archive to import.
-
Click OK.
Note:
If the application into which you import producers is currently running in Integrated WLS, you must re-run the application to see the updated producers. Simply refreshing the page may result in errors caused by the different MDS instances used at design time and runtime.59.4 Testing JSR 286 Portlets
Before making your portlets available in a production environment, it is highly advisable to test them first to make sure that they behave as expected.
This section includes the following topics:
-
Section 59.4.1, "How to Run a WSRP Portlet Producer on Integrated WebLogic Server"
-
Section 59.4.2, "What Happens When You Run a WSRP Portlet Producer on Integrated WebLogic Server"
-
Section 59.4.3, "How to Deploy a WSRP Portlet Producer to the Integrated WebLogic Server"
59.4.1 How to Run a WSRP Portlet Producer on Integrated WebLogic Server
The Integrated WebLogic Server (Integrated WLS) provides a quick and easy way of testing your portlets because it is preconfigured so that you can run applications within JDeveloper without needing to create deployment profiles.
To test a JSR 286 portlet on Integrated WLS:
-
In JDeveloper, open the portlet producer application that owns the portlet that you want to test.
-
Expand the portlet project (for example, Portlets).
-
Expand the Web Content node and then the WEB-INF node.
-
Right-click portlet.xml and choose Run.
Running
portlet.xmltriggers the packaging and deployment of your portlet producer application on an Integrated WLS instance named after the application. -
Check the IntegratedWebLogicServer - Log window to monitor the deployment progress. The log shows the URL of the application page. The WSRP producer URL uses the following syntax:
http://host:port/applicationname-Portlets-context-root/info
where:
-
hostis the server to which your producer has been deployed. -
portis the HTTP Listener port. Typically, it is7101. When the server is started, the port is displayed in the console. -
context-rootis the Web application's context root.
A test page similar to Figure 59-6 displays in a browser window.
-
-
While the application is running, you can switch back and forth between JDeveloper and your browser to make changes at design time in your application, save the changes, and then refresh the test page in your browser.
-
When the producer is successfully running, you should register it with an application and add one or more portlets to a page to check that it is working correctly. Registering a producer gives applications the information they require to locate and communicate with that producer. After you register a producer, it is exposed as a connection, and the producer and its portlets become available in the Application Resources panel under the Connections node, or in the Resource Palette.
To register producers of JSR 286 portlets, follow the instructions provided in Section 63.2.1.1, "How to Register a WSRP Portlet Producer."
To add your portlets to a page, follow the instructions provided in Section 63.5, "Adding Portlets to a Page."
-
To stop an Integrated WLS instance, in the Run Manager tab, select DefaultServer and click the red Stop icon. When the instance stops, the application is undeployed, and therefore, becomes unavailable.
Tip:
You can also stop an Integrated WLS instance by clicking the red Stop icon in the IntegratedWebLogicServer - Log window and selecting DefaultServer.
59.4.2 What Happens When You Run a WSRP Portlet Producer on Integrated WebLogic Server
When you run a WSRP portlet producer on Integrated WLS, the following happens:
-
WSDLs and other configuration files are added to the WEB-INF directory to configure the portlets as a web service.
-
The
web.xmlfile is updated with listener and server classes, filters, parameters, and other configurations that are required to run the JSR 286 portlet producer application successfully.For example, the
oracle.portlet.server.adapter.web.ServerContextListenerclass,WSRP_v2_PortletManagement_ServiceandWSRPBaseServicefilters, and so on. -
Libraries required for JSR 286 portlets are added to the
weblogic.xmlfile, for example,oracle.portlet-producer.wsrp.
These configurations vary depending upon the portlet requirements.
59.4.3 How to Deploy a WSRP Portlet Producer to the Integrated WebLogic Server
When you run a WSRP portlet producer application on the Integrated WLS instance, when the instance stops, the application is undeployed and therefore becomes unavailable. For a more persistent testing scenario, you can deploy your portlet producer application to the Integrated WLS so that it is always available while the Default Server is running.
If you choose this method, then you must first create deployment profiles, as described in Section 61.4, "Creating a WAR Deployment Profile." If you deploy your application to the Integrated WLS, then the Deployment Configuration dialog displays to enable you to configure and customize deployment settings. The file system MDS repository precreated by JDeveloper displays in the Repository Name field.
For information about deploying and running an application on the Integrated WLS, see Section 7.2, "Deploying a Portal Framework Application to the Integrated WebLogic Server."
59.4.4 Testing Portlet Personalization
If you have implemented personalization for your portlet, then the Personalize icon appears on the portlet only for authenticated users. Hence, to test the personalization of a portlet, you must have some form of security implemented for the application consuming the portlet. For testing purposes, you may prefer to just configure the most basic authentication possible. For more information, see Section 74.12, "Configuring Basic Authentication for Testing Portlet Personalization."
59.4.5 Hiding or Removing the WSRP Test Page
For security purposes, you may want to hide the WSRP test page so that it is visible only to administrators, or you may want to remove it entirely.
This section includes the following subsections:
Note:
There is also a Webservice test page, which enables you to build up SOAP requests to the producer in a web browser. For WSRP portlet producers this test page is disabled by default. Although this test page does not provide any useful information for testing your portlet producers, you can enable it, if desired, by extracting theoracle-webservices.xml file from the deployed producer's WAR file, setting the expose-testpage flag to true for both WSRP v1 and WSRP v2 producers, and then repacking the WAR and EAR files and redeploying the producer.59.4.5.1 Hiding the WSRP Test Page
If you do not want all users to be able to see the WSRP test page, you can protect it so that only administrators can see it.
To hide the WSRP test page:
-
In JDeveloper, open the portlet producer application for which you want to hide the test page.
-
Expand the portlet project (for example, Portlets).
-
Expand the Web Content node and then the WEB-INF node.
-
Right-click web.xml and choose Open.
-
Click the Source tab.
-
Add the following code:
<security-role> <description>AdministratorRole</description> <role-name>Admin</role-name> </security-role> <security-constraint> <display-name>TestPageInfo</display-name> <web-resource-collection> <web-resource-name>TestPageInfo</web-resource-name> <description>Protect the test page servlet.</description> <url-pattern>/info/*</url-pattern> </web-resource-collection> <auth-constraint> <description>Administrators</description> <role-name>Admin</role-name> </auth-constraint> <user-data-constraint> <transport-guarantee>NONE</transport-guarantee> </user-data-constraint> </security-constraint> -
Save the
web.xmlfile.
59.4.5.2 Removing the WSRP Test Page
You can remove the WSRP test page completely.
To remove the WSRP test page, you must edit an element that is injected into the web.xml file at packaging time, so you must edit the web.xml file in the resulting EAR file.
To remove the WSRP test page:
-
Extract the
web.xmlfile from the EAR file created at packaging time and open it in an editor of your choice. -
Comment out the following code:
<servlet-mapping>
   <servlet-name>WSRPTestPage</servlet-name>
   <url-pattern>/info</url-pattern>
</servlet-mapping>
-
Save the
web.xmlfile and add the edited file to the EAR file.
59.5 Deploying JSR 286 Portlets to a WebLogic Managed Server
For information about how to deploy JSR 286 portlets to a WebLogic Managed Server, see Chapter 61, "Deploying Portlet Producers."
When you deploy a portlet producer containing JSR 286 portlets to a WebLogic Managed Server, the configuration settings described in Section 59.4.2, "What Happens When You Run a WSRP Portlet Producer on Integrated WebLogic Server" are added to the EAR file.
59.6 Migrating WebLogic Portal Portlets to WebCenter Portal
This section discusses migrating WebLogic Portal portlets developed with the WebLogic Portal's Eclipse IDE to WebCenter Portal's JDeveloper environment.
This section includes the following topics:
-
Section 59.6.1, "Migrating Java Portlets from WebLogic Portal to WebCenter Portal"
-
Section 59.6.2, "Problems With Migrating WLP Portlets to a WebCenter Portal Application"
Note:
There is no direct support or tooling available for migrating WLP portlets to a WebCenter Portal project. In many cases, significant refactoring and recoding is required. This section highlights some of the migration issues and offers recommendations as appropriate.59.6.1 Migrating Java Portlets from WebLogic Portal to WebCenter Portal
In general, JSR 286 standard portlets (Java portlets) that were developed in WebLogic Portal can be moved directly to a WebCenter Portal/JDeveloper environment. Simply copy all of the portlet artifacts (portlet.xml, .java files, .jsp files, and so on) into a JDeveloper Portlet Producer application project.
Note:
Any WebLogic Portal specific APIs used by the portlet must be rewritten to use WebCenter Portal APIs. WebLogic Portal specific APIs will not work in a WebCenter environment.Tip:
You can use the WebLogic Portal Export feature to export your Java portlets to an archive file and then import the archive file into your JDeveloper project. This technique may be simpler than manually copying all the portlet artifacts from one environment to another. See the "Exporting Java Portlets for Use on Other Systems" section in the Oracle Fusion Middleware Portlet Development Guide for Oracle WebLogic Portal.59.6.2 Problems With Migrating WLP Portlets to a WebCenter Portal Application
Moving portlets from a WLP development environment to a WebCenter Portal development environment is not directly supported. In general, this process can involve substantial rewriting or refactoring of the migrated portlet code and related files.
Note:
If a portlet (regardless of type) was capable of running over WSRP in WebLogic Portal, the portlet can be consumed directly from the WebLogic Portal's portlet producer in a WebCenter Portal consumer. See the "WSRP Interoperability with Oracle WebCenter Portal and Oracle Portal" section in the Oracle Fusion Middleware Federated Portals Guide for Oracle WebLogic Portal.Problems inherent in moving WebLogic Portal portlets directly to a WebCenter Portal project in JDeveloper can include the following:
-
URL Generation – Some URL types supported by WebLogic Portal do not work in WebCenter Portal, including DesktopURL, CustomEventURL, PageURL, WindowURL, StandalonePortletURL, and possibly others.
-
Events – The WebCenter Portal consumer does not generate all of the events that the WebLogic Portal framework generates. These unsupported events include Init, LookAndFeelReinit, Notification, Refresh, WindowActivation, WindowDeactivation, and possibly others.
-
Render Dependencies – WLP render dependencies do not work in WebCenter.
-
WLP Framework APIs – Many WLP APIs are not supported in WebCenter Portal.
59.6.3 General Tips for Migrating WLP Portlets to a WebCenter Portal Portlet Producer Application
This section provides general guidance on moving WLP portlets into WebCenter Portal's portlet producer environment. Although portlet migration is not directly supported, this section lists tips that might help you with the manual migration process of the various WLP portlet types.
Caution:
This section provides general guidance only. As discussed in Section 59.6, "Migrating WebLogic Portal Portlets to WebCenter Portal," direct migration of WLP portlet types to WebCenter Portal application or portlet producer application is not directly supported. In almost all cases, rewriting and refactoring of existing portlet code is required when moving portlets from WLP to WebCenter Portal.As noted previously, any WebLogic Portal specific APIs used by the portlet must be rewritten to use WebCenter Portal APIs. WebLogic Portal specific APIs will not work in a WebCenter environment.
-
JSP portlets – Moving JSP portlets directly into a WebCenter Portal project is not supported. You can consider refactoring the JSP portlet into a JSR286 portlet and then migrate it as explained in Section 59.6.1, "Migrating Java Portlets from WebLogic Portal to WebCenter Portal."
-
JSR 168/286 portlets – Most Java (JSR 168 / 286) portlets can be directly imported to a WebCenter Portal portlet producer and run as JSR286 portlets. Some JSR168 portlets that take advantage of specific error conditions guaranteed by the JSR168 specification may need to be run in a JSR168 compatibility mode. See the "JSR-286/JSR-168 Portlet Compatibility" section in the Oracle Fusion Middleware Portlet Development Guide for Oracle WebLogic Portal. JSR168 portlets using WLP's proprietary eventing (event subscriptions declared in a
.portletfile) must be re-written to use JSR286 events. -
Java Page Flow portlets – JPF portlets are not supported by WebCenter Portal's portlet producer and must be either consumed from a WebLogic Portal WSRP producer or refactored to become JSR286 or JSF portlets.
-
JSF portlets – If the portlet is written to the JSR329 JSF Portlet bridge in WLP, it should run on a WebCenter producer with no changes. For portlets using the WLP "native" JSF portlet bridge, the portlet must be consumed from a WebLogic Portal producer or upgraded to a JSF 1.2 portlet using the JSR329 bridge. See also the "Working With JSF-Java Portlets" chapter in the Oracle Fusion Middleware Portlet Development Guide for Oracle WebLogic Portal.
-
Clipper portlets – Clipper portlets are not supported in WebCenter portal, but the web clipping features in WebCenter Portal's pagelet producer provide equivalent functionality.
-
Struts portlets – Moving Struts portlets directly into a WebCenter Portal project is not supported. You can consider refactoring the JSP portlet into a JSR286 portlet and then migrate it as explained in Section 59.6.1, "Migrating Java Portlets from WebLogic Portal to WebCenter Portal."
-
Content Presenter portlets – WLP Content Presenter portlets will not work over WSRP and will not work with WebCenter. Portal However, equivalent functionality is available in WebCenter Portal's content presenter. See the "Publishing Content Using Content Presenter" chapter in Oracle Fusion Middleware Building Portals with Oracle WebCenter Portal.
-
Remote (WSRP) portlets – Remote (WSRP) portlets consumed in WLP can be consumed in a WebCenter Portal's consumer instead. Remote portlets taking advantage of WLP-specific WSRP features may need modification. For example the custom data transfer feature must be replaced by using events or shared parameters to convey data. See the "WSRP Interoperability with Oracle WebCenter Portal and Oracle Portal" and "Configuring WSRP Security Between WLP and a WebCenter Portal: Framework Application" chapters in the Oracle Fusion Middleware Federated Portals Guide for Oracle WebLogic Portal.
59.7 Troubleshooting JSR 286 Java Portlets
This section provides information to assist you in troubleshooting problems you may encounter while creating and testing JSR 286 portlets.
This section includes the following topics:
59.7.1 Issues with Creating JSR 286 Portlets
This section includes the following topics:
59.7.1.1 Cannot Access the Create Portlet Wizard
In the New Gallery, I cannot find the Standards-based Java Portlet (JSR 286) option.
The application in which you are trying to create the JSR 286 portlet was created using WebCenter Portal's Portal Framework application template and therefore is not scoped for portlet creation.
-
Try creating the portlet in a Portlet Producer Application or any application scoped for portlet creation (any application except for those built using WebCenter Portal's Portal Framework application template).
-
In the New Gallery, click the All Technologies tab to list all available options regardless of the technology scope of the application.
59.7.1.2 Cannot Add the Portlet Functionality that I Want to the Portlet
I cannot find the option to add certain features, for example portlet events or public render parameters, to the portlet in the Create JSR 286 Java Portlet wizard.
The Create JSR 286 Java Portlet wizard does not provide the option to add certain features to portlets.
After you create the portlet using the Create JSR 286 Java Portlet wizard, edit the portlet.xml file using the Overview Editor to add advanced functionality. For more information, see Section 59.3, "Developing JSR 286 Java Portlets."
59.7.2 Issues with Testing JSR 286 Portlets
For a list of the issues you may encounter when consuming portlets during the testing phase of portlet development, see Section 63.11, "Troubleshooting Portlets."