The resources required to create virtual machines are stored in a storage repository. This section provides information on the structure of storage repositories, and describes how you manage virtual machine resources in storage repositories. See Section 4.8, “Managing Storage Repositories” for information on creating and managing storage repositories.
A storage repository is used to store virtual machine resources, so that these resources can be made available to Oracle VM Servers in a server pool, without having to copy the resources to each Oracle VM Server. The Oracle VM Servers in a server pool gain access to these virtual machine resources by having the storage repository presented to them. If your storage is file-based storage, you can present a storage repository to multiple server pools. Alternatively, if your storage is physical disk-based, you can only present the storage repository to a single server pool.
The types of virtual machine resources can be categorized as:
Virtual machine templates: Reusable virtual machine templates used to create multiple virtual machines.
Assemblies: Template containing a configuration of multiple virtual machines with their virtual disks and the inter connectivity between them.
ISO files: DVD/CD image files used to create virtual machines from scratch using the installation media.
Virtual disks: Virtual disks used by virtual machines to perform boot operations, to run the operating system, and to extend the storage capability of virtual machines.
Virtual machine files: Configuration files of your virtual machines.
You access and manage virtual machine resources in a storage repository using the Repositories tab.
To enable third party backup tools to access the contents of a storage repository, see Section 4.8.5, “Enabling Storage Repository Back Ups”.
The following sections describe the structure of a storage repository, and how to manage its contents.
Each storage repository has a predefined structure, which is visible in Oracle VM Manager, and maps to the directory structure of the underlying physical storage. Figure 7.1, “Graphical User Interface view of storage repository contents” shows the repository as seen through the Oracle VM Manager user interface. The directory structure is listed in Table 7.3, “Storage Repository Directory Structure”.
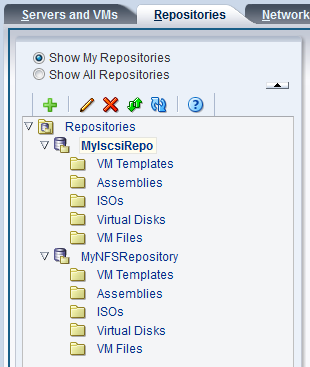
The directories listed in Table 7.3, “Storage Repository Directory Structure” are subdirectories of a storage repository file system. On disk they are, in fact, located under the path:
/OVS/Repositories/repository_id/...
Table 7.3 Storage Repository Directory Structure
Directory Name | Description |
|---|---|
This is the directory that contains guest virtual machine templates. See Section 7.5.3, “Virtual Machine Templates” for information on working with virtual machine templates. | |
Contains preconfigured sets of virtual machines, typically created with Oracle Assembly Builder. See Section 7.5.4, “Assemblies” for information on working with assemblies. | |
ISO files | Contains ISO files that can be mounted as virtual CD/DVD drives on virtual machines. See Section 7.5.5, “ISO Files (CD/DVD Images)” for information on working with ISO files. |
Contains virtual disks, which can be either dedicated to a virtual machine or shared by multiple virtual machines. See Section 7.5.6, “Virtual Disks” for information on working with virtual disks. | |
Contains virtual machine configuration files. See Section 7.5.7, “Virtual Machine Configuration Files” for information on working with virtual machine configuration files. |
- 7.5.3.1 Using a Virtual Machine Template
- 7.5.3.2 Importing a Virtual Machine Template
- 7.5.3.3 Creating a Virtual Machine Template
- 7.5.3.4 Editing a Virtual Machine Template
- 7.5.3.5 Deleting Virtual Machine Templates
- 7.5.3.6 Cloning a Virtual Machine Template
- 7.5.3.7 Moving a Virtual Machine Template
- 7.5.3.8 Managing Virtual Machine Template Clone Customizers
A virtual machine template is a fully pre-installed, pre-configured virtual machine that can be repeatedly used to create new virtual machines. A typical virtual machine template contains:
An operating system.
A file which contains the basic configuration information, such as the number of virtual CPUs, the amount of memory, the size of disk, and so on.
Pre installed applications.
Virtual machine templates can contain the configuration of one or more virtual machines. In most cases, a template will only contain a single virtual machine. Virtual machine templates are shared among users to create new virtual machines. New virtual machines inherit the same contents and configuration from the template.
You can obtain or create a virtual machine template by:
Downloading an Oracle VM template from the Oracle Technology Network, and importing it into Oracle VM Manager. See Section 2.11, “Oracle VM Templates” for more information on downloading a template. See Section 7.5.3.2, “Importing a Virtual Machine Template” for information on importing a template.
Downloading an Oracle VM template that contains an assembly file (.ovf file) from the Oracle Technology Network, and importing it into Oracle VM Manager as an assembly, then creating a template from the assembly. See Section 7.5.4, “Assemblies” for more information on importing an assembly.
Cloning an existing virtual machine or template as a template in Oracle VM Manager. For information on cloning virtual machine templates, see Section 7.9, “Cloning a Virtual Machine or Template”.
Creating a template from scratch. See Section 7.5.3.3, “Creating a Virtual Machine Template” for information on creating a template.
A virtual machine template can be used to create virtual machines, and to create new templates based on the original. To create a virtual machine from a template, see Section 7.7, “Creating a Virtual Machine”.
A virtual machine template contains various components such as the virtual machine configuration information, virtual disks that contain the operating system and any application software. These components are packaged together as an Oracle VM template file. An assembly is similar to a virtual machine template, but in the open standard Open Virtualization Format (OVF) format. Older Oracle VM template files were packaged as Oracle VM template files, and the more recent templates are packaged in OVF format as assemblies. If the template you are importing uses the OVF format, see Section 7.5.4, “Assemblies” for information on importing an assembly and creating a template from the assembly.
Before you can use a virtual machine template, you must import it into Oracle VM Manager and make it available to your server pool(s). Virtual machine templates are stored in the server pool's storage repository by importing them from a web server into Oracle VM Manager.
In a storage repository, templates are typically imported as an archive (.tgz, .tar or other). The archive contains a virtual machine configuration file (.cfg) file, and at least one virtual disk image (.img file).
On disk, a template archive is unpacked after import. The .cfg file of the virtual machine is always referenced from the Templates folder, but the virtual disk image files (.img) are placed in the VirtualDisks folder. This makes the creation of virtual machines from template a lot faster, which also applies to cloning of virtual machines.
If you downloaded an Oracle VM template from the Oracle Software Delivery Cloud which contains an template.tgz file, you should use this procedure to import the template. This format of a template is the older format used by Oracle to publish Oracle VM templates.
To import a virtual machine template:
The Oracle VM template should be accessible to your Oracle VM environment from a location that can be reached using HTTP, HTTPS or FTP.
Click the Repositories tab. Select the repository in which to store the template. Select VM Templates in the navigation tree.
Select Import VM Template...
 in the toolbar in the management pane.
The Import VM Template dialog box is displayed.
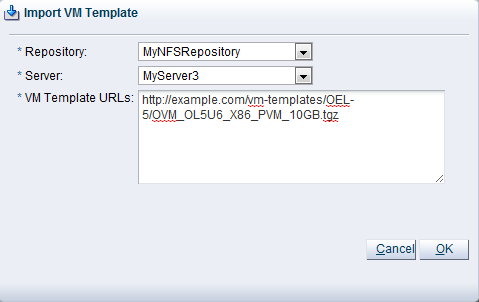
Select or edit the following:
Repository: The storage repository in which to import the template.
Server: The Oracle VM Server to use the perform the template import.
VM Template URLs: The URLs for the templates. The URL schemes supported are HTTP, HTTPS, and FTP. To import a template using FTP, use the standard FTP syntax, for example:
ftp://
user:password@server/path/filename.tgzEach template component should be listed on a new line. Each URL must be a reference to a complete file. If your template files are split into multiple compressed files [2] , concatenate those files and enter the URL for the concatenated file, for example to concatenate a number of compressed files to one compressed file, enter
$ cat template.tgz.1of3 template.tgz.2of3 template.tgz.3of3 > template.tgz
Then enter the URL to the single compressed template file, in this case, template.tgz.
To import a template that is not compressed as a single file, each component must be a complete file (if not, concatenate them to one file), for example to enter a virtual disk image and a virtual machine configuration file that together make up a complete template, you could enter:
http://myexample.com/System-sda.img
http://myexample.com/vm.cfg
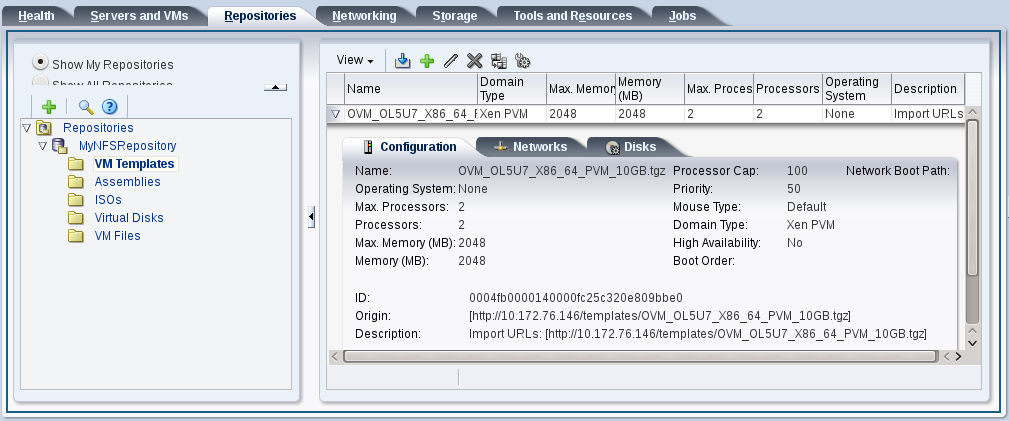
Click OK to import the template. When the import job is complete, the new template is displayed in the table in the management pane. Expand the table row to see more information about the template.
For information about creating a virtual machine from a template, see Section 7.9, “Cloning a Virtual Machine or Template”.
To create a virtual machine template, you can specify all the parameters in the same way you would to create a virtual machine, or you can clone an existing template. This section discusses these two methods of creating a virtual machine template.
It is also possible to create a template directly from an existing virtual machine by cloning it as a template. For information on creating a template from an existing virtual machine, see Section 7.9, “Cloning a Virtual Machine or Template” .
To create a template using a template:
Click the Repositories tab. Select the repository in which the template is to be created. Click VM Templates in the navigation tree.
Click Create VM Template...
 .
.
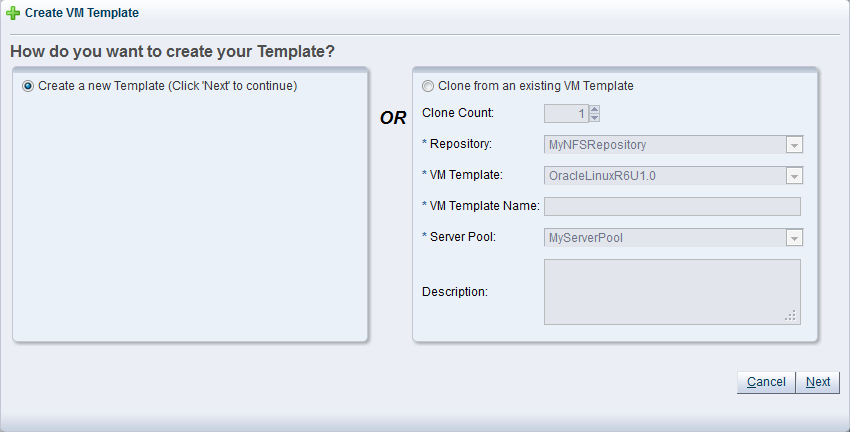
The Create VM Template wizard is displayed.
Select the Clone from an existing VM Template option.
Enter or select the following:
Clone Count: The number of templates to create from the template.
Repository: Select the repository in which to create the virtual machine configuration files.
VM Template: The template to use to create the templates.
VM Name: A name for the template. The maximum name length is 256 characters and may contain any character. The name need not be unique. Each clone is suffixed with a dot and the clone number, starting with 0, for example MyVMTemplate.0, MyVMTemplate.1 and so on.
Server Pool: The server pool in which to deploy the virtual machines.
Description: A description of the templates.
Click Finish. The templates are created and saved in the repository.

To create a new template:
Click the Repositories tab. Select the repository in which the template is to be created. Click VM Templates in the navigation tree.
Click Create VM Template...
.
The Create VM Template wizard is displayed.
Select the Create a new Template option. Click Next.
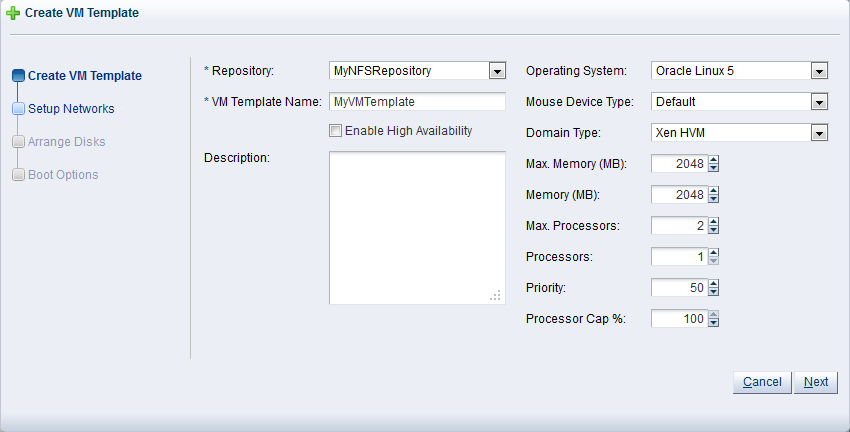
The Create VM Template step of the wizard is displayed.
Enter or select the following:
Repository: Select the repository in which to create the virtual machine configuration file.
VM Template Name: A name for the template. The maximum name length is 256 characters and may contain any character. The name need not be unique.
Enable High Availability: Select to enable HA. See Section 6.4, “High Availability (HA)” for more information on HA.
Description: A description of the template.
Operating System: The operating system of the template. This setting enables or disables certain virtual machine settings that your guest operating system may require.
Mouse Device Type: The mouse type to use for the template. Select one of:
Default
PS2 Mouse
USB Mouse
USB Tablet
This option is ignored if using a SPARC hypervisor.
Domain Type: The domain type of the template. Oracle recommends you create paravirtualized virtual machines if possible, as the performance of a paravirtualized virtual machine is superior to that of a hardware virtualized guest.
Xen HVM: Hardware virtualization, or fully virtualized. When you select this option you must supply an ISO file in a repository (in the Create Storage step of the wizard) from which to create the virtual machine. See Section 7.5.5, “ISO Files (CD/DVD Images)” for information on importing an ISO file into a repository.
Xen HVM, PV Drivers: Identical to Xen HVM, but with additional paravirtualized drivers for improved performance of the virtual machine. See Section 7.13, “Converting to Paravirtualized Guests or Installing Paravirtualized Drivers” for more information about using paravirtualized drivers. This Domain Type is used to run Microsoft Windows™ guest operating systems with an acceptable performance level.
Xen PVM: Paravirtualized. Enables you to select a location for the mounted ISO file from which to create the virtual machine. Before you create the virtual machine using the paravirtualized method, mount the ISO file on an NFS share, or HTTP or FTP server. You supply the location of the mounted ISO file in the Network Boot Path field in the Boot Options step of the wizard. For information on creating a mounted ISO file, see Section 7.4, “Virtual Machine Installation Media”.
OVM/SPARC: This domain type should be selected if the server pool and hypervisors use Oracle VM Server for SPARC as the hypervisor instead of Oracle VM Server for x86.
Unknown: This hypervisor should be selected if the domain type is unknown.
Max. Memory (MB): The maximum size of the memory the virtual machine is to be allocated. When you edit a running virtual machine, this is the maximum amount of memory that can be allocated.
Memory (MB): The size of the memory the virtual machine is to be allocated. This is the memory allocation to use when starting the virtual machine. You can change this when editing a running virtual machine, up to the value of the maximum memory set in the previous field. For HVM guests, increasing or decreasing the memory requires a restart of the virtual machine. For PVM guests, no restart is required.
Max Processors: The maximum number of processors to be used by the virtual machine. The number of processors is expressed in number of physical CPU cores, and is limited to 128.
Processors: The number of processors to be used by the virtual machine. The number of processors is expressed in number of physical CPU cores, and is limited to 128.
Priority: The CPU priority of the virtual machine. You can select a high (100), intermediate (50), or low (1) priority for the virtual CPUs, or a self-defined priority, by moving the slider. The higher the priority, the more physical CPU cycles are given to the virtual machine.
This option is ignored if using a SPARC hypervisor.
Processor Cap %: Increase or decrease the percentage to which the virtual CPUs can receive scheduled time. This parameter defines the maximum percentage to which the virtual CPUs can receive scheduled time. You can select a high (100), intermediate (50), or low (1) percentage of scheduled time for the virtual CPUs, or a custom percentage, by moving the slider. Use this parameter to keep low priority virtual machines from consuming too many CPU cycles on a Virtual Machine Server.
This option is ignored if using a SPARC hypervisor.
The Priority and Processor Cap% parameters are passed to the Xen hypervisor for use by the credit scheduler, which automatically load balances guest VCPUs across all available physical CPUs using an algorithm that combines these two parameters. Therefore, these parameters are a key factor for the performance of the virtual machine on x86 hardware.
On SPARC, each virtual machine uses dedicated physical CPU threads and CPUs are not shared between virtual machines, being exclusively assigned to a single virtual machine.
Click Next.
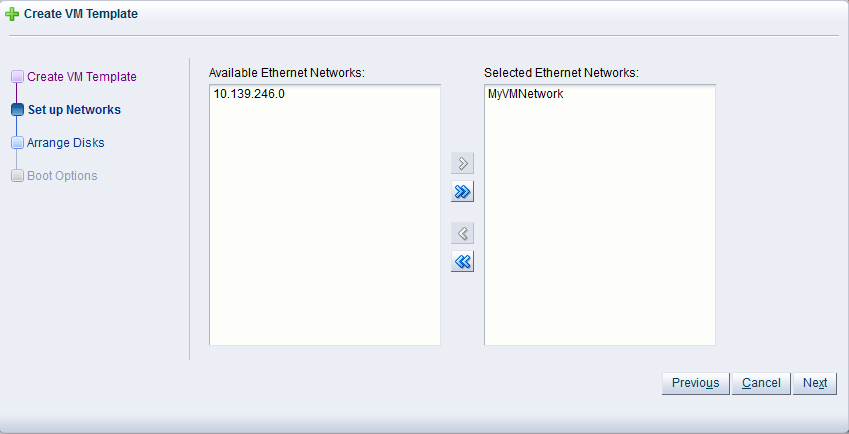
The Setup Networks step is displayed in the wizard.
Select the network to use from the Available Ethernet Networks field and add it to the Selected Ethernet Networks field. Click Next.
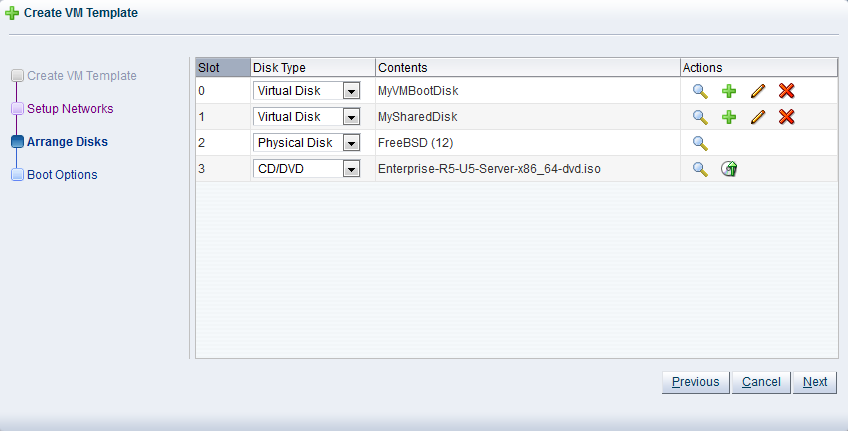
The Arrange Disks step of the wizard is displayed.
Select the desired storage configuration of your template, such as virtual disks, physical disks, and ISO files. On a separate slot, add one or more of the following disk types:
Empty A empty slot.
Virtual Disk: This allows you to add or create a virtual disk. Virtual disks can be shared by virtual machines.
Physical Disk The physical disks are the disks in a storage array. Physical disks can be shared by virtual machines.
CD/DVD: This adds an ISO file in a storage repository and can be used to create HVM and PVHVM virtual machines. When creating a virtual machine from an ISO file, you must use a single file. Installations that span multiple ISO files are not supported. ISO files cannot be used to create PVM virtual machines.
Add or create any virtual disks to use as the virtual machine's hard disk, select any physical disks to add, and select any ISO files to use to create the virtual machine. Add the disks in the order they should appear in the virtual machine. The disk with the boot partition or installation media should be the first disk listed. An HVM guest can have up to four disks, including empty CD/DVD drives. A PVM or PVHVM guest can have up to 52 disks. Only one slot can contain an empty CD/DVD.
To create or add a virtual disk:
To create a virtual disk, select Virtual Disk from the Disk Type drop-down list and click Create a Virtual Disk
.
The Create Virtual Disk dialog box is displayed.
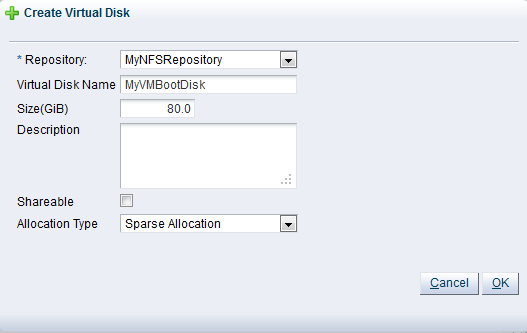
Enter or select the following to create a virtual disk:
Repository: The repository in which the virtual disk is to be created.
Virtual Disk Name: The name of the virtual disk to be created and made available to the virtual machine. See Section 7.5.6, “Virtual Disks” for more information about using virtual disks.
Size (GiB): The disk size in GiB of the virtual disk.
Description: A description of the virtual disk.
Shareable: Whether the virtual disk should be shareable (read/write) with other virtual machines.
Allocation Type: Whether to use a Sparse Allocation or Non-sparse Allocation. Sparse Allocation creates a sparse disk, so the size of the disk is initially small and increases as it is used. Sparse allocation is faster than using Non-Sparse Allocation when creating a virtual machine. Non-Sparse Allocation creates the entire disk when the virtual machine is created, and so is slower than creating a sparse disk.
Click OK.
To search for an existing virtual disk to add to the virtual machine, click Select a Virtual Machine Disk
 . The Select a Virtual Machine
Disk dialog box is displayed.
. The Select a Virtual Machine
Disk dialog box is displayed.
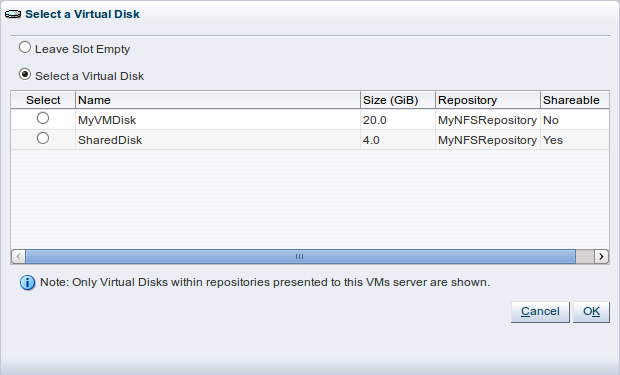
Select the virtual disk to use and Click OK.
To add a physical disk:
To add a physical disk to the virtual machine, select Physical Disk from the Disk Type drop-down list. Click Select a Virtual Machine Disk
. The Select a Physical
Disk dialog box is displayed.
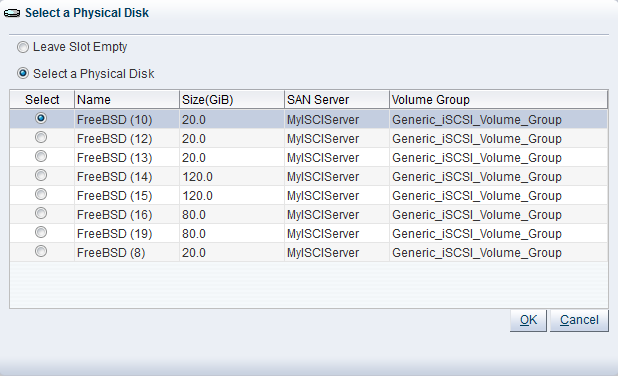
Select a physical disk and click OK.
To add an ISO file:
To add an ISO file to the virtual machine, select CD/DVD from the Disk Type drop-down list. Click Select a Virtual Machine Disk
. The Select an ISO
dialog box is displayed.
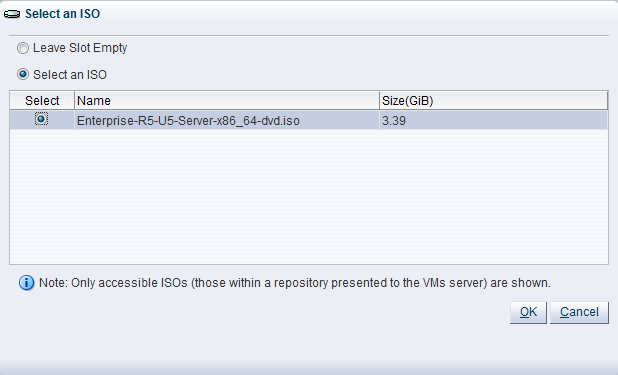
Select an ISO file and click OK.
When you have set up the virtual machine's disks, click Next.
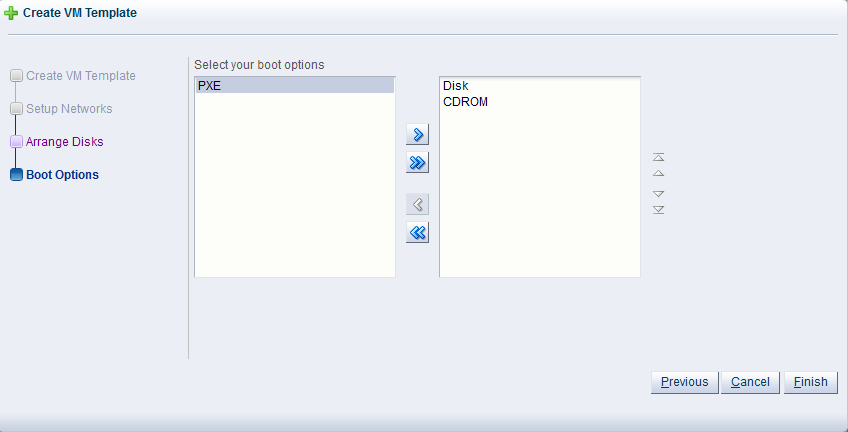
The Boot Options step is displayed in the wizard.
Select the boot media order for your virtual machine.
If you are creating a hardware virtualized virtual machine (HVM), you can choose the PXE boot option. If so, remember to put PXE first in the Select your boot options field, and change the boot order again after installation and before rebooting the virtual machine. To use PXE, you must configure a PXE/tftp environment to offer the necessary boot media and instructions to the virtual machine.
If you are creating a paravirtualized virtual machine (PVM), you also have the Network option available (not shown in here). If so, specify Network to be at the top of the right-hand-side column, and enter the location of the mounted ISO file from which to perform the operating system installation in the Network Boot Path field (also not shown in here), for example
http://example.com/Enterprise-R6-U1-Server-x86_64-dvd.iso/
For information on creating a mounted ISO file, see Section 7.4, “Virtual Machine Installation Media”.
You cannot use the Network Boot Path field to boot a virtual machine using PXE. This field can only be used to specify the path to a mounted ISO file to use when installing a PVM guest.
Click Finish. The template is created and saved in the repository.
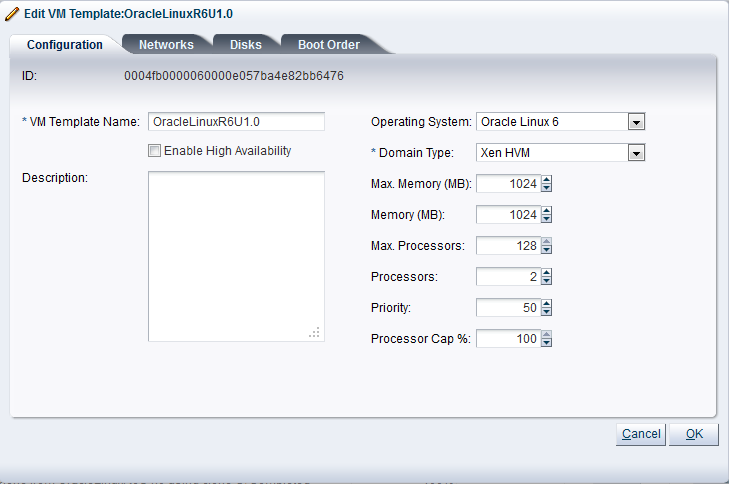
You can edit a virtual machine template to change the configuration, networking, disks and boot order.
To edit a virtual machine template:
Click the Repositories tab. Select the repository in which the template is saved. Click VM Templates in the navigation tree.
Select the template to edit in the table in the management pane and click Edit Selected VM Template...
 .
.
The Edit VM Template dialog box is displayed.
Make any required changes to the template and click OK to save the template. For detailed information on each field in this dialog box, see Section 7.5.3.3, “Creating a Virtual Machine Template” .
You can delete a virtual machine template, and the virtual disks associated with it.
To delete a virtual machine template:
Click the Repositories tab. Select the repository in which the template is saved. Click VM Templates in the navigation tree.
Select one or more templates in the table in the management pane and click Delete Selected VM Template...
 .
.
The Delete Confirmation dialog box is displayed. Select the virtual disks associated with the templates you want to delete, if any. Click OK to delete the templates.
You can clone a virtual machine template to create new templates or virtual machines from the original template. See Section 7.9, “Cloning a Virtual Machine or Template” for information on cloning a template.
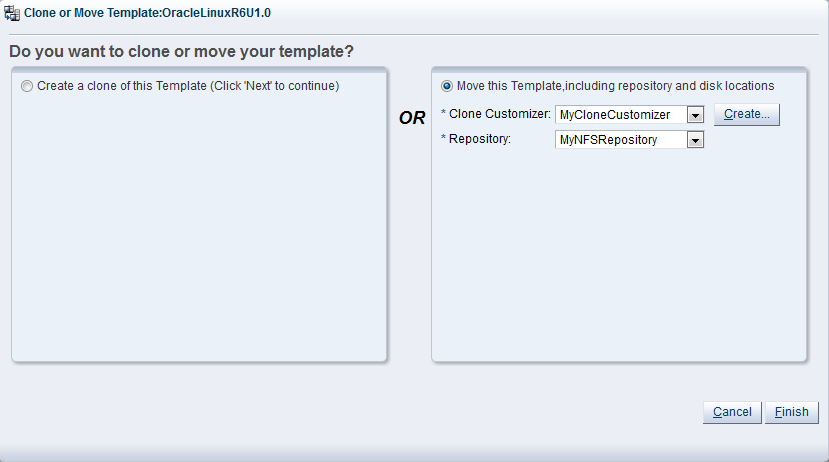
You can move a virtual machine template's resources (virtual disks, virtual machine configuration files) to a different storage repository, or change the location of the disks and network used in the template. You can change the location of disks and the network to use when you move a virtual machine template using a clone customizer.
To move a virtual machine template:
Click the Repositories tab. Select the repository in which the template is saved. Click VM Templates in the navigation tree.
Select the template to move in the table in the management pane and click Clone or Move
 .
.
The Clone or Move Template dialog box is displayed.
Select Move this Template.
Select a clone customizer from the Clone Customizer drop-down list. If no clone customizers are displayed or you want to create a new one, click Create. See Section 7.9.1.1, “Creating a Clone Customizer” for information on creating a clone customizer.
Select a repository from the Repository drop-down list. The repository is where the template's virtual machine configuration file is moved to.
Click Finish to move the template.
To create, edit or delete clone customizers, see Section 7.9.1, “Managing Clone Customizers”.
An assembly is a kind of infrastructure template containing a configuration of one or more virtual machines with their virtual disks and even the inter connectivity between them. Assemblies can be created as a set of .ovf (Open Virtualization Format) and .img (disk image) files, or may all be contained in a single .ova (Open Virtualization Format Archive) file. Disk image files can be different formats such as VMDK, VHD, VDI in addition to raw disk images. After the assemblies are imported, the disk images are converted into raw disk images used by Oracle VM Templates and virtual machines.
To use an assembly, you must first import it into a repository, then create one or more templates from the assembly. You create one virtual machine template for each virtual machine in the assembly. You can then use the template(s) to deploy the virtual machines that originated from the assembly. You cannot deploy all virtual machines in an assembly in one step; you must deploy each virtual machine individually. To perform deployment of all virtual machines, including the associated networking configuration, you should use Oracle Enterprise Manager.
For ease of use, you should use a single .ova file when working with assemblies in Oracle VM. You can also use the .ovf format with the associated disk image files, but you must import all the disk files individually as virtual disks, then import the .ovf file as an assembly before you can use the assembly to create a template.
An assembly can contain a virtual machine from another virtualization software vendor, such as VMWare. This enables you to import virtual machines from other virtualization software providers. Just make sure the virtual machine to be imported is correctly saved or created using the OVF standards and all files are saved in an assembly file using the OVF archive file format, then import the .ova file into Oracle VM Manager as you would any other assembly file.
To display the virtual machines which use an assembly, select the assembly in the management pane and expand the table row.
To import an assembly:
Create or locate an assembly file. This should be a single .ova file, which contains the .ovf descriptive file(s), and disk image file(s) for the assembly. If you do not have the assembly in the archive (.ova) format, but instead have a series of virtual disk images and the .ovf file, you must first import all the virtual disk files, then continue with this procedure to import the .ovf file.
NoteOVF files in the version 0.9 format (as used by ESX 3.5) are not supported. If the assembly that you wish to import uses an unsupported format, you can try to use VMware's Converter or OVF Tool to convert to a newer version or you can use qemu-img to convert the vmdk files to raw disk files and recreate the VM manually.
See Section 7.5.6, “Virtual Disks” for information on importing virtual disk files.
Place the assembly file in a location accessible from your Oracle VM Manager host computer using either of these protocols: HTTP, HTTPS or FTP.
Click the Repositories tab. Select the repository in which to store the assembly file. Select Assemblies in the navigation tree.
Select Import VM Assembly...
in the toolbar in the management pane.
The Import VM Assembly dialog box is displayed.
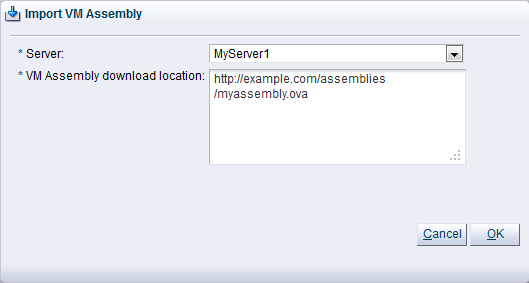
Select or edit the following:
Server: The Oracle VM Server to use the perform the assembly file import.
VM Assembly download location: The URL for the assembly file. The URL schemes supported are HTTP, HTTPS, and FTP. For example:
http://example.com/assemblies/myassembly.ova
Click OK to import the assembly file. When the import job is complete, the new assembly is displayed in the table in the management pane.
To create a virtual machine template from an assembly:
Click the Repositories tab. Select the repository in which the assembly file is located. Select Assemblies in the navigation tree.
Select Create VM Template...
in the toolbar in the management pane.
The Create VM Template dialog box is displayed.
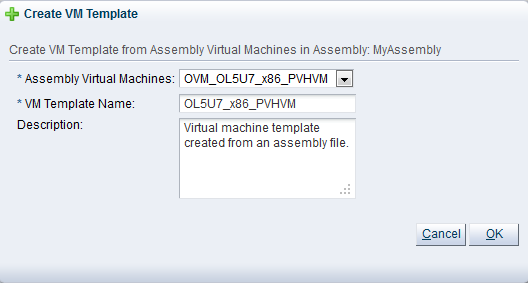
Select or edit the following:
Assembly Virtual Machines: The virtual machine in the assembly from which to create a template.
VM Template Name: A name for the template.
Description: An option text description of the template.
Click OK to create the template. The template is created in the same repository as the original assembly is located. When you have created a template from the assembly, you can use the template to create and deploy virtual machines. See Section 7.5.3.1, “Using a Virtual Machine Template” for information on using a template to create virtual machines.
To edit an assembly file:
Click the Repositories tab. Select the repository in which the assembly file is located. Select Assemblies in the navigation tree.
Select the assembly in the table in the management pane. Click Edit Selected VM Assembly...
in the management pane toolbar.
Edit the Name or Description. Click OK.
To delete assembly files:
Click the Repositories tab. Select the repository in which the assembly files are located. Select Assemblies in the navigation tree.
Select one or more assembly files in the table in the management pane. Click Delete Selected VM Assembly
in the management pane toolbar.
The Delete Confirmation dialog box is displayed. Click OK.
To refresh assembly files:
Click the Repositories tab. Select the repository in which the assembly files are located. Select Assemblies in the navigation tree.
Select one or more assembly files in the table in the management pane. Click Refresh Selected VM Assembly
 in the management pane toolbar.
The contents of the assembly files are refreshed from the storage repository.
Virtual machines have no access to the physical DVD or CD-ROM drive. You can assign virtual drives to virtual machines by offering ISO files containing the image of a DVD or CD-ROM. These image files can be found in the ISOs folder in a storage repository.
You import ISO files from a web server into Oracle VM Manager. You can then select the installation media as an ISO file when you create a virtual machine. To create a virtual machine using an ISO file, see Section 7.7, “Creating a Virtual Machine”.
To be able to use an ISO file with your virtual machine you must first import the file into an appropriate storage repository, namely one that can be accessed by the server pool where the virtual machine is to be created. If your storage repository uses file-based storage, you can the make the repository available to multiple server pools, therefore making an ISO file available to multiple server pools. If you are using storage array-based storage, you can only make a repository available to a single server pool. Virtual machines can only access ISO files on repositories that have been assigned to the server pool to which they belong.
To copy an ISO file to the same repository, another repository, a file system, or a storage array, you clone the ISO file. To clone an ISO file, it must not be in use by any running virtual machines or other clone job.
To display the virtual machines which use an ISO file, select the ISO file in the management pane and expand the table row.
To delete an ISO file, it must not be in use by any virtual machines.
To import an ISO file:
Click the Repositories tab. Select the repository in which to store the ISO file. Select ISOs in the navigation tree.
Select Import ISO...
in the toolbar in the management pane.
The Import ISO dialog box is displayed.
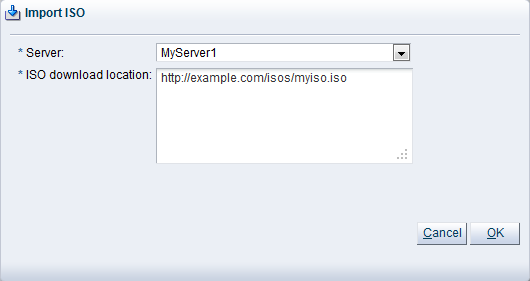
Select or edit the following:
Server: The Oracle VM Server to use the perform the ISO file import.
ISO download location: The URL for the ISO file. The URL schemes supported are HTTP, HTTPS, and FTP. For example:
http://example.com/isos/myiso.iso
Click OK to import the ISO file. When the import job is complete, the new ISO is displayed in the table in the management pane.
To edit an ISO file:
Click the Repositories tab. Select the repository in which the ISO file is located. Select ISOs in the navigation tree.
Select the ISO in the table in the management pane. Click Edit Selected ISO
in the management pane toolbar.
The Edit ISO dialog box is displayed. Edit the ISO Name or Description. Click OK.
To delete ISO files:
Click the Repositories tab. Select the repository in which the ISO files are located. Select ISOs in the navigation tree.
Select one or more ISO files in the table in the management pane. Click Delete Selected ISO
in the management pane toolbar.
The Delete Confirmation dialog box is displayed. Click OK.
To clone an ISO file:
Click the Repositories tab. Select the repository in which the ISO is located. Select ISOs in the navigation tree.
Select the ISO in the table in the management pane. Click Clone ISO
 in the management pane toolbar.
The Clone ISO dialog box is displayed.
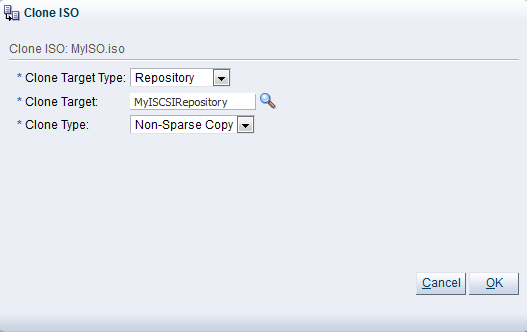
Select or edit the following:
Clone Target Type: The destination storage type for the cloned ISO, either:
Repository
Physical Disk
Storage Array
Clone Target: The destination location for the cloned ISO. Click Search Clone Target
to select the destination.
The Search Clone Target dialog box is displayed.
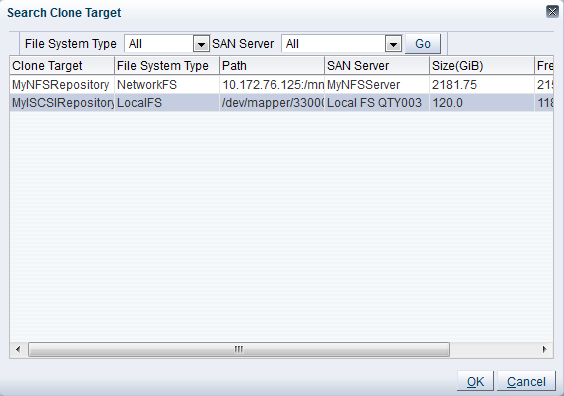
Select the location on which to clone the ISO and click OK.
Clone Type: Whether to use a Sparse Copy or Non-sparse Copy. Sparse Copy creates a sparse disk, so the size of the disk is smaller than the original. Sparse copy is faster than using Non-Sparse Copy. Non-Sparse Copy copies the entire ISO, and so is slower than creating a sparse disk.
Click OK to clone the ISO file.
A virtual machine needs at least one disk – that is, a disk to boot from and to run the operating system. Virtual disks can be part of a template, assembly, can be created as part of the virtual machine creation process, or can be created independently inside the storage repository. Virtual disks can be shared across virtual machines, or dedicated to one virtual machine. All virtual disks available in the storage repository appear in Virtual Disks in the navigation tree when you select a storage repository, regardless of how they are created.
When you create a virtual machine from scratch, you are given the opportunity to either create a new virtual disk or use an existing one. This section lists how to create, import, edit, delete and clone virtual disks. For more information about creating a virtual machine from scratch, see Section 7.7, “Creating a Virtual Machine”.
To display the virtual machines which use a virtual disk, select the virtual disk in the management pane and expand the table row.
To create a new virtual disk:
Click the Repositories tab. Select the repository in which to store the virtual disk. Select Virtual Disks in the navigation tree.
Click Create Virtual Disk...
in the management pane toolbar.
The Create Virtual Disk dialog box is displayed.
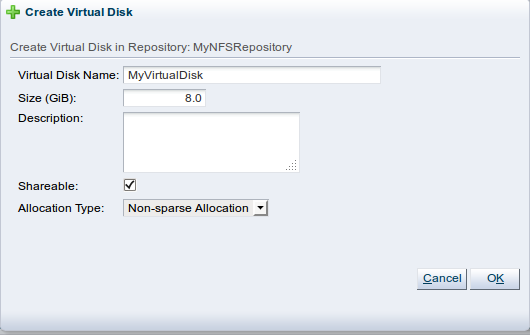
Enter or select the following:
Virtual Disk Name: A name for the virtual disk.
Size (GiB): The size of the disk, in GiB.
Description: A description of the virtual disk.
Shareable: Whether the virtual disk is shareable. Shareable disks have read/write privileges in multiple virtual machines and should be used with caution.
Allocation Type: Whether to create a sparse or non-sparse virtual disk.
Click OK to create the new disk. To display which virtual machines use a disk, expand the table row in the management pane.
To import a virtual disk:
Click the Repositories tab. Select the repository in which to store the virtual disk. Select Virtual Disks in the navigation tree.
Click Import Virtual Disk...
in the management pane toolbar.
The Import Virtual Disk dialog box is displayed.
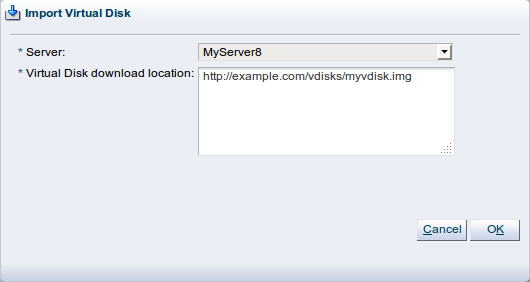
Select or edit the following:
Server: The Oracle VM Server to use the perform the virtual disk file import.
Virtual Disk download location: The URL for the virtual disk file. The URL schemes supported are HTTP, HTTPS, and FTP. For example:
http://example.com/vdisks/myvdisk.img
Click OK to import the virtual disk file. When the import job is complete, the new virtual disk is displayed in the table in the management pane.
To edit a virtual disk:
Click the Repositories tab. Select the repository in which the virtual disk is located. Select Virtual Disks in the navigation tree.
Select the virtual disk in the table in the management pane. Click Edit Virtual Disk...
in the management pane toolbar.
The Edit Virtual Disk dialog box is displayed.
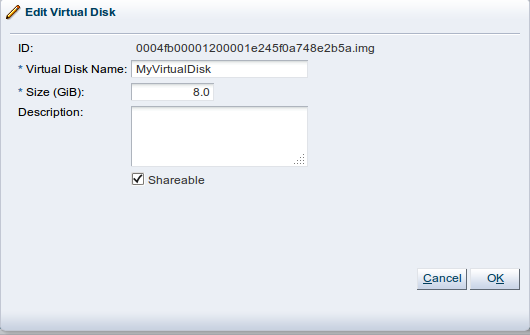
Enter or select the following:
Virtual Disk Name: A name for the virtual disk.
Size (GiB): The size of the disk, in GiB.
Description: A description of the virtual disk.
Shareable: Whether the virtual disk is shareable. Shareable disks have read/write privileges in multiple virtual machines and should be used with caution.
Click OK to save the changes.
WarningWhen resizing a disk there is always a risk of data corruption. Also, the file system on the virtual disk may not be aware of the resize operation, so you may have to perform operating specific procedures to make the guest virtual machine aware of the change in disk size.
To delete virtual disks:
Click the Repositories tab. Select the repository in which the virtual disks are located. Select Virtual Disks in the navigation tree.
Select one or more virtual disks in the table in the management pane. Click Delete Selected Virtual Disk
in the management pane toolbar.
The Delete Confirmation dialog box is displayed. Click OK.
To clone a virtual disk:
Click the Repositories tab. Select the repository in which the virtual disk is located. Select Virtual Disks in the navigation tree.
Select the virtual disk in the table in the management pane. Click Clone Virtual Disk
in the management pane toolbar.
The Clone Virtual Disk dialog box is displayed.
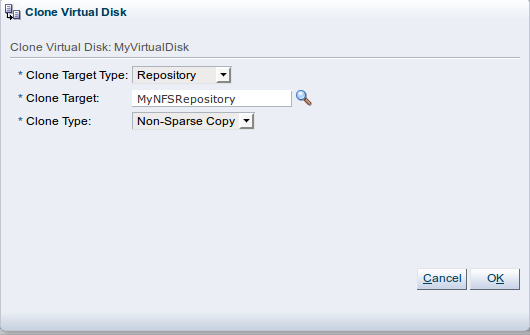
Select or edit the following:
Clone Target Type: The destination storage type for the cloned virtual disk, either:
Repository
Physical Disk
Storage Array
Clone Target: The destination location for the cloned virtual disk. Click Search Clone Target
to select the destination.
The Search Clone Target dialog box is displayed.
Select the location on which to clone the virtual disk and click OK.
Clone Type: Whether to use a Sparse Copy or Non-sparse Copy. Sparse Copy creates a sparse disk, so the size of the disk is smaller than the original. Sparse copy is faster than using Non-Sparse Copy. Non-Sparse Copy copies the entire virtual disk, and so is slower than creating a sparse disk.
Click OK to clone the virtual disk.
The final folder in a storage repository navigation tree is VM Files. This folder lists all the virtual machine configuration files in the storage repository. In the Create Virtual Machine wizard you specify which storage repository to use to store the configuration file of your virtual machine. Consider the VM Files folder to be the home location of all the virtual machines that have been created in the selected storage repository. You cannot perform any actions to the virtual machine configuration files. If you want to rename, move or delete any of these files, you should perform those operations on the virtual machine, not just the virtual machine configuration file.
See Section 7.10.2, “Editing a Virtual Machine” for information on editing a virtual machine, and Section 7.10.13, “Deleting Virtual Machines” for information on deleting a virtual machine.
[2] Templates can get very large, therefore it is not unusual that they're split into manageable chunks. This splitting is done without any attempt at preserving the structure, so the structure must be reconstructed by amalgamating the various files together again before import.