As described in Section 4.1, “Storage Overview”, Oracle VM Manager distinguishes between File Servers and SAN Servers in the Storage tab. Depending on your hardware and networking configuration, external storage may be detected during discovery of the Oracle VM Servers or a rescan of their physical disks. Local storage is always detected during this discovery operation.
An external storage element is created on storage hardware: a server configured for NAS offering NFS shares, generic iSCSI targets and LUNs, or SAN devices from your preferred storage vendors. The server or disk subsystem offering the storage simply needs to be reachable by the Oracle VM Servers in the Oracle VM environment through a Fibre Channel or Ethernet network. The external storage is offered as a mount point (NFS share) or LUN (iSCSI and fibre channel) which can be discovered through Oracle VM Manager as a potential location for a repository, or a raw disk for use with a VM.
The typical way to attach external storage to the Oracle VM environment is to create a new storage entity in Oracle VM Manager and point to the location of the external storage provider while selecting the appropriate Storage Connect plug-in.
Subsequently, you may choose to configure a storage repository on one or more of the discovered storage entities in order to make storage resources available to servers and server pools in the Oracle VM environment.
These preparation and configuration steps are covered in the following topics. Storage repository configuration is covered in Section 4.8, “Managing Storage Repositories”.
In Oracle VM, the term file server is used to indicated file-based storage made available to the environment from another physical server, as opposed to local storage. Describing the technology used to expose file systems, NFS shares and so on, is beyond the scope of this guide. The procedure below explains how you can bring the exposed file-based storage into Oracle VM, prepare it for the installation of a storage repository, and configure the file server and discovered file systems.
To discover a file server:
Make sure that your storage server exposes a writable file system to the storage network of your server pool.
Select the Storage tab.
In the toolbar above the navigation pane, click Discover File Servers
 . The Discover a File
Server dialog box is displayed, where you enter
the information necessary for Oracle VM Manager to discover the
external storage mount points.
. The Discover a File
Server dialog box is displayed, where you enter
the information necessary for Oracle VM Manager to discover the
external storage mount points.
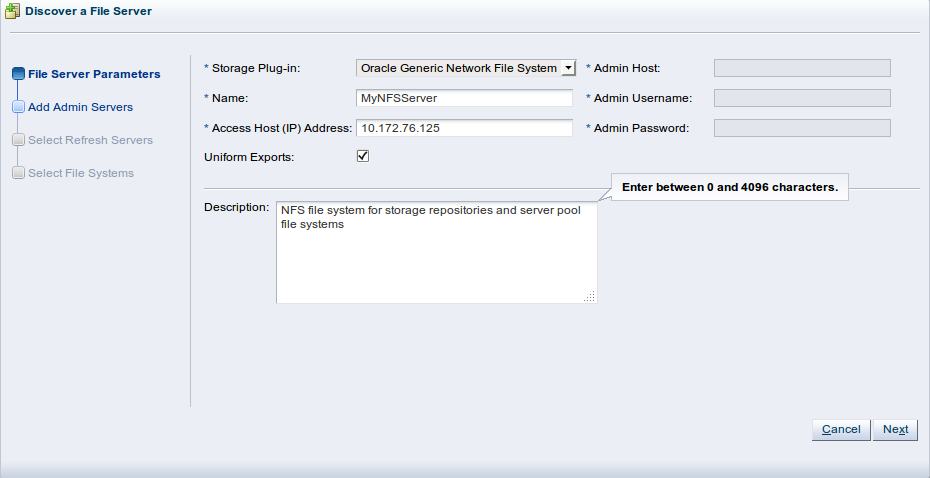
Always enter the following information:
Storage Plug-in: The storage plug-in corresponding to the type of file server (generic NFS or vendor-specific).
Name: The name you wish to use to identify the file server.
Access Host: The host name or IP address of the server offering the file system.
Uniform Exports: If all Oracle VM Servers in all server pools have access to the same exports on the file server, leave this as the default (checked). If the file server is configured to offer different exports to different server pools, this box should be unchecked and, once you have completed the steps in the wizard, you need to configure NFS Access Groups so that Oracle VM Manager can be made aware of export permissions. See Section 4.6.1.1, “NFS Access Groups for Non-uniform Exports” for more information.
ImportantNon-uniform exports are not intended for servers within the same server pool. Your NFS server should be configured to, at least, provide the same exports to all of the servers that belong to a particular clustered server pool.
Description: Optional information you would like to add about this file server.
If you are adding a non-generic file server, for example a Sun ZFS Storage Appliance, also enter the additional plug-in options to enable Oracle VM Manager to access the file server's configuration management functions:
Admin Host: The host name or IP address where administrative access to the file server is allowed with appropriate credentials.
Admin User Name: A user name with administrator access to the file server.
Admin Password: The administrator password for the user name you entered.
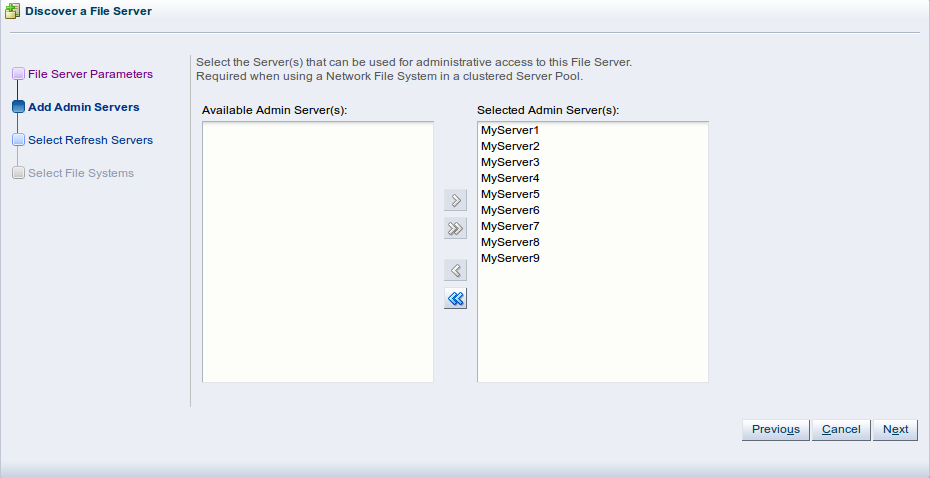
Click Next to proceed to the admin server selection screen. If you are working with a non-clustered server pool, you may skip this screen. Admin servers are designated Oracle VM Servers that are capable of logging into a storage array or file server to perform administrative functions such as extending a file system or creating a new LUN. In the case of an NFS file server, admin servers are only used to validate the file server. For backward compatibility reasons, admin servers are also capable of being used to perform file server refreshes in much the same way as refresh servers.
Use the arrow buttons to move the required Oracle VM Servers to the Selected Servers box.
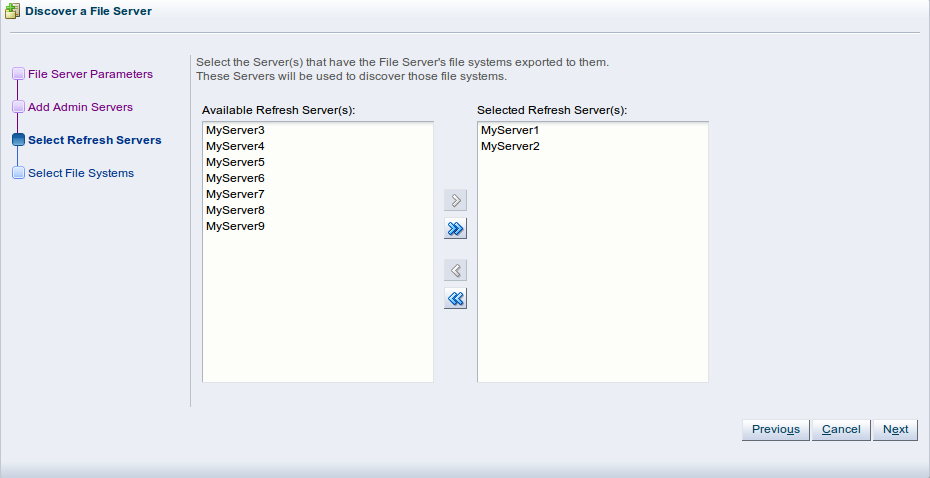
Click Next to proceed to the refresh servers selection screen. Refresh servers are designated Oracle VM Servers that have visibility of one or more file systems on an NFS file server. These servers are used for file system refreshing across server pools.
Each file system must be assigned at least one refresh server to allow for file system refreshing. During the refresh of a file server, the refresh servers are used to refresh all file systems used across all pools. For this reason it is critical that your refresh server list contains at least one server from each server pool.
ImportantIn some environments, it is plausible to expect that the file server is configured to provide different file system exports to different server pools. Therefore, it is possible that no single server has access to all of the exports provided by a file server. By assigning a server from each server pool to handle file system refreshes, Oracle VM can ensure that all file systems are refreshed across all server pools. If your environment is set up in such a way, you need to configure NFS Access Groups so that the manager can be made aware of export permissions. See Section 4.6.1.1, “NFS Access Groups for Non-uniform Exports” for more information.
If you select the Refresh All option available in the context menu for Server Pools on the Servers and VMs tab, the configured refresh servers specified for each filesystem are used to perform a comprehensive file system refresh and you are not provided with an option to use one or more alternate refresh servers.
In this screen, you must include at least one server from each server pool that you intend to create. You may select more than one server from each server pool in order to ensure high availability, but adding more than two servers is superfluous.
NoteIf you defined a group of admin servers in the previous step, for backward compatibility reasons, these servers are added to the refresh server list, and can be used to perform file server refreshes as well. This is not apparent in the Oracle VM Manager user interface.
If you are using non-uniform file system exports (as selected on the first screen of this wizard), click Finish to complete the wizard. A message is displayed to inform you that you should now create access groups for the file server. See Section 4.6.1.1, “NFS Access Groups for Non-uniform Exports” for information on creating an NFS access group. When at least one access group is configured, you should then refresh the file systems on the file server to make them available for use in Oracle VM Manager. See Section 4.6.2, “Managing File Server Configuration” for information on refreshing a file server.
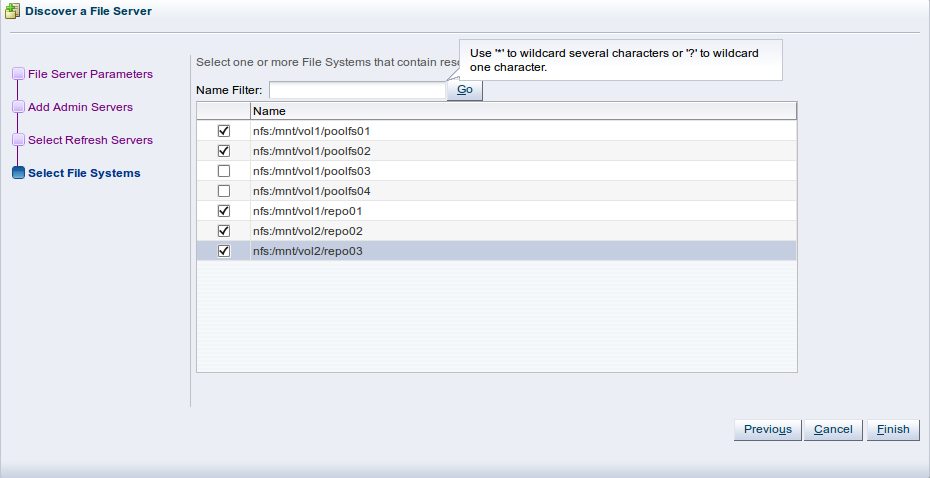
If you are using uniform file system exports, click Next to proceed to the file systems selection screen. If any file systems contain existing virtual machine resources, select the corresponding check boxes to have Oracle VM Manager add the existing resources to the environment.
At the top of the screen you can see that there is an option to provide a Name Filter. You can use this filter to specify search criteria to limit the objects displayed. See Section 3.14, “Name Filters” for more information.
Click Finish to complete the file server registration.
The new file server appears in the navigation pane, under File Servers.
NoteIf you created shares to be used as server pool file systems, these are discovered in the same process. Since these file systems are relatively small, be sure to keep those available for the server pools and create storage repositories on the higher capacity file systems.
At the end of the file server discovery a refresh operation is triggered to make sure all file systems available on the file server appear in Oracle VM Manager. When the operation is complete, and if you select the file server in the navigation pane, the available file systems appear in the File Systems overview table in the management pane.

Your file server and file systems are now ready to be used either for storage repositories or as server pool file systems. A server pool file system is selected during the creation of the server pool; to create storage repositories on your file systems, see Section 4.8, “Managing Storage Repositories”.
If a server is unable to mount the file system for some
reason, such as a permissions related issue, Oracle VM Manager does not
report the failure as this would stop any further mounting. If
a server is unable to access a file system the reason is
reported in the /var/log/ovs-agent.log
log file on the server.
Usually an NFS server is configured to export the same file systems to different server pools. This setup is described as having uniform exports. If, however, your NFS server is configured to export different file systems to different server pools, no single server in any server pool has full access to all of the exports available on the NFS server. This setup is described as having non-uniform exports. In these cases, in order for Oracle VM Manager to properly handle file system refreshes, you need to configure NFS Access Groups to define the permissions available to each server pool. If your exports are uniform across all server pools, you do not need to perform this operation.
It is important to understand that when describing uniform and non-uniform exports, we are describing how the NFS server is configured to present exports to all of the servers belonging to a particular server pool. Within any clustered server pool, all of the servers must have access to the same exports on the NFS server.
To configure NFS Access Groups for non-uniform exports
In the Storage tab, expand the File Servers folder in the navigation pane and select a file server listed here. In the management pane, select the NFS Access Groups perspective from the drop down.
To add a new NFS Access Group, click on the Create NFS Access Group icon
 .
.
The Create NFS Access Group wizard appears. Enter a meaningful name and description for the NFS Access Group that you are creating. The group defines the set of file systems that are available to a particular set of servers. Click Next.
In the Select File Systems dialog, identify the file systems that are accessible via the set of servers that you are going to assign to the NFS Access Group. Use the arrow buttons to move them into the Selected File System(s) panel. Click Next.
In the Select Servers dialog, select either the individual servers or the server pools that have access to the file system exports that you selected in the previous step. Use the arrow buttons to move them into the Selected Server(s)/Selected Server Pool(s) panel. Click Finish to complete the process of defining a new NFS Access Group.
To edit an existing NFS Access Group, click on the Update NFS Access Group icon
 . This will open the Edit NFS Access Group dialog. Tabs
are provided to allow you to change the NFS Access Group
details, File Systems and Servers.
. This will open the Edit NFS Access Group dialog. Tabs
are provided to allow you to change the NFS Access Group
details, File Systems and Servers.
To delete an existing NFS Access Group, click on the Delete NFS Access Group icon
 . A confirmation dialog is displayed before the action can
be completed.
. A confirmation dialog is displayed before the action can
be completed.
To view events pertaining to an existing NFS Access Group, click on the NFS Access Group Events icon
 . The Events dialog is displayed showing a listing of
events specific to the NFS Access Group. You may need to
acknowledge particular events in order to resolve an
issue. See Section B.1.11, “Acknowledging Events/Errors”
for information on acknowledging events.
. The Events dialog is displayed showing a listing of
events specific to the NFS Access Group. You may need to
acknowledge particular events in order to resolve an
issue. See Section B.1.11, “Acknowledging Events/Errors”
for information on acknowledging events.
It is possible to edit the configuration for an existing file server. The steps and options to do so are described below.
To change the registered file server configuration:
If you need to modify a file server, select the File Servers folder in the navigation pane, select one or more file servers in the management pane table, and use the applicable buttons in the management pane toolbar. Alternatively, right-click the file server and choose one of these corresponding options:
-
Edit File Server:
Change file server settings such as name, access host,
description and plug-in options; change admin server
settings in the second section of the wizard.
-
Delete File Server:
Remove the selected file server from your Oracle VM
environment.
 Discover File Systems:
Discover all file systems for one or more file servers.
Discover File Systems:
Discover all file systems for one or more file servers.
 Refresh File Server:
Request an update of the configuration for one or more
file servers in case changes have been made to the disks
and file systems.
Refresh File Server:
Request an update of the configuration for one or more
file servers in case changes have been made to the disks
and file systems.
 Add/Remove Admin
Server: Determine which Oracle VM Servers are
responsible for information exchange with this file
server.
Add/Remove Admin
Server: Determine which Oracle VM Servers are
responsible for information exchange with this file
server.
If you need to modify a file system, select the file server it belongs to, and make sure the perspective of the management pane is set to File Systems. Select one or more file systems in the overview table and click the appropriate button in the toolbar above to choose one of these options:
-
Edit File System:
Change the name and description of the file system.
-
Delete File System:
Stop using the selected file systems in your Oracle VM
environment.
-
Refresh File System:
Request an update of the file system information for one
or more file systems to see if changes have been made to
the size and contents. When selecting one or more file
systems to be refreshed the
Refresh Servers
selected for this purpose during the initial discovery
of the file server are used to temporarily mount the
selected file systems during the file system refresh.
-
Display Selected File System
Events: Display the
Events dialog box to
see events for the file system.
The purpose of listing unmanaged storage arrays is that Oracle VM warns you when it detects storage in the environment for which no particular management mechanism is available or in case the appropriate management mechanism cannot be determined. In other words, the unmanaged storage arrays, for iSCSI and for fibre channel, are placeholders for physical disks of which the appropriate location in the storage management tree is unclear.
It should be noted that the unmanaged arrays behave differently for iSCSI and fibre channel. For iSCSI the use of the unmanaged array in practice is temporary, but for fibre channel the situation is different. Because generic fibre channel arrays are simply detected when they are connected to the storage network, there is no mechanism to place them under a separate storage array based on a specific access host. Consequently, generic fibre channel LUNs will remain in the unmanaged fibre channel storage array, which has no access group.
You must always configure an admin server when using generic fibre channel storage with Oracle VM. The admin server is required for discovery and administrative operations. For example, rescanning the physical disks of an array will not produce any results if no admin server is set. Configure the admin server(s) as described in Section 4.6.4.3, “Editing a SAN Server”.
You may choose to delete the unmanaged storage elements from the Oracle VM environment in case you do not intend to use it. In the case of generic iSCSI storage arrays, it is preferable to register them in the correct way by following the procedures in Section 4.6.4.1, “Discovering a SAN Server”. To properly register the storage entries, you should remove them from the unmanaged array. After registration these entries are displayed under a managed storage array of the appropriate type.
Vendor-specific storage, which does not use a generic Storage Connect plug-in, must always be registered with its dedicated plug-in and appears under its own storage array entry in the storage management tree.
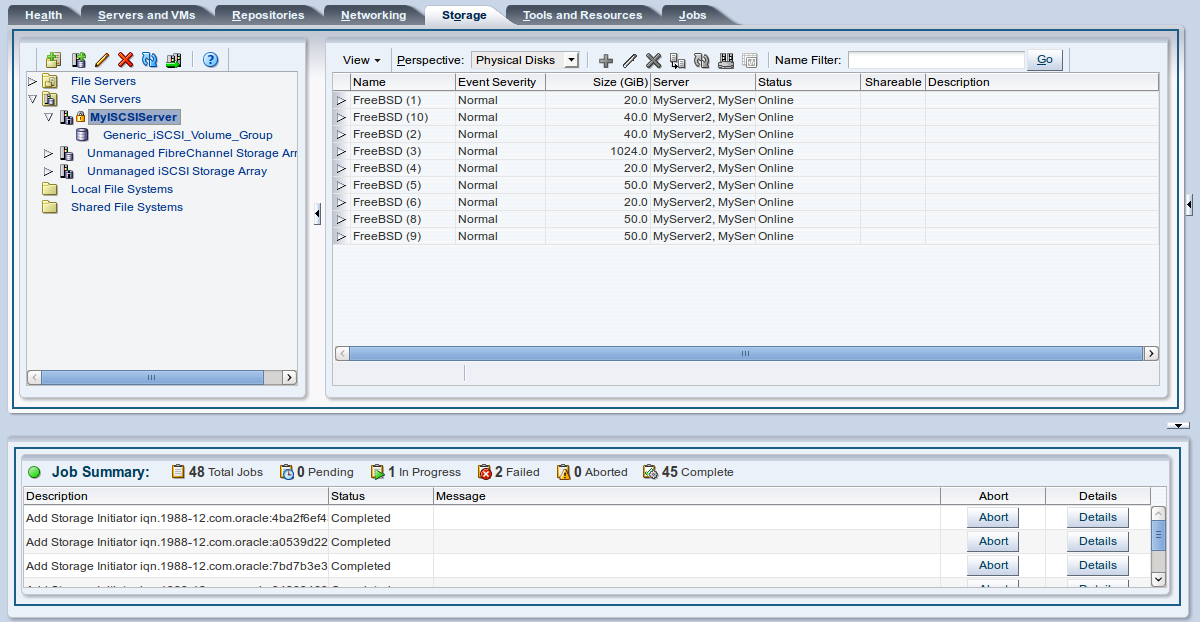
In Oracle VM, the term SAN server is used to indicate block-based storage made available to the environment from another physical server. The storage entities are also referred to as storage arrays and include external as well as local storage volumes. Describing the technology used to expose raw disk space in the form of iSCSI targets and LUNs or the configuration of a SAN (storage attached network), is beyond the scope of this guide. The procedure below explains how you can bring the exposed block-based storage into Oracle VM and configure the storage array and physical disks either for the installation of a storage repository or direct attachment as physical disk to a virtual machine.
Oracle VM has a default Unmanaged Fibre Channel Storage Array. Since only a single generic fibre channel storage array can exist, no additional arrays of this type can be created. Consequently, the instructions below apply to SAN servers and storage arrays using the following types of Storage Connect plug-ins:
Generic iSCSI.
Vendor-specific iSCSI.
Vendor-specific fibre channel.
The end-to-end procedure is broken down into three phases, discussed in the following sections.
This first phase covers the discovery and registration part, meaning how you discover the container of the storage elements you intend to use in your environment.
Depending on the selected storage type and plug-in, you may be required to enter additional information than shown in this example (which uses an ISCSI SAN server) when registering your storage array, as shown in the following table.
Table 4.1 Required Information for Registering Different Storage Types
Information Field Required | Generic iSCSI | Vendor-specific iSCSI | Generic Fibre Channel | Vendor-specific Fibre Channel |
|---|---|---|---|---|
Access host and port | Yes | Yes | No | No |
Access credentials/Chap | No | Optional | No | No |
Administration information | No | Yes | No | Yes |
Plug-in private data | No | Optional | No | Optional |
To discover a storage array:
Make sure that your storage server exposes raw disks (Fibre Channel SAN volumes, iSCSI targets and LUNs) to the storage network of your server pool.
Select the Storage tab.
In the toolbar above the navigation pane, click Discover SAN Server
 .
.
The Discover SAN Server wizard is displayed, where you enter the information necessary for Oracle VM Manager to discover the external storage elements.
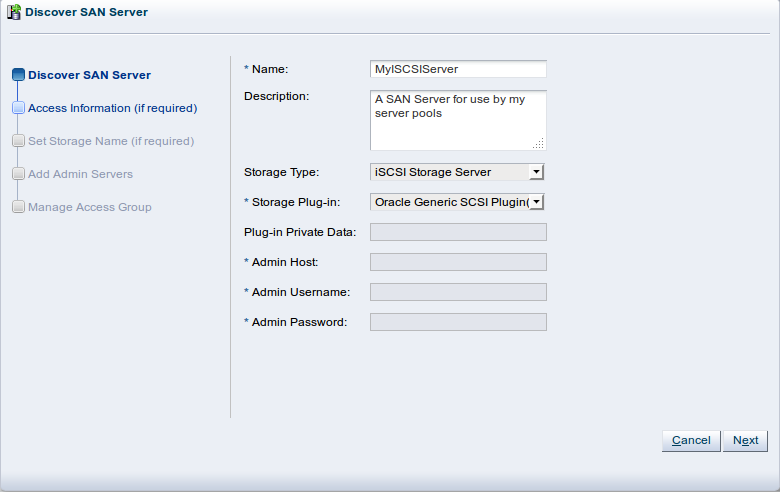
In the Discover SAN Server step enter the following information:
Name: The name you wish to use to identify the SAN server.
Description: Optional information you would like to add about this SAN server.
Storage Type: The array is either a SAN or an iSCSI storage server.
Storage Plug-in: The storage plug-in corresponding to the type of storage array, which is either generic iSCSI, or a vendor-specific iSCSI or fibre channel plug-in.
Plugin Private Data: Any vendor-specific storage plug-in data that may be required. This is not available to generic storage.
NoteWhen registering a vendor-specific storage array, be sure to double-check the information you entered in the plug-in private data field. Once the storage array is registered, this field can no longer be modified. If you need to update the plug-in private data, you must unregister and re-register the storage array.
Admin Host: The host name or IP address of the administration host. This is not available to generic storage.
Admin Username: The admin host username. This is not available to generic storage.
Admin Password: The password for the admin user. This is not available to generic storage.
Click Next.
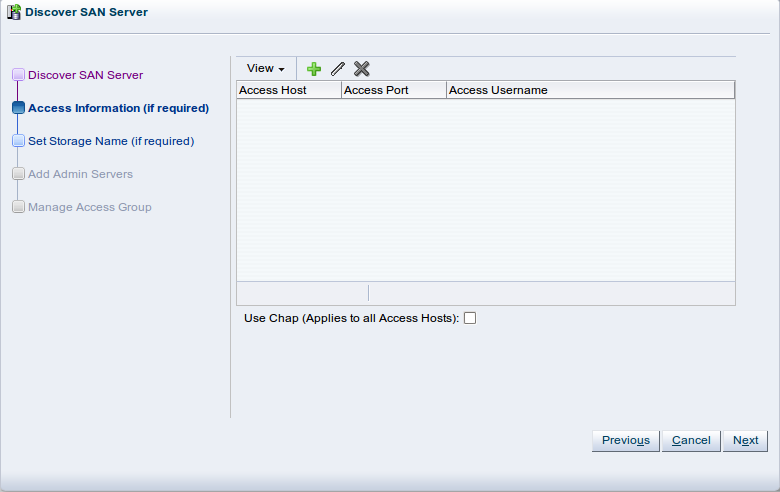
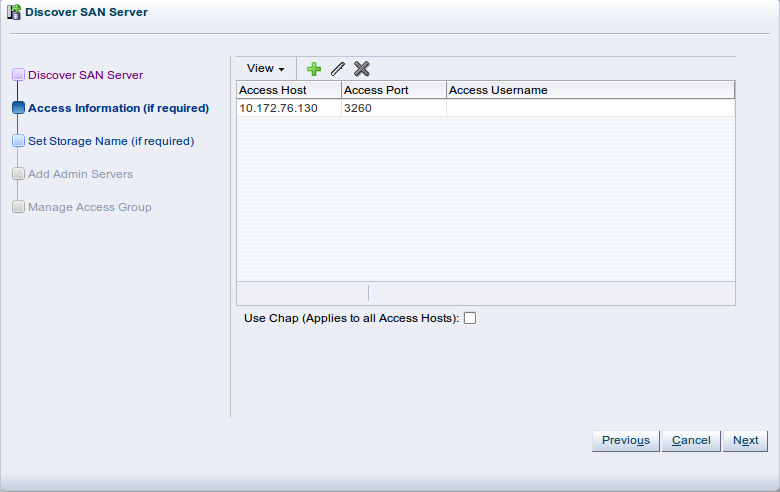
The Access Information step is displayed. This is not applicable to fibre channel storage arrays.
An access host is the IP address of the network interface that has access to the SAN server and creates a network path to the storage. On this screen enter one or more access hosts to create network paths to the storage. To add multiple paths (for multipathing), add multiple access hosts. You must have at least one access host to the storage. On some ISCSI servers, only one access host is supported, so your screen may differ from the example in this step. If so, enter the access host IP address, access port and optionally the Chap authentication details on the screen that you see, and the remaining parts of this step are not required to performed.
If you want to use Chap authentication to connect to the SAN server, check the Use Chap check box.
Click Create New Access Host
 to add access hosts for the SAN server.
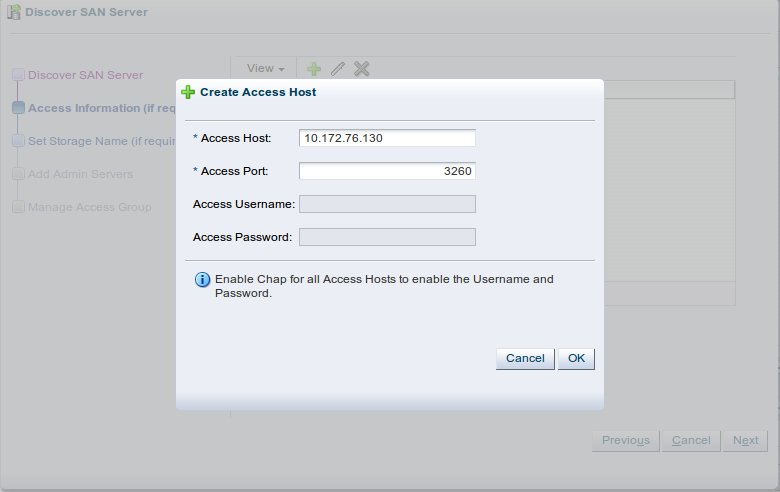
The Create Access Host dialog box is displayed.
Enter the IP address and access port of the host that has access to the SAN server. The default access port for iSCSI is 3260. If you checked Chap authentication on the previous screen, enter the username and password to access the storage. Click OK.
Repeat this step for each access host, for example, you may have access hosts such as 10.172.76.130, 10.172.76.131, 10.172.77.130, and 10.172.77.131 to enable multipathing.
When you have entered all access hosts, click Next.
For most SAN servers the wizard moves straight to the Add Admin Servers step. However, if you have vendor-specific storage hardware with an admin host handling more than one storage array, such as certain HP EVAs and EMC arrays, you must enter the name of the array to be used for the new SAN server. The wizard recognizes this type of storage and displays the Set Storage Name step when applicable. Enter the storage name and click Next.
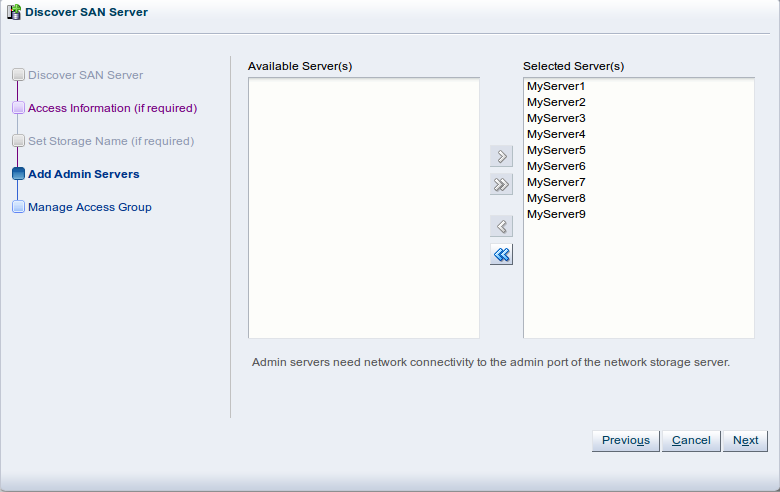
The Add Admin Servers step is displayed. If you are working with a non-clustered server pool, you may skip this step.
Use the arrow buttons to move the required Oracle VM Servers to the Selected Servers box. This selects which Oracle VM Servers are to be made available to perform Oracle VM related admin operations on the SAN server. Click Next.
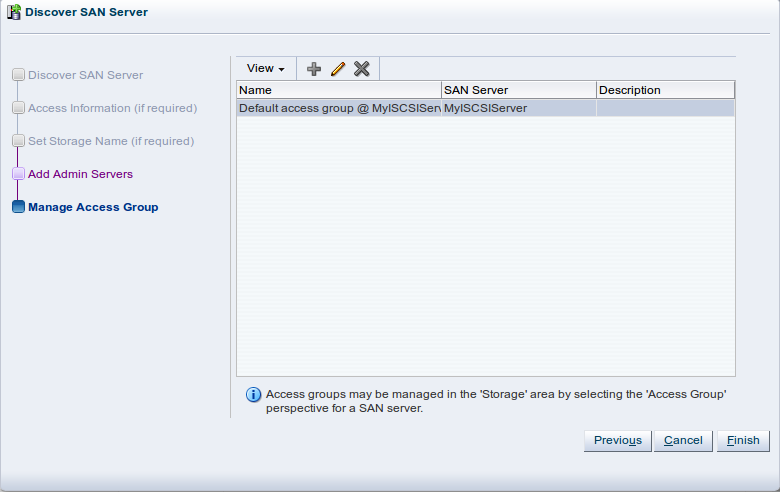
The Manage Access Group step is displayed.
This final phase of the wizard offers you the access group configuration functionality. Within an access group you add the storage initiators to Oracle VM Servers to complete the storage configuration.
ImportantYou must add a storage initiator to an access group for each Oracle VM Server that you want to access the SAN server. If you do not add any storage initiators, Oracle VM cannot log in to the storage array and no LUNs can be accessed.
A default access group may be created during the discovery process.
If no access group exists, you can create one from this screen by clicking Create Access Group
.
If you want to modify an existing access group for use with this SAN server, select it from the list and click Edit Access Group
.
If necessary, you can delete an access group by clicking Delete Access Group
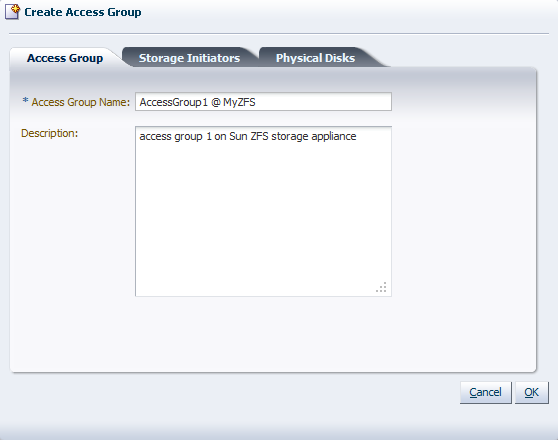
This example uses a generic ISCSI SAN server, so a default access group is created. Select the default access group in the table and click Edit Access Group
, then select the Storage
Initiators tab in the
Edit Access Group dialog
box.
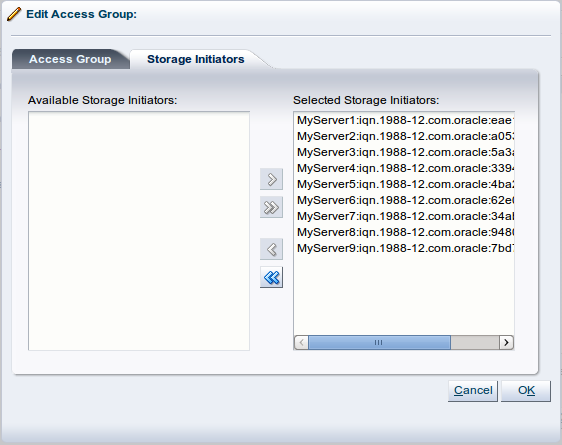
Select and move the Oracle VM Servers into the Selected Storage Initiators box to add storage initiators to each Oracle VM Server. Click OK.
The access group management functionality is also available outside this wizard. To access it, you must go to the Storage tab, select a SAN server in the navigation pane, and change the Perspective field in the management pane to Access Groups, as described in Section 4.6.4.2, “SAN Server Access Groups”. Access group management for an individual Oracle VM Server is also described in Section 6.10.13, “Managing Access Groups and Storage Initiators on an Oracle VM Server”.
Click Finish to complete the SAN server discovery operation.
The new storage array appears in the navigation pane, under SAN Servers. Prior to the access group configuration, the Storage Connect plug-in established a link to the storage location. By configuring the access group(s), you grant one or more Oracle VM Servers access to the storage array, so that the storage elements or physical disks offered by the SAN server appear in Oracle VM Manager. Access group configuration and management is described in detail in the next section. The exception to the rule is again the unmanaged fibre channel storage array, which does not use the concept of access groups but offers its LUNs to all Oracle VM Servers connected to the fibre channel storage network.
During discovery of a storage array you are given the option of configuring access groups which enable Oracle VM Servers to access the storage. This section explains the configuration of storage array access groups.
Except for generic storage arrays, it is possible to create multiple access groups in order to arrange and restrict physical disk access according to your requirements. The generic iSCSI storage arrays have a single access group available by default, where you can simply add or remove storage initiators from your Oracle VM Servers.
Generic fibre channel storage has no access groups and is always listed under the Unmanaged Fibre Channel Storage Array folder.
Select the appropriate procedure for your type of storage array.
To configure an access group for a non-generic iSCSI storage array:
In the navigation pane, select your SAN server. In the management pane, select the Perspective Access Groups.
Click Create Access Group
. The Create Access Group
dialog box appears.
In the Access Group tab, enter a name for your new access group and optionally provide a description.
Select the Storage Initiators tab. It contains the available storage initiators for this type of storage on the Oracle VM Servers in your environment.
Use the arrow buttons to move the required initiators to the Selected Storage Initiators box.
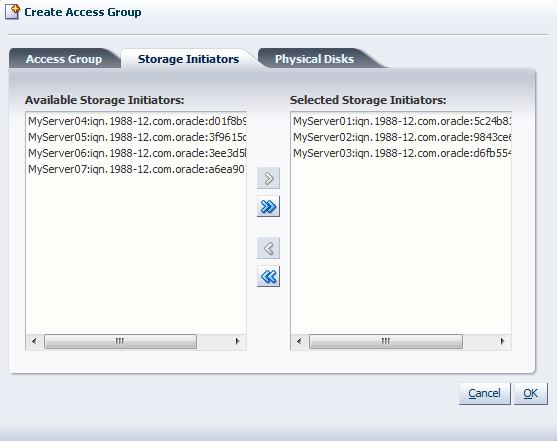 Note
NoteYou can also use the Storage Initiators perspective in the Servers and VMs tab to view and configure storage initiators on an individual Oracle VM Server. See Section 6.10.13, “Managing Access Groups and Storage Initiators on an Oracle VM Server” for more information on using this method.
Select the Physical Disks tab. It contains the available storage elements on the storage array you are registering.
NoteIf this is the first time you are configuring access to this storage array, the list of available physical disks may be empty. You may have to edit the access group afterwards to select physical disks. See Section 4.8.4, “Deleting a Storage Repository” for details.
Use the arrow buttons to move the required disks to the Selected Physical Disks box. These disks will be presented to the Oracle VM Servers of which the iSCSI initiator is part of the access group.
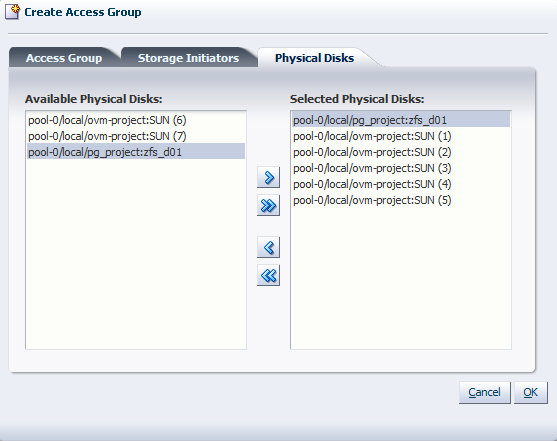
Click OK to create the new access group with the selected initiators and physical disks. The new access group now appears in the Access Groups table. If you change the Perspective of the management pane to Physical Disks, the list of presented physical disks appear in the table.
After configuring the access group it is advisable to refresh the SAN server to make sure that the current storage layout and access rules are in effect.
The selected physical disks in your non-generic storage array are now available to the Oracle VM Servers in this access group. The access group configuration of a generic iSCSI storage array is simpler, as you can see below.
To configure the access group for a generic iSCSI storage array:
In the navigation pane, select your SAN server. In the management pane, select the Perspective Access Groups. The default access group for this storage array is already present.
Select the default access group and click Edit Access Group
. The Edit Access Group
dialog box appears.
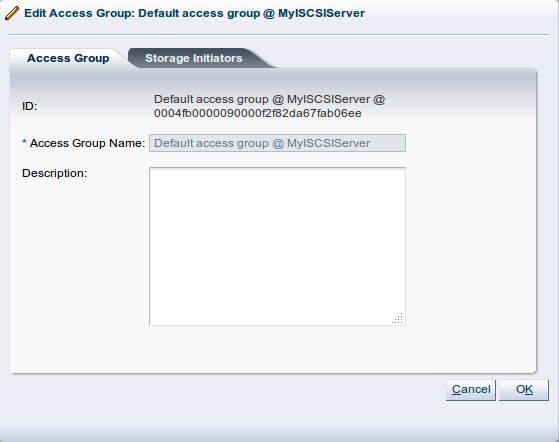
In the Access Group tab, you cannot modify the name of the default access group, but if required, you can provide a description for the access group.
Select the Storage Initiators tab. It contains the available storage initiators for this type of storage on the Oracle VM Servers in your environment.
Use the arrow buttons to move the required initiators to the Selected Storage Initiators box.
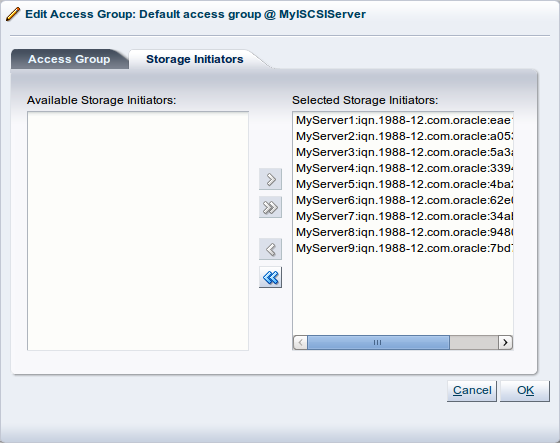 Note
NoteYou can also use the Storage Initiators perspective in the Servers and VMs tab to view and configure storage initiators on an individual Oracle VM Server. See Section 6.10.13, “Managing Access Groups and Storage Initiators on an Oracle VM Server” for more information on using this method.
For a generic storage array you cannot select which physical disks are added; all disks are automatically presented to the selected Oracle VM Servers.
Click OK to save your changes to the default access group. If you change the Perspective of the management pane to Physical Disks, the list of presented physical disks appears in the table.
After configuring the access group it is advisable to refresh the storage array to make sure that the current storage layout and access rules are in effect.
The Oracle VM Servers in this access group now have the necessary permissions to use the physical disks of the storage array; they can be deployed either as disks for virtual machines (VMs) or for storage repositories. To create storage repositories on your physical disks, see Section 4.8, “Managing Storage Repositories”.
Of course, you can always make changes to the storage configuration you just registered. The steps and options to do so are described below.
This section discusses the update options available after a storage array has been discovered through Oracle VM Manager.
To change the registered storage array configuration:
If you need to modify the registered SAN servers, select the SAN Servers folder in the navigation tree, select the SAN Servers option in the Perspective drop-down list, select one or more SAN servers in the table and click the appropriate button in the toolbar above to select one of these options:
-
Edit SAN Server:
Change SAN server settings such as name, description,
add/edit/remove access hosts; and change admin server
settings.
Note
When editing access hosts, you are unable to change the IP address or hostname for an existing access host. If you need to change this parameter, you should remove the access host that is no longer accessible at the specified IP address or hostname, and then add a new access host with the corrected information.
-
Delete SAN Server:
Remove one or more selected SAN servers from your
Oracle VM environment.
-
Refresh SAN Server:
Request an update of storage array configuration for
one or more SAN servers in case changes have been made
to the available physical disk configuration on the
servers.
-
Add/Remove Admin
Server: Determine which Oracle VM Servers are
responsible for information exchange with this SAN
server.
If you need to modify a physical disk on a storage array, select the SAN server in the navigation pane, and make sure that the Perspective of the management pane is set to Physical Disks. Select one or more physical disks in the overview table, and click the appropriate button in the toolbar above to select one of these options:
-
Edit Physical Disk:
Change the name, description and extra information of
the physical disk or make it shareable.
-
Delete Physical Disk:
Stop using one or more selected physical disks in your
Oracle VM environment.
Warning
If you delete a LUN from a registered storage array, make sure that you delete it in Oracle VM Manager first, before you physically delete it from the storage server. If you do not respect this order of operations, the system will go into an unknown state, which can only be resolved by rebooting the Oracle VM Servers the deleted LUN is connected to.
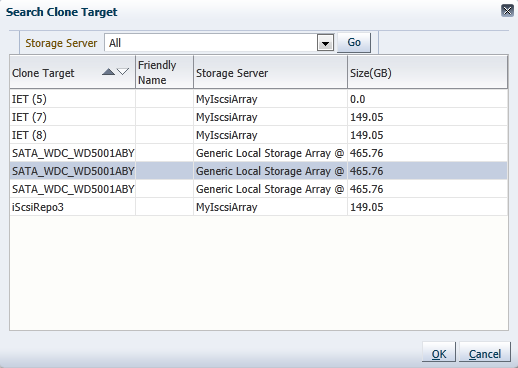
 Clone Physical Disk:
Create a thin clone, sparse copy or non-sparse copy of
the physical disk on the selected target. The options
are explained in the table below:
Clone Physical Disk:
Create a thin clone, sparse copy or non-sparse copy of
the physical disk on the selected target. The options
are explained in the table below:
Clone Target
Thin Clone
Sparse Copy
Non-sparse Copy
Physical Disk
Yes
Storage Array
Yes
Storage Repository
Yes
Yes

This applies specifically to a physical disk; for more information about VM cloning, see Section 7.9, “Cloning a Virtual Machine or Template”.
For a definition of these clone target types, see Glossary.
-
Refresh Physical
Disk: Request an update of one or more
physical disks to see if changes have been made to the
size and configuration. It is important to do this if
you have made changes to any of your physical disks,
so that Oracle VM Manager is capable of correctly determining
available disk space when performing operations like
creating a repository.
CautionA critical event is generated and the repository is put into an error state if the disk has all three of the following properties:
The disk has been shrunk
The disk is NOT an extended physical disk
The disk has an OCFS2 file system present
This is not a typical action for most users, but is worth keeping in mind when changing disk sizes.
To put the repository back to a normal state you need to extend the physical disk to a size equal or larger than the OCFS2 file system size and then acknowledge the event in repository events table. See Section B.1.11, “Acknowledging Events/Errors” for information on acknowledging events.
 Display Servers using Physical
Disk...: Displays which servers are using
the selected physical disk.
Display Servers using Physical
Disk...: Displays which servers are using
the selected physical disk.
-
Display Selected Physical Disk
Events...: Display the
Events dialog box to
see events for the physical disk.
If you need to modify the way Oracle VM Servers access the physical disks in your storage array, select the SAN server in the tree structure in the navigation pane, set the management pane Perspective to Access Groups, and select the access group you wish to modify. Using the toolbar buttons near the top of the tab, choose one of these options:
-
Edit Access Group:
Change access group settings such as name,
description, selected storage initiators and physical
disks.
-
Delete Access Group:
Remove one or more selected access groups.
 Present/Unpresent Physical
Disk: Change the selection of physical
disks to which this access group has access.
Present/Unpresent Physical
Disk: Change the selection of physical
disks to which this access group has access.
-
Display Selected Access Group
Events...: Display the
Events dialog box to
see events for the access groups.
NoteFor generic iSCSI storage arrays, only the selected storage initiators can be modified. Other properties cannot be changed.
When discovering the physical disks or LUNs of a SAN storage array, you may find some that contain unwanted file systems. Oracle VM expects physical disks and LUNs to be entirely clean, without any file system information on them, and Oracle VM Manager offers the functionality to remove a file system from a physical disk.
To remove file system from physical disks via the Servers and VMs tab:
Select the Servers and VMs tab.
In the navigation pane, select an Oracle VM Server to which the physical disk with the unwanted file system is presented.
Change the Perspective of the management pane to Physical Disks.
In the table, select one or more physical disks from which you want to remove the file systems and click Delete File System

Click OK to confirm the deletion of the file system and destroy the data stored on the physical disk.
To remove file systems from a physical disk via the Storage tab:
Select the Storage tab.
In the navigation pane, select the Shared File Systems folder.
In the table in the management pane, select one or more file systems that correspond with the storage devices you need to clean.
Click Delete File System
Click OK to confirm the deletion of the file systems and destroy the data stored on the physical disks.
When the file system is removed from the physical disk, it can be used to create a storage repository or as a raw physical disk for a virtual machine.
If an Oracle VM Server has unused hard disks, they can be used as local storage for your environment. On condition that these spare disks are completely empty, meaning they have no partitions or file systems, they are included automatically in the local storage array of the Oracle VM Server.
Note that local storage arrays are not listed under the Storage tab. You can, however, see the local storage entities in locations where you can use them; for example when you create a storage repository, select a physical disk for a VM, list the physical disks accessible to an Oracle VM Server, or select a physical clone target.
Local storage has the advantage that it is fast and easy to use, but users must be aware that there is no possibility to share this type of storage and that it cannot be used in a high-availability configuration. Consequently, if you need to store important data and run important virtual machines that require virtually uninterrupted uptime with a high degree of data loss prevention, it is recommended not to use local storage but to invest in attached storage with proper redundancy instead.
In addition, local storage lacks flexibility in a clustered setup with multiple Oracle VM Servers in a server pool. Resources and VM disks that live on local storage cannot be shared with other servers, even if they are within the same server pool. This means that you cannot use a template, ISO or VM disk stored on a local repository on another Oracle VM Server, and that live migration of VMs with locally stored disks is impossible. We strongly advise you to take this into account when designing your Oracle VM environment.
The configuration where local storage is most useful is where you have an unclustered server pool that contains only one Oracle VM Server. By configuring a storage repository (see Section 4.8, “Managing Storage Repositories”) on local storage you can set up an Oracle VM virtualized environment quickly and easily on a single server: all your resources, virtual machines and their disks are stored locally. Since there is only one Oracle VM Server, access to resources is guaranteed.
Some properties of local storage elements may be edited through the Oracle VM Server management pane: go to the Servers and VMs tab, select the appropriate server in the navigation pane and set the management pane Perspective to Physical Disks. Disks available to this server are displayed, and available operations can be executed via the toolbar buttons above.
Before you can remove a storage server, you must delete any storage repositories and server pool file systems on it.
If there is a storage repository on the storage server, all virtual machine resources such as virtual machine templates, virtual disks, assemblies and ISO files must be removed from the repository. If the storage repository is on a file server (NFS server), you should also release ownership of the storage repository before you delete the repository. Deleting an unowned storage repository only removes it from the Oracle VM Manager database; it does not delete any files in the repository. If the storage repository is on a storage array (physical disk), all of the contents of the storage repository must be deleted. Then the file system on which the storage repository resides must also be deleted.
If there is a server pool file system on the storage server, the server pool must be deleted to delete the server pool file system.
The storage server may now be shut down and decommissioned.
For more information on working with virtual machine resources, see Section 7.5, “Virtual Machine Resources”. For more information on deleting a server pool, see Section 6.9.8, “Deleting Server Pools”. For more information on releasing ownership of a storage repository, see Section 4.8.3, “Editing a Storage Repository”. For more information on deleting a storage repository, see Section 4.8.4, “Deleting a Storage Repository”.