13 Operating System Provisioning
This chapter describes the operating system (OS) provisioning features that are available in Oracle Enterprise Manager Ops Center.
The following information is included:
-
Location of Operating System Provisioning Information in the UI
-
Provisioning an Operating System on an Oracle Solaris Cluster
See Chapter 12, "Operating System Management" for information about monitoring, OS Analytics, and managing boot environments. See Chapter 14, "Operating System Updates" for information about patching and updating your operating systems. See Chapter 11, "Hardware" for information about provisioning firmware.
13.1 Introduction to Operating System Provisioning
The provisioning feature provides a method of automatically and consistently installing operating systems on managed systems from the Oracle Enterprise Manager Ops Center UI.
You can provision the following:
-
Oracle Solaris operating systems
-
Linux operating systems
-
Oracle VM Server for SPARC
-
Logical Domains
-
Oracle Solaris Clusters
This chapter focuses on basic OS provisioning. Many of the concepts apply to other types of provisioning. See Related Resources for Operating System Provisioning for links to information about provisioning Oracle VM Server for SPARC, logical domains, virtual machines, and Oracle Solaris Cluster.
Provisioning an operating system installs a specific operating system release with your defined configuration. Earlier versions of the software used a single OS Provisioning profile to define both the operating system and the configuration. Beginning with Oracle Enterprise Manager Ops Center 12.2.0.0.0, the single profile is replaced with an OS Provisioning profile and an OS Configuration profile.
Note:
If you created OS Provisioning profiles in versions of the software earlier than 12c Release 2, see Migrating OS Provisioning Profiles to the New Format for how Oracle Enterprise Manager Ops Center updates your profiles and plans to the new format.The following are needed to define your OS provisioning job:
-
OS Provisioning profile: Defines the image, provisioning, and installation requirements, including the basic OS configuration and boot network information.
-
OS Configuration profile: Defines the networking configuration. You can use a simple networking interface for any Oracle Solaris or Linux operating system, or advanced networking configurations for Oracle Solaris.
When you create a configuration profile for Oracle Solaris, you can configure the following advanced networking options:
-
Link aggregation: Provides high availability and higher throughput by aggregating multiple interfaces at the MAC layer. Link aggregation enables you to combine the capacity of multiple full-duplex Ethernet links into a single logical link.
-
IP multipathing (IPMP): Provides features such as higher availability at the IP layer. IPMP enables you to configure multiple IP interfaces into a single IPMP group.
You can implement both Link Aggregation and IPMP methods on the same network because they work at different layers of the network stack.
After you create the profiles, you create a deployment plan to apply the profiles. As part of applying the plan, you can change some of the options that you defined earlier in the profiles.
-
-
Provision OS deployment plan: Defines the OS Provisioning and OS Configuration profiles to use and the targets to provision. The plan also provides you with an opportunity to provide a specific IP address and to make changes to the network and interface for the target.
Figure 13-1 shows the basic steps that you need to plan for, and complete, a provisioning job:

As shown in Figure 13-1, the following are the basic steps that you need to plan for, and complete, a provisioning job:
-
Plan ahead. See Planning for Operating System Provisioning for items to consider before provisioning.
-
Download a file with the OS image into the Software Library. See Images and Images for OS Provisioning for details on downloading images.
-
Create an OS Provisioning profile, edit an existing profile, or reuse an existing profile. See About Oracle Solaris OS Provisioning Profiles for an overview. Creating an Oracle Solaris 11 OS Provisioning Profile or Creating an Oracle Solaris 9 or 10 OS Provisioning Profile.
-
Create an OS Configuration profile, edit an existing profile, or reuse an existing OS Configuration profile. See Creating an Oracle Solaris 11 OS Configuration Profile or Creating an Oracle Solaris 9 or 10 OS Configuration Profile.
-
For provisioning OS on logical domains, you cannot use the OS Provisioning and OS Configuration profiles created for bare-metal provisioning. You must select the Logical Domain subtype when you create OS provisioning profiles for logical domains. See Provisioning an Operating System on Logical Domains for more information about OS provisioning on logical domains.
-
Create or configure a deployment plan that includes the OS Provisioning profile and the OS Configuration profile.
Note:
To successfully provision an operating system, the plan must contain an OS Provisioning profile and an OS Configuration profile with the same platform, either SPARC or x86. For Oracle VM Server for SPARC, the control domain (CDom) version must be the same. -
Manage the service processor for one or more systems that you want to provision.
-
To provision an existing system with a new operating system, verify that the service processor is discovered. See Adding Assets Using a Discovery Profile for how to discover a service processor.
-
To provision a bare metal system, manage the service processor. See Declaring Servers for OS Provisioning for details.
-
-
Apply the deployment plan on one or more targets. When you choose a group as a target, it must be a homogeneous group where all members are the same.
Note:
The target must have a discovered and managed service processor for Oracle Enterprise Manager Ops Center to identify the system as a target.13.1.1 Default Profiles and Plans
Beginning with the 12.2.2.0 release, the software does not automatically generate a default set of Oracle Solaris 11 OS provisioning profiles and plans for each Support Repository Update (SRU) or OS image that you import. Default profiles and plans are still created for earlier versions of Oracle Solaris and for Linux images. This change significantly reduces the number of default profiles and plans that you need to manage. See the Oracle Enterprise Manager Ops Center Administration Guide for how to change the configuration to generate a set of default profiles and plans.
In releases prior to 12.2.2.0, when you import or download packages into a software library, the software creates a default OS Provisioning profile, OS Configuration profile, and deployment plan for the specific package. The profiles and plans appear in the Plan Management section of the UI.
All default profiles and plans have a naming convention that begins with default and includes the type of profile or plan and ISO image information. For example, the software creates the following for an Oracle Solaris 11.0 SPARC-10.1.0 Oracle Solaris Desktop package:
-
OS Provisioning profile:
default-profile-Oracle Solaris 11.0 sparc-10.1.0-OracleSolarisDesktop v1 -
OS Configuration profile:
default-osc-profile-Oracle Solaris 11.0 sparc-10.1.0-OracleSolarisDesktop v1 -
Deployment Plan:
default-profile-Oracle Solaris 11.0 sparc-10.1.0-OracleSolarisDesktop-plan
The default deployment plan references the associated default profiles for the package. You can edit the default profiles and plans, you can create copies of the default profiles and plans and edit them, or you can create your own profiles and plans. See Plans and Profiles for an overview of deployment and operational plans and version control.
13.1.2 Deployment Plans
A deployment plan defines the OS Provisioning and OS Configuration profiles to apply, the managed targets to provision, the network configuration and IP addresses for the targets, and the tasks to perform. Several different deployment plans let you provision an operating system. The Provision OS plan is a simple plan with the sole task of provisioning the operating system. The Provision OS plan lets you install the OS on a single system, one or more groups of systems, or a combination of systems that are attached to your network. Other plans are multi-step or complex plans where OS provisioning is one of several tasks performed. See About Deployment Plans That Provision an Operating System for more information.
In some cases, the requirements are determined by the target type that you are provisioning. Each target type has different requirements and options. See Planning for Operating System Provisioning for a list of requirements.
Note:
To provision Oracle Solaris 11 or to manage Oracle Solaris 11 boot environments, both the Enterprise Controller and Proxy Controller must be installed on a system that is running Oracle Solaris 11.To provision Oracle Solaris 9 and 10, you can use a Proxy Controller that is installed on a system that is running either Oracle Solaris or Linux.
To provision Oracle Solaris 10 using JET customization, the Enterprise Controller must be installed on a system that is running an Oracle Solaris operating system.
13.2 Roles for Operating System Provisioning
Table 13-1 lists the tasks that are discussed in this section and the role required to complete the task. An administrator with the appropriate role can restrict privileges to specific targets or groups of targets. Contact your administrator if you do not have the necessary role or privilege to complete a task. See the Oracle Enterprise Manager Ops Center Administration Guide for information about the different roles and the permissions they grant.
Table 13-1 OS Provisioning Tasks and Roles
| Task | Role |
|---|---|
|
Import or upload image |
Storage Admin |
|
Create OS Provisioning profile |
Plan/Profile Admin Asset Admin Update Admin |
|
Create OS Configuration profile |
Plan/Profile Admin Asset Admin Update Admin |
|
Create OS Provisioning Deployment Plan |
Plan/Profile Admin Asset Admin Update Admin |
|
Apply, or deploy a Deployment Plan |
Apply Deployment Plans |
13.3 Actions for Operating System Provisioning
OS Provisioning enables you to deploy an Oracle Solaris or Linux operating system on a managed system or service processor.
The following actions are available for OS provisioning:
-
Modify or create an OS Provisioning profile to define the OS platform, image, configuration, file system, naming service, and other installation parameters.
-
Modify or create an OS Configuration profile to define the OS platform, OS management, and network interface configuration.
-
Modify or create a Deployment Plan to define which OS Provisioning profile and OS Configuration profile to deploy, to identify the target systems, and to begin a provisioning job.
13.4 Location of Operating System Provisioning Information in the UI
Operating system information appears in the Assets section in the Navigation pane. The operating system appears beneath the system in the asset tree. Click the OS in the Asset section to display information.
OS Provisioning profiles, OS Configuration profiles, and Deployment Plans appear in the Plan Management section in the Navigation pane. Click a profile or plan to view more details.
13.5 Planning for Operating System Provisioning
The following are some of the items to consider before provisioning:
-
Do you need the Enterprise Controller and Proxy Controller installed on Oracle Solaris 11?
See Enterprise and Proxy Controller Requirements for OS Provisioning.
-
Do you want to use WAN boot or Dynamic Host Configuration Protocol (DHCP) services to support OS provisioning operations?
See Using WAN Boot for Oracle Solaris Operating Systems and Using Dynamic Host Configuration Protocol (DHCP).
-
Do you want to use advanced networking, either IPMP or Link Aggregation, for Oracle Solaris?
See Defining IPMP in an OS Configuration Profile and Defining Link Aggregation in an OS Configuration Profile.
-
Do you have OS images available in the library?
-
Do you have the latest firmware installed on the system?
-
Do you want to create custom scripts to add to the provisioning job?
You can create a script to perform a task that is not defined in the OS provisioning or OS Configuration profiles and include it in the OS provisioning job. For example, you might want to change permission levels or disable print capabilities. See Creating Custom Scripts.
-
Do you want to install an Agent Controller on the new operating system for full management capabilities?
-
Do you have networks and IP addresses available for provisioning?
Review the following information to plan for OS provisioning:
13.5.1 Enterprise and Proxy Controller Requirements for OS Provisioning
The operating system that the Enterprise Controller and Proxy Controller are installed on might impact your ability to provision an operating system or Oracle VM Server for SPARC. If you ever plan on provisioning, patching, or managing Oracle Solaris 11, install the Enterprise Controller and Proxy Controller on systems that are running the Oracle Solaris 11 operating system.
Table 13-2 shows the actions that you can perform based upon which operating system that the Enterprise Controller and Proxy Controller are installed.
Table 13-2 Provisioning Actions Determined by the Operating System on which the Enterprise Controller and Proxy Controller are Installed
| Action | Enterprise and Proxy Controllers on Oracle Solaris 11 | Enterprise and Proxy Controllers on Oracle Solaris 10 | Enterprise and Proxy Controllers on Linux |
|---|---|---|---|
|
OS Provisioning Oracle Solaris 11 |
Supported |
Not Supported |
Not Supported |
|
OS Provisioning Oracle Solaris 11 with JET and DHCP server |
JET: Not Supported Oracle DHCP server: Not Supported ISC DHCP server: Supported |
JET: Not Supported Oracle DHCP server: Not Supported |
JET: Not Supported Oracle DHCP server: Not Supported |
|
OS Provisioning Oracle Solaris 10 |
JET Supported Oracle DHCP server: Not Supported |
JET Supported Oracle DHCP server: Supported |
JET: Not Supported Oracle DHCP server: Not Supported |
|
OS Provisioning Oracle Solaris 10 with JET and DHCP Server |
JET: Supported Oracle DHCP server: Not Supported |
JET: Supported Oracle DHCP server: Supported |
JET: Not Supported Oracle DHCP server: Not Supported |
|
OS Provisioning Linux |
Supported |
Supported |
Supported |
|
Provisioning Oracle VM Server for SPARC |
Supported |
Supported |
Enterprise Controller: Supported Proxy Controller: Not Supported |
|
Provisioning Oracle VM Server for x86 |
Supported |
Supported |
Supported |
Note:
To provision Oracle Solaris 10 using JET customization, the Enterprise Controller must be installed on a system that is running an Oracle Solaris operating system.The specific hardware, OS, and firmware requirements that you need for provisioning Oracle VM Server for SPARC are described in Chapter 19, "Oracle VM Server for SPARC".
13.5.2 Networking for OS Provisioning
The target system boots over the network and gets its network configuration and the location of the install server from a DHCP server or WAN boot.
When provisioning an operating system, the Proxy Controller must be attached to the same subnet as the assets that you want to provision. You can use DHCP or WAN boot (Oracle Solaris only). To improve security and bandwidth, consider establishing a provisioning network for OS deployment and a production network for guest management.
When you install a system from the network, you must provide a method of determining the network configuration (IP address and gateway), which server is going to perform the boot and install, and the installation instructions.
Oracle Enterprise Manager Ops Center uses DHCP services or WAN boot to support OS provisioning operations. DHCP servers enable you to obtain the IP configuration and the rest of the information needed on the NIC. You must configure DHCP services on the Proxy Controller on the same subnet as the target systems to support OS provisioning. Configure the DHCP services in the Oracle Enterprise Manager Ops Center user interface, not from the command line. Oracle Solaris 10 uses the Oracle DHCP server with a Proxy Controller that is running Oracle Solaris 10. Oracle Solaris 11 uses an ISC DHCP server.
WAN boot enables you to provision Oracle Solaris 10 or 11 on a SPARC platform across the network. With WAN boot, the software explicitly configures the information in the Open Boot PROM (OBP) and uses WAN boot for installation.
WANBoot has a number of benefits over broadcast-based installation:
-
Not restricted to a single subnet
-
Does not require special DHCP configuration or DHCP helpers
-
Uses standard HTTP and HTTPS protocols, which cross firewalls much more easily than NFS-based package installations.
For more information, see Using WAN Boot for Oracle Solaris Operating Systems and Using Dynamic Host Configuration Protocol (DHCP).
13.5.3 Using WAN Boot for Oracle Solaris Operating Systems
The following information is in this section:
13.5.3.1 Overview of WAN Boot
The WAN boot installation method enables you to boot and install software over a wide area network (WAN) by using HTTP. By using WAN boot, you can install the Solaris OS on SPARC based systems over a large public network where the network infrastructure might be untrustworthy. You can use WAN boot with security features to protect data confidentiality and installation image integrity.
WAN boot is the default connection for Oracle Solaris 11 provisioning. Oracle Solaris 11 provisioning does not use a Flash Archive (FLAR) image.
Oracle Solaris 10 provisioning can use a WAN boot or DHCP connection. For Oracle Solaris 10, you need a FLAR to use WAN boot. When you do not use the FLAR, you must enable DHCP before you can provision.With a WAN boot connection, Oracle Solaris 10 provisioning enables you to provision a FLAR image on a SPARC system using an HTTP web server. WAN boot installation is useful when DHCP does not meet your organization's security policies or you have SPARC-based systems that are located in geographically remote areas and you need to install servers or clients that are accessible only over a public network. Because WAN boot uses an HTTP server, it works across your corporate firewall and does not require DHCP or a JumpStart boot server to be on the same network as the client systems.
Note:
When provisioning Oracle Solaris with WAN boot, the boot interface only uses untagged networks. Since the OpenBoot PROM (OBP) is not aware of VLAN tagging and cannot handle VLAN-tagged network packets, do not use a tagged network as the boot network.The WAN boot installation method uses port 5555 and HTTP to boot and install software on SPARC-based ILOM, ALOM, or M-series systems over a wide area network (WAN). For Oracle Solaris 11, you can edit the SMF service to change the default port from 5555 to another port. See the Oracle Enterprise Manager Ops Center Administration Guide for how to reconfigure the default WAN boot port.
The WAN boot security features protect data confidentiality and installation image integrity over a large public network where the network infrastructure might be untrustworthy. You can use private keys to authenticate and encrypt data. You can also transmit your installation data and files over a secure HTTP connection by configuring your systems to use digital certificates. For more information about secure WAN boot installation configuration, see the Security Configurations Supported by WAN Boot section of the Oracle Solaris 10 10/09 Installation Guide: Network-Based Installations document at http://docs.oracle.com/cd/E19253-01/821-0439/wanboottasks2-30/index.html.
Note:
WANBoot is not available on older hardware.13.5.3.2 Requirements for a WAN Boot Connection
The following are required to use WAN boot with Oracle Enterprise Manager Ops Center:
-
Oracle Solaris 11
-
The target is a SPARC ALOM-CMT, ILOM-SPARC or M-Series platform that has a supported OBP or XCP. See Checking OBP Support for WAN Boot on the Client for how to check your client OBP. For M-Series, the XSCF Control Package (XCP) file should be at least version 1082. The XCP file contains the hardware's control programs and includes the XSCF firmware and the OpenBoot PROM firmware.
-
The Enterprise Controller is installed on an Oracle Solaris operating system. You can use a SPARC or x86 platform for the Enterprise Controller.
-
WAN boot is enabled for Oracle Solaris 11 in Administration. See Disabling and Enabling WAN Boot.
Note:
When the target does not have the required OBP firmware version, the Oracle Solaris 11 provisioning profiles do not appear in the target list for the server. -
-
Oracle Solaris 10
-
The target is a SPARC (ALOM-CMT, ILOM-SPARC or M-Series) and has the minimum OBP or XCP version
-
Use a FLAR image. WAN boot is only supported in Oracle Solaris 10 if you use flash archives. ISO images require DHCP.
-
The Enterprise Controller is installed on an Oracle Solaris operating system. You can use a SPARC or x86 platform for the Enterprise Controller.
-
WAN boot is enabled for Oracle Solaris 10 in Administration. See Disabling and Enabling WAN Boot.
-
The target has the required OBP firmware installed. To determine if your client system has a WAN boot-enabled PROM, see Checking OBP Support for WAN Boot on the Client.
Note:
When the target does not have the required OBP firmware version, Oracle Solaris 10 provisioning reverts to a DHCP connection, or OBP/XCP versions + if an ISO is used. -
-
Verify that the
/opt/SUNWjet/etc/server*interface*file on the Proxy Controller is updated to use the Proxy IP to target the network.
13.5.3.3 Checking OBP Support for WAN Boot on the Client
To determine if your client system has a WAN boot-enabled PROM, perform the following to check the client Open Boot PROM (OBP) for WAN boot support.
-
Log in to a terminal window as root.
-
Enter the following to check the OBP configuration variables for WAN boot support:
# eeprom | grep network-boot-arguments -
The OBP supports WAN boot installations when the variable network-boot-arguments appears, or when the command returns the output network-boot-arguments: data not available. For example:
# eeprom | grep network-boot-argumentsnetwork-boot-arguments: data not available -
If the command in Step 2 does not return any output, the OBP does not support WAN boot installations. Use Firmware Provisioning to update the OBP to the required level.
13.5.3.4 Setting Up a WAN Boot Connection
When Oracle Enterprise Manager Ops Center is installed on an Oracle Solaris operating system, the Enterprise Controller is automatically configured to be a WAN boot server.
Oracle Solaris 11 uses WAN boot. For earlier versions of Oracle Solaris, WAN boot is the default connection for provisioning when the requirements are met and you choose to use a FLAR image. When you launch an OS provisioning on an eligible SPARC-based system and you choose a FLAR image, the software automatically uses WAN boot. If you have a group of systems to provision, the software determines whether to use WAN boot or DHCP for each system.
13.5.3.5 Disabling and Enabling WAN Boot
WAN boot is automatically installed and enabled when the Enterprise Controller is running on an Oracle Solaris operating system. You can disable or enable WAN boot in the Enterprise Controller configuration file.
To Disable and Enable WAN Boot
-
Expand the Administration section in the Navigation pane, then click Enterprise Controller.
-
Click the Configuration tab.
-
Select OS Provisioning from the Subsystem menu.
Figure 13-2 Enterprise Controller's Configuration Tab
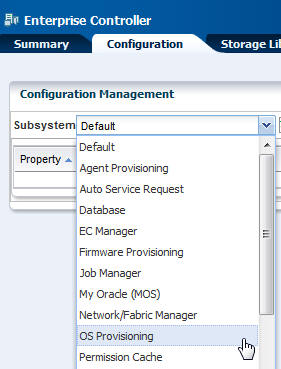
Description of "Figure 13-2 Enterprise Controller's Configuration Tab"
-
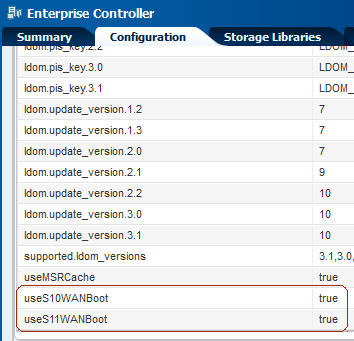
Scroll down to the WAN boot property:
-
For Oracle Solaris 11, see the following property:
usesS11WANBoot. -
For Oracle Solaris 10, see the following property:
usesS10WANBoot.
When true appears in the value column, WAN boot is enabled, as shown in Figure 13-3.
-
-
(Optional) To disable WAN boot, change the value for the property to false.
-
(Optional) To enable WAN boot, change the value for the property to true.
13.5.4 Using Dynamic Host Configuration Protocol (DHCP)
DHCP dynamically assigns IP addresses to devices on a network. A typical OS provisioning job requires an installation server and a DHCP server on the same subnet as that of the client systems. A JumpStart boot server must be on the same subnet as that of the client systems.
Before you can provision, you must configure DHCP services on the Proxy Controllers. You can use basic DHCP services, with or without defined subnets, or an external DHCP server. See the Oracle Enterprise Manager Ops Center Administration Guide for information about how to configure DHCP and subnets for OS provisioning.
Note:
Oracle Solaris 10 supports an Oracle Solaris DHCP server. The external DHCP-related files are copied only if the Proxy Controller is running on an Oracle Solaris 10 operating system.Oracle Solaris 11 only supports an ISC DHCP server.
Verify that the Dynamic Host Configuration Protocol (DHCP) services are enabled on Proxy Controllers. You cannot create a profile or assign any network if the DHCP services are not enabled. The Install Server option to provision an OS on a server is not enabled if the DHCP is not enabled on any of the interfaces.
13.5.5 Determining the Network Interface to Use
The OS Configuration profile lets you define all network interfaces you want to use on the operating system. As part of the OS Configuration profile for Oracle Solaris, you have the option to establish Link Aggregation or IPMP network interfaces that the target system will use after the operating system is configured.
The OS Configuration profile lets you define all network interfaces you want to use on the operating system. When you use an on board interface for the provisioning network, you can pair the network with option card interfaces for Link Aggregation. Before you provision, you must know your network architecture. For example, the PCIe slot and Netn connection. Figure 13-4 is an example of the PCIe slots on a T4-4 server.

You can use a built-in network interface or a network that is connected to a specific port on a network interface card (NIC). This information is not available from the Oracle Enterprise Manager Ops Center UI. You must contact your network administrator for the details.
The OS Configuration profile lets you define one or more interfaces. When you specify the network interfaces, you select an interface for the controller from a list of 32 interfaces. The 32 interfaces that appear in the wizard are all possible network interfaces, not available interfaces. Your network administrator can give you the list of available networks and interfaces. As shown in Figure 13-5, the primary interface is net_0 and is the boot interface in the OS Configuration profile. Always define the first interface that appears in the table as the boot interface. You can change the primary interface to a different network when you apply the plan.
Figure 13-5 Specify Network Interfaces in the OS Configuration Profile
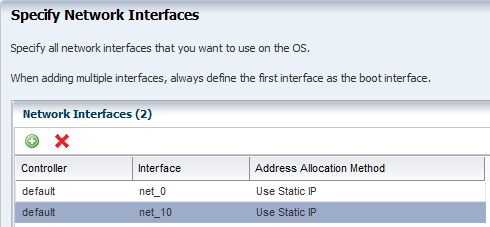
Description of "Figure 13-5 Specify Network Interfaces in the OS Configuration Profile"
The Boot Interface Resources Assignments page in the OS Configuration profile lets you provide the network resources and host name for each target. By default, the first network listed is the IP address and host name for the primary boot interface. If you do not enter a host name, your DNS server provides the name.
As shown in Figure 13-6, you specify the network resources for the boot interface of each target when you apply the plan, including assigning the network and the IP address for each target. Instead of using the network interface (NIC) to perform an OS provisioning job, you can provide a MAC address for the service processor. When you provide the MAC address, the DNS server provides the host name.
Figure 13-6 Assign Boot Interface Resources in the Deployment Plan
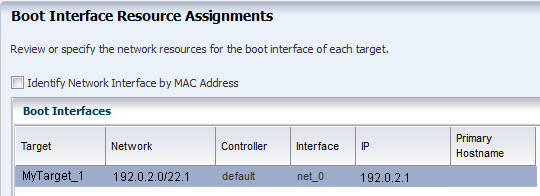
Description of "Figure 13-6 Assign Boot Interface Resources in the Deployment Plan"
Note:
When you apply the plan, the OS Configuration provides a list of available tagged and untagged networks for the boot interface. However, OS provisioning cannot boot from a tagged network and the networks will only be configured in untagged mode.You can change the networking when you apply a plan that includes OS provisioning, including changing the primary interface to a different interface for a specific target. The flexibility in defining networking is useful when you want to perform OS provisioning and boot on a backup or provisioning network, but you need the host name to match the primary interface. The first listed interface in the OS Configuration profile is the primary interface and is the interface to use when setting the system host name. You can set a second network interface to be the boot interface.
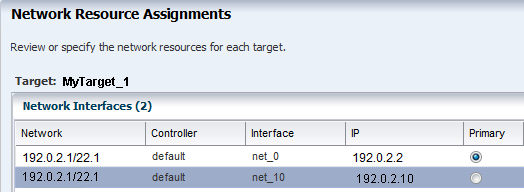
As shown in Figure 13-7, the deployment plan gives you the opportunity to define which network is the primary network when you have multiple network interfaces.
Figure 13-7 Network Resource Assignments in the Deployment Plan
Description of "Figure 13-7 Network Resource Assignments in the Deployment Plan"
Refreshing the Oracle Solaris 11 Service
Oracle Enterprise Manager Ops Center creates an Oracle Solaris 11 installadm Automated Installer service when you first configure the Proxy Controller. If the service is not created during configuration, the software creates the service when you run the first Oracle Solaris 11 OS provisioning job. The service creates and updates the Oracle Solaris 11 Image Packaging System (IPS), which contains the packages that you need to install, provision, and update your Oracle Solaris 11 operating system.
The Oracle Solaris 11 installadm service creates and adds the existing network interfaces in the /var/ai/ai-webserver/listen-addresses.conf. When you add a new network interface, you must refresh the installadm service to enable Oracle Solaris 11 AI service access on that interface.
Note:
When you add a new network interface, run thesvcadm refresh system/install/server command to refresh the service to enable Oracle Solaris 11 AI service access on that interface. Use the installadm list and the other options for installadm to check the status. See the Oracle Enterprise Manager Ops Center Command Line Interface Guide for more details.
You cannot use new interfaces to provision or update Oracle Solaris 11 until you refresh the service.
13.5.6 Provisioning an OS Using a User-Defined MAC Address
Instead of using the IP address and NIC to perform an OS provisioning job, you can provide a MAC address for the service processor.
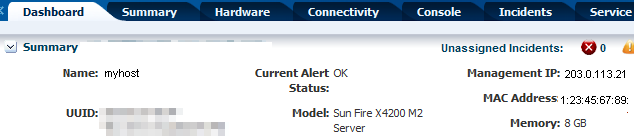
To view the MAC address, expand Assets in the Navigation pane, then select the service processor. The MAC address appears on the right side of the Summary section of the Dashboard tab, as shown in Figure 13-8.
Figure 13-8 Dashboard Page Showing MAC Address
Description of "Figure 13-8 Dashboard Page Showing MAC Address"
Special OS Provisioning and OS Configuration profiles are not required to use a MAC address for provisioning an operating system When you apply a plan that includes the OS Provisioning and OS Configuration profiles, you step through the plan to verify the configuration and provide final information before starting the job.
The Boot Interface Resources Assignments page lets you provide the network resources and host name for each target. By default, the first network listed is the IP address and host name for the primary boot interface. Alternatively, you can choose to provide the MAC address. Click Identify Network Interface by MAC Address to display the MAC Address field, as shown in Figure 13-9. Enter the MAC Address and the IP Address. When you provide the MAC address, the DNS server provides the host name.
Figure 13-9 Boot Interface Resource Assignments Using MAC Address
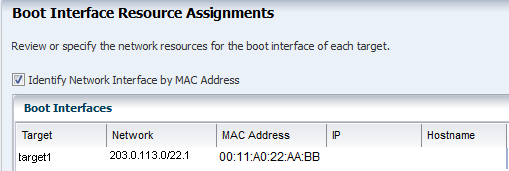
Description of "Figure 13-9 Boot Interface Resource Assignments Using MAC Address"
13.5.7 Defining IPMP in an OS Configuration Profile
IP multipathing (IPMP) groups provide network failover for your Oracle Solaris operating system, Oracle VM Server for SPARC system, and guests. Use IPMP to improve overall network performance by automatically spreading out outbound network traffic across the set of interfaces in the IPMP group.
You can configure one or more physical interfaces into an IPMP group. After configuring the IPMP group, the system monitors the interfaces in the IPMP group for failure. If an interface in the group fails or is removed for maintenance, IPMP migrates, or fails over, the failed interface's IP addresses. The failover feature of IPMP preserves connectivity and prevents disruption of any existing connections. The network access changes from the failed interface to the standby interface in the IPMP group and the data address of the failed interface migrates to the standby interface. See IP Multipathing Groups and Creating IPMP Groups for more information about IPMP groups.
13.5.8 Defining Link Aggregation in an OS Configuration Profile
Link aggregation, as defined in the IEEE802.3ad standard, is an Oracle Solaris feature that enables you to pool several datalink resources into a single logical link to improve network performance and availability. Figure 13-10 is an example of a link aggregation configured on a system. The aggregation, aggr1, has three underlying datalinks, net0, net1, and net2. The datalinks are dedicated to serving the traffic that traverses the system through the aggregation.
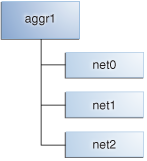
In an aggregated link, two or more NICs form a group and all members of the link aggregation provide network access at the same time. In addition to the high availability and load balancing that an IPMP group provides, an aggregated link can provide increased throughput when the network ports are also aggregated.
Link aggregation has the following features:
-
Increased bandwidth: The capacity of multiple links is combined into one logical link.
-
Automatic failover and failback: By supporting link-based failure detection, traffic from a failed link is failed over to other working links in the aggregation.
-
Improved administration: All underlying links are administered as a single unit.
-
Less drain on the network address pool: The entire aggregation can be assigned one IP address.
-
Link protection: You can configure the datalink property that enables link protection for packets flowing through the aggregation.Resource management: Datalink properties for network resources as well as flow definitions enable you to regulate applications' use of network resources.
When you create an OS Configuration profile, link aggregation is a networking option that is available for Oracle Solaris and Oracle VM Server for SPARC. To define link aggregation networking, you must define a load balancing policy and a MAC address policy.
Aggregated interfaces are treated as a single network interface. Oracle Enterprise Manager Ops Center includes any link aggregations in the list of available NICs, as if the link aggregation were an individual interface. To assign a network with a link aggregation to an Oracle VM Server or global zone, select the link aggregation from the NIC list. You can view the link aggregation details on the Oracle VM Server's or global zone's Network tab. See Link Aggregation in Chapter 17, "Networks for Virtualization", Managing Global Zone Networks in Chapter 18, "Oracle Solaris Zones", or in the tasks in Chapter 19, "Oracle VM Server for SPARC" for more information.
-
L2: Determines the outgoing link by hashing the MAC (L2) header of each packet
-
L3: Determines the outgoing link by hashing the IP (L3) header of each packet
-
L4: Determines the outgoing link by hashing the TCP, UDP, or other ULP (L4) header of each packet
Link Aggregation Control Domain (LACP)
If the aggregation topology involves a connection through a switch, determine whether the switch supports LACP. When the switch supports LACP, you must configure LACP for the switch and the aggregation.
-
LACP Mode: Select No when the switch does not support LACP. When the aggregation topology involves a connection through a switch that supports LACP, configure LACP for the switch and the aggregation and define whether LACP runs in Active or Passive mode.
-
LACP Timer: Define the timer as either Short or Long.
-
Auto: Use MAC address of any network interfaces in the Link Aggregation
-
Fixed: Use MAC address of a specific network interface. Select the network interface to use in the next step.
Link aggregations perform similar functions as IPMP to improve network performance and availability.
When interfaces are aggregated, they are treated as a single network interface. Oracle Enterprise Manager Ops Center displays the link aggregation in the list of available NICs as if it were an individual interface. You can assign a network with a link aggregation to a non-global zone, and select the link aggregation from the NIC list.
13.5.9 Adding Images to Local Software Libraries
The images and supporting metadata that you use to provision and update operating systems are stored in software libraries, as shown in Figure 13-11.
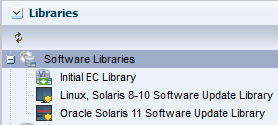
The software libraries shown in Figure 13-11 are created when you install Oracle Enterprise Manager Ops Center:
-
Oracle Solaris 11 Software Library: Acts as a local copy of the Oracle Solaris 11 Image Packaging System (IPS) repository. This library contains the packages to install, provision, and update Oracle Solaris 11 operating systems.
-
Linux, Oracle Solaris 8-10 Software Library: Contains Knowledge Base metadata, operating system package and patch content for Linux and Oracle Solaris and operating systems.
-
Initial EC Library: Stores the operating system (and firmware) images that you download.
You can use the following methods to add images:
-
Upload ISO Image: Copies the ISO image from a system's web browser to the library.
-
Import Image: Copies the ISO or FLAR from a file system location on the Enterprise Controller system to the library.
-
Download OS Image: Downloads the OS image from My Oracle Support to the library.
See Chapter 5, "Software Libraries" for more information about software libraries and adding images to the library.
13.5.10 Using the Latest Firmware Version
Verify that you have the latest firmware version before provisioning an operating system, including Oracle VM Server for SPARC and bare metal provisioning.
13.5.11 About NVRAC When Provisioning an OS on a SPARC Platform
When you run an OS provisioning job on a SPARC machine, Oracle Enterprise Manager Ops Center resets the configuration to the factory default configuration and removes the user-defined commands that are executed during start-up and that are stored in the NVRAMRC file in the non-volatile RAM (NVRAM). The Control Domain OS Provisioning profile does give you the option to preserve the information in the NVRAMRC file. See Chapter 19, "Oracle VM Server for SPARC" for more information about provisioning a Control Domain and Oracle VM Server for SPARC.
13.5.12 Creating Custom Scripts
You can create a script and reference the script in the OS Provisioning profile. When the script is saved in a directory that the Enterprise Controller can access, Oracle Enterprise Manager Ops Center deploys the script as part of the provisioning job. You can save scripts in a local directory of the Enterprise Controller, or in a directory that the Enterprise Controller mounts using NFS.
You cannot use custom scripts when provisioning Oracle Solaris 11.
13.5.13 Determining Agent Management Mode
You can manage an operating system in one of two modes: agent managed or agentless managed. The management mode determines the features that are enabled for your operating system.
When you choose the agent managed mode, you can perform software updates and create operating system reports. When you choose agentlessly managed, SSH credentials are required to monitor the operating system. You can change the management mode after the OS is provisioned.
Agent managed is the more robust management mode because the Agent Controller enables a greater level of communication with the Proxy Controller and Enterprise Controller than the agentless managed operating systems. You can use the features and perform the actions described in this chapter with an agentless managed operating system, but OS update functionality requires an agent managed operating system. You can manage your operating systems by installing an Agent Controller on the OS or by using SSH to perform tasks. See Using Agent Management for Operating Systems for more details on managing operating systems with or without an Agent Controller. See Virtualization Agent Controllers for more information about Agent Controllers specifically used for virtualization.
13.6 About OS Provisioning Profiles
To complete provisioning, you must have an OS Provisioning profile and an OS Configuration profile. OS Provisioning profiles define the provisioning and installation details.
The following information is covered in this section:
See Default Profiles and Plans for information about default OS Provisioning profiles. When you download an OS image, the job saves the image in the Initial EC Software Library. You can create an OS Provisioning Profile from that image:
-
To create an OS Provisioning profile for Linux and Oracle Solaris versions earlier than Oracle Solaris 11, add the images into the Initial EC Library.
-
To create an OS Provisioning profile for Oracle Solaris 11, add the images to the Oracle Solaris 11 Software Library.
OS Provisioning profiles are in the Plan Management section of the UI. To view the profiles, expand Plan Management, scroll down to Profiles and Policies, then open the OS Provisioning folder. You can create new profiles or copy and edit existing profiles in Plan Management.
You can create one or more new libraries to organize and save the images to a location other than the Initial EC Software Library. You can save the images in a local software library on the Enterprise Controller or in a Network Attached Storage (NAS) software library that you create on an NFS server that the Enterprise Controller can access. See Chapter 5, "Software Libraries" for more information about software libraries and importing images.
After you download the OS images, you can copy or create new OS Provisioning profiles. You can reuse the profiles in a variety of plans that have OS provisioning as a step.
MPxIO is highly desirable on SPARC, whether for a standalone Global Zone or an Oracle VM Server for SPARC Control Domain. MPxIO is enabled on the default OS Provisioning profiles.
See Defining Link Aggregation in an OS Configuration Profile and Defining IPMP in an OS Configuration Profile for information about Link Aggregation and IPMP networking options.
13.6.1 About Oracle Solaris OS Provisioning Profiles
For each OS Provisioning profile, you specify the OS image, OS setup parameters, user account details, ISCSI disk usage, file system parameters, and the naming service for the operating system.
When using an OS Provisioning profile to install Oracle Solaris 11, the profile always installs the latest version of the Oracle Solaris 11 operating system.
When you specify the naming service in the OS Provisioning profile, you must ensure that you enter the correct information in each of the fields. IP addresses 0.0.0.0 or 255.255.255.255 are allowed. Enter each IP address in a new row in the Name Server field. In the Domain Name Search List field, enter each domain name, such as 1domain.com and 2domain.com, on a new line.
See Default Profiles and Plans for information about default OS Provisioning profiles and plans. When you have the software configured to automatically create a default profiles, each profile is defined by the OS image that is in the Software Library. When you import an OS image into the software library, the software creates a default OS Provisioning profile. The profile name is the OS description prepended with the term default-profile. For example, default-profile-Oracle Solaris 11.0 sparc 10.1.0-OracleSolarisDesktop. You can edit the default profile, or you can copy the default profile to create a new profile that you can edit to define your parameters.
JumpStart Enterprise Toolkit for Oracle Solaris 9 and 10
For Oracle Solaris 9 and 10 only, you can optionally use JumpStart Enterprise Toolkit (JET) modules to specify additional Installation Parameters. Oracle Solaris 11 uses the Automated Installer (AI) instead of JET.
Within the Oracle Enterprise Manager Ops Center UI, there are 2 methods of influencing the JET template variables:
-
Import a JET Template
-
Add JET variables to the OS provisioning profile
You cannot manipulate the JET template in the UI. When you want to make changes to a template, make the changes and then import the template.
To learn more about JET and how to use JET in a profile, see About JumpStart Enterprise Toolkit (JET) for Oracle Solaris.
13.6.2 About Linux Provisioning Profiles
Each profile is defined by the OS image that is in the Software Library.
When you have the software configured to automatically create a default profiles, each profile is defined by the OS image that is in the Software Library. When you import an OS image into the software library, the software creates a default OS Provisioning profile. The profile name is the OS description prepended with the term default-profile. You can edit the default profile, or you can copy the default profile to create a new profile that you can edit to define your parameters. See Default Profiles and Plans for information about default OS Provisioning profiles and plans.
When you specify the naming service in the OS Provisioning profile, ensure that you enter the correct information in each of the fields. IP addresses 0.0.0.0 or 255.255.255.255 are allowed. Enter each IP address in a new row in the Name Server field. In the Domain Name Search List field, enter each domain name, such as 1domain.com and 2domain.com, on a new line.
13.7 About OS Configuration Profiles
OS Configuration profiles define the operating system, network configuration details, host name, and server pool configuration.
The OS Configuration profile enables you to specify and assign the following network resources:
-
Controller
-
Interface
-
Address Allocation Method
-
Network
-
IP address
A server pool is a group of one or more virtualization hosts with the same processor architecture that have access to the same virtual and physical networks, and storage resources. Server pools provide load balancing, high availability capabilities, and sharing of some resources for all members of the pool. Once created, you can edit the server pool settings.
You can create server pools for Oracle VM Server (for SPARC and x86) and for Oracle Solaris Zones. When you want the server to be added to a server pool, you can configure the OS Configuration profile to assign the newly provisioned server to a compatible server pool or you can create a new server pool based on the attributes of the newly provisioned server and assign default server pool settings. See Chapter 21, "Server Pools".
Two advanced network interface options are available for Oracle Solaris and Oracle VM Server for SPARC systems:
-
Link Aggregation: Provides high availability and higher throughput by aggregating multiple interfaces at the MAC layer.
-
IP Multipathing (IPMP): Provides features such as higher availability at the IP layer.
You can implement both methods on the same network because they work at different layers of the network stack.
13.7.1 Defining Link Aggregation in an OS Configuration Profile
Link aggregation groups two or more NICs. All members of the link aggregation provide network access at the same time and are treated as a single network interface. The link aggregation appears in the list of available NICs in the UI as an individual interface.
Link aggregation is a networking option when you create an Oracle Solaris or Oracle VM Server for SPARC OS Configuration profile. You define the link aggregation load balancing policy and a MAC address policy.
-
Expand Plan Management in the Navigation pane.
-
Select OS Configuration in the Profiles and Policies tree. A list of existing OS Configuration profiles appears in the center pane.
-
Click Create Profile in the Actions or center pane.
-
Name the profile and enter a profile description. Select Solaris as the Subtype and OSP SPARC or OSP x86 as the Target Type. Click Next.
-
The default setting is to automatically manage the OS with Oracle Enterprise Manager Ops Center and Deploy the Agent Controller. This option provides the most robust management capabilities. If you do not want to enable SAN storage connectivity, deselect Enable Multiplexed I/O (MPxIO). Click Next.
-
Select Use Link Aggregation for the Networking Services, then click Next.
-
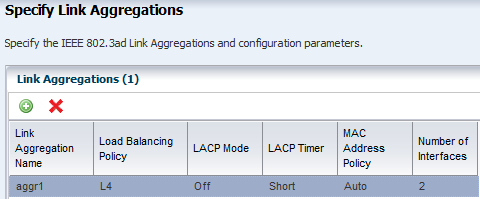
Select a link aggregation name, define the Load Balancing Policy, LACP Mode, MAC Address Policy and the number of link aggregations you want. Click Next.
-
Load Balancing Policy determines the outgoing link:
-
L2: Hashes the MAC (L2) header of each packet
-
L3: Hashes the IP (L3) header of each packet
-
L4: Hashes the TCP, UDP, or other ULP (L4) header of each packet
-
-
LACP
Configure the LACP for the switch and aggregation when your link aggregation topology has a switch connection that supports LACP.
-
MAC Address Policy
-
Auto: Use MAC address of any network interfaces in the Link Aggregation.
-
Fixed: Use MAC address of a specific network interface. Select the network interface to use in the next step.
-
-
-
Specify the interface for each link aggregation. The number of interfaces is determined by the number that you defined in step 7. A list of all possible interfaces appears in the wizard. Work with your network administrator to know the interfaces that are available and which interfaces to configure.
Figure 13-13 Specify Link Aggregation Interfaces
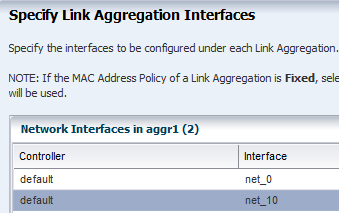
Description of "Figure 13-13 Specify Link Aggregation Interfaces"
-
Review the summary of the parameters selected, then click Finish to create the OS Configuration profile for link aggregation.
13.7.2 Defining IPMP in an OS Configuration Profile
IP multipathing (IPMP) groups provide network failover for your Oracle Solaris operating system, Oracle VM Server for SPARC system, and guests.
You can configure one or more physical interfaces into an IPMP group. After configuring the IPMP group, the system monitors the interfaces in the IPMP group for failure. If an interface in the group fails or is removed for maintenance, IPMP migrates, or fails over, the failed interface's IP addresses. The failover feature of IPMP preserves connectivity and prevents disruption of any existing connections. The network access changes from the failed interface to the standby interface in the IPMP group and the data address of the failed interface migrates to the standby interface. See IP Multipathing Groups and Creating IPMP Groups for more information about IPMP groups.
-
Expand Plan Management in the Navigation pane.
-
Select OS Configuration in the Profiles and Policies tree. A list of existing OS Configuration profiles appears in the center pane.
-
Click Create Profile in the Actions or center pane.
-
Name the profile and enter a profile description. Select Solaris as the Subtype and OSP SPARC or OSP x86 as the Target Type. Click Next.
-
The default setting is to automatically manage the OS with Oracle Enterprise Manager Ops Center and Deploy the Agent Controller. This option provides the most robust management capabilities. If you do not want to enable SAN storage connectivity, deselect Enable Multiplexed I/O (MPxIO). Click Next.
-
Select Use IPMP for the Networking Services, then click Next.
-
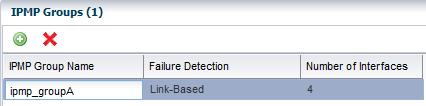
Use the default IPMP group name, or click the field and enter a name. Select the Failure Detection Policy, and enter the number of interfaces you want. Click Next.
Probe based failure detection probes the target systems to determine the condition of the interface. Each target system must be attached to the same IP link as the members of the IPMP group.
-
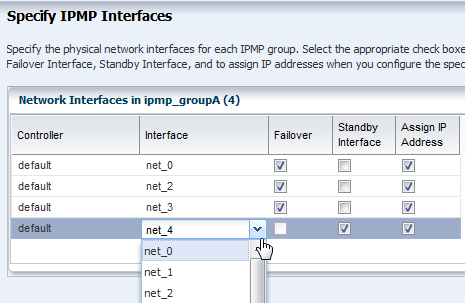
Specify the network interfaces. Select an interface from the list. For each interface, select either the Failover or Standby Interface check box. If you use Link and Probe based failure detection, you do not need to provide test IP addresses. The number of interfaces is determined by the number that you defined in step 7.
Note:
A list of all possible interfaces appears in the wizard. Work with your network administrator to know the interfaces that are available and which interfaces to configure. -
Review the summary of the parameters selected, then click Finish to create the OS Configuration profile for IPMP groups.
13.8 Migrating OS Provisioning Profiles to the New Format
If you have OS Provisioning profiles in a version of Oracle Enterprise Manager Ops Center earlier than 12c Release 2, use the Upgrade feature to upgrade to Oracle Enterprise Manager Ops Center 12.2 and automatically upgrade the profiles to the new format. The software upgrade feature automatically migrates the OS Provisioning profiles to an OS Provisioning profile and an OS Configuration profile. The original names of the migrated profiles are appended with osp or osc.
In addition to updating the profiles, existing deployment plans that use an OS Provisioning profile are also updated to use the new OS Provisioning and OS Configuration profiles. Migrating to the new format does not change the version number of the profile or plan.
For every OS provisioning profile created in Oracle Enterprise Manager Ops Center 12.1, a new OS Provisioning profile and a new OS Configuration profile are created in the 12.2 release. The new profiles have the following naming convention: <12.1_profile_name>-osp and <12.1_profile_name>_osc respectively. Each profile is version one. For example, an OS Provisioning profile is named S11_SPARC_LargeServer in the 12.1 release. In the 12.2 release, the profile is converted into the following two profiles: S11_SPARC_LargeServer_osp and S11_SPARC_LargeServer_osc. The original profile S11_SPARC_LargeServer is deleted.
In the 12.1 release, both bare metal provisioning and logical domain guest provisioning were done using the same profiles. Beginning with 12.2, you can only provision a guest with the Logical Domain profile sub-type. When you upgrade from release 12.1 to release 12.2, a new Logical Domain profile is created for each Oracle Solaris 11 bare metal provisioning profile that was created in 12.1. The release 12.1 logical domain OS Provisioning profile is converted in the 12.2 release to a new logical domain OS Provisioning profile and a new OS Configuration profile and the original profile is deleted. The new profiles use the following naming convention: <12.1_profile_name>-logicaldomain-osp and <12.1_profile_name>-logicaldomain-osc respectively. For example, an OS Provisioning profile is named S11_SPARC_LargeServer in the 12.1 release. In the 12.2 release, the profile is converted into the following two profiles: S11_SPARC_LargeServer_osp and S11_SPARC_LargeServer_osc.
The deployment plans conversion is similar to the profile conversion. New deployment plans are created from the old plans, the plan version is updated, and the plan name is prefixed with <12.1_plan_name>. For example, the name for the new logical domain plan is <12.1_plan_name>-logicaldomain-osp-plan. The new plans use the new OS Provisioning and OS Configuration profiles. For Provision OS plans, the just the version of the 12.1 plan is updated and the OS Provisioning and OS Configuration profiles are added to the plan.
13.9 About Deployment Plans That Provision an Operating System
Deployment plans execute the OS Provisioning profile and OS Configuration profile on the targets you select, enabling you to provision in a consistent and repeatable way.
Note:
When adding an OS Provisioning profile and an OS Configuration profile to a plan, use the profiles that reference the same platform subtype.Deployment plans are all based on defined templates that provide a sequence of steps to perform a task. After you create the profiles to define your tasks, you select a deployment plan template and create a plan that uses specific profiles. You can reuse the profiles in different plans to create consistency.
The following simple, multi-step, and complex plans include steps for OS provisioning:
-
Provision OS: Use this plan to provision an operating system.
-
Install Server: Use this plan to provision an operating system on the server and update the OS. The Update Software step enables you to update the OS or install additional OS packages. This step is run as part of the OS provisioning job.
-
Configure M-Series Hardware, Create and Install Domain: Use this plan to configure an M-Series server, create dynamic system domains, provision OS on the domains, and update the domains.
-
Configure and Install Dynamic System Domain: Use this plan to create dynamic system domains, provision and update OS on the domains.
-
Configure Server Hardware and Install OS: Use this plan to configure a service processor or a chassis, provision OS and update the OS.
-
Configure and Install Logical Domains: Use this plan to create logical domains and provision OS on the logical domains.
When you select a plan to apply, a list of eligible targets appears in the target selector list. Targets are eligible when they meet the criteria of the profiles, such as type of platform, and for which you have the correct permissions to perform the provisioning tasks. Before deploying the plan on the selected targets, you have the ability to review, add, and override the configuration settings for the plan. For example, you can change the IP address and the boot interface.
13.10 Provisioning Oracle Solaris 11
The following information is in this section:
13.10.1 About Oracle Solaris 11 and Provisioning
Oracle Solaris 11 uses a new OS provisioning technology, called the Automated Installer. This feature replaces the older JumpStart Enterprise Toolkit (JET) technology that Oracle Enterprise Manager Ops Center uses to provision earlier versions of Oracle Solaris.
Oracle Enterprise Manager Ops Center reduces the complexity by using a local copy of the Oracle Solaris 11 Software Library on the Enterprise Controller and creating an Automated Installer server on the Proxy Controller for your use.
Note:
To provision an Oracle Solaris 11 operating system, the Enterprise Controller and Proxy Controller must both be running on an Oracle Solaris 11 operating system. The repository resides on the Enterprise Controller and the Automated Installer server resides on the Proxy Controller. When the Enterprise Controller and Proxy Controller are not running on Oracle Solaris 11, the Oracle Solaris 11 library and OS provisioning actions are not available.Oracle Enterprise Manager Ops Center can create and run multiple installadm services on the same Proxy Controller, one for each solaris-auto-install mini root. For example, Oracle Solaris 11, 11.1, 11.1.6.4.0, or whenever the solaris-auto-install version increases in an SRU (Support Repository Update). An SRU is a package of bug fixes and updates that releases on a regular basis. SRUs eliminate the ad hoc patching from Oracle Solaris 10 and earlier versions of the operating system. Each Oracle Solaris SRU builds upon, and only contains the changes from, the preceding Oracle Solaris 11 update. Oracle Solaris 11 uses a 5-digit taxonomy to define the SRU. The digits represent Release.Update.SRU.Build.Respin. For example, Oracle Solaris 11.1.6.4.0.
The Oracle Solaris 11 network architecture is significantly different from previous releases of Oracle Solaris. The implementation, the names of the network interfaces, the commands, and the methods for administering and configuring them is different from previous versions of Oracle Solaris. These changes were introduced to bring a more consistent and integrated experience to network administration, particularly as administrators add more-complex configurations including link aggregation, bridging, load balancing, or virtual networks. In addition to the traditional fixed networking configuration, Oracle Solaris 11 introduced automatic network configuration through network profiles.
The OS Provisioning and OS Configuration profiles that you use for provisioning Oracle Solaris 11 contain all of the information needed, such as type of target, OS image, time zone and language setup disk partitions, naming services and network details. With Oracle Solaris 11, you can define link aggregations or IPMP groups for advanced networking.
You can provision Oracle Solaris 11 zones as part of the OS installation. After a system is bootstrapped with a minimized operating system, the operating system is installed from the Oracle Solaris 11 Software Update Library in Oracle Enterprise Manager Ops Center. The zones are provisioned during the initial system reboot after the base operating system is installed.
13.10.2 Steps for Oracle Solaris 11 Provisioning Plan
A provisioning plan includes an Oracle Solaris 11 OS Provisioning profile and an OS Configuration profile. You can create a new plan or you can copy an existing plan and edit it to create a new plan.
Note:
When you create the plan, both the OS Provisioning profile and the OS Configuration profile must have the same platform subtype, either Solaris SPARC or Solaris x86.Perform the following before you provision the operating system:
-
Verify that the Oracle Solaris 11 Software Library is configured on the Enterprise Controller and the package you want is available in the library.
If the image is not in the Oracle Solaris 11 Software Library, import the OS image.
Note:
Uploading the packages from Oracle to the library can take several hours. -
(Optional) Edit an existing OS Provisioning profile or create a new profile.
-
Discover the service processors of the target systems.
-
Verify that any scripts the profile uses are in a directory that the Enterprise Controller can access. You can save scripts in a local directory of the Enterprise Controller, or in a directory that the Enterprise Controller mounts using NFS.
-
When you are provisioning a dynamic system domain of an M-Series server, the domain must have an IP address.
Note:
It is a good practice to place the systems that you are going to provision in Maintenance Mode so that you can take the system offline without generating alerts and incidents.Steps to Provision Oracle Solaris 11
Complete the following steps to provision an operating system:
-
Create an Oracle Solaris 11 Provisioning profile. See Creating an Oracle Solaris 11 OS Provisioning Profile.
-
Create an Oracle Solaris Configuration profile.
-
Create a deployment plan that uses Oracle Solaris 11 OS Provisioning and OS Configuration profiles, or verify that a plan and profiles are available and configured with the parameters you want to use.
See Specifying Common Oracle Solaris 11 Parameters for more information.
-
Discover the service processor of the target system.
-
Place the asset in Maintenance Mode to prevent events related to a system going offline.
-
Select the deployment plan and define the targets for the plan. The target must be an x86 server or WAN boot-capable SPARC server. Review the configuration parameters and make any last minute changes in the plan before applying the plan to the target system.
13.10.3 Specifying Common Oracle Solaris 11 Parameters
Oracle Solaris 11 uses the following components for provisioning an operating system:
-
Oracle Solaris 11 Software Library: A local version of the software package repository. You can update the Oracle Solaris 11 Software Library, as needed, and then provision multiple systems without using a network connection to Oracle for each provisioning job. See Software Libraries for more information about adding content to libraries.
-
Installation manifest: Defines the system configuration, including what software to install and details on the virtualized environments to provision. A default manifest is included with each Image Packaging System (IPS) software repository.
-
DCHP or WAN boot connection
-
x86 client: Requires a DHCP connection.
-
SPARC client: Requires a DHCP or WAN boot connection. Oracle Enterprise Manager Ops Center automatically sets up WAN boot connection.
-
Note:
Oracle Solaris 11 only supports a ISC DHCP Server. Oracle Solaris DHCP Server is not supported.13.10.4 Creating an Oracle Solaris 11 OS Provisioning Profile
You can create multiple profiles to respond to subtle variations in hardware attributes, software profiles, or your organization's requirements.
When you create an Oracle Solaris 11 OS Provisioning profile, you select the architecture, either SPARC or x86, to display the boot image and distribution for your architecture. You must provide non-root user credentials and root user credentials. You can only use non-root user credentials to login or SSH to the client after install.
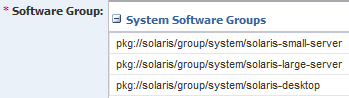
Oracle Solaris 11 System Software Groups
Oracle Solaris 11 provides three system software group packages that install different sets of packages appropriate for a larger server, a smaller server or non-global zone, or a graphical desktop environment. The boot image is associated with the software group.
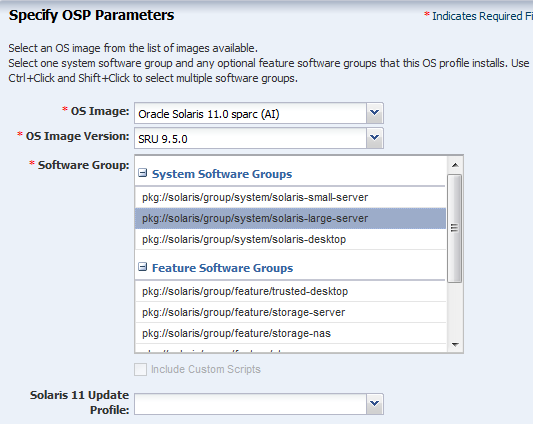
As shown in Figure 13-16, you must select one of the following software groups:
-
large-server: Provides common network services for an enterprise server. This group package also contains hardware drivers that are required for servers, such as InfiniBand drivers.
-
small-server: Provides a smaller set of packages to be installed on a small server or non-global zone.
-
desktop: Provides the GNOME desktop environment and other GUI tools such as web browsers and mail. It also includes drivers for graphics and audio devices.
See the Oracle Solaris 11 Package Lists documentation for a detailed comparison of the three packages and list of contents.
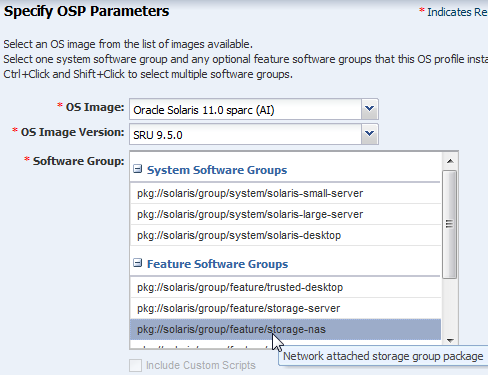
Oracle Solaris 11 Feature Software Groups
The boot image might have additional software groups that you can select, such as trusted-desktop, storage-server and storage-nas. Each group has a tool tip that describes the group, as shown in Figure 13-17. You can select one or more of these groups.
To install the operating system on an iSCSI disk, select the Use iSCSI Disk option when you create the profile, then specify the iSCSI disk settings. When you use this option, you must provide the following parameters when you deploy the OS Provisioning plan:
-
Storage server IP
-
SCSI disk LUN
Note:
When you specify the naming service in the OS Provisioning profile, each IP address in the Name Server field must be entered in a new row. IP addresses 0.0.0.0 or 255.255.255.255 are allowed. In the Domain Name Search List field, enter each domain name, such as1domain.com and 2domain. com, on a new line.To Create an Oracle Solaris 11 OS Update Profile for Provisioning
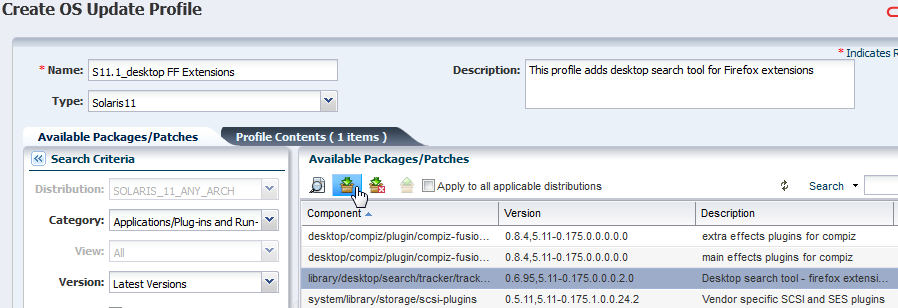
You might create an update profile to install a specific Oracle Solaris 11 version or package, uninstall a package, or install a script. First, create a user-defined Oracle Solaris 11 Update Profile to define the action. When you create or edit an OS Provisioning profile, you can add your OS Update profile.
This example shows how to create an OS Update profile that installs the Firefox Extensions package.
-
Expand Plan Management in the Navigation pane, then select Update Profiles under Profiles and Policies.
-
Click New Profile.
-
Enter a name and description for the profile, then select Solaris 11 as the Type.
-
Select Distribution, Category, View, and Version from the Search Criteria. Select Show Only Support Repository Updates to further filter the list. The available search criteria are determined by your selection. In this example, select Applications/Plug-ins and Run-times from the Category menu and Latest Versions. A list of available packages appears on the right side of the page.
-
Highlight the package. Click the View Details icon, which is the first icon, to get more information about your selection. To add the package components to the Profile Contents, select the components, then click the Install icon.
-
Click Create OS Update Profile. The profile appears in the list of Update profiles.
To Create an Oracle Solaris 11 Provisioning Profile
You can use the default profiles, copy a default profile to create a new profile, or create a new profile.
See the Oracle Enterprise Manager Ops Center Provisioning Oracle Solaris 11 Operating System document for how to create an OS provisioning profile, an OS Configuration profile, and a Provision OS deployment plan to complete a provisioning job.
This example shows how to create a new profile to provision a system with Oracle Solaris SPARC.
-
Expand Plan Management in the Navigation pane, then select OS Provisioning in the Profiles and Policies tree.
-
Click Create Profile in the Actions pane.
-
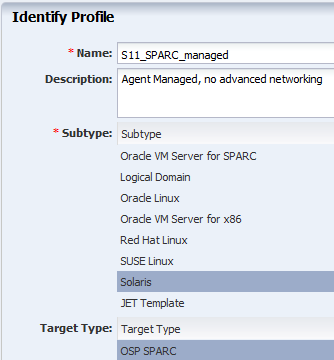
Name the profile and complete the profile description. A detailed description will help when determining which profile to use when several are available. Select Solaris x86 or Solaris SPARC from the Subtype and Target Type options, then click Next.
Figure 13-19 Identify Oracle Solaris 11 OS Provisioning Profile
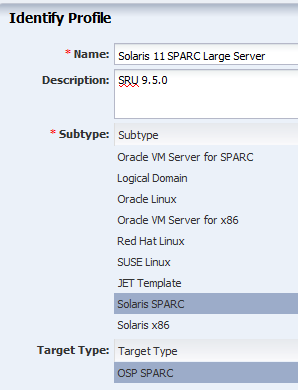
Description of "Figure 13-19 Identify Oracle Solaris 11 OS Provisioning Profile"
-
Select the OS image, OS Image Version, and Software group. Optionally, you can select a user-defined Solaris 11 Update profile. Click Next.
-
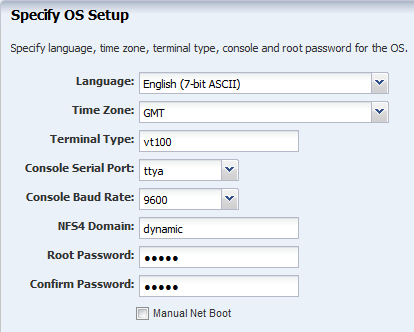
Edit the OS Setup parameters for language, time zone, terminal type, console serial port and baud rate, and NFS4 Domain, as needed. Enter a password for root in the Root Password and Confirm Password fields. Click Next.
-
Language: Select a language from the list.
-
Time Zone: Specify the time zone for the OS.
-
Terminal Type: Select a terminal type from the list.
-
Console Serial Port: To monitor the installation using a serial connection, select the correct console serial port device.
-
Console Baud Rate: To monitor the installation using a serial connection, select the correct serial port device baud rate.
-
NFS4 Domain: Enter the NFS4 domain name that the target system will use. The dynamic value for NFSv4 domain name enables the NFSv4 domain to be derived dynamically, at run time, based on the naming service configuration. You can also provide valid domain name to hard code the value for NFSv4 domain.
-
Password: Enter the root password for the root user on systems provisioned using this profile. Re-enter the password for confirmation. The default password is admin.
-
Manual Net Boot: Select this option when you want to manually control booting from the network. When you select this option, you are prompted to manually boot the system before the provisioning job completes.
-
For DHCP servers: Use the
boot net - installcommand to manually boot the system over the network. -
For WAN boot servers: Set the WAN boot parameters in the Open Boot PROM (OBP) before running the
boot net - installcommand.Note:
The client-ID value of the WAN boot parameters must use the following format: 01<macaddress>. For example, client-id=0100123FF4E56E.
-
-
-
Specify the User Account details by entering a user name and password, then click Next.
-
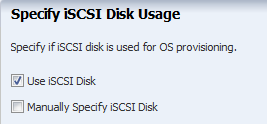
On the Specify iSCSI Disk Image page, select the Use iSCSI Disk check box if you want to use an iSCSI disk for OS provisioning. When you select Use iSCSI Disk, another check box appears. Select Manually Specify iSCSI Disk to manually define the iSCSI disk resource assignments later. Click Next.
Note:
To assign a volume group and automatically create a new iSCSI disk, the DSL library must be attached to the server. -
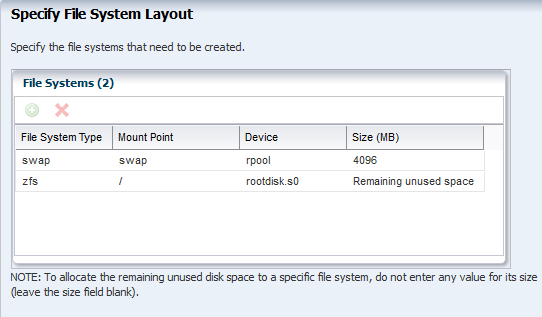
Review and edit the default file system layout, then click Next.
This example uses the default file system layout. To specify changes to the default File System space, click the size field for the file system, and redefine.
-
Select the Naming Service as None, DNS, NIS, or LDAP, then click Next.
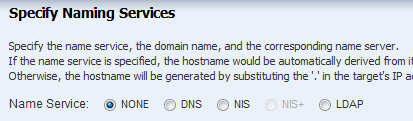
Description of the illustration osp_profile_namesvc.png
When using a naming service, select the service and complete the required fields.
-
Review the parameters and click Finish to create the OS Provisioning profile for provisioning Oracle Solaris 11 operating system.
Figure 13-24 Oracle Solaris 11 OS Provisioning Profile Summary
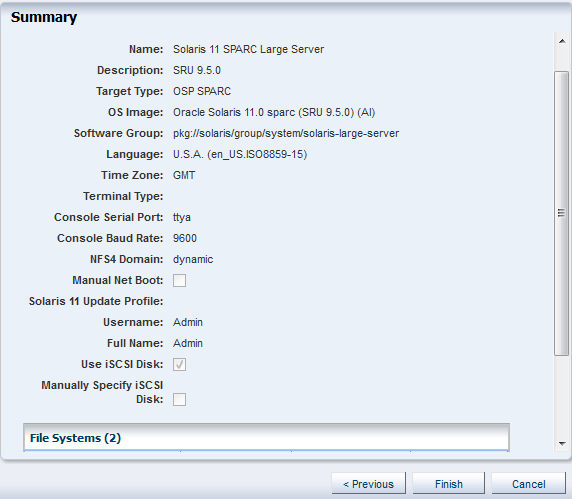
Description of "Figure 13-24 Oracle Solaris 11 OS Provisioning Profile Summary"
The profile appears in the center pane and in the Profiles and Policies section of Plan Management.
13.10.5 Creating an Oracle Solaris 11 OS Configuration Profile
The OS Configuration profile defines the networking configuration. You can use advanced networking configurations for Oracle Solaris.
When you create a configuration profile for Oracle Solaris, you can configure the following advanced networking options:
-
Link aggregation: Provides high availability and higher throughput by aggregating multiple interfaces at the MAC layer. Link aggregation enables you to combine the capacity of multiple full-duplex Ethernet links into a single logical link.
-
IP Multipathing (IPMP): Provides features such as higher availability at the IP layer. IPMP enables you to configure multiple IP interfaces into a single IPMP group.
You can implement both Link Aggregation and IPMP methods on the same network because they work at different layers of the network stack.
After you create the profiles, you create a deployment plan to apply the profiles. As part of applying the plan, you can change the options that you defined earlier in the profiles.
Note:
When you specify the network interfaces, select an interface for the controller from a list of 32 interfaces. The 32 interfaces that appear in the wizard are all possible network interfaces, not available interfaces. Your network administrator can give you the list of available networks. By default, the first interface listed is the boot interface.To Create an OS Configuration Profile
-
Expand Plan Management in the Navigation pane, then select OS Configuration in the Profiles and Policies tree.
-
Click Create Profile in the Actions pane.
-
Name the profile and complete the profile description. A detailed description will help when determining which profile to use when several are available. Select Solaris x86 or Solaris SPARC from the Subtype and Target Type options, then click Next.
Figure 13-25 Identify Oracle Solaris 11 OS Configuration Profile
Description of "Figure 13-25 Identify Oracle Solaris 11 OS Configuration Profile"
-
Click Next to accept the default selection to Automatically manage with Oracle Enterprise Manager Ops Center and Deploy the Agent Controller. This option provides the most robust management capabilities.
-
Specify the networking you want to establish for the target system.
-
If you selected Link Aggregation in Step 5, complete the following steps for each link aggregation:
-
Specify the Link Aggregation parameters. See Defining Link Aggregation in an OS Configuration Profile for details on the parameters.
-
Specify the Link Aggregation interfaces for each Link Aggregation.
The 32 interfaces that appear in the list (net_0 - net_31) are possible network interfaces, not available interfaces. Contact your network administrator for a list of available interfaces.
Figure 13-29 Specify Link Aggregation Interfaces
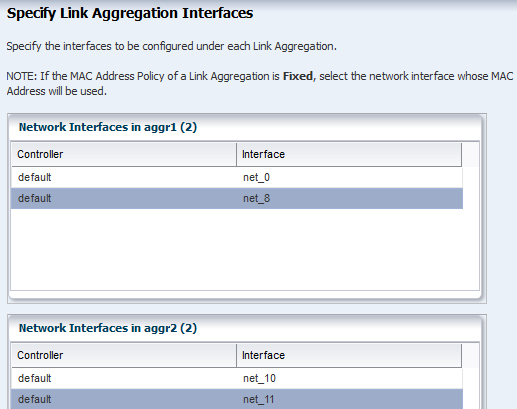
Description of "Figure 13-29 Specify Link Aggregation Interfaces"
-
Go to Step 9.
-
-
If you selected Use IPMP in Step 5, complete the IPMP parameters. See Defining IPMP in an OS Configuration Profile for details.
-
Complete the Failure Detection method, either Link-Based or Link Based + Probe Based, and the number of interfaces.
-
Specify the interface. Select the check boxes to define the IPMP configuration for Failover and Standby Interface. Select Assign IP Address to assign the IP address.
-
Go to Step 9.
-
-
If you selected None for Networking in Step 5, define the network interfaces that you want to use on the operating system. The boot interface is typically net_0, as shown in Figure 13-32. You define the IP address when you apply the plan to a target system. Click the Add icon to add other interfaces.
-
Review the Summary page, then click Finish. The new configuration appears in the table in the center pane. Click the profile to view the details.
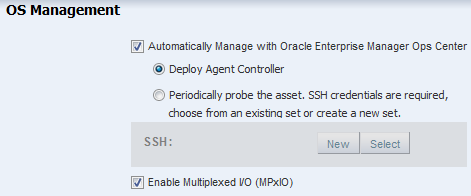
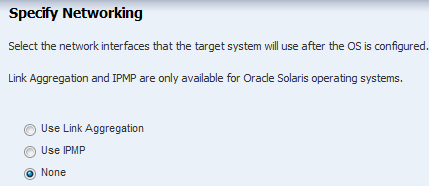
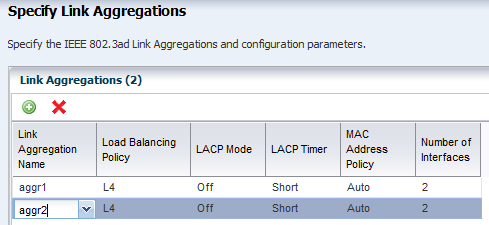
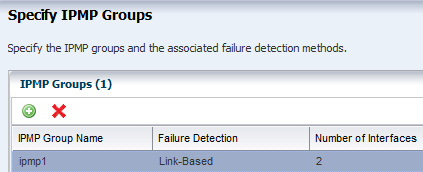
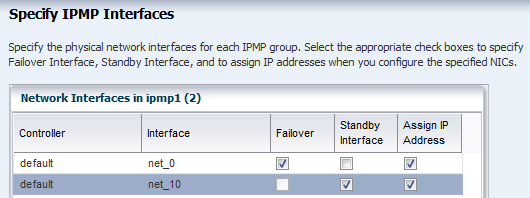
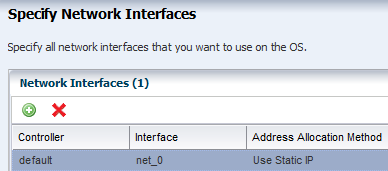
13.11 Provisioning Oracle Solaris 9 and 10
You can create OS profiles for provisioning Oracle Solaris 9 or 10 on x86 or SPARC platforms. See Planning for Operating System Provisioning for the requirements needed for OS provisioning, including network requirements.
The OS Provisioning and OS Configuration profiles collect all the information such as type of target, OS image, time zone and language setup, required JET modules, disk partitions, naming services and network details.
Perform the following before you provision the operating system:
-
Import the OS image. Uploading the packages from Oracle to the library can take several hours.
-
(Optional) Edit an existing OS Provisioning profile or create a new profile.
-
Discover the service processors of the target systems.
-
Verify that the Dynamic Host Configuration Protocol (DHCP) services are enabled on Proxy Controllers. You cannot create a profile or assign any network if the DHCP services are not enabled. The Install Server option to provision OS on a server is not enabled if the DHCP is not enabled on any of the interfaces.
Note:
Oracle Solaris 10 supports an Oracle Solaris DHCP Server. The external DHCP-related files are copied only if the Proxy Controller is running on an Oracle Solaris 10 operating system. -
Verify that any scripts the profile uses are in a directory that the Enterprise Controller can access. You can save scripts in a local directory of the Enterprise Controller, or in a directory that the Enterprise Controller mounts using NFS.
-
When you are provisioning a dynamic system domain of an M-Series server, the domain must have an IP address.
Note:
It is a good practice to place the systems that you are going to provision in Maintenance Mode so that you can take the system offline without generating alerts and incidents.Complete the following steps to provision an operating system:
-
Verify that the OS Provisioning profile and OS Configuration profile are available and configured with the parameters you want to use. See Specifying Common Oracle Solaris 9 and 10 Parameters for more information.
-
Create a deployment plan that enables OS provisioning. The plan must contain an OS Provisioning profile and an OS Configuration profile that use the same subtype, either Oracle Solaris SPARC or x86.
-
Discover the service processors of the target systems.
-
Place the asset in Maintenance Mode to prevent events related to a system going offline.
-
Select the deployment plan and define the targets for the plan. Make any last minute changes in the plan, then submit the job.
See the Oracle Enterprise Manager Ops Center Provisioning Oracle Solaris 10 Operating System Guide for an end-to-end example.
13.11.1 Specifying Common Oracle Solaris 9 and 10 Parameters
To create a profile that installs the Oracle Solaris 9 or 10 OS, specify the following parameters:
-
Manual reboot: By default, the profile reboots the OS. You can choose the Manual Net Boot option to enable manual control of network boot operations for the target system.
Note:
The Enterprise Controller cannot remotely control the network boot process on systems that do not have a service processor. When your target system does not have a service processor, you must select the Manual Net Boot option. -
Custom Scripts: When you specify the OS Parameters, you have the option to include custom scripts. This feature is disabled for Oracle Solaris 11 profiles.
13.11.2 About JumpStart Enterprise Toolkit (JET) for Oracle Solaris
For Oracle Solaris 9 and 10 only, you can optionally use JumpStart Enterprise Toolkit (JET) modules to specify additional installation parameters. Oracle Solaris 11 uses the Automated Installer (AI) instead of JET.
JET provides a framework to simplify and extend the JumpStart functionality provided within the Oracle Solaris 9 and 10 operating system. The SUNWjet and JetFLASH packages are installed on the Proxy Controller during installation when the Proxy Controller is installed on an Oracle Solaris 10 operating system.
Using JET provides more options for defining the Jumpstart parameters. When you install JET on a JumpStart server, you have the following advantages:
-
Install multiple versions of Oracle Solaris
-
Deploy flash archives
-
Utilize multiple boot methods
-
Install recommended patches
-
Configure all your network interfaces
Note:
You cannot define IPMP groups or link aggregation for a JET template profile.Table 13-3 describes the JET modules that are installed on the Proxy Controller.
Table 13-3 JET Modules and Associated Packages
| JET Module Name | JET Package | Description |
|---|---|---|
|
base_config |
SUNWjet |
Provides the standard installation configuration for the client, including the information required to set up the JumpStart server to allow the client to boot and build. |
|
custom |
SUNWjet |
Adds functionality to the JumpStart framework to handle packages, patches, scripts, and files. |
|
flash |
JetFLASH |
Adds the ability for the JumpStart server to deliver Solaris images in Solaris Flash format. |
Within the Oracle Enterprise Manager Ops Center UI, there are 2 methods of influencing the JET template variables:
-
Import a JET Template
-
Add JET variables to the OS provisioning profile
You cannot manipulate the JET template in the UI. When you want to make changes to a template, make the changes and then import the template.
See Appendix C, "JumpStart Enterprise Toolkit" for a list of SUNWjet parameters, to learn more about JET and how to use JET in a profile.
To create a profile that uses the JumpStart Enterprise Toolkit (JET), select a JET template that defines all the parameters for OS provisioning.
Place the JET template on a directory that the Enterprise Controller can access. You can also create a JET template on the Enterprise Controller in the directory /opt/SUNWjet/Templates, using the following command:
./make_template template_name
A sample template is provided. You can make a copy and change the values in the JET template as required. During provisioning, the OS provisioning parameters are read from the template. After you create the JET templates you want and save them on the Enterprise Controller, you can use them in your Oracle Solaris provisioning profiles.
13.11.3 Creating an Oracle Solaris 9 or 10 OS Provisioning Profile
The OS Provisioning profile defines the OS provisioning parameters, including the platform-specific OS image and software package, file system layout, user accounts, naming services, and other installation requirements.
Complete the following steps to create an OS Provisioning profile:
-
Expand Plan Management in the Navigation pane.
-
Select OS Provisioning under the Profiles and Policies section.
-
Click Create Profile in the Actions pane.
-
Define the following profile parameters in the Create Profile-OS Provisioning wizard, then click Next.
-
Name: The name of the profile.
-
Description: A description of the profile.
-
Subtype: Select Solaris SPARC or Solaris x86.
-
Target Type: Select the target type, either SPARC or x86.
-
-
Select an OS Image, OS Image Version, and Software Group. This example does not include custom scripts. Click Next.
-
Specify the following OS setup parameters:
-
Language: Select a language for the OS.
-
TimeZone: Specify the time zone for the OS.
-
Terminal Type: Enter a terminal type, if other than the default type listed.
-
Console Serial Port: A default port appears in the wizard. If incorrect, select the correct console serial port device for your environment. This port enables you to monitor the installation using a serial connection.
-
Console Baud Rate: A default serial port device baud rate is provided. If incorrect, select the correct baud rate for your device.
-
NFS4 Domain: Enter the NFS4 domain name that the target system will use. The dynamic value for NFSv4 domain name enables the NFSv4 domain to be derived dynamically, at run time, based on the naming service configuration. You can also provide valid domain name to hard code the value for NFSv4 domain.
-
Password: Enter the root password for the root user on systems provisioned using this profile. Re-enter the password for confirmation.
-
-
Click Next to skip specifying the Installation Parameters.
-
Review and edit the default file system layout, then click Next.
To specify changes, click the size field for the file system and redefine the size. To add another file system, click the Add icon and complete the fields.
-
Select the naming service you want, or select None, then click Next.
-
Review the parameters selected for Oracle Solaris 10 operating system provisioning, then click Finish to save the profile.
13.11.4 Creating an Oracle Solaris 9 or 10 OS Configuration Profile
The OS Configuration profile defines the networking configuration.
When you create a configuration profile for Oracle Solaris, you can configure the following advanced networking options:
-
Link aggregation: Provides high availability and higher throughput by aggregating multiple interfaces at the MAC layer. Link aggregation enables you to combine the capacity of multiple full-duplex Ethernet links into a single logical link.
-
IP Multipathing (IPMP): Provides features such as higher availability at the IP layer. IPMP enables you to configure multiple IP interfaces into a single IPMP group.
You can implement both Link Aggregation and IPMP methods on the same network because they work at different layers of the network stack.
After you create the profiles, you create a deployment plan to apply the profiles. As part of applying the plan, you can change some of the options that you defined earlier in the profiles.
13.12 Provisioning an Operating System on Logical Domains
To provision an operating system on logical domains, you must select the Logical Domain subtype when you create OS Provisioning and OS Configuration profiles. You cannot use the OS profiles that are created for bare-metal provisioning. Refer to Provisioning OS on Logical Domains in Chapter 19, "Oracle VM Server for SPARC" for more information about creating OS provisioning and configuration profiles for provisioning OS on logical domains.
13.13 Provisioning an Operating System on an Oracle Solaris Cluster
To provision an operating system on an Oracle Solaris Cluster, you provision the same operating system on all nodes of a cluster. The Cluster OS profile handles the pre-action and post-action operations. See the Oracle Solaris Cluster documentation and Appendix A, "Oracle Solaris Cluster" for how to install a new Oracle Solaris Cluster and to maintain existing Oracle Solaris Clusters.
13.14 Provisioning Linux
You can create OS Provisioning and OS Configuration profiles for provisioning Linux OS on x86 systems. The profiles collect all the information such as type of target, OS image, time zone and language setup disk partitions, naming services and network details.
Provisioning Oracle Linux and other supported versions of Linux is very similar to provisioning Oracle Solaris 10 x86.You add the Linux image, create the OS Provisioning and OS Configuration profiles, create a Provision OS deployment plan, then apply the plan to provision the operating system.
The OS Provisioning plan will use Kickstart as the install mechanism to perform the installation. You do not need to do anything to enable Kickstart.
Provisioning requires a DHCP-enabled network interface for the boot interface. You can add multiple networks, as long as the networks are available and defined in the Enterprise Controller. You can select a NIC from the list of available logical interfaces for each network or you can use the Address Allocation Method for the selected networks. You cannot use the Address Allocation method for the boot interface. When you use a static IP address, you must provide the IP address when you apply a deployment plan that uses the profile. The IP address is assigned to the target system after provisioning.
Note:
When you specify the naming service in the OS Provisioning profile, each IP address in the Name Server field must be entered in a new row. IP addresses 0.0.0.0 or 255.255.255.255 are allowed. In the Domain Name Search List field, enter each domain name, such as1domain.com and 2domain.com, on a new line.Perform the following before you provision the operating system:
-
Import the OS image. Uploading the packages from Oracle to the library can take several hours.
-
(Optional) Edit an existing OS Provisioning profile or create a new profile.
-
Discover the service processors of the target systems.
-
Verify that the Dynamic Host Configuration Protocol (DHCP) services are enabled on Proxy Controllers. You cannot create an OS Configuration profile or assign any network if the DHCP services are not enabled. The Install Server option to provision OS on a server is not enabled if the DHCP is not enabled on any of the interfaces.
-
Verify that any scripts the profile uses are in a directory that the Enterprise Controller can access. You can save scripts in a local directory of the Enterprise Controller, or in a directory that the Enterprise Controller mounts using NFS.
Note:
It is a good practice to place the systems that you are going to provision in Maintenance Mode so that you can take the system offline without generating alerts and incidents.Complete the following steps to provision an operating system:
-
Verify that the Linux image you want to use is available in the library, or import the Linux image. See Chapter 5, "Software Libraries" and the
Deploy How To libraryfor more information. -
Create an OS Provisioning profile and an OS Configuration profile using Linux as the Target Type. Configure the profiles with the parameters you want to use. See Specifying Common Linux Parameters and Specifying SuSE Parameters for more information.
-
Create a Provision OS deployment plan or other deployment plan that enables OS provisioning.
-
Discover the service processors of the target systems.
-
Place the asset in Maintenance Mode to prevent events related to a system going offline.
-
Select the deployment plan and click Apply Plan to define the targets for the plan. Make any last minute changes in the plan, then submit the job.
-
When the job completes and the new operating system is provisioned, take the asset out of Maintenance Mode.
Specifying Common Linux Parameters
Specify the following parameters:
-
Installation number: The number that enables you to install all of the Linux software that is included in your subscription.
-
Partition action: Use this parameter when you want to change the disk partition of the system.
-
You can opt to remove all the existing Linux partitions and retain the non-Linux partitions. You can provide specification for the new partitions.
-
You can opt to preserve all the existing partitions. You must define new partitions, outside of the partitions that exist, in which to install the OS.
-
You can opt to remove all the existing partitions. Define specification for the new partitions.
-
-
Install protocol: Specify HTTP or NFS as the install protocol.
-
Kernel parameters: Enter kernel parameters for the GRUB menu of the target system, when needed.
-
MD5 Checksum: Select this option to use MD5 encryption for user passwords.
-
Reboot action: Select whether you want to reboot the target system after OS installation.
-
Disk label initialization: Select this option to initialize labels on new disks. This option creates labels that are appropriate for the target system architecture.
-
Shadow passwords: Select this option to use an
/etc/shadowfile to store passwords on the target system. -
Clear master boot record: Select this option to clear all invalid partition tables.
-
Linux packages: You can specify the Linux packages to include or exclude during provisioning. To include a package, enter the package name in a line. To exclude any package, enter the package name preceded by a dash (-).
To create a profile that installs the SuSE Linux OS, specify the following parameters:
-
FTP proxy server: Enter the name of the FTP proxy server to support FTP services.
-
HTTP proxy server: Enter the name of the HTTP proxy server to support HTTP services.
-
Install protocol: Specify HTTP or NFS as the install protocol.
-
Enable proxy servers: Select this option to enable the FTP and HTTP proxy servers that you specified in the FTP Proxy Server and HTTP Proxy Server fields.
-
Kernel parameters: Enter kernel parameters for the GRUB menu of the target system, when necessary.
-
Reboot action: Select whether you want to reboot the target system after OS installation.
-
Linux packages: You can specify the Linux packages to include or exclude during provisioning. To include a package, enter the package name in a line. To exclude any package, enter the package name preceded by a dash (-).
13.15 Related Resources for Operating System Provisioning
See the following workflows and how to documentation in the Deploy How To library at http://docs.oracle.com/cd/E40871_01/nav/deployhowto.htm for end-to-end examples and workflows.
-
Oracle Enterprise Manager Ops Center Deploy Operating Systems Workflow
-
Oracle Enterprise Manager Ops Center Provisioning Oracle Solaris 11 Operating Systems
-
Oracle Enterprise Manager Ops Center Provisioning Oracle Solaris 10 Operating Systems
For information related to this feature, go to one of the following resources in the Oracle Enterprise Manager Ops Center Feature Reference Guide:
-
See Chapter 4, "Monitoring Rules and Policies" for information on how monitoring rules and policies work in the software.
-
See Chapter 12, "Operating System Management" and Chapter 14, "Operating System Updates" for information about managing, patching, or updating, your operating systems.
-
See Chapter 18, "Oracle Solaris Zones" for information about zones and how you can use Oracle Enterprise Manager Ops Center to efficiently manage all phases of zones lifecycle.
-
Chapter 19, "Oracle VM Server for SPARC" for the requirements and information needed to provision Oracle VM Server for SPARC and domains
-
See Chapter 20, "Oracle VM Server for x86" for the requirements and information needed to provision Oracle VM Server for SPARC and domains.
-
See Appendix A, "Oracle Solaris Cluster" for how to use Oracle Enterprise Manager Ops Center to install and upgrade Oracle Solaris Clusters.
See Chapter 11, "Hardware" for information about provisioning firmware.
For more information about how to set up and manage the Oracle Enterprise Manager Ops Center infrastructure, including DHCP and WAN boot, see the Oracle Enterprise Manager Ops Center Administration Guide.
For in-depth information about Oracle Linux, Oracle Solaris, DHCP, WAN boot, and related features, see the following Oracle documentation:
-
For a list of the Oracle Linux documentation available in HTML and PDF formats, visit the Oracle Linux Documentation at >
>http://www.oracle.com/us/technologies/linux/index.html. -
For a list of the Oracle Solaris 11 and 11.1 documentation available in HTML and PDF formats, visit the Oracle Solaris 11 Documentation at >
>http://www.oracle.com/technetwork/documentation/solaris-11-192991.html. -
For a list of the Oracle Solaris 10 documentation available in HTML and PDF formats, visit the Oracle Solaris 10 Documentation at >
>http://www.oracle.com/technetwork/documentation/solaris-10-192992.html. -
For a list of the Oracle Solaris 8 and 9 documentation, visit the Legacy Solaris Documentation at >
>http://www.oracle.com/technetwork/documentation/legacy-solaris-192993.html. -
For more information about JET resources and documentation, see Solaris 10 10/09 Installation Guide: Custom JumpStart and Advanced Installations available at http://docs.oracle.com/cd/E18752_01/html/821-1911/index.html.
-
For JET documentation and to download additional modules, see http://www.oracle.com/technetwork/systems/jet-toolkit/index.html.