Defining the Planning Model
This section provides overviews of how to set up the planning model and activity scenario combinations and discusses how to:
Define planning model defaults.
Copy existing planning models.
Manage activities and scenarios in the planning model.
Send email to users.
Define dimension levels for planning centers and prepare activities and scenarios.
Define data sources for asset activities.
Define data sources for line item activities.
Assign planning target scenarios and controls.
Associate spread types with line item activities.
Define data sources for position activities.
Associate spread types with position activities.
Assign planning method defaults to line item activities.
Define views.
Specify user view details.
Specify row display filters.
Specify row display options.
Specify column display options.
Assign email templates.
Define currency options.
Pages Used to Define the Planning Model
|
Page Name |
Definition Name |
Navigation |
Usage |
|---|---|---|---|
|
Model |
BP_MODEL |
|
Create a planning model and assign the related default parameters. |
|
Copy Model |
BP_MODEL_COPY |
Click the Copy Model button on the Model page. |
Copy an existing planning model to use as a starting point for a new planning model. |
|
Activity Group |
BP_ACTIVITY_GRP |
|
Edit or create an activity group. |
|
Scenario Group |
BP_SCENARIO_GRP |
|
Edit or create a scenario group. |
|
Activity Scenario |
BP_ACTV_SCEN |
|
Set up and manage activities and scenarios in the planning model. |
|
Scenario Manager |
BP_SCENARIO_MGR |
Click the View Scenario Manager link on the Activity Scenario page. |
Manage and update status for activities and scenarios in a planning model. |
|
Compose Mail |
BP_EMAIL |
Click the Email link on the Activity Scenario page. |
Send email to users about budgets and plans. |
|
Dimension Level Summarization |
BP_ACT_SCN_LVL |
Click the Dimension Level link on the Activity Scenario page. |
Define dimension levels, including the planning center dimension, in which an activity scenario is prepared. |
|
Display and Select TreeNodes |
PSTREEVIEWER |
Click the Tree View icon on the Dimension Level Summarization page. |
Select a tree node to define the level of preparation, summarization, or both for the dimension. |
|
Data Source |
BP_DATSRC_ASSET |
Click the Data Source link (associated with an asset activity) on the Activity Scenario page. |
Define data sources for asset activities. |
|
Data Source |
BP_SOURCE_SCEN |
Click the Data Source link (associated with a line item activity) on the Activity Scenario page. |
Define data sources for line item activities. |
|
Spread Definition |
BP_ACTVSCN_SPRD |
|
Enter spread IDs for a line item activity when AMTPER Method ID is used. Enter defaults and available spread IDs for a position activity. |
|
Planning Target Control |
BP_TGT_CONTROL |
Click the View Target Control link on the Data Source page (associated with a line item activity). |
Review target control definitions. |
|
Planning Targets |
BP_TGT_SUMMARY |
Click the View Targets link on the Data Source page (associated with a line item activity). |
Define planning target details for the activity scenario in the planning model. |
|
Data Source |
BP_POS_SRC_SCEN |
Click the Data Source link (associated with a position activity) on the Activity Scenario page. |
Define data sources for position activities. |
|
Planning Method Group |
BP_MTHD_GROUP |
Click the link in the Method Group column on the Line Item Defaults tab on the Activity Scenario page. |
Review the planning method group defaults. |
|
Assign Planning Method Defaults |
BP_MTH_GRP_DFLT |
Click the Method Defaults link on the Line Item Defaults tab on the Activity Scenario page. |
Assign method defaults by account to line item activities. |
|
Override Controls Help |
BP_MTH_DFLT_OVRIDE |
Click the Override Controls Help link on the Assign Planning Method Defaults page. |
Review how to override controls. |
|
Define View |
BP_DEFINE_VIEW |
Click the Define View link on the Line Item Defaults tab on the Activity Scenario page. |
Create or edit a public view definition to determine how users view data in line item activities. Enter a view name and description. |
|
User View Details |
BP_USRVIEW_DEFN1 |
Click the Edit or Create link on the Define View page. |
Enter a description to identify the public view details. |
|
Row Display Filter |
BP_USRVIEW_DEFN2 |
Click the Edit or Create link on the Define View page, and then select the Row Display Filter tab. |
Define dimension defaults that appear in a line item activity. |
|
Row Display Options (help page) |
BP_USRVIEW_TEXT |
|
View help documentation for row display view definition options. |
|
Row Display Options |
BP_USRVIEW_DEFN3 |
Click the Edit or Create link on the Define View page, and then select the Row Display Options tab. |
Define whether dimension values appear in line item activities at the detail or summary level. Define amount types and currency display options. |
|
Column Display Options |
BP_USRVIEW_DEFN4 |
Click the Edit or Create link on the Define View page, and then select the Column Display Options tab. |
Define the type of data that appears in line item activity columns. |
|
Column Display Options (help page) |
BP_USRVIEW_TEXT2 |
Click the Column Display Help link on the Column Display Options page. |
View help documentation for column display view definition options. |
|
Assign Email Templates |
BP_MDL_TMPL_DEFN |
Click Email Templates on the Security and Email tab on the Activity Scenario page. |
Assign email templates for specific actions for the line item activity scenario. |
|
Currency Options |
BP_MODEL_CURR |
|
For a multicurrency model, select entry and target currency codes used in the planning model. |
|
Notes |
BP_MODEL_NOTES |
|
Enter notes for the planning model. |
Understanding How to Set Up the Planning Model
Define the framework for the budget by performing the following tasks:
Define the planning model.
Assign an activity group to the planning model.
Assign a scenario group to the planning model.
Activity scenario combinations are created based on the groups associated with the planning model.
For these combinations define:
- Dimension levels or summarization for planning center and other dimensions.
- Data sources for activities.
- Comparison scenarios and target scenarios for line item activities.
- Default values for line-item activity types, including account category, enforce budget and zero base budget options, method defaults, and public views.
Assign a security group and (optionally) a secondary security group to each activity scenario.
Assign email templates.
Define currency options for a multiple currency planning model.
Enter any notes about the planning model.
Understanding Activity Scenario Combinations
You can use activity scenarios to organize the timing of different plans or budgets at similar or varying times throughout your organization's budget cycle. Each activity scenario combination is like its own independent data repository. Activity scenario combinations are automatically created in your planning model when you choose an activity group and scenario group definition in your model. You can leverage some of the same setup data defined by the model, with the scenario's main attribute using the time-related data and the main attribute of the activity using the dimension-related data. The intersection of the two (activity scenario) provides multiple plans and budgets that can be related or independent. The unique activity scenario combinations control the information that you can view and modify under the umbrella of a planning model, which is defined for a business unit. You can have one or many activity scenario combinations within each planning model that you create. Each activity scenario that you define can be staged, released to end users, or placed on hold at any time you define.
Note: When using a Commitment Control planning model, ensure that the activity group you assign contains no activities allowing balance sheet planning, because it is not supported by Commitment Control.
For example, detailed revenue and expense budgets are prepared at the greatest level of detail, and the data is sent back to the general ledger system for storing and tracking. Prior to the commencement of the following year's budget, a higher-level strategic plan may be developed first, covering anywhere from one to five years. As a business process, this information is prepared and reviewed prior to creating a more detailed budget for the following year. In the following example, the first two columns indicate the activity scenario combinations. It includes three line item activities and two scenarios. Because the Strategic Two-Year Plan is associated with a different scenario (2007–2008 Plan), it may use a different element of time, such as an annual calendar. This strategic plan is prepared well before any detail plans are created, having a start date and end date of April 1 and April 30, respectively, for preparation. It is completed before the revenue and expense detail plans are prepared. Using the start and end dates with the activity scenario enables you to open up preparation of the data based on your organization's requirement for the information, or the phase or stage of the budgeting cycle that you are in. You can overlap or stagger the preparation of activity scenarios. No restrictions are placed on the start and end dates. The 2007 Budget Scenario has the two activities, revenue and expense. The start and end dates of budget preparation of these two activity scenarios are not the same, but are overlapping.
|
Line Item Activity |
Scenario (Calendar Years) |
Start Date |
End Date |
|---|---|---|---|
|
Strategic Two-Year Plan |
2007–2008 Plan |
April 1, 2006 |
April 30, 2006 |
|
Projected Revenue |
2007 Budget |
July 1, 2006 |
August 31, 2006 |
|
Expense Budget |
2007 Budget |
August 1, 2006 |
September 30, 2006 |
Use the Activity-Scenario page in your planning model to define rules and indicate the start and end dates for preparation of the activity scenarios by users.
Model Page
Use the Model page (BP_MODEL) to create a planning model and assign the related default parameters.
Image: Model page
This example illustrates the fields and controls on the Model page. You can find definitions for the fields and controls later on this page.
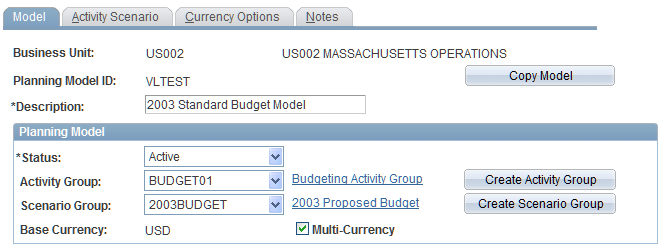
| Copy Model |
Click to copy the model to a new planning model or business unit |
| Status |
Select the desired status. Values are Active (default) and Inactive. Note: You can change the status to Inactive only if no activity scenario in the model has a status of Released. |
| Activity Group |
Select the desired activity group. Click the link next to the drop-down list box to access the Activity Group page and edit or view the selected activity group. See Establishing Activities and Activity Groups. Note: This drop-down list box is unavailable when at least one of the activities or scenarios is staged. |
| Scenario Group |
Select the desired scenario group. Click the link next to the drop-down list box to access the Scenario Group page and edit or view the selected scenario group. See Setting Up Scenarios and Scenario Groups. Note: This drop-down list box is unavailable when at least one of the activities or scenarios is staged. |
| Create Activity Group |
Click to create a new activity group. |
| Create Scenario Group |
Click to create a new scenario group. |
| Multi-Currency |
Select to enable setup of currency options for the model, which displays the Currency Options tab. Whether or not you select this option, the business unit base currency is the default currency for the model. Note: If you clear the Multi-Currency check box, the system removes any definition that you create using the Currency Options page. |
Copy Model Page
Use the Copy Model page (BP_MODEL_COPY) to copy an existing planning model to use as a starting point for a new planning model.
Copy an existing planning model to use as a starting point for a new planning model, open the new planning model, and then modify the parameters for the new model as needed.
Managing Activities and Scenarios in the Planning Model
Use the Activity Scenario page (BP_ACTV_SCEN) to set up and manage activities and scenarios in the planning model.
Image: Activity Scenario page
This example illustrates the fields and controls on the Activity Scenario page. You can find definitions for the fields and controls later on this page.
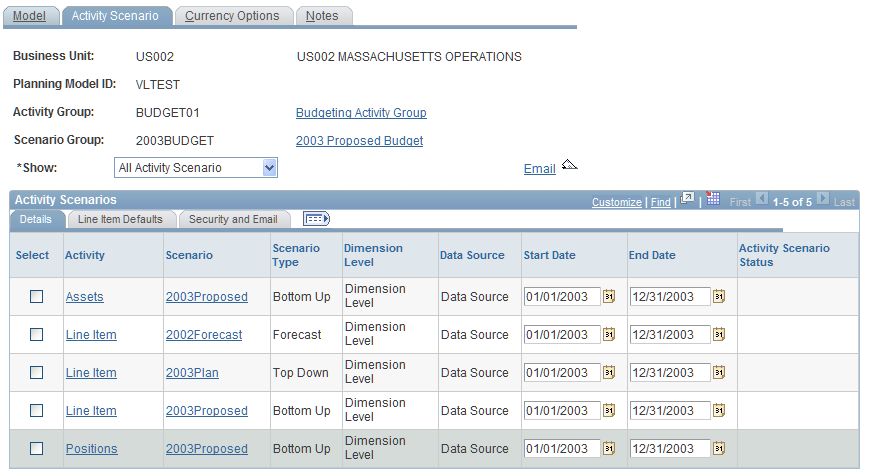
| Show |
Select which activity scenario combinations you want to display. Values are: All Activity Scenario: Displays all valid activity and scenario combinations for the planning model. Selected Activity Scenario: Displays only the selected activity scenario combinations. |
| Edit/View Activity Group |
Click to access the Activity Group page and edit or view the selected activity group. |
| Edit/View Scenario Group |
Click to access the Scenario Group page and edit or view the selected scenario group. |
| View Scenario Manager |
Click to access the Scenario Manager page and manage, update, change status, or review process results of the activity scenarios defined. |
|
Click to access the Compose Mail page and send emails to planning and budgeting users. See Compose Mail Page. |
Details
Access the Details tab of the Activity Scenario page.
Image: Activity Scenario page: Details tab
This example illustrates the fields and controls on the Activity Scenario page: Details tab. You can find definitions for the fields and controls later on this page.
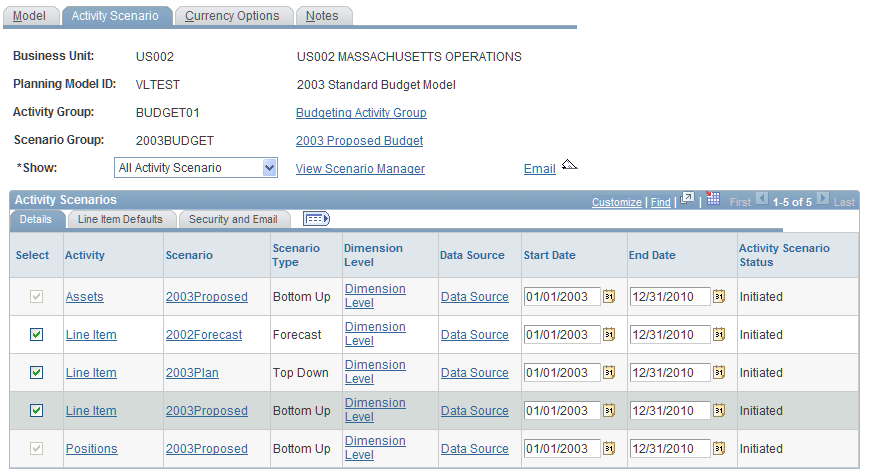
Based on the selected activity group and scenario group, the following table depicts all the permitted combinations of activity scenarios. The combinations allowed are driven by the budgeting type of the scenario group, each of the scenario types in the group, and the activity types allowed with each:
|
Scenario Type |
|||||
|---|---|---|---|---|---|
|
Budgeting Type |
Activity Type |
History |
Bottom Up |
Forecast |
Top Down |
|
Standard Budget Ledger |
Line Item |
X |
X |
X |
X |
|
Position |
X |
||||
|
Assets |
X |
||||
|
Controlled Budget Ledger |
Line Item |
X |
X |
X |
X |
|
Position |
X |
||||
|
Assets |
X |
||||
|
Project Budget Ledger |
Line Item |
X |
X |
X |
X |
|
Position |
|||||
|
Assets |
| Select |
Select to include and display the links on the associated row so that you can set up the activity scenario. |
| Activity |
Displays the short description of the activity that you can click to access the Activity page and review the activity's definition. |
| Scenario |
Displays the short description of the scenario that you can click to access the Scenario page and review the scenario's definition. |
| Dimension Level |
Click to access the Dimension Level Summarization page and define dimension levels for the planning center and other dimensions associated with a tree for the specified activity scenario to be prepared. If you did not set up the Dimension Level Summarization page, then staging assumes the lowest level for processing. See Dimension Level Summarization Page. Note: This link is available when you select the activity scenario row on the Details tab. |
| Data Source |
Click to access the Data Source page and define data sources for the activity scenario. See Dimension Level Summarization Page. Note: This link is available when you select the activity scenario row on the Details tab. |
| Start Date and End Date |
Enter the date range within which your users will access the activity scenario for preparation, submission, or approval. If the current date is outside of the start and end date range, the activity scenario is unavailable to the end users. You can change the dates as necessary, because model processes are not associated with them. |
| Activity Scenario Status |
Displays the status of the activity scenario. Values are: Initiated: Appears when you select the row's Select check box, but have not yet processed or staged the activity scenario. End users cannot see their planning centers on the My Planning Workspace page while an activity scenario is initiated. Staged: Appears automatically when the activity scenario has been successfully staged. End users cannot see their planning centers on the My Planning Workspace page while an activity scenario is staged. Released: Appears when you change the status to Released on the Scenario Manager page. End users can see and work with their planning centers on the My Planning Workspace page. On Hold: Appears when you change the status to On Hold on the Scenario Manager page. End users cannot see their planning centers on the My Planning Workspace page while an activity scenario is on hold. View Only: Appears when you change the status to View Only on the Scenario Manager page. End users cannot edit the planning center data when it is in View Only status. Note: The status can be changed manually on the Scenario Manager page, or automatically when the complete data staging process is run (the process sets an Initiated activity scenario to Staged). |
Line Item Defaults
Access the Line Item Defaults tab of the Activity Scenario page.
Image: Activity Scenario page: Line Item Defaults tab
This example illustrates the fields and controls on the Activity Scenario page: Line Item Defaults tab. You can find definitions for the fields and controls later on this page.
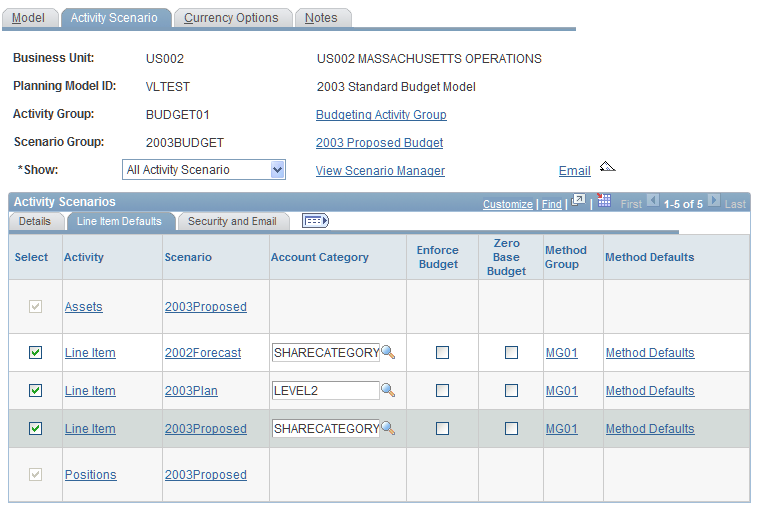
| Account Category |
(Optional) Enter the desired account category default for a line item activity. After you stage the activity scenario, end users can use the account category as a way to filter on data within their line item grid as a view option or for reporting. |
| Enforce Budget |
Select to have the staging process validate dimension (ChartField) combinations or controlled budget rules for line-item activity scenarios. Any combination rows marked in error are indicated with the error icon in the line item activity grid. End users are responsible for correcting the invalid combination or deleting the row before submitting their plan or budget. Any new rows added during the preparation of the line item activity need to be valid to be saved. When the check box is not selected, the system does not enforce dimension combinations or controlled budget rules. You can disable the option after a stage, which enables users to submit budgets with invalid rows. Note: Enforce budget applies only to line item activity types. If invalid rows are created in child activities such as assets and positions, users will need to modify the dimension combinations in the child to update the parent line item with the correct and valid combinations. |
| Zero Base Budget |
Select to enable preparers to develop budgets without a base amount as a starting point. The system distributes to preparers a line-item activity scenario that contains all the rows from the base budget (data source) selected, except that all the budget amounts are zero. Note: After you stage the data, this check box is unavailable. |
| Method Group |
Click to access the Planning Method Group page and view the method and driver defaults in the group. |
| Method Defaults |
Click to access the Assign Planning Method Defaults page and assign planning method defaults to line item activities by account, or account and an optional dimension. |
| Define View |
Click to access the Define View page and define the public view for line item activities. See Define View Page. |
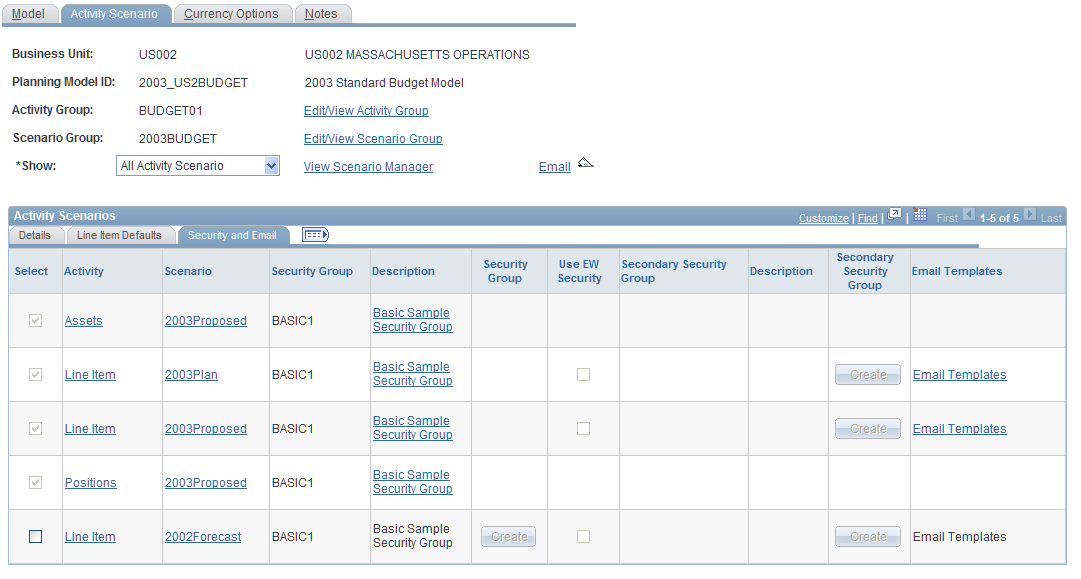
Security and Email
Access the Security and Email tab of the Activity Scenario page.
Image: Activity Scenario page: Security and Email tab
This example illustrates the fields and controls on the Activity Scenario page: Security and Email tab. You can find definitions for the fields and controls later on this page.
Compose Mail Page
Use the Compose Mail page (BP_EMAIL) to send email to users about budgets and plans.
Image: Compose Mail page (displaying the User Planning Centers group box)
This example illustrates the fields and controls on the Compose Mail page (displaying the User Planning Centers group box). You can find definitions for the fields and controls later on this page.
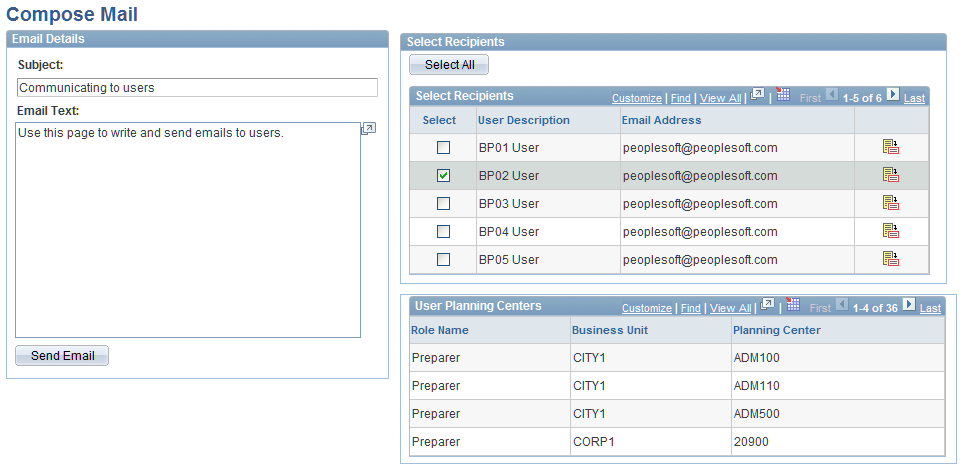
Users designated as Planning and Budgeting users who have email addresses appear on this page. Enter email subject and text information in the Email Details section.
Dimension Level Summarization Page
Use the Dimension Level Summarization page (BP_ACT_SCN_LVL) to define dimension levels, including the planning center dimension, in which an activity scenario is prepared.
Image: Dimension Level Summarization page
This example illustrates the fields and controls on the Dimension Level Summarization page. You can find definitions for the fields and controls later on this page.
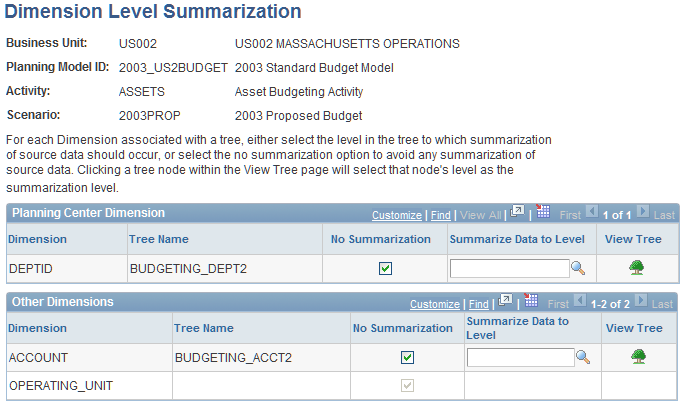
The system displays all dimensions selected for the activity as well as the trees defined on the Activity Group Hierarchy page.
Note: Any activities associated with the planning model require dimensions for account and the planning center dimension.
If you have staged the activity scenario, you should not change the fields on this page.
Data Source Page
Use the Data Source page (BP_DATSRC_ASSET) to define data sources for asset activities.
Click the Data Source link (associated with an asset activity) on the Activity Scenario page.
Image: Data Source page
This example illustrates the fields and controls on the Data Source page. You can find definitions for the fields and controls later on this page.
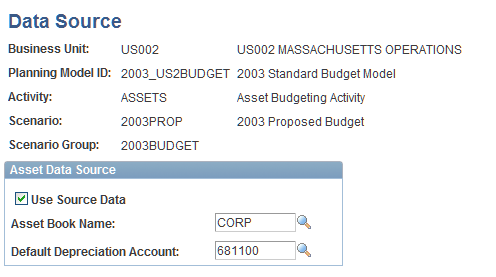
The Data Source page for asset-related defaults is available only when you have defined an asset activity type that is used in conjunction with a bottom-up scenario type.
Data Source Page
Use the Data Source page (BP_SOURCE_SCEN) to define data sources for line item activities.
Click the Data Source link (associated with a line item activity) on the Activity Scenario page.
Image: Data Source page for line items
This example illustrates the fields and controls on the Data Source page for line items. You can find definitions for the fields and controls later on this page.
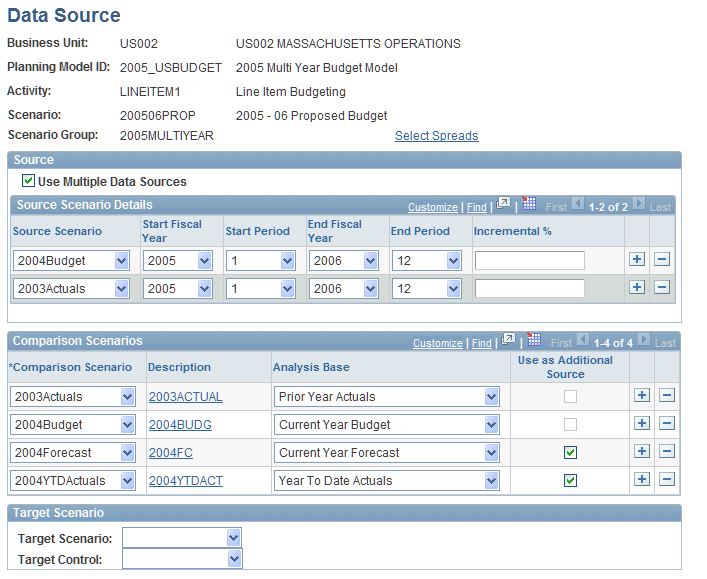
| Select Spreads |
Click to access the Spread Definition page and enter a spread ID for an activity. |
Source
Comparison Scenarios
Target Scenario
Planning Targets Page
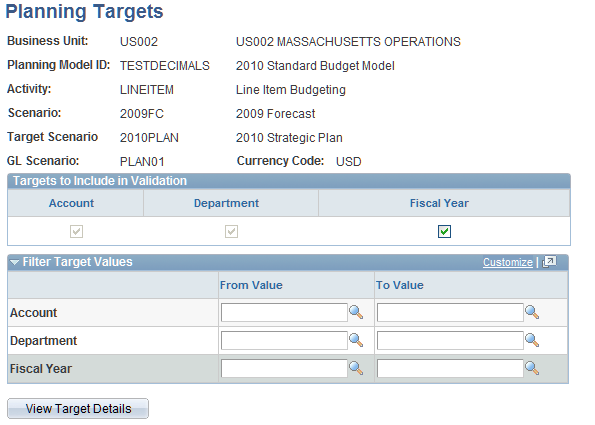
Use the Planning Targets page (BP_TGT_SUMMARY) to define planning target details for the activity scenario in the planning model.
Click the View Targets link on the Data Source page (associated with a line item activity).
Image: Planning Targets page
This example illustrates the fields and controls on the Planning Targets page. You can find definitions for the fields and controls later on this page.
Spread Definition Page
Use the Spread Definition page (BP_ACTVSCN_SPRD) to enter spread IDs for a line item activity when AMTPER Method ID is used.
Enter defaults and available spread IDs for a position activity.
Click the Select Spreads link on the Data Source page (associated with a line item activity).
Click the Select Spreads link on the Data Source page (associated with a position budgeting activity).
Image: Spread Definition page for line item
This example illustrates the fields and controls on the Spread Definition page for line item. You can find definitions for the fields and controls later on this page.
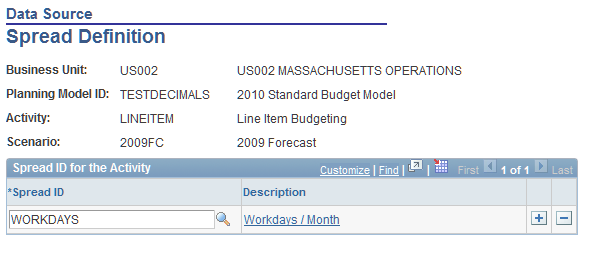
For the proposed line-item activity scenario, you can associate spread IDs to be used in conjunction with the amount per period (AMTPER) methods for budget preparation. When the scenario for the line item activity is a Forecast scenario type, the page is still available to allow for the AMTPER definitions.
Data Source Page
Use the Data Source page (BP_POS_SRC_SCEN) to define data sources for position activities.
Click the Data Source link (associated with a position activity) on the Activity Scenario page.
Image: Data Source page for position activity
This example illustrates the fields and controls on the Data Source page for position activity. You can find definitions for the fields and controls later on this page.
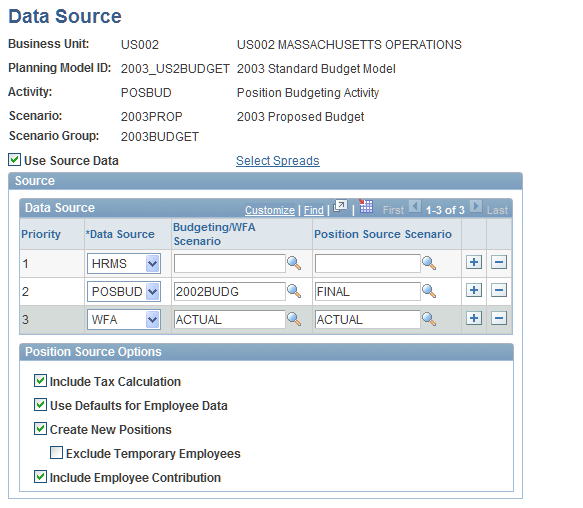
The Data Source page for position-related defaults is available only when you have defined a position activity type that is used in conjunction with a bottom-up scenario type.
Spread Definition Page
Use the Spread Definition page (BP_ACTVSCN_SPRD) to enter defaults and available spread IDs for a position activity
Click the Select Spreads link on the Data Source page (associated with a position budgeting activity).
Image: Spread Definition page for position activity
This example illustrates the fields and controls on the Spread Definition page for position activity. You can find definitions for the fields and controls later on this page.
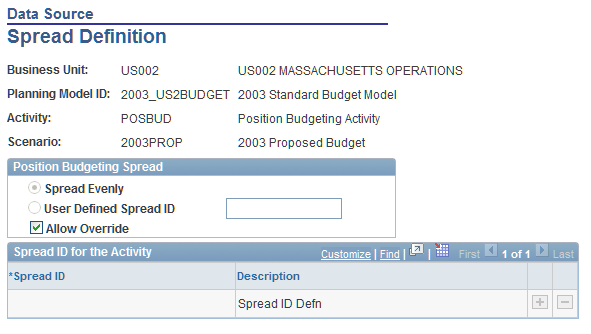
For the proposed position activity scenario, you can associate spread IDs to be used in conjunction with the position budgeting (POSBUD) method for budget preparation.
The Position Budgeting Spread group box sets the global default for all positions in the activity scenario. This group box is available when:
A position activity is associated with a bottom-up scenario type.
Note: The position activity is not supported with forecast or top-down scenario types.
The associated scenario is not using an annual calendar.
A standard or control budget type exists, as defined by the scenario group.
Project type budgets do not allow position budgeting.
Assign Planning Method Defaults Page
Use the Assign Planning Method Defaults page (BP_MTH_GRP_DFLT) to assign method defaults by account to line item activities.
Click the Method Defaults link on the Line Item Defaults tab on the Activity Scenario page.
Image: Assign Planning Method Defaults page
This example illustrates the fields and controls on the Assign Planning Method Defaults page. You can find definitions for the fields and controls later on this page.
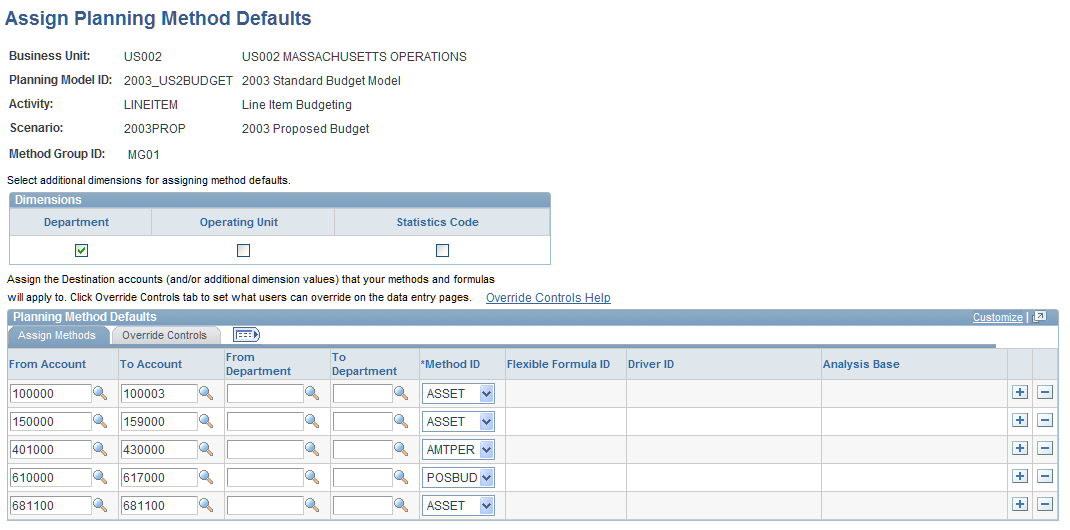
To review and edit any of the planning method group defaults that are available for the line item activity, you can click the Method Group ID link (method group ID assigned in the activity group) in the Method Group column on the Line Items Defaults tab.
The Method Defaults link on the Line Item Defaults tab is used to assign any exceptions by account in the line item activity. Without a method default for an account, the system automatically assigns the BASBUD (base budget amount) method to every line item in a base budget and allows override for each row. Use the Assign Planning Method Defaults page to define exceptions by account, including override restrictions on methods.
Assign Methods
Override Controls
Select or clear the following check boxes to specify which method and related defaults (that you assign to each account row in the line item activity) the preparers can override using the data entry pages. Insert rows to identify exceptions to the base budget default method.
Note: If you do not change the system defaults for methods and method override controls assigned to a line item in the base budget, the system allows override of all method details.
Define View Page
Use the Define View page (BP_DEFINE_VIEW) to create or edit a public view definition to determine how users view data in line item activities.
Enter a view name and description.
Views defined here are public and available options when using a line item activity. Users can select these public views from the line item entry page while working on the activity.
| View Name and Description |
Enter a name for the view before clicking the Create link to define details for it. If the view already exists, select the Edit link to update the defaults. |
| Casual Preparer |
Select to enable users with this role to use predefined public views when preparing line item activities. If you clear this check box, the system uses a flat view of the model when casual preparers access line items. |
| Default |
Select to provide a default view that will be used when accessing the line item activity until changed by the end user. You can define one default for Casual Preparer role, and one default that can be used for non-Casual Preparer roles when selected. Note: If a user view has a planning center filter on it, you cannot select the default check box. The system displays an error message if you do. You must either change the view or choose another public view as the default. |
| Edit |
Click to access the User View Details, Row Display Filter, Row Display Options, and Column Display Options pages and further define view details. Note: The link will say Create instead if it is a new public view. You must first enter a view name before clicking this link. If a secondary security group is on the activity scenario, and the default user view displays a tree, then the system does not save the page and displays an error message indicating that a default user view with a tree is not allowed with a secondary security group; you cannot use a secondary security group in combination with a default user view that has a dimension level. To resolve this, you can either clear the dimension levels of the default user view, or remove the secondary security group from the activity scenario. See User View Details Page, Row Display Filter Page, Row Display Options Page, Column Display Options Page. |
User View Details Page
Use the User View Details page (BP_USRVIEW_DEFN1) to enter a description to identify the public view details.
Row Display Filter Page
Use the Row Display Filter page (BP_USRVIEW_DEFN2) to define dimension defaults that appear in a line item activity.
Click the Edit or Create link on the Define View page, and then select the Row Display Filter tab.
Image: Row Display Filter page
This example illustrates the fields and controls on the Row Display Filter page. You can find definitions for the fields and controls later on this page.
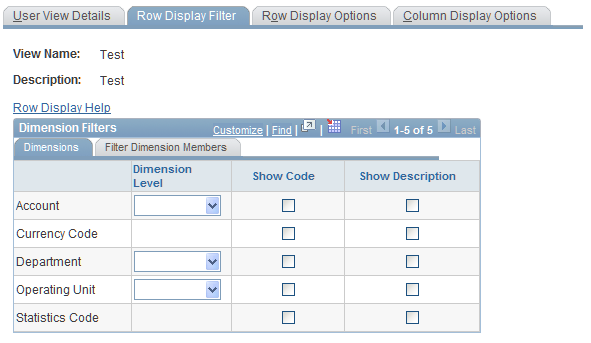
| Row Display Help |
Click to access the Row Display Help page and review information about each page element. |
Dimensions
Filter Dimension Members
Row Display Options Page
Use the Row Display Options page (BP_USRVIEW_DEFN3) to define whether dimension values appear in line item activities at the detail or summary level.
Define amount types and currency display options.
Click the Edit or Create link on the Define View page, and then select the Row Display Options tab.
Image: Row Display Options page
This example illustrates the fields and controls on the Row Display Options page. You can find definitions for the fields and controls later on this page.
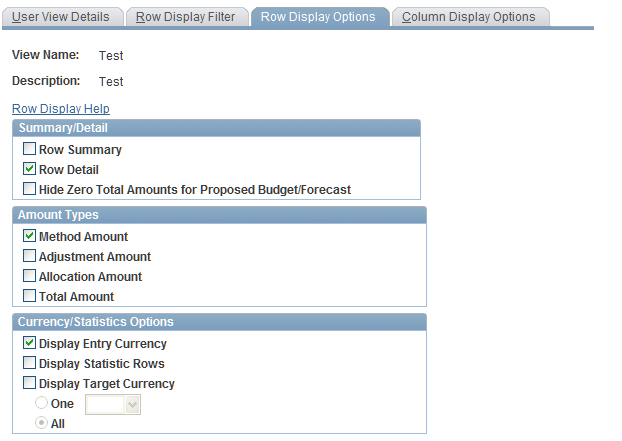
Note: If the model is not defined as a multicurrency model, the currency options are unavailable.
The system does not add statistical amounts to totals or display statistical amounts at the summary level of a node. If you select Display Entry Currency, the system does not summarize statistical amounts. To summarize statistical amounts at the node level, select a specific dimension value for statistics code.
|
To display: |
Set these filter dimension values: |
Set these currency and statistics options: |
|---|---|---|
|
No currency 1 statistics code |
Select a statistics code |
Display Statistic Rows |
|
No currency All statistics |
None |
Display Statistic Rows |
|
All entry currency All statistic codes |
None |
|
|
1 entry currency No statistic codes |
Select a currency code |
|
|
All entry currency No statistics |
None |
|
When you use statistical accounts, if you select Display Statistic Rows, the system displays statistical accounts, but these accounts are not rolled up or summarized with currency data. If you leave the dimension value blank, when displaying currency or statistics, the system displays all values.
Use the Row Display Options page to set currency and statistics options.
Column Display Options Page
Use the Column Display Options page (BP_USRVIEW_DEFN4) to define the type of data that appears in line item activity columns.
Click the Edit or Create link on the Define View page, and then select the Column Display Options tab.
Image: Column Display Options page
This example illustrates the fields and controls on the Column Display Options page. You can find definitions for the fields and controls later on this page.
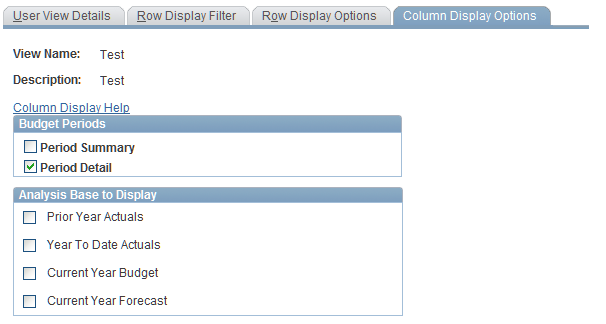
Note: The system displays ledger data associated with the analysis base that you define using the Data Source page for the line-item activity scenario.
The coordinator defines analysis bases that determine historical periods included in the view. The historical information appears as annual totals in the columns.
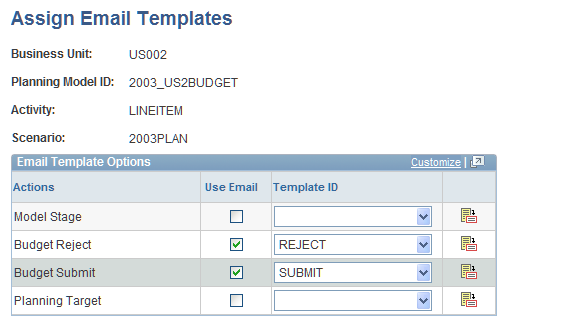
Assign Email Templates Page
Use the Assign Email Templates page (BP_MDL_TMPL_DEFN) to assign email templates for specific actions for the line item activity scenario.
Image: Assign Email Templates page
This example illustrates the fields and controls on the Assign Email Templates page. You can find definitions for the fields and controls later on this page.
Currency Options Page
Use the Currency Options page (BP_MODEL_CURR) to for a multicurrency model, select entry and target currency codes used in the planning model.
Image: Currency Options page
This example illustrates the fields and controls on the Currency Options page. You can find definitions for the fields and controls later on this page.
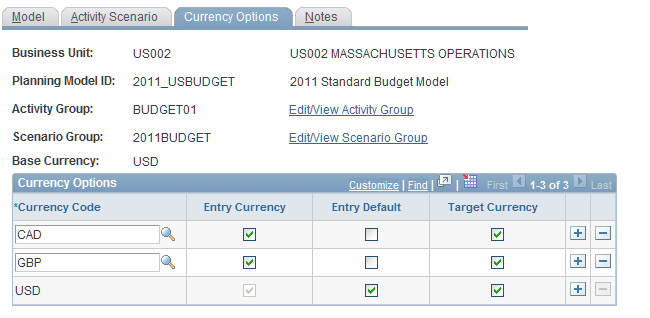
Note: The Currency Options tab is available when you select multicurrency on the Model page.
See Understanding Multiple Currencies.
If you are working with a multicurrency planning model, the Currency Options grid displays the one or more rows that you define, and the three available check boxes, in which the base business unit currency definition is the default. After one activity scenario has been staged, you cannot delete any rows or change any check boxes.
Note: After you stage a model, you cannot change the values on the Currency Options page. To add or delete currencies, you cannot have a single activity or scenario staged in the planning model.