Setting Up Ledger Mapper
This topic lists prerequisites and discusses how to:
Map ledger data.
Create data manager rules for the general ledger (GL) mapper method.
Configure ledger mappings for new or configured ChartFields.
Page Used to Set Up the Ledger Mapper
|
Page Name |
Definition Name |
Navigation |
Usage |
|---|---|---|---|
|
Ledger to Resource Mapping |
LEDMAP_TBL1 |
|
Map ledger data, such as assets and liabilities, that do not enter the system through one of the analytic applications. |
Prerequisites
Before you can set up your Ledger Mapper, you must:
Complete your warehouse business unit setup.
Specify your ledger mapping defaults.
Set up your tablemaps, datamaps, filters, and constraints.
See Understanding Warehouse Business Unit Setup, Understanding Warehouse Business Units, TableSet Sharing, and SetID Mapping, Specifying Ledger Mapping Defaults, and Understanding Metadata.
Ledger to Resource Mapping Page
Use the Ledger to Resource Mapping page (LEDMAP_TBL1) to map ledger data, such as assets and liabilities, that do not enter the system through one of the analytic applications.
Image: Ledger to Resource Mapping page
This example illustrates the fields and controls on the Ledger to Resource Mapping page. You can find definitions for the fields and controls later on this page.
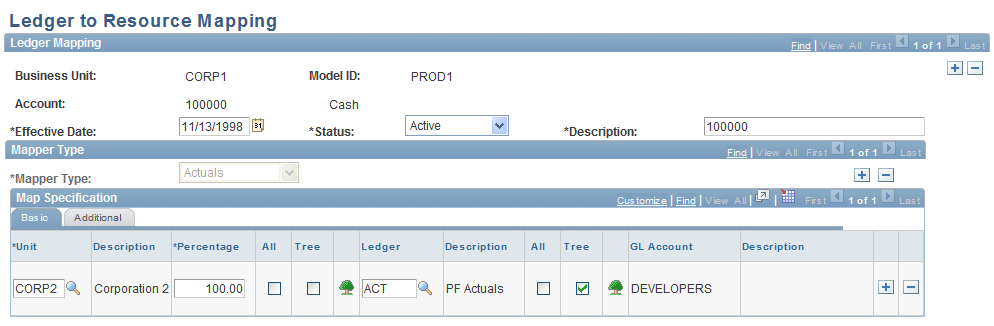
For each delivered ChartField (ledger, general ledger account, operating unit, department, and product), enter the following information:

Creating Data Manager Rules for the GL Mapper Method
You can now set up the Data Manager rules. You must set up a Data Manager rule for each SetID for which you want to map ledger data. The data manager rule creates the SQL code for that SetID.
Configuring Ledger Mappings for New or Configured ChartFields
This topic describes how to configure ledger mapping with any configured or new ChartFields that you want to use with EPM. This process ensures that the ChartFields appear on the Ledger Mapping Defaults pages and other Ledger Mapper pages.
Warning! Be sure to save your original settings before configuring. Before you attempt any configurations, you should be familiar with the PeopleTools Application Designer and Application Engine, and your ChartField structure.
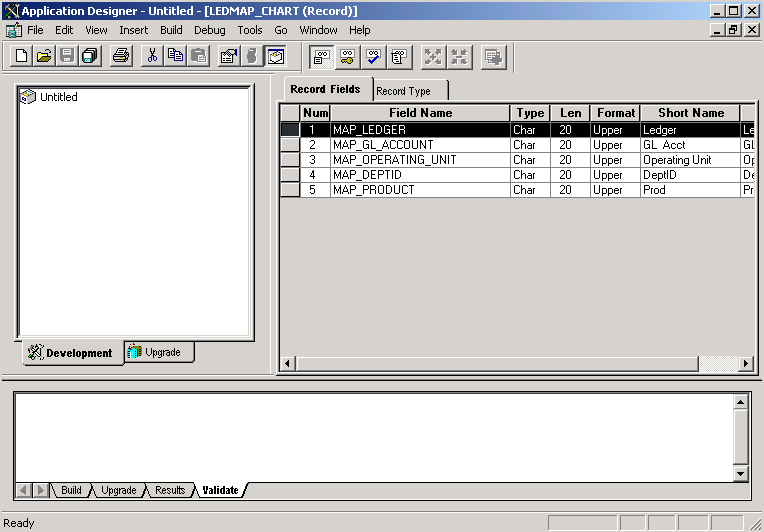
Image: Adding ChartFields to the LEDMAP_CHART subrecord
This example illustrates the Adding ChartFields to the LEDMAP_CHART subrecord.
To configure ledger mappings:
Add the ChartFields to the subrecord LEDMAP_CHART.
To open the record, launch the PeopleTools Application Designer and select File, Open. Open the LEDMAP_CHART subrecord and add the new ChartFields. Fields should be MAP_[name]. Make the new fields key fields.
Add ChartFields depending on whether a prompt table exists. When you are finished, save the record. Add the new ChartField to the LED_KEY2_SBR record and make it a key field. Also add the new ChartField to the LED_KNK_SBR record, but do not designate it as a key.
Add the ChartFields to the SQL object LEDMAP_CHART.
To open the SQL object, select File, Open in the Application Designer. Open the LEDMAP_CHART SQL object (object type: SQL), and add the new ChartFields. Fields should be MAP_[name].
Alter the corresponding tables and views for each of the modified subrecords.
You should alter them in the following order: LED_KNK_SBR, LED_KEY2_SBR, LEDMAP_CHART.
Note: You must use Find Object References to determine which tables and views need to be altered.
Alter the LEDMAP_SEQ grid on the page LEDMAP_TBL1.
In the Application Designer, access the page LEDMAP_TBL1. Go to the LEDMAP_SEQ grid and add or update the following fields:
Detail
Description
Check box CHARTFIELD_X_OPT*
Record DERIVED_LEDMAP (Short description) (Yes/No)
Edit box CHARTFIELD_X_OPT
Record LEDMAP_WORK (Long description, Invisible)
Check box CHARTFIELD_X_TOPT
Record LEDMAP_SEQ (Short description) (Yes/No)
Edit box CHARTFIELD_X_TREE
Record DERIVED_LEDMAP (Long description, Invisible)
Push Button CHARTFIELD_X_TSEL
Record DERIVED_LEDMAP (copy image from previous ChartField)
Edit box MAP_[name]
Record LEDMAP_SEQ (Long description)
Note: X refers to the ChartField number. If you insert the new ChartField between existing ChartFields on the LEDMAP_CHART subrecord, you must add the new fields and renumber the existing fields. The subrecord sequence number must match the CHARTFIELD_X_OPT.
Note: Before saving the grid and page, adjust the size of all boxes for All/Tree/Tree Name for ChartField.
Add the following fields to the PF_LED_TMPL_TBL1 page:
Detail
Description
Edit box FIELDNAMEX
Record DERIVED_LEDMAP (None, Invisible, Display Control)
Label Text = "FIELDNAMEX"
Edit box CHARTFLD_X_TREEVW
Record PF_LED_TMPL_TBL (None)
Edit box CHARTFLD_X_NODEVW
Record PF_LED_TMPL_TBL (None)
Edit box SHORTNAME
Record PSDBFIELD (None, Display-Only, Related Display)
Label Text = " FIELDNAMEX descr"
Note: X refers to the ChartField number. When you save the data, you can ignore the warning message PSDBFLDLABL. SHORTNAME occurs more than once.
If you receive any errors, check the layout order and reorder the fields as they should appear on the page.
Add the GL mapper rule for the current SetID on the Data Manager Rules Define Rule page if it is not there already.
Warning! If the ABMP rule already exists for the current SetID, you must rebuild the SQL by resolving the page.
To use trees, specify the appropriate tree view, tree node view, and tree name on the Ledger Mapping Defaults page.
Set up tree view and tree node views for the new ChartFields. Also, be sure to add the views under a record group control for the ChartField (add a new record group if one does not exist). Access the Ledger Mapper Defaults II page and set up a tree name if needed.
Correct existing ledger to resource mappings to reflect the new ChartField.
Use the All Values option as a default or specify a value or tree.