
Maintaining Resource Profiles
The resource profile is a dynamic record designed for periodic review and update by the resource and resource manager to reflect changes in the resource's qualifications. You view or modify various parts of a resource's profile when you establish and maintain the resource.
This section discusses how to:
Maintain resource objective, areas of specialty, and additional resource information.
Maintain resource work experience.
Maintain resource qualifications.
Maintain resource preferences.
Maintain resource general information.
Enable Secure Data 1 and Secure Data 2
Review resource profiles.
Pages Used to Maintain Resource Profiles
|
Page Name |
Definition Name |
Navigation |
Usage |
|---|---|---|---|
|
Profiles - Overview |
RS_ERES_OVERVW |
|
View or modify a resource's objective, areas of specialty, and additional resource information. |
|
Profiles - Work Experience |
RS_ERES_WORK_HIST |
Click Work Experience on any Resource Profile page. |
View a resource's work experience information. |
|
Work Experience (edit) |
RS_WORK_HIST_EDIT |
Click Add Work Experience or Edit on the Resource Profile - Work Experience page. |
Add or modify a resource's work experience entries. |
|
Profiles - Qualifications |
RS_ERES_COMP_ACOMP |
Click Qualifications on any Resource Profile page. |
View or modify a resource's qualifications that are stored in the employee source database. |
|
Profiles - Preferences |
RS_ERES_PREFS |
Click Preferences on any Resource Profile page. |
View or modify resource preference information. |
|
Profiles - General Info |
RS_ERES_GEN_INFO |
Click General Info on any Resource Profile page. |
View or modify a resource's contact information, job, passports and visas, weekly work days, home airport, assignment restrictions, and flexible resource attribute values. |
|
Profiles — Secure Data 1 |
RS_SEC_DATA 1 |
|
Enable you to secure or unsecure data tabs based on the preference selected in the Installation options. |
|
Profiles - Secure Data 2 |
RS_SEC_DATA 2 |
|
Enable you to secure or unsecure data tabs based on the preference selected in the Installation options. |
|
Profiles - Resource Profile |
RS_RES_PROF_RVW |
|
Review consolidated resource profile information in a resumé format. |
|
<Resource> Contact Information |
RS_RES_PROF_CONTCT |
Click Contact Information on the Resource Profile - <Resource> page. |
Review a resource's address and telephone information. |
Maintain Resource Profile Page
Use the Profiles — Secure Data 1 page (RS_SEC_DATA 1) to enable you to secure or unsecure data tabs based on the preference selected in the Installation options.
Resource Management, Maintain Resource Profiles,Profiles,Secure Data 1
Click Secure Data 1 on any Resource Profile page.
Use the Profiles - Secure Data 2 page (RS_SEC_DATA 2) to enable you to secure or unsecure data tabs based on the preference selected in the Installation options.
Resource Management, Maintain Resource Profiles,Profiles,Secure Data 2
Click Secure Data 2 on any Resource Profile page
Image: Profiles — Secure Data 1 and Secure Data 2
This example illustrates the fields and controls on the Profiles — Secure Data 1 and Secure Data 2. You can find definitions for the fields and controls later on this page.
If a user has security access to a secure data tab, only that tab will be visible on the Maintain Resource Profile, Profile page. If they do not have access to any of the secure data tabs, then the tabs will not be visible on this page.
Note: If a field is placed on either secure data tab in the setup options, it is considered as a secure field. The position and headers/titles of these secure fields on their original tabs will remain the same. However, the actual data is replaced with the word 'SECURED'. If a field is not placed on a secure data tab, then it will be visible throughout the tabs in their current place on the resource profile.
The information defined in the Resource Profile page is based upon the secure profile data options set by the administrator. For example, if a particular field such as job code has been selected as secured by the administrator you will not be able to view the job code, instead the text 'SECURED' will be displayed for the particular field.
Profiles - Overview Page
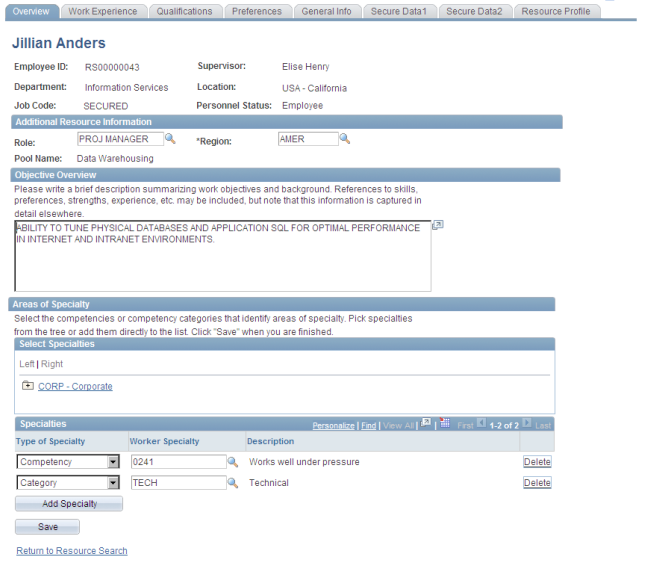
Use the Profiles - Overview page (RS_ERES_OVERVW) to view or modify a resource's objective, areas of specialty, and additional resource information.
Image: Profiles — Overview Page
This example illustrates the fields and controls on the Profiles — Overview Page. You can find definitions for the fields and controls later on this page.

Note: In the Overview tabs the Job code has been set to 'SECURED', as the job code field is placed on the secure data tab in the setup options. The position and headers/titles of the secure fields on their original tabs remain the same. If a field is not placed on a secure data tab, then it will be visible throughout the tabs in their current place on the resource profile. Similar functionality applies for all the other Tabs in the Maintain Resource Profiles.
See Setting Up Cross-Application Installation Options.
Note: The Resource Matching process does not use the data that is captured for objective and areas of specialty. It is informational only.
Profiles - Work Experience Page
Use the Profiles - Work Experience page (RS_ERES_WORK_HIST) to view a resource's work experience information.
Image: Profiles - Work Experience page
This example illustrates the fields and controls on the Profiles - Work Experience page. You can find definitions for the fields and controls later on this page.
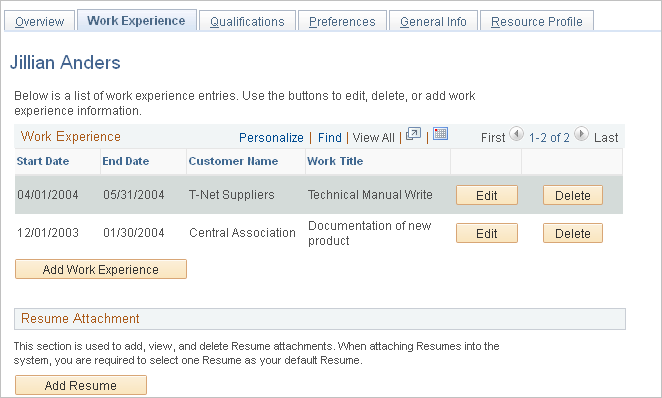
Note: Resource Matching uses the Work Description field on the Work Experience edit page to calculate Work Experience factor fit scores.
A resource's past, present, and future work assignments appear on the page. The system automatically adds a work experience entry to the page each time the resource placed on an assignment in the status Assigned or Pending Approval in PeopleSoft Resource Management. You can modify or enhance the entry for further clarity.
If a resource's assignment is canceled before the start date, the system automatically deletes the work experience entry from this page. If the assignment is canceled after the start date but before the assignment end date, the system automatically changes the work experience end date to the assignment cancellation date.
You can manually create work experience entries to record previous work experience that occurred at another company or before implementing PeopleSoft Resource Management.
Resume Attachment
Click Add Resume to add a resumé attachment.
Profiles - Qualifications Page
Use the Profiles - Qualifications page (RS_ERES_COMP_ACOMP) to view or modify a resource's qualifications that are stored in the employee source database.
Image: Profiles - Qualifications page (1 of 2)
This example illustrates the fields and controls on the Profiles - Qualifications page (1 of 2). You can find definitions for the fields and controls later on this page.
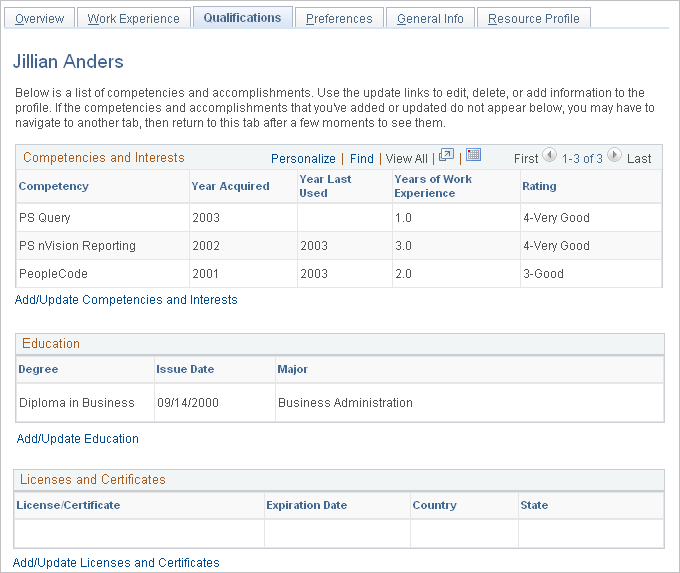
Image: Profiles - Qualifications page (2 of 2)
This example illustrates the fields and controls on the Profiles - Qualifications page (2 of 2). You can find definitions for the fields and controls later on this page.

Use this page to view qualifications or access pages to update the information.
Updating Qualification Information in PeopleSoft HRMS
If PeopleSoft HRMS is the employee source database, click the Add/Update link in a qualification region to access PeopleSoft HRMS by using the Single Signon feature. There, you can make modifications, save your changes, and then return to the resource profile in PeopleSoft Resource Management.
Updating Qualification Information in PeopleSoft Resource Management
If the Financials database is the employee source database, click an Add/Update link to access the PeopleSoft Resource Management pages that you use to modify resource qualifications. This topic is discussed in more detail elsewhere in this topic.
Profiles - Preferences Page
Use the Profiles - Preferences page (RS_ERES_PREFS) to view or modify resource preference information.
Image: Profiles - Preferences page
This example illustrates the fields and controls on the Profiles - Preferences page. You can find definitions for the fields and controls later on this page.
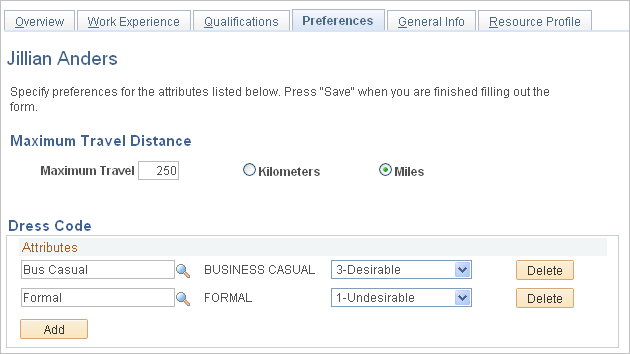
If the organization establishes a flexible preference attribute, it appears on this page for the resource to specify values and preference levels. For example, if there is a flexible preference attribute called Work Region, the resource can specify a level of desire to work in each of the various regions.
Profiles - General Info Page
Use the Profiles - General Info page (RS_ERES_GEN_INFO) to view or modify a resource's contact information, job, passports and visas, weekly work days, home airport, assignment restrictions, and flexible resource attribute values.
Image: Profiles - General Info page (1 of 2)
This example illustrates the fields and controls on the Profiles - General Info page (1 of 2). You can find definitions for the fields and controls later on this page.

Image: Profiles - General Info page (2 of 2)
This example illustrates the fields and controls on the Profiles - General Info page (2 of 2). You can find definitions for the fields and controls later on this page.
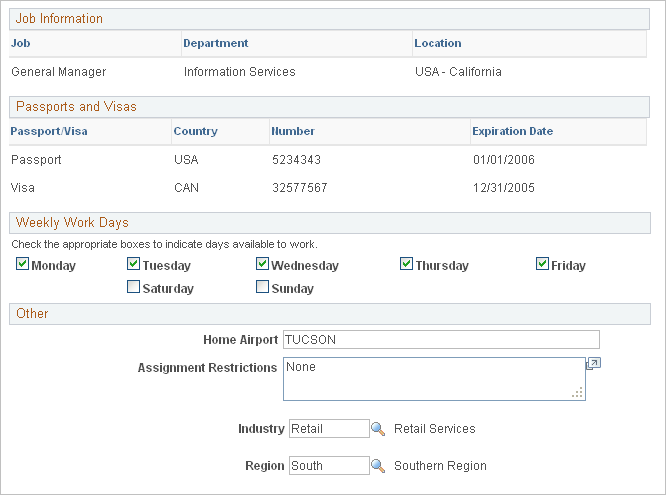
You cannot modify address, job information, or passport and visa information on this page; you must update this information in the employee source database tables. For example, if the Financials database is the employee source database, you can update this information using the Personal Data component (RS_CM_PERSONAL).
Address
View the resource's street address, city, town, county, province, state, postal zip code, and country. Additionally, view the email address for the primary email account of the user ID that is associated with this resource. The email address is used when the system notifies the resource of date or status changes on assignments.
Phone
Enter a phone number, the type of phone number entered, and the days of the week that the resource can be reached at that number.
Job Information
Review the job title, department, and location with which the resource is affiliated, as defined in the employee's Job record. If the resource has multiple jobs, the job that is specified for use in PeopleSoft Resource Management appears.
Passports and Visas
Review passports or visas held by the resource as defined in the employee source database.
Weekly Work Days
Select the appropriate check boxes to indicate the days of the week that the resource is available to work.
Weekly work days are used to determine a resource's available work days for assignments and appointments. The resource schedule uses shading to indicate the work days that are not available.
Other
If the organization established a flexible resource attribute, either for use as a flexible qualification factor or for information only, it appears on this page. For example, if there is a flexible attribute called Industry, you can specify the industry expertise.
| <Flexible Resource Attribute> |
Enter or look up the appropriate value for each attribute. |
| Add |
Click to add flexible attribute values, if the attribute allows multiple values. |
Profiles - Resource Profile Page
Use the Profiles - Resource Profile page (RS_RES_PROF_RVW) to review consolidated resource profile information in a resumé format.
Image: Profiles — Resource Profile Page (1 of 2)
This example illustrates the fields and controls on the Profiles — Resource Profile Page (1 of 2). You can find definitions for the fields and controls later on this page.
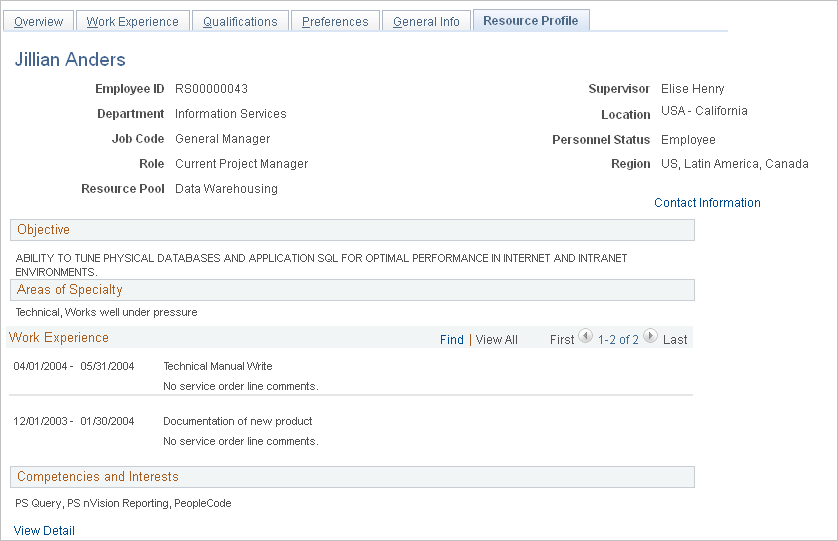
Image: Profiles — Resource Profile Page (2 of 2)
This example illustrates the fields and controls on the Profiles — Resource Profile Page (2 of 2). You can find definitions for the fields and controls later on this page.

Image: Profiles — Resource Profiles Contact Information
This example illustrates the fields and controls on the Profiles — Resource Profiles Contact Information. You can find definitions for the fields and controls later on this page.

This page consolidates the resource profile sections into a single, display-only format. A group box appears on this page if the following two conditions are true:
It is selected during implementation to appear on the Resource Profile display-only summary page.
It contains data for the resource.
On installation, the administrator selects which items are to appear on the Resource Profile tab and also the resource-view only page in the Profile Display Options groupbox in the installation options. The 6 potential secure fields on the Resource Profile tab are Job Code, Home Phone Number, Mobile Phone Number, City, Areas of Specialty, and Passport and Visa Numbers.
If one of the items chosen for the Resource Profile tab (and also the resource-view only page) is also a secure data field, and the user does not have access to this secure data field, then the header for this field will still be shown on the Resource Profile tab, but the actual data will be replaced with the word 'SECURED'. If the user has security access to a secure data tab, which has a data field enabled, then they WOULD BE ABLE TO SEE this field on the Resource Profile tab, and also the Resource-view only page.
If the field has not been assigned to either Secure Data 1 tab or Secure Data 2 tab, it is not considered a secure field, and hence would be visible on this tab and on the resource-view only page.
If they are viewing their own profile then they should be able to see all fields on the Resource Profile tab, and on the Resource-view only page.
When updating their own data at Resource Management, Maintain Resource Profiles, My Profile, the system disregards all secure data rules. There are no secure data tabs. The user can update and view their information exactly as they currently can with the fields in their current positions on the tabs.