
Setting Up Cross-Application Installation Options
Use the Installation Options component (INSTALLATION) to set up cross-application installation options.
This section discusses how to:
Define options for installed PeopleSoft applications.
Set overall installation options.
Set Financial Sanctions options.
Set up login information for the Dun and Bradstreet interface.
Define alternate characters for language codes.
Set Documentum installation options.
Enable entry events at the installation level.
Define Commitment Control installation options.
Define customer hierarchy display options.
Pages Used to Set Up Cross-Application Installation Options
|
Page Name |
Definition Name |
Navigation |
Usage |
|---|---|---|---|
|
Installation Options |
INST_LINKS |
|
Use to access the general options and the product options. |
|
Products |
INSTALLATION_FS |
|
All PeopleSoft products are delivered with the purchased and licensed products. Deselect the check boxes for all products that you have not licensed. Select the check boxes for the products that you have licensed and enabled in your database. Unless you deselect the unlicensed products, you are likely to encounter performance issues or other processing problems when unnecessary processes or database activity is triggered that is related to the unlicensed products. For example, unlicensed products for which the check boxes remain selected can cause unnecessary processing due to ChartFields that are specifically related to the unlicensed products. If you have not licensed any of these products—Project Costing, Expenses, Resource Management—you will see these ChartFields: PC Business Unit, Activity, Source Type, Category, or Subcategory on pages. Deselect the check boxes for these three products on the Installation Options - Products page, and then run ChartField configuration to inactivate the ChartFields (as they are specific to these three products). |
|
Overall |
INSTALLATION_FS1 |
Set Up Financials/Supply Chain, Install, Installation Options, Overall |
Configure installation information and indicate how you want to use cross-application features. |
|
Financial Sanctions Options |
SDN_SRCH_OPT_SEC |
Click the Financial Sanctions Options link on the Installation Options - Overall page. |
Define financial validation options for these PeopleSoft applications: Treasury, Payables, eSettlements, and Order Management. Select the search options and specify the SES (Oracle Secure Enterprise Search) search definitions. |
|
DB Account (Dun and Bradstreet account) |
DB_ACCOUNT_SEC |
Click the DB Account Information link on the Installation Options - Overall page. |
Enter logon IDs and passwords by setID for each Dun and Bradstreet account. |
|
Alternate Character |
ALT_CHAR_PNL |
Click the Alternate Character link. |
Select the alternate characters that the system uses for a specific language code. |
|
Documentum |
OPER_DEF_TABLE_DC |
Click the Documentum link. |
Set your Documentum installation options. You can set several specific document management control options that both enable the document management system and specify system-level configurations. |
|
Federal Processing Options |
INSTALLATION_FD |
|
Enable federal registry processing for vendors or customers. |
|
Entry Event |
INSTALLATION_EE |
and click the Entry Event link. |
Enable the use of entry events in General Ledger, Payables, Purchase Orders, Receivables, and Billing, as well as upward and downward adjustments to commitment control budgets. |
|
Commitment Control |
INSTALLATION_KK |
and click the Commitment Control link. |
Enter various commitment control installation options for default budget date, reversal date, budget period liquidation, funding source, and online budget checking. Also, set the option to initiate pop-up for errors and warnings for online transaction budget checking. |
|
Customer Installation Options - Customer page |
INSTALLATION_CU |
Set Up Financials/Supply Chain, Install, Installation Options, Customer |
Define overall customer hierarchy default options. |
Installation Options - Products Page
Use the Installation Options - Products page (INSTALLATION_FS) to enable PeopleSoft products that you have licensed.
Deselect the check boxes for all products that you have not licensed. Select the check boxes for the products that you have licensed and need to enable in your database.
Installation Options - Overall Page
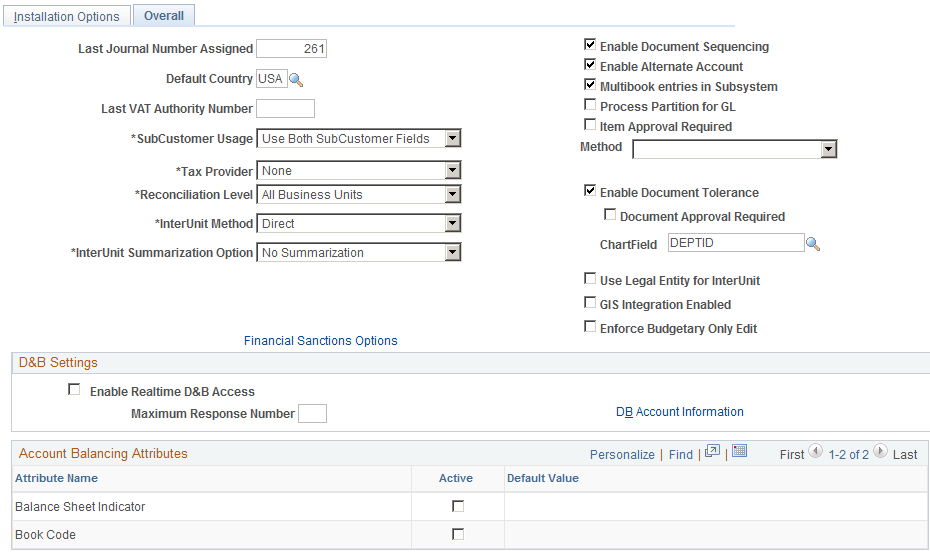
Use the Installation Options - Overall page (INSTALLATION_FS1) to configure installation information and indicate how you want to use cross-application features.
Image: Installation Options - Overall page
This example illustrates the fields and controls on the Installation Options - Overall page. You can find definitions for the fields and controls later on this page.
| Last Journal Number Assigned |
Displays a number that represents where to begin numbering journals. You can change the numbering for your journals so that the next journal number assigned is one number greater than the journal number that appears in this field. All journals increment sequentially from the first journal created. |
| Default Country |
Select a country to appear by default on your pages. You can override the default on the actual pages. |
| Last VAT Authority Number (last value-added tax authority number) |
Enter the last value-added tax (VAT) authority number used for the system to automatically start assigning when you create new VAT authority numbers. You can edit this field only if the VAT authority number changes. When you use the Express VAT Code function, the system automatically creates a VAT authority number at the time that you create a VAT code. You then assign one or more tax authorities to a VAT code, to define the VAT rate applicable for that VAT code. |
| SubCustomer Usage |
History, aging, events, and some profiles are available for subdivisions within customers if you enable subcustomer levels in your system. Select whether you want to use the first SubCustomer field, both SubCustomer fields, or no SubCustomer fields. These fields appear on any pages where a customer that has subcustomers appears. |
| Tax Provider |
Select None, Taxware, or Vertex as the type of tax provider software that you use. This option determines what fields appear on PeopleSoft application pages that have implications for sales and use tax. Before selecting a third-party tax application, the application should be installed and configured to communicate with the PeopleSoft system. Note: When you change tax providers, a process will run to update the geocodes and business unit tax settings. You can view the status of this process on the Tax Provider Installation page. Geocodes will be deselected when changing the tax provider to None. No taxes can be computed through a third-party solution until the process has finished. Transactions for business units set to use the PeopleSoft tax tables will not be affected by the change. |
| Tax Provider Setup |
The Tax Provider Setup link appears when you choose a third-party from the Tax Vendor list. Click the link to complete setup for the chosen tax vendor solution. |
| Reconciliation Level |
Identify the type of business unit-level security to use for the bank reconciliation process. Select All BUs if you want the reconciliation process to include all business units set up in the system. Select Single BU if you want reconciliation to adhere to the business unit security that you have already defined. When you select Single BU, the run parameters for the Auto Reconciliation process requires you to select the business unit that you want to perform reconciliation. The list displays the business units that the user is allowed to access. |
| InterUnit Method |
Select one of the due-to and due-from balancing methods for InterUnit transactions from the following values. Direct: The due-to and due-from ChartFields used to balance each entity in the transaction are retrieved from the Inter/IntraUnit template definition of the entity. Indirect: The due-to and due-from ChartFields used to balance each entity in the transaction are retrieved from the Inter/IntraUnit template definition of the affiliate entity. Pairs: The due-to and due-from ChartFields used to balance each entity in the transaction are retrieved from a definition for the pair of entities, or business units, involved in the transaction. Pairs are defined on the InterUnit Pair Maintenance page. |
| InterUnit Summarization Option |
Select one of the following options. Note: The InterUnit Summarization Option is not available to users of Sybase because of technical limitation of that database.
|
| Financial Sanctions Options |
Click to access the Financial Sanctions Options page, where you can set up financial sanctions validation. |
| Enable Document Sequencing |
Select to use document sequencing for the overall installation. |
| Enable Alternate Account |
Select to enable alternate account processing. Alternate account produces journal-line and transaction-level balances for statutory reporting requirements. The primary account field contains the corporate accounts, and an alternate account contains the statutory accounts. You define mapping options for each alternate account or the system accesses by default the suspense account defined on the Ledger For a Unit page. It is not necessary to install General Ledger to use alternate accounts in other applications. |
| Create MultiBook Accounting Entries in Subsystems |
Select to enable the system to create multibook accounting entries on an auxiliary page in the subsystems. General Ledger must be installed for this option to be available. |
| Process Partition for GL |
Select to improve processing performance. You must have performed the procedures necessary to enable multiple General Ledger Post processes to run concurrently with unique data partitions. This option is available only if you have installed General Ledger. |
| Item Approval Required: Method |
Select Manual or Workflow as your approval method. If you select Manual, an authorized user can set the status of individual items on the Item Approval page to Approved or Denied. If you select workflow approval, you must establish item approval as a business process in PeopleSoft Workflow. |
| Enable Document Tolerance |
Select to perform document tolerance checking, which is an edit that checks the percentage or monetary amount discrepancy between a requisition and purchase order document or a purchase order and voucher. This tolerance checking is performed at the distribution line level. You define these tolerance thresholds by ChartField value. In the ChartField field, enter the ChartField whose values you use to define document tolerance checking. |
| Document Approval Required |
Select to have the Document Tolerance Checking Application Engine process (FS_DOC_TOL) check that the voucher has been approved. If the voucher is not approved, the process issues an exception. If you do not select this option, the process proceeds with the regular validation—whether or not the voucher has been approved—passing vouchers that are within tolerance and generating exceptions for those that are over tolerance. |
| ChartField |
Enter the ChartField whose values you use to define document tolerance checking. |
| Use Legal Entity for InterUnit |
Select if you want to segregate InterUnit transactions for business units by legal entities, such as corporations, partnerships, and sole proprietors, and if you want to use different InterUnit payables and receivables, depending on whether the transaction is InterEntity or IntraEntity. Deselect this field if the InterUnit method is pairs. |
| GIS Integration Enabled (Geographic Information System integration enabled) |
Select to enable the integration of a Geographic Information System (GIS) with PeopleSoft Maintenance Management and PeopleSoft Asset Management. There are specific setup requirements to enable PeopleSoft Maintenance Management and PeopleSoft Asset Management to integrate with ESRI:
See also Location/Comments/Attributes Page. |
| Enforce Budgetary Only Edit |
Select to enforce the budgetary only edit when you save a transaction. This enables edit of Budgetary Only ChartField values if there are multiple effective-dated values with different Budgetary Only values. Deselect this option if you do not require this edit. |
| Enable Realtime D&B Access (enable realtime Dun and Bradstreet access) |
Select to enable users to use the Dun and Bradstreet interface to order and purchase Dun and Bradstreet reports. |
| Maximum Response Number |
Enter the maximum number of rows that you want to receive from the Dun and Bradstreet system when you are searching for a Data Universal Numbering System (DUNS) number. |
| DB Account Information (Dun and Bradstreet account information) |
Click to access the D & B Account page, where you enter login information for each Dun and Bradstreet account. |
| Account Balancing Attributes |
Select the appropriate check box to activate the following account balancing attributes: Balance Sheet Indicator: If you define an account value as balance sheet or off-balance sheet, you must also assign various General Ledger processes, such as Journal Edit, Revaluation, Closing, Position Accounting, and so on, with the appropriate balance sheet or off-balance sheet account to perform the necessary balancing. Book Code: If you use the Book Code feature to further segregate transactions into balancing subsets within the same ledger, it is particularly important that the Book Code ChartField values and the Balance Sheet Indicator values be properly grouped and matched with your account ChartField to ensure proper balancing. You define a combination of a book code and a balance sheet indicator value as an account balancing group. You associate the two with an account as an attribute. You can activate any one of the account balancing attributes. You do not need to activate both if you want to activate only one. The system populates the Default Value field with the default account balancing group value that you set up when you configure your ChartFields. Note: Book Code is only supported by the General Ledger and Asset Management products. You might require a blank Book Code if Asset Management has a mix of asset business units with some using and some not using Book Codes, which need new Account Balancing Groups and interunit templates to use the blank Book Code value. |
Financial Sanctions Options Page
Use the Financial Sanctions Options page (SDN_SRCH_OPT_SEC) to define financial validation options for these PeopleSoft applications: Treasury, Payables, eSettlements, and Order Management.
Select the search options and specify the SES (Oracle Secure Enterprise Search) search definitions.
Image: Financial Sanctions Options page
This example illustrates the fields and controls on the Financial Sanctions Options page. You can find definitions for the fields and controls later on this page.

You can validate payees, banks, vendors, and customers against any search index you specify on the Financial Sanctions Options page. Depending upon how you set up the validation options, these applications provide a process for administrators to ensure the match is correct and to prevent any financial transactions from occurring with that individual or entity.
See Understanding the Financial Sanctions Service.
See Understanding Financial Sanctions Validation.
See Validating Financial Sanctions.
Validation Options
Search Options
You perform a search in one of two ways: invoke a search on the financial sanctions data stored in the FSCM database or invoke a search using a third-party web service. A common application package (FS_SDN_SEARCH) provides a search interface for accessing the financial sanctions data stored in the FSCM database or by using a third-party web service.
| Use Enterprise Search Service |
Select to access the financial sanctions data stored in the FSCM database. |
| SES Score Threshold (Secure Enterprise Search Score Threshold) |
Enter a score that the system uses to determine if there is a potential match. The system performs a search on the Oracle SES search definitions created on the financial sanctions data. The score returned by SES is compared to the score that you enter. If the score returned is greater than, or equal to, the score that you enter, it is considered a potential match. Note: The higher the number you enter, the more accurate the match has to be to the financial sanctions data. The lower the number you enter, the system returns more potential matches. You need to determine what is acceptable for your organization. Warning! To modify the delivered SESscore threshold amount, you must have a thorough understanding of how the SES search engine functions within the PeopleSoft Search Framework. See PeopleTools: PeopleSoft Search Technology |
| Use Third Party Web Service |
Select to use a third-party web service to access financial sanctions data. |
| Message Node Name |
Enter the node name for the exchange of XML-formatted, IP messages between PeopleSoft and the third-party web service. You must configure this node to invoke the third-party web service. Also, you must transform the outbound IP request message received by the third-party web service, as well as the inbound IP response message sent from it. See Understanding the Financial Sanctions Service. See Defining Integration Broker Settings for Payments. Note: This PeopleSoft application provides a web service (SDN Search) that accesses the financial sanctions data stored in the FSCM database. The web service is delivered using either Integration Broker or by using a Business Process Execution Language (BPEL) map. Enabling web services is discussed in PeopleTools: Integration Broker in the "Creating Third-Party Integrations Using WSDL" topic. |
List of SES Search Definitions
The SES search engine performs the search on the financial sanctions data.
D&B Account Page
For each business unit that has a separate billing account to purchase reports through the Dun and Bradstreet interface, enter the setID. Enter the user ID and password that is used to log on for each setID.
Alternate Character Page
Use the Alternate Character page (ALT_CHAR_PNL) to select the alternate characters that the system uses for a specific language code.
PeopleSoft Alternate Character architecture accommodates language phonetic requirements, primarily supporting Japanese Furigana requirements for EFT processing. You can expand its implementation to include other language needs.

Documentum Page
Use the Documentum page (OPER_DEF_TABLE_DC) to set your Documentum installation options.
You can set several specific document management control options that both enable the document management system and specify system-level configurations.
Note: All fields on this page are case-sensitive.
Federal Processing Options Page
Use the Federal Processing Options page (INSTALLATION_FD) to enable federal registry processing for vendors or customers.
Image: Federal Processing Options
This example illustrates the fields and controls on the Federal Processing Options. You can find definitions for the fields and controls later on this page.
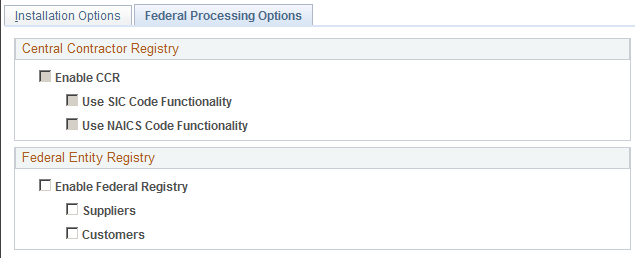
The Central Contractor Registry group box settings are defined on the Payables Installation Options page. The fields on this page are display only and unavailable for editing.
Entry Event Page
Use the Entry Event page (INSTALLATION_EE) to enable the use of entry events in General Ledger, Payables, Purchase Orders, Receivables, and Billing, as well as upward and downward adjustments to commitment control budgets.
Note: Entry event is not supported by funding source functionality.
Installation Options - Commitment Control Page
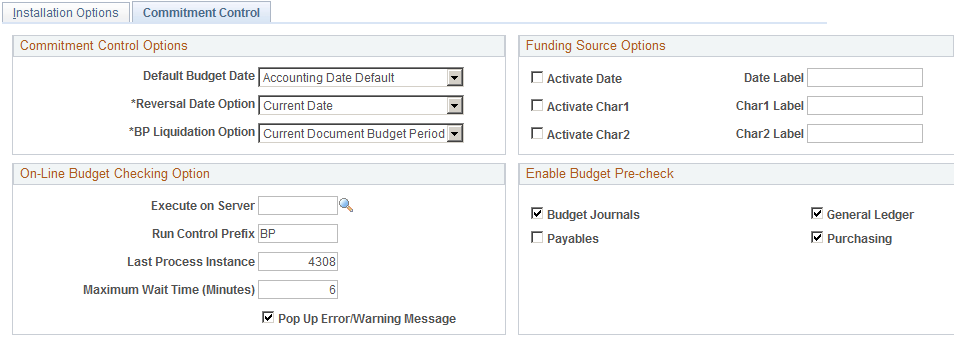
Use the Installation Options - Commitment Control page (INSTALLATION_KK) to enter various commitment control installation options for default budget date, reversal date, budget period liquidation, funding source, and online budget checking.
Also, set the option to initiate pop-up for errors and warnings for online transaction budget checking.
Image: Installation Options - Commitment Control page
This example illustrates the fields and controls on the Installation Options - Commitment Control page. You can find definitions for the fields and controls later on this page.
Commitment Control Options
Funding Source Options
On-Line Budget Checking Option
Enable Budget Pre-Check
Select the PeopleSoft applications in the Enable Budget Pre-check group box for which you want to enable check-only budget checking. The check-only feature allows you to budget-check transactions and budget journals online or in batch without posting transactions or budgets to the commitment control budget ledgers. The applications that appear in this group box vary, depending upon the products that are enabled for commitment control as specified in the Enable Commitment Control group box on the Installation Options - Products page.
Installation Options - Customer Page
Use the Installation Options - Customer page (INSTALLATION_CU) to define overall customer hierarchy default options.
Image: Installation Options - Customer page
This example illustrates the fields and controls on the Installation Options - Customer page. You can find definitions for the fields and controls later on this page.
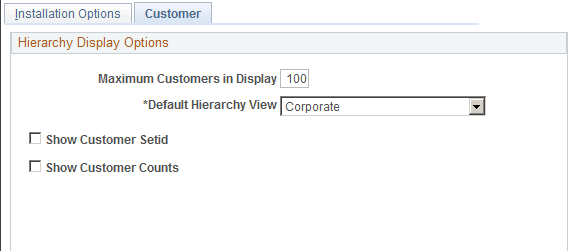
The values selected on this page affect the way the Customer Hierarchy page is presented in these components.
Customer Information, General Information, Customer Hierarchy page (Customers, Customer Information, General Information, click the Correspondence Selection link, the Remit From Selection link, or the Corporate Selection link).
Customer Hierarchy component (Accounts Receivable, Customer Accounts, Customer Information, Customer Hierarchy).
Collections Workbench component (Accounts Receivable, Customer Accounts, Collections Workbench, click the Hierarchy tab).