Release 1.2
Part Number E36379-01
Contents
Previous
Next
| Oracle Pedigree and Serialization Manager Process Guide Release 1.2 Part Number E36379-01 | Contents | Previous | Next |
There are several common functions that are used throughout the Oracle Pedigree and Serialization Manager (OPSM) application. Several pages within the application use these common functions. These common functions work basically the same for each page within the application. These common functions are documented here to provide ease of understanding and to prevent repetition in the documentation.
This chapter covers the following topics:
Several pages in Oracle Pedigree and Serialization Manager (OPSM) display the results from a search in a table format. Using the common table functionality you can manipulate the table so that it fits your needs. The common table functionality includes:
Detaching a table from the application page.
Changing the columns that appear in a table.
Reordering the columns that appear in a table.
Use these procedures to detach a table, to change the columns that appear in a table, and to reorder the columns that appear in a table:
Navigate to an Oracle and Pedigree and Serialization Manager page that displays the search results in a table format.
Enter search criteria for the page and click the Search button.
Example of the Maintain Locations Page Where the Search Results Display in a Table Format
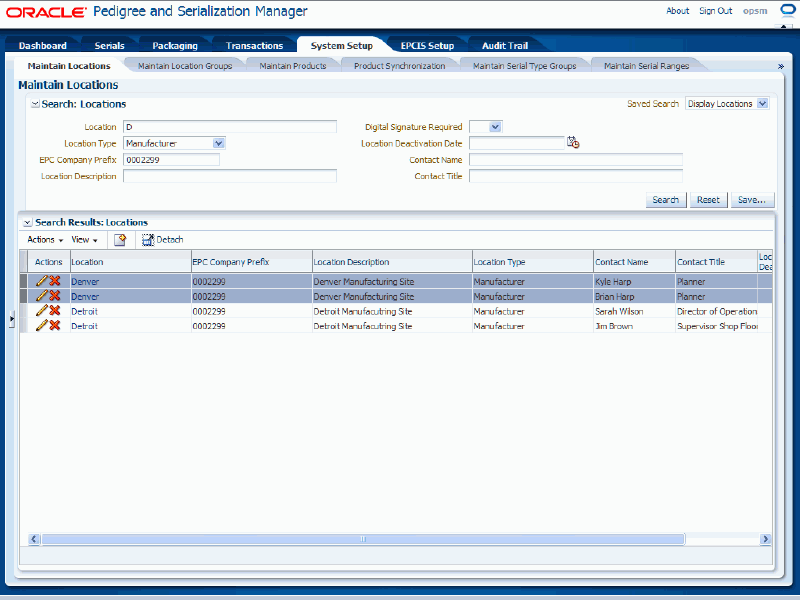
All of the available data that matches the search criteria appears in a table format.
Select Detach from the View menu or click the Detach icon located at the top of the table.
Example of the Maintain Locations Table Detached From the Page
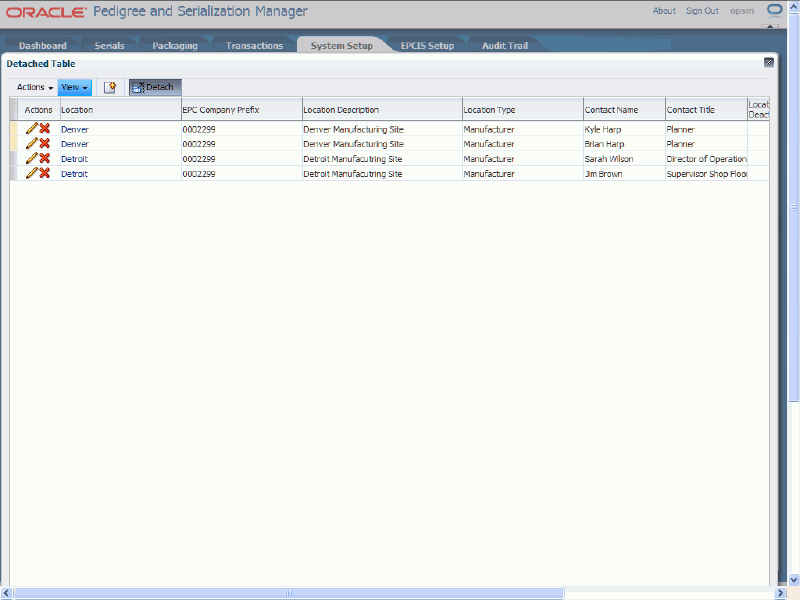
A new page appears with the table detached from the page. This functionality enables you to view more of the search result information in the table at one time.
Select Attach from the View menu or click the Detach Table icon located at the top of the table.
The table is placed back within the page from which it originated.
To Change the Columns that Appear in a Table
Navigate to an Oracle and Pedigree and Serialization Manager page that displays the search results in a table format.
Enter search criteria for the page and click the Search button.
Example of the Maintain Serials Page Where the Search Results Display in a Table Format
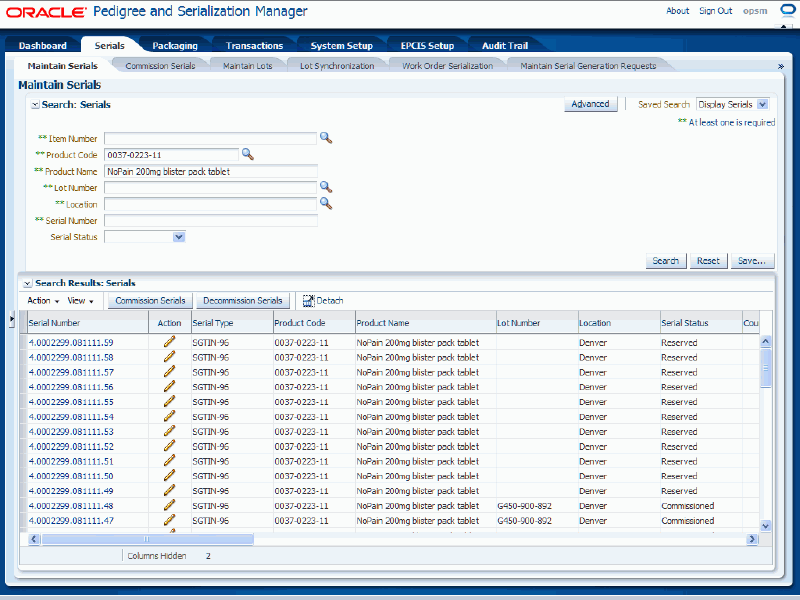
All of the available data that matches the search criteria appears in a table format.
Select Columns from the View menu.
Example of Maintain Serials Page with View Menu Expanded
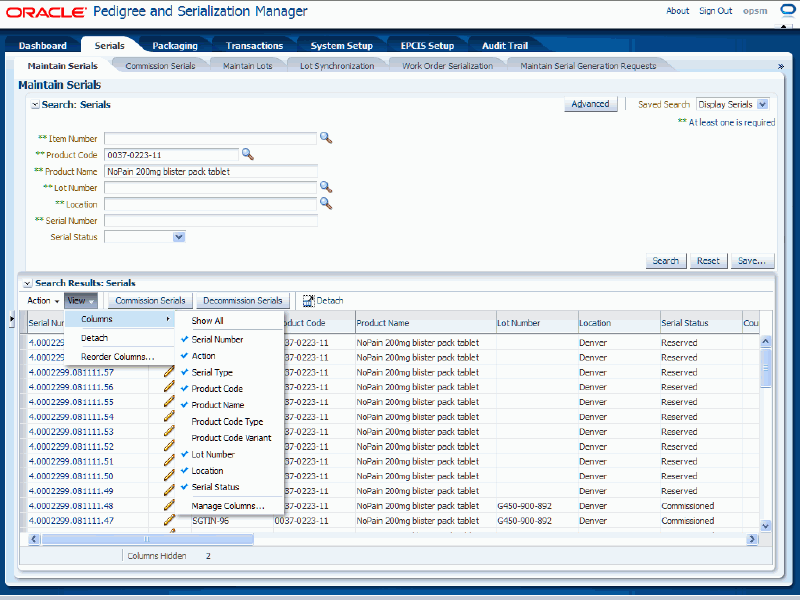
A dialog box appears displaying all of the available columns that can display for the table.
A blue check mark appears next to the columns that are currently selected for display in the table.
An available column name (black in color) with no check mark appears next to the columns that are available for display but have not been selected. Someone may have previously cleared that column for display.
The Manage Columns option appears if the table has more available columns for selection. Select Manage Columns to view all the columns available for selection in the table.
For more information on the Manage Columns option, see Procedure: To Change and Reorder Columns that Appear in the Table at One Time.
Note: If a column name is grey it is unavailable to be changed for the table.
Select the column (with a blue check mark) you would like to remove from the table or select the available column (without a check mark) you would like to add to the table.
Example of the Maintain Serials Page with the Action Field Removed From the Table
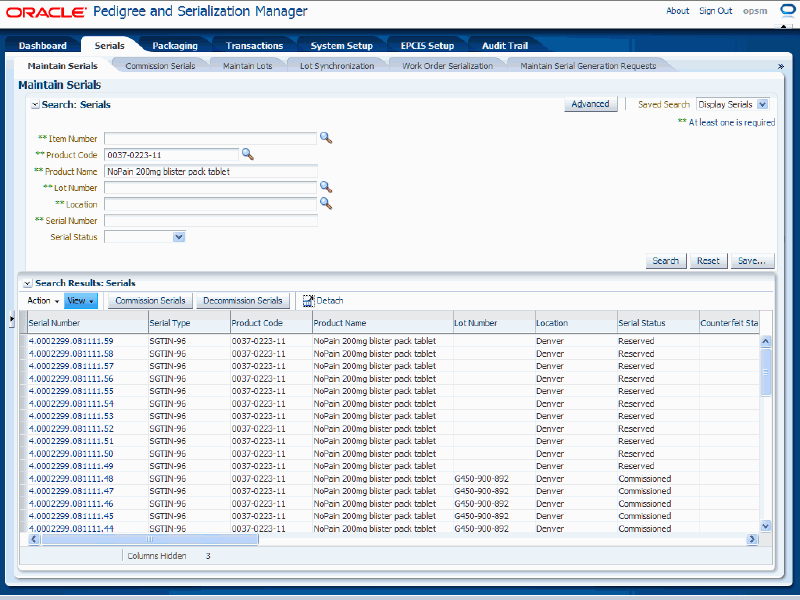
The column you removed is not displayed in the table or the column you added is displayed in the table.
Repeat Steps 3-4 until all of the columns you require display in the table.
(Optional) To show all columns, select Columns from the View menu and then select Show All.
The system displays all of the columns available for the table listed in the table.
To Reorder the Columns that Appear in a Table (Drag and Drop)
Navigate to an Oracle and Pedigree and Serialization Manager page that displays the search results in a table format.
Enter search criteria for the page and click the Search button.
Example of the Maintain Serials Page Where the Search Results Display in a Table Format
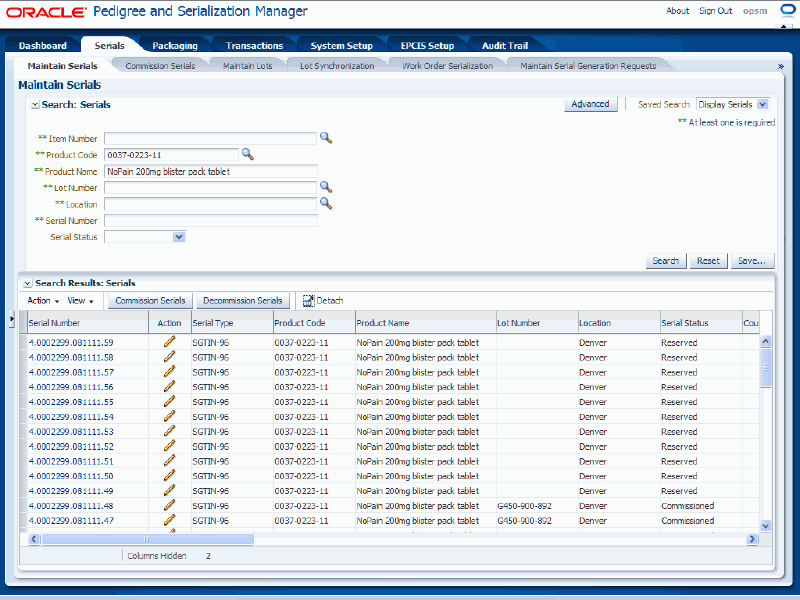
All of the available data that matches the search criteria appears in a table format.
Select the column you want to move and drag and drop it the correct location in the table.
Example of the Maintain Serials Page Where the Serial Type and Product Code Fields Display Ahead of the Action Field
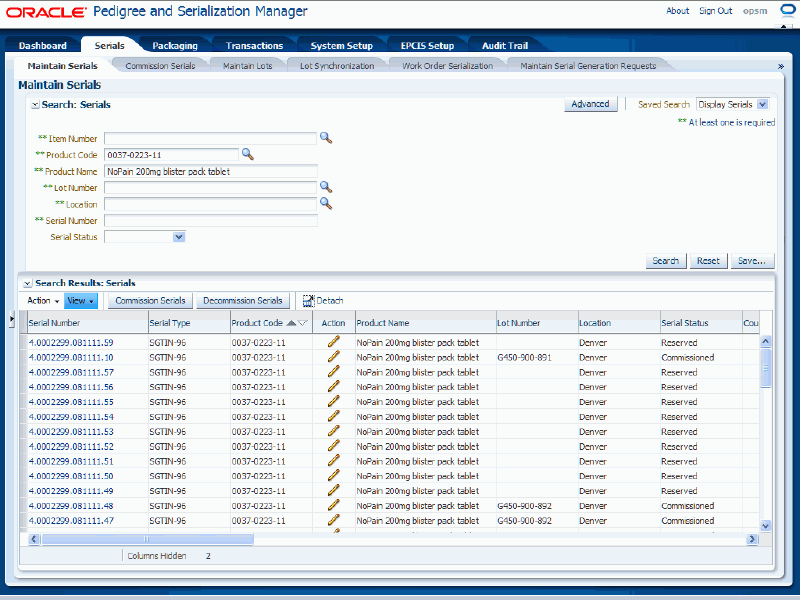
The table reappears displaying the columns in the order that you dropped them.
Repeat Step 3 until you have the columns in the order that you want.
To Reorder the Columns that Appear in a Table (View Menu)
Navigate to an Oracle and Pedigree and Serialization Manager page that displays the search results in a table format.
Enter search criteria for the page and click the Search button.
Example of the Maintain Serials Page Where the Search Results Display in a Table Format

All of the available data that matches the search criteria appears in a table format.
Select Reorder Columns from the View menu.
The Reorder Columns dialog box appears displaying all of the available columns that can display for the table. They are listed in the order in which they currently display on the page.
Select the columns you want to move.
Note: You can select one or more columns to move at one time.
Example of the Reorder Columns Dialog Box
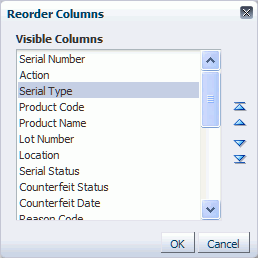
The Move Selected Item icons become available located on the right of the dialog box.
Move the columns to where you want them to display in the table. Perform one of these options:
Click the "Move selected item to top of list" icon to move the column or columns you selected to the top of the list.
Click the "Move selected items up one in list" icon to move the column or columns you selected up one place in the list.
Click the "Move selected items to bottom of list" icon to move the column or columns you selected to the bottom of the list.
Click the "Move selected items down one in list" icon to move the column or columns you selected down one place in the list.
Repeat Steps 4-5 until you have the columns in the order that you want.
Click the OK button.
Example of the Maintain Serials Page Where the Serial Type and Product Code Fields Display Ahead of the Action Field

The table reappears displaying the columns in the order that you selected.
To Change and Reorder Columns that Appear in the Table at One Time
Navigate to an Oracle and Pedigree and Serialization Manager page that displays the search results in a table format.
Enter search criteria for the page and click the Search button.
Example of Maintain Serials Page Where Search Results Display in a Table Format
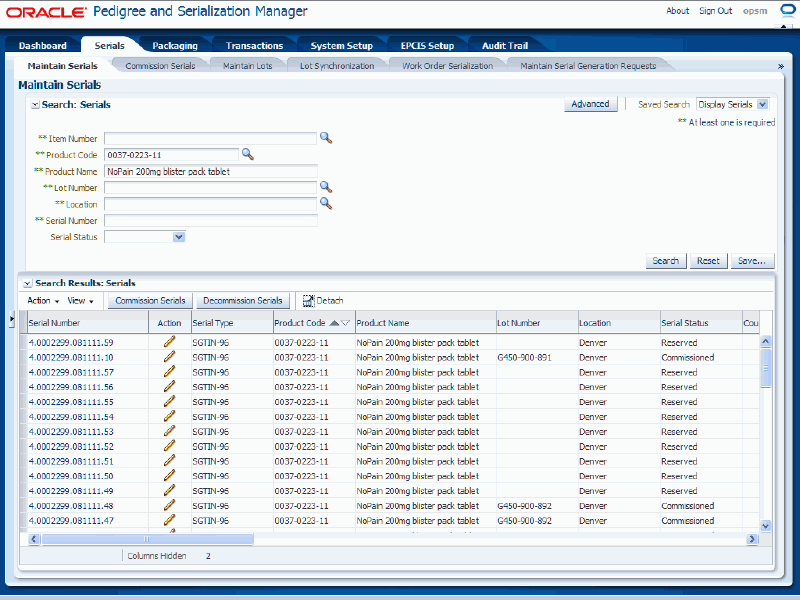
All of the available data that matches the search criteria appears in a table format.
Select Columns from the View menu.
Select Manage Columns from the Columns menu.
Note: This option only appears if you have more than 10 columns available for selection.
Example of the Manage Columns Dialog Box
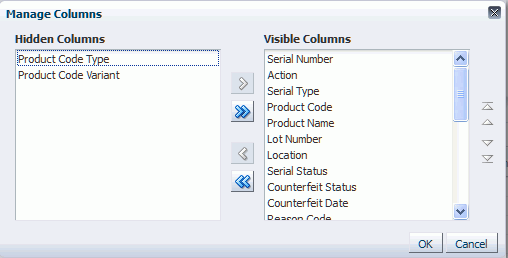
The Manage Columns dialog box appears.
Select the columns in the Hidden Columns region or the Visible Columns region that you want to make visible in the table or hide in the table.
Note: If you want to move all columns at once to be either hidden or visible you do not have to select the columns.
Restructure the table. Perform one of these options:
Click the "Move selected items to other list" icon to move the hidden column to the Visible Columns region.
Click the "Move all items to other list" icon to move all hidden columns to the Visible Columns region.
Click the "Remove selected item from list" icon to move the visible column to the Hidden Columns region.
Click the "Remove all item from list" icon to move all visible columns to the Hidden Columns region.
Click the "Move selected item to top of list" icon to move the visible column or columns you selected to the top of the list.
Click the "Move selected items up one in list" icon to move the visible column or columns you selected up one place in the list.
Click the "Move selected items to bottom of list" icon to move the visible column or columns you selected to the bottom of the list.
Click the "Move selected items down one in list" icon to move the visible column or columns you selected down one place in the list.
Repeat steps 5-6 until you have the columns that you want to display in the table and the order of the columns for the table.
Click the OK button.
Example of Maintain Serials Table with Action Field Removed and Product Code Field Moved to the Front of the Table (First Column)
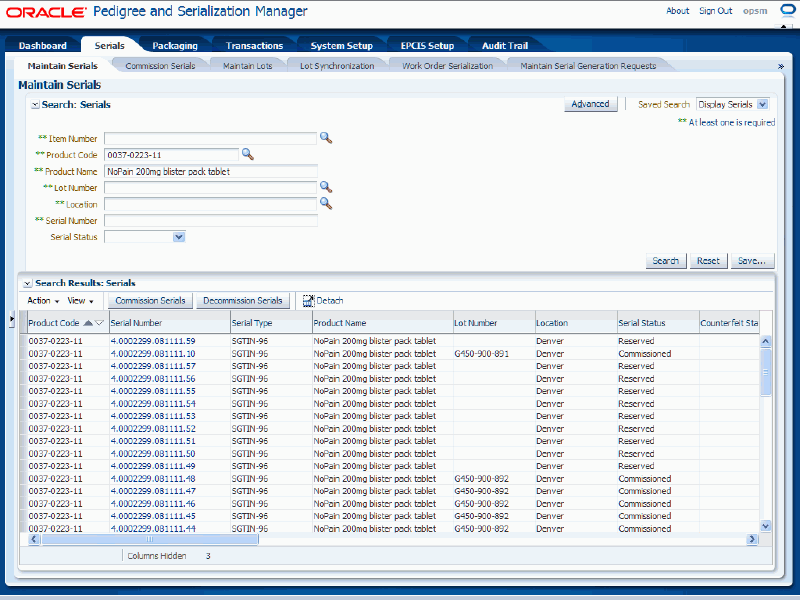
The table reappears displaying the columns and the column order that you selected.
Several pages in Oracle Pedigree and Serialization Manager (OPSM) require you to enter search criteria before you can maintain that particular type of data using that page. OPSM enables you to save the search criteria that you entered for a page so that you don’t have to continually enter it every time that you access the page.
Use these procedures to create a saved search, personalize a saved search, and delete a saved search:
Navigate to an Oracle and Pedigree and Serialization Manager page that requires search criteria to be entered.
Enter search criteria for the page and click the Search button.
Example of the Maintain Locations Page with a Search Performed
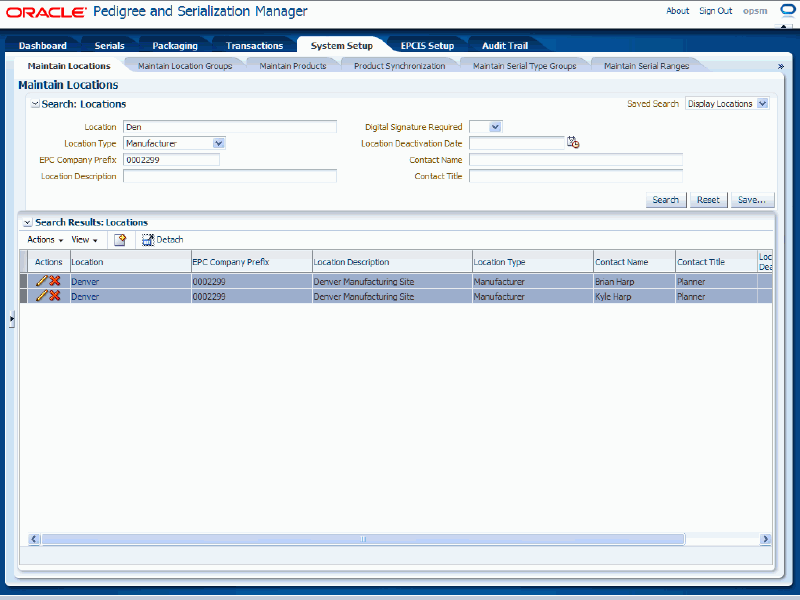
All of the available data that matches the search criteria appears in a table format.
Click the Save button located in the search criteria region of the page.
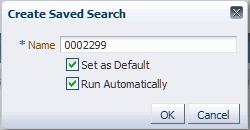
The Create Saved Search dialog box appears.
Enter the following information in the dialog box:
| Field Name | Description |
|---|---|
| Name | Enter the name for the saved search. |
| Set as Default check box | (Optional) Select this check box if you want this saved search to appear as the default saved search for the page. This check box appears selected by default. |
| Run Automatically check box | (Optional) Select this check box if you want this saved search to run automatically when you enter the page. This check box appears selected by default. |
Example of Create Saved Search Dialog Box
Click the OK button.
Example of Maintain Locations Page Displaying the Saved Searches
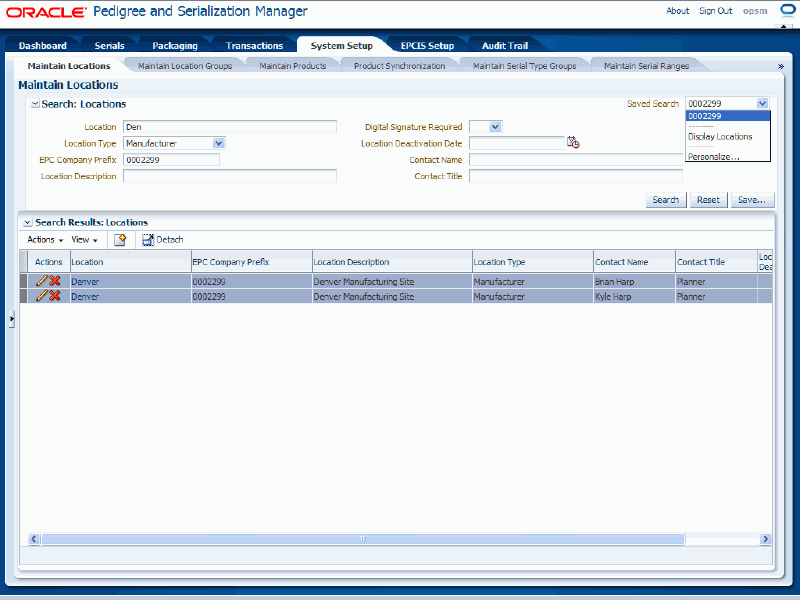
The system saves the saved search and you will be able to select it or it will be the default for the Saved Search field depending on the creation options you selected when creating it.
Navigate to an Oracle and Pedigree and Serialization Manager page where a Saved Search has been created.
Select the Saved Search you want to personalize using the drop down arrow next to the Saved Search field.
Select Personalize using the drop down arrow for the Saved Search field.
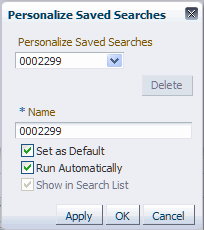
The Personalize Saved Searches dialog box appears displaying the information for the saved search.
Modify these fields pertaining to the saved search:
| Field Name | Description |
|---|---|
| Name | Modify the name for the saved search. |
| Set as Default check box | (Optional) Modify this check box selection. Select this check box if you want this saved search to appear as the default saved search for the page. |
| Run Automatically check box | (Optional) Modify this check box selection. Select this check box if you want this saved search to run automatically when you enter the page. |
Example of Personalize Saved Searches Dialog Box
Click the OK button.
The Saved Search is modified.
Navigate to an Oracle and Pedigree and Serialization Manager page where a Saved Search has been created.
Select the Saved Search you want to delete using the drop down arrow next to the Saved Search field.
Select Personalize using the drop down arrow for the Saved Search field.
The Personalize Saved Searches dialog box appears displaying the information for the saved search.
Click the Delete button.
Note: You can only delete a saved search that is not the default.
The system displays a message stating you are about to delete this saved search.
Click the Yes button.
The Saved Search is removed from the system.
Several pages in Oracle Pedigree and Serialization Manager (OPSM) that initiate a background process use the job instances functionality. For example, the Product Synchronization, Lot Synchronization, Work Order Serialization, and Web Service Exceptions pages. The job instances functionality works basically the same for each page but the actual title of each page will vary depending on the process you can perform from that page.
The job instances functionality enables you to manage and maintain job instances. A job instance represents one individual instance of running a particular background process. When you initiate a process, the system assigns a job instance Id to that specific run of the process. Using the job instance Id you can verify if the process completed successfully or if there were errors or warnings during the execution of the process. Messages are included with the job instance to describe if the process completed successfully or if a process did not complete successfully (warnings and errors). Using the job instances functionality you can:
Search for a job instance.
View the job instance and its associated messages.
Delete a job instance.
Use these procedures to search for (basic and advanced search), view, and delete job instances:
To Search for Job Instances (Basic Search)
Navigate to an Oracle Pedigree and Serialization Manager page that initiates a process.
After you initiate a process, you can use the job instances functionality to monitor the background process and to view the results of the process.
Example of the Product Synchronization page that uses job instances functionality
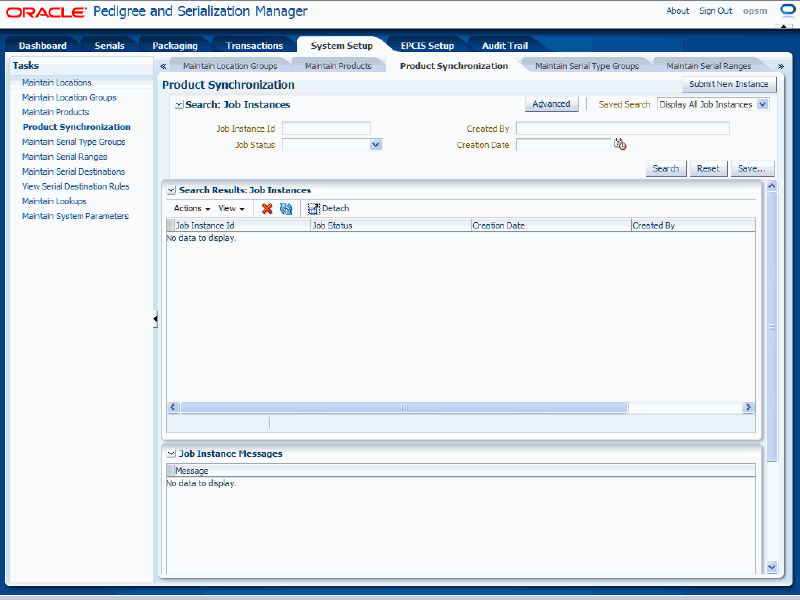
In the Search: Job Instances region, enter the search criteria for the job instances using one or more of these fields:
| Field Name | Description |
|---|---|
| Job Instance Id | (Optional) Enter a specific job instance Id. |
| Job Status | (Optional) Select the job status for the job instances. Job Statuses are:
Job statuses are defined using the system Lookup Type PAS_JOB_STATUS. |
| Web Service Name | This field is only available when using the job instances functionality on the Web Service Exceptions page. (Optional) Select the web service name. Web service names are:
|
| Created By | (Optional) Enter the individual that created the job instances (initiated the process). |
| Creation Date | (Optional) Select the date the job instances were created. |
Otherwise, you can click the Search button without entering any search criteria and all available job instance Ids will appear.
Click the Search button.
Example of the Product Synchronization page (Basic Search)
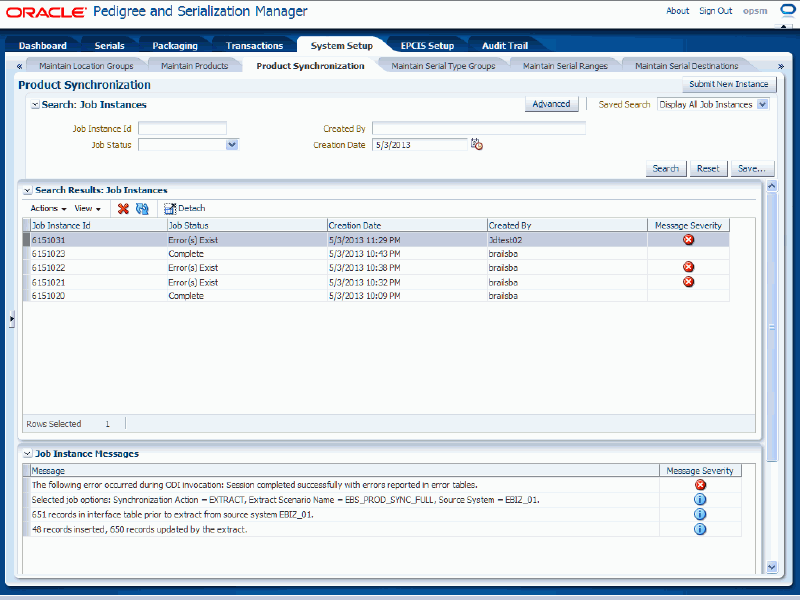
All of the job instance Ids that match the search criteria appear in the Search Results: Job Instances region in a table format. The messages that are generated for each job instance Id appear in the Job Instance Messages region (bottom of page). The fields that appear for each job instance Id are:
| Field Name | Description |
|---|---|
| Job Instance Id | Displays the job instance Id for a specific job instance. |
| Job Status | Displays the status of the job instance Id. |
| Web Service Name | This field is only available when using the job instances functionality on the Web Service Exceptions page. Displays the web service name. Web service names are:
|
| Creation Date | Displays the date the job instance Id was created. |
| Created By | Displays the individual that created the job instance Id. |
| Message Severity | Displays an icon to represent the severity of the messages that were generated for the job instance Id. A red circle with an X indicates the job instance Id was unsuccessful and contains error messages and may also contain warning messages. A yellow triangle with an exclamation point indicates the job instance Id was successful but it contains warning messages. |
Below the Search Results: Job Instances region appears the Job Instance Messages region. If a row in the Search Results: Job Instances table contains a warning or error message severity for a job instance Id the messages for that condition display in this region. If no message severity exists, informational messages display in this region (blue circle with the letter "i'). Each text message associated with the job instance Id and the message severity icon (informational, warning, or error) for the message displays in this region.
Click the Advanced button to perform an advanced search for job instances.
To Search for Job Instances (Advanced Search)
Use the Advanced Search functionality to perform a more detailed search for specific job instance Ids. Field operators associated with the search criteria fields can be used during an Advanced Search so that a range of job instances can be easily retrieved.
Navigate to an Oracle Pedigree and Serialization Manager page that initiates a background process.
After you initiate a process, you can use the job instances functionality to monitor the process and to view the results of the process.
Example of the Product Synchronization page that uses job instances functionality

Click the Advanced button.
Note: Clicking the Advanced or Basic button will keep the values in the base criteria fields.
Example of the Product Synchronization page displaying advanced search criteria
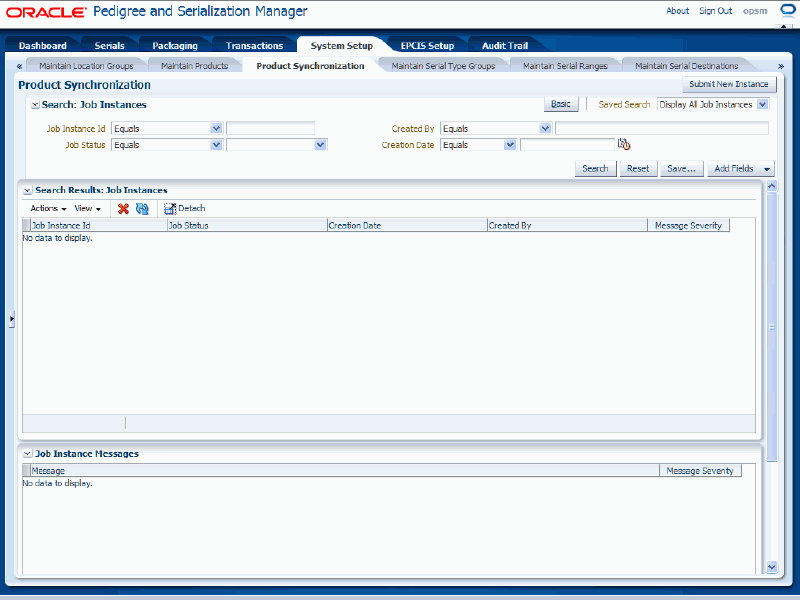
In the Search: Job Instances region, enter the search criteria for the job instances using one or more of these fields:
| Field Name | Description |
|---|---|
| Job Instance Id | (Optional) Select the field operator and then enter the job instance Id. Operators are:
|
| Job Status | (Optional) Select the field operator and then select the job status for the job instances. Operators are:
Job Statuses are:
Job statuses are defined using the system Lookup Type PAS_JOB_STATUS. |
| Web Service Name | This field is only available when using the job instances functionality on the Web Service Exceptions page. (Optional) Select the field operator and then select the web service name. The field operators are the same as that for the Job Status field. Web service names are:
|
| Created By | (Optional) Select the field operator and then enter the individual that created the job instances (initiated the process). The field operators are the same as that for the Job Status field. |
| Creation Date | (Optional) Select the field operator and then select the date the job instances were created. Operators are:
|
Otherwise, you can click the Search button without entering any search criteria and all available job instance Ids will appear.
(Optional) To enter additional search criteria fields, click the Add Fields button and select the field you would like to add to the search criteria.
The selected field appears as a search criteria field.
Note: To remove the additional field, click the Remove icon next to the field. The field will be removed from the search criteria.
(Optional) Enter search criteria for the additional fields.
Click the Search button.
Example of Product Synchronization page (Advanced Search)
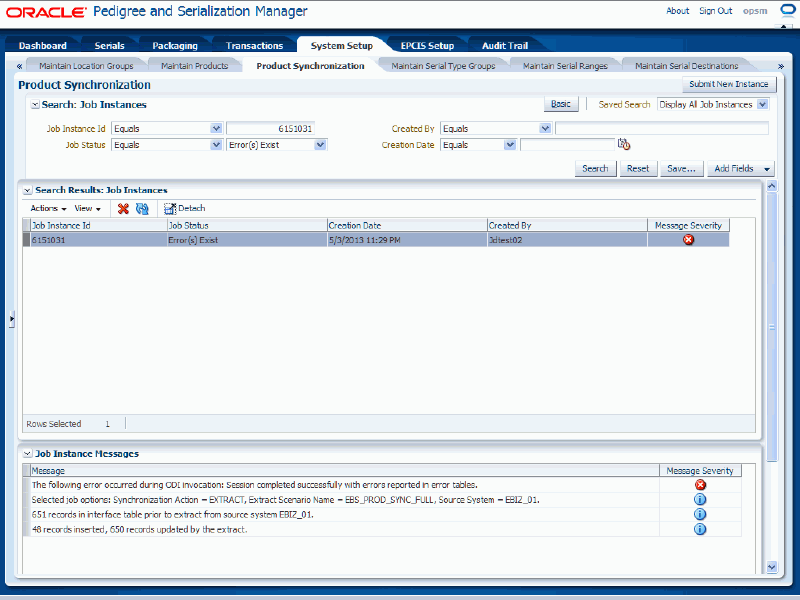
All of the job instance Ids that match the search criteria appear in the Search Results: Job Instances region in a table format. The messages that are generated for each job instance Id appear in the Job Instance Messages region (bottom of page). The fields that appear for each job instance Id are:
| Field Name | Description |
|---|---|
| Job Instance Id | Displays the job instance Id for a specific job instance. |
| Job Status | Displays the status of the job instance Id. |
| Web Service Name | This field is only available when using the job instances functionality on the Web Service Exceptions page. Displays the web service name. Web service names are:
|
| Creation Date | Displays the date the job instance Id was created. |
| Created By | Displays the individual that created the job instance Id. |
| Message Severity | Displays an icon to represent the severity of the messages that were generated for the job instance Id. A red circle with an X indicates the job instance Id was unsuccessful and contains error messages and may also contain warning messages. A yellow triangle with an exclamation point indicates the job instance Id was successful but it contains warning messages. |
Below the Search Results: Job Instances region appears the Job Instance Messages region. If a row in the Search Results: Job Instances table contains a warning or error message severity for a job instance Id the messages for that condition display in this region. If no message severity exists, informational messages display in this region (blue circle with the letter "i'). Each text message associated with the job instance Id and the message severity icon (informational, warning, or error) for the message displays in this region.
Navigate to an Oracle Pedigree and Serialization Manager page that initiates a process.
Enter search criteria for the job instance Ids you want to view and click the Search button.
Example of the Product Synchronization page (Basic Search)

All of the job instance Ids that match the search criteria appear in the Search Results: Job Instances table.
Select a job instance Id in the Job Instances table.
Scroll to the Job Instance Messages region of the page.
If a row in the Search Results: Job Instances table contains a warning or error message severity for a job instance Id the messages for that condition display in this region. If no message severity exists, informational messages display in this region (blue circle with the letter "i'). Each text message associated with the job instance Id and the message severity icon (informational, warning, or error) for the message displays in this region.
Navigate to an Oracle Pedigree and Serialization Manager page that initiates a process.
Enter search criteria for the job instance Ids you want to delete and click the Search button.
All of the job instance Ids that match the search criteria appear in the Search Results: Job Instances table.
Select the job instance Id in the Job Instances table that you want to delete.
Select Delete from the Actions menu or click the Delete Job Instance icon located at the top of the Search Results: Job Instances region.
The system displays a message asking if you are sure you want to delete this job instance.
Click the Yes button.
The job instance Id and its associated messages are deleted from the system.
![]()
Copyright © 2013, Oracle and/or its affiliates. All rights reserved.