Release 1.2
Part Number E36379-01
Contents
Previous
Next
| Oracle Pedigree and Serialization Manager Process Guide Release 1.2 Part Number E36379-01 | Contents | Previous | Next |
This chapter covers the following topics:
Before you can use the Oracle Pedigree and Serialization Manager (OPSM) application you must first set up the application.
Follow this high-level process flow to set up Oracle Pedigree and Serialization Manager:
Set up lookup types and codes.
For more information, see Maintaining Lookup Types and Codes.
Set up OPSM system parameters.
For more information, see Maintaining System Parameters.
Create locations.
For more information, see Maintaining Locations.
Create location groups (optional).
For more information, see Maintaining Location Groups.
Create Products and Item Cross Reference.
For more information, see Understanding the Product Definition Process, Maintaining Products, Defining Product and Item Cross Reference Information from Integrated Transactional Systems, Synchronizing Products (Products Interface table), and
Create serial type groups and serial types.
For more information, see Maintaining Serial Type Groups and Serial Types.
Create serial ranges (optional).
For more information, see Maintaining Serial Ranges.
Create serial destinations and destination rules (optional).
For more information, see Maintaining Serial Destinations and Destination Rules and Viewing Serial Destination Rules.
Create Product Synchronization, Lot Synchronization, and Work Order Serialization scenarios (optional).
For more information, see Defining Product Synchronization, Lot Synchronization, and Work Order Serialization Scenarios.
New products can be created directly in the Oracle Pedigree and Serialization Manager (OPSM) application with a cross reference to the item in one or more transactional systems. OPSM is the central repository for product definitions. OPSM stores the attributes used to identify the product along with the required regulatory product attributes required to generate a pedigree. OPSM also stores product packaging level information and attributes that control serialization of the product packaging unit. The serialization process control attributes determine the serial type, serial generation overage amounts, and serial range control. In addition, process control attributes for the product determine if serials are tracked for transactions with no change of ownership, the creation of a pedigree, whether serials can be created from the shipment transaction, and whether the serials are generated by OPSM or externally for the product. Process controls for the product can be overridden by location.
Products can be defined in OPSM in these ways:
Using the Maintain Products page in OPSM. Product information can be created, modified, or deleted using the OPSM product pages.
For more information on defining products in OPSM, see Maintaining Products.
Using the Product Synchronization process. Product and item cross reference information can be merged from the Products Interface table.
For more information see, Synchronizing Products (Products Interface Table).
Using the Define Product and Item Cross Reference page in OPSM. From an external system, you can call the OPSM Define Product and Item Cross Reference page where you can define all of the different product attributes for the product in OPSM as it relates to the item from the transactional system. You can also specify the product overrides by location if necessary.
For more information, see Defining Product and Item Cross Reference Information from Integrated Transactional Systems.
Using the Product Service web service in OPSM. From an external system, product information can be created or updated using the Product Service web service.
For more information, see Web Service Details.
The Oracle Serialization and Tracking Integration Pack for Oracle Pedigree and Serialization Manager and Oracle E-Business Suite 3.1 can be used to synchronize product and item cross reference information from Oracle E-Business Suite to OPSM using one of the following methods:
Calling the OPSM Define Product and Item Cross Reference page from the Oracle E-Business Suite (Oracle Inventory) Master Item window or from the Organization Item window.
The Source System Precedence setting in the OPSM system parameters controls whether product and product detail information can be updated from any source system or only from the owning source system. The owning source system is recorded on the product and product detail records.
For information on defining products using the Define Product and Item Cross Reference page, see Defining Product and Item Cross Reference Information from Integrated Transactional Systems.
For more information on maintaining system parameters, see Maintaining System Parameters.
Using the batch product synchronization process between Oracle E-Business Suite and OPSM. Using the Product Synchronization page in OPSM you initiate the product synchronization process between these two applications.
The Source System Precedence setting in the OPSM system parameters controls whether product and product detail information can be updated from any source system or only from the owning source system. The owning source system is recorded on the product and product detail records.
For more information on synchronizing products, see Synchronizing Products (Products Interface Table).
For more information on maintaining system parameters, see Maintaining System Parameters.
For more information on integrating Oracle E-Business Suite with OPSM, see the Oracle Serialization and Tracking Integration Pack for Oracle Pedigree and Serialization Manager and Oracle E-Business Suite 3.1 - Implementation Guide.
Use the Maintain Lookups pages in Oracle Pedigree and Serialization Manager (OPSM) to set values (codes) for lookup types. Lookup types determine how the OPSM application controls access to and processes data. Lookup types are associated to one of these access levels:
System
Seeded data (lookup codes) are provided for this lookup type. You can change the Meaning and Description fields for the lookup type and lookup codes. You cannot delete or add new lookup codes for the lookup type.
User Defined
No seeded data (lookup codes) are provided. You can change the Meaning and Description fields for the lookup type. You add all of the lookup codes for the lookup type and you can delete the lookup codes for the lookup type.
Extensible
Extensible is a mixture of system and user defined. Some seeded data (lookup codes) are provided. You can change the Meaning and Description fields for the lookup type and the seeded data lookup codes. You cannot delete the seeded data. You can add additional lookup codes and you can delete lookup codes that you have added.
Use the Maintain Lookups pages to define the codes for the User Defined lookup types and you may need to edit or add additional codes to the Extensible lookup types depending on your organizational needs.
These tables list the User Defined and Extensible lookup types and their associated meaning and lookup codes:
| Lookup Type | Lookup Type Meaning | Lookup Type Description | Lookup Codes |
|---|---|---|---|
| PAS_CONTAINER_TYPE | Container Type | The type of container or package for the product. This is typically the lowest saleable unit packaging type (e.g. Bottle, Blister Pack, etc.). | None by default. |
| PAS_CUSTOM_LOOKUP_TYPE | Custom Lookup Type | Available for customer-defined use (such as a cross-reference within custom serial generation). This lookup type will not be referenced by OPSM during standard processing. | None by default. |
| PAS_CUSTOM_SERIAL_METHOD | Custom Serial Method | A lookup available for customer-defined use within the custom serial generation algorithm which will indicate which custom serial algorithm to use. This lookup must be configured by the end user for use in custom serial generation. | None by default. |
| PAS_DESTINATION_GROUPS | Destination Groups | Identifies a destination group which is used to organize like serial destinations for management of destination rules. |
|
| PAS_DOCUMENT_TYPE | Document Type | The type of document (e.g. Invoice Number, Shipping Number, Work Order, etc.). | None by default. |
| PAS_DOSAGE_FORM | Dosage Form | The dosage form of the product is the physical form of the product that is packaged (e.g. Pill, Capsule, etc.). | None by default. |
| PAS_LABEL_PRINT_FORMAT | Label Print Format | The format the label is printed in. | None by default. |
| PAS_LOCATION_TYPE | Location Type | The type of location. | None by default. |
| PAS_LOT_EXTRACT | Lot Extract | Identifies the Oracle Data Integrator (ODI) scenario that will be used for the lot information extract. | None by default. Oracle provides these lookup codes for the integration between Oracle E-Business Suite and OPSM:
|
| PAS_PACKAGE_UNIT | Package Unit Type | The type of packaging unit of the serialized product or cartonization packaging unit (e.g. Bottle, Blister Pack, Box. Case, Bundle, Pallet, Container, etc.). | None by default. |
| PAS_PRODUCT_CATEGORY | Product Category | The category of product. | None by default. |
| PAS_PRODUCT_EXTRACT | Product Extract | Identifies the Oracle Data Integrator (ODI) scenario that will be used for the product information extract. | None by default. Oracle provides these lookup codes for the integration between Oracle E-Business Suite and OPSM:
|
| PAS_PRODUCT_UOM | Product Unit of Measure | The Product UOM or Product Packaging Unit of the serialized product. This lookup will be a subset of the PAS_PACKAGE_UNIT lookup which contains packaging identification of serialized products and serialized levels of cartonization (e.g. Bottle, Blister Pack, Box, Case). | None by default. All lookup codes defined in PAS_PRODUCT_UOM must also be set up in PAS_PACKAGE_UNIT. |
| PAS_SERIAL_USAGE | Serial Usage | The current usage of the serialized item. | None by default. |
| PAS_SOURCE_SYSTEM | Source System | The identifier used to distinguish different transactional or Enterprise Resource Planning (ERP) systems. | None by default. |
| PAS_WORK_ORDER_EXTRACT | Work Order Extract | Identifies the Oracle Data Integrator (ODI) scenario that will be used for the work order extract. | None by default. Oracle provides these lookup codes for the integration between Oracle E-Business Suite and OPSM:
|
| Lookup Type | Lookup Type Meaning | Lookup Type Description | Lookup Code, Meaning, and Description |
|---|---|---|---|
| PAS_EPC_TYPE | EPC Number Type | Type of EPC Number | GTIN, GTIN-14, GTIN-14 EPC Number |
| PAS_LABEL_TYPE | Label Type | The type of package identifier (e.g. Container, LPN, Serial Number, etc.). |
|
| PAS_PRODUCT_CODE_TYPE | Product Code Type | The type of product code (e.g. NDC, GTIN, DIN, etc.). |
|
| PAS_REASON_CODE | Reason Code | The reason code identifying why a serialized item has become inactive. |
|
| PAS_SERIAL_TYPE | Serial Type | The format of the serial number (e.g. SGTIN-96, etc.). |
|
| PAS_SERIAL_TYPE_GROUP | Serial Type Group | A group of like serial types. |
|
For a complete list of the lookup types and their associated lookup codes, see Appendix C Lookup Types and Codes.
Use these procedures to search for, view, edit, delete, and translate lookup types and codes:
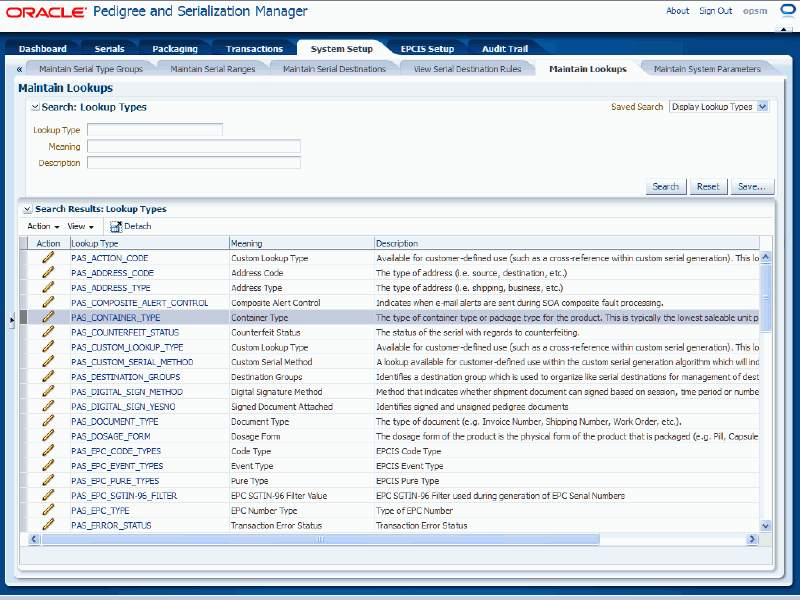
Navigate to the Maintain Lookups page.
Maintain Lookups page
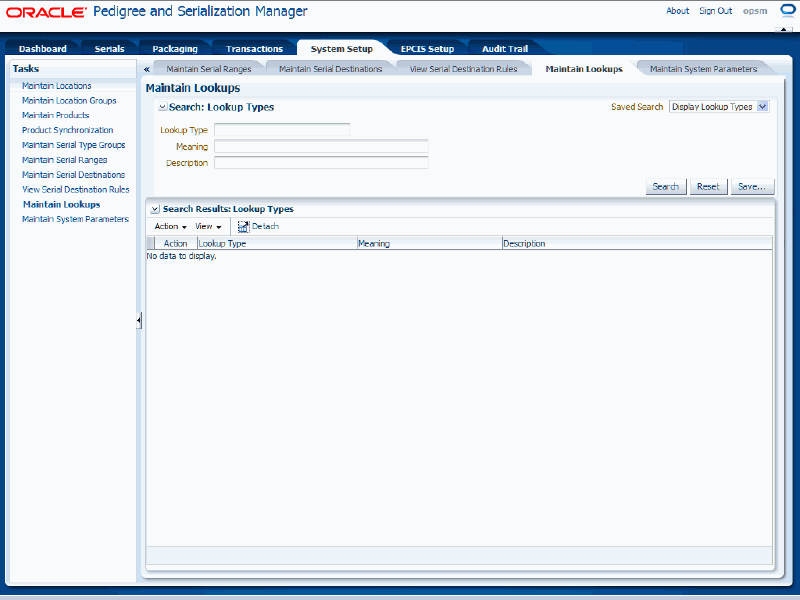
In the Search: Lookup Types region, enter the search criteria for the lookup types using one or more of these fields:
| Field Name | Description |
|---|---|
| Lookup Type | (Optional) Enter the lookup type. |
| Meaning | (Optional) Enter the meaning for the lookup type. |
| Description | (Optional) Enter the description for the lookup type. |
Otherwise, you can click the Search button without entering any search criteria and all available lookup types will appear.
Click the Search button.
Maintain Lookups page
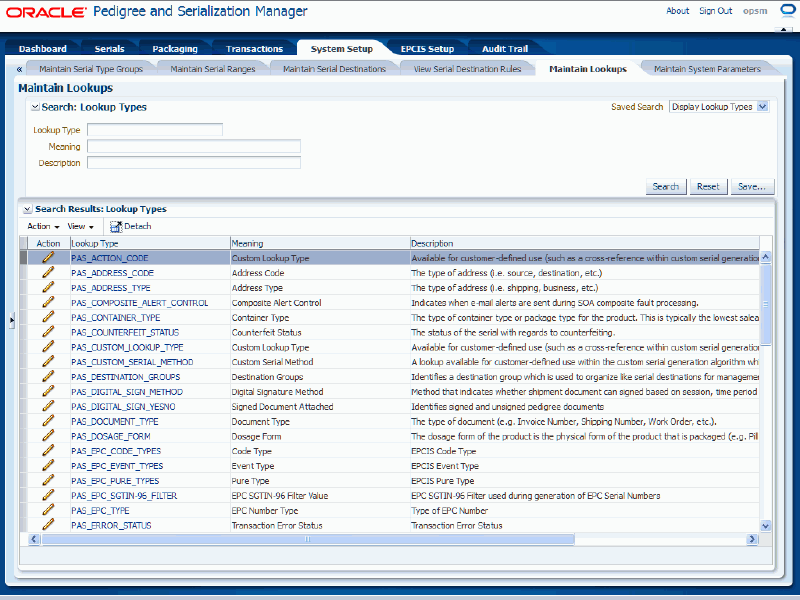
All of the lookup types that match the search criteria appear in the Search Results: Lookup Types region in a table format.
Navigate to the Maintain Lookups page.
Enter search criteria for the lookup types you want to view and click the Search button.
All of the lookup types that match the search criteria appear in the Search Results: Lookup Types table.
Click the Lookup Type link in the table for the lookup type that you want to view the details for.
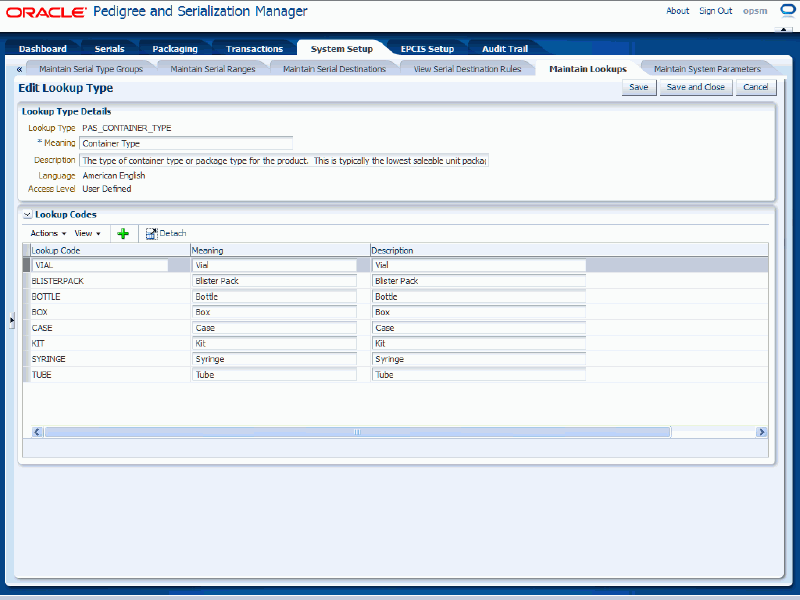
View Lookup Type page
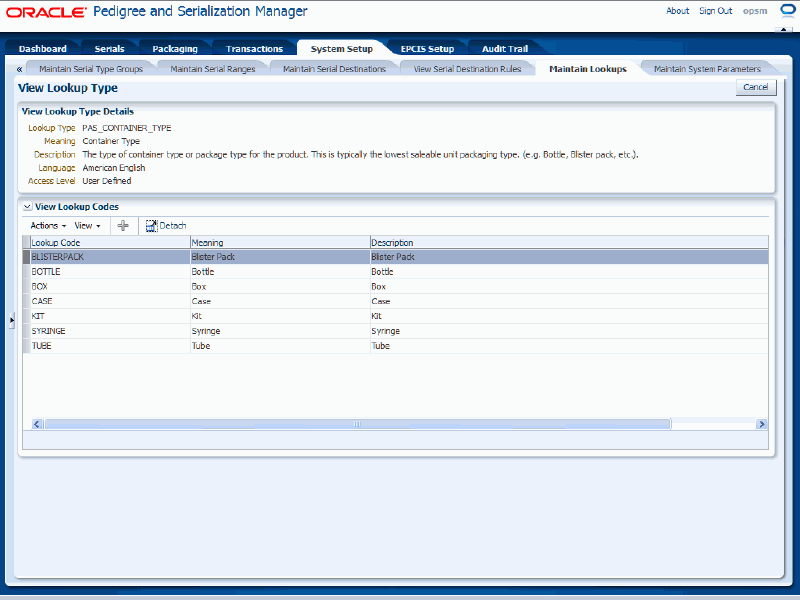
The View Lookup Type page appears displaying the details (Meaning, Description, Language, and Access Level) for the lookup type and all of its associated lookup codes with their meaning and description.
Click the Cancel button to return to the Maintain Lookups page.
To Edit Lookup Types and Codes
Navigate to the Maintain Lookups page.
Enter search criteria for the lookup types you want to edit and click the Search button.
All of the lookup types that match the search criteria appear in the Search Results: Lookup Types table.
Select the lookup type in the table that you want to edit the lookup type fields for or edit lookup codes for.
For all Access Level (User Defined, Extensible, and System) lookup types you can edit the Meaning and Description fields for the lookup type and its associated lookup codes.
Maintain Lookups page
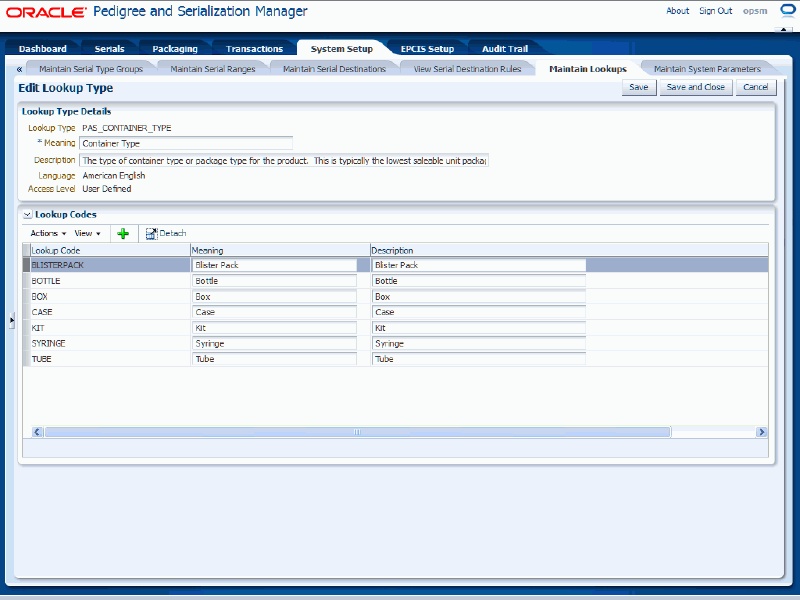
Select Edit in the Action menu or click the Edit Lookups icon associated with the lookup type in the Action column of the results table.
Edit Lookup Type page
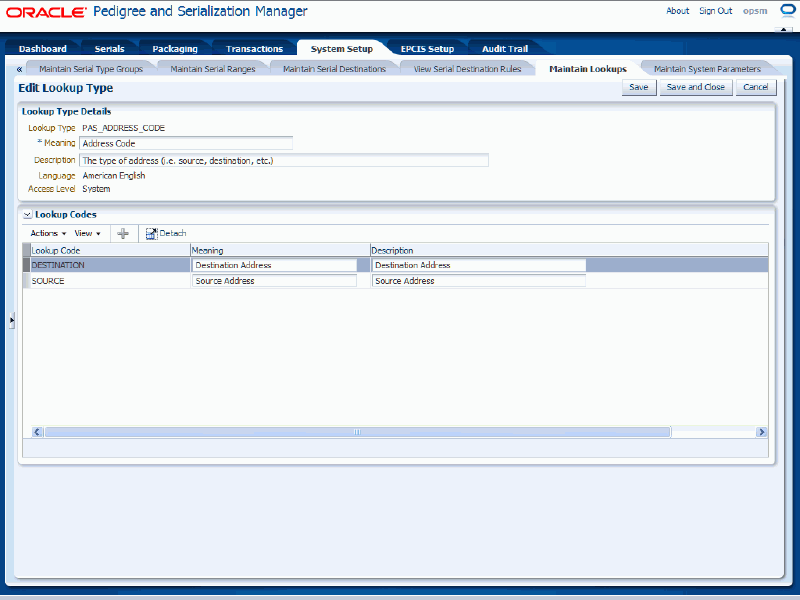
The Edit Lookup Type page appears displaying the details (Meaning, Description, Language, and Access Level) for the lookup type and all of its associated lookup codes with their meaning and description.
Edit the lookup type fields by changing the Meaning and Description fields associated with the lookup type in the Lookup Type Details region of the page.
Edit the lookup code fields by changing the Meaning and Description fields for the lookup codes in the Lookup Codes region of the page.
Save your work. Choose one of these options:
Click the Save and Close button to save the information and return back to the Maintain Lookups page.
Click the Save button to save the information and to stay on this page so you can continue to edit the information.
To Add Lookup Codes to a Lookup Type
Navigate to the Maintain Lookups page.
Enter search criteria for the lookup types you want to add lookup codes to and click the Search button.
You can only add lookup codes to User Defined and Extensible lookup types.
All of the lookup types that match the search criteria appear in the Search Results: Lookup Types table.
Select the lookup type in the table that you want to add lookup code fields for.
Maintain Lookups page
Select Edit in the Action menu or click the Edit Lookups icon associated with the lookup type in the Action column of the results table.
Edit Lookup Type page
The Edit Lookup Type page appears displaying the details (Meaning, Description, Language, and Access Level) for the lookup type and all of its associated lookup codes with their meaning and description.
Select Add Lookup Code from the Actions menu or click the Add Lookup Code icon located at the top of the Lookup Codes table.
Note: You can only add new lookup codes for User Defined and Extensible lookup types. The Add Lookup Code icon and menu option are not available for System lookup types.
Edit Lookup Type page
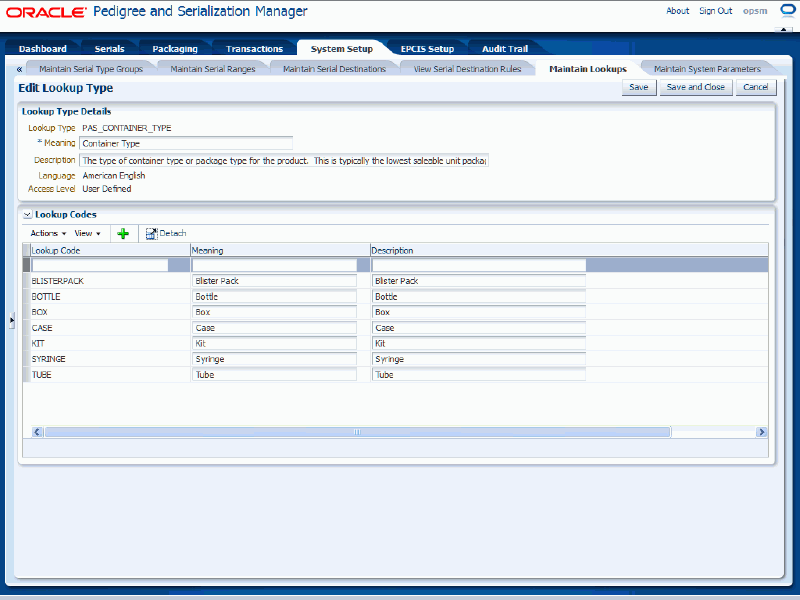
A new row appears in the Lookup Codes table.
Enter the Lookup Code, Meaning, and Description for the lookup code.
Edit Lookup Type page
Save your work. Choose one of these options:
Click the Save and Close button to save the information and return back to the Maintain Lookups page.
Click the Save button to save the information and to stay on this page so you can continue to add information.
To Delete Lookup Codes Associated with a Lookup Type
Navigate to the Maintain Lookups page.
Enter search criteria for the lookup types you want to delete lookup codes from and click the Search button.
You can only delete lookup codes for User Defined lookup types and user defined lookup codes for Extensible lookup types. Extensible lookup types also contain system defined lookup codes that cannot be deleted.
All of the lookup types that match the search criteria appear in the Search Results: Lookup Types table.
Select the lookup type in the table that you want to delete lookup code fields for.
Select Edit in the Action menu or click the Edit Lookups icon associated with the lookup type in the Action column of the results table.
The Edit Lookup Type page appears displaying the details (Meaning, Description, Language, and Access Level) for the lookup type and all of its associated lookup codes with their meaning and description.
Select the Lookup Code you want to delete in the Lookup Codes table.
Select Delete Lookup Code in the Actions menu or click the Delete icon associated with the lookup code in the Action column of the Lookup Codes table.
The Delete Lookup Code menu option and Delete icon will be grayed and unavailable for lookup codes associated with System lookup types and for system defined lookup codes for Extensible lookup types.
Note: You can only delete lookup codes for User Defined lookup types and user defined lookup codes for Extensible lookup types.
The system displays a message stating you are about to delete this lookup code from the system. If this code is currently being used anywhere in the system, deletion of the code will cause unpredictable results. If you have not yet used the code within the system, you can safely delete it. Are you sure you want to delete this lookup code?
Click the Yes button.
The lookup code is deleted from the lookup type.
Before you can begin to use Oracle Pedigree and Serialization Manager (OPSM) you must first set up system parameters. System parameters will define the owning source system default, source system precedence, serial type default, and use serial ranges default setting for product details. They will also define the default settings in OPSM for the different types of transactions used in OPSM, as well as, the Operation Dashboard URLs, the Pedigree BI Publisher server URL that will be used to print Pedigrees, Digital Signature Keystore information, and error notification setup information.
Use these procedures to view, set, and modify system parameters:
Note: The system parameters record is seeded upon installation. You cannot create or delete a system parameter record.
Navigate to the Maintain System Parameters page.
Maintain System Parameters page
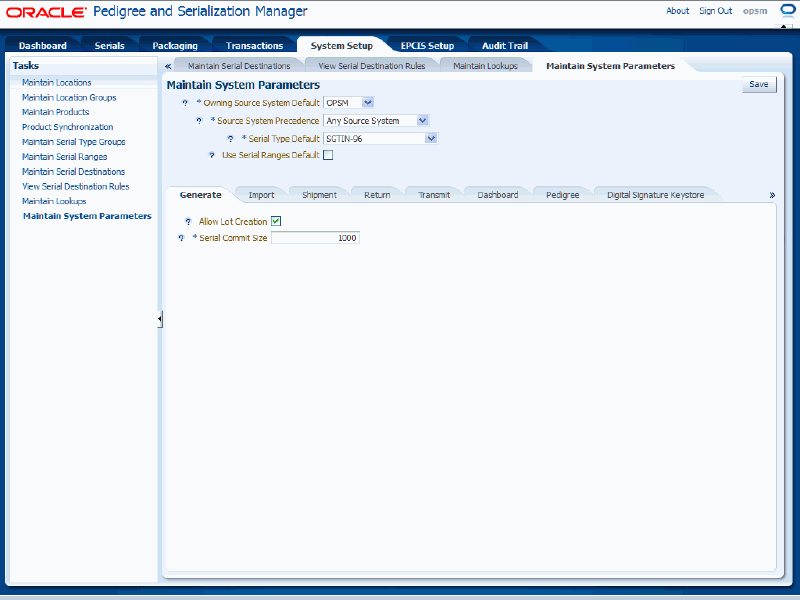
The Maintain System Parameters page appears displaying the current settings for the system parameters.
Select the different sub tabs (Generate, Import, Shipment, Return, Transmit, Dashboard, Pedigree, Digital Signature Keystore, Error Notification, and Serial Edit) to view the particular system parameters for that area.
Navigate to the Maintain System Parameters page.
Maintain System Parameters page - Generate sub tab

Select the settings for the following parameters:
| Field Name | Description |
|---|---|
| Owning Source System Default | Use this field to specify the default setting for the Owning Source System field on the Maintain Products page. This field value will default into the Product Regulatory Information when a new product is created. This field value indicates the transactional system from which this product originated. Owning Source Systems are user defined using Lookup Type PAS_SOURCE_SYSTEM. For more information on creating a product, see Procedure: To Create Products. |
| Source System Precedence | Select the source system precedence. This field value indicates whether product or product detail information can be changed by any source system or only the owning source system. Source System Precedences are:
This is used by Product Synchronization process and the Define Product and Item Cross Reference page. This is not enforced in the Maintain Products page. |
| Serial Type Default | Use this field to specify the default setting for Serial Type when creating product details for a product. The value you select will appear by default on the Create Product page (Serial Generation Details sub tab) when creating a product. SGTIN-96 appears by default in this field. Serial types are defined using extensible Lookup Type PAS_SERIAL_TYPE. OPSM provides several serial types. For more information on creating a product, see Procedure: To Create Products. |
| Use Serial Ranges Default check box | (Optional) If this check box is selected, then the Use Serial Ranges check box will default as selected on the Create Product page (Serial Generation Details sub tab), when creating a product. The Use Serial Ranges check box is clear by default. For more information on creating a product, see Procedure: To Create Products. |
Select the Generate sub tab.
Select the settings for the following parameters:
| Field Name | Description |
|---|---|
| Allow Lot Creation check box | (Optional) Select this check box to enable a lot to be added to OPSM at the time of serial generation if the lot doesn’t already exist. If no lot exists in OPSM, and this parameter is not set, the system will issue an exception for the generate transaction. |
| Serial Commit Size | When performing a generate transaction, enter the number of serials that will be processed before the system commits the serials to the database. |
Select the Import sub tab.
Maintain System Parameters page - Import sub tab
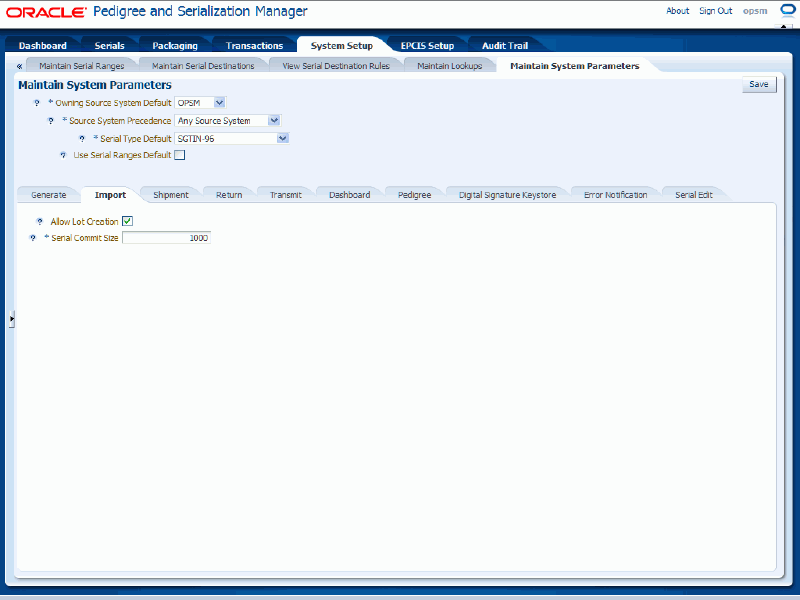
Select the settings for the following parameters:
| Field Name | Description |
|---|---|
| Allow Lot Creation check box | (Optional) Select this check box to enable a lot to be added to OPSM at the time of serial import if the lot doesn’t already exist. If no lot exists in OPSM, and this parameter is not set, the system will issue an exception for the import transaction. |
| Serial Commit Size | When performing an import transaction, enter the number of serials that will be processed before the system commits the serials to the database. |
Select the Shipment sub tab.
Maintain System Parameters page - Shipment sub tab
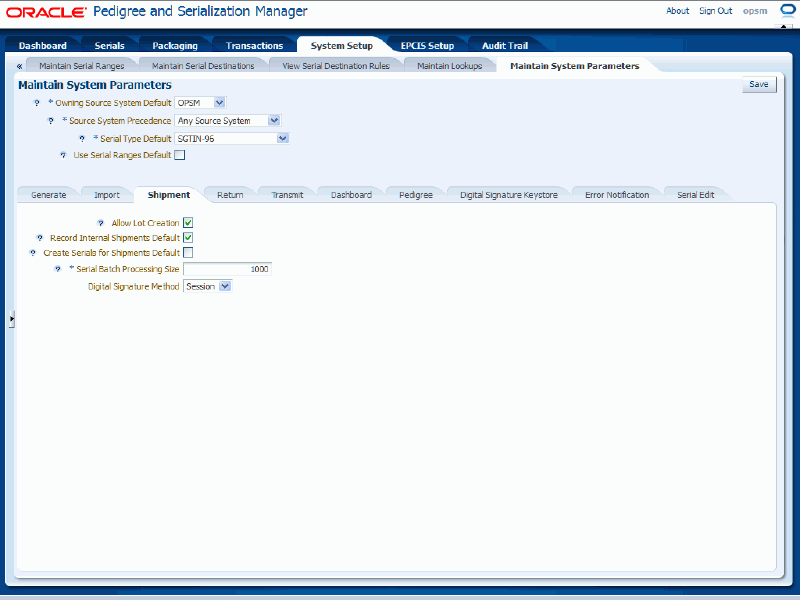
Select the settings for the following parameters:
| Field Name | Description |
|---|---|
| Allow Lot Creation check box | (Optional) Select this check box to enable a lot to be added to OPSM at the time of shipment if the lot doesn’t already exist. If no lot exists in OPSM, and this parameter is not set, the system will issue an exception for the shipment transaction. |
| Record Internal Shipments Default check box | (Optional) If this check box is selected, then the Record Internal Shipment check box will default as selected on the Create Product page, when creating a new product. If selected on the Create Product page, then the system will record shipments to internal customers for that product. For more information on creating products, see Procedure: To Create Products. |
| Create Serials for Shipments Default check box | (Optional) If this check box is selected, then the Create Serials for Shipment check box will default as selected on the Create Product page when creating a new product. If selected on the Create Product page, then the serials for the shipment will be created for that product in OPSM at the time of shipment. If the serials already exist, the shipment transaction will be set to an exception status. For more information on creating a new product, see Procedure: To Create Products. |
| Serial Batch Processing Size | When processing a shipment transaction, enter the number of serials that will be processed by the system as a batch. Processing the serials in batches is a mechanism used to improve performance and scalability. 1000 appears by default for this field. |
| Digital Signature Method | (Optional) Select the method you would like to use when digitally signing Pedigree documents. Method values are:
|
Select the Return sub tab.
Maintain System Parameters page - Return sub tab
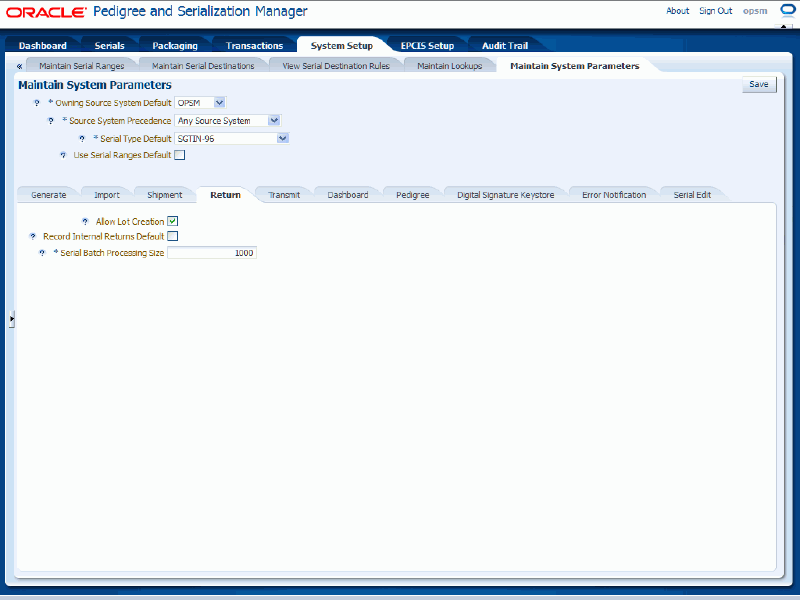
Select the settings for the following parameters:
| Field Name | Description |
|---|---|
| Allow Lot Creation check box | (Optional) Select this check box to enable a lot to be added to OPSM at time of return if the lot doesn’t already exist. If no lot exists in OPSM, and this parameter is not set, the system will issue an exception for the return transaction. |
| Record Internal Returns Default check box | (Optional) If this check box is selected, then the Record Internal Returns check box will default as selected on the Create Product page when creating a new product. If selected on the Create Product page, then the system will record product returns from internal customers for that product. For more information on creating products, see Procedure: To Create Products. |
| Serial Batch Processing Size | When processing a return transaction, enter the number of serials that will be processed by the system as a batch. Processing the serials in batches is a mechanism used to improve performance and scalability. 1000 appears by default for this field. |
Select the Transmit sub tab.
Maintain System Parameters page - Transmit sub tab

Select the setting for the following parameter:
| Field Name | Description |
|---|---|
| Serial Batch Processing Size | When processing a transmit transaction, enter the number of serials that will be processed by the system as a batch. Processing the serials in batches is a mechanism used to improve performance and scalability. |
Select the Dashboard sub tab.
Maintain System Parameters page - Dashboard sub tab
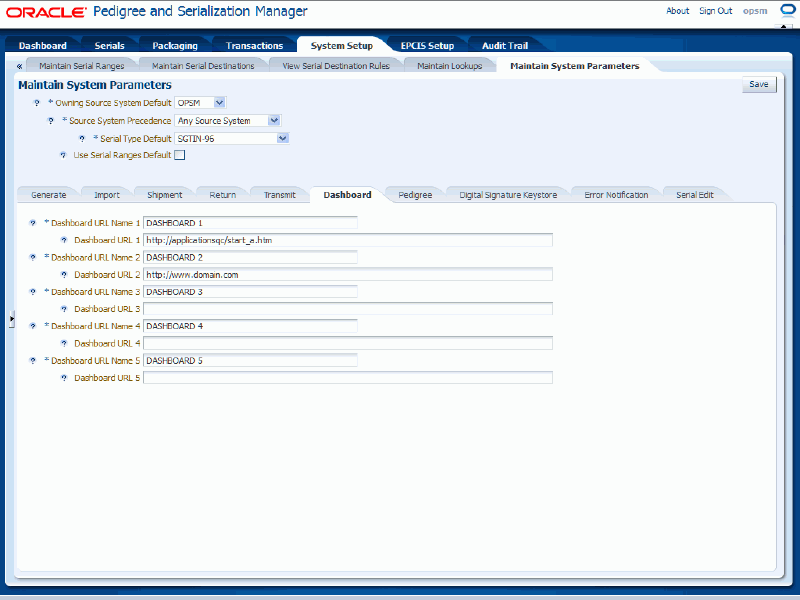
Select the settings for the following parameters:
| Field Name | Description |
|---|---|
| Dashboard URL Name (1-5) | Enter the value that represents the task list name on the Operations Dashboard for the first through fifth custom URL’s. |
| Dashboard URL (1-5) | Enter the value that represents the first through fifth custom URL’s on the Operations Dashboard. Enter a fully qualified URL value (for example, http://www.domain.com). If no value is entered, the URL will not display on the Operations Dashboard. For more information, see Adding Custom URLs to the Operations Dashboard. |
Select the Pedigree sub tab.
Maintain System Parameters page - Pedigree sub tab
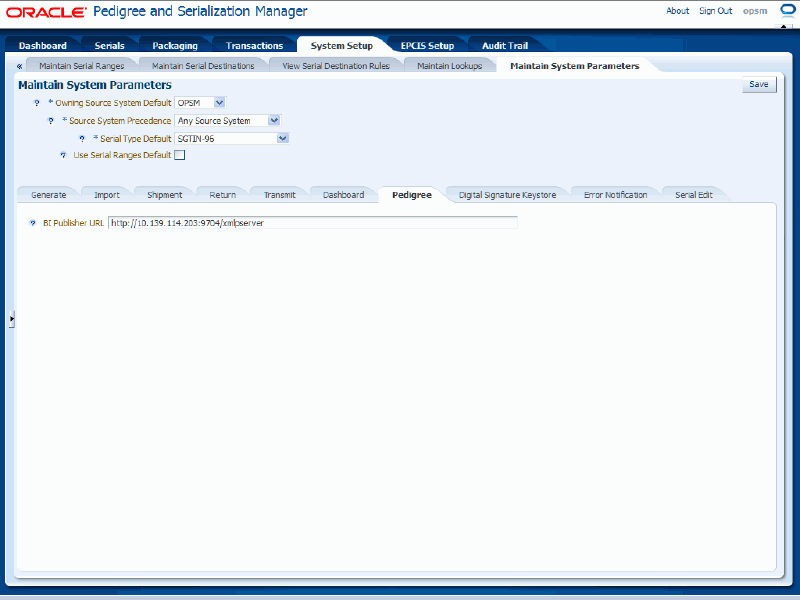
Enter the setting for the following parameter:
| Field Name | Description |
|---|---|
| BI Publisher URL | Enter the BI Publisher server URL that will be used to print Pedigrees. Enter a fully qualified URL value (for example, http://hostname:port/xmlpserver). |
Select the Digital Signature Keystore sub tab.
Maintain System Parameters page - Digital Signature Keystore sub tab
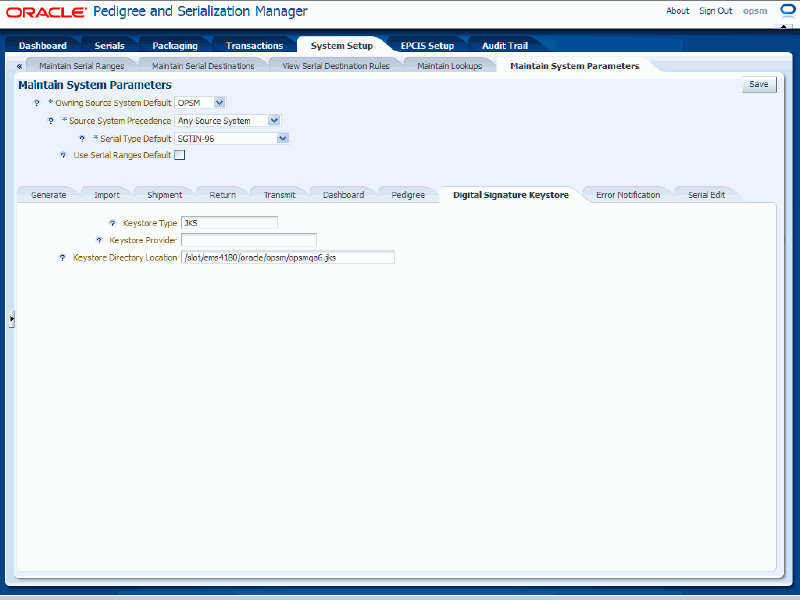
Enter the settings for the following parameters:
| Field Name | Description |
|---|---|
| Keystore Type | Enter the type of keystore that will be used for the digital signature of Pedigree documents (for example, JKS, PKCS12, and so on). |
| Keystore Provider | Enter the package provider of the keystore that will be used for the digital signature of Pedigree documents. |
| Keystore Directory Location | Enter the location of the keystore file including the full path and file name. For example:
This file should be located on the same middle-tier as the WebLogic Server or should be accessible from it. |
For more information on digitally signing a Pedigree, see:
Select the Error Notification sub tab.
Maintain System Parameters page - Error Notification sub tab
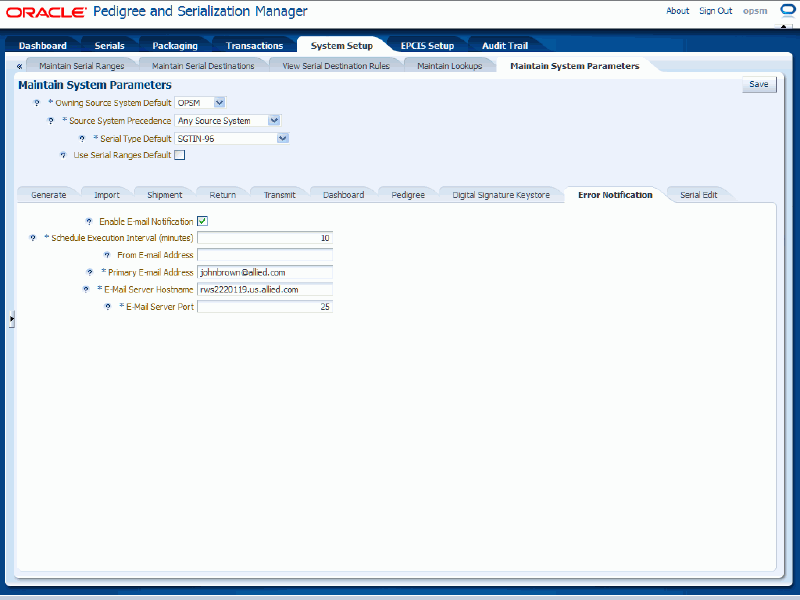
Enter the settings for the following parameters:
| Field Name | Description |
|---|---|
| Enable E-mail Notification check box | Select this check box if you want the system to send notification e-mails if errors are detected on transactions or transactions that are locked as "In Progress" during the processing of the Transaction Service, Serial Service, and Product Service web services. If this check box is not selected, the system will not send any e-mail notifications of errors.
Note: The Oracle Scheduler must also be configured on the database for error notifications to occur. |
| Schedule Execution Interval (minutes) | Enter the amount of time in minutes after which the system will check for errors. 60 minutes appears by default. This field is required if you enable e-mail notifications. Note: Oracle recommends that you do not set this interval to a very small number as it can effect overhead. |
| From E-mail Address | (Optional) Enter the e-mail address that will appear in the From line of the e-mail notification. If this information is not specified, the "To" e-mail address will appear by default in the notification. |
| Primary E-mail Address | Enter the primary e-mail address where messages will be sent if e-mail notifications are enabled. This e-mail address can be a distribution list. This field is required if you enable e-mail notifications. |
| E-mail Server Hostname | Enter the hostname of the e-mail server from which notifications will be sent. This field is required if you enable e-mail notifications. |
| E-mail Server Port | Enter the port of the e-mail server from which notifications will be sent. This field is required if you enable e-mail notifications. |
For more information on the error notification process, see Web Services E-Mail Notification.
Select the Serial Edit sub tab.
Maintain System Parameters page - Serial Edit sub tab
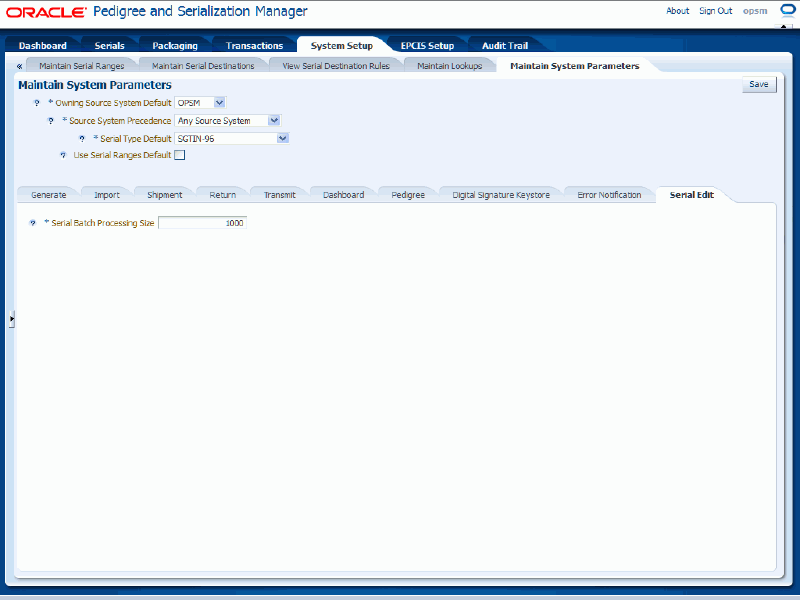
Select the setting for the following parameter:
| Field Name | Description |
|---|---|
| Serial Batch Processing Size | When processing Reserve, Commission, Decommission, or Edit Serials transactions using the SerialsServiceAMService web service, enter the number of serials that will be processed by the system as a batch. Processing the serials in batches is a mechanism used to improve performance and scalability. All operations within the SerialsServiceAMService web service use this parameter. 1000 appears by default for this field. |
Click the Save button.
Navigate to the Maintain System Parameters page.
Modify any of the parameters settings.
Click the Save button.
Use the Location pages in Oracle Pedigree and Serialization Manager (OPSM) to define and maintain locations associated with the management of serial numbers. You must define location information in the OPSM system. You can define a location for a company, a facility, a branch or plant, a production line, or a physical location where products are shipped or returned.
Transactional systems integrating to the OPSM system will need to identify the location when requesting serials or recording transactions against the serials. The location identifies the entity that has performed the transaction and defines the controls the system enforces on that entity.
Location setup provides the following:
Identification of the location:
Location Description
Location Type
Electronic Product Code (EPC) Company Prefix
Global Location Number (GLN)
Source System
Longitude and Latitude
External Reference Identifier
Digital signature required indicator
Licensing information:
State License Number
DEA Number
Licensing Agency
License State/Region
Deactivation of the Location:
Location Deactivation Date
If a location has been deactivated, the system will not generate new serials for the location. Previously generated serials for the location (when it was active) will be transacted as normal.
Location contacts information:
Contact Name
Contact Title
Contact Email
Contact Telephone
Contact URL
Contact User Id
Primary contact indicator
Receive error notifications indicator
The Pedigree, Digital Signature, and Error Notification functionality in OPSM use location contacts:
Contact User ID on the location contact should be the user ID that will be entered when the user is prompted for digital signature validation (it should be the user that is authorized to sign pedigrees).
Contact User ID is optional for contacts that will not be signing pedigrees.
Contact marked as the primary contact is the contact that will display and print on the Pedigree document.
Contact marked as the one to receive error notifications is the contact that will receive e-mail notifications if errors are detected on transactions, serial status updates, or transactions that are locked "In Progress" pertaining to this location during the Transaction Service and Serial Service web services processing.
E-mail notifications are only sent if you have enabled e-mail notification on the Maintain System Parameters page - Error Notification sub tab.
Location Group information:
Location Group
Location Group Description
Defines the location groups associated with the location. You can use location groups to define a single serial range for multiple locations.
Controls the logic used for the creation and transmission of serials:
Defines the serial type for non-product specific serial generation.
Defines the default label type for shipping containers sent in on new transactions.
Controls warnings for available serials for the location.
Defines critical and at risk serial thresholds.
Locations are also used in the definition of products, lots, serial ranges, and serial destinations in these ways:
Product Definition: Control attributes can be overridden specific to the Product and Location.
Lot Definition: Location is included in the identification of the lot to support the creation of duplicate lot records.
Serial Ranges: Ranges can be defined by two levels of granularity:
Serial Type Group and Location
Serial Type Group and Location Group
Serial Type Group, Location, and Product Unit Identifier
Serial Type Group, Location Group, and Product Unit Identifier
Serial Destinations: Serial destinations can be defined at three levels of granularity:
Transaction Type
Transaction Type and Location
Transaction Type, Location, and Product
Use these procedures to search for, view, create, edit, deactivate, and delete locations:
Navigate to the Maintain Locations page.
Maintain Locations page
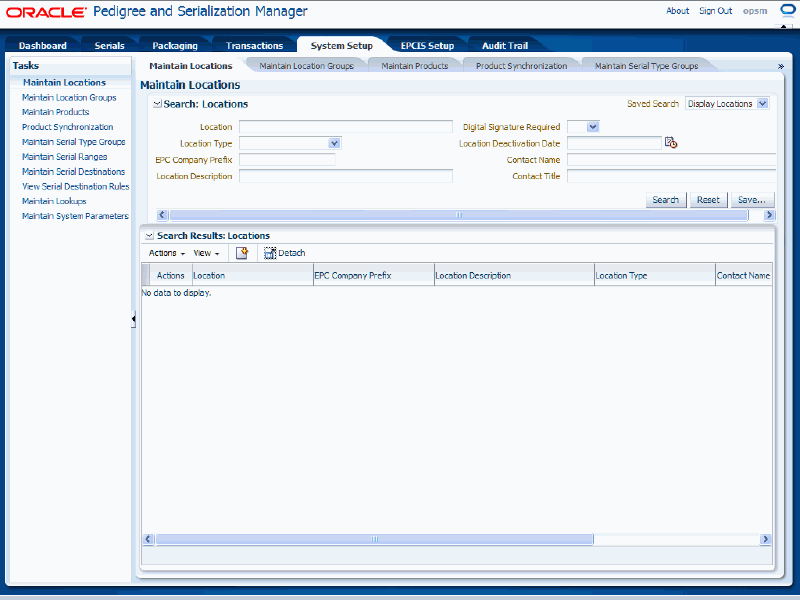
In the Search: Locations region, enter the search criteria for the locations using one or more of these fields:
| Field Name | Description |
|---|---|
| Location | (Optional) Enter the location. |
| Location Type | (Optional) Select the location type. Location Types are user-defined using Lookup Type PAS_LOCATION_TYPE. |
| EPC Company Prefix | (Optional) Enter the Electronic Product Code (EPC) company prefix. |
| Location Description | (Optional) Enter the description for the location. |
| Digital Signature Required | (Optional) Select whether you want to view locations where a digital signature is required for the Pedigrees. Values are:
|
| Location Deactivation Date | (Optional) Select the date the location was inactivated. |
| Contact Name | (Optional) Enter the contact name. |
| Contact Title | (Optional) Enter the contacts title. |
Otherwise, you can click the Search button without entering any search criteria and all available locations will appear.
Click the Search button.
Maintain Locations page
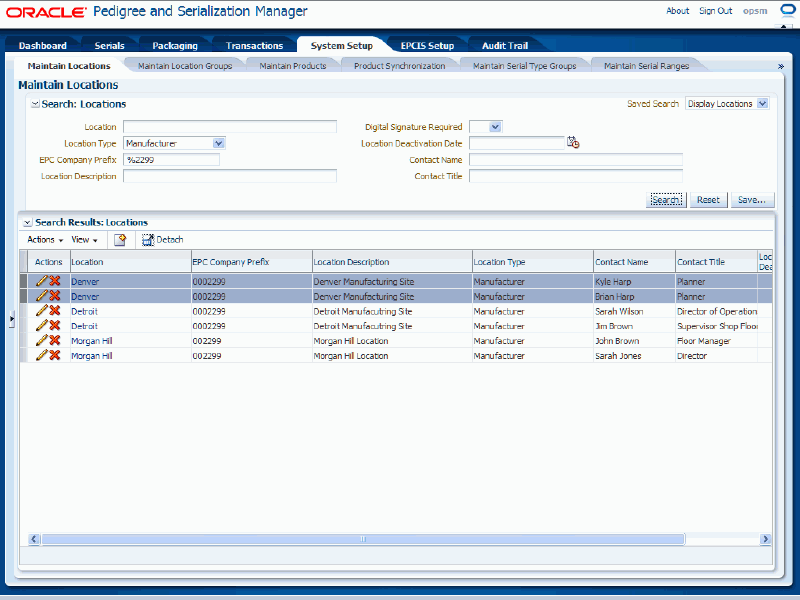
All of the locations that match the search criteria appear in the Search Results: Locations region in a table format.
To View Location Detail Information
Navigate to the Maintain Locations page.
Enter search criteria for the locations you want to view and click the Search button.
All of the locations that match the search criteria appear in the Search Results: Locations table.
Click the Location link in the table that you want to view.
View Location page
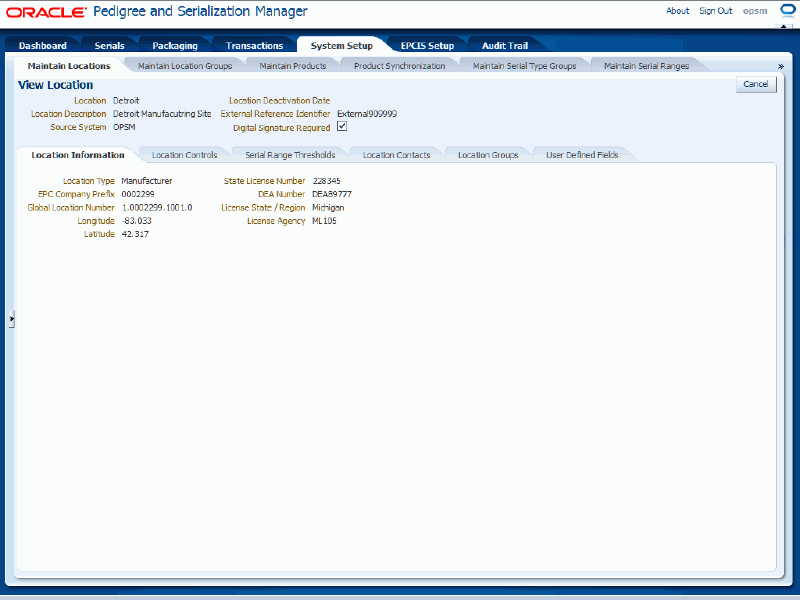
The View Location page appears.
Select the different sub tabs (Location Information, Location Controls, Serial Range Thresholds, Location Contacts, Location Groups, and User Defined Fields) to view that particular type of information for the location
Click the Cancel button to return back to the Maintain Locations page.
Navigate to the Maintain Locations page.
Select Create from the Actions menu or click the Create icon located at the top of the Search Results: Locations region.
Create Location page
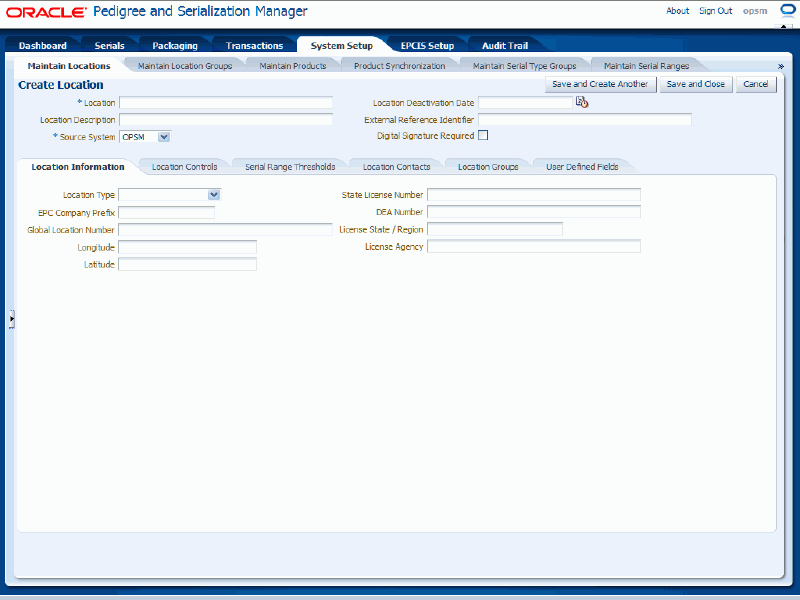
The Create Location page appears.
Enter the following information:
| Field Name | Description |
|---|---|
| Location | Enter the location. |
| Location Description | (Optional) Enter the description for the location. |
| Source System | Select the Source System that this location is associated with. Source systems are user-defined using PAS_SOURCE_SYSTEM Lookup Type. |
| Location Deactivation Date | (Optional) Enter the date the location will be deactivated. If a location has been deactivated, the system will not generate new serials for the location. Previously generated serials for the location (when it was active) will be transacted as normal. |
| External Reference Identifier | (Optional) Enter an external reference identifier for the location. The external reference identifier is used to identify the entity from the external system that is identified as a location in OPSM. If using the page interface between Oracle E-Business Suite and OPSM, the External Reference Identifier is required. |
| Digital Signature Required check box | (Optional) Select this check box to indicate that a digital signature is required for Pedigrees at this location. |
Create Location page
Select the Location Information sub tab.
Enter the following information:
| Field Name | Description |
|---|---|
| Location Type | (Optional) Select the type of location. Use the type to clarify what this location is used for. Location Types are user-defined using Lookup Type PAS_LOCATION_TYPE. |
| EPC Company Prefix | (Optional) Enter the Electronic Product Code (EPC) Company Prefix for the location. The EPC Company Prefix must be between 6-12 characters in length and contain numeric values. The EPC Company Prefix is required for creation of SGTIN serial types in OPSM. |
| Global Location Number | (Optional) Enter either the Global Location Number (GLN) or the Serialized Global Location Number (SGLN) for the location. |
| Longitude | (Optional) Enter the longitude for the location. Entering longitude and latitude information will display the location on the Location Map located within the Operations Dashboard. |
| Latitude | (Optional) Enter the latitude for the location. Entering longitude and latitude information will display the location on the Location Map located within the Operations Dashboard. |
| State License Number | (Optional) Enter the State License Number for the location. |
| DEA Number | (Optional) Enter the Drug Enforcement Agency (DEA) Number for the location. |
| License State/Region | (Optional) Enter the state or region that the license is associated with. Pedigree uses this information. |
| License Agency | (Optional) Enter the agency that issued the license. Pedigree uses this information. |
Create Location page - Location Information sub tab
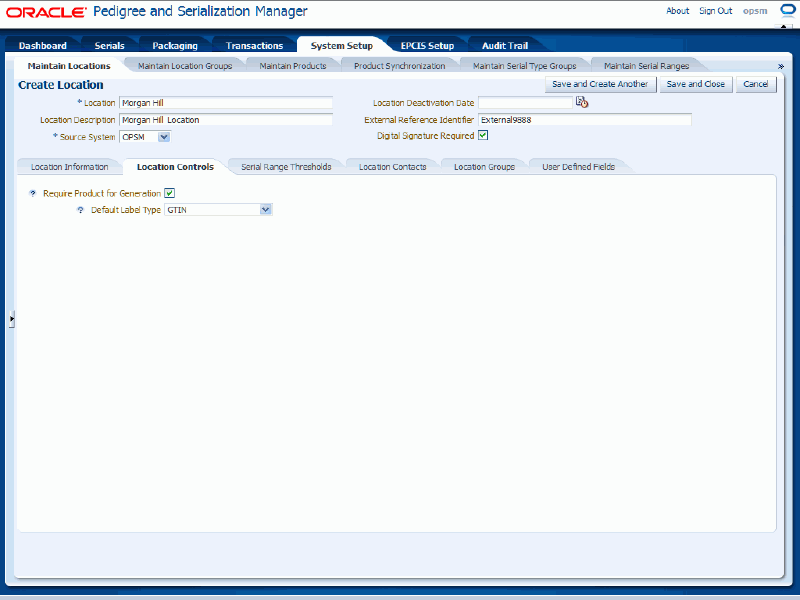
Select the Location Controls sub tab.
Select one of the serial creation check boxes for this location:
Select the Require Product for Generation check box if this location requires product identification on non-product specific serial types when serials are generated or imported for this location.
This check box appears selected by default.
Select the Non-Product Specific Serial Type the system will use when generating or importing serials for this location.
Note: The Non-Product Specific Serial Type field will not appear until you clear the Require Product for Generation check box.
Select the Default Label Type for the location.
The system uses this label type when a label type is not provided during the creation of label records for new transactions. The use of this default only occurs for labels that represent the shipping containers on the transactions. The system will utilize the location provided on the transaction to retrieve this Default Label Type value.
Create Location page - Location Controls sub tab
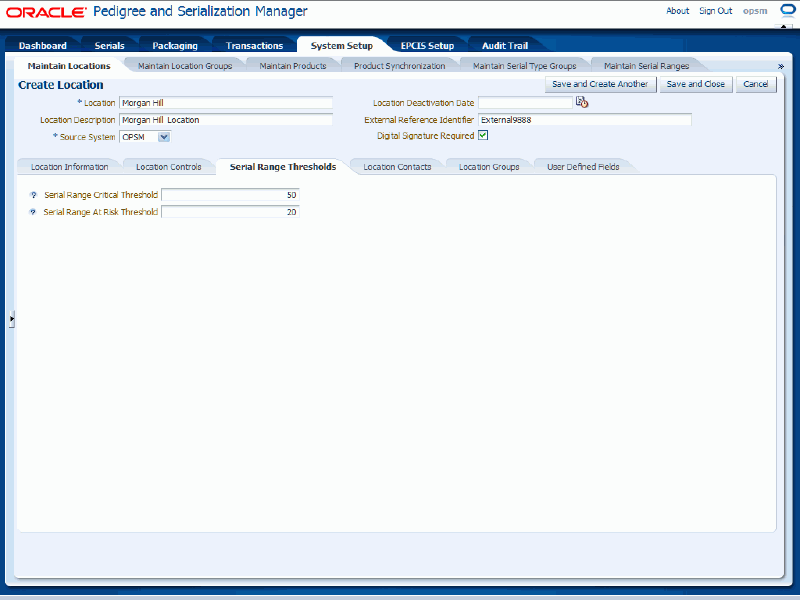
Select the Serial Range Thresholds sub tab.
(Optional) Enter the Serial Range Critical Threshold value for the location. Zero appears by default.
This is the default critical threshold value for this location’s serial ranges. This value will appear by default on the serial range when a new range is created.
If the remaining serials within a range are less than the Critical Threshold on the serial range, the range is included in the Critical count in the Serial Range Management component of the Operations Dashboard.
For information on the Serial Range Management component, see Using the Serial Range Management Component.
(Optional) Enter the Serial Range At Risk Threshold value for the location. Zero appears by default.
This is the default at risk threshold value for this location’s serial ranges. This value will appear by default on the serial range when a new serial range is created.
If the remaining serials within a range are less than the At Risk Threshold and greater than or equal to the critical threshold value, the range is included in the At Risk count in the Serial Range Management component of the Operations Dashboard.
For information on the Serial Range Management component, see Using the Serial Range Management Component.
Create Location page - Serial Range Thresholds sub tab
Select the Location Contacts sub tab.
Create Location page - Location Contacts sub tab

Maintain Location Contacts:
To Create Location Contacts
Select Create Location Contact from the Actions menu or click the Create icon located at the top of the Location Contacts table.
Create Location page - Location Contacts sub tab
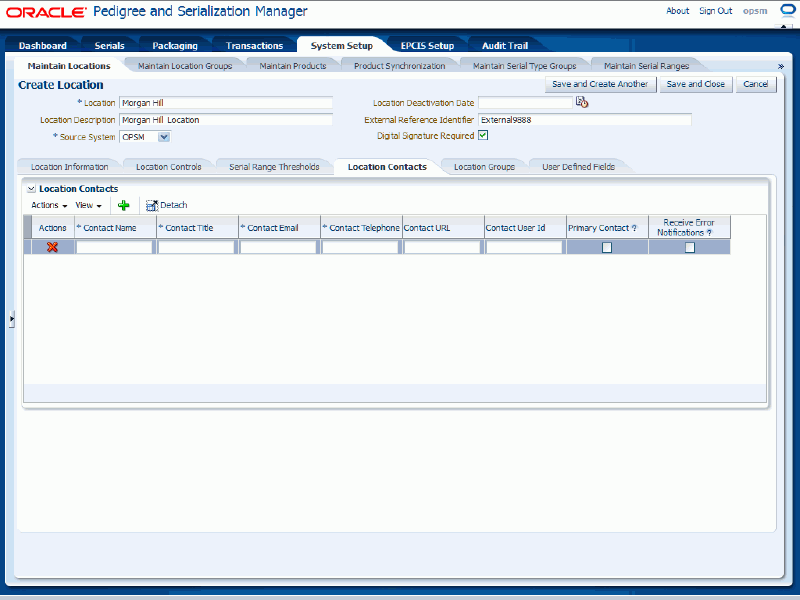
A new row appears in the location contacts table.
Enter the following information:
| Field Name | Description |
|---|---|
| Contact Name | Enter the name for the location contact. |
| Contact Title | Enter the title for the location contact. |
| Contact Email | Enter the e-mail address for the location contact. |
| Contact Telephone | Enter the telephone number for the location contact. |
| Contact URL | (Optional) Enter the URL for the location contact. |
| Contact User Id | (Optional) Enter the contact user Id for the location contact. This user ID should be the same as the alias for the digital signature certificate that you defined. Note: Existing users that are upgrading to OPSM Release 1.2 need to add a valid contact user ID to every location contact that will be digitally signing pedigrees. This information should be entered before they actually digitally sign a pedigree document. Otherwise, they will receive an error message and will not be able to digitally sign a pedigree. |
| Primary Contact? check box | Select this check box next to the primary location contact for the location. At least one contact must be marked as the primary contact for the location. The contact marked as primary will be the one to display and print on the Pedigree document. |
| Receive Error Notifications? check box | Select this check box if the system will send notification e-mails for this location if errors are detected on transactions, serial status updates, or transactions that are locked "In Progress" during the Transaction Service and Serial Service web services processing. You can select more than one contact to receive error notifications. For more information on web service error notifications, see Web Service E-Mail Notifications. |
Repeat steps 1-2 until all of the location contacts are defined.
Create Location page - Location Contacts sub tab

To Delete Location Contacts
Select the location contact in the table that you want to delete.
Select Delete Location Contact in the Actions menu or click the Delete icon in the Actions column of the contacts table.
The system displays a message asking if you are sure you want to delete the location contact.
Click the Yes button.
The location contact is deleted from the system.
Select the Location Groups tab.
Create Location page - Location Groups sub tab
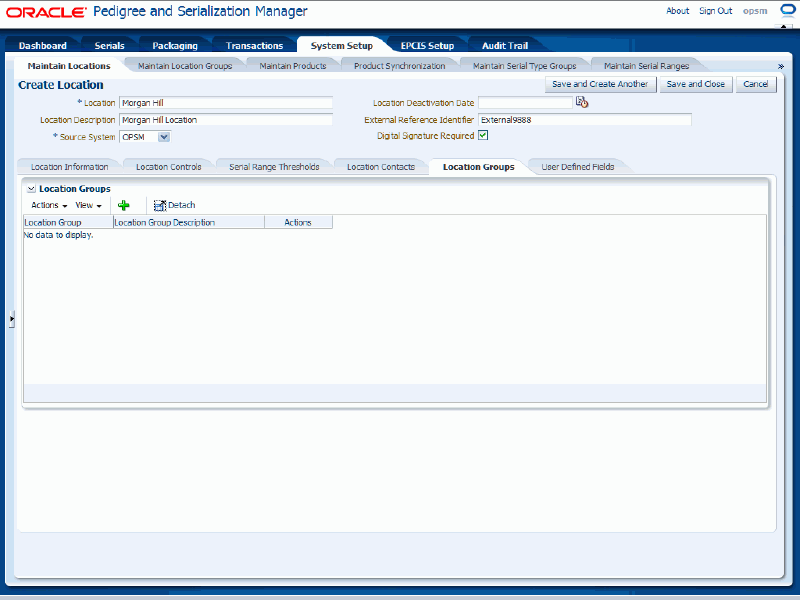
Maintain Location Groups:
To Add Location Groups to a Location
Select Add Location Group from the Actions menu or click the Add Location Group icon located at the top of the Location Groups table.
Create Location page - Location Groups sub tab
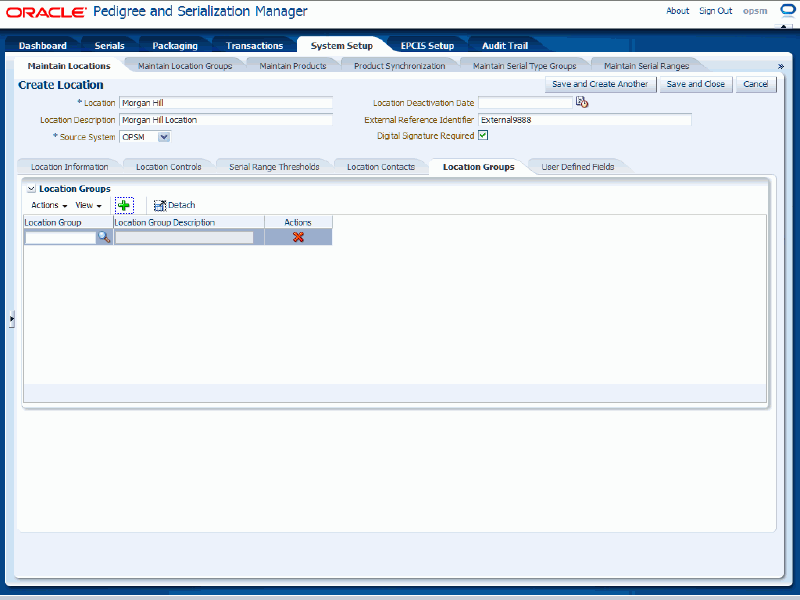
A new row appears in the location groups table.
Select a location group in the Location Groups field.
The Location Group Description field appears after you select a location group.
Note: Using the Location Groups tab, you are only creating an association between the location and location group.
Note: Location Groups are defined using the Create Location Group page. For more information on creating location groups, see Maintaining Location Groups.
Repeat steps 1-2 until all of the location groups are added.
Create Location page - Location Groups sub tab

To Delete Location Groups from a Location
Select the location group in the table that you want to delete.
Select Delete Location Group in the Actions menu or click the Delete Location Group icon in the Actions column of the location groups table.
The system displays a message asking if you are sure you want to delete this location group and location association.
Click the Yes button.
The location group association to the location is deleted from the system. The location group itself is not deleted.
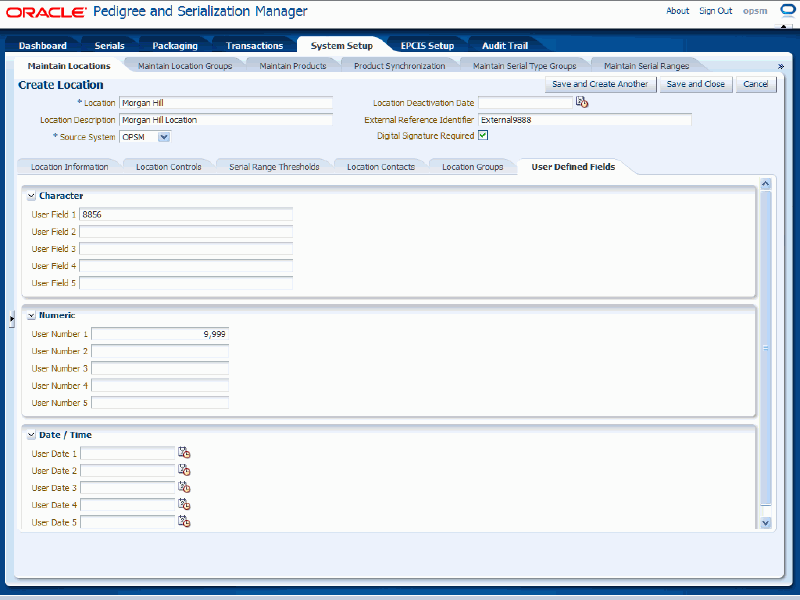
Select the User Defined Fields sub tab.
Enter user-defined data using any of the fields in the Character, Numeric, and Date/Time regions of the page.
Create Location page - User Defined Fields sub tab
Save your work. Choose one of these options:
Click the Save and Close button to save this location and return back to the Maintain Locations page.
Click Save and Create Another button to save this location and to stay on this page so you can create another location. The system displays a message that the location was saved successfully and it clears all of the values in the fields.
Navigate to the Maintain Locations page.
Enter search criteria for the locations you want to edit and click the Search button.
All of the locations that match the search criteria appear in the Search Results: Locations table.
Select the location in the table that you want to edit.
Select Edit in the Actions menu or click the Edit Location icon associated with the location in the Actions column of the results table.
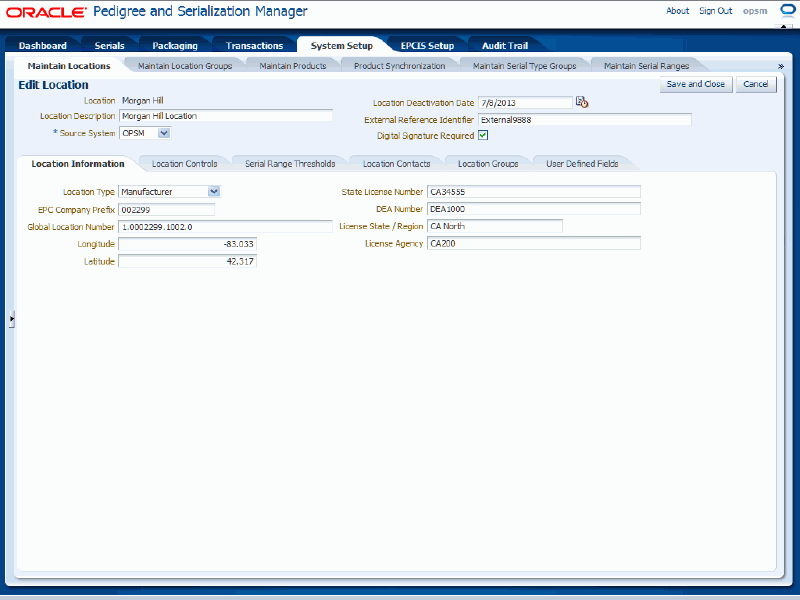
Edit Location page

The Edit Location page appears displaying all of the existing information for the location.
Edit any of the location fields. You can edit any of the fields pertaining to the location.
Click the Save and Close button to save the changes you made to the location information and to return back to the Maintain Locations page.
Navigate to the Maintain Locations page.
Enter search criteria for the locations you want to deactivate and click the Search button.
All of the locations that match the search criteria appear in the Search Results: Locations table.
Select the location in the table that you want to deactivate.
Select Edit in the Actions menu or click the Edit Location icon associated with the location in the Actions column of the results table.
The Edit Location page appears displaying all of the existing information for the location.
Enter the date the location will become inactive in the Location Deactivation Date field.
Note: The Deactivation Date must be in the future. It cannot be the current date.
Edit Location page
Click the Save and Close button to save the changes you made to the location information and to return back to the Maintain Locations page.
If a location has been deactivated, the system will not generate new serials for the location and you will not be able to associate deactivated locations to a location group. Previously generated serials for the location (when it was active) will be transacted as normal.
Navigate to the Maintain Locations page.
Enter search criteria for the locations you want to delete and click the Search button.
All of the locations that match the search criteria appear in the Search Results: Locations table.
Select the location in the table that you want to delete.
Select Delete in the Actions menu or click the Delete Location icon in the Actions column of the results table.
The system displays a message asking if you are sure you want to delete the location.
Note: If you try to delete a location that has associated transactions, serials, or lots the system will issue an error message. Use the Deactivation Date functionality to prevent additional serial creation for the location.
Click the Yes button.
The location is deleted from the system and any location groups associations are also deleted.
Use the Maintain Location Groups page in Oracle Pedigree and Serialization Manager (OPSM) to define and maintain location groups. You can associate one or more locations to a location group. Then when you go to define serial number ranges you can define them by location group versus by individual location. A location group enables you to define a single serial range for multiple locations.
Note: A location can belong to one or more location groups.
Use these procedures to search for, create, edit, and delete location groups:
To Search for Location Groups (Basic Search)
Navigate to the Maintain Location Groups page.
Maintain Location Groups page (Basic Search)
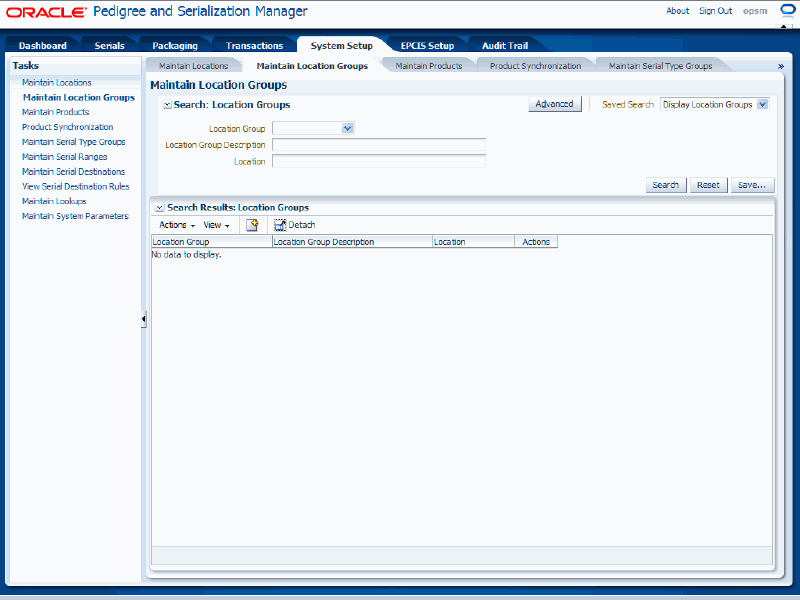
The Maintain Location Groups page appears.
In the Search: Location Groups region, enter the search criteria for the location groups using one or more of these fields:
| Field Name | Description |
|---|---|
| Location Group | (Optional) Select the location group. |
| Location Group Description | (Optional) Enter the description for the location group. |
| Location | (Optional) Enter a location associated with the location group. |
Otherwise, you can click the Search button without entering any search criteria and all available location groups will appear.
Click the Search button.
Maintain Location Groups page (Basic Search)
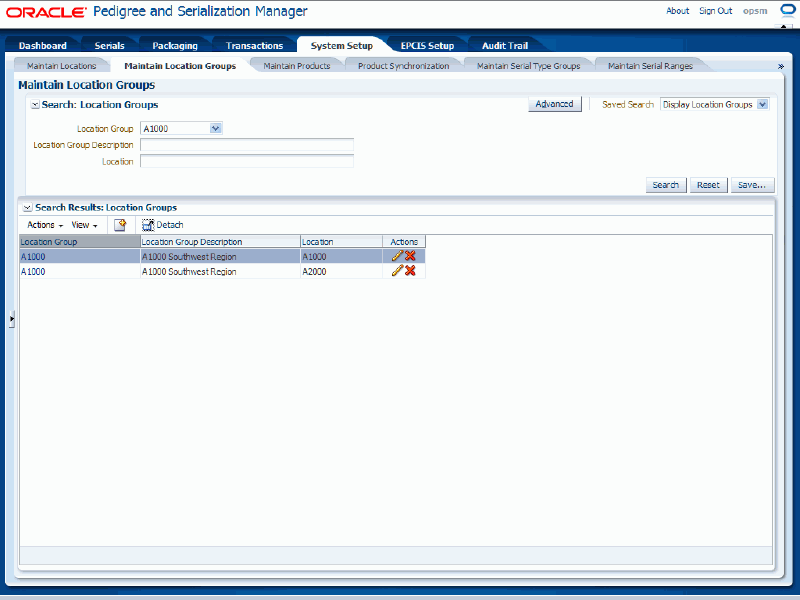
All of the location groups that match the search criteria appear in the Search Results: Location Groups region in a table format.
Click the Advanced button to perform an advanced search.
To Search for Location Groups (Advanced Search)
Navigate to the Maintain Location Groups page.
Click the Advanced button.
Maintain Location Groups page (Advanced Search)
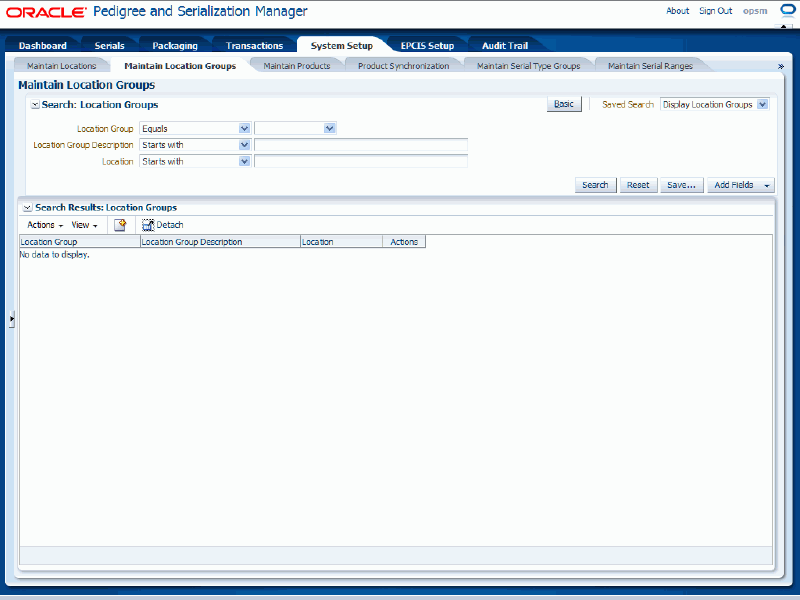
In the Search: Location Groups region, enter the search criteria for the location groups using one or more of these fields:
| Field Name | Description |
|---|---|
| Location Group | (Optional) Select the field operator and then select the location group. Operators are:
|
| Location Group Description | (Optional) Select the field operator and then enter the description for the location group. The field operators are the same as that for the Location Group field. |
| Location | (Optional) Select the field operator and then enter a location associated with the location group. The field operators are the same as that for the Location Group field. |
Otherwise, you can click the Search button without entering any search criteria and all available location groups will appear.
Click the Search button.
Maintain Location Groups page (Advanced Search)
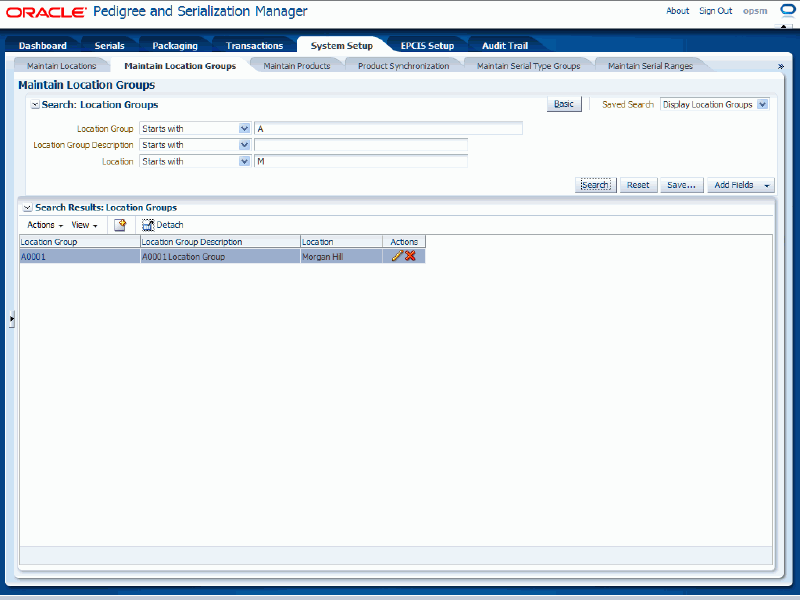
All of the location groups that match the search criteria appear in the Search Results: Location Groups region in a table format.
Click the Basic button to have the page hide the advanced search criteria fields and re-display the basic search criteria fields.
Note: Clicking the Reset button clears the values in all of the criteria fields.
Navigate to the Maintain Location Groups page.
Select Create from the Actions menu or click the Create Location Group icon located at the top of the Search Results: Location Groups region.
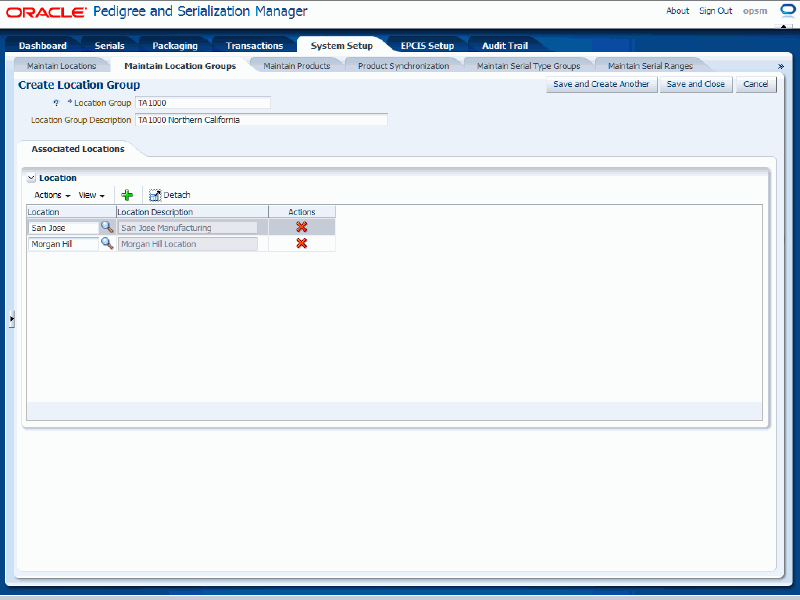
Create Location Group page
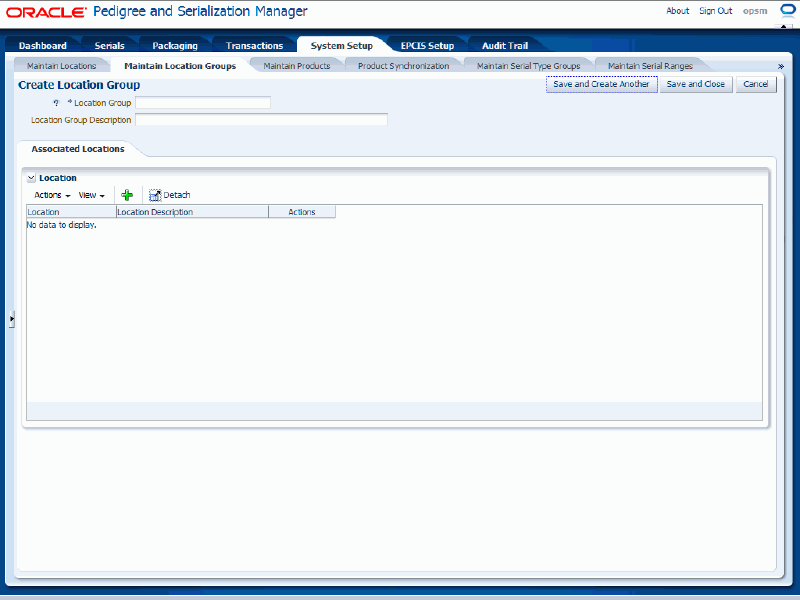
The Create Location Group page appears.
Enter the following information:
| Field Name | Description |
|---|---|
| Location Group | Enter the location group. |
| Location Group Description | (Optional) Enter the description for the location group. |
Create Location Group page

Maintain locations for the location group:
To Associate Locations to a Location Group
Select Add from the Actions menu or click the Add Location Association icon located at the top of the Locations region.
Create Location Group page

A new row appears in the locations table.
Enter the following information:
| Field Name | Description |
|---|---|
| Location | Select a location. Deactivated locations will not appear in the list of available locations. |
| Location Description | The description of the location will automatically display after you select a location. |
Repeat steps 1 through 2 until you have added all of the locations you want to the location group.
Note: Only active locations will be available for selection. Any location whose deactivation date is on or prior to the date when you are trying to associate the location will not display.
Create Location Group page
To Delete Locations from a Location Group
Select the location in the table that you want to delete.
Select Delete from the Actions menu or click the Delete Location Association icon in the Actions column of the locations table.
The location is deleted from the location group.
Save your work. Choose one of these options:
Click the Save and Close button to save this location group and return back to the Maintain Location Groups page.
Click Save and Create Another button to save this location group and to stay on this page so you can create another location group. The system displays a message that the location group was saved successfully and it clears all of the values in the fields.
Navigate to the Maintain Location Groups page.
Enter search criteria for the location groups you want to edit and click the Search button.
All of the location groups that match the search criteria appear in the Search Results: Location Groups table.
Select the location group in the table that you want to edit.
Select Edit in the Actions menu or click the Edit Location Group icon associated with the location group in the Actions column of the results table.
Edit Location Group page
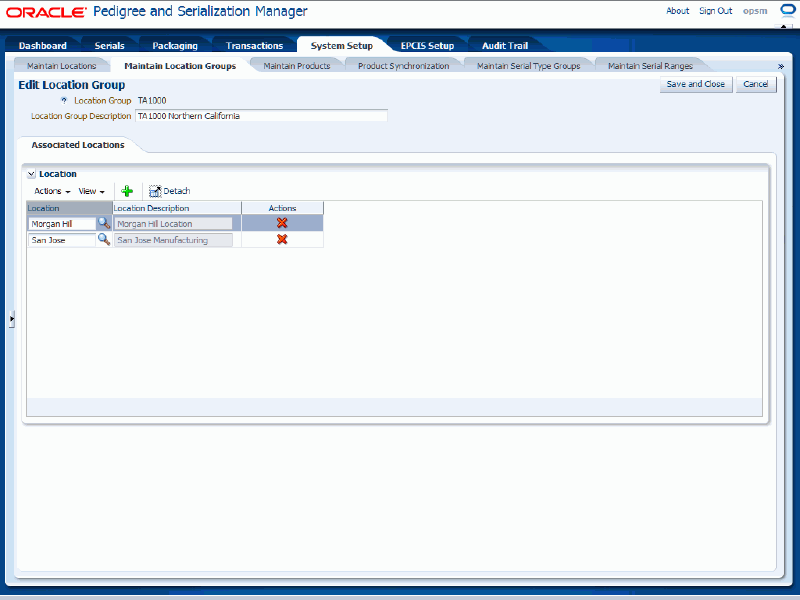
The Edit Location Group page appears displaying all of the existing information for the location group.
(Optional) Edit the Location field if necessary.
Edit Location Group page (location field modified)

(Optional) Add additional locations or delete locations if necessary.
Note: Only active locations will be available for selection. Any location whose deactivation date is on or prior to the date when you are trying to associate the location will not display.
Click the Save and Close button to save the changes you made to the location group and to return back to the Maintain Location Groups page.
Navigate to the Maintain Location Groups page.
Enter search criteria for the location groups you want to delete and click the Search button.
All of the location groups that match the search criteria appear in the Search Results: Location Groups table.
Select the location group in the table that you want to delete.
Select Delete in the Actions menu or click the Delete Location Group icon in the Actions column of the results table.
The system displays a message asking if you are sure you want to delete the location group and all of its associated locations.
Note: You cannot delete a location group if it has a serial range associated to it.
Click the Yes button.
The location group and all of its associated locations are deleted from the system.
Use the Maintain Product pages in Oracle Pedigree and Serialization Manager (OPSM) to maintain product information associated with the management of serial numbers.
To process serials, certain product information must be set up in OPSM. This information will enable OPSM to determine the standards to use when generating the serial number. Product information contains:
General information about the product.
Regulatory information for the product.
Product details for the product.
This information will enable OPSM to determine the standards to use when generating serial numbers.
Item cross-references for the product.
This information will enable you to set up cross-reference information from your transactional systems to products in OPSM.
Location overrides for the product.
This information will enable overrides for a specific location. You can specify by location if you want tracking for internal shipments and returns and whether OPSM will create the serial numbers in OPSM when a shipment transaction occurs. You can also override the serialization control for a specific location.
Use these procedures to search for, create, edit, and delete products:
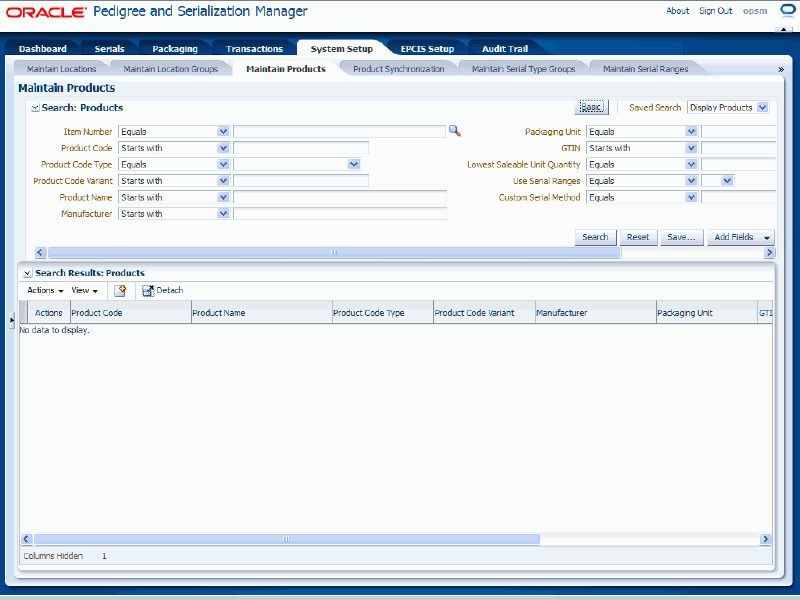
To Search for Products (Basic Search)
Navigate to the Maintain Products page.
Maintain Products page (Basic Search)
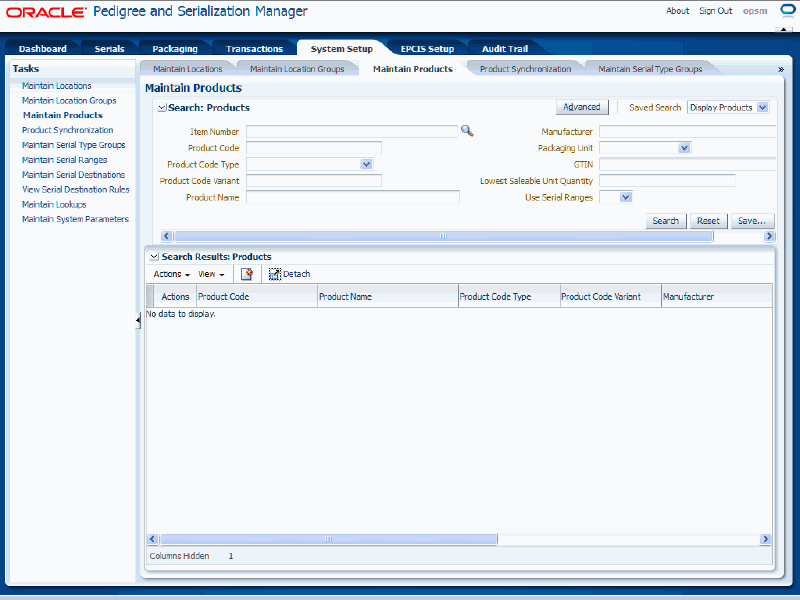
In the Search: Products region, enter the search criteria for the products using one or more of these fields:
| Field Name | Description |
|---|---|
| Item Number | (Optional) Select the item number for the product code. This is the transactional systems item number. It is used to find the Product Code to perform the search. The item number search is merely a way for you to search for the correct product code. When you select the Item Number, the Product Code, Product Code Type, Product Code Variant, Product Name, and Manufacturer fields are automatically populated. If you clear the Item Number, then the Product Code, Product Code Type, Product Code Variant, Product Name, and Manufacturer fields get cleared as well. |
| Product Code | (Optional) Enter the product code. You can enter a partial product code value on which to search. |
| Product Code Type | (Optional) Select the product code type. Product code types are defined using extensible Lookup Type PAS_PRODUCT_CODE_TYPE. OPSM provides several product code types. |
| Product Code Variant | (Optional) Enter the product code variant.
Note: GTIN and NDC product codes can be reused after a specified number of years. The product code variant is used to differentiate between multiple products using the same product code. |
| Product Name | (Optional) Enter the name of the product. |
| Manufacturer | (Optional) Enter the manufacturer for the product. |
| Packaging Unit | (Optional) Select the packaging unit for this product. |
| GTIN | (Optional) Enter the Global Trade Identification Number (GTIN) assigned to the product. |
| Lowest Saleable Unit Quantity | (Optional) Enter the total number of the lowest saleable units contained in this packaging unit for the product. |
| Use Serial Ranges | (Optional) Select the setting for the Use Serial Ranges field. Values are:
|
Otherwise, you can click the Search button without entering any search criteria and all available products will appear.
Click the Search button.
Maintain Products page (Basic Search)
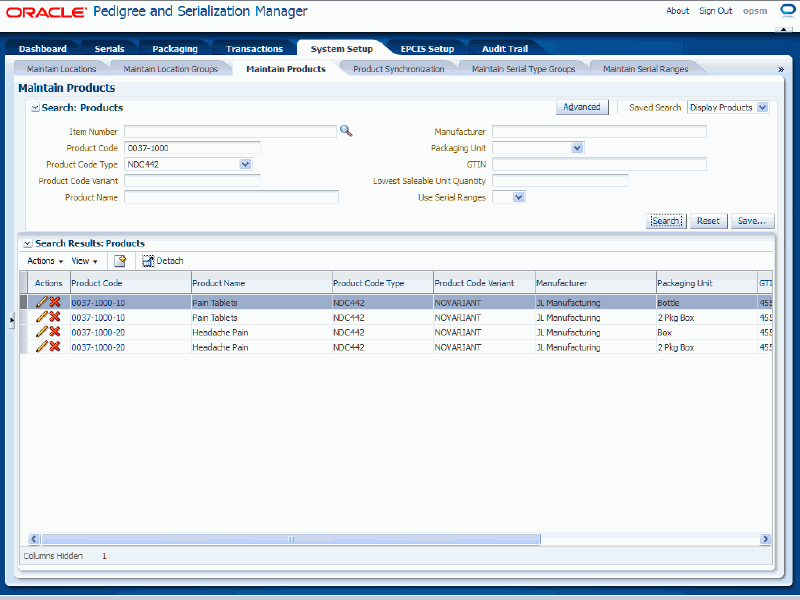
All of the products that match the search criteria appear in the Search Results: Products region in a table format.
Click the Advanced button to perform an advanced search.
To Search for Products (Advanced Search)
Navigate to the Maintain Products page.
Click the Advanced button.
Note: Clicking the Advanced or Basic button will keep the values in the base criteria fields.
Maintain Products page (Advanced Search)
In the Search: Products region, enter the search criteria for the products using one or more of these fields:
| Field Name | Description |
|---|---|
| Item Number | (Optional) Select the field operator and then select the item number for the product code. Operators are:
This is the transactional systems item number. It is used to find the Product Code to perform the search. The item number search is merely a way for you to search for the correct product code. When you select the Item Number, the Product Code, Product Code Type, Product Code Variant, Product Name, and Manufacturer fields are automatically populated. If you clear the Item Number, then the Product Code, Product Code Type, Product Code Variant, Product Name, and Manufacturer fields get cleared as well. |
| Product Code | (Optional) Select the field operator and then enter the product code. You can enter a partial product code value on which to search. The field operators are the same as that for the Item Number field. |
| Product Code Type | (Optional) Select the field operator and then select the product code type. The field operators are the same as that for the Item Number field. Product code types are defined using extensible Lookup Type PAS_PRODUCT_CODE_TYPE. OPSM provides several product code types. |
| Product Code Variant | (Optional) Select the field operator and then enter the product code variant. The field operators are the same as that for the Item Number field. Note: GTIN and NDC product codes can be reused after a specified number of years. The product code variant is used to differentiate between multiple products using the same product code. |
| Product Name | (Optional) Select the field operator and then enter the name of the product. The field operators are the same as that for the Item Number field. |
| Manufacturer | (Optional) Select the field operator and then enter the manufacturer for the product. The field operators are the same as that for the Item Number field. |
| Packaging Unit | (Optional) Select the field operator and then select the packaging unit for this product. The field operators are the same as that for the Item Number field. |
| GTIN | (Optional) Select the field operator and then enter the Global Trade Identification Number (GTIN) assigned to the product. The field operators are the same as that for the Item Number field. |
| Lowest Saleable Unit Quantity | (Optional) Select the field operator and then enter the total number of the lowest saleable units contained in this packaging unit for the product. The field operators are the same as that for the Item Number field. |
| Use Serial Ranges | (Optional) Select the field operator and then select the setting for the Use Serial Ranges field. Values are:
The field operators are the same as that for the Item Number field. |
| Custom Serial Method | (Optional) Select the field operator and then select the Custom Serial Method. The field operators are the same as that for the Item Number field. Custom Serial Methods are user-defined using Lookup Type PAS_CUSTOM_SERIAL_METHOD. These methods must also be configured by the end user for use in custom serial generation. |
Otherwise, you can click the Search button without entering any search criteria and all available products will appear.
(Optional) To enter additional search criteria fields, click the Add Fields button and select the field you would like to add to the search criteria.
The selected field appears as a search criteria field.
Note: To remove the additional field, click the Remove icon next to the field. The field will be removed from the search criteria.
(Optional) Enter search criteria for the additional fields.
Click the Search button.
Maintain Products page (Advanced Search)

All of the products that match the search criteria appear in the Search Results: Products region in a table format.
Note: Clicking the Reset button clears the values in all of the criteria fields.
Click the Basic button to have the page hide the advanced search criteria fields and re-display the basic search criteria fields.
Navigate to the Maintain Products page.
Select Create from the Actions menu or click the Create icon located at the top of the Search Results: Products region.
Create Product page
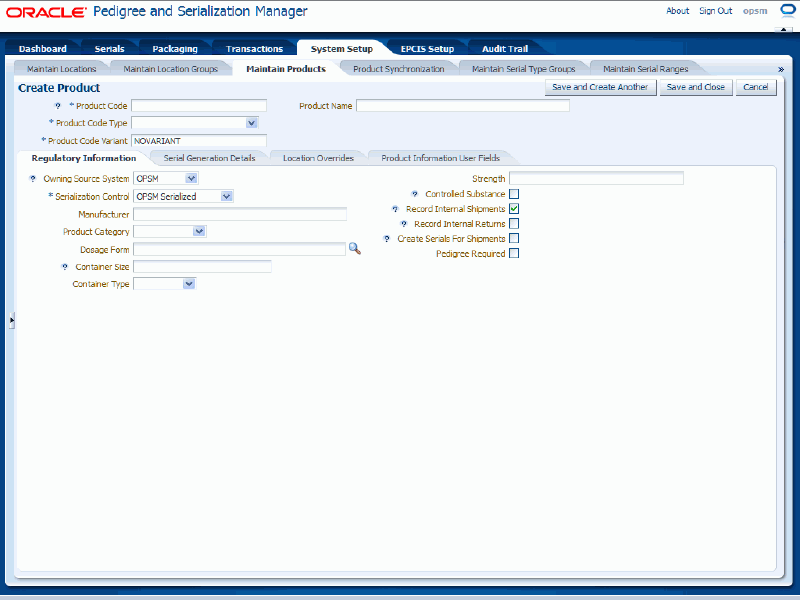
The Create Product page appears.
Enter the following information:
| Field Name | Description |
|---|---|
| Product Code | Enter the product code. The product code length must match that for the product code type selected. For example, a product code must be 14 digits for a GTIN product code type. |
| Product Code Type | Select the product code type. Product code types are defined using extensible Lookup Type PAS_PRODUCT_CODE_TYPE. OPSM provides several product code types. |
| Product Code Variant | (Optional) Enter the product code variant. NOVARIANT appears by default.
Note: GTIN and NDC product codes can be reused after a specified number of years. The product code variant is used to differentiate between multiple products using the same product code. |
| Product Name | (Optional) Enter the name of the product. |
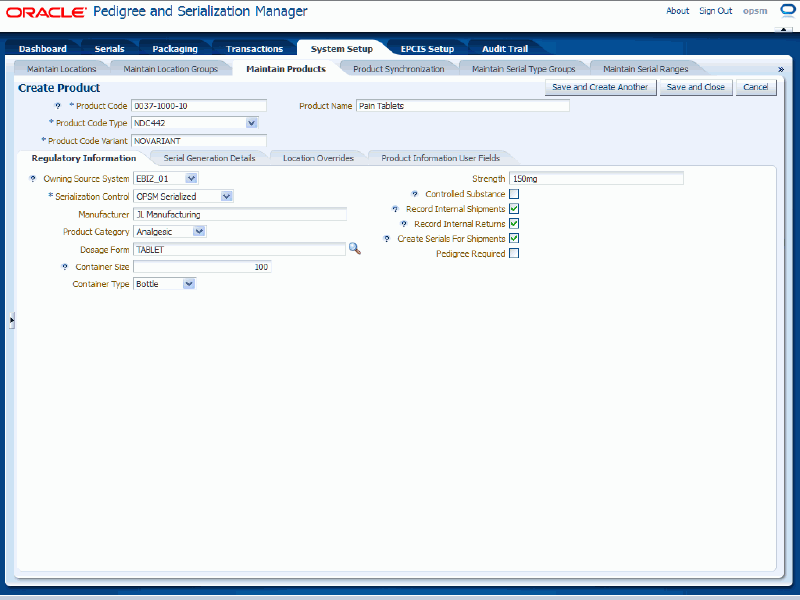
Select the Regulatory Information sub tab.
Use this sub tab to enter information that is required for regulatory requirements.
Enter the following information:
| Field Name | Description |
|---|---|
| Owning Source System | Select the transactional system that has ownership of the product definition. The System Parameters value for the Owning System Source Default field appears by default. For information on the system parameters, see Maintaining System Parameters. |
| Serialization Control | Select whether serials for this product are externally generated or generated by the OPSM system. Values are:
OPSM Serialized appears by default. If Serial Control is set to OPSM Serialized, serials can be generated by OPSM for this product. When set to Externally Generated, serials can be created in OPSM by either importing the serials or uploading the serials at time of shipment. The value for Serial Control can be overridden by product and location. |
| Manufacturer | (Optional) Enter the name of the Manufacturer for this product. Manufacturer is required if the Pedigree Required check box is selected. |
| Product Category | (Optional) Select a product category code. For example, painkillers, anti-depressants, anti-anxiety, and so on. Product categories are user defined using Lookup Type PAS_PRODUCT_CATEGORY. |
| Dosage Form | (Optional) Select the form of dosage for the product. For example, tablet, liquid, or capsule. Dosage Form is required if the Pedigree Required check box is selected. Dosage forms are user defined using Lookup Type PAS_DOSAGE_FORM. |
| Container Size | (Optional) Enter the number of units contained in a package of the product. For example, 60 or 100. Container Size is required if the Pedigree Required check box is selected. |
| Container Type | (Optional) Select the type of container for the product. Container types are user defined using Lookup Type PAS_CONTAINER_TYPE. |
| Strength | (Optional) Enter the strength or potency for the product including the unit of measure. For example, 60mg or 25ml. Strength is required if the Pedigree Required check box is selected. |
| Controlled Substance check box | (Optional) Select this check box if this product is a controlled substance. This field is used only for informational purposes. |
| Record Internal Shipments check box | This check box setting appears by default from the Maintain System Parameters page. Select this check box if you want the system to record shipments from internal customers for this product. |
| Record Internal Returns check box | This check box setting appears by default from the Maintain System Parameters page. Select this check box if you want the system to record returns from internal customers for this product. |
| Create Serials for Shipments check box | This check box setting appears by default from the Maintain System Parameters page. Select this check box if the system will create serials in the Oracle Pedigree and Serialization Manager system at the time of shipment. |
| Pedigree Required check box | (Optional) Select this check box if you require a Pedigree to be created upon Shipment of the product. If selected, the system will automatically create a Pedigree for the Shipment transaction. Product Name, Strength, Manufacturer, Dosage Form, and Container Size are required when Pedigree Required is selected. |
Create Product page - Regulatory Information sub tab
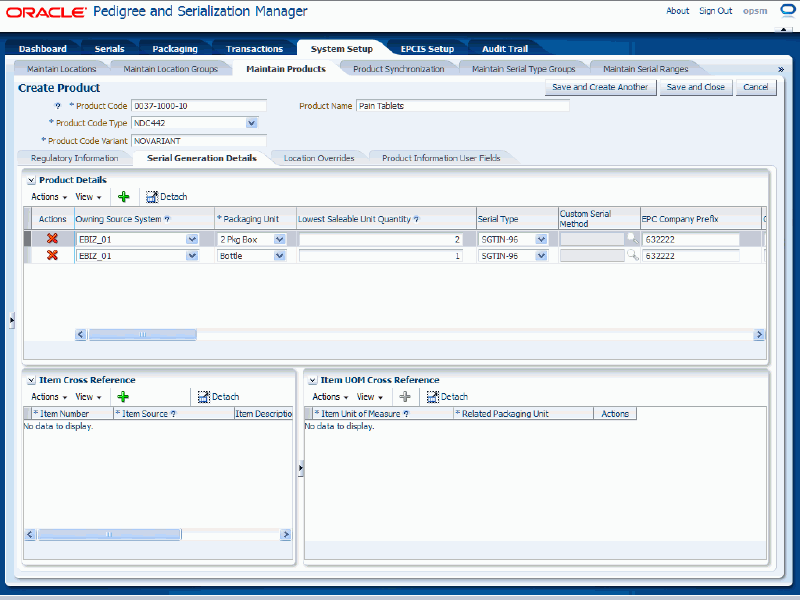
Select the Serial Generation Details sub tab.
The system will use the information specified for this sub tab to generate the serials for the product. Packaging information is included so that the system has the ability to generate serials for multiple levels of packaging based on a request for serials at the lowest saleable unit.
Create Product page - Serial Generation Details sub tab
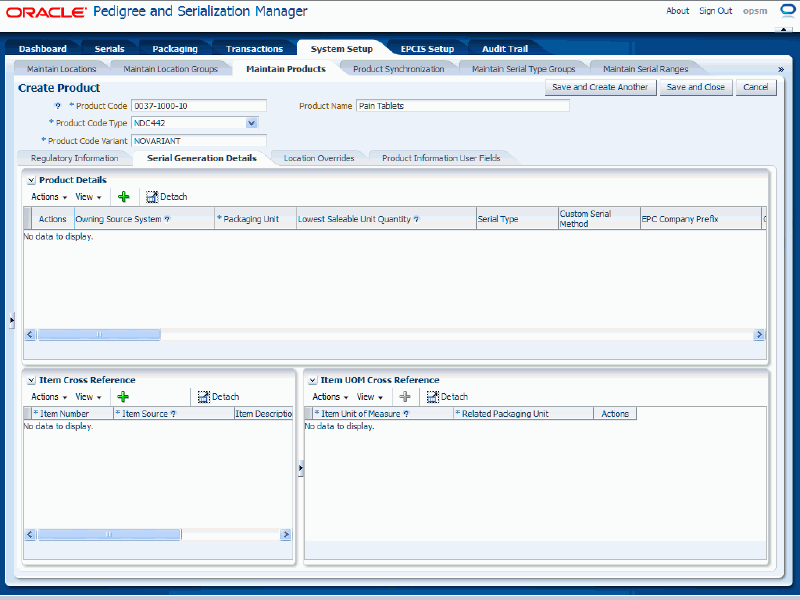
To add product details, select Add Product Detail from the Actions menu or click the Add Product Detail (“+” plus sign) icon located at the top of the Product Details region.
Note: At least one product detail row must be created for each product code that you define.
Note: You can only create one product detail row for a product code associated with a GTIN product code type.
A new row appears in the Product Details region where you can add the information.
Enter the following information:
| Field Name | Description |
|---|---|
| Owning Source System | Select the transactional system that has ownership of the product detail information. The System Parameters value for the Owning System Source Default field appears by default. For information on the system parameters, see Maintaining System Parameters. |
| Packaging Unit | (Optional) Select the packaging unit for this product. Packaging units are user defined using Lookup Type PAS_PACKAGE_UNIT. Note: If you are entering packaging units for the product, at least one of the packaging units must represent the products lowest level of detail where lowest saleable unit quantity equal 0 (zero). |
| Lowest Saleable Unit Quantity | (Optional) Enter the total number of the lowest saleable units contained in this packaging unit. Zero appears by default. You cannot enter a negative value. For example, a 10 package box (packaging unit) holds 10 saleable units, a 5 package case (packaging unit) holds 50 saleable units, and so on. The 5 package case contains 5 10 package boxes, which accounts for the 50 saleable units. A syringe (packaging unit) is the lowest saleable unit, it does not have any saleable units packed within it so it’s represented by a zero in this field. |
| Serial Type | Select the type of serial that will be generated. The System Parameters value for the Serial Type Default field appears by default. For information on the system parameters, see Maintaining System Parameters. |
| Custom Serial Method | (Optional) Select the custom serial method to be used when generating the serial numbers for the product. This field becomes available if you select a custom serial type in the Serial Type field. OPSM delivers predefined serial types in the Lookup Type PAS_SERIAL_TYPES but you can add additional custom serial types to this lookup type. |
| EPC Company Prefix | (Optional) Enter the Electronic Product Code (EPC) company prefix assigned to the product. When serials are generated in OPSM, the EPC company prefix within the SGTIN-96 AND SGTIN-198 serials is verified against this EPC company prefix to ensure that they are correct. |
| GTIN | (Optional) Enter the Global Trade Identification Number (GTIN) assigned to the product. GTIN is required for SGTIN serial types or serial types that are associated to a serial type group where the Product Unit Identifier Formula is set to GTIN. For products associated with a GTIN product code type, the system populates the GTIN with the value in the Product Code field and it cannot be changed. |
| EPC Filter Value | (Optional) Enter the EPC (Electronic Product Code) filter value that represents the packaging level for the product. EPC Filter Value is required for SGTIN serial types. |
| Product Unit Identifier | Displays the product unit identifier associated with the serial type group. |
| Overage | (Optional) Enter how many additional serials should be generated above the quantity/percent requested. Zero appears by default. You cannot enter a negative value. The Overage Type determines whether you will enter a quantity or a percentage. |
| Overage Type | (Optional) Select the type. Types are:
|
| Use Serial Ranges check box | (Optional) Select this check box if you want the system to use a specific range when generating serials. The System Parameters value for the Use Serial Ranges Default check box field appears by default. For information on the system parameters, see Maintaining System Parameters. |
| Label Print Format | (Optional) Select the print label format for the product and packaging unit. |
| User Field 1 through 15 | (Optional) Enter user-defined data using any of these fields. |
| User Number 1 through 5 | (Optional) Enter user-defined data using any of these fields. |
| User Date 1 through 5 | (Optional) Enter user-defined data using any of these fields. |
Create Product page - Serial Generation Details sub tab
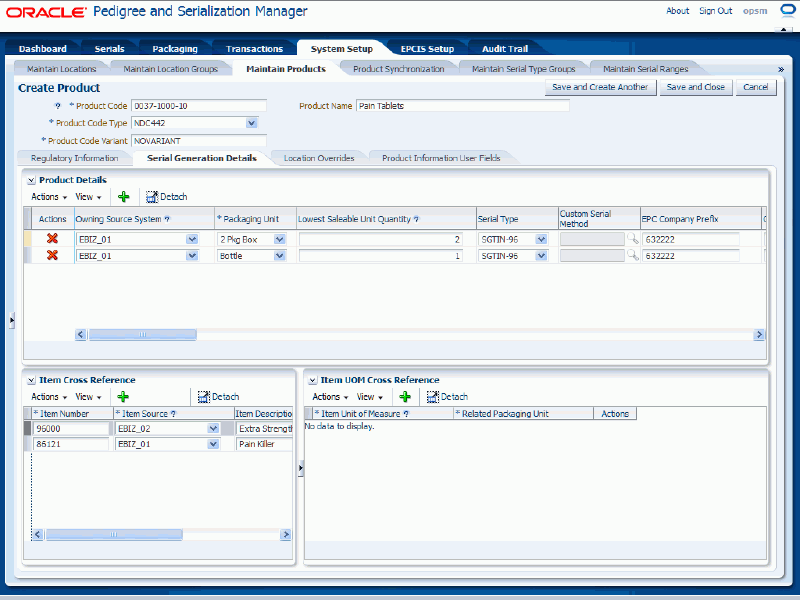
To add item cross-references, select Add Product Item from the Actions menu or click the Add Product Item (“+” plus sign) icon located at the top of the Item Cross Reference region.
Item cross-reference information is where you can specify the mapping from one or more transactional system items to a product.
A new row appears in the Item Cross Reference region where you can add the information.
Enter the following information:
| Field Name | Description |
|---|---|
| Item Number | Enter the item number. |
| Item Source | Select the item source (transactional system) from which this item originates. |
| Item Description | (Optional) Enter the description for the item. |
Note: The item cross-reference rows are related to the item UOM cross-references rows. When you select an item in the Item Cross Reference region the associated row will appear in the Item UOM Cross Reference region if a cross-reference UOM has been entered. Otherwise, you can create the cross-reference UOM row for the item cross-reference.
Important: You must enter an Item UOM cross-reference record if you plan to reference the product using the transaction system item number when searching for serials or transactions, generating serials, or recording transactions in OPSM.
Create Product page - Serial Generation Details sub tab
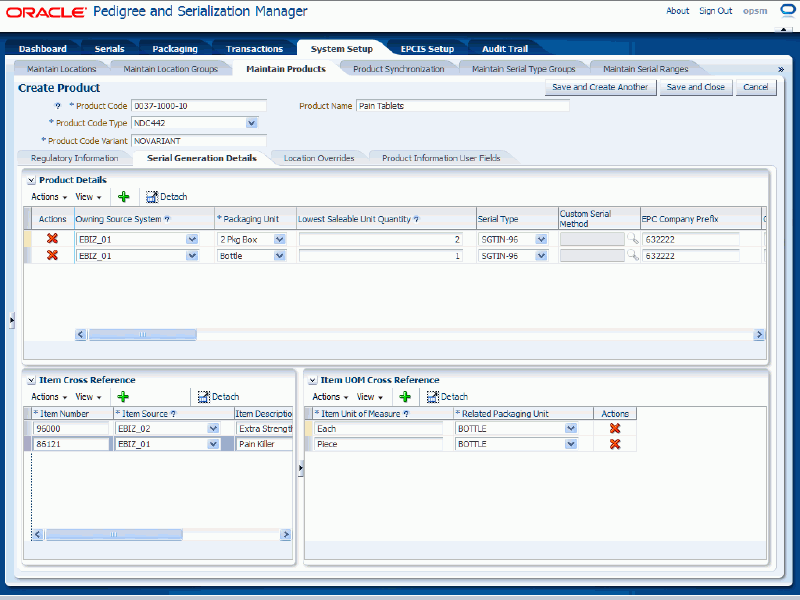
To add item UOM cross-references, select Add Product Item UOM from the Actions menu or click the Add Product Item UOM (“+” plus sign) icon located at the top of the Item UOM Cross Reference region.
Note: You cannot create item UOM cross-references without first entering item cross-reference information.
A new row appears in the Item UOM Cross Reference region where you can add the information.
Enter the following information:
| Field Name | Description |
|---|---|
| Item Unit of Measure | Enter the item unit of measure provided by the item source. This field is case sensitive. Values should be entered as they are stored in the transactional system for integration. For example, Ea versus EA. |
| Related Packaging Unit | Select the related packaging unit. The packaging units that appear for selection are based on the packaging units defined in the Product Details region of the page. The system uses this field to relate the item UOM to the correct product detail record. |
Create Product page - Serial Generation Details sub tab
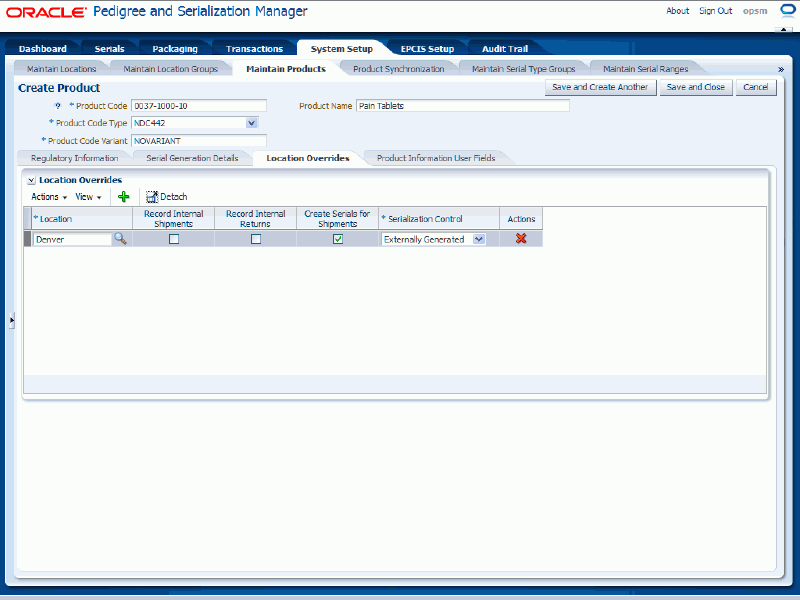
Select the Location Overrides sub tab.
Use this tab to provide override information for locations. The override parameters at the location level will override those specified at the product level.
Create Product page - Location Overrides sub tab
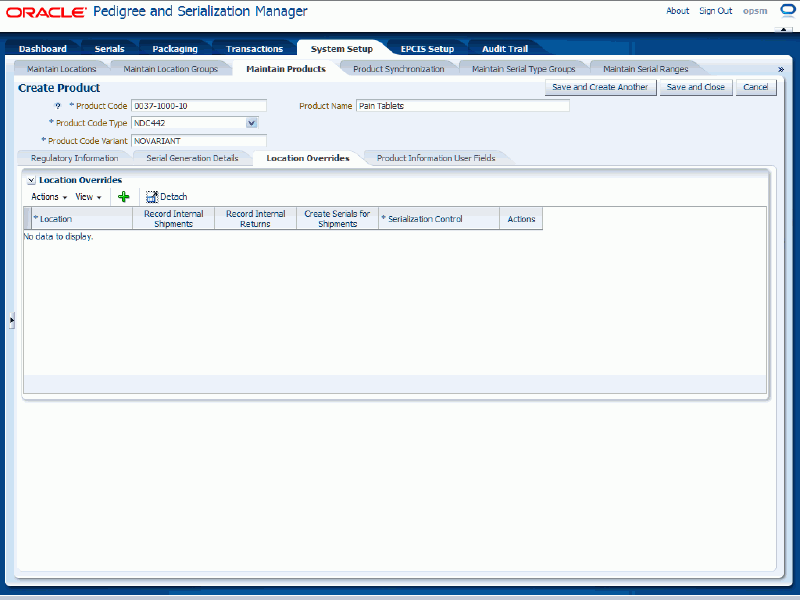
To add location overrides, select Add Product Location from the Actions menu or click the Add Product Location (“+” plus sign) icon located at the top of the Location Overrides region.
A new row appears in the Location Overrides region where you can add the information.
Enter the following information:
| Field Name | Description |
|---|---|
| Location | Select the location. |
| Record Internal Shipments check box | (Optional) Select this check box if you want the system to record shipments to internal customers for this product at this location. |
| Record Internal Returns check box | (Optional) Select this check box if you want the system to record returns to internal customers for this product at this location. |
| Create Serials for Shipments check box | (Optional) Select this check box if the system will create serials in the Oracle Pedigree and Serialization Manager system at the time of shipment at this location. If serials are not sent in with the Shipment transaction, the system will issue an exception. |
| Serialization Control | (Optional) Select if the serials for this location are externally generated or OPSM serialized. |
Create Product page - Location Overrides sub tab
Select the Product Information User Fields sub tab.
Create Product page - Product Information User Fields sub tab
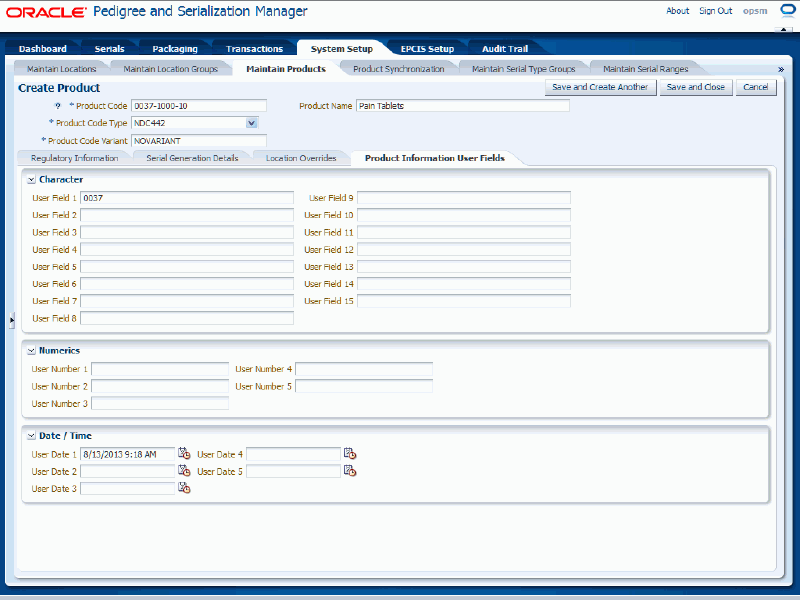
Enter user-defined data using any of the fields in the Character, Numeric, and Date/Time regions of the page.
Save your work. Choose one of these options:
Click the Save and Close button to save this product and return back to the Maintain Products page.
Click Save and Create Another button to save this product and to stay on this page so you can create another product. The system displays a message that the product was saved successfully and it clears all of the values in the fields.
Navigate to the Maintain Products page.
Enter search criteria for the products you want to edit and click the Search button.
All of the products that match the search criteria appear in the Search Results: Products table.
Select the product in the table that you want to edit.
Select Edit in the Actions menu or click the Edit Product icon associated with the product in the Actions column of the results table.
Edit Product page
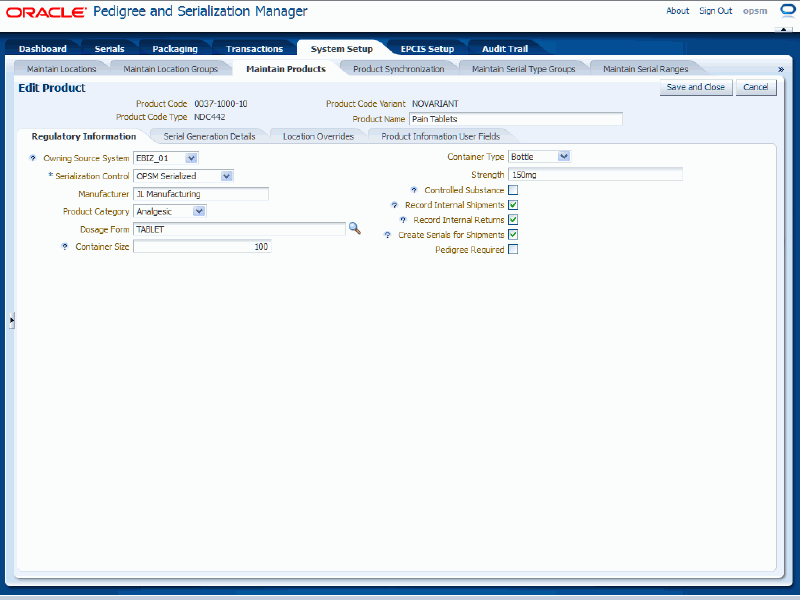
The Edit Product page appears displaying all of the existing information for the product.
Edit any of the product fields located within the sub tabs.
Click the Save and Close button to save the changes you made to the product information and to return back to the Maintain Products page.
To Delete all of the Product Information
Navigate to the Maintain Products page.
Enter search criteria for the products you want to delete and click the Search button.
All of the products that match the search criteria appear in the Search Results: Products table.
Select the product in the table that you want to delete.
Select Delete in the Actions menu or click the Delete Product icon in the Actions column of the results table.
Note: If you try to delete a product that has associated transactions, serials, or lots the system will issue an error message.
The system displays a message asking if you are sure to want to delete the product.
Click the Yes button.
The product is deleted from the system.
To Delete Serial Generation Details for a Product
Navigate to the Maintain Products page.
Enter search criteria for the products you want to delete serial generation details for and click the Search button.
All of the products that match the search criteria appear in the Search Results: Products table.
Select the product in the table that you want to delete serial generation details for.
Select Edit in the Actions menu or click the Edit Product icon in the Actions column of the results table.
The Edit Product page appears.
Select the Serial Generation Details sub tab.
Delete product details.
Select the product detail row you want to delete in the Product Details region.
Note: You cannot delete a product detail row if there are associated item UOM cross-references associated with that product detail. Delete the item UOM cross-references first and then you will be able to delete the product detail.
Select Delete Product Detail from the Actions menu or click the Delete Product Detail icon in the Actions column for the row.
The system displays a message asking if you are sure to want to delete the product details.
Click the Yes button.
The product details are deleted from the system.
Delete item cross-references.
To Delete Item Cross-References
Select the item cross-reference row you want to delete in the Item Cross Reference region.
The item UOM cross-references associated with this item appear in the Item UOM Cross Reference region.
Select Delete Product Item from the Actions menu or click the Delete Product Item icon in the Actions column for the row.
The system displays a message asking if you are sure to want to delete the product item.
Click the Yes button.
The item cross-reference and all of its associated item UOM cross-references are deleted from the system.
Delete item unit of measure cross-references.
To Delete Item Unit of Measure Cross-References
Select the item unit of measure cross-reference row you want to delete in the Item UOM Cross Reference region.
Select Delete Product Item UOM from the Actions menu or click the Delete Product Item UOM icon in the Actions column for the row.
The system displays a message asking if you are sure to want to delete the product item UOM.
Click the Yes button.
The item UOM cross-reference is deleted from the system.
To Delete Location Overrides for a Product
Navigate to the Maintain Products page.
Enter search criteria for the products you want to delete location overrides for and click the Search button.
All of the products that match the search criteria appear in the Search Results: Products table.
Select the product in the table that you want to delete location overrides for.
Select Edit in the Actions menu or click the Edit Product icon in the Actions column of the results table.
The Edit Product page appears.
Select the Location Overrides sub tab.
Select the location override row you want to delete in the Location Overrides region.
Select Delete Product Location from the Actions menu or click the Delete Product Location icon in the Actions column for the row.
The system displays a message asking if you are sure you want to delete the product location.
Click the Yes button.
The location override is deleted from the system.
Oracle Pedigree and Serialization Manager (OPSM) can be integrated with transactional systems to define product and item cross reference based on the item information passed between the systems. Item information from one or more transactional systems can be cross referenced to the same product within OPSM.
The Define Product and Item Cross Reference page can only be accessed from an externally calling system. This page is not available in OPSM from the Tasks menu. OPSM provides a web page, external.jspx, which can be used to integrate external systems to OPSM.
From the external system, you can call the OPSM Define Product and Item Cross Reference page. If you have not previously signed in to OPSM, you will be prompted for user authentication. After successful authentication, you can use the Define Product and Item Cross Reference page to define all of the different product attributes for the item in OPSM and you can specify the product overrides by location if necessary.
The Source System Precedence setting in the OPSM system parameters controls whether product and product detail information can be updated from any source system or only from the owning source system. The owning source system is recorded on the product and product detail records.
For more information on the product definition process, see Understanding the Product Definition Process.
For more information on integrating Oracle E-Business Suite with OPSM, see the Oracle Serialization and Tracking Integration Pack for Oracle Pedigree and Serialization Manager and Oracle E-Business Suite 3.1 - Implementation Guide.
Use these procedures to:
Define product and packaging information from an external system (product does not exist in OPSM).
Define product and packaging information from an external system (product does exist in OPSM).
Edit product and packaging information from an external system.
To Define Product and Packaging Information from an External System (Product Does Not Exist in OPSM)
To Invoke the Define Product and Item Cross Reference Page in OPSM
Call the URL to invoke the Define Product and Item Cross Reference page passing the parameter values:
| Parameter Name | Description |
|---|---|
| page | ‘defineProduct’ |
| key | The item in the external system to be cross referenced to a product in OPSM. |
| unit | The unit of measure of the item to be cross referenced to a product packaging unit in OPSM. |
| keydesc | The description of the item in the external system. |
| loc | The location identifier for the item in the external system. |
| src | The identifier for the external system that invoked OPSM (for example, EBIZ_01). |
If prompted for user authentication, enter your user ID and password.
To Complete the Product Definition in OPSM
Upon entry, the Define Item and Product Cross Reference page will be displayed.
Define Product and Item Cross Reference page
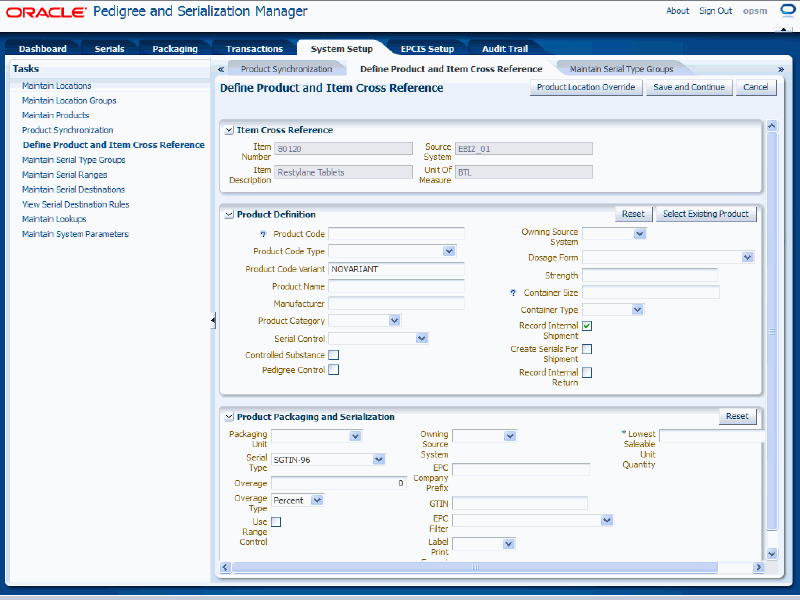
The Define Product and Item Cross Reference page is called asynchronously. The Define Product and Item Cross Reference page appears displaying the Item Number, Item Description, Source System, and Unit of Measure in the Item Cross Reference region of the page from the item number information.
Enter the following information:
| Field Name | Description |
|---|---|
| Product Definition region | |
| Product Code | Enter the product code. The product code length must match that for the product code type selected. For example, a product code must be 14 digits for a GTIN product code type. |
| Product Code Type | Select the product code type. Product code types are defined using extensible Lookup Type PAS_PRODUCT_CODE_TYPE. OPSM provides several product code types. |
| Product Code Variant | (Optional) Enter the product code variant. NOVARIANT appears by default.
Note: GTIN and NDC product codes can be reused after a specified number of years. The product code variant is used to differentiate between multiple products using the same product code. |
| Product Name | (Optional) Enter the name of the product. Product Name is required if the Pedigree Control check box is selected. |
| Manufacturer | (Optional) Enter the name of the Manufacturer for this product. Manufacturer is required if the Pedigree Control check box is selected. |
| Product Category | (Optional) Select a product category code. For example, painkillers, anti-depressants, anti-anxiety, and so on. Product categories are user defined using Lookup Type PAS_PRODUCT_CATEGORY. |
| Serial Control | Select whether serials for this product are externally generated or generated by the OPSM system. Values are:
|
| Controlled Substance check box | (Optional) Select this check box if this product is a controlled substance. This field is used only for informational purposes. |
| Pedigree Control check box | (Optional) Select this check box if you require a Pedigree to be created upon Shipment of the product. If selected, the system will automatically create a Pedigree for the Shipment transaction. |
| Owning Source System | Select the transactional system that owns the product definition. The Owning Source System field appears by default from the item source system passed from the transactional system. |
| Dosage Form | (Optional) Select the form of dosage for the product. For example, tablet, liquid, or capsule. Dosage Form is required if the Pedigree Control check box is selected. Dosage forms are user defined using Lookup Type PAS_DOSAGE_FORM. |
| Strength | (Optional) Enter the strength or potency for the product including the unit of measure. For example, 60mg or 25ml. Strength is required if the Pedigree Control check box is selected. |
| Container Size | (Optional) Enter the number of units contained in a package of the product. For example, 60 or 100. Container Size is required if the Pedigree Control check box is selected. |
| Container Type | (Optional) Select the type of container for the product. Container types are user defined using Lookup Type PAS_CONTAINER_TYPE. |
| Record Internal Shipment check box | This check box setting appears by default from the Maintain System Parameters page. Select this check box if you want the system to record shipments to internal customers for this product. For information on the system parameters, see Maintaining System Parameters. |
| Create Serials for Shipment check box | This check box setting appears by default from the Maintain System Parameters page. Select this check box if the system can create serials in the Oracle Pedigree and Serialization Manager system at the time of shipment. For information on the system parameters, see Maintaining System Parameters. |
| Record Internal Return check box | This check box setting appears by default from the Maintain System Parameters page. Select this check box if you want the system to record returns from internal customers for this product. For information on the system parameters, see Maintaining System Parameters. |
| Product Packaging and Serialization region | |
| Packaging Unit | (Optional) Select the packaging unit for this product. Packaging units are user defined using Lookup Type PAS_PACKAGE_UNIT. Note: If you are entering packaging units for the product, at least one of the packaging units must represent the lowest saleable unit quantity equal 0 (zero). |
| Serial Type | (Optional) Select the type of serial that will be generated. The System Parameters value for the Serial Type Default field appears by default. For information on the system parameters, see Maintaining System Parameters. |
| Overage | (Optional) Enter how many additional serials should be generated above the quantity/percent requested. Zero appears by default. You cannot enter a negative value. The Overage Type determines whether you will enter a quantity or a percentage. |
| Overage Type | (Optional) Select the type. Types are:
|
| Use Range Control check box | (Optional) Select this check box if you want the system to use a product specific range when generating serials. The System Parameters value for the Use Serial Ranges Default field appears by default. For information on the system parameters, see Maintaining System Parameters. |
| Owning Source System | Select the transactional system that owns the product detail definition. The Owning Source System field appears by default from the item source system passed from the transactional system. |
| EPC Company Prefix | (Optional) Enter the Electronic Product Code (EPC) company prefix assigned to the product. |
| GTIN | (Optional) Enter the Global Trade Identification Number (GTIN) assigned to the product. If the Product Unit Identifier Formula defined in Serial Type Groups is GTIN, then this field is required. |
| EPC Filter | (Optional) Select the EPC (Electronic Product Code) filter value that represents the packaging level for the product. |
| Label Print Format | (Optional) Select the print label format for the product and packaging unit. |
| Lowest Saleable Unit Quantity | (Optional) Enter the total number of the lowest saleable units contained in this packaging unit. Zero appears by default. You cannot enter a negative value. For example, a 10 package box (packaging unit) holds 10 saleable units, a 5 package case (packaging unit) holds 50 saleable units, and so on. A syringe (packaging unit) is the lowest saleable unit; it does not have any saleable units packed within it so it’s represented by a zero in this field. |
Define Product and Item Cross Reference page

Click the Save and Continue button.
Define Product and Item Cross Reference page

A message appears in the upper left hand corner stating that the item was saved successfully. The Product Location Override button becomes available in the upper right hand corner of the page after you have successfully saved all of the product definition information.
To Enter Product Location Overrides
(Optional) Click the Product Location Override button at the top of the page.
Product Process Controls and Location Overrides page
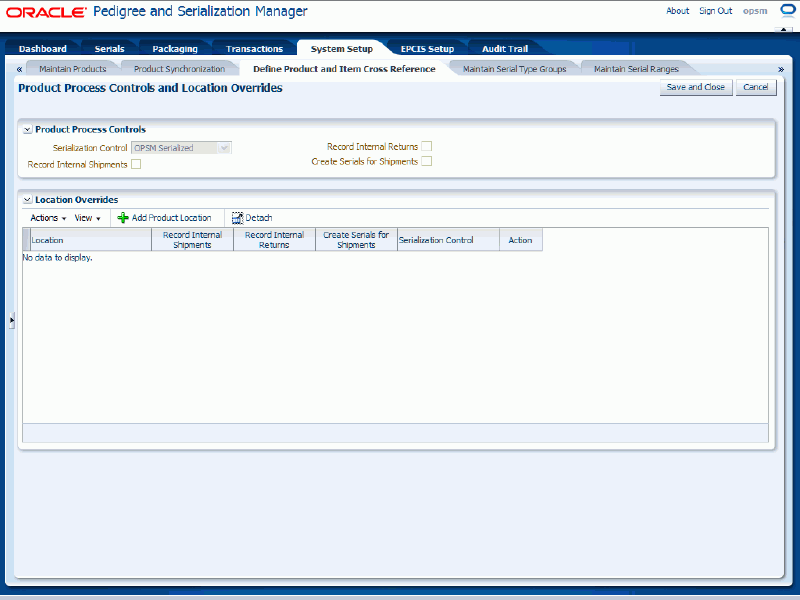
The Product Process Controls and Location Overrides page appears displaying the Serialization Control, Record Internal Shipments check box, Record Internal Returns check box, and Create Serials For Shipments check box settings for the product code in the Product Process Controls region of the page.
Select Add Product Location from the Actions menu or click the Add Product Location (“+” plus sign) icon located at the top of the Location Overrides region.
A new row appears in the Location Overrides region where you can add the information.
Enter the following information:
| Field Name | Description |
|---|---|
| Location | Select the location. |
| Record Internal Shipments check box | (Optional) Select this check box if you want the system to record shipments from internal customers for this product at this location. |
| Record Internal Returns check box | (Optional) Select this check box if you want the system to record returns from internal customers for this product at this location. |
| Create Serials for Shipments check box | (Optional) Select this check box if the system will create serials in the Oracle Pedigree and Serialization Manager system at the time of shipment at this location. If serials are not sent in with the Shipment transaction, the system will issue an exception. |
| Serialization Control | (Optional) Select if the serials for this location are Externally Generated or OPSM Serialized. |
Product Process Controls and Location Overrides page
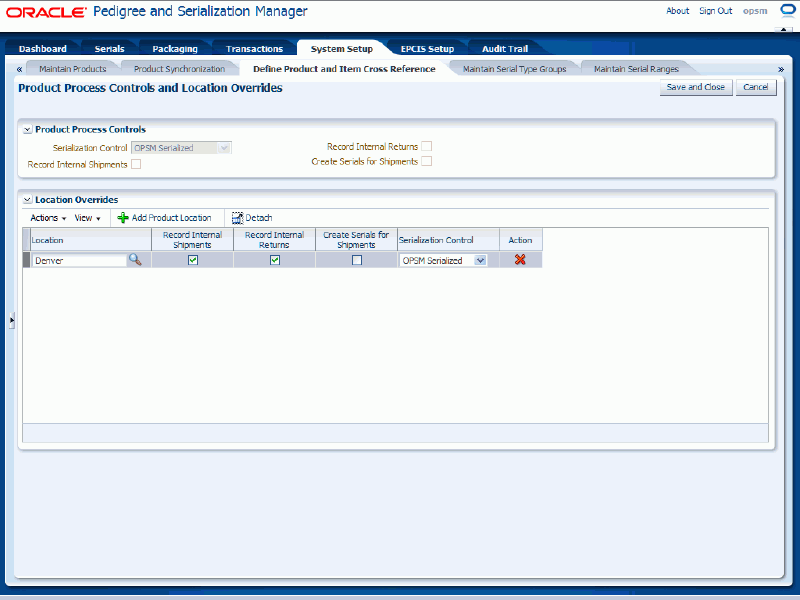
Click the Save and Close button.
The product definition is saved in OPSM. To view the product code and item cross references that were created, you can access the Maintain Products page in OPSM and view the product code information.
For more information on viewing a product code in OPSM, see Maintaining Products.
To Define Product and Packaging Information from an External System (Product Exists in OPSM)
To Invoke the Define Product and Item Cross Reference Page in OPSM
Call the URL to invoke the Define Product and Item Cross Reference page passing the parameter values:
| Parameter Name | Description |
|---|---|
| page | ‘defineProduct’ |
| key | The item in the external system to be cross referenced to a product in OPSM. |
| unit | The unit of measure of the item to be cross referenced to a product packaging unit in OPSM. |
| keydesc | The description of the item in the external system. |
| loc | The location identifier for the item in the external system. |
| src | The identifier for the external system that invoked OPSM (for example, EBIZ_01). |
If prompted for user authentication, enter your user ID and password.
To Complete the Product Definition in OPSM
Upon entry, the Define Item and Product Cross Reference page will be displayed.
Define Product and Item Cross Reference page

The Define Product and Item Cross Reference page is called asynchronously. The Define Product and Item Cross Reference page appears displaying the Item Number, Item Description, Source System, and Unit of Measure in the Item Cross Reference region of the page from the item number information.
Click the Select Existing Product button in the Product Definition region.
Select Existing Product dialog box
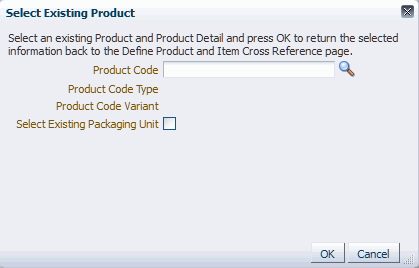
The Select Existing Product dialog box appears.
Enter product code search criteria using one of these methods:
To Search for an Existing Product Only
Click the Search for Product Code icon next to the Product Code field.
The Search and Select: Product Code dialog box appears.
Enter search criteria for the product code using one or more of these fields (Product Code Unformatted, Product Code, Product Name, Product Category, Manufacturer, Item Number, Item Source, and Item Description) and click the Search button.
Otherwise, you can click the Search button without entering any search criteria and all available product codes will appear.
Search and Select: Product Code dialog box
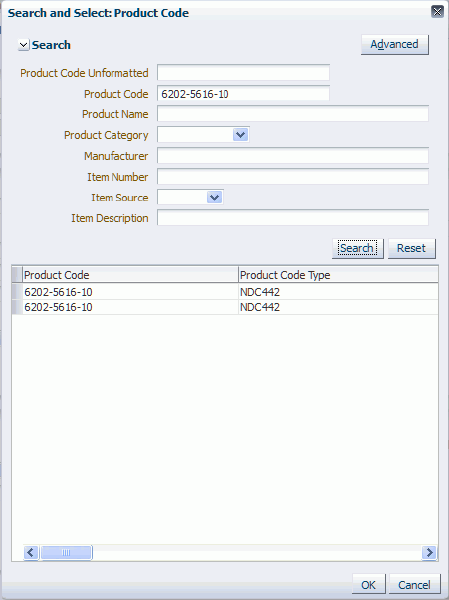
All of the product codes that match the search criteria appear in the lower portion of the dialog box in a table format.
Select the Product Code and Product Code Type combination and click the OK button.
Select Existing Product dialog box
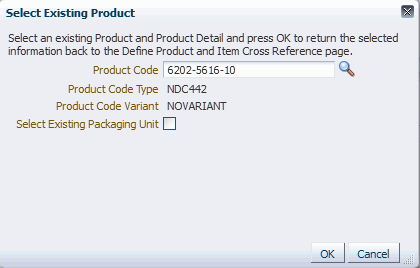
The Select Existing Product dialog box reappears.
Click the OK button.
Define Product and Item Cross Reference page
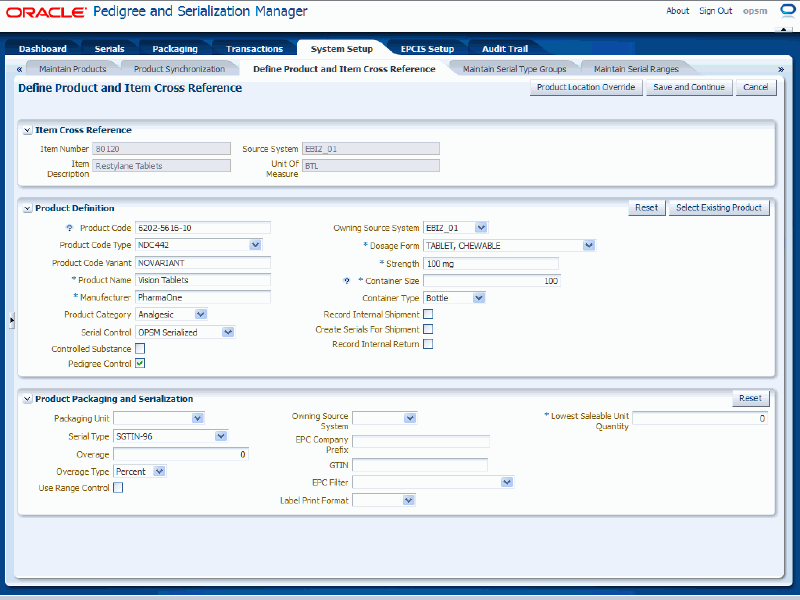
The Define Product and Item Cross Reference page appears displaying the fields associated with product code and product code type that you selected in the Product Definition region of the page. You will still need to enter values for the fields in the Product Packaging and Serialization region of the page.
To Search for an Existing Product and Packaging Unit
Select the Select Existing Packaging Unit check box.
Select Existing Product dialog box
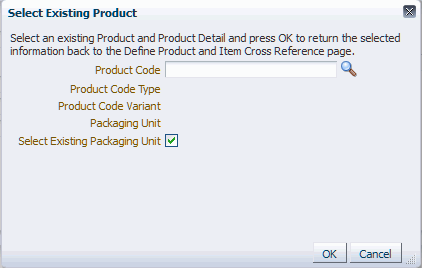
The Packaging Unit field appears on the Select Existing Product dialog box.
Click the Search for Product Code icon next to the Product Code field.
The Search and Select: Product Code dialog box appears displaying packaging unit as a search criteria field.
Enter search criteria for the product code and packaging unit using one or more of these fields (Product Code, Product Code Type, Product Code Variant, Packaging Unit, Product Name, Product Category, and Manufacturer) and click the Search button.
Otherwise, you can click the Search button without entering any search criteria and all available product codes will appear.
Search and Select Product Code dialog box
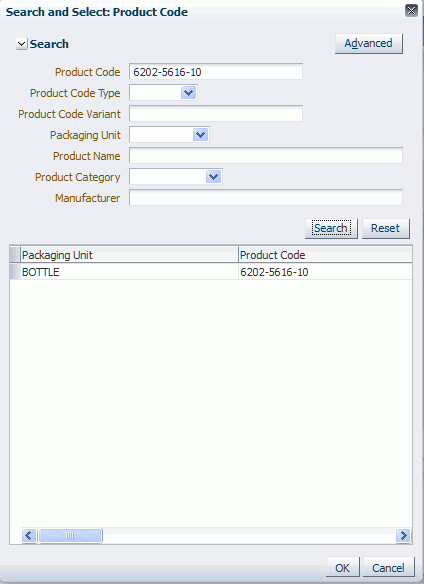
All of the product codes and packaging units that match the search criteria appear in the lower portion of the dialog box in a table format.
Select the product code and packaging unit combination and click the OK button.
Select Existing Product dialog box
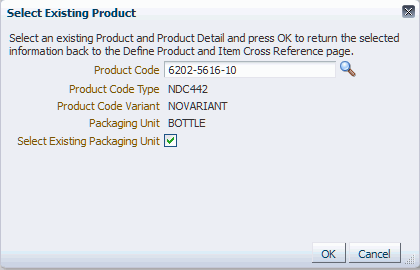
The Select Existing Product dialog box reappears displaying the packaging unit and product code selected.
Click the OK button.
Define Product and Item Cross Reference page

The Define Product and Item Cross Reference page appears displaying the fields associated with product code and packaging unit that you selected in the Product Definition and Product Packaging and Serialization regions of the page.
Enter information in the Product Definition or Product Packaging and Serialization regions that was not provided by the existing product code and packaging unit that you selected.
Click the Save and Continue button.
Define Product and Item Cross Reference page

A message appears in the upper left hand corner stating that the item was saved successfully. The Product Location Override button becomes available in the upper right hand corner of the page after you have successfully saved all of the product definition information.
To Enter Product Location Overrides
(Optional) Click the Product Location Override button on the top of the page.
Product Process Controls and Location Overrides page
The Product Process Controls and Location Overrides page appears displaying the Serialization Control, Record Internal Shipments check box, Record Internal Returns check box, and Create Serials For Shipments check box settings for the product code in the Product Process Controls region of the page.
Select Add Product Location from the Actions menu or click the Add Product Location (“+” plus sign) icon located at the top of the Location Overrides region.
A new row appears in the Location Overrides region where you can add the information.
Enter the following information:
| Field Name | Description |
|---|---|
| Location | Select the location. |
| Record Internal Shipments check box | (Optional) Select this check box if you want the system to record shipments from internal customers for this product at this location. |
| Record Internal Returns check box | (Optional) Select this check box if you want the system to record returns from internal customers for this product at this location. |
| Create Serials for Shipments check box | (Optional) Select this check box if the system will create serials in the Oracle Pedigree and Serialization Manager system at the time of shipment at this location. If serials are not sent in with the Shipment transaction, the system will issue an exception. |
| Serialization Control | (Optional) Select if the serials for this location are Externally Generated or OPSM Serialized. |
Product Process Controls and Location Overrides page
Click the Save and Close button.
The product definition is saved in OPSM. To view the product code and item cross references that were created, you can access the Maintain Products page in OPSM and view the product code information.
For more information on viewing a product code in OPSM, see Maintaining Products.
To Edit Product and Packaging Information from an External System
To Invoke the Define Product and Item Cross Reference Page in OPSM
Call the URL to invoke the Define Product and Item Cross Reference page passing the parameter values:
| Parameter Name | Description |
|---|---|
| page | ‘defineProduct’ |
| key | The item in the external system to be cross referenced to a product in OPSM. |
| unit | The unit of measure of the item to be cross referenced to a product packaging unit in OPSM. |
| keydesc | The description of the item in the external system. |
| loc | The location identifier for the item in the external system. |
| src | The identifier for the external system that invoked OPSM (for example, EBIZ_01). |
If prompted for user authentication, enter your user ID and password.
To Edit Product and Packaging Information
Upon entry, the Define Item and Product Cross Reference page will be displayed.
Define Product and Item Cross Reference page

The Define Product and Item Cross Reference page is called asynchronously. The Define Product and Item Cross Reference page appears displaying all the information that is currently associated with the item number and product code.
Update or modify any of the fields in the Product Definition or Product Packaging and Serialization regions of the page.
Click the Save and Continue button.
Define Product and Item Cross Reference page (product code changed)
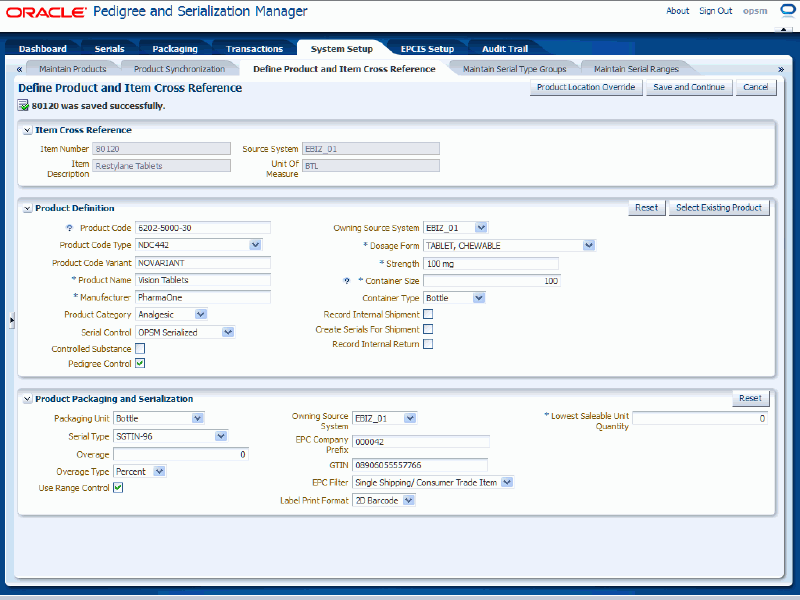
The system removes the old record containing the product and item cross reference information and creates another record with the new product and item cross reference information.
To Edit Product Location Overrides
Click the Product Location Override button on the top of the page.
Product Process Controls and Location Overrides page
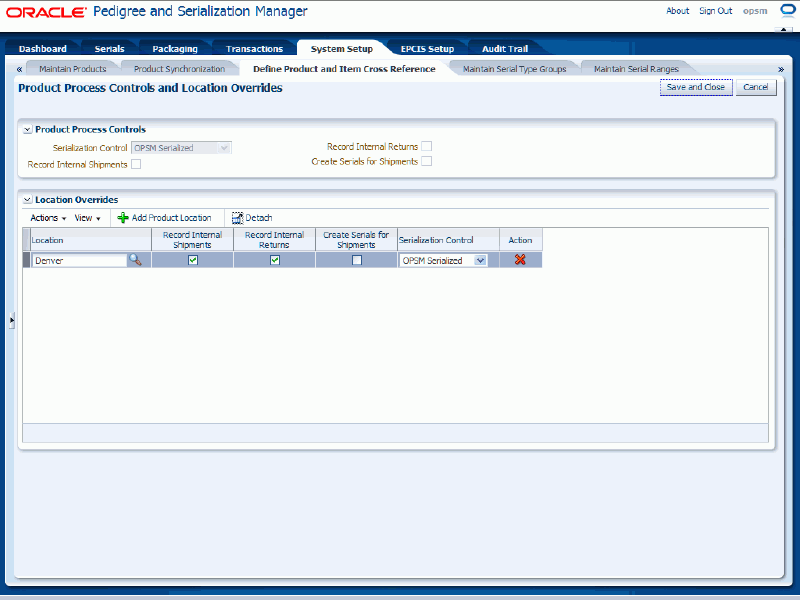
The Product Process Controls and Location Overrides page appears displaying the current location override information for the product definition.
Update or modify any of the information. Perform one of these actions:
Modify any of the field settings for a current location that is displayed.
Add an additional location and its location override field settings.
Select Add Product Location from the Actions menu or click the Add Product Location (“+” plus sign) icon located at the top of the Location Overrides region.
Enter a new location and select the override settings for that location.
Delete a current location and its override settings that are currently displayed.
Select the location override row you want to delete in the Location Overrides region.
Select Delete Product Location from the Actions menu or click the Delete Product Location icon in the Action column for the row.
The system displays a message asking if you are sure you want to delete the product location.
Click the Yes button.
Product Process Controls and Location Overrides page (additional location added)
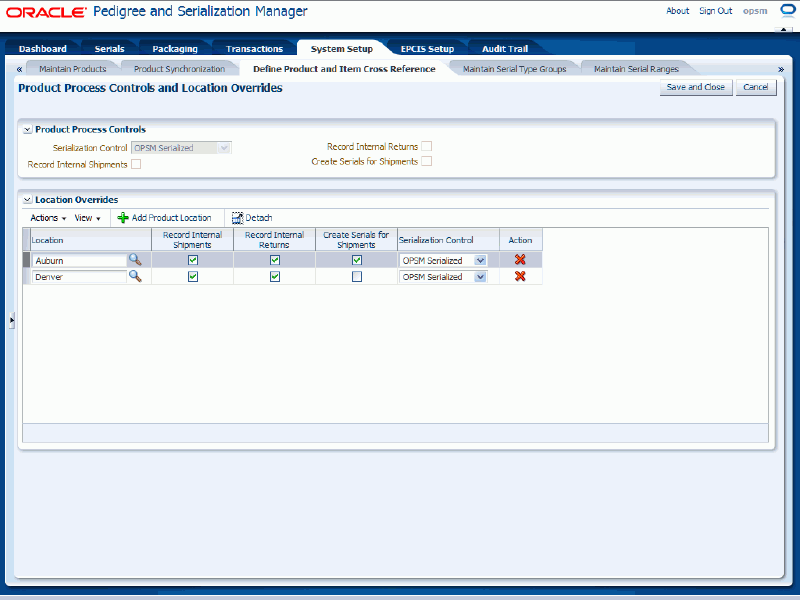
Click the Save and Close button.
The product definition is saved in OPSM. To view the product code and item cross references that were created, you can access the Maintain Products page in OPSM and view the product code information.
For more information on viewing a product code in OPSM, see Maintaining Products and Item Cross Reference.
Oracle Pedigree and Serialization Manager (OPSM) provides a Products Interface table that enables external systems to integrate with OPSM for Product Synchronization.
Using the Product Synchronization page in OPSM you will initiate a process which will perform one of the following synchronization actions:
Extract Items
Extract Items and Merge Product and Item Cross Reference
Merge Product and Item Cross Reference
The Source System Precedence setting in the OPSM system parameters controls whether product and product detail information can be updated from any source system or only from the owning source system. The owning source system is recorded on the product and product detail records.
For more information on the product definition process, see Understanding the Product Definition Process.
For more information on defining Product Synchronization scenarios, see Defining Product Synchronization, Lot Synchronization, and Work Order Serialization Scenarios.
For more information on integrating Oracle E-Business Suite with OPSM, see the Oracle Serialization and Tracking Integration Pack for Oracle Pedigree and Serialization Manager and Oracle E-Business Suite 3.1 - Implementation Guide.
Use these procedures to:
Extract item information from an external system.
Merge the extracted items into OPSM.
Extract and merge item information from an external system.
Prerequisites
A product extract scenario must be defined in OPSM.
An Oracle Data Integrator (ODI) extract application that conforms to the required specifications must exist and must be configured to communicate with OPSM.
For more information, see the Oracle Serialization and Tracking Integration Pack for Oracle Pedigree and Serialization Manager and Oracle E-Business Suite 3.1.
For Product and Item Cross Reference Merge:
The Products Interface table must be populated by the extract system or another method.
The Action Code column for each record that is ready to be merged must be set to MERGE.
To Extract Item Information from an External System
Navigate to the Product Synchronization page.
Product Synchronization page
Click the Submit New Instance button in the upper right hand corner of the Product Synchronization page.
Product Synchronization dialog box
The Product Synchronization dialog box appears.
Enter the following options for the Product Synchronization process:
| Field Name | Description |
|---|---|
| Synchronization Action | Select Extract Items. After you select the Synchronization Action, the Extract Scenario Name and Source System fields become available. |
| Extract Scenario Name | Select the extract scenario name. Extract Scenario Names are user defined using Lookup Type PAS_PRODUCT_EXTRACT. Oracle delivers two lookup codes for Product Synchronization between OPSM and Oracle E-Business Suite for the PAS_PRODUCT_EXTRACT lookup type. They are:
|
| Source System | Select the source system where you are going to synchronize item information from into OPSM. Source Systems are user defined using the Lookup Type PAS_SOURCE_SYSTEM. |
Product Synchronization Dialog Box
Click the OK button to initiate the Product Synchronization process.
The Product Synchronization process runs in the background. The system assigns a job instance Id for that specific run of the process. The Product Synchronization page reappears.
The Product Synchronization (Extract Items) background process will invoke an Oracle Data Integrator (ODI) application to extract item information from an external system. The item information that is extracted from the source system will be uploaded into the target OPSM Products Interface table (PAS_S_PRODUCT_INTERFACE).
Enter the following information in the Search: Job Instances region of the page:
| Field Name | Description |
|---|---|
| Job Instance ID | (Optional) Enter a specific job instance ID. |
| Job Status | (Optional) Select the job status for the job instances. Job Statuses are:
|
| Creation Date | Select a creation date for the job instance that is equal to the current date. |
| Created By | Enter the individual that initiated the process. |
Click the Search button.
Locate the job instance Id for the process and verify that the Job Instance Id completed successfully or completed with warnings.
The Job Status associated with job instance Id is at one of these statuses:
Complete: Job instance completed successfully with no errors or warnings.
Error(s) Exist: Job instance did not complete successfully.
In Progress: Job instance is in progress.
Submitted: Job instance has been submitted but not started.
Abnormal Termination: The job instance did not complete successfully due to a catastrophic failure (for example, the system went down during processing).
Warning(s) Exist: Job completed successfully but there are warning messages.
Scroll to the Job Instance Messages region and view the following:
Informational messages (blue circle with the letter "i"): These messages display the parameters used to initiate the process and the results of the process.
Warning messages (A yellow triangle with an exclamation point): These messages display the warning messages for the process.
For more information on the job instances functionality, see Using Job Instances functionality.
To Merge the Extracted Items into OPSM
Navigate to the PAS_S_PRODUCT_INTEFACE table.
Enrich the data in the table with OPSM specific product information.
Enter an action code of MERGE and enter OPSM product data for each item number listed in the table.
Navigate to the Product Synchronization page.
Click the Submit New Instance button in the upper right hand corner of the Product Synchronization page.
The Product Synchronization dialog box appears.
Enter the following options for the Product Synchronization process:
| Field Name | Description |
|---|---|
| Synchronization Action | Select Merge Item and Product Cross Reference. After you select the Synchronization Action, the Source System and Disregard Source System Exceptions fields become available. The Source System Precedence field appears displaying by default the Source System Precedence setting from the OPSM System Parameters page. |
| Source System | Select the source system where you are going to synchronize item information from into OPSM. Source Systems are user defined using the Lookup Type PAS_SOURCE_SYSTEM. |
| Source System Precedence | Displays the Source System Precedence setting from the OPSM System Parameters page. Values are:
|
| Disregard Source System Exceptions | If the Source System Precedence is set to Owning Source System, select the Disregard Source Systems Exceptions check box if you don't want the system to notify you if source systems exceptions occur. This check box is not selected by default. Both the product and the product details can be associated with an owning source system. Within the System Parameters in OPSM you have the ability to select the source system precedence. If you select to give source system precedence to the “owning source system” then no other system can update that data. For example, if the products owning source system is EBIZ_02 and an update comes in from EBIZ_01, the system issues an error because EBIZ_01 isn’t the owning source system and the system parameter setup states that only the owning source system can update the product. If you select the Disregard Source Systems Exceptions check box that means you do not want to be notified if these types of exceptions occur. It does not mean that the system ignores source system precedence and updates the record anyway; it simply means that the error is not written to the error table and subsequently they will not display in the Job Instance Message area on the bottom part of the page. The record will still be cleared from the Product Interface table even though it was not successfully processed. If you do not select the Disregard Source Systems Exceptions check box, the system will record an error every time a source system precedence issue occurs and the messages will display in the Job Instance Message area. The records that are in error will remain in the Product Interface table. |
Product Synchronization dialog box
Click the OK button to initiate the Product Synchronization process.
The Product Synchronization process runs in the back ground. The system assigns a job instance Id for that specific run of the process. The Product Synchronization page reappears.
The Product Synchronization (Merge Product and Item Cross Reference Information) background process takes the item number and product information that was enriched from the PAS_S_PRODUCT_INTERFACE table and validates and inserts the transformed data into the OPSM Product and Item Cross Reference tables (PAS_S_PRODUCTS, PAS_S_PRODUCT_DETAILS, PAS_S_PRODUCT_ITEMS, and PAS_S_PRODUCT_ITEM_UOMS).
Enter the following information in the Search: Job Instances region of the page:
| Field Name | Description |
|---|---|
| Job Instance ID | (Optional) Enter a specific job instance ID. |
| Job Status | (Optional) Select the job status for the job instances. Job Statuses are:
|
| Creation Date | Select a creation date for the job instance that is equal to the current date. |
| Created By | Enter the individual that initiated the process. |
Click the Search button.
Locate the job instance Id for the process and verify that the Job Instance Id completed successfully or completed with warnings.
The Job Status associated with job instance Id is at one of these statuses:
Complete: Job instance completed successfully with no errors or warnings.
Error(s) Exist: Job instance did not complete successfully.
In Progress: Job instance is in progress.
Submitted: Job instance has been submitted but not started.
Abnormal Termination: The job instance did not complete successfully due to a catastrophic failure (for example, the system went down during processing).
Warning(s) Exist: Job completed successfully but there are warning messages.
Scroll to the Job Instance Messages region and view the following:
Informational messages (blue circle with the letter "i"): These messages display the parameters used to initiate the process and the results of the process.
Warning messages (A yellow triangle with an exclamation point): These messages display the warning messages for the process.
You can also verify the results of the Product Synchronization process (Merge Product and Item Cross Reference Information synchronization action) by navigating to the OPSM Edit Product page. The Serial Generation Details sub tab will display the item and product information that was created in OPSM.
For more information on the job instances functionality, see Using Job Instances functionality.
For more information on the OPSM Edit Product page, see Maintaining Products.
To Extract and Merge Item Information from an External System
Navigate to the Product Synchronization page.
Product Synchronization page
Click the Submit New Instance button in the upper right hand corner of the Product Synchronization page.
Product Synchronization dialog box
The Product Synchronization dialog box appears.
Enter the following options for the Product Synchronization process:
| Field Name | Description |
|---|---|
| Synchronization Action | Select Extract Items and Merge Product and Item Cross Reference. After you select the Synchronization Action, the Extract Scenario Name, Source System, and Disregard Source System Exceptions fields become available. The Source System Precedence field appears displaying by default the Source System Precedence setting from the OPSM System Parameters page. |
| Source System | Select the source system where you are going to synchronize item information from into OPSM. Source Systems are user defined using the Lookup Type PAS_SOURCE_SYSTEM. |
| Extract Scenario Name | Select the extract scenario name. Extract Scenario Names are user defined using Lookup Type PAS_PRODUCT_EXTRACT. Oracle delivers two lookup codes for Product Synchronization between OPSM and Oracle E-Business Suite for the PAS_PRODUCT_EXTRACT lookup type. They are:
|
| Source System Precedence | Displays the Source System Precedence setting from the OPSM System Parameters page. Values are:
|
| Disregard Source System Exceptions | If the Source System Precedence is set to Owning Source System, select the Disregard Source Systems Exceptions check box if you don't want the system to notify you if source systems exceptions occur. This check box is not selected by default. Both the product and the product details can be associated with an owning source system. Within the System Parameters in OPSM you have the ability to select the source system precedence. If you select to give source system precedence to the “owning source system” then no other system can update that data. For example, if the products owning source system is EBIZ_02 and an update comes in from EBIZ_01, the system issues an error because EBIZ_01 isn’t the owning source system and the system parameter setup states that only the owning source system can update the product. If you select the Disregard Source Systems Exceptions check box that means you do not want to be notified if these types of exceptions occur. It does not mean that the system ignores source system precedence and updates the record anyway; it simply means that the error is not written to the error table and subsequently they will not display in the Job Instance Message area on the bottom part of the page. The record will still be cleared from the Product Interface table even though it was not successfully processed. If you do not select the Disregard Source Systems Exceptions check box, the system will record an error every time a source system precedence issue occurs and the messages will display in the Job Instance Message area. The records that are in error will remain in the Product Interface table. |
Product Synchronization dialog box
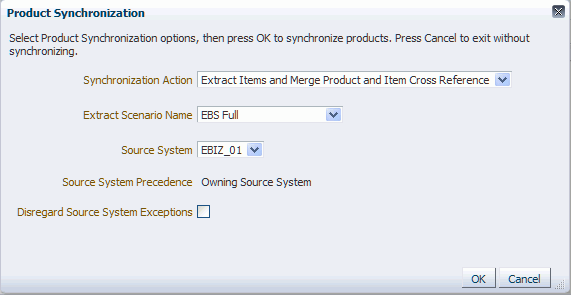
Click the OK button to initiate the Product Synchronization process.
The Product Synchronization process runs in the back ground. The system assigns a job instance Id for that specific run of the process. The Product Synchronization page reappears.
The Product Synchronization (Extract Items) background process will invoke an Oracle Data Integrator (ODI) application to extract item information from an external system. The item information that is extracted from the source system will be uploaded into the target OPSM Products Interface table (PAS_S_PRODUCT_INTERFACE).
The Product Synchronization (Merge Product and Item Cross Reference Information) background process takes the item number and product information from the PAS_S_PRODUCT_INTERFACE table and validates and inserts the transformed data into the OPSM Product and Item Cross Reference tables (PAS_S_PRODUCTS, PAS_S_PRODUCT_DETAILS, PAS_S_PRODUCT_ITEMS, and PAS_S_PRODUCT_ITEM_UOMS).
Enter the following information in the Search: Job Instances region of the page:
| Field Name | Description |
|---|---|
| Job Instance ID | (Optional) Enter a specific job instance ID. |
| Job Status | (Optional) Select the job status for the job instances. Job Statuses are:
|
| Creation Date | Select a creation date for the job instance that is equal to the current date. |
| Created By | Enter the individual that initiated the process. |
Click the Search button.
Locate the job instance Id for the process and verify that the Job Instance Id completed successfully or completed with warnings.
The Job Status associated with job instance Id is at one of these statuses:
Complete: Job instance completed successfully with no errors or warnings.
Error(s) Exist: Job instance did not complete successfully.
In Progress: Job instance is in progress.
Submitted: Job instance has been submitted but not started.
Abnormal Termination: The job instance did not complete successfully due to a catastrophic failure (for example, the system went down during processing).
Warning(s) Exist: Job completed successfully but there are warning messages.
Scroll to the Job Instance Messages region and view the following:
Informational messages (blue circle with the letter "i"): These messages display the parameters used to initiate the process and the results of the process.
Warning messages (A yellow triangle with an exclamation point): These messages display the warning messages for the process.
You can also verify the results of the Product Synchronization process (Merge Product and Item Cross Reference Information synchronization action) by navigating to the OPSM Edit Product page. The Serial Generation Details sub tab will display the item and product information that was created in OPSM.
For more information on the job instances functionality, see Using Job Instances functionality.
For more information on the OPSM Edit Product page, see Maintaining Products.
Use the Serial Type Group pages in Oracle Pedigree and Serialization Manager (OPSM) to maintain serial type groups and serial types that are used by the system when generating serial numbers. Serial types are required in OPSM and are used to define the criteria and method for the generation of serial numbers. Serial type groups are used to group one or more serial types for serial range management. New serial types and new serial type groups can be added. If a new serial type is added to an existing serial type group, the new serial type will utilize the existing serial ranges defined for the serial type group. Adding a new serial type group will establish a new set of serial ranges.
After serial type groups are created, you can optionally define serial ranges for the serial type groups. Serial ranges contain information to reserve ranges of unique numbers for the generation of serial numbers.
For more information on serial ranges, see Maintaining Serial Ranges.
The Product Unit Identifier (PUID) is used to define the control level for management of serial ranges and generation of unique serial numbers. The control level can be defined by Product, Product Packaging Unit, or GTIN level. Use these criteria when deciding which PUID level to use:
Use a PUID equal to GTIN if the serial type is based off the GTIN (for example, SGTIN-96).
Use either PUID equal to Product or PUID equal to Product Packaging Unit when the serial is not GTIN based. Choose based on business need to serialize uniquely by Product or Product Packaging Unit.
Important: The PUID Formula defined on the Serial Type Group cannot be changed if products, serial ranges, or serials exist for any of the serial types within the Serial Type Group.
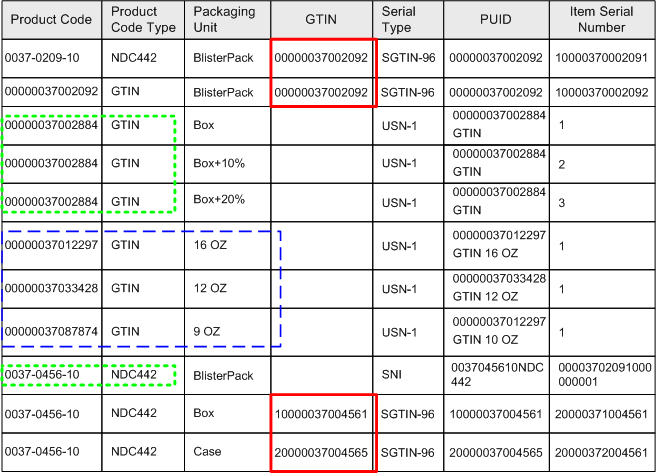
Following are scenarios illustrating the various PUID control levels:
Scenario 1: Two product codes that can represent the same product (PUID = GTIN).
Two different product codes are used to define the same product. Product Codes are different, but they share the same GTIN. GTIN is used to control serials ranges and unique serial generation validation.
Example of where GTIN control level would be used for an SGTIN serial

Scenario 2: Serialization by Product without consideration for packaging (PUID = Product).
Different packaging units of a product exist that share a common product code. Product Code is used to assure unique serialization across different product packaging units
Example where Product control level would be used for a product based serial number
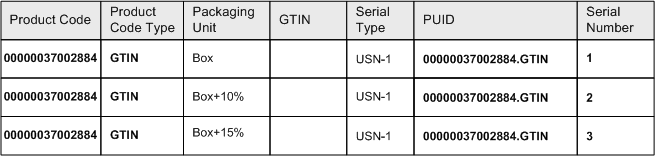
Scenario 3: Serialization by Product Packaging (USN-1) (PUID = Product Packaging Unit).
Unique serial number at each product packaging level without a GTIN.
Example where Product Packaging (Product Detail) control level would be used for a product packaging based serial number
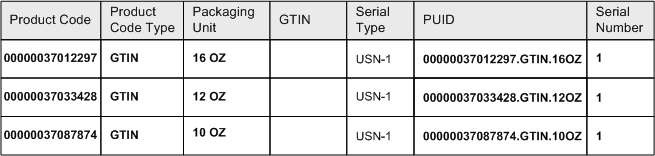
Serial Type definitions are used to define the attributes used for serial generation. These attributes include the minimum and maximum value of the unique number portion of the generated serial.
Attributes defined for serial types include:
Minimum value
Maximum value
Unique Serial Number Method
Increment By
Random Minimum
Random Maximum
Example of Serial Type Groups and Serial Types Setup

When defining serial types, one or more serial types can be assigned to a serial group. If more than one serial type is assigned to a serial group, all the serial types within the serial group will share a common set of serial range records.
SGTIN-96 serial type and SGTIN-198 serial type are in the same serial type group. Serials generated for either of these serial types will share the same serial range definition.
SGTIN-96 serial type and USN-1 serial type are in separate serial type groups. This enables separate serial ranges to be defined for each of the serial types.
Use these procedures to search for, view, create, edit, and delete serial type groups:
Prerequisites
For more information, see Maintaining Lookups.
To Search for Serial Type Groups
Navigate to the Maintain Serial Type Groups page.
Maintain Serial Type Groups page
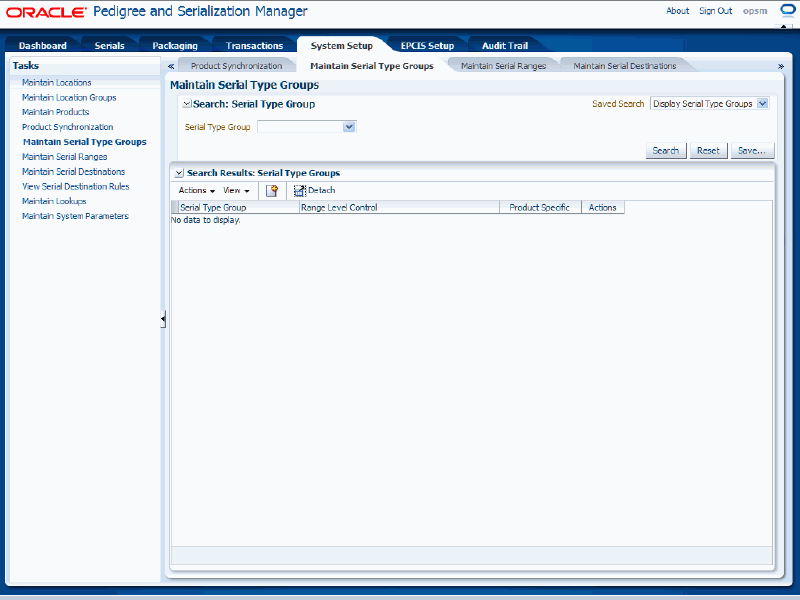
(Optional) In the Search: Serial Type Group region, select the Serial Type Group you want to search for using the Serial Type Group field.
Note: You can click the Search button without entering any search criteria and all available serial type groups will appear.
Click the Search button.
Maintain Serial Type Groups page
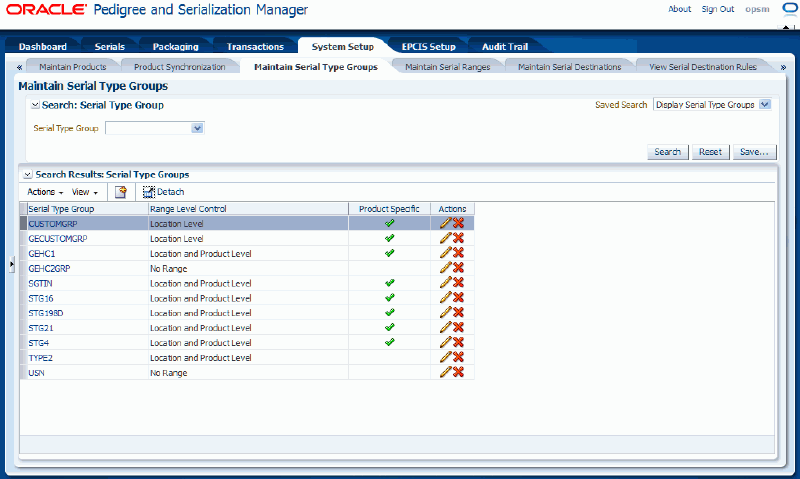
All of the serial type groups that match the search criteria appear in the Search Results: Serial Type Groups region in a table format. The following information displays for each serial type group:
| Field Name | Description |
|---|---|
| Serial Type Group | Displays the serial type group. |
| Range Level Control | Displays the range level control for the serial type group. Range Level Controls are:
|
| Product Specific | Displays a green check mark icon if a serial type group is product specific. |
| Actions | Displays the Edit Serial Type Group and Delete Serial Type Group icons. |
To View Serial Type Group Information
Navigate to the Maintain Serial Type Groups page.
Enter search criteria for the serial type group you want to view and click the Search button.
All of the serial type groups that match the search criteria appear in the Search Results: Serial Type Groups table.
Select the serial type group in the table that you want to view.
Click the Serial Type Group link.
View Serial Type Group page
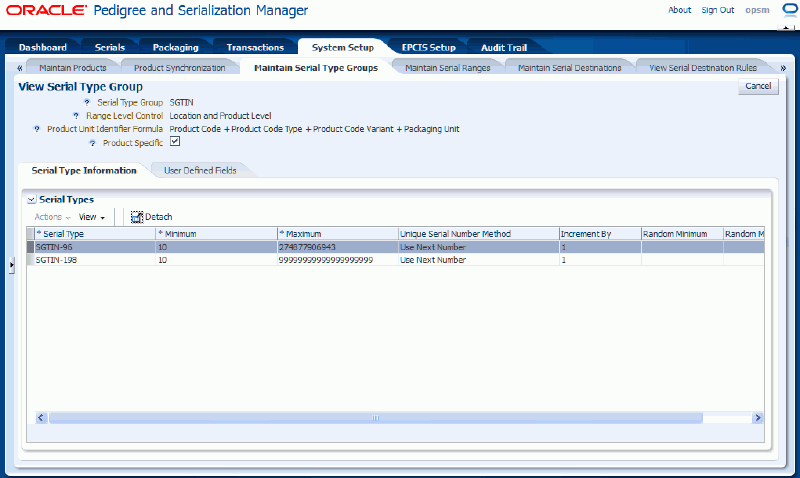
The View Serial Type Group page appears.
Select the different sub tabs (Serial Type Information and User Defined Fields) to the view that particular type of information for the serial type group.
Click the Cancel button to return back to the Maintain Serial Type Groups page.
Navigate to the Maintain Serial Type Groups page.
Select Create from the Actions menu or click the Create Serial Type Group icon located at the top of the Search Results: Serial Type Groups region.
Create Serial Type Group page
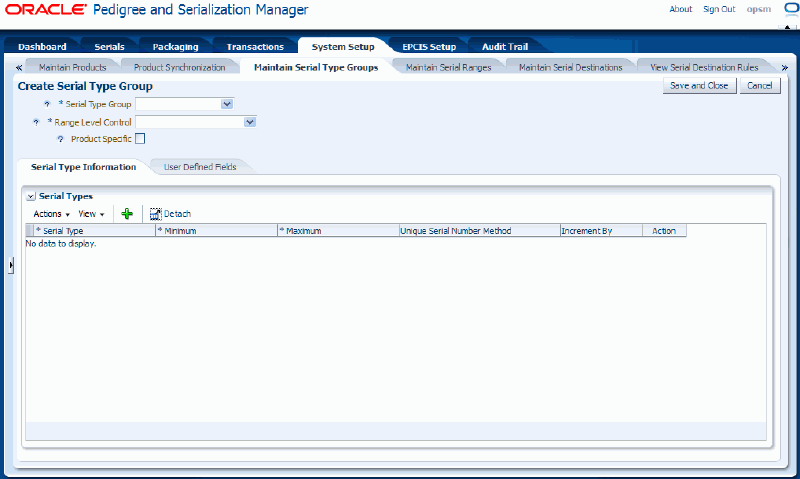
The Create Serial Type Group page appears.
Enter the following information:
| Field Name | Description |
|---|---|
| Serial Type Group | Select the serial type group. Serial type groups are a grouping of common serial types. |
| Range Level Control | Select the range level control for the serial type group. The system uses this field to determine how to access serial ranges. Range Level Controls are:
When you select a range level control of Location and Product Level the Product Unit Identifier Formula field is required and the Product Specific check box must be selected. The Product Unit Identifier Formula field will become available after the Product Specific check box is selected or after the range level control of Location and Product Level is selected. |
| Product Unit Identifier Formula | The Product Unit Identifier (PUID) is used to define the control level for management of serials ranges and generation of unique serial numbers. The control level can be defined by Product, Product Packaging Unit, or GTIN level. Select the Product Unit Identifier Formula for the serial type group. Formulas are:
|
| Product Specific check box | (Optional) Product Specific check box is selected:
Product Specific check box is clear:
The Product Specific check box should be selected for serial types such as, SGTIN-96 and SGTIN-198 that incorporate the product code into the serial number. Optionally, serial types that do not incorporate the product code can be marked as product specific to make them behave like a product specific serial type. When you select a range level control of Location and Product Level the Product Unit Identifier Formula field is required and the Product Specific check box must be selected. The Product Unit Identifier Formula field will become available after the Product Specific check box is selected or after the range level control of Location and Product Level is selected. |
Select the Serial Type Information sub tab.
Select Add from the Actions menu or click the Add Serial Type icon located at the top of the Serial Types table.
A new blank row appears in the table.
Enter the following information:
| Field Name | Description |
|---|---|
| Serial Type | Select the serial type you would like to add to this serial type group. |
| Minimum | Enter the minimum value of the serial number that can be created for this serial type. |
| Maximum | Enter the maximum value of the serial number that can be created for this serial type.
Note: The maximum value on the serial type can be set based on the standards for the serial type, limitations of label size for printing, or limitations on serial size from integrated systems. |
| Unique Serial Number Method | Select the unique serial number method. Methods are:
|
| Increment By | Enter the increment by value for the serial number. This field is used in conjunction with the Use Next Number unique serial number method. This field is not available for a method of Use Random Number. |
| Random Minimum | Enter the minimum random increment used when the Unique Serial Number Method is Use Random Number. |
| Random Maximum | Enter the maximum random increment used when the Unique Serial Number Method is Use Random Number. |
Create Serial Type Group page - Serial Type Information sub tab
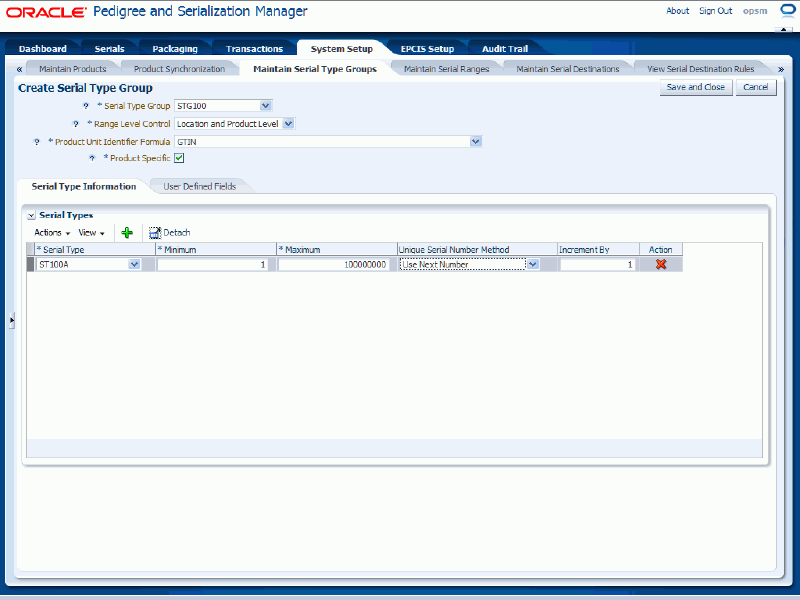
Repeat steps 5-6 until all serial types have been added.
Select the User Defined Fields sub tab.
Enter user-defined data using any of the fields in the Character, Numeric, and Date/Time regions of the page.
Create Serial Type Group page - User Defined Fields sub tab
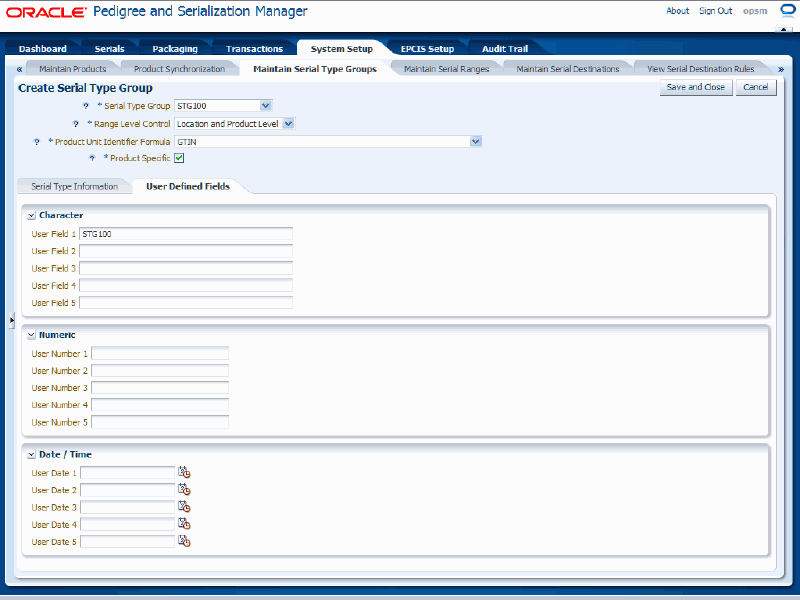
Click the Save and Close button to save this serial type group and return back to the Maintain Serial Type Groups page.
Navigate to the Maintain Serial Type Groups page.
Enter search criteria for the serial type groups you want to edit and click the Search button.
All of the serial type groups that match the search criteria appear in the Search Results: Serial Type Groups table.
Select the serial type group in the table that you want to edit.
Select Edit in the Actions menu or click the Edit Serial Type Group icon associated with the serial type group in the Actions column of the results table.
Edit Serial Type Group page
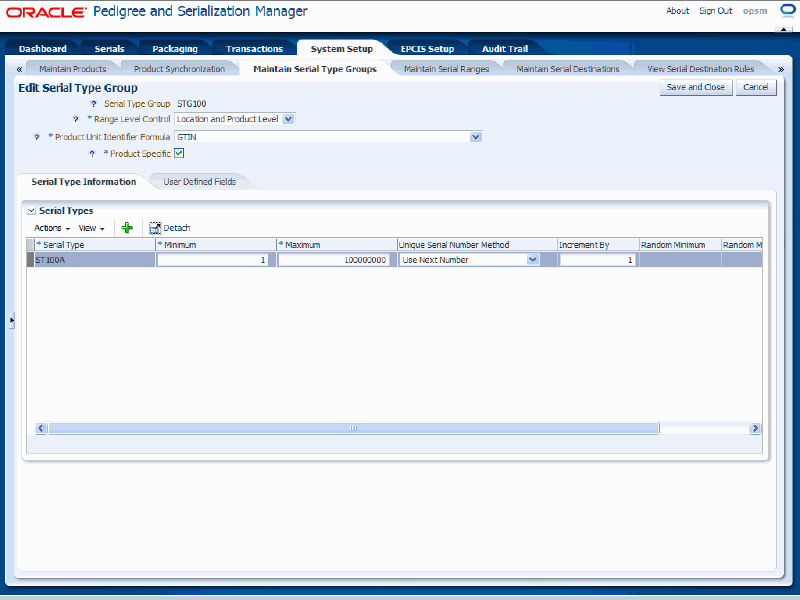
The Edit Serial Type Group page appears displaying all of the existing information for the serial type group.
Edit any of the serial type group fields.
You can edit any of the fields pertaining to the serial type group.
The PUID Formula and Product Specific check box cannot be changed if:
Locations are defined with the location serial type defined within the serial type group.
Product detail records have been defined with a Serial Type that is associated to the Serial Type Group.
Serial ranges have been defined for the Serial Type Group.
Serials have been generated for any serial type within the serial type group.
If the Product Specific check box is clear, Range Level Control cannot be changed to Location and Product Level after products are defined with a serial type associated to the serial type group.
Click the Save and Close button to save the changes you made to the serial type group information and to return back to the Maintain Serial Type Groups page.
Navigate to the Maintain Serial Type Groups page.
Enter search criteria for the serial type groups you want to delete and click the Search button.
All of the serial type groups that match the search criteria appear in the Search Results: Serial Type Groups table.
Select the serial type group in the table that you want to delete.
Select Delete in the Actions menu or click the Delete Serial Type Group icon in the Actions column of the results table.
The system displays a message asking if you are sure you to want to delete the serial type group.
Note: If you try to delete a serial type group that has associated serial types the system will issue an error message. You must first delete the serial types associated with the serial type group and then you will be able to delete the serial type group.
For more information on deleting serial types associated with a serial type group, see Procedure: To Delete Serial Types Associated with a Serial Type Group.
Click the Yes button.
The serial type group is deleted from the system.
To Delete Serial Types Associated with a Serial Type Group
Navigate to the Maintain Serial Type Groups page.
Enter search criteria for the serial type groups you want to delete serial types for and click the Search button.
All of the serial type groups that match the search criteria appear in the Search Results: Serial Type Groups table.
Select the serial type group in the table that you want to delete the associated serial type from.
Select Edit in the Actions menu or click the Edit Serial Type Group icon in the Actions column of the results table.
The Edit Serial Type Group page appears displaying all of the associated serial types within the Serial Type Information sub tab.
Select the Serial Type in the Serial Types table that you want to delete.
Serial types cannot be deleted if locations or products are defined for the serial type or serial numbers are created for the serial type in OPSM.
Select Delete from the Actions menu or click the Delete Serial Type icon located in the Action column for the serial type.
The system displays a message asking if you are sure you to want to delete the serial type.
Click the Yes button.
The serial type is deleted from the serial type group.
The use of the serial range management feature in Oracle Pedigree and Serialization Manager (OPSM) is optional. Serial range management enables ranges of serials to be reserved for the following:
Location
Location Group
Location and product unit identifier (PUID)
Location Group and product unit identifier (PUID)
The range control level is established in the Serial Group definition. The reservation of the serial range will prevent other locations from generating or importing serial numbers within the reserved range.
Use the Maintain Serial Ranges page in OPSM to maintain unique serial ranges for a serial type group. These ranges are used by the system when generating serial numbers.
You do need to define a serial type group for the OPSM system to be able to generate serial numbers. The serial type group provides the parameters for how the serial ranges should be defined.
The rules for establishing serial ranges by location are:
Serial type group and location are required.
Starting serial number must be greater than or equal to the serial type minimum value within the serial type group.
Ending serial number must be less than or equal to the serial type maximum value within the serial type group.
Ranges with the same serial type group but different locations or location groups cannot overlap.
Ranges with the same serial type group and with the same location cannot overlap.
Ranges with the same serial type group and with a location group that contains a location that may already have a range defined cannot overlap.
The system uses this logic to find the serial range for processing a serial generation request:
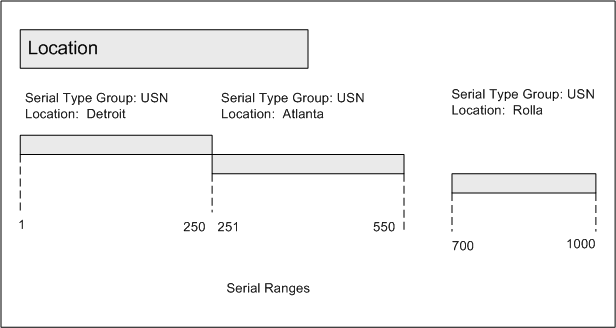
If Use Serial Ranges on the Product Detail record is not enabled, the system will bypass the usage of a range even if a range is defined.
If a serial range is found that matches the serial type group and location, the starting serial number and ending serial number defined for the range will establish the available range of serials.
If a serial range that matches the serial type group and location is not found, the system will issue an exception error. For example, a request from Location: Denver for serials where Serial Type Group is USN would fail because a range for Denver has not been established.
The rules for establishing serial ranges by location and PUID are:
Serial type group, location, and PUID are required.
Starting serial number must be greater than or equal to the serial type minimum value within the serial type group.
Ending serial number must be less than or equal to the serial type maximum value within the serial type group.
Ranges with the same serial type group but different locations or location groups with the same PUID cannot overlap.
Ranges with the same serial type group and with the same location and PUID cannot overlap.
Ranges with the same serial type group and a location group that contains a location that is already defined cannot overlap.
After a range is established for a product based on the Product’s PUID, ranges must be established for all locations requesting serial generation for that product. If a request for serials is received from a location that does not have a range established for the product, the request will fail.
Note: Range control can be turned off for a product packaging unit by manually turning off range control in the Product Details table. This enables range control to be turned off without having to delete the existing ranges.
The system uses this logic to find the serial range for processing a serial generation request:
If Use Serial Ranges on the Product Detail record is not enabled, the system will bypass the usage of a range even if a range is defined.
If the Product Detail record identified on the serial generation request is set to Use Serial Ranges, the system will issue an exception error if a serial range is not found.
If a serial range is found that matches the Serial Type Group, Location, and PUID, the starting serial number and ending serial number defined for the range will establish the available range of serials.
If a serial range that matches the Serial Type Group, Location, and PUID is not found, the system will issue an exception error. For example, a request where the Serial Type Group is "SGTIN", the Location is "Rolla", and PUID is "0037020910.1" would fail because a range for this PUID has not been established for Rolla.
The rules for establishing serial ranges by location group are:
Serial type group and location group are required.
Starting serial number must be greater than or equal to the serial type minimum value within the serial type group.
Ending serial number must be less than or equal to the serial type maximum value within the serial type group.
Ranges with the same serial type group but different location groups or locations cannot overlap.
Ranges with the same serial type group and location group cannot overlap.
Ranges with the same serial type group and with a location that already has a location group set up for that serial type group cannot overlap.
The system uses this logic to find the serial range for processing a serial generation request:
If Use Serial Ranges on the Product Detail record is not enabled, the system will bypass the usage of a range even if a range is defined.
If a serial range is found that matches the serial type group and location group, the starting serial number and ending serial number defined for the range will establish the available range of serials.
If a serial range that matches the serial type group and location group is not found, the system will issue an exception error. For example, a request from Location Group: Group C for serials where Serial Type Group is USN would fail because a range for Group C has not been established.
The rules for establishing serial ranges by location group and PUID are:
Serial type group, location group, and PUID are required.
Starting serial number must be greater than or equal to the serial type minimum value within the serial type group.
Ending serial number must be less than or equal to the serial type maximum value within the serial type group.
Ranges with the same serial type group but different location groups or locations with the same PUID cannot overlap.
Ranges with the same serial type group, PUID, and location group cannot overlap.
Ranges with the same serial type group, PUID, and with a location that already has a location group set up for the serial type group cannot overlap.
After a range is established for a product based on the Product’s PUID, ranges must be established for all location groups requesting serial generation for that product. If a request for serials is received from a location group that does not have a range established for the product, the request will fail.
The system uses this logic to find the serial range for processing a serial generation request:
If Use Serial Ranges on the Product Detail record is not enabled, the system will bypass the usage of a range even if a range is defined.
If the Product Detail record identified on the serial generation request is set to Use Serial Ranges, the system will issue an exception error if a serial range is not found.
If a serial range is found that matches the Serial Type Group, Location Group, and PUID, the starting serial number and ending serial number defined for the range will establish the available range of serials.
If a serial range that matches the Serial Type Group, Location Group, and PUID is not found, the system will issue an exception error. For example, a request where the Serial Type Group is "SGTIN", the Location Group is "Group C", and PUID is "0037020910.1" would fail because a range for this PUID has not been established for "Group C".
Use these procedures to search for, create, edit, and delete serial ranges:
Prerequisites
Navigate to the Maintain Serial Ranges page.
Maintain Serial Ranges page
In the Search: Serial Ranges region, enter the search criteria for the serial ranges using one or more of these fields:
| Field Name | Description |
|---|---|
| Serial Type Group | (Optional) Select the serial type group for the serial range. |
| Location Group | (Optional) Select the location group for the serial range. |
| Location | (Optional) Select the location for the serial range. |
| Product Unit Identifier | (Optional) Select the product unit identifier for the serial range. |
Otherwise, you can click the Search button without entering any search criteria and all available serial ranges will appear.
Click the Search button.
Maintain Serial Ranges page
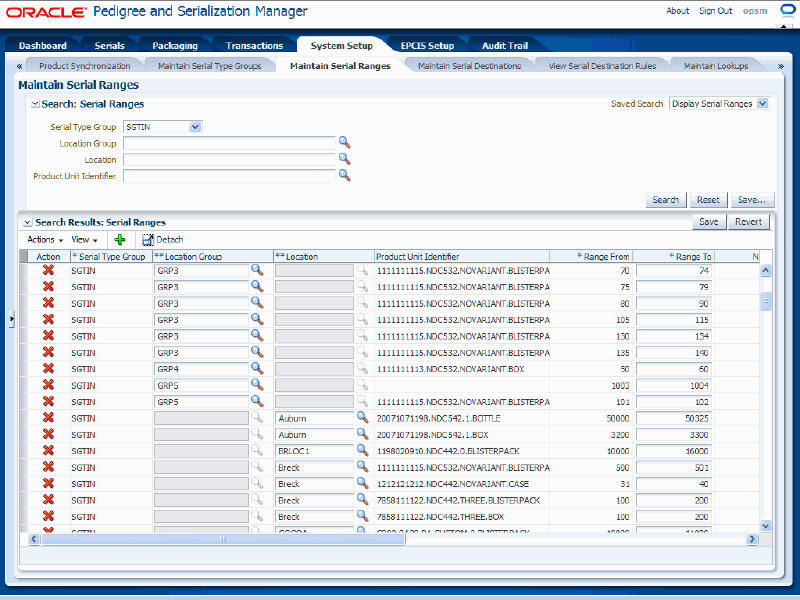
All of the serial ranges that match the search criteria appear in the Search Results: Serial Ranges region in a table format. The following information displays for each serial range:
| Field Name | Description |
|---|---|
| Action | Displays a Delete Serial Range icon. |
| Serial Type Group | Displays the serial type group for the serial range. |
| Location Group | Displays the location group for the serial range.
Note: Serial ranges are either associated with a location or a location group but not both at the same time. If a location group displays for a serial range then the location field is not available and vice versa. |
| Location | Displays the location for the serial range.
Note: Serial ranges are either associated with a location or a location group but not both at the same time. If a location displays for a serial range then the location group field is not available and vice versa. |
| Product Unit Identifier | Displays the product unit identifier for the serial range. |
| Range From | Displays the beginning of the serial range. |
| Range To | Displays the end of the serial range. |
| Next Serial | Displays the next serial number that will be generated. |
| Effective Start Date | Displays the date the serial range became effective. |
| Effective End Date | Displays the date the serial range will no longer be effective. |
| Date Exhausted | Displays the date the last serial number within the range was generated. |
| Critical Threshold | Displays the critical threshold value for this serial range. If the remaining serials within the range are less than this value, the range is included in the Critical count in the Serial Range Management component of the Operations Dashboard. |
| At Risk Threshold | Displays the at risk threshold value for this serial range. If the remaining serials within the range are less than this value, and greater than or equal to the critical threshold value, the range is included in the At Risk count in the Serial Range Management component of the Operations Dashboard. |
Navigate to the Maintain Serial Ranges page.
Select Add from the Actions menu or click the Add Serial Range icon located at the top of the Search Results: Serial Ranges region.
Maintain Serial Ranges page - Add Action
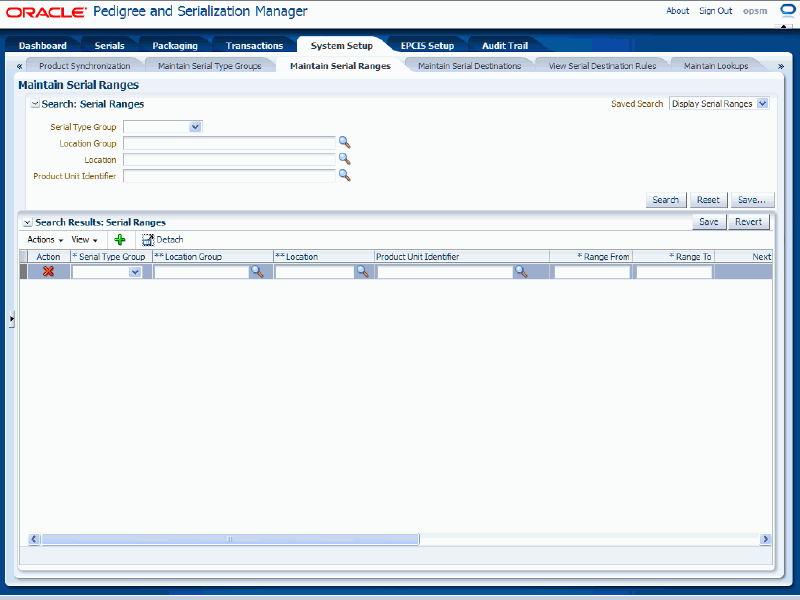
A new blank row appears in the table. Enter data in this row.
Enter the following information:
| Field Name | Description |
|---|---|
| Serial Type Group | Select the serial type group for this serial range. Serial type groups are a grouping of common serial types. |
| Location Group | Select the location group for this serial range. If you select a location group the Location field becomes unavailable for entry. You can select a location group or a location for the serial range but not both at the same time. |
| Location | Select the location for this serial range. If you select a location the Location Group field becomes unavailable for entry. You can select a location group or a location for the serial range but not both at the same time. |
| Product Unit Identifier | Select the Product Unit Identifier for this serial range. For example, Electronic Product Code (EPC) Number. |
| Range From | Enter the beginning of the range for this serial range.
Note: If the serial type group is defined with a Range Level Control of Location Level, ranges cannot overlap with ranges assigned to other locations. This applies if you are specifying a location or a location group. If the serial type group is defined with a Range Level Control of Location and Product Level, the ranges cannot overlap the ranges assigned to another location with the same company prefix for the same product. This applies if you are specifying a location or a location group. |
| Range To | Enter the end of the range for this serial range. |
| Effective Start Date | Enter the date this serial range becomes effective. The current date appears by default. |
| Effective End Date | Enter the date this serial range will no longer be effective. |
| Critical Threshold | Enter the Critical Threshold value for this serial range. If the remaining serials within the range are less than this value, the range is included in the Critical count on the Operations Dashboard. |
| At Risk Threshold | Enter the At Risk Threshold value for this serial range. If the remaining serials within the range are less than this value, and greater than or equal to the critical threshold value, the range is included in the At Risk count on the Operations Dashboard. |
Repeat steps 2-3 until all serial ranges have been added.
Click the Save button to save the serial ranges.
Maintain Serial Ranges page - Add Action
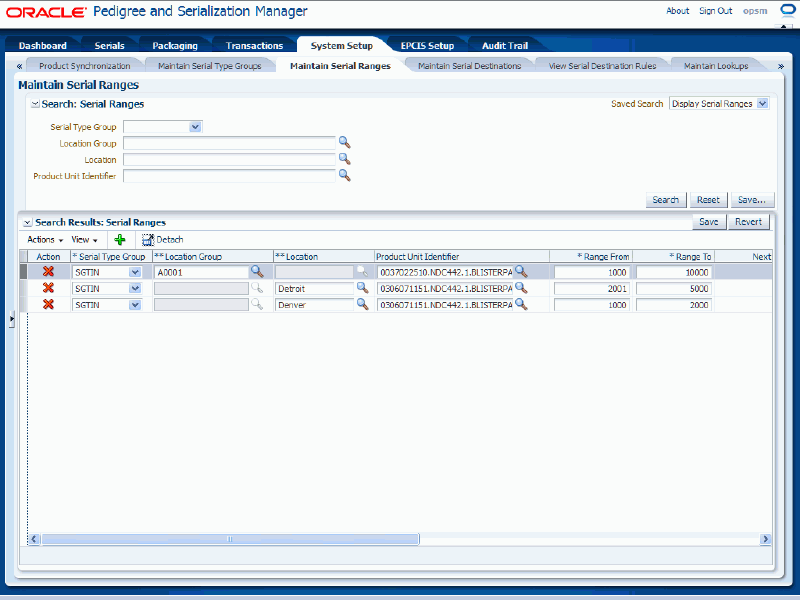
Click the Revert button to have the system reverse all of the changes you have made.
The system will re-display the serial ranges as they were before the last save.
Navigate to the Maintain Serial Ranges page.
Enter search criteria for the serial ranges you want to edit and click the Search button.
All of the serial ranges that match the search criteria appear in the Search Results: Serial Ranges table.
Edit the serial range fields.
You can only edit the Location Group, Location, Range To, Effective Start Date, Effective End Date, Critical Threshold, and At Risk Threshold fields pertaining to the serial range.
Note: You may want to delete the entire range and start over.
Click the Save button to save the changes you made to the serial ranges.
Navigate to the Maintain Serial Ranges page.
Enter search criteria for the serial ranges you want to delete and click the Search button.
All of the serial ranges that match the search criteria appear in the Search Results: Serial Ranges table.
Select the serial range in the table that you want to delete.
Select Delete in the Actions menu or click the Delete Serial Range icon in the Action column of the results table.
The system displays a message asking if you are sure you to want to delete the serial range.
Click the Yes button.
The serial range is deleted from the system.
Use the Serial Destination pages in Oracle Pedigree and Serialization Manager (OPSM) to maintain serial destinations and their associated destination rules. OPSM supports the web service and file exchange communication methods.
You can then define serial destination rules for each serial destination. Destination rules can be created for a transaction type, location, and product code. These rules are then used by the system to determine the destination to send a serial number to during its processing. After destination rules are set up for the transaction, when serials are transacted (generated, imported, shipped, and returned), the system will check to see if there are any destination rules set up for the transaction. If it finds a destination rule, the system will transmit the transacted serials to the destination specified. The system will create a resulting Serial Transmission transaction that you can view using the Maintain Transactions page.
The system uses the following hierarchy when determining the destination:
First, the system uses Destination Group, Transaction Type, Location, and Product Code to determine the serial destination. The system throughout the process only looks at information that is within the effective dates.
If no information is found with destination group, transaction type, location, and product code then the system uses Destination Group, Transaction Type, and Product Code to determine the serial destination.
If no information is found with destination group, transaction type, and product code then the system uses Transaction Type and Location to determine the serial destination.
Finally, if no information is found with transaction type and location the system only uses the Transaction Type to determine the serial destination.
The moment the system finds a match at any of the above 4 levels going from most specific to least specific, it stops looking any further.
Use these procedures to search for, view, create, edit, and delete serial destinations and to add, edit, and delete serial destination rules for a destination:
To Search for Serial Destinations
Navigate to the Maintain Serial Destinations page.
Maintain Serial Destinations page
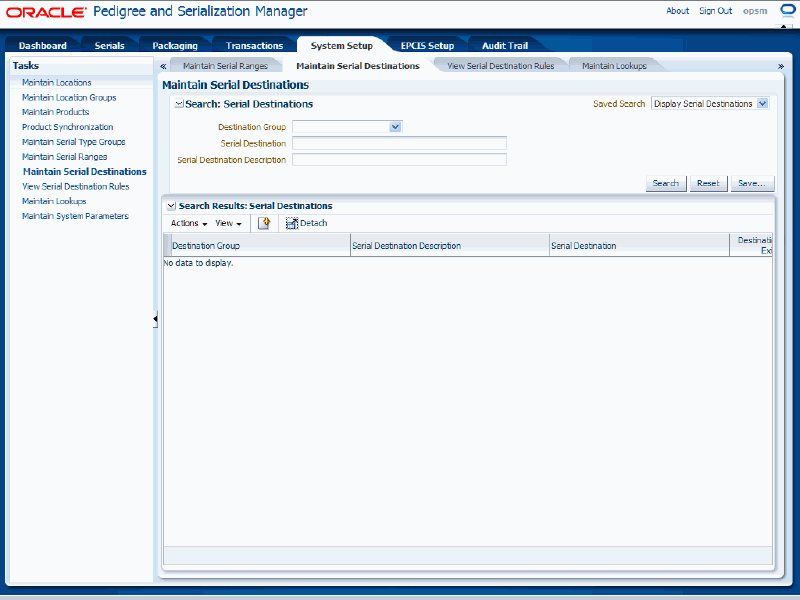
In the Search: Serial Destinations region, enter the search criteria for the serial destinations using one or both of these fields:
| Field Name | Description |
|---|---|
| Destination Group | (Optional) Select the destination group. Destination Groups are user defined using Lookup Type PAS_DESTINATION_GROUPS. |
| Serial Destination | (Optional) Enter the serial destination. |
| Serial Destination Description | (Optional) Enter the description for the serial destination. |
Otherwise, you can click the Search button without entering any search criteria and all available serial destinations will appear.
Click the Search button.
Maintain Serial Destinations page
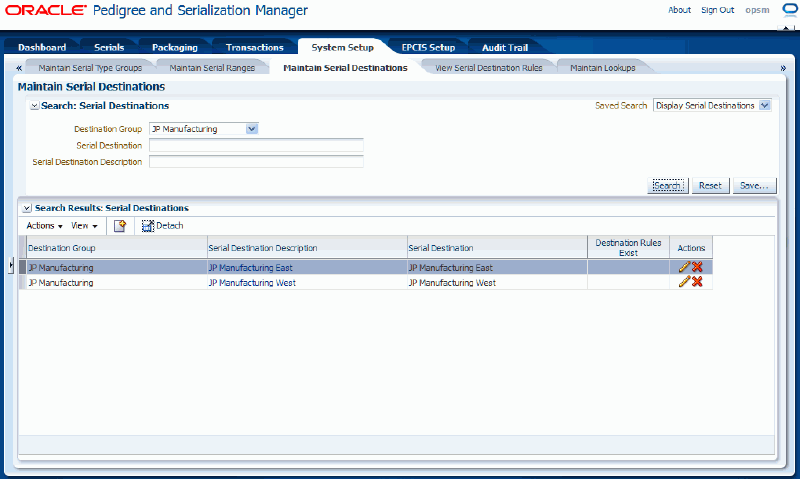
All of the serial destinations that match the search criteria appear in the Search Results: Serial Destinations region in a table format. If the serial destination has rules associated with it a green Check Mark icon will display in the Destination Rules Exist column for the serial destination.
For more information on Serial Destination Rules, see Procedure: To Add Destination Rules to a Serial Destination in this section of the guide.
To View Serial Destination Detail Information
Navigate to the Maintain Serial Destinations page.
Enter search criteria for the serial destinations you want to view and click the Search button.
All of the serial destinations that match the search criteria appear in the Search Results: Serial Destinations table.
Select the serial destination in the table that you want to view.
Click the Serial Destination Description link.
View Serial Destination page
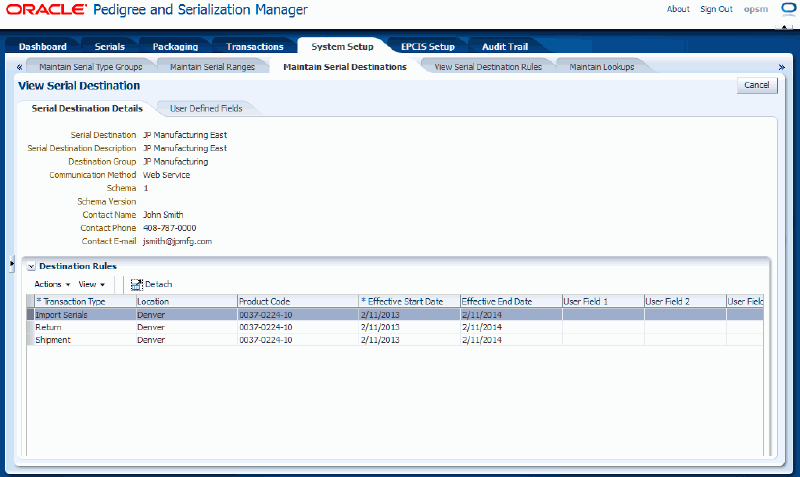
The View Serial Destination page appears.
Select the different tabs (Serial Destination Details and User Defined Fields) to the view that particular type of information for the serial destination.
At the bottom of the Serial Destination Detail tab is a Destination Rules region that displays all of the existing rules for the serial destination.
Click the Cancel button to return back to the Maintain Serial Destinations page.
Navigate to the Maintain Serial Destinations page.
Select Create from the Actions menu or click the Create icon located at the top of the Search Results: Serial Destinations region.
Create Serial Destination page
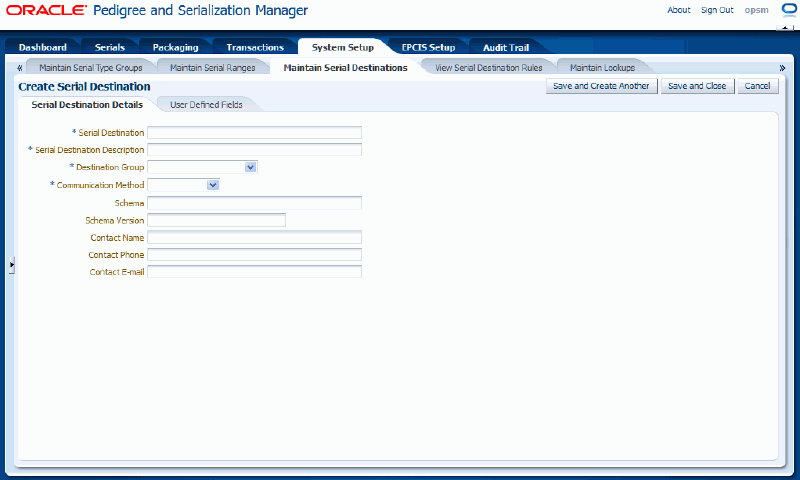
The Create Serial Destination page appears displaying Serial Destination Details and User Defined Fields tabs.
Enter the following information for the Serial Destination Details tab:
| Field Name | Description |
|---|---|
| Serial Destination | Enter a destination. This should match the destination name that you have set up in the Oracle SOA Suite. |
| Serial Destination Description | Enter a description for the destination. |
| Destination Group | Select the destination group for this serial destination. Destination Groups are user defined using Lookup Type PAS_DESTINATION_GROUPS. |
| Communication Method | Select the method of communication for this destination. Communication Methods are: File Exchange and Web Service. |
| Schema | (Optional) Enter the schema for the destination. Schemas are the format of the xml that OPSM is sending. The consuming Web Service will need to know the schema so they can communicate with OPSM. |
| Schema Version | (Optional) Enter the schema version for the destination. |
| Contact Name | (Optional) Enter the name of the person to contact for this destination. |
| Contact Phone | (Optional) Enter the phone number of the person to contact for this destination. |
| Contact E-mail | (Optional) Enter the e-mail address of the person to contact for this destination. |
Create Serial Destination page - Serial Destination Details sub tab
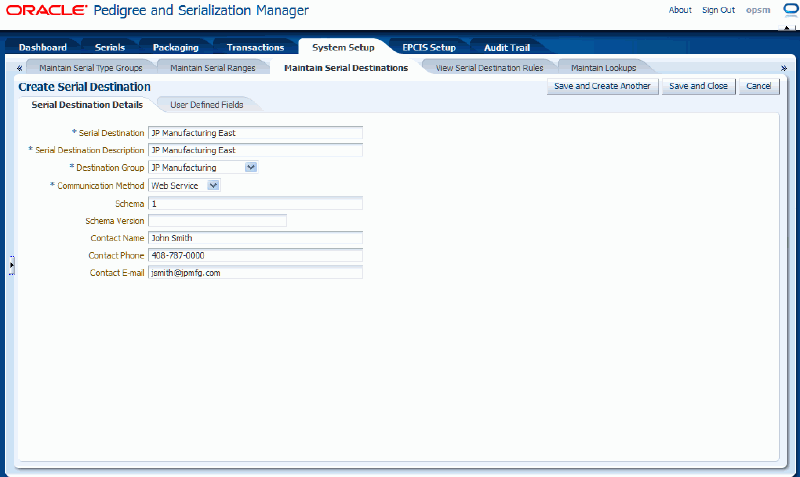
Select the User Defined Fields tab.
Enter user-defined data using any of the fields in the Character, Numeric, and Date/Time regions of the page.
Create Serial Destination page - User Defined Fields sub tab
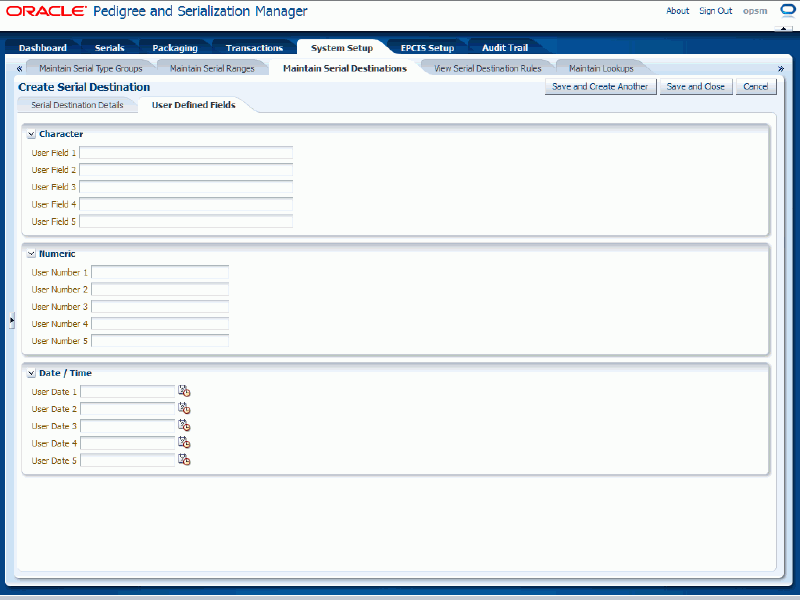
Save your work. Choose one of these options:
Click the Save and Close button to save this serial destination and return back to the Maintain Serial Destinations page.
Click the Save and Create Another button to save this serial destination and to stay on this page so you can create another serial destination. The system displays a message stating that the serial destination was saved successfully and it clears all of the values in the fields.
Navigate to the Maintain Serial Destinations page.
Enter search criteria for the serial destinations you want to edit and click the Search button.
All of the serial destinations that match the search criteria appear in the Search Results: Serial Destinations table.
Select the serial destination in the table that you want to edit.
Select Edit in the Actions menu or click the Edit Serial Destination icon associated with the serial destination in the Actions column of the results table.
Edit Serial Destination page

The Edit Serial Destination page appears displaying all of the existing information for the serial destination. At the bottom of the Serial Destination Details tab a Destination Rules region appears displaying the rules associated with the serial destination if they exist. The Destination Rules region is available for entry at this time.
Edit any of the serial destination fields.
You can edit any of the fields pertaining to the serial destination.
Add, edit, or delete destination rules.
For information, see the procedures in this section:
Save your work. Choose one of these options:
Click the Save button to save the changes you made to the serial destination information and to stay on the page so that you can make additional modifications.
Click the Save and Close button to save the changes you made to the serial destination information and return back to the Maintain Serial Destinations page.
Navigate to the Maintain Serial Destinations page.
Enter search criteria for the serial destinations you want to delete and click the Search button.
All of the serial destinations that match the search criteria appear in the Search Results: Serial Destinations table.
Select the serial destination in the table that you want to delete.
Select Delete in the Actions menu or click the Delete Serial Destination icon in the Actions column of the results table.
The system displays a message asking if you are sure to want to delete the serial destination.
Note: If you try to delete a serial destination that has associated serial destination rules the system will issue an error message. You must first delete the serial destination rules associated with the serial destination before you can delete the serial destination.
For information on deleting serial destination rules, see Procedure: To Delete Serial Destination Rules for a Serial Destination in this section.
Click the Yes button.
The serial destination is deleted from the system.
To Add Destination Rules to a Serial Destination
Navigate to the Edit Serial Destination page.
Edit Serial Destination page

The Edit Serial Destination page appears displaying all of the existing information for the serial destination. At the bottom of the Serial Destination Details tab is a Destination Rules region. The Destination Rules region is available for entry at this time.
Note: You must first create a destination before you can add destination rules to it. See the Procedure: To Create Serial Destinations in this section.
Select Add Destination Rule from the Actions menu or click the Add Destination Rule icon at the top of Destination Rules region.
Edit Serial Destination page
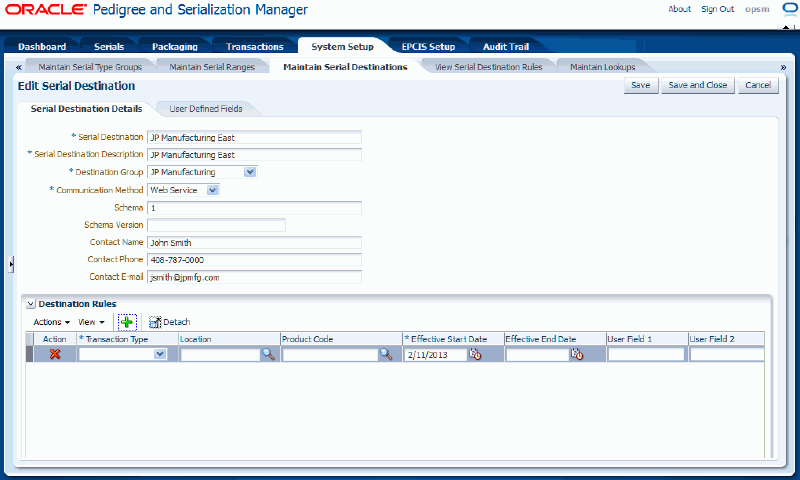
A blank row appears in the table.
Enter the following information:
| Field Name | Description |
|---|---|
| Transaction Type | Select a type of transaction. Transaction Types are:
|
| Location | (Optional) Select a location. |
| Product Code | (Optional) Select the product code. |
| Product Code Type | The product code type displays after you select the product code. |
| Product Code Variant | The product code variant displays after you select the product code. |
| Effective Start Date | Enter the start date this rule becomes effective. The current date appears by default. |
| Effective End Date | Enter the end date this rule will no longer be effective. |
| User Fields 1-5 | Enter user-defined data using any of these fields. |
| User Number 1-5 | Enter user-defined data using any of these fields. |
| User Date 1-5 | Enter user-defined data using any of these fields. |
Repeat Steps 2-3 until all of the serial destination rules you want to add have been entered for the destination.
Edit Serial Destination page
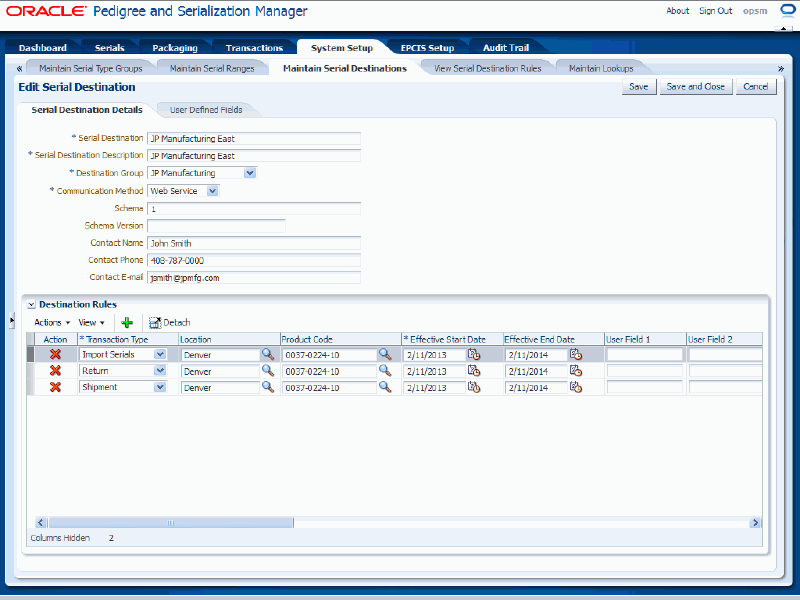
Save your work. Choose one of these options:
Click the Save button to save the serial destination rules and to stay on this page so you can create another serial destination rule.
Click the Save and Close button to save the serial destination rules and return back to the Maintain Serial Destinations page.
To Edit Destination Rules for a Serial Destination
Navigate to the Edit Serial Destinations page.
The Edit Serial Destination page appears displaying all of the existing information for the serial destination. At the bottom of the Serial Destination Details tab is a Destination Rules region. This region displays all of the existing destination rules for the destination.
In the Destination Rules region, modify any of the fields pertaining to a destination rule.
Add additional destination rules.
To add additional destination rules
Select Add Destination Rule from the Actions menu or click the Add Destination Rule icon.
Enter the destination rule information.
Remove destination rules.
To remove destination rules
Select the destination rule you want to delete.
Select Delete Destination Rule from the Actions menu or click the Delete Destination Rule icon in the Action column in the table for the destination rule.
The system displays a message asking if you are sure to want to delete the serial destination rule.
Click the Yes button.
The serial destination rule is deleted from the system.
Save your work. Choose one of these options:
Click the Save button to save the serial destination rules and to stay on this page so you can continue to make modifications.
Click the Save and Close button to save the serial destination rules and return back to the Maintain Serial Destinations page.
To Delete Destination Rules for a Serial Destination
Navigate to the Edit Serial Destination page.
The Edit Serial Destination page appears displaying all of the existing information for the serial destination. At the bottom of the Serial Destination Details tab is a Destination Rules region. This region displays all of the existing destination rules for the destination.
Select the destination rule you want to delete.
Select Delete Destination Rule from the Actions menu or click the Delete Destination Rule icon in the Action column in the table for the destination rule.
The system displays a message asking if you are sure to want to delete the serial destination rule.
Click the Yes button.
The serial destination rule is deleted from the system.
Save your work. Choose one of these options:
Click the Save button to save the serial destination rules and to stay on this page so you can continue to make modifications.
Click the Save and Close button to save the serial destination rules and return back to the Maintain Serial Destinations page.
Use the View Serial Destination Rules page in Oracle Pedigree and Serialization Manager (OPSM) to view a comprehensive list of destination rules and their associated destinations. You can view the destination rules in a multitude of ways by using the search criteria fields that include destination group, transaction type, location, product code, effective dates, and serial destination.
By using the advanced search functionality you can search for a range of serial destination rules by using the operator field (equals, contains, ends with, starts with, and so on) associated with the search criteria fields.
Use these procedures to view serial destination rules:
Prerequisites
To View Serial Destination Rules (Basic Search)
Navigate to the View Serial Destination Rules page.
View Serial Destination Rules page (Basic Search)
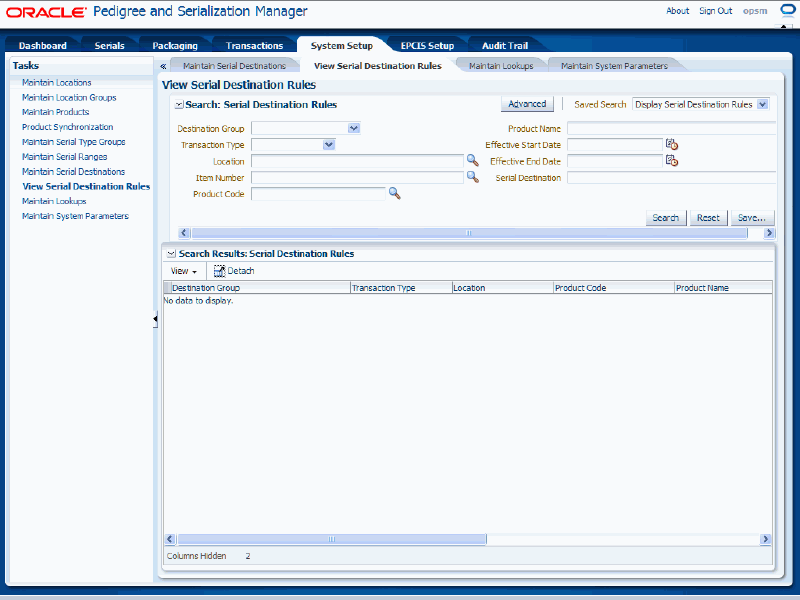
In the Search: Serial Destination Rules region, enter the search criteria for the serial destination rules using one or more of these fields:
| Field Name | Description |
|---|---|
| Destination Group | (Optional) Select the destination group. Destination Groups are user defined using Lookup Type PAS_DESTINATION_GROUPS. |
| Transaction Type | (Optional) Select the transaction type. Transaction types are:
|
| Location | (Optional) Select the location. |
| Item Number | (Optional) Select the item number for the serial destination rule. This is the transactional systems item number. It is used to find the Product Code to perform the search. The item number search is merely a way for you to search for the correct product code. When you select the Item Number, the Product Code and Product Name fields are automatically populated. If you clear the Item Number, then the Product Code and Product Name fields get cleared as well. You cannot enter both the Item Number and the product fields (Product Code and Product Name) on the search. |
| Product Code | (Optional) Select the product code. |
| Product Name | (Optional) Enter the product name associated with the product. |
| Effective Start Date | (Optional) Enter the effective start date for the destination rules. |
| Effective End Date | (Optional) Enter the effective end date for the destination rules. |
| Serial Destination | (Optional) Enter the serial destination. |
Otherwise, you can click the Search button without entering any search criteria and all available serial destination rules will appear.
Click the Search button.
View Serial Destination Rules page (Basic Search)

All of the serial destination rules that match the search criteria appear in the Search Results: Serial Destination Rules region in a table format. The fields that appear for each destination rule are:
| Field Name | Description |
|---|---|
| Destination Group | Displays the destination group associated with the rule. Destination Groups are user defined using Lookup Type PAS_DESTINATION_GROUPS. |
| Transaction Type | Displays the transaction type associated with the rule. Transaction types are:
|
| Location | Displays the location associated with the rule. |
| Product Code | Displays the product code associated with the rule. |
| Product Name | Displays the product name associated with the product. |
| Effective Start Date | Displays the effective start date for the destination rule. |
| Effective End Date | Displays the effective end date for the destination rule. |
| Serial Destination | Displays the serial destination associated with the rule. |
Click the Advanced button to perform an advanced search.
To View Serial Destination Rules (Advanced Search)
Use the Advanced Search functionality to perform a more detailed search for specific serial destination rules. Field operators associated with the search criteria fields can be used during an Advanced Search so that a range of serial destination rules can be easily retrieved.
Navigate to the View Serial Destination Rules page.
Click the Advanced button.
Note: Clicking the Advanced or Basic button will keep the values in the base criteria fields.
View Serial Destination Rules (Advanced Search)
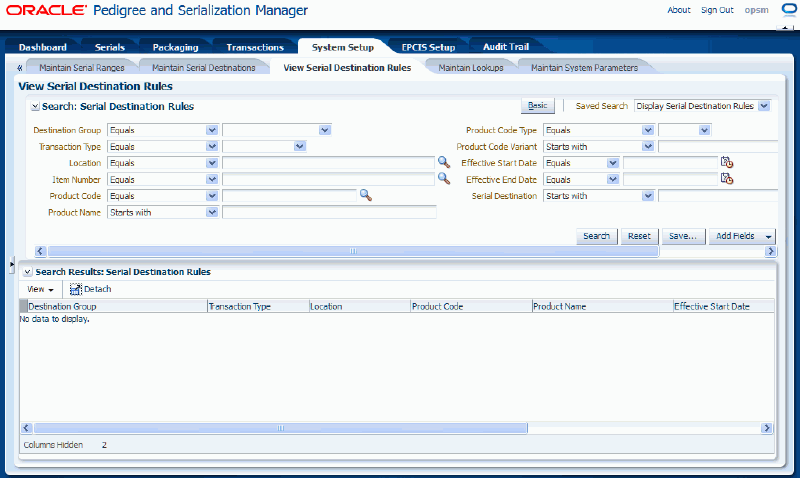
In the Search: Serial Destination Rules region, enter the search criteria for the serial destination rules using one or more of these fields:
| Field Name | Description |
|---|---|
| Destination Group | (Optional) Select the field operator and then select the destination group. Operators are:
Destination Groups are user defined using Lookup Type PAS_DESTINATION_GROUPS. |
| Transaction Type | (Optional) Select the field operator and then select the transaction type. Transaction types are:
The field operators are the same as that for the Destination Group field. |
| Location | (Optional) Select the field operator and then enter the location. The field operators are the same as that for the Destination Group field. |
| Item Number | (Optional) Select the field operator and then select the item number for the serial destination rule. This is the transactional systems item number. It is used to find the Product Code to perform the search. The item number search is merely a way for you to search for the correct product code. When you select the Item Number, the Product Code, Product Name, Product Code Type, and Product Code Variant fields are automatically populated. If you clear the Item Number, then the Product Code, Product Name, Product Code Type, and Product Code Variant fields get cleared as well. You cannot enter both the Item Number and the product fields (Product Code, Product Name, Product Code Type, and Product Code Variant) on the search. The field operators are the same as that for the Destination Group field. |
| Product Code | (Optional) Select the field operator and then select the product code. The field operators are the same as that for the Destination Group field. |
| Product Name | (Optional) Select the field operator and then enter the product name associated with the product. The field operators are the same as that for the Destination Group field. |
| Product Code Type | (Optional) Select the field operator and then select a product code type. For example, NDC442 and GTIN. The field operators are the same as that for the Destination Group field. |
| Product Code Variant | (Optional) Select the field operator and then enter the product code variant. The field operators are the same as that for the Destination Group field. |
| Effective Start Date | (Optional) Select the field operator and then enter the effective start date for the destination rules. Operators are:
|
| Effective End Date | (Optional) Select the field operator and then enter the effective end date for the destination rules. The field operators are the same as that for the Effective Start Date field. |
| Serial Destination | (Optional) Select the field operator and then enter the destination. The field operators are the same as that for the Destination Group field. |
Otherwise, you can click the Search button without entering any search criteria and all available serial destination rules will appear.
(Optional) To enter additional search criteria fields, click the Add Fields button and select the field you would like to add to the search criteria.
The selected field appears as a search criteria field.
Note: To remove the additional field, click the Remove icon next to the field. The field will be removed from the search criteria.
(Optional) Enter search criteria for the additional fields.
Click the Search button.
View Serial Destination Rules (Advanced Search)
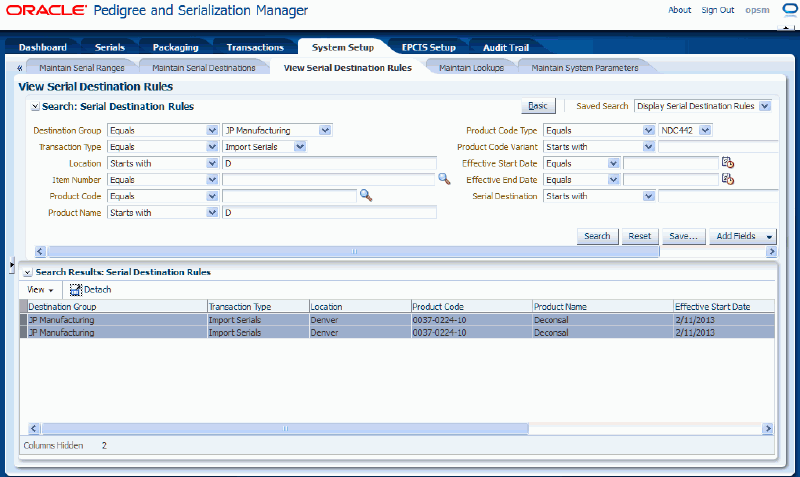
All of the serial destination rules that match the search criteria appear in the Search Results: Serial Destination Rules region in a table format.
Click the Basic button to have the page hide the advanced search criteria fields and re-display the basic search criteria fields.
Note: Clicking the Reset button clears the values in all of the criteria fields.
The Product Synchronization, Lot Synchronization, and Work Order Serialization processes use Oracle Data Integrator (ODI). When you run the Product Synchronization, Lot Synchronization, and Work Order Serialization processes in Oracle Pedigree and Serialization Manager (OPSM) you must specify a synchronization action. If you select an extract synchronization action you must also enter an extract scenario name. The ODI process uses the extract scenario name to determine the data to be extracted.
Use this procedure to create an extract scenario:
Prerequisites
The Oracle Serialization and Tracking Integration Pack for Oracle Pedigree and Serialization Manager and Oracle E-Business Suite 3.1 provides the ODI scenarios as part of the integration pack. These scenarios can be used as-is or can be modified or copied to create a new scenario.
For more information on integrating Oracle E-Business Suite with OPSM, see the Oracle Serialization and Tracking Integration Pack for Oracle Pedigree and Serialization Manager and Oracle E-Business Suite 3.1 - Implementation Guide.
To Create an Extract Scenario
Access the database table PAS_S_ODI_EXTRACT_DEF.
Add a new extract definition to the database table for the particular type of process (product synchronization, lot synchronization, and work order serialization).
Access the database table PAS_S_ODI_CONNECT_CONFIG.
Verify that a record exists in this table. Add a record if one does not exist. This table contains connection information for ODI. You need information from the ODI installation process to add a record to this table.
Navigate to the OPSM Maintain Lookups page.
Search for the Lookup Type that pertains to the Product, Lot, or Work Order Serialization extracts.
The Lookup Types are:
PAS_PRODUCT_EXTRACT for Product Synchronization
PAS_LOT_EXTRACT for Lot Synchronization
PAS_WORK_ORDER_EXTRACT for Work Order Serialization
Add a Lookup Code to the PAS_PRODUCT_EXTRACT, PAS_LOT_EXTRACT, or PAS_WORK_ORDER_EXTRACT Lookup Type that matches the extract definition that you created in Step 2.
Save your work.
The extract scenario you created is available for selection and use by the Product Synchronization, Lot Synchronization, or Work Order Serialization processes.
![]()
Copyright © 2013, Oracle and/or its affiliates. All rights reserved.