Release 1.2
Part Number E36379-01
Contents
Previous
Next
| Oracle Pedigree and Serialization Manager Process Guide Release 1.2 Part Number E36379-01 | Contents | Previous | Next |
This chapter covers the following topics:
Oracle Pedigree and Serialization Manager (OPSM) gives you the ability to audit the changes or activity that occur to serial data in the OPSM database. The audit trail provides information on all changes made through the OPSM pages themselves, direct integrations with Oracle E-Business Suite, and the web service processes (add, update, and delete). Audit information for each change includes:
The user who made the change in the database.
The date and time when the change was made in the database.
The fields that were changed in the database including before and after values of the changed fields.
The Audit Trail Setup page in OPSM gives administrators the flexibility to define which fields are audited within each business object based on their business requirements. All columns in each business object are available for audit. OPSM delivers the application without any attributes selected for auditing. The business objects equate to the OPSM tables. The descriptions related to all of the columns in the OPSM database can be viewed using SQL Developer.
After you set up the audit trail and activity has occurred in the system, you will use the Audit Trail History page in OPSM to review the results of the audit and export the results to Excel if you choose. Recording and auditing of this serial data can assist you in being 21 CFR Part 11 compliant.
OPSM provides several business objects that are available for auditing. This table lists the business objects in the order that they appear in the Audit Trail Setup page along with their descriptions. Some of the business objects are listed multiple times because the hierarchy is based on the relationship between the business object. You only have to set up one instance of the business objects and it will apply to all instances. You can select any of these business objects when setting up the audit trail:
| Node | Business Object | Description |
|---|---|---|
| SYSTEM SETUP | ||
| Dashboards | The Operations Dashboard in Oracle Pedigree and Serialization Manager (OPSM) provides information to support day-to-day activities that occur in OPSM. | |
| Dashboards Refresh | Stores information on the last time data displayed within the Dashboard components was updated. | |
| System Parameters | System parameters will define the owning source system default, source system precedence, serial type default, serial ranges default setting for product details and the default settings in OPSM for the different type of transactions. | |
| Location Groups | Location Groups in OPSM are used to associate locations which will share data, such as serial ranges. | |
| Location Location Groups | The Location Location Groups table is used to maintain the relationship between the records in the Locations table and their associated location group. | |
| Locations | Locations in OPSM are used to define and maintain locations associated with the management of serial numbers. | |
| Location Contacts | Location Contacts are used to define the Pedigree Contact for each location, as well as the notification contact. | |
| Location Location Groups | The Location Location Groups table is used to maintain the relationship between the records in the Locations table and their associated location group. | |
| Serial Type Groups | Serial type groups are used to group one or more serial types for serial range management. | |
| Serial Type Group Details | Serial type group details stores the information specific to the serial type group (i.e. whether generation of serials is Random or Sequential). | |
| Products | Products and their associated records maintain product information associated with the management of serial numbers. | |
| Product Details | Information stored in Product Details will enable OPSM to determine the standards to use when generating serial numbers. | |
| Serial Types | Serial types are required in OPSM and are used to define the criteria and method for the generation of serial numbers. | |
| Locations | Locations in OPSM are used to define and maintain locations associated with the management of serial numbers. | |
| Serial Type Groups | Serial type groups are used to group one or more serial types for serial range management. | |
| Product Items | Product Items are used to relate the transactional systems Item number to OPSM's Product. | |
| Product Item UOMs | Product Items UOMs are used to relate the transactional systems Item number to OPSM's Product Packaging Unit. | |
| Product Details | Information stored in Product Details will enable OPSM to determine the standards to use when generating serial numbers. | |
| Product Locations | Product Locations are used to override the processing behavior of the product for a particular location. | |
| Locations | Locations in OPSM are used to define and maintain locations associated with the management of serial numbers. | |
| Serial Destination Rules | Destination rules can be created for a transaction type, location, and product code. These rules are then used by the system to determine the destination to send a serial number to during its processing. | |
| Locations | Locations in OPSM are used to define and maintain locations associated with the management of serial numbers. | |
| Products | Products and their associated records maintain product information associated with the management of serial numbers. | |
| Serial Destinations | Serial Destinations store information about where to transmit serial data and which communication method to use. | |
| Serial Ranges | Serial ranges reserves groups of serials for a specific location or location and product unit identifier (PUID). | |
| Locations | Locations in OPSM are used to define and maintain locations associated with the management of serial numbers. | |
| Serial Range Details | Serial range details stores information pertinent to the serial range, such as Next Number. | |
| Serial Type Groups | Serial type groups are used to group one or more serial types for serial range management. | |
| Location Groups | Location Groups in OPSM are used to associate locations which will share data, such as serial ranges. | |
| Lookup Types | Lookup types determine how the OPSM application controls access to and processes data. | |
| Lookup Type Translations | Lookup types translations stores the translated text for the various Lookup types. | |
| Lookup Values | Lookup values provide the allowed values for their associated lookup type. | |
| Lookup Value Translations | Lookup value translations stores the translated text for the different Lookup values. | |
| SERIALS AND TRANSACTIONS | ||
| Serials | Serials contains information about serial numbers which is a unique number assigned for identification which varies from its successor or predecessor by a fixed discrete integer value. | |
| Lots | The lot number is uniquely identified by the Lot Number, Source System, Location (optional), Product Code, Product Code Type, Product Code Variant, and Packaging Unit. The lot must be identified on a serial when it is commissioned, shipped, or returned. A valid lot expiration date is required for shipment and return of the serials. | |
| Locations | Locations in OPSM are used to define and maintain locations associated with the management of serial numbers. | |
| Product Details | Information stored in Product Details will enable OPSM to determine the standards to use when generating serial numbers. | |
| Packs | Packages are objects into which other objects are packed. Examples of packages are boxes, cases, totes, and so on. | |
| Labels | Labels represent identifiers that may or may not be unique but which are associated to a particular package within OPSM. | |
| Serials | Serials contains information about serial numbers which is a unique number assigned for identification which varies from its successor or predecessor by a fixed discrete integer value. | |
| Pack Associations | Pack associations maintain the relationship between the records in the packages and their identifying labels. | |
| Labels | Labels represent identifiers that may or may not be unique but which are associated to a particular package within OPSM. | |
| Pack Associations | Pack associations maintain the relationship between the records in the packages and their identifying labels. | |
| Locations | Locations in OPSM are used to define and maintain locations associated with the management of serial numbers. | |
| Product Details | Information stored in Product Details will enable OPSM to determine the standards to use when generating serial numbers. | |
| Products | Products and their associated records maintain product information associated with the management of serial numbers. | |
| Serial Types | Serial types are required in OPSM and are used to define the criteria and method for the generation of serial numbers. | |
| Transaction Serial Associations | Transaction serial associations maintain the relationship between the serial records and their related transactions. | |
| Serials | Serials contains information about serial numbers which is a unique number assigned for identification which varies from its successor or predecessor by a fixed discrete integer value. | |
| Transactions | Transactions provide visibility into the events that occur for a serial number. | |
| Locations | Locations in OPSM are used to define and maintain locations associated with the management of serial numbers. | |
| Lots | The lot number is uniquely identified by the Lot Number, Source System, Location (optional), Product Code, Product Code Type, Product Code Variant, and Packaging Unit. The lot must be identified on a serial when it is commissioned, shipped, or returned. A valid lot expiration date is required for shipment and return of the serials. | |
| Pedigrees | Pedigrees associates the pedigree document to the transaction record. | |
| Pedigree Documents | Pedigree documents contains the actual pedigree generated for the transaction. | |
| Product Details | Information stored in Product Details will enable OPSM to determine the standards to use when generating serial numbers. | |
| Product Items | Product Items are used to relate the transactional systems Item number to OPSM's Product. | |
| Product Item UOMs | Product Items UOMs are used to relate the transactional systems Item number to OPSM's Product Packaging Unit. | |
| Products | Products and their associated records maintain product information associated with the management of serial numbers. | |
| Transaction Address | Transaction addresses contains business addresses and shipping addresses related to the transaction. | |
| Transaction Documents | Transaction documents contain any document information associated to the transaction such as Work Order number, Sales Order, etc. | |
| Transaction Errors | Transaction errors contains information related to errors encountered while processing the transaction. | |
| Transaction Labels | Transaction labels contain any shipping container information related to the transaction. | |
| Labels | Labels represent identifiers that may or may not be unique but which are associated to a particular package within OPSM. | |
| Product Items | Product Items are used to relate the transactional systems Item number to OPSM's Product. | |
| Transaction Products | Transaction products lists the products associated with the transaction. | |
| Transaction Serial Associations | Transaction serial associations maintain the relationship between the serial records and their related transactions. | |
| Transaction Serial Associations | Transaction serial associations maintain the relationship between the serial records and their related transactions. | |
| Transaction Documents | Transaction documents contain any document information associated to the transaction such as Work Order number, Sales Order, etc. | |
| Serial Generation Requests | When a request is made to OPSM to generate serials, the details of that request are stored here. | |
| Locations | Locations in OPSM are used to define and maintain locations associated with the management of serial numbers. | |
| Product Details | Information stored in Product Details will enable OPSM to determine the standards to use when generating serial numbers. | |
| Serial Generation Request Messages | Serial Generation Request Messages stores any error or warning messages generated while processing a serial generation request. | |
| Transactions | Transactions provide visibility into the events that occur for a serial number. | |
| Job Instances | When you initiate a process in OPSM such as a web service, the system assigns a job instance Id to that specific run of the process. This can be used to verify if the process completed successfully or if there were errors or warnings during the execution of the process. | |
| Job Instance Messages | Any error or warning messages generated during a process initiated by OPSM are stored here. | |
| Job Instance Parameters | Job Instance Parameters stores details related to the process initiated by OPSM. | |
| EPCIS | ||
| Users | Users contains the user information for EPCIS processing. | |
| Policies | Policies contains security information related to EPCIS Query processing. | |
| Policy Elements | Policy elements stores details related to the security policy for EPCIS Query processing. |
The system uses a user key as a unique identifier for a record that is being affected by an add, change, or delete activity. The user key may not provide enough information for you to quickly identify the record that was affected. OPSM provides context attributes which give you user-friendly information which is easier to recognize and enables you to easily isolate the record in question. For example, if a change is made on the product detail record, and the product_detail_id is the user key, then the identifier may be 111538. By adding context attributes, OPSM can display the product code and the product UOM (1234-5645-55 - EA) which you can use to search for within the Maintain Products page.
This table lists the context attributes for the audit trail:
| Module Name | Business Object | User Key | Context Attribute 1 | Context Attribute 2 | Context Attribute 3 |
|---|---|---|---|---|---|
| System Setup | PAS_S_DASHBOARDS | Dashboard Id | Not needed Only one record is allowed | ||
| PAS_S_DASHBOARDS_REFRESH | Dashboard Component | ||||
| PAS_S_SYSTEM_PARAMETERS | System Parameter Id | ||||
| PAS_S_LOCATION_GROUPS | Location Group | Location Group Description | |||
| PAS_S_LOCATION_LOCATION_GRPS | Location Location Grp Id | Location Group | Location Name | ||
| PAS_S_LOCATION CONTACTS | Location Contact Id | Contact Name | Location | ||
| PAS_S_LOCATIONS | Location | ||||
| PAS_S_SERIAL_TYPE_GROUPS | Serial Type Group | ||||
| PAS_S_SERIAL_TYPE_GRP_ DTLS | Serial Type Grp Dtl Id | Serial Type Group | Product Unit Identifier | ||
| PAS_S_PRODUCTS | Product Id | Product Code (Formatted) | Product Code Variant | ||
| PAS_S_PRODUCT_DETAILS | Product Detail Id | Product Code (Formatted) | Packaging Unit (Product UOM) | ||
| PAS_S_SERIAL_TYPES | Serial Type | Serial Type Group | |||
| PAS_S_PRODUCT_ITEMS | Product Item Id | Item Number | Item Source | Product Code (Formatted) | |
| PAS_S_PRODUCT_ITEM_UOMS | Product Item UOM Id | Product Code (Formatted) | Item Number | Item UOM | |
| PAS_S_PRODUCT_LOCATIONS | Product Location ID | Product Code (Formatted) | Location | ||
| PAS_S_SER_ DEST_RULES | Serial Dest Rules Id | Transaction Type | Serial Destination | Location | |
| PAS_S_SERIAL_DESTINATIONS | Destination | Serial Destination Description | |||
| PAS_S_SERIAL_RANGES | Range ID | Location | Location Group | Product Code (Formatted) (Conditional - will only display if PUID is provided) | |
| PAS_S_SERIAL_RANGE_DETAILS | Range Detail ID | Location | Location Group | Product Code (Formatted) (Conditional - will only display if PUID is provided) | |
| PAS_S_LOOKUP_TYPES_B | Lookup Type | ||||
| PAS_S_LOOKUP_TYPES_TL | Lookup Type | Lookup Type | Language | ||
| PAS_S_LOOKUP_VALUES_B | Lookup Code | Lookup Type | |||
| PAS_S_LOOKUP_VALUES_TL | Lookup Code | Lookup Type | Language | ||
| Serials and Transactions | PAS_S_SERIALS | Unique Check String | Serial Number | Product Code (Formatted) | Packaging Unit (Product UOM) |
| PAS_S_LOTS | Lot Id | Lot Number | Lot Source | Product Code (Formatted) | |
| PAS_S_PACKS | Pack Id | Package Unit | Package Identifier (Label) | Package Identifier Type (Label Type) | |
| PAS_S_LABELS | Label Id | Package Identifier (Label) | Package Identifier Type (Label Type) | ||
| PAS_S_PACK_ASSOCIATIONS | Pack Association ID | Package Identifier (Parent Label) | Package Identifier (Child Label) | ||
| PAS_S_TRANS_ SERIAL_ASSOCS | Trans Serial Assoc Id | Item Serial Number | Transaction Type | ||
| PAS_S_TRANSACTIONS | Transaction ID | Transaction Type | Transaction Date | ||
| PAS_S_PEDIGREES | Pedigree UUID | Transaction Type | Product Code (Formatted) | ||
| PAS_S_PEDIGREE_DOCUMENTS | Pedigree Document ID | Transaction Type | Product Code (Formatted) | Pedigree UUID | |
| PAS_S_TRANSACTION_ADDRESSES | Transaction Address Id | Address Code | Transaction Type | Transaction Date | |
| PAS_S_TRANSACTION_DOCS | Transaction Doc Id | Segment 2 | Transaction Type | Transaction Date | |
| PAS_S_TRANSACTION_ERRORS | Transaction Error Id | Transaction Type | Transaction Date | Transaction Error | |
| PAS_S_TRANSACTION_LABELS | Transaction Label Id | Package Identifier (Label) | Transaction Type | ||
| PAS_S_TRANSACTION_PRODUCTS | Transaction Product ID | Transaction Type | Transaction Date | Product Code (Formatted) | |
| PAS_S_SERIAL_GEN_REQUESTS | Serial Gen Request Id | Source System | Product Code (Formatted) | Creation Date | |
| PAS_S_SERIAL_GEN_REQ_MSGS | Serial Gen Request Msg ID | Product Code (Formatted) | Lot Number | Creation Date | |
| PAS_S_JOB_INSTANCES | Job Instance ID | Job Type | |||
| PAS_S_JOB_INSTANCE_MSGS | Job Instance Msg ID | Job Instance ID | Job Type | Error Code | |
| PAS_S_JOB_INSTANCE_PARAMS | Job Instance Param ID | Job Instance ID | Job Type | Parameter Name | |
| PAS_S_SERIAL_UPDATE_REQUESTS | Serial Update Request ID | Serial Update Type | Operation Name | Update Status | |
| PAS_S_SERIAL_LIST | Serial List ID | Item Serial Number | Serial Update Request ID | ||
| EPCIS | PAS_EPC_USERS | EPC User | Description | ||
| PAS_EPC_POLICIES | EPC Policy | Policy Description | |||
| PAS_EPC_POLICY ELEMENTS | Policy Element ID | EPC Policy | Meaning | Element Value |
Use the Audit Trail Setup page in Oracle Pedigree and Serialization Manager (OPSM) to set up the OPSM business objects and their associated attributes that you want to audit.
Use this procedure to set up the audit trail:
Navigate to the Audit Trail Setup page.
Audit Trail Setup page
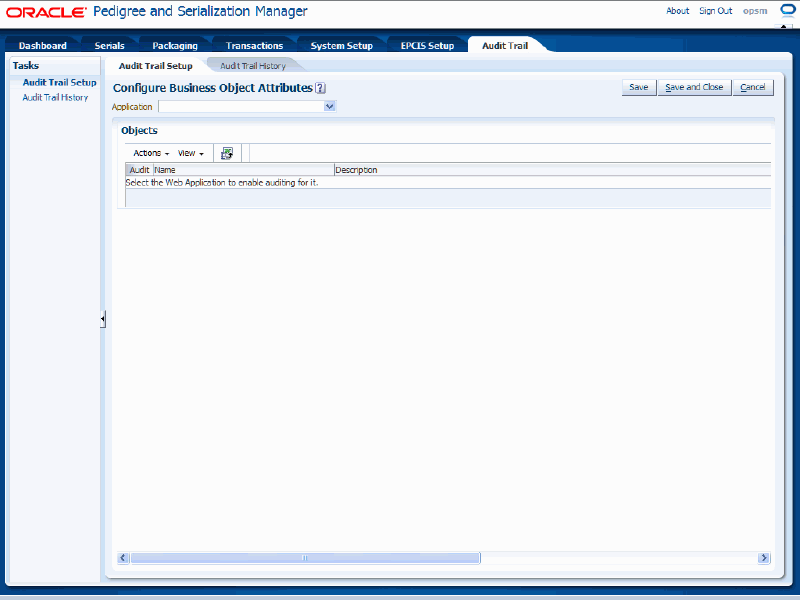
Select Oracle Pedigree and Serialization Manager in the Application field.
Audit Trail Setup page
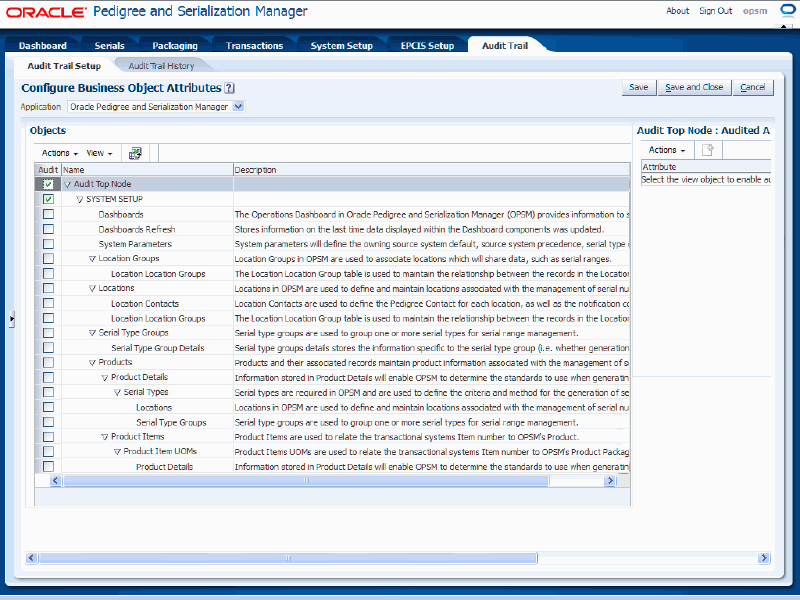
All of the business objects defined by OPSM display in the Objects region of the page in a tree format.
The business objects equate to the OPSM tables. The descriptions related to all of the columns in the OPSM database can be viewed using SQL Developer.
Select the business object name that you would like to audit in the tree (left side of page). Do not select the Audit check box. Click the object Name.
Audit Trail Setup page
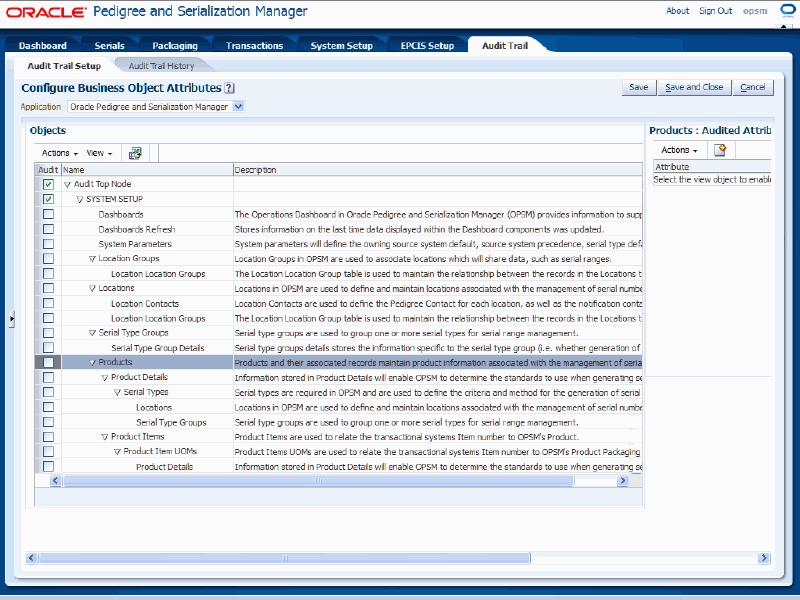
The title of region on the right side of the page will reflect the business object you selected along with "Audited Attributes". For example, if you select "Products" as the business object name, the region on the right side of the page will be titled "Products: Audited Attributes".
Select the attributes for the business object that you want to audit in the Audited Attributes region (right side of page):
Select Create from the Actions menu or click the Create icon located at the top of the Audited Attributes table.
Select and Add Audit Attributes dialog box
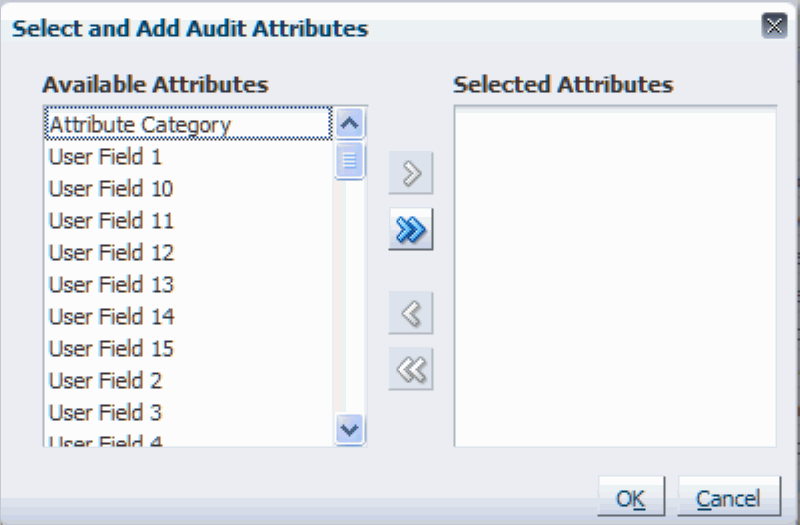
The Select and Add Audit Attributes dialog box appears displaying all of the available attributes that can be audited for that business object.
Select the attributes you want to audit by using one of these options:
Select one or more attributes in the Available Attributes region and click the "Move selected items to other list" icon (single arrow pointing to the right).
The selected available attributes move to the Selected Attributes region.
Click the "Move all items to other list" icon (double arrows pointing to the right).
All of the available attributes move to the Selected Attributes region.
Select and Add Audit Attributes dialog box
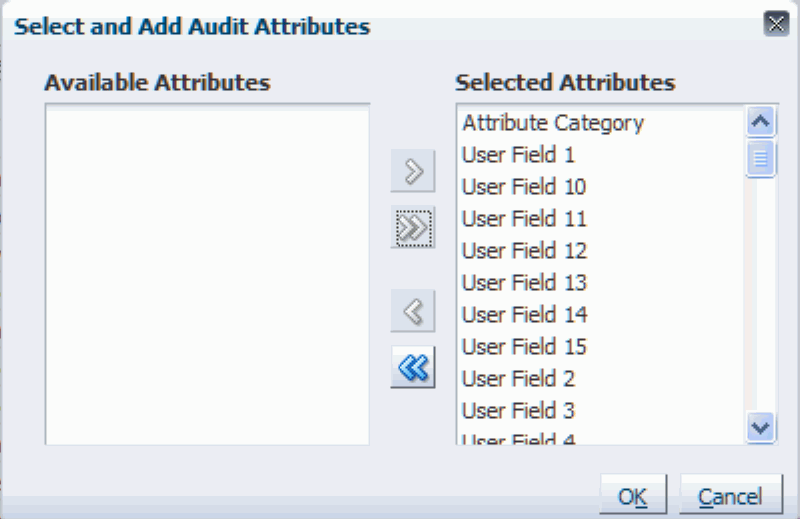
All of the available attributes that were selected move to the Selected Attributes region.
Click the OK button.
Audit Trail Setup page
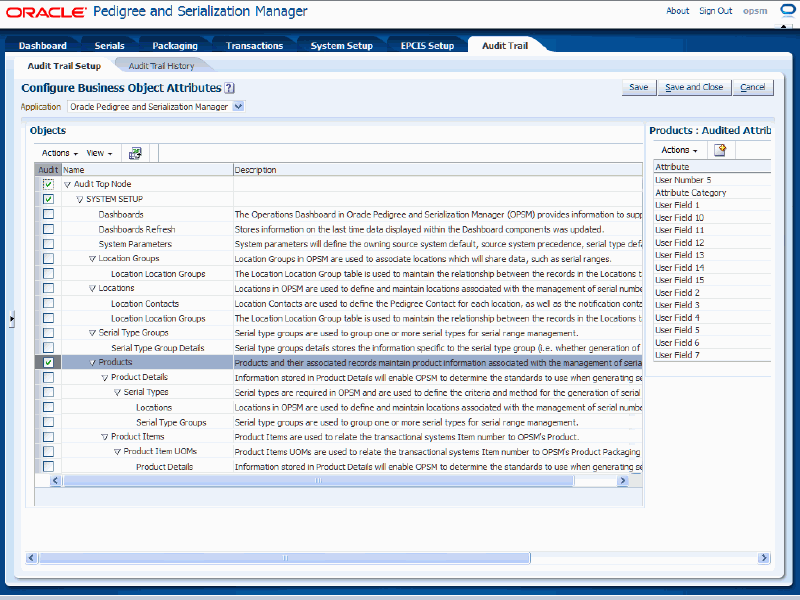
The Audit Trail Setup page re-displays with the Audit check box selected for the business object name in the Objects region (left side of page). All of the audited attributes that were selected display in the Audited Attributes region (right side of page).
Repeat steps 3 and 4 until you have defined all of the audit criteria for the audit trail.
Click the Save button to save your work.
Use the Audit Trail Setup page in Oracle Pedigree and Serialization Manager (OPSM) to view the OPSM business objects and their associated attributes that you are currently auditing.
Use this procedure to view the audit trail setup:
Navigate to the Audit Trail Setup page.
Select Oracle Pedigree and Serialization Manager in the Application field.
Audit Trail Setup page
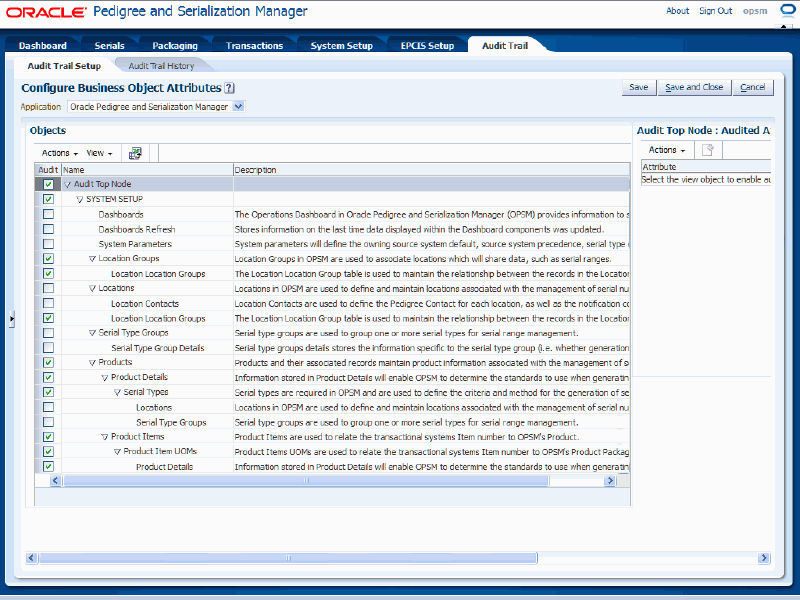
All of the business objects defined by OPSM display in the Objects region of the page in a tree format. A check mark displays in the Audit column for those business object that are currently being audited.
Select one of the business objects that is currently being audited in the tree. Click the object name in the tree.
Audit Trail Setup page
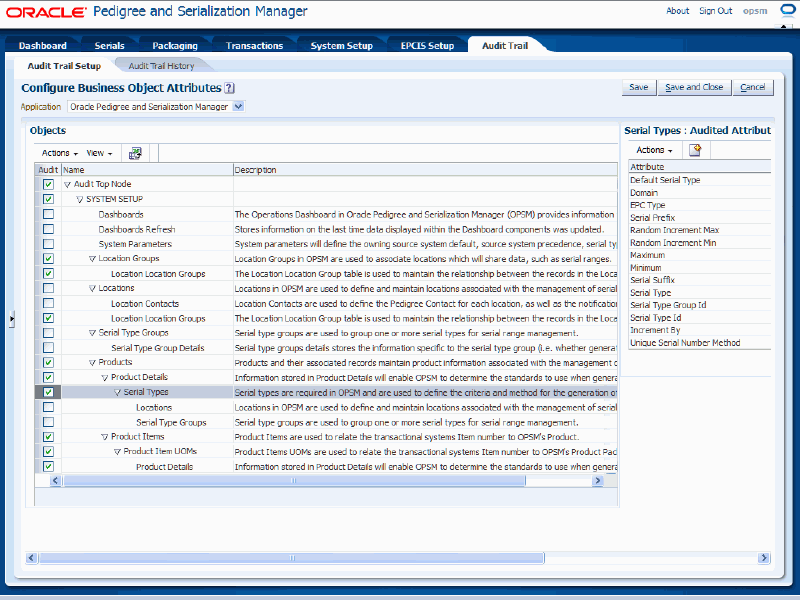
The attributes that are being audited for the business object display in the Audited Attributes region (right side of the page).
Repeat step 3 for each business object that is being audited in the audit trail.
Use the Audit Trail Setup page in Oracle Pedigree and Serialization Manager (OPSM) to update the OPSM business objects and their associated attributes that you are currently auditing.
Use this procedure to update the audit trail setup:
To Update the Audit Trail Setup
Navigate to the Audit Trail Setup page.
Select Oracle Pedigree and Serialization Manager in the Application field.
All of the business objects defined by OPSM display in the Objects region of the page in a tree format. A check mark in the Audit column means that particular business object has been selected for auditing.
Update the audit trail setup information by following one of these procedures:
To Remove All of the Business Objects from the Audit Trail Setup
Clear the Audit check box next to the Audit Top Node business object name.
Note: The attributes are still selected for all of the business objects that you were auditing and have not been removed. At a later date you could come back and select to audit all of the business objects again by selecting the Audit check box next to the Audit Top Node and saving.
Click the Save button to save your work.
To Remove a Business Object from the Audit Trail Setup
Clear the Audit check box next to the business object name.
Note: The attributes are still selected and have not been removed. At a later date you could come back and select to audit this business object again by selecting the Audit check box and saving.
Click the Save button to save your work.
To Add Back a Business Object that was Previously Removed from the Audit Trail Setup
Select the Audit check box next to a business object that still has attributes selected.
Click the Save button to save your work.
To Add Additional Business Objects and Attributes to the Audit Trail Setup
Follow the same steps as if you were setting up the audit trail.
For more information, see Setting Up the Audit Trail.
To Add Additional Attributes to a Business Object or to Remove Attributes from a Business Object in the Audit Trail Setup
Select a business object name that is being auditing in the tree (left side of page). Click the object Name. A check mark in the Audit column means that particular business object has been selected for auditing.
The existing attributes that are being audited for that business object name display in the Audited Attributes region.
Select Create from the Actions menu or click the Create icon located at the top of the Audited Attributes table.
The Select and Add Audit Attributes dialog box appears displaying all of the available attributes that can be audited for that business object along with the attributes that have already been selected.
Add or remove attributes that are available for auditing using one of these options:
Select one or more attributes in the Available Attributes region and click the "Move selected items to other list" icon (single arrow pointing to the right).
The selected attributes move to the Selected Attributes region.
Click the "Move all items to other list" icon (double arrows pointing to the right).
All of the available attributes move to the Selected Attributes region.
Select one or more attributes in the Selected Attributes region and click the "Remove selected items from list" icon (single arrow pointing left).
The selected attributes move to the Available Attributes region.
Click the "Remove all items from list" icon (double arrows pointing to the left).
All of the selected attributes move to the Available Attributes region.
Click the OK button.
The Audit Trail Setup page re-displays reflecting the updated information.
Use the Audit Trail Setup page in Oracle Pedigree and Serialization Manager (OPSM) to export the audit trail setup information to a Microsoft Excel spreadsheet.
Use this procedure to export audit trail setup information to Excel:
To Export Audit Trail Setup Information to Excel
Navigate to the Audit Trail Setup page.
Select Oracle Pedigree and Serialization Manager in the Application field.
All of the business objects defined by OPSM display in the Objects region of the page in a tree format. A check mark in the Audit column means that particular business object has been selected for auditing.
Select Export to Excel from the Actions menu or click the Export to Excel icon located at the top of the Objects region.
The system creates a Microsoft Excel spreadsheet file (.xls extension) that lists all of the business objects that have been selected for audit and those that have not, and a dialog box appears asking if you want to open the Excel spreadsheet or if you want to save the spreadsheet.
Open or save the Excel spreadsheet.
Use the Audit Trail Setup page in Oracle Pedigree and Serialization Manager (OPSM) to synchronize any additions or updates to the audit business objects and their associated attributes. For example, let's say you accept and install a patch that is delivered from OPSM and in that patch changes or additions will occur to tables or fields within the audit business objects in OPSM. In that case, you would synchronize the audit business objects that display on the Audit Trail Setup page to those that appear in the actual database so that the new or updated information is available for auditing in OPSM. Using the Synchronize action on the Audit Trail Setup page enables you to perform that synchronization.
Use this procedure to synchronize audit trail setup information:
To Synchronize Audit Trail Setup Information
Navigate to the Audit Trail Setup page.
Select OPSM in the Application field.
All of the business objects defined by OPSM display in the Objects region of the page in a tree format. A check mark in the Audit column means that particular business object has been selected for auditing.
Select Synchronize from the Actions menu in the Objects region.
The business objects and attributes are synchronized.
Click the Save button to save your work.
Use the Audit Trail History page in Oracle Pedigree and Serialization Manager (OPSM) to search for audit trail history records that have occurred in the OPSM system.
Use this procedure to search for audit trail history:
Prerequisites
Set up the audit trail using the Audit Trail Setup page in OPSM.
Perform activity in OPSM related to the audit trail setup criteria that you have set up.
To Search for Audit Trail History
Navigate to the Audit Trail History page.
Audit Trail History page
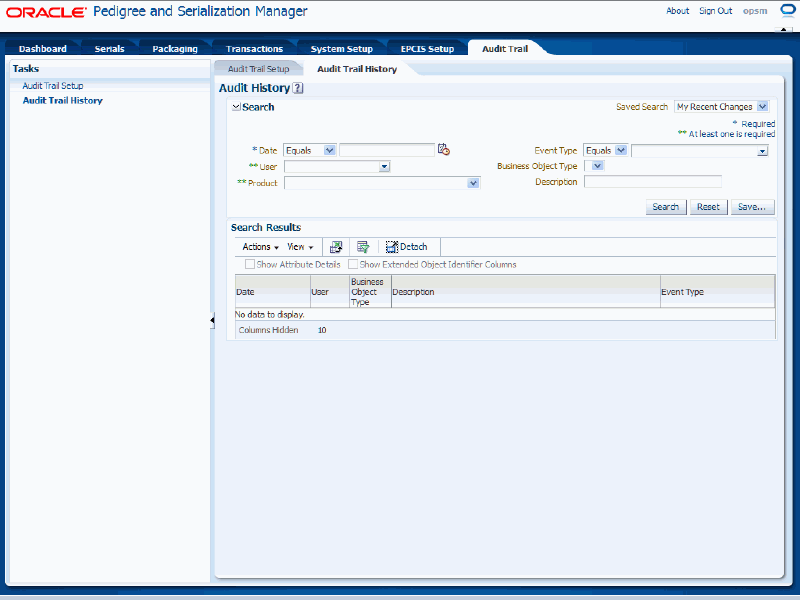
In the Search region, enter the search criteria for the audit trail history using these fields:
| Field Name | Description |
|---|---|
| Date and Operator | Select the operator for the date and then enter the date for the audit trail history you want to search for. Operators are:
If you select the Between operator you must enter a from and to date. |
| User | Select the user associated with the audit trail history. The User field or Product field, or both need to be selected. |
| Product | Select the product associated with the audit trail history. Other product options are hardcoded into the page, but only the Oracle Pedigree and Serialization Manager option applies.
The User field or Product field, or both need to be selected. |
| Event Type and Operator | (Optional) Select the operator for the event type and then enter the event type for the audit trail history you want to search for. Operators are:
Event types are:
|
| Business Object Type | (Optional) Select the business object type associated with the audit trail history. Only business objects that have been set up for auditing display in this field.
Note: You must select a business object type for the Show Attributes Detail check box to be available. |
| Description | (Optional) Enter a user key value in the Description field associated to the business object type. |
Audit Trail History page
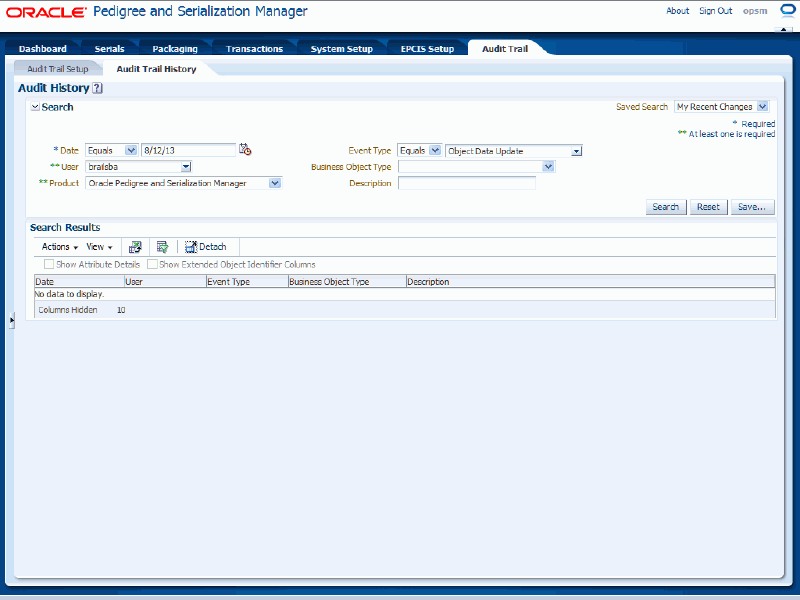
Click the Search button.
Audit Trail History page
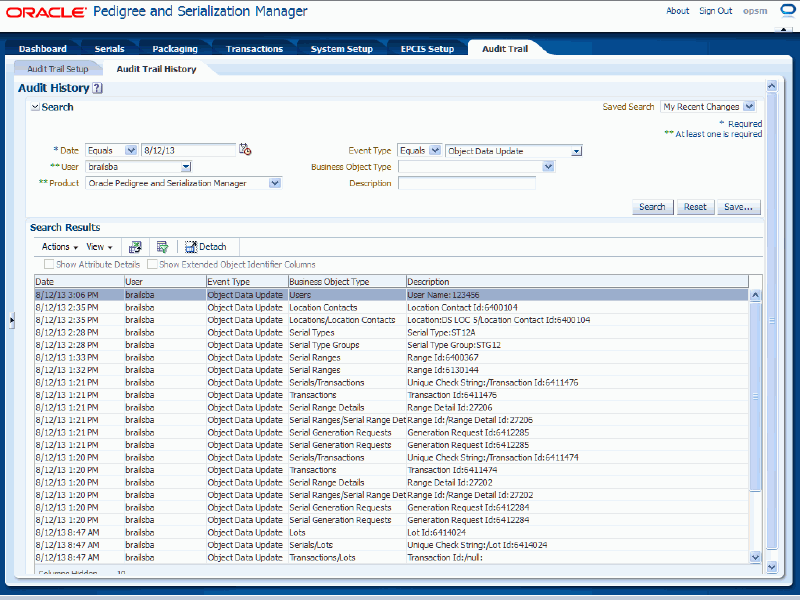
All of the audit trail history records that match the search criteria appear in the Search Results region in a table format. For each record the following information displays:
| Field Name | Description |
|---|---|
| Date | Displays the date for the audit trail history record. |
| User | Displays the user for the audit trail history record. |
| Event Type | Displays the event type for the audit trail history record. |
| Business Object Type | Displays the business object type for the audit trail history record. |
| Description | Displays the user key for the audit trail history record. |
(Optional) View the attribute details by selecting the Show Attribute Details check box located at the top of the search results table.
This check box is only available if you select a specific Business Object Type in the search region.
The system displays the additional attribute detail columns in the search results table. For each record the following information displays:
| Field Name | Description |
|---|---|
| Attribute | Displays the specific attribute that was audited. |
| Old Value | Displays the old value for the attribute if the audit trail history record pertains to an Object Data Update event type. |
| New Value | Displays the new value for the attribute if the audit trail history record pertains to an Object Data Update or Object Data Insert event types. |
(Optional) View the object identifiers by selecting the Show Extended Object Identifier Columns check box located at the top of the search results table. This check box is only available if you also select the Show Attribute Details check box.
The system displays the additional object identifier columns in the search results table. For each record the following information displays:
| Field Name | Description |
|---|---|
| Context Name1 | Displays the first context name for the audit trail history record. |
| Context Value1 | Displays the first context value for the audit trail history record. |
| Context Name2 | Displays the second context name for the audit trail history record. |
| Context Value2 | Displays the second context value for the audit trail history record. |
| Context Name3 | Displays the third context name for the audit trail history record. |
| Context Value3 | Displays the third context value for the audit trail history record. |
For more information on the context attributes used in auditing, see Understanding Auditing.
Use the Audit Trail History page in Oracle Pedigree and Serialization Manager (OPSM) to view the audit trail history result information for the audit trail that you defined.
Use this procedure to view the audit trail history:
Prerequisites
Set up the audit trail using the Audit Trail Setup page in OPSM.
Perform activity in OPSM related to the audit trail setup criteria that you have set up.
To View the Audit Trail History
Navigate to the Audit Trail History page.
In the Search region, enter search criteria for the audit trail history.
Click the Search button.
Audit Trail History page
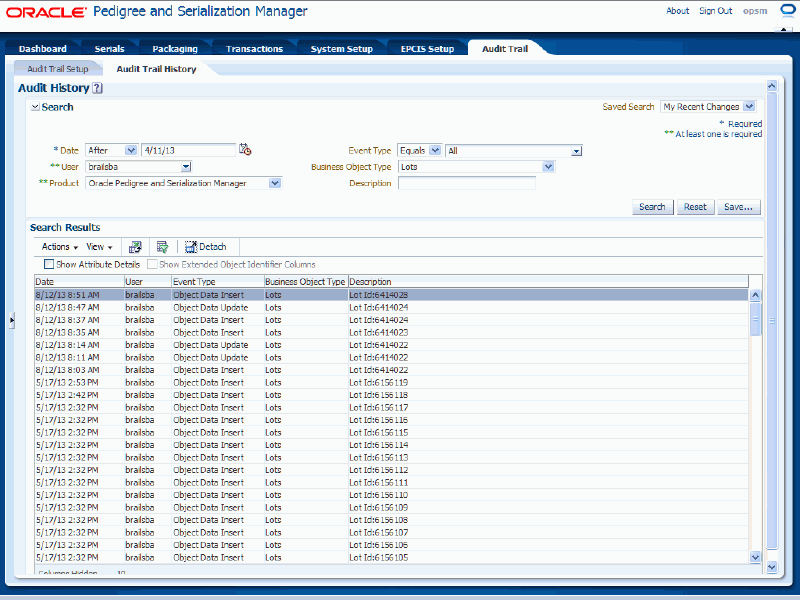
The audit trail history results that match the search criteria display in the Search Results region in a table format.
(Optional) View the attribute details by selecting the Show Attribute Details check box located at the top of the search results table.
This check box is only available if you select a specific Business Object Type in the search region.
Audit Trail History page
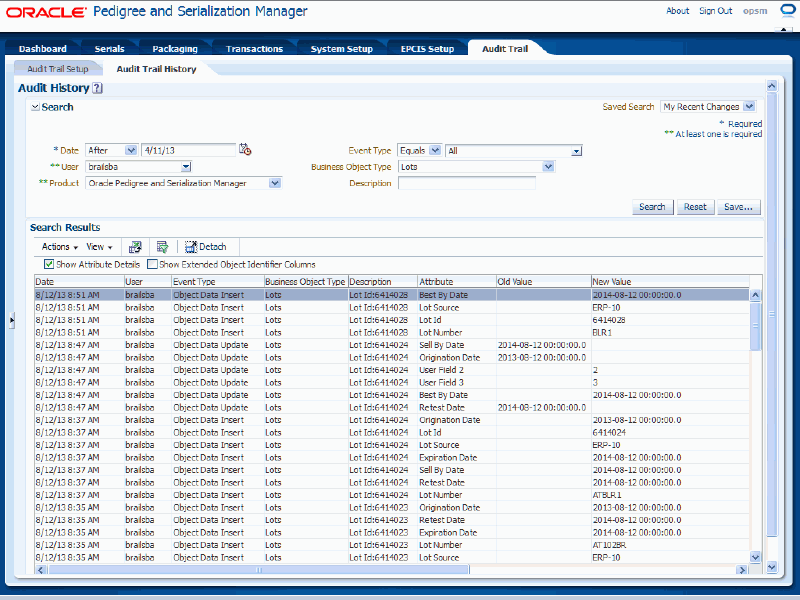
The system displays the additional attribute detail columns in the search results table. For each record the following information displays:
| Field Name | Description |
|---|---|
| Attribute | Displays the specific attribute that was audited. |
| Old Value | Displays the old value for the attribute if the audit trail history record pertains to an Object Data Update or Object Data Delete event type. |
| New Value | Displays the new value for the attribute if the audit trail history record pertains to an Object Data Update or Object Data Insert event types. |
(Optional) View the object identifiers by selecting the Show Extended Object Identifier Columns check box located at the top of the search results table. This check box is only available if you also select the Show Attribute Details check box.
Audit Trail History page
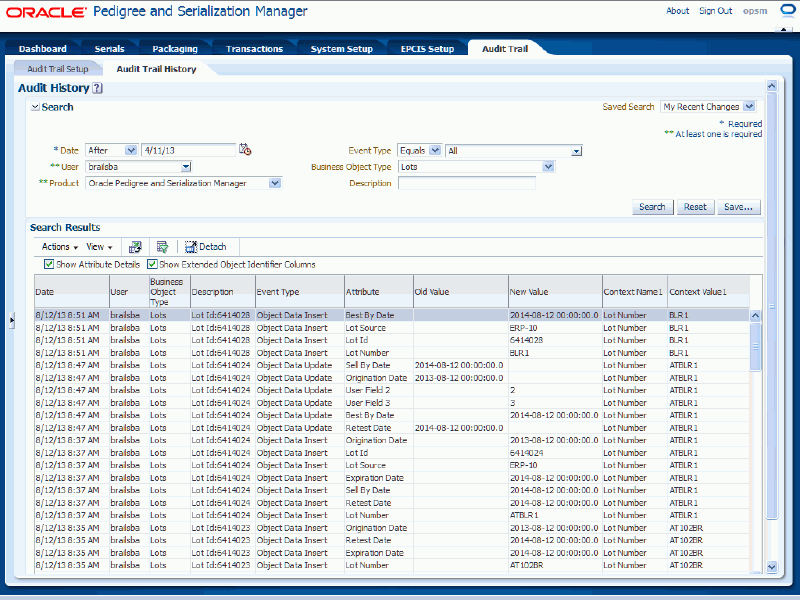
The system displays the additional object identifier columns in the search results table. For each record the following information displays:
| Field Name | Description |
|---|---|
| Context Name1 | Displays the first context name for the audit trail history record. |
| Context Value1 | Displays the first context value for the audit trail history record. |
| Context Name2 | Displays the second context name for the audit trail history record. |
| Context Value2 | Displays the second context value for the audit trail history record. |
| Context Name3 | Displays the third context name for the audit trail history record. |
| Context Value3 | Displays the third context value for the audit trail history record. |
For more information on the context attributes used in auditing, see Understanding Auditing.
Use the Audit Trail History page in Oracle Pedigree and Serialization Manager (OPSM) to export the audit trail history results to a Microsoft Excel spreadsheet.
Use this procedure to export the audit trail history to Excel:
Prerequisites
To Export the Audit Trail History to Excel
Navigate to the Audit Trail History page.
In the Search region, enter search criteria for the audit trail history.
Click the Search button.
The audit trail history results that match the search criteria display in the Search Results region in a table format.
Select Export to Excel from the Actions menu or click the Export to Excel icon located at the top of the search results table.
The system creates a Microsoft Excel comma separated value file (.csv extension) containing all of the audit trail history records and a dialog box appears asking if you want to open the Excel spreadsheet or if you want to save the spreadsheet.
Open or save the Excel spreadsheet.
![]()
Copyright © 2013, Oracle and/or its affiliates. All rights reserved.