3 Configuring an Agent Deployment with Anywhere
This section describes the procedures and settings in the Anywhere Console, and how to use them to create an Agent deployment for your end-users.
In this chapter, you will learn about the following:
3.1 Overview of Creating a Deployment Package
Following is the general procedure for creating a deployment package. Use the settings in the three tabs of the Anywhere Console for your deployment configurations. See the section for each tab for an in-depth discussion of that tab's settings.
3.1.1 A Few Notes About Anywhere Prerequisites and Deployment Limitations
Consider the following when planning your deployment options:
-
Anywhere is designed for compatibility with Windows Authenticator v1. It is not designed to work with Logon Manager features that require installing system services or GINAs, adding registry entries outside of
Live HKLM\Software\Passlogix, or additions to Program Files or Windows system folders. -
The Visual C++ Runtime Library and .NET 2.0 Framework are prerequisites for running Anywhere. The installation package includes the Visual C++ Runtime Library, however you must make the .NET 2.0 Framework available to users. See the Oracle Enterprise Single Sign-On Suite Release Notes for a complete list of software and hardware requirements.
-
The final output of the deployment package is not a
.MSIfile. You must ensure that you supply any additional requirements that your end users will need to run their Logon Manager and additional Agent software. -
Due to security restrictions in Windows Server 2008 and Windows 7, you must change group policy settings in order for end users running these clients to use the Anywhere deployment package. See the Technical Notes in the Oracle Enterprise Single Sign-On Suite Release Notes for more information.
-
Anywhere does not support Kiosk Manager. When you install Logon Manager with the intention of using it to create a deployment. Do not select the Kiosk Manager option.
-
You must be running a 32-bit operating system when creating a 32-bit deployment, and a 64-bit operating system when creating a 64-bit deployment. Moreover, a 32-bit deployment downloaded to a 64-bit operating system, or a 64-bit deployment downloaded to a 32-bit operating system, will fail.
3.1.2 Creating a Deployment Package
-
Create a certificate file to be submitted when you generate the deployment package. See Section 7.1.2, "Obtaining a Certificate for SSL Connectivity" for complete instructions.
-
Install the Administrative Console and Agent on a clean workstation.
-
Optionally, install Provisioning Gateway.
-
Configure the Oracle products as you want them for deployment.
-
Make your Logon Manager and Provisioning Gateway configuration settings available to Anywhere by one of the following methods:
-
Live Registry. Write the Global Agent Settings to the registry, and select Live registry under Options > Agent settings.
-
Exported Registry File (.REG). The Administrative Console
.REGfile is not immediately compatible with Anywhere. If you want to use this file, you must do the following:-
Open Microsoft Registry Editor (
regedit.exe). -
Open the Administrative Console registry file from within regedit.exe.
-
Save the Administrative Console registry file using
regedit.exe. -
Browse to this file for your selection on the Options tab > Agent settings.
Note:
The Console produces a.REGfile compatible only with 32-bit systems. If you are merging the.REGfile on a 64-bit system, you must run the following command to move the merged registry data to the correct location within the registry (otherwise, Universal Authentication Manager will not function):reg.exe COPY HKLM\Software\PasslogixHKLM\Software\Wow6432Node\Passlogix /sTest your configuration before proceeding to create the deployment package.
-
-
-
Install the Anywhere Console. Anywhere reads the Oracle software configuration on the workstation where you installed it.
-
Verify in the General tab that the products and versions installed are the ones that you want to deploy.
-
From the Options tab, specify:
-
The deployment version and location, the installation location, and the installation type.
-
The update schedule preferences.
-
Which registry settings Anywhere will use (the settings from the live registry, or the registry file you saved using
regedit.exe).
-
-
On the Generate tab:
-
In the Summary window, review all settings.
-
Enter the directory path where the deployment package will be created, or click the Browse… button to navigate to the directory.
-
Click the Generate button.
-
At the prompt, enter the location for the certificate file that you created, and the password.
-
-
From the File menu, click Save or Save As… to save the deployment configuration settings.
-
Copy the deployment package to the virtual directory or file share that you specified in the Target location setting.
-
If deploying from a web server, customize the index.html file in the deployment directory, replacing the generic text with the information that you want end users to see.
-
If this is a first installation, notify users that the deployment package is available.
-
To create additional deployment packages, reconfigure settings on the Administrative Console, and click New on the Anywhere File menu.
Note:
Users do not have the option to alter the installation. If you want different users to install different packages, create a separate deployment package for each installation.
3.2 The General Tab
The two sections of the General tab contain information about the Oracle products installed on the workstation where you are creating the deployment package.
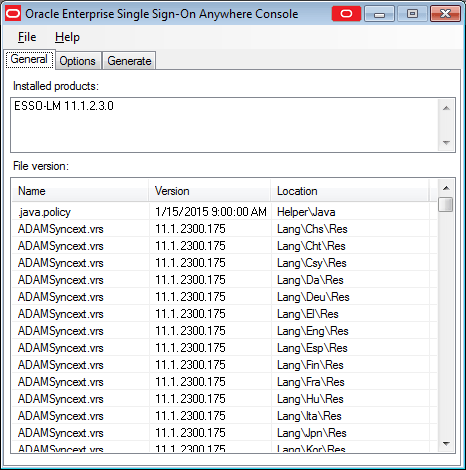
| Window Region | Function |
|---|---|
| Installed products | This section lists the Oracle products in the configuration. This list must contain Logon Manager and might also include Provisioning Gateway. |
| File version | This section lists all components that were installed as part of the Oracle product installation, with their version numbers and installation locations. This information is the same as the information in the Logon Manager "About" box. |
3.3 The Options Tab
Use the Options tab to configure the settings for your deployment package.
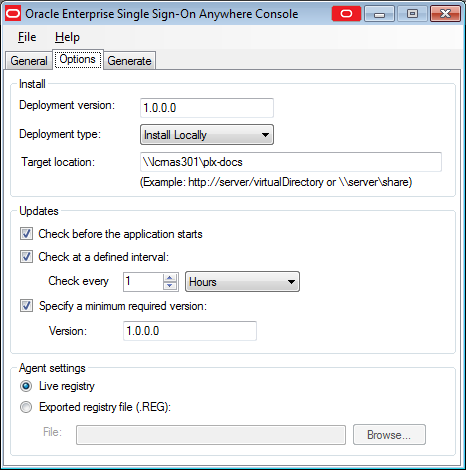
3.3.1 Install Settings
Use the settings in the Install group to configure the deployment version and file locations.
| Setting | Function |
|---|---|
| Deployment version | Specify the four-field (x.x.x.x) version number of the deployment. It is your choice whether to match the deployment version to the version of Logon Manager that you use for the deployment. |
| Deployment type | Specify whether Anywhere will install on the local workstation.
The Install Locally option creates a shortcut icon to Anywhere in the user's Start menu and adds an entry for Anywhere to the user's Add or Remove Programs applet on the Control Panel. The Online option is a per-session deployment and does not create the Start menu shortcut or add an entry to Add or Remove Programs. It also requires the user to have access to the web server or file share where the Anywhere deployment package is located in order to run Anywhere. The files will be cached on the user's machine, but the user cannot run the program directly. |
| Target location | Enter the virtual directory or file share from which Anywhere will be distributed. |
3.3.2 Updates Settings
Use the settings in the Updates group to specify when Anywhere should check for updates, and whether the user has the option to reject them when they are available.
Note:
If the user declines an optional update, Anywhere does not offer that update again.| Setting | Function |
|---|---|
| Check before the application starts | Check this box to have Anywhere check for updates to any of the installed files before the application launches. Anywhere updates only files that have changed. |
| Specify a minimum required version | Check this box to enforce a minimum deployment version.
This setting is useful for rollbacks. Anywhere rolls back only one version. If you want to roll back beyond the previous deployment, rename the desired rollback to a higher version than currently installed, and specify this new version as the minimum required. Rollbacks are available through Control Panel > Add or Remove Programs > Change > Restore. |
| Check at defined intervals | Check this box to specify a time interval at which Anywhere checks for updates. Configurable intervals are from one hour to one year (52 weeks). |
3.3.2.1 Localized Deployments
In order for localized installers and update notifications to appear in the correct language, you must have the appropriate .NET language pack installed on the workstation. To install a .NET language pack:
-
Log on to the local workstation.
-
Install the latest Microsoft .NET Framework if it is not already present (version 2.0 or above is required).
-
Download and install the target .NET language pack for your version of the .NET Framework.
-
Restart the workstation.
-
Install Anywhere.
The installer appears in the target language.
3.3.3 Agent Settings
Use the settings in the "Agent Settings" group to specify which registry settings Anywhere should use.
| Setting | Function |
|---|---|
| Live registry | Select to use the same settings as in the Anywhere live registry. |
| Exported registry file (.REG) | Select to use a custom registry that you created in the Administrative Console and exported. If you select this option, click the Browse… button to direct Anywhere to the desired registry file. |
Note:
The Console produces a.REG file compatible only with 32-bit systems. If you are merging the .REG file on a 64-bit system, you must run the following command to move the merged registry data to the correct location within the registry (otherwise, Universal Authentication Manager will not function):
reg.exe COPY HKLM\Software\Passlogix HKLM\Software\Wow6432Node\Passlogix /s
3.4 The Generate Tab
Use the Generate tab to view a summary of your configuration settings, specify a location for your deployment output, and generate your deployment package.
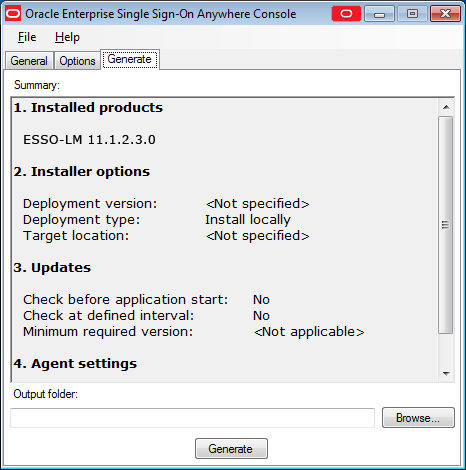
| Setting | Function |
|---|---|
| Summary | Review the settings in the General and Options tabs. |
| Output folder | Enter the path of the directory where you want to generate the Anywhere deployment, or click the Browse… button to navigate to the desired directory. |
| Generate | After you review your settings and specify the location of the deployment package, click the Generate button to create the Anywhere deployment package. |
Note:
Before distributing the deployment package, verify that it works correctly.The Anywhere installation includes a customizable index.html file. Edit this file with the information to direct end users to the deployment package, and distribute it.