4 Using the Administrative Console to Configure Password Reset
This chapter describes the Password Reset settings in the Administrative Console, and how to use them to configure repositories, connections, and the Enrollment Interview and Reset Quiz for your end-users.
This section covers the following procedures:
4.1 First-Time Setup
After you have installed the Password Reset server application, the first task is to configure the service for use with the directory-server or relational database and Web services. You perform this first-time configuration with the dialog pages in the System tab:
-
Use the Reset Service tab to set the Anonymous Logon account-the user account through which Password Reset users and administrators access the service.
-
Use the Storage tab to configure the directory or database to create the Password Reset repository for system questions and user data.
-
Use the Reset Service tab to set the Service account-the user account that Password Reset "logs on as" to the server.
When you have completed these steps, you can begin configuring the reset service itself. These tasks include:
-
Setting up the Enrollment Interview by supplying a set of system questions and associated point values
-
Setting the general reset service options. These options include the pass and fail score thresholds, user-lockout parameters, and administrator.
4.1.1 Configuring Service Storage
Use the Storage tab (under the System node) to view or change connection settings for the database (SQL Server or Oracle Database) or directory service (Active Directory or AD LDS (ADAM)) that you use as the repository for Password Reset system questions and user enrollments. To do this, use the settings in the Storage Configuration group. When you have completed your changes, click Submit to apply your new settings to Password Reset.
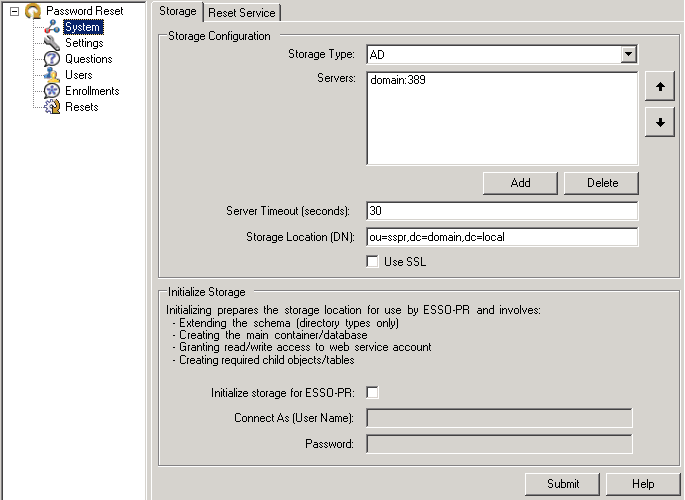
Description of the illustration pr_strge_tab_crop.png
You also use the Storage tab to have Password Reset perform the first-time setup tasks that prepare the database or directory-server repository for use with the enrollment and reset services. These tasks include:
-
Extending the schema to include directory types/database tables
-
Creating the main container or database
-
Granting read/write access to the Web service account
-
Creating required child objects or tables.
To perform these tasks, use the controls in the Initialize Storage group:
-
Select Initialize storage for Password Reset.
-
For Connect as User Name, enter the user name of an administrator of the directory server.
-
Enter the administrator password.
-
Click Submit to save any changes or modifications. Your changes will be lost if you do not click the Submit button before closing the Storage tab.
The following table provides information on the types of services used for storage.
| Storage Configuration | |
|---|---|
| Storage type | The type of service used. The remaining settings in this group change based on this selection.
Options are: |
The following table provides information about configuring connection settings for Active Directory and AD LDS (ADAM).
The following table provides information about configuring connection settings for LDAP.
Note:
For correct functionality of the Enrollments and Resets tabs when using Oracle Internet Directory (OID) as your repository, you must use the Catalog Management Tool included with OID to index thecreateTimestamp attribute.The following table provides information about configuring connection settings for an Oracle Database.
The following table provides information about configuring connection settings for a SQL Server.
The following table provides information on preparing the database or directory-server repository for initial setup.
| Initialize Storage | |
|---|---|
| Initialize storage for ESSO-PR | Activates the first-time configuration tasks. If this option is checked, Password Reset automatically iterates through the new connections in the list and attempts to initialize them sequentially. If a connection fails to initialize, initialization stops and connections further down in the list will not be initialized. If this occurs, resolve the issue and then retry initialization.
Note for Oracle Database: Because of the steps you performed in the Database Connections section, this setting is unnecessary and unavailable for Oracle Database. You need only enter the following two settings. |
| Connect as (User Name) | The user name of a directory or database administrator. |
| Password | The password of the administrator. |
4.1.1.1 Adding a Server
To add a server:
-
Enter the name or IP address and the port number for the server that holds the password reset information (users, password reset policies, enrollment questions and answers).
-
Click OK to return to the Storage Configuration tab when you are finished.
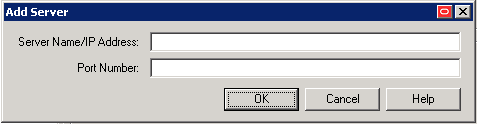
Description of the illustration pr_add_server.png
You can use multiple servers for failover support. If you enter more than one server address, Password Reset iterates through the list, in sequential order, until either it has successfully connected to a server or all connection attempts have failed.
4.1.1.2 Adding a Connection String
You must specify a connection string to the server that holds your password reset information (users, password reset policies, enrollment questions and answers). This must be the complete connection string for the database server; for example:
-
For Oracle DB:
Provider=OraOLEDB.ORACLE;Data Source=XE;User ID=system;Password=password -
For SQL Server:
Provider=SQLOLEDB.1;Integrated Security=SSPI;Initial Catalog=SSPR;Data Source=Servername;Trusted_Connection=Yes
You can use multiple servers for failover support. If you enter more than one server address, Password Reset iterates through the list, in sequential order, until either it has successfully connected to a server or all connection attempts have failed.
To add a connection string:
-
Enter the connection string for the server that holds the password reset information (users, password reset policies, enrollment questions and answers).
-
Click OK to return to the Storage Configuration tab when you are finished.
4.1.2 Configuring the Reset Service Account
Use the Reset Service tab (under the System node) to set or change the Anonymous Logon for Internet Information Services (IIS) Web Services. This is the domain account through which all end users access the Password Reset Web interface.
The following figure shows the Reset Service tab with the Status, Account, Listening Port, and Domain fields populated.
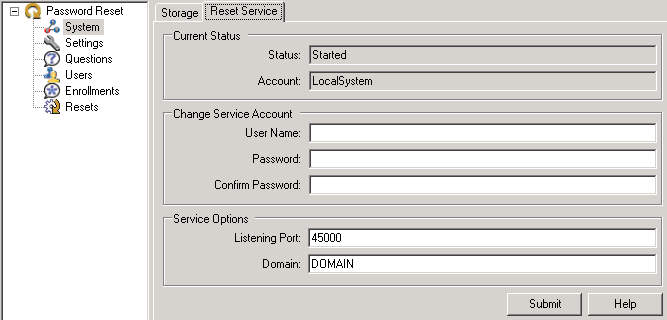
Description of the illustration pr_sys_reset_srv.png
The Anonymous Logon account you specify in this dialog appears in the Log On As column of the Computer Management Services tool. The account should have local administrator privileges, including permission to perform the following tasks:
-
Start, stop, and change services
-
Read from and write to Active Directory, AD LDS (ADAM) instance, or database server
-
Write to the local-machine registry (
HKLM)
Note:
To create a new user account with administrator privileges, use the Users and Groups tool in the Windows Computer Management Console.4.1.2.1 Setting or Changing the Anonymous Logon
To set or change the anonymous logon:
-
Enter the User Name and Password of the account that you want to use.
-
Enter the password again to confirm.
-
Click Submit.
| Setting | Function |
|---|---|
| Status | Displays whether the reset service account is started. This field is informational only. |
| Account | Displays the current password reset account. This field is informational only. |
| User name | The user name you have designated for the reset service account. |
| Password and Confirm password | The password of the reset service account. Enter the password in both fields. |
| Listening port | The number of the port used to detect password reset activity (default is 45000). |
| Domain | The trusted domain where user accounts are located. This setting is required only if the user accounts are in a domain other than that of the Password Reset machine's domain.
Note: Changes to this setting take effect immediately and do not require a restart of the IIS or Password Reset Service. |
4.2 Setting Up the Enrollment Interview
When the user starts the enrollment process, Password Reset displays the Enrollment Interview.
The Enrollment Interview comprises a series of questions in two groups:
-
Required questions
-
Optional questions
The required and optional questions are called system questions. System questions are predefined and managed by the administrator using the Questions tab of the Administrative Console. See Editing System Questions and Question Examples for more information.
When the end user has answered enough questions to meet the defined enrollment level, the Enrollment Interview ends.
If the user skips any optional questions, they may not meet the enrollment level threshold. If this scenario occurs, Password Reset begins the optional question set again, prompting the user to answer any questions they may have skipped.
4.2.1 Enrollment Level Settings
The Enrollment Level is specified on the Settings tab. This feature allows the administrator to set the total points value that end users must accumulate in order to complete the enrollment interview process, called the authentication threshold. This threshold removes the previous requirement that the administrator had to configure required questions with enough total value in points to meet the Authentication Success Level (Settings > Authentication thresholds). 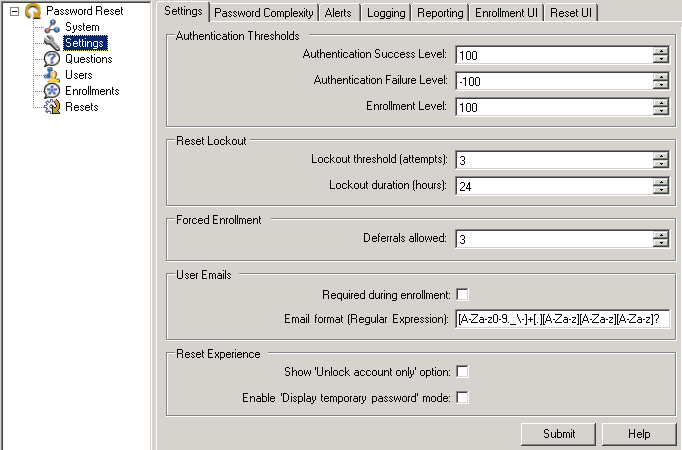
Description of the illustration pr_settings_stngs_crop.png
Password Reset allows administrators to configure questions with enough points to meet the Enrollment Level by counting both the required and optional questions. The Enrollment Level must be at least equal to the Authentication Success Level. With both the Enrollment Level and Authentication Success Level thresholds, users have the flexibility to select questions they want to answer out of a pool of questions.
During the enrollment interview, starting questions can be optional or required. A progress bar shows the user's progress (in percentage) in satisfying the enrollment level threshold.
If users reach the end of the question set without enough points to meet the enrollment level, Password Reset displays the message, "You have not answered enough optional questions to satisfy the enrollment requirement. In order to complete the enrollment process, you must continue to answer questions until the progress bar reaches 100%." Password Reset will then begin the optional question set prompting users to answer questions they previously skipped.
4.2.2 National Language Support
The initial enrollment dialog can be presented in the preferred language for each business unit as required by National Language Support (NLS). NLS is required for all languages supported by Password Reset.
The welcome text that appears on the initial page of the English enrollment interview is stored in an XML file called UserText.xml. The XML file names for the localized welcome pages take the form: UserText.language_code.xml, where language_code is replaced with the language code as denoted in the RFC 1766 format used by .NET. For example, the German XML file is named UserText.de.xml, the French XML file is named UserText.fr-ca.xml, and so forth. The files are stored in the \WebServices folder. Password Reset loads all the files with the above naming pattern and uses the appropriate version to display the 'Welcome' screen of the enrollment page.
On the client side, the Windows interface passes the language the user installed within the URL to tell Password Reset to show the enrollment page in that language.
For a complete list of language codes, see Section 7.3.4, "Password Reset Client-Side Registry Settings".
4.2.3 Questions Tab
Use the Questions tab to review and modify the current set of system questions. You can create new questions, set their language, set their point-values, set Required/Optional status, set answer sources and validity checks on the end user's answers, and select Users and Groups to allow or deny access.
You can modify the text, language, and weights of existing questions. You can also disable system questions—that is, remove them from the Enrollment Interview. Questions that you disable from the Enrollment Interview will still appear in the Reset Quiz to end users who have already provided answers to the disabled question, but they will no longer be presented to users who subsequently enroll or re-enroll.
See Creating System Questions, Editing System Questions, and Enrollment Interview for more information.
4.2.4 Creating System Questions
Use the System Questions tab (under the Questions node) to create system questions for the Enrollment Interview. For instructions to edit questions, including enabling/disabling and changing question weights, see Editing System Questions. For suggested text and settings, also see Question Examples.
Note:
Password Reset stores the answers to the Enrollment Interview in encrypted form in the repository using the one-way SHA-1 hash algorithm. Additionally, 16 random bytes of entropy are added to enrollment answers before hashing.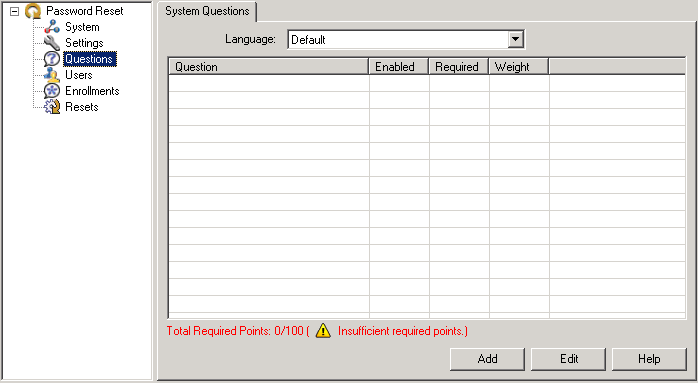
Description of the illustration pr_qstns_sys_qs_crop.png
To create a new system question:
-
In the System Questions tab, select the Language in which to enter the question. The default language is always available. Password Reset offers the following language options.
- English (default)
-
Brazilian Portuguese
-
Czech
-
Danish
-
Dutch
-
Finnish
-
French/Canadian French
-
German
-
Greek
- Hungarian
-
Italian
-
Japanese
-
Korean
-
Norwegian
-
Polish
-
Portuguese
-
Romanian
- Russian
-
Simplified Chinese
-
Slovak
-
Spanish
-
Swedish
-
Thai
-
Traditional Chinese
-
Turkish
You can enter and configure the same questions in multiple languages. When you navigate to this tab and select a language from the drop-down list, your questions display in whichever language you select.
As you add questions to this list, the line directly below the window keeps a running tally of the potential points a user can accumulate with correct and incorrect answers. The line appears in red type until you add questions with enough points for a user to reach the authentication threshold that you specified on the Settings tab.
-
Click Add to launch the Edit Question dialog and begin entering and configuring questions.
4.2.4.1 Assigning Point Values to Questions
Secure implementation of self-service reset depends on the selection and weighting of the individual system questions. Here are some primary considerations for each question:
-
How secret the answer is. How few people (ideally, none) are likely to know or be able to guess any given user's answer. The more secret the answer, the higher a point-value that can be assigned to the question if answered correctly in the Reset Quiz.
-
How personal the answer is. How much a wrong answer ensures that the person taking the Reset Quiz is not the authorized user; for example, "Are you left-handed, right-handed, or ambidextrous?" Questions that call for personal answers can serve as "eliminators" in the Reset Quiz: few or zero points are awarded for a correct response, and more points deducted for an incorrect response.
-
How memorable and static the answer is. This ensures that the user will recall the exact answer that he or she provided at enrollment. Questions that involve preferences (such as "what is your favorite ice cream") should have lower point-values for both correct and incorrect answers and are better suited as Optional questions. By comparison, questions that are based on unchanging and easily-recalled facts ("What is the name of the last high school you attended?") can have higher point-values for correct or incorrect responses; they are better candidates for Required questions.
-
The minimum number of questions that must be answered in order to pass (or explicitly fail) the Reset Quiz. This is derived from the Success/Failure score thresholds and the point values you assign to each question for correct and incorrect responses.
See Question Examples for more information.
4.2.5 Editing System Questions
After creating system questions, you can edit them and adjust their configurations in the Edit Question tab. Access this tab by clicking the Edit button on the System Questions tab.
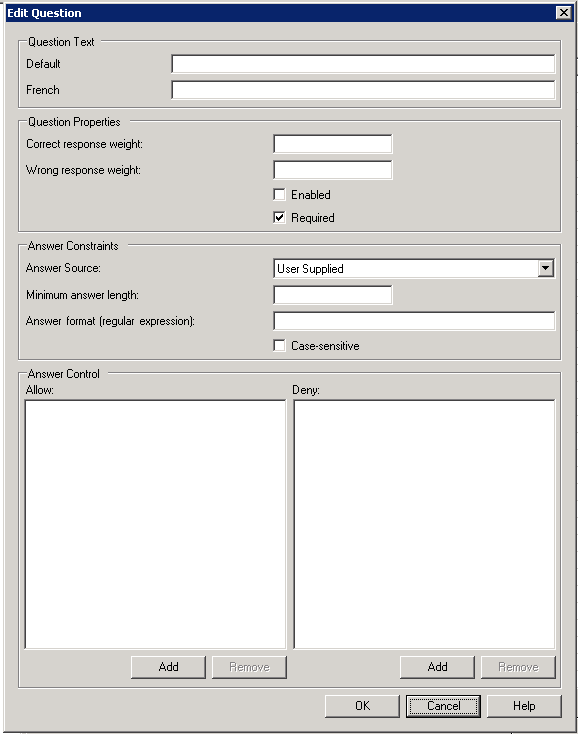
Description of the illustration pr_edit_sys_questns.png
Using this tab, you can:
-
Create new questions (in multiple languages, if desired)
-
Assign point values
-
Set Required/Optional status
-
Specify answer sources
-
Perform validity checks on the end user's answers
-
Select Users and Groups to allow or deny access to any question
-
Disable system questions; that is, remove them from the Enrollment Interview.
Questions that you disable from the Enrollment Interview will still appear in the Reset Quiz to end users who have already provided answers to the disabled question, but they will no longer be presented to users who subsequently enroll or re-enroll.
See Enrollment Interview for more information. For suggested text and settings, also see Question Examples.
The following table provides information about Question Text settings.
| Question Text | Description |
|---|---|
| Question text | The text of the question, in the default language, as it is displayed to the end user.
If you specify case-sensitivity, the answer given in the Reset Quiz must have exactly the same spelling, punctuation, capital-letter use, and white space, as the answer in the Enrollment Interview. Therefore, it is advisable to include formatting instructions or examples. For instance, if asking for a telephone number, provide an example, such as "(333) 555-1234" to insure consistency between the Enrollment Interview and the Reset Quiz. If the question is "What is your Social Security number?" note whether or not the response should include dashes between number segments. |
| <Language> text | If you are using Password Reset in more than one language, enter the translated question text in this field. |
The following table provides information about Question Properties settings.
| Question Properties | |
|---|---|
| Correct response weight | Specify the number of points to add to the end user's score if the question is answered correctly. If modifying this field, see Changing Question Weights. |
| Wrong response weight | Specify a negative number to indicate the number of points to deduct from the end user's score if the question is answered incorrectly. If modifying this field, see Changing Question Weights. |
| Enabled | If checked: This question is used in the Enrollment Interview and in the Reset Quiz.
If unchecked: This question is not used in the Enrollment Interview. It is used in a Reset Quiz only if: 1) it has previously been enabled and 2) if the end user has answered the question in an Enrollment Interview. |
| Required | If checked: This is a Required question. The end user must provide an answer to the question in order to complete enrollment. A Required question is always used in the Reset Quiz.
If unchecked: This is an Optional question. The end user can skip this question in the Enrollment Interview, in which case the question will not be used in this end user's Reset Quiz. If the end user supplies an answer to an Optional question, the question is used in the Reset Quiz only after all Required questions have been asked. |
The following table provides information about Answer Constraints settings.
| Answer Constraints | |
|---|---|
| Answer source | Specify the source from which the answer to this question should come. Select the default, User supplied, if the user will supply the correct answer during the Enrollment Interview.
If the source is not supplied by the user, select the external validator location from the drop-down list. See External Validators for more information. |
| Minimum answer length | Specify the minimum number of characters the end user must enter for a valid answer. |
| Answer format | Specify the format and punctuation for the answer using a regular expression. For example, you can specify the date format "12/1/1983" with the expression
\d*\d/*\d\d/\d{4}
(allowing the entry of single or double-digit month and day and requiring a four-digit year). If you want to require the end user to type a Social Security number with dashes, use the expression
\d{3}-\d{2}-\d{4}
This setting is optional. Note: For more information about regular expressions, refer to |
| Case sensitive | If checked. The end user's answer is checked for consistent use of upper- and lower-case characters.
If unchecked. The end user's answer is not checked for consistent use of upper- and lower-case characters. |
The following table provides information about Access Control settings.
| Access Control | |
|---|---|
| Allow | Click the Add button to launch a window from which to select users and groups that will receive this question. See Selecting Users and Groups for Question Assignment. |
| Deny | Click the Add button to launch a window from which to select users and groups that will not receive this question.
Note: By default, if any user or group is denied access, all users and groups are denied access except those specified in the Allow list. |
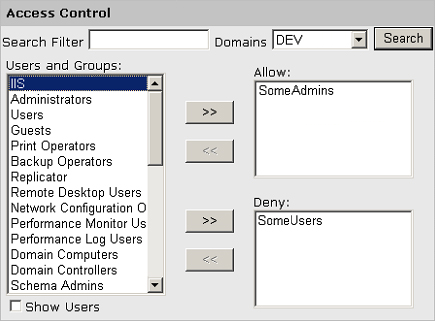
4.2.5.1 Selecting Users and Groups for Question Assignment
Clicking the Add button in the Access Control settings displays the Edit Users and Groups dialog.
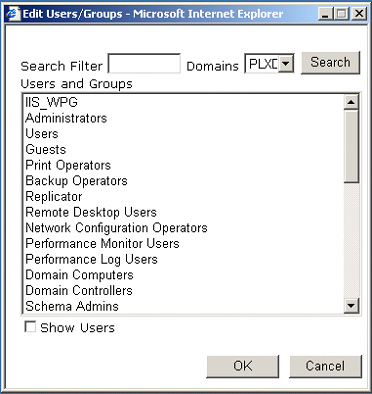
To use this dialog:
-
Enter a search filter, if desired, and select a domain from the drop-down list.
-
Check the Show Users box at the bottom of the screen if you want the list to include individual users as well as groups (this could create a very long list). You can check this box before or after performing the search.
-
Click the Search button.
-
Scroll through the Users and Groups list on the left to locate the groups (and users if you checked the box below) to specify who receives the question you are configuring.
-
Do one of the following:
-
Double-click an item in one list to move it to the other list.
-
Click the right-facing double arrows (>>) to move a user or group to the Selected list on the right. Remove an entry by clicking the left-facing double arrows (<<).
-
-
Click OK to save your selections and return to the Edit Question dialog.
For more information about how system questions are assigned to users and groups, see Role/Group Support.
4.2.5.2 Modifying or Disabling a System Question
You can change the text or point value of a question, assign or unassign it to users and groups, or remove it from the enrollment interview entirely. To perform any of these tasks:
-
In the Questions tab, select the Language in which to modify the question.
-
Do one of the following:
-
Double-click a question.
-
Select a question and click Edit.
-
-
In the Edit Question dialog, do any or all of the following:
-
Edit the text and then click OK.
-
Edit the weights and then click OK.
Note:
If you change the values in the Correct Response Weight or Wrong Response Weight fields, a Response Weights Changed dialog appears. See Changing Question Weights. -
Clear Enabled to remove the question from the Enrollment Interview.
Note:
After you create a question, you cannot change whether to require it or the answer constraints settings. -
Select or deselect the Users and Groups that you want to assign this question to.
Note:
You cannot assign questions to users or groups when using a database (such as Microsoft SQL Server or Oracle Database) for your repository. The settings are available for editing, but the assignments will not be written to the database.
-
-
Click OK to save your changes, or click Cancel to abandon your changes, and return to the System Questions tab.
4.2.5.3 Changing Question Weights
The weight of a question may be modified if it is determined to be more or less effective in the reset test. A possible ramification of modifying a correct response weight after a question has been created is that enrolled users might not be able to pass the reset test due to an insufficient score, even if they answer all the questions correctly. To avoid such an occurrence, if a correct response weight is changed, a dialog appears, presenting the option to:
-
Modify this question: When this option is selected, the change will be made to this question. Note that users who answered this question during enrollment may not be able to reset their password if the correct response weight is set too low.
or
-
Disable this question and create a new question: Disables this question and creates a new question with the changes. The benefit is that currently enrolled users will not be affected by the changes. Note that disabled questions are shown as "disabled" (dimmed) in the System Questions list.
4.2.6 Question Examples
The following tables provide some examples of system questions, recommended as Required, Eliminator, or Optional, with suggested point values based on the default score thresholds of -100 to 100 points.
4.2.6.1 Required Questions
These questions are good prospects for Required questions. Note that all of these questions have answers that are facts on record. Oracle strongly recommends that your selection of Required questions have answers that come from as many different sources as possible. For example, in some states, a driver's license may display the Social Security number and date of birth.
| Question | Required? | Points if Correct | Points if Incorrect |
|---|---|---|---|
| What is your Social Security number (numbers only, no spaces)? | Y | 10 | -75 |
| What is your date of birth (mmddyy)? | Y | 25 | -50 |
| In which city were you born? | Y | 25 | -50 |
| What is your mother's maiden name? | Y | 25 | -75 |
| What was the name of the first school you attended? (or "...that you remember attending)?" | Y | 25 | -25 |
| What is the name of the last high school that you attended? | Y | 25 | -25 |
4.2.6.2 Eliminators
These questions are Eliminators because the authorized end user is very unlikely to answer them incorrectly. The answers are personal, and therefore have low or no point-value for correct answers and high negative point-value if answered incorrectly.
| Question | Required? | Points if Correct | Points if Incorrect |
|---|---|---|---|
| What is your eye color? | Y | 0 | -75 |
| Are you left/right handed, or ambidextrous (l, r, or a) | Y | 5 | -75 |
| What is your gender (male or female)? | Y | 0 | -75 |
4.2.6.3 Optional Questions
These questions are acceptable as Optional questions only, because they may not apply to all enrollees.
| Question | Required? | Points if Correct | Points if Incorrect |
|---|---|---|---|
| What was the name of your first or favorite pet? | N | 25 | -25 |
| What color was your first car? | N | 25 | -25 |
| What is your wife's maiden name? | N | 25 | -25 |
| How many siblings do you have? | N | 25 | -25 |
| What is your spouse's date of birth? (mmddyy) | N | 25 | -25 |
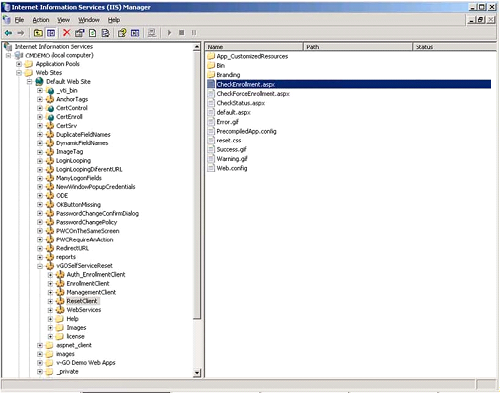
4.2.7 Excluding Users from Forced Enrollment
Note:
The use of the Windows Integrated authentication method in this procedure requires that the Password Reset server URL be added to the Internet Explorer Local Intranet zone for all end users. In the absence of this URL, pass-through authentication will fail and the user will not be prompted for forced enrollment, despite having permissions to thecheckenrollment.aspx page.To exclude users from forced enrollment, do the following:
-
Open the Internet Information Services (IIS) Manager tool.
-
Locate the
vGOSelfServiceResetvirtual Web directory, and expand it. -
Locate the
CheckEnrollment.aspxfile beneath thevGOSelfServiceResetResetClientvirtual directory. -
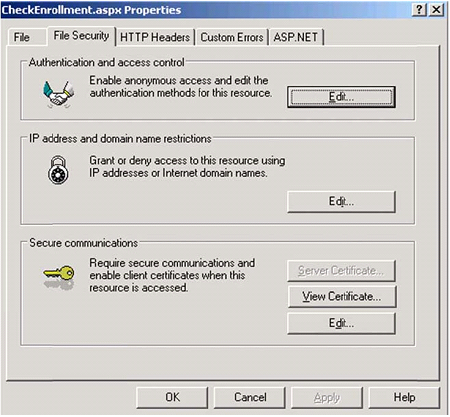
Right-click CheckEnrollment.aspx, and select Properties.
Description of the illustration pr_excl_iis_panel.png
-
In the properties of CheckEnrollmentStatus.aspx, click the File Security tab, then click Edit in the Authentication and access control section.
Description of the illustration pr_excl_chk_enroll.png
-
In the Authentication Methods dialog, uncheck Anonymous Access so that only Integrated Authentication is selected.
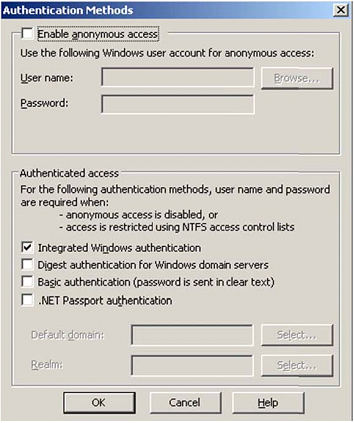
Description of the illustration pr_excl_auth_methods.png
-
Navigate to
C:\Program Files\Passlogix\v-GO SSPR\ResetClient, and set permissions on theCheckEnrollment.aspxfile. Add the Exclusion Group(s) with Deny permissions checked. In the example below, the Exclusion Group isUniversal_Group_SSPR.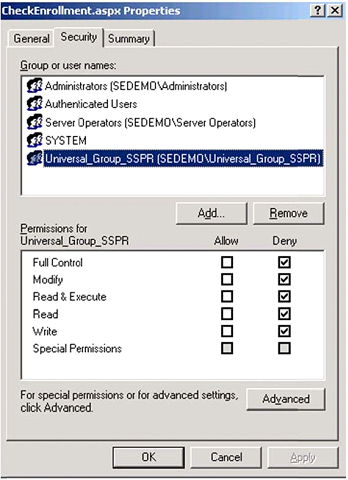
Description of the illustration pr_excl_chk_enroll_sec.png
4.3 Configuring Reset Authentication
When an end user requests a password reset, Password Reset displays the Reset Quiz.
The Reset Quiz is a series of questions drawn from the system questions that the end user answered in the Enrollment Interview. The Reset Quiz presents all of the required questions one at a time, in random order, for the end user to enter a response. If there are no required questions set up, the Reset Quiz presents the optional questions only. With each response, the preset point-value for correct answers is added to the total score, or the point-value for incorrect answers is deducted.
After all of the required questions have been presented, the Reset Quiz continues until either:
-
All Optional questions have been presented.
-
The end user answers a sufficient number of questions to meet either of two score thresholds.
-
If the end user's score equals or exceeds a preset Success score threshold, the New Password dialog appears. The end user then enters and confirms a new password, and returns to the initial logon dialog.
-
If the end user's score equals or falls below a preset Failure score threshold, the Reset Quiz ends with no password reset, and the end user returns to the initial logon dialog. Password Reset records the quiz session as an explicit failure, indicating that the end-user failed the quiz by incorrectly answering questions.
-
If the end user answers all of the questions without achieving either score threshold, the Reset Quiz ends with no password reset, and the end user returns to the initial logon dialog. Password Reset records the quiz session as an implicit failure indicating that the end-user failed the quiz with an insufficient score to pass or explicitly fail.
-
The Success and Failure score thresholds are set by the administrator in the Settings page of the Password Reset node of the Administrative Console. The text and point-values for individual system questions are set in the System Questions page.
Also see Reset Service Settings for more information.
4.3.1 Score Thresholds
The score thresholds are the point-values that determine whether the end user passes or fails the Reset Quiz.
-
The Success value determines the score (the point-value total achieved for the quiz) that end users must achieve in order to reset their passwords.
-
The Failure value determines the minimum (that is, a negative) score that end users can accrue by answering Reset Quiz questions incorrectly. If the end user's score falls below this setting, the Reset Quiz ends without a password reset.
See Enrollment Level Settings for more information.
4.3.2 Editing Reset Service Settings
Use the Settings tab (under the Settings node) to modify general settings for the Reset Quiz. When you have completed your changes, click Submit to apply your new settings to Password Reset.
The following table provides information about Authentication Threshold settings (shown below).

Description of the illustration pr_auth_thresh.png
| Authentication Thresholds | |
|---|---|
| Authentication success level | The score (the point-value total achieved for the quiz) that end users must achieve in order to reset their passwords. The default value is 100. |
| Authentication failure level | The minimum (negative) score that end users can accrue. If the end user's score falls below this setting, the Reset Quiz ends without a password reset. The default value is -100. |
| Enrollment level | The score (the point-value total achieved for the enrollment interview) that end users must achieve in order to complete the enrollment interview. The default value is 100. The Enrollment Level must be at least equal to or greater than the Authentication Success Level. |
The following table provides information about Reset Lockout settings (shown below).

Description of the illustration pr_reset_lockout.png
| Reset Lockout | |
|---|---|
| Lockout threshold (attempts) | The number of consecutive unsuccessful reset attempts permitted. If an end user fails the Reset Quiz this number of times in a row, no further Reset Quiz attempts are permitted for the Lockout Duration interval. |
| Lockout duration (hours) | The time period, in hours, that an end user is not permitted to take the Reset Quiz. The Lockout Duration begins when the end user consecutively fails the Reset Quiz the number of times given for Lockout Thresholds.
Note: To override lockout for individual end users, click the Users tab, select the end user from the list, then click Unlock. |
The following table provides information about Forced Enrollment settings (shown below).

Description of the illustration pr_force_enroll.png
| Forced Enrollment | |
|---|---|
| Deferrals allowed | The maximum number of times a user can defer Password Reset enrollment. When the user exceeds the maximum number of deferrals, he must complete the enrollment process in order to be allowed to log on.
Note: If you wish, you can exclude certain users from forced enrollment. See Excluding Users from Forced Enrollment for detailed instructions. |
The following table provides information about User E-mails settings (shown below).

Description of the illustration pr_user_email.png
| User E-mails | Function |
|---|---|
| Required during enrollment | Controls whether or not users are required to enter an e-mail address during the enrollment process. |
| E-mail format (regular expression) | Controls the valid format of the user e-mail address. The default setting allows for most acceptable e-mail formats. |
The following table provides information about Reset Experience settings (shown below).

Description of the illustration pr_reset_exp.png
| Reset Experience | Function |
|---|---|
| Show "Unlock account only" option | Controls whether or not a user is given the option to unlock his or her account rather than reset the password. This option is presented after a user passes the Reset Quiz. |
| Enable "Display temporary password" mode | Controls whether or not Password Reset should allow the end user to reset the password regardless of the Active Directory password policy. With this checkbox enabled, Password Reset overrides any Active Directory restrictions that are in place and provides the user with a temporary password. The user can then log on with that temporary password and change it through Windows. |
Also see Configuring Reset Authentication for more information.
4.3.3 Multi-Domain Support
You can configure Password Reset to reset Windows passwords and unlock Windows accounts in its own domain or any domain you designate as trusted.
Multi-domain support requires the following conditions:
-
There must be valid two-way trusts between the Password Reset domain and other domains.
-
The Password Reset reset service user account must be a member of the local administrators group of the trusted domain.
-
All the domains must share the same settings as the Password Reset server, such as password complexity, alerts, questions, and so forth.
To set up multi-domain support, in the Administrative Console, select the domain you want to designate as trusted from any of the following screens:
-
The drop-down menu in the Edit Users/Groups dialog.
-
The Questions tab, when you edit existing questions or create a new one.
-
The Users tab.
When you make a domain selection on any one of these screens, that change is reflected in all the other screens. The domain that you select is saved in the registry value, HKLM\SOFTWARE\Passlogix\SSPR\SSPRService\DisplayDomain.
Note:
When performing queries against a trusted domain, you may receive the error message: "The server is not operational." This can occur if the guest account on the trusted domain is turned on, because that account does not have the rights to enumerate usersTo eliminate this error, do one of the following:
-
Turn off the guest account in the trusted domain.
-
Create the same trusted domain user account in the trusted domain.
4.4 Password Complexity
Use the Password Complexity tab (under the Settings node) only to adjust the password constraints to make certain that they match or are within the constraints of the Group Policy of the Windows domain. This setting does not apply to end-user passwords (see note, below). In typical usage (that is for typical group policies), these settings need not be changed.
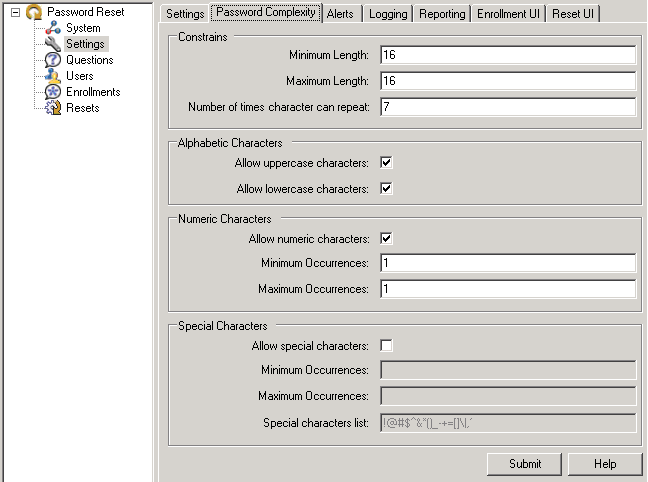
Description of the illustration pr_stngs_pwd_cmplx_crop.png
The following tables explain the options for the Password Complexity settings. When you have completed your changes, click Submit to apply your new settings to Password Reset.
Note:
In order for Password Reset to reset end-user passwords, the Reset Service account performs an intermediate password reset as a proxy for the user. The Reset Service account generates a password internally that must conform to the domain's group policy, but is not subject to the domain's minimum password age policy. The password complexity settings in this dialog apply only to that intermediate password, not to end-user passwords.Resetting a password adds two entries to the user's password history in Active Directory.
| Constraints | |
|---|---|
| Minimum length | Minimum internal password length: 1-63 (default: 16) |
| Maximum length | Maximum internal password length: 1-63 (default: 16) |
| Number of times characters can repeat | 0-62, default: 7 |
| Alphabetic Characters | |
|---|---|
| Allow uppercase characters | Select to allow uppercase characters (default: allowed) |
| Allow lowercase characters | Select to allow lowercase characters (default: allowed) |
| Numeric Characters | |
|---|---|
| Allow numeric characters | Select to allow numeric characters (0-9), (default: allowed) |
| Minimum occurrences | 1-63, default: 1 |
| Maximum occurrences | 1-63, default: 1 |
| Special Characters | |
|---|---|
| Allow special characters | Select to allow special characters (non-alphabetical, non-numeric) (default: not allowed) |
| Minimum occurrences | 1-63, default: 1 |
| Maximum occurrences | 1-63, default: 1 |
| Special characters list | Characters that may be used (default: !@#$%^&*()_-=+[]\|.?) |
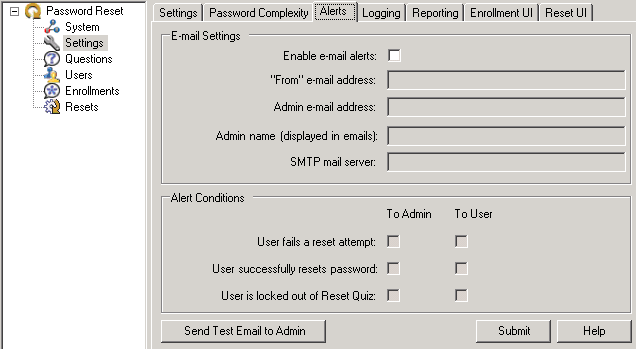
4.5 Alerts
Use the Alerts tab (under the Settings node) to configure Password Reset to email administrators and/or users with notification of significant user-generated events. You configure this alert with the UserText.xml template included with the product in the directory: C:\program files\Passlogix\v-GO SSPR\WebServices.
Description of the illustration pr_stngs_alerts_crop.png
The following table lists the variables in the UserText.xml file.
| E-Mail Template Variable | Description |
|---|---|
| $USER | The user's "display name" (full name) as defined in Active Directory |
| $ACCOUNT | The user's username in the format: domain\username. |
| $ADMIN | The administrator's name (as entered in the Alerts tab of the Administrative Console) |
| $DATETIME | The date and time when the event occurred; for example: 7/23/2012 3:24 PM |
| $ATTEMPTS | The number of times the user has failed the reset quiz |
| $PRODUCT | ESSO-PR |
| $FULLPRODUCT | Oracle Enterprise Single Sign-On Password Reset |
You can see a sample alert by clicking Send Test E-mail to Admin. When you are satisfied with the results, click Submit to apply your new settings to Password Reset.
The following table provides information on E-mail Template variables.
| E-Mail Settings | Description |
|---|---|
| Enable e-mail alerts | Select to activate e-mail alerts |
| "From" e-mail address | The e-mail address that originates the alert. This can be any valid email address for the SMTP mail server specified below. |
| Admin e-mail address | The e-mail address of the administrator to whom the alerts will be sent. |
| Admin name (displayed in e-mails) | The name of the administrator to whom alerts will be sent. This name will be displayed in the e-mails. |
| SMTP mail server | The name of the outbound mail server. |
The following table provides information on Alert Conditions.
| Alert Conditions | Description |
|---|---|
| User fails a reset attempt | Select who should receive e-mail alerts if a user fails a reset attempt: the Admin, the User, or both.
This field is only active if Enable e-mail alerts is selected. Also see Reset Service Settings for the lockout controls. |
| User successfully resets password | Select who should receive e-mail alerts if a user successfully resets his password: the Admin, the User, or both.
This field is only active if Enable e-mail alerts is selected. |
| User is locked out of Reset Quiz | Select who should receive e-mail alerts if a user fails the Reset Quiz more times than the threshold permits: the Admin, the User, or both.
This field is only active if Enable e-mail alerts is selected. |
4.6 Logging
Use the Logging tab (under the Settings node) to enable logging, specify the syslog server and port, and select the types of events that should generate syslog messages. Password Reset sends these messages to a syslog listener, which in turn generates notifications to apprise the administrator of user enrollment and reset events.
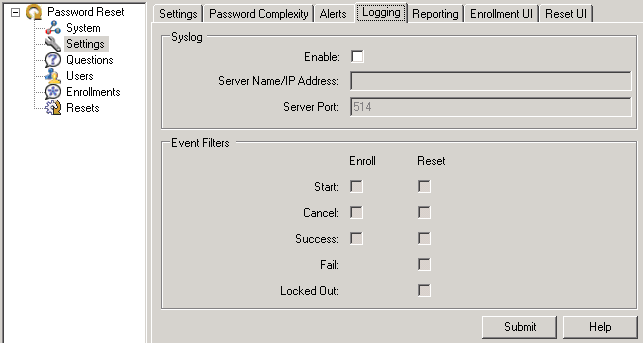
Description of the illustration pr_stngs_lgng_crop.png
Enter the following information and click Submit to apply your new settings to Password Reset.
| SysLog Setting | Function |
|---|---|
| Enable | If checked, syslog logging will be enabled. |
| Server name/IP address | The name or IP address of the syslog server. |
| Server port | The port where the syslog server is listening for Syslog messages (default port is 514). |
| Event Filters | Function |
|---|---|
| Start | Check to have Password Reset send a message when the user begins an enrollment or reset session. |
| Cancel | Check to have Password Reset send a message when the user cancels an enrollment or reset session. |
| Success | Check to have Password Reset send a message when the user successfully completes an enrollment or reset session. |
| Fail | Check to have Password Reset send a message when the user fails the reset session. |
| Locked out | Check to have Password Reset send a message when the user gets locked out of the Password Reset system (by failing too many reset quizzes). |
4.7 Reporting
Use the Reporting tab (under the Settings node) to configure generation of reports on user activities. Refer to the Reporting section of this guide for more information on using this tool.
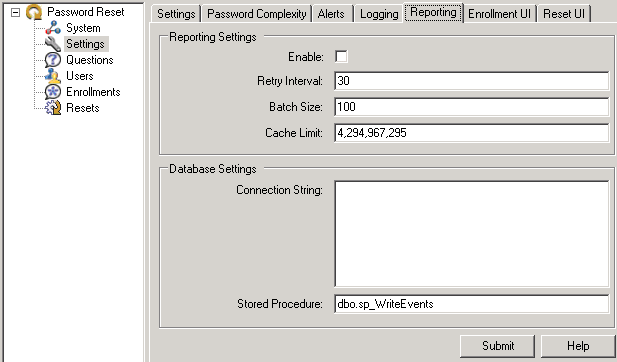
Description of the illustration pr_stngs_reporting_crop.png
The settings on this tab configure the Reporting tool and database. Click Submit to apply your new settings.
The following table provides information on Reporting settings.
| Reporting Setting | Function |
|---|---|
| Enable | Check this box to enable Reporting. |
| Retry interval | Defines timeout in minutes between sequential operations of the Reporting Service Cache offloading events to the database. Default is 30. An interval is necessary to reduce database connection load. |
| Batch size | Defines the group size of events to be sent to the database Stored Procedure at one time. Default is 100. For example, if you have 1000 events in the Reporting Service cache and the Batch Size = 100, you will have 10 database Stored Procedure calls. |
| Cache limit | Number of reporting events to be cached. Once this number is reached, the oldest events are discarded. Default is 4,294,967,295.
For example, if the batch size is 100, and an end users system cannot connect to the reporting service, it will keep logging events. Once it gets to |
The following table provides information on database settings.
| Database Setting | Function |
|---|---|
| Connection string | Database connection string in the OLE DB format:
"Provider=sqloledb; Data Source=myServerName; Initial Catalog=myDatabaseName; User Id=myUsername; Password=myPassword" or Provider=SQLOLEDB.1;Integrated Security=SSPI;Persist Security Info=False;Initial Catalog=<Database>;Data Source=<DBServer> |
| Stored procedure | The name of the stored procedure in the database. When encoded events are sent to the database, the stored procedure is called to decode the XML file and store the events in the database. |
4.8 Configuring the Enrollment User Interface
Use the Enrollment UI tab (under the Settings node) to customize the Enrollment Interview User Interface.
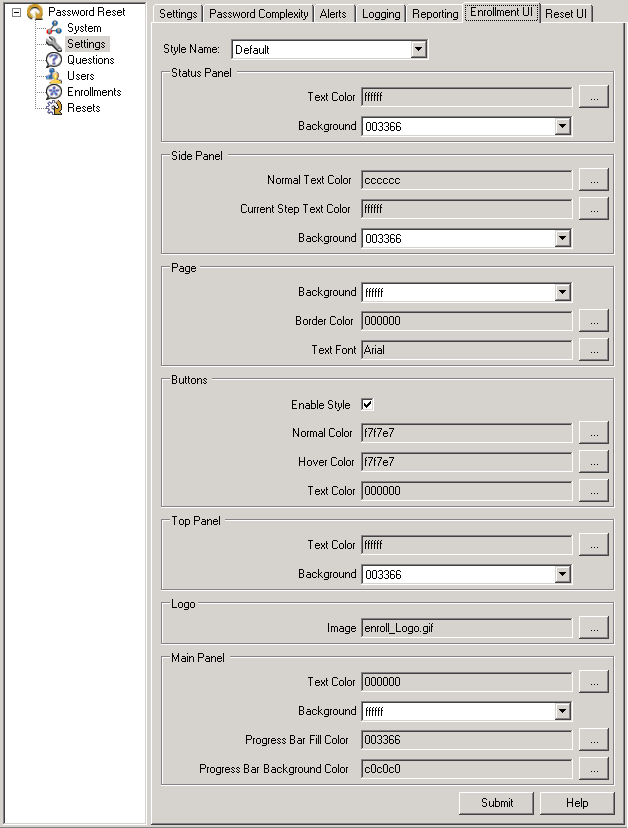
Description of the illustration pr_stngs_enrlmnt_ui_crop.png
You can edit the look and feel of all Password Reset Client pages (the Enrollment and Reset interviews, not the Administrative Console). This page allows you to adjust colors, fonts, and logos on the Enrollment user interface.
The choices you make on this tab become the Default style settings. You can create additional styles by performing the following steps:
-
Shut down the Administrative Console.
-
In
C:\Program Files\Passlogix\v-GO SSPR\WebServices\Templates, select thedefault.xmland copy it. -
Paste the copy into the same directory.
-
Select the copied file and rename it. The new style will be available in the drop-down when you relaunch the Administrative Console. You can select it to create and save an entirely different look and feel while still retaining the Default style.
Enter the following information and click Submit to apply your new settings to Password Reset.
| Status Panel | Function |
|---|---|
| Text color | Select the color for the text in the status panel.
or
|
| Background | From the drop-down list, select to use either a solid color or background image.
Note: There is no size requirement for this image. For reference, the Oracle status panel background image is 408x28. |
| Side Panel | Function |
|---|---|
| Normal text color | Select the text color for the unhighlighted category text in the side panel. Follow the same procedure as above to choose a color. |
| Current step text color | Select the text color for the current step text in the side panel. Follow the same procedure as above to choose a color. |
| Background | From the drop-down list, select to use either a solid color or background image. Follow the same procedure as above.
Note: There is no size requirement for this image. |
| Page | Function |
|---|---|
| Background | From the drop-down list, select to use either a solid color or background image. Follow the same procedure as above.
Note: There is no size requirement for this image. |
| Border color | Select the border color for the page. Follow the same procedure as above to choose a color. |
| Text font | Select the font to be used for the Enrollment UI. Click the ellipsis ("…") button to launch the Font window. Highlight the desired font and click OK.
Note: The font list is generated from fonts installed on the server. To add a font to the list, install it on the server. |
| Buttons | Function |
|---|---|
| Enable style | Check this box to activate the button style you create in this section. |
| Normal color | Select the normal color for buttons in the Enrollment UI. Follow the same procedure as above to choose a color. |
| Hover color | Select the hover color for buttons in the Enrollment UI. Follow the same procedure as above to choose a color. |
| Text color | Select the text color for buttons in the Enrolment UI. Follow the same procedure as above to choose a color. |
| Top Panel | Function |
|---|---|
| Text Color | Select the text color to be displayed for the text in the top panel of the Enrollment UI. Follow the same procedure as above to choose a color. |
| Background | From the drop-down list, select to use either a solid color or background image. Follow the same procedure as above.
Note: There is no size requirement for this image. For reference, the Oracle status panel background image is 408x47. |
| Logo | Function |
|---|---|
| Image | Select the logo image to appear in the top left area of the Enrollment UI. Follow the same procedure for selecting a background image above. For images to appear in this list, they must exist in the %SSPR%\Images folder.
Note: There is no size requirement for this image. For reference, the Oracle enrollment logo is 146x47. |
| Main Panel | Function |
|---|---|
| Text Color | Select the color for the text in the main panel. Follow the same procedure as above to choose a color. |
| Background | From the drop-down list, select to use either a solid color or background image. Follow the same procedure as above.
Note: There is no size requirement for this image. For reference, the Oracle main panel background image is 408x273. |
4.9 Configuring the Reset User Interface
Use the Reset UI dialog (under the Settings tab) to customize the Reset User Interface.
You can edit the look and feel of all Password Reset Client pages (the Enrollment and Reset interviews, not the Administrative Console). This page allows you to adjust colors, fonts, and logos on the Reset User Interface.

Description of the illustration pr_stngs_reset_ui_crop.png
Configure the following settings as you want them and click Submit to apply your changes to Password Reset.
| Logo | Function |
|---|---|
| Image | Select the logo image to appear in the reset window. Click the ellipsis ("…") button to launch a window that lets you choose from all images in the %SSPR%\Images folder on the server.
Note: The maximum size for this image is 448x45. For reference, the Oracle reset logo is 342x24. |
| Window | Function |
|---|---|
| Border Color | Select the border color for the reset box:
|
| Background | From the drop-down list, select to use either a solid color or background image.
Note: There is no size requirement for this image. For reference, the Oracle reset window background image is 450x350. |
| Normal text color | Select the text color for error messages that appear during the reset process. Follow the same procedure as above to choose a color. |
| Error color | Select the text color for the unhighlighted category text in the side panel. Follow the same procedure as above to choose a color. |
| Version info color | Select the text color for version information shown on the reset window. Follow the same procedure as above to choose a color. |
| Buttons | Function |
|---|---|
| Enable style | Check this box to activate the button style you create in this section. |
| Normal color | Select the normal color for buttons in the Enrollment UI. Follow the same procedure as above to choose a color. |
| Hover color | Select the hover color for buttons in the Enrollment UI. Follow the same procedure as above to choose a color. |
| Text color | Select the text color for buttons in the Enrolment UI. Follow the same procedure as above to choose a color. |
| Page | Function |
|---|---|
| Background | From the drop-down list, select to use either a solid color or background image. Follow the same procedure as above.
Note: There is no size requirement for this image. |
| Text font | Select the font to be used for the Reset UI. Click the ellipsis ("…") button to launch the Font window. Highlight the desired font and click OK.
Note: The font list is generated from fonts installed on the server. To add a font to the list, install it on the server. |
4.9.1 Changing the Reset User Interface Through the Registry
Some user interface settings are configurable through registry settings only. For instance:
-
The Reset User Interface, by default, has fields pre-populated with the username and domain of the last Windows account to log on to the workstation. You can set the message above these fields to display a prompt that reads, "To reset your network password, please type in your user name, choose the domain, and click OK to continue."
-
The title bar for the enrollment and reset windows, by default, reads, "Oracle ESSO-PR." You can change this window title to suit your company's needs.
-
The password reset link message, by default, reads, "Forgot your password? Click here to reset it." You can change the message in this link (registry settings for this configuration apply only to Windows 7).
Note:
To learn more about customizing error messages, continue to Customizing Reset Messages. -
You can eliminate the "Forgot your password?" link under the user's default Windows 7 logon tile, and create a separate password reset tile and text, on the logon screen. This setting is useful in some Windows 7 environments where attaching the reset user interface to the Microsoft password credential provider causes the appearance of duplicate tiles.
See Section 7.3.4, "Password Reset Client-Side Registry Settings" for the specific registry settings to configure the above options.
4.9.2 Customizing Reset Messages
When the user attempts to change a password and cannot, due to either an account or password policy restriction that you have set, the user receives an error message explaining why the attempt was unsuccessful. The Administrator has the ability to customize the most common of these error messages through the Administrative Console to help the user to correct the error.
Following are the customizable error messages and the instances that would prompt their display:
| Message | Message Code | Description |
|---|---|---|
| Password has been successfully reset. | Text_ResetSuccess |
The password reset attempt was successful. |
| Your account has been successfully unlocked. | Text_UnlockSuccess |
The attempt to unlock the account was successful. |
Your temporary password is "<b>{0}</b>". |
Text_TempPassword |
Provides the user with a temporary password after completion of the reset quiz.
Note: Be certain to include the {0} syntax in this message. Password Reset replaces this string with the temporary password. |
<p>Thank you for using $PRODUCT.</p>
|
Text_Success |
Informational message that follows each of the success messages above.
Note: Password Reset replaces the |
| Access Denied | Error_AccessDenied |
There is a configuration error that the Administrator needs to rectify in order for the user to continue. |
| Bad Password | Error_BadPassword |
The user entered a password that does not fulfill the password policy requirements. |
| Click here to reset the enrollment session. | Text_ResetSession |
This text instructs the user to click to be directed to a URL that links to the reset session. |
| Session is invalid. | Error_SessionInvalid |
The user has exceeded the permissible interval of inactivity while taking the reset quiz. |
| The answers provided failed to satisfy the requirements necessary to continue with the reset. | Error_FailQuiz |
The user provided enough incorrect answers to reach the failure threshold. |
| The reset service is currently not available. Please contact your administrator for more information. | Error_ServiceNotRunning |
The SSPRChangePasswordSvc service is not running on the Password Reset server. |
| Error retrieving user data. Please make sure the specified user is enrolled. | Error_UnknownUser |
The user who is attempting to log on has not enrolled in Password Reset. |
| User Cannot Change | Error_UserCannotChange |
The user is attempting to change a password in a time frame or manner contrary to the policy that the Administrator has defined. |
| User Not Found | Error_UserNotFound |
The user's account has been deleted from Active Directory between the time of enrollment and the current attempt to access the account. |
| Your account has been locked out. | Error_LockedOut |
The user has exceeded the permissible number of failures taking the reset quiz and has been locked out of Password Reset. The user must wait until the Administrator unlocks the account or the lockout interval elapses. |
Note:
To use these settings, add them to the Server registry. See Section 7.3.5, "Password Reset Server-Side Registry Settings" for more information.In the following example, you will change the "Bad Password" error message. If the user enters a password that does not comply with the password policy, the user receives the standard error message, "The password did not meet password policy requirements."
Perhaps you want to inform the user how to select a policy-compliant password, and so you want to add more information to this message. To change this message:
-
From the Start menu, select Run…
-
Open the registry by entering
regedit. -
Select the registry key:
HKLM > SOFTWARE > Passlogix > SSPR > SSPRService. -
Create a new
DWORDvalue by right-clicking the SSPRService folder and clicking New > DWORD value. -
Name the registry setting
Reset_CustomizedErrorMsgand assign a value of1to activate it. This setting specifies the directory from which the Server retrieves the error message:C:\Program Files|Passlogix\v-GO SSPR\ResetClient\App_CustomizedResources. -
Select the
.inifile that you want to edit and open it in a text editor.Note:
The Server retrieves the error message in the language that the user selected during enrollment. If the user selected English, the Server uses theResetErrorStrings.inifile. Otherwise it uses the corresponding language's .ini file. The messages available for editing are contained in this.inifile. -
Open the
.inifile in Notepad or another text editor. -
Change the message to read as you want it to display to the end user.
Note:
Be certain to enter the message as one continuous line. If you want to display the message to the end user as separate paragraphs, use the<br>tag. -
Save your changes and close the file. The next time a user enters an unacceptable password, he will see your edited message. For example, "The password did not meet password policy requirements. Please enter a password at least seven characters long."
4.9.3 Role/Group Support
System questions can be assigned to particular roles or user groups. Role/Group assignment determines the questions a user will be asked during the enrollment interview.
Note:
You cannot assign questions to users or groups when using a database (such as Microsoft SQL Server or Oracle Database) for your repository. The settings are available for editing, but the assignments will not be written to the database.The Access Control panel makes users and groups available so that you can assign question rights to them. The Users and Groups list is unpopulated until you check the Show Users box. Domain users and groups are not initially assigned Allow or Deny access for a given question.
When a user or group is selected, the arrow buttons (<< and >>) become enabled. You move users back and forth between the Users and Groups list and the Allow and Deny lists by clicking the arrow buttons. When you click Create or Modify, the Role/Group access rights are written to the back-end storage for the system question.
The rules for Access Control are as follows:
-
Allow/Deny lists empty: All users and groups receive the question.
-
Allow list empty, Deny list populated: All users and groups in the Deny list do not receive the question. All other users and groups receive the question; Allow is implicit.
-
Deny list empty, Allow list populated: All users and groups in the Allow list receive the question. All other users/groups do not. Deny is implicit.
-
Both lists populated: Users and groups in the Allow list that are not in the Deny list receive the question. If a user or group in the Allow list is also in the Deny list, or belongs to a group in the Deny list, that user or group does not receive the question. Deny overrides Allow.
A user's or group's presence in the Deny list always supersedes its presence in the Allow list.
The following table provides information about user and group permissions.
| Scenario Number | Description | Allow | Deny | Outcome |
|---|---|---|---|---|
| 1 | No user or group specified in Allow and Deny lists | Ø | Ø | Everyone receives the question. |
| 2 | Dr. Baxter specified in Allow list; no one specified in Deny list | Dr. Baxter | Ø | Only Dr. Baxter receives the question. All others users are denied. |
| 3 | Dr. Baxter specified in Deny list; no one specified in Allow list | Ø | Dr. Baxter | Everyone receives the question except Dr. Baxter. |
| 4 | Doctors group specified in Allow list; Dr. Loomis, a member of Doctors group, specified in Deny list | Doctors | Dr. Loomis | All members-and only members-of Doctors group receive the question, except Dr. Loomis, who is denied the question. |
| 5 | Doctors group specified in Deny list, Dr. Loomis specified in Allow list | Dr. Loomis | Doctors | Everyone, including Dr. Loomis, is denied the question. The Deny list supersedes the Allow list. |
The scenarios below demonstrate how to apply these rules.
You have set up a group, Doctors, which includes members Dr. Baxter and Dr. Loomis.
-
Scenario 1: If the Allow and Deny lists are unpopulated, all users and groups receive the question.
-
Scenario 2: If the Deny list is unpopulated and the Allow list is populated, only users and groups in the Allow list receive the question.
-
Scenario 3: If any user or group is in the Deny list, and the Allow list is unpopulated, only the user or group in the Deny list does not receive the question.
-
Scenario 4: If a group is in the Allow list but a member of that group is in the Deny list, all members of that group receive the question except the member in the Deny list.
-
Scenario 5: If a group is in the Deny list but a member of that group is in the Allow list, that member will not receive the question.
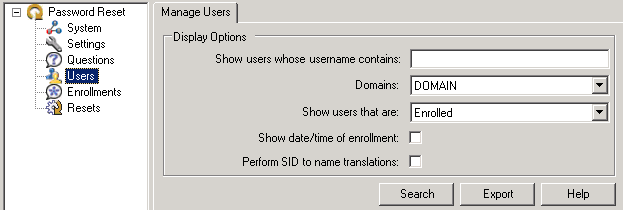
4.10 Managing Users
Use the Manage Users tab (under the Users node) to generate reports on the enrollment status of end users. This report indicates whether or not users have completed the Enrollment Interview, the date and time of enrollment, and whether or not the user is currently locked out.
Description of the illustration pr_users_mnge_users_crop.png
To generate a report, select the appropriate display options. Click Search to generate and display the report on your screen, or click Export to save the report as a CSV file.
| Field | Options |
|---|---|
| Show users whose username contains | Enter text for the report search to match. |
| Domains | Select from the available domains. |
| Show users that are: | Select the user enrollment status to generate a report on:
|
| Show date/time of enrollment | Select to display the date and time of enrollment. (Enabling this may increase report generation time.) |
| Perform SID to name translations | Check the box if you want to use Active Directory to retrieve users' usernames based on their SIDs, rather than retrieving them from the repository cache.
Enabling this setting slows performance, but is useful in instances where users have changed their usernames since their initial enrollment. |
4.10.1 User Details General Tab
This tab displays the following information about a user account:
-
User Name. The name associated with this account.
-
Enrolled. The current enrollment status of this account.
-
Locked Out. Whether the end user has been locked out of the reset service for having repeatedly failed the Reset Quiz; the number of permitted consecutive failures and the duration of the lockout are specified on the Settings tab (under the Settings node).
-
E-mail. The end user's e-mail address.
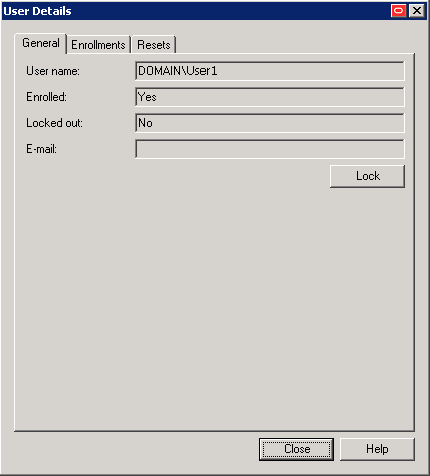
Description of the illustration pr_user_dets_general.png
A user whose account is unlocked will have a Lock button beneath the information fields, and a user whose account is locked will have an Unlock button beneath the information fields. You can change the lockout status of a user by clicking Lock or Unlock as appropriate.
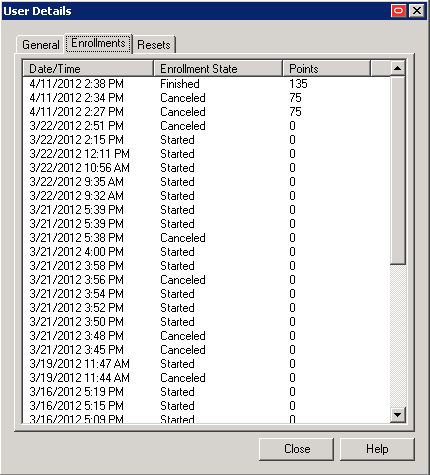
4.10.2 User Details Enrollments Tab
This tab provides information about the enrollment status of the specified user:
-
The date and time of each enrollment attempt.
-
The current status of the enrollment. There are three possible statuses:
-
Started. The user has begun to take the Enrollment Interview but has not completed it.
-
Finished. The user has completed the Enrollment Interview.
-
Canceled. The user began to take the Enrollment Interview but canceled before answering enough questions to reach the authentication threshold.
-
-
The total number of points that the user accumulated with the questions he answered.
4.10.3 User Details Resets Tab
This tab provides information about the reset status of the specified user:
-
The date and time of each reset attempt
-
The current status of the reset; that is, whether it was successful
-
The score the user achieved on the Reset Quiz
-
The IP address of the workstation at which the user took the Reset Quiz

4.10.4 Managing Enrollments
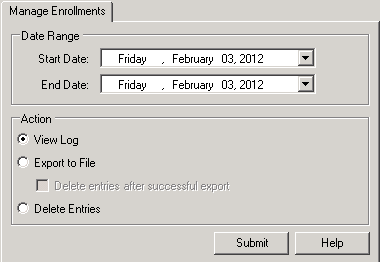
Use the Manage Enrollments tab (under the Enrollments node) to view, export, or delete enrollment log entries within a specified date range.
Description of the illustration pr_enrl_mng_enroll_crop.png
-
Select a Start Date and an End Date for the date range from the pop-up calendars).
-
Select an Action:
-
View log opens the Search Results window where you can review users, their status, scores, and the time of their activity.
-
Export to file saves all log entries within the specified date range to a file in comma-separated-value format. Select the Delete entries after successful export checkbox if you want to remove the exported log entries after saving them to a file.
-
Delete entries removes all log entries within the specified date range, without saving them.
-
-
Click Submit. If you have selected Export to file, in the Save As dialog, enter a file name and click OK.
See Enrollment Interview for more information.
4.10.4.1 Viewing Enrollment Search Results
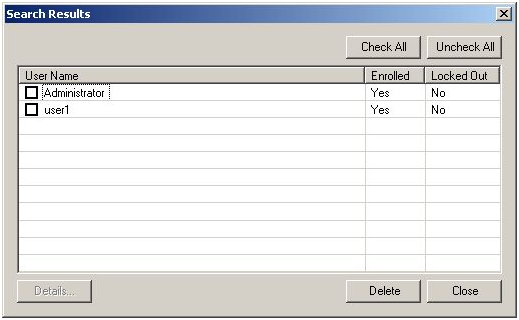
Use the Search Results screen (from the Manage Enrollments tab) to view the enrollment log.
Description of the illustration pr_mng_usrs_srch_rslts_crop.png
This log records enrollment activity for all users who have taken (or at least started) the Enrollment Interview within the time span you specify:
-
The names of all users who began the Enrollment Interview.
-
The current enrollment status of each user.
-
The total point values of all system questions (Required and Optional) that the end user answered during enrollment.
-
The date and time of each enrollment activity.
See Enrollment Interview and Managing Enrollments for more information.
4.11 Managing Resets
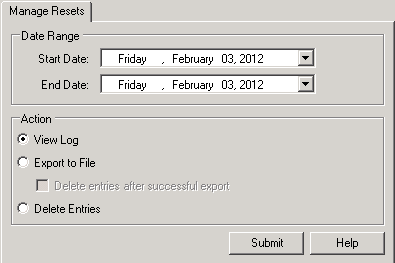
Use the Manage Resets tab (under the Resets node) to view, export, or delete reset log entries within a specified date range.
Description of the illustration pr_resets_mng_rsts_crp.png
-
Select a Start Date and an End Date for the date range for the date range from the pop-up calendars).
-
Select an Action:
-
View Log opens the Search Results window where you can review users, their status, scores, and the time of their activity.
-
Export to File saves all log entries within the specified date range to a file in comma-separated-value format. Select the Delete entries after successful export checkbox if you want to remove the exported log entries after saving them to a file.
-
Delete removes all log entries within the specified date range, without saving them.
-
-
Click Submit. If you have selected Export to File, in the Save As dialog, enter a file name and click OK.
See Configuring Reset Authentication for more information.
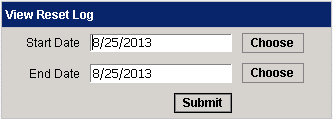
4.11.1 Viewing Resets
Use the View Resets dialog (under the Resets tab) to view the reset log. The record for each Reset Quiz given shows the username, the date and time of the quiz, the quiz score, the current reset status, and the IP address of the workstation used to take the quiz.
Description of the illustration pr_rst_view_rsts.png
To view log entries within a specific date range, enter a Start Date and an End Date (or click Choose to select a date from a pop-up calendar), then click Submit.
See Configuring Reset Authentication for more information.
4.11.1.1 Viewing Reset Search Results
Use the Search Results window (under the Manage Resets tab) to view the reset log. This log records reset activity for all users who have taken (or at least started) the Reset Quiz within the time span you specify:
-
The names of all users who began the Reset Quiz
-
The current reset status of each user
-
The score the user achieved during the Reset Quiz
-
The date and time the user attempted to reset his password
-
The IP address of the workstation from which the user took the Reset Quiz
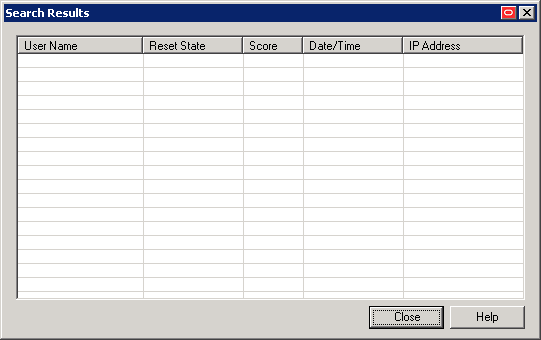
Description of the illustration pr_reset_srch_rslts_crop.png
See Creating System Questions and Managing Enrollments for more information.
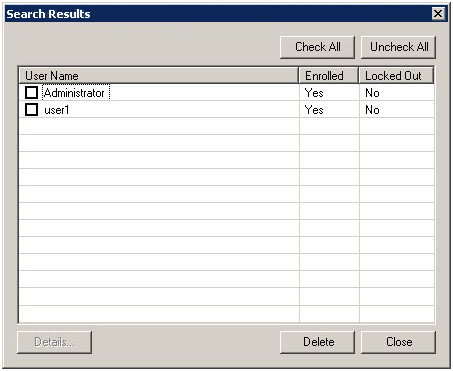
4.11.1.2 Viewing User Search Results
This table contains a list of the users who met the search criteria you defined on the Manage Users tab, with their enrollment and lockout status. From this list you also can:
-
Unenroll a user by checking the box next to the User Name and clicking Unenroll. Use the Check All and Uncheck All boxes to select or deselect all names in the list quickly.
-
Learn more about a user's history by highlighting the User Name (not the checkbox) and clicking the Details button at the bottom of the page to launch the User Details screen.
Note:
The Details button is only available if the user account contains information other than the User Name.
Description of the illustration pr_mng_users_srch_results.png
4.12 Working with External Validators
By default, Password Reset requires the administrator to create and configure all the questions and weights used for reset, and the user to answer these questions upon enrollment. Password Reset can also work with external validator sources to simplify this process. External validators allow organizations to write an interface, which can be accepted by Password Reset, to their back end. This validator can call data from various sources (for example, the HR database) that contain pre-defined answers.
For example, suppose one of the reset questions is "What is your Social Security Number?" By default, when a user enrolls, the enrollment interview asks him to supply his social security number. Then when a user resets his password, he is asked to enter his social security number. With an external validator in place, an administrator can direct Password Reset to an external data source which contains a pre-defined list of social security numbers. The validator supplies the answer to that question upon user enrollment so that the user does not even have to see that question. A user will only have to enter the answer to that question when attempting to reset his password. If all system questions are answered by an external validator, users can be automatically enrolled.
The basic steps to implement the use of external validators are:
4.12.1 Writing the External Validator Interface
The external validator must be written in .NET 4.0. To write an implementation, add a reference to the library Passlogix.PasswordReset.dll. Within your assembly, a class implementing the interface, ISSPRValidator, must be written. The interface has the following five methods:
-
Initialize -
Cleanup -
IsValidQuestion -
IsValidAnswer -
FriendlyName
Note:
Validators that do not implement theISSPRValidator interface or fail on startup will be ignored.The validator interface definition is as follows:
public interface ISSPRValidator
{
// Called by ESSO-PR on first use of validator.
void Initialize();

// Called once by ESSO-PR when the service shuts down.
void Cleanup();

// Returns true/false if question is valid for a given user
bool IsValidQuestion(ISSPRQuery iquery);

// Returns true/false if question/answer pair is correct
bool IsValidAnswer(ISSPRQuery iquery, string strAnswer);

// The friendly name for SSPR to display
string FriendlyName { get; }
}
The ISSPRQuery interface is supplied by the SSPR service and contains the following properties:
interface ISSPRQuery
{
// The guid of the question
Guid QuestionGuid { get; }

// The user's identity (in SID format)
string UserIdentity { get; }
}
After this interface has been implemented, the following attribute must be declared referencing the implementation:
[assembly: ISSPRValidatorType("<Validator class>")]
Replace the string <Validator class> with the full name of the class (including namespace) that implements this interface.
4.12.2 Installing the External Validator
After the validator.dll is written, follow these steps:
-
Create a directory called
ValidatorsunderINSTALL_DIR\VgoSelfServiceReset\WebServices.The actual validator directory is defined inweb.configand can be changed if a different folder for discovery is preferred. -
Copy the validators into this directory.
-
Restart the Password Reset Web Service.
4.12.3 Directing Password Reset to the External Validator
After the validators are installed, do the following:
-
Open the Password Reset node of the Administrative Console.
-
Click Questions from the top menu and then select System Questions. Select an existing question or create a New Question.
-
The Answer Source drop-down field lists the available external validators that can be used. The default is User Supplied, which indicates that the user must answer that question during enrollment. If a validator is installed and detected, its friendly name will now be listed here. Select the appropriate validator and save the question settings.
4.12.3.1 User Enrollment with External Validators
Enrollment can contain a mix of User Supplied and Validator Supplied questions. Questions that require external validation will be checked against IsValidQuestion and allowed/discarded based on the result. A user will be prompted for answers only on questions that are user supplied. In a pure external validation case, the user will be automatically enrolled.
4.12.4 Deleting the External Validator
To delete an external validator:
-
Remove the
.dllfrom the directory in which you placed it. -
Return to the Administrative Console, and individually select for editing the questions that relied on the external validator.
You will be presented with the error message, "The validator <validator details> cannot be found. Answer Source will default to User Supplied."
-
Click the Modify button.
Note:
Deleting an external validator results in users' failing the reset quiz, but does not force them to re-enroll. In order to force their re-enrollment, you must delete users whose enrollment was dependent on the external validator.