4 Managing Devices and Workspaces
This chapter documents device and Secure Workspace management topics. It is organized into the following sections:
4.1 About the Mobile Devices Page in the Mobile Security Manager Console
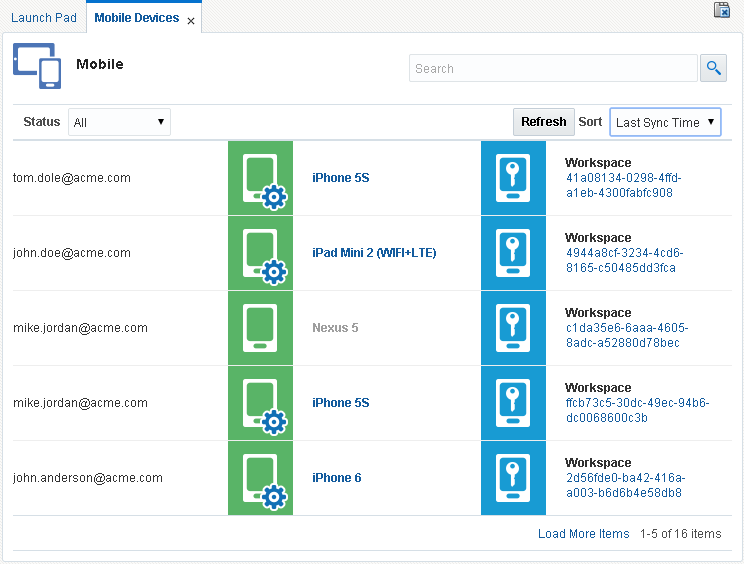
Use the Mobile Devices page to search for and view details about the devices and Workspaces registered to a user, and to perform routine administrative tasks on managed devices (Lock, Wipe, De-register, Sync, Clear/Reset Passcode) and Workspaces (Lock, Unlock, Wipe, Reset Passcode).
Note:
To learn how to open the Devices page, see Section 2.2.2, "Opening the Mobile Security Manager Console Pages" and choose Mobile Devices from the page menu.This section includes the following topics:
4.1.1 Searching for Devices and Workspaces
A search box is located in the top portion of the Mobile Devices page. Use the search box to search for a device by user name, device ID, workspace ID, device / Workspace display name, or model. Search results are displayed in the bottom portion of the page.
All searches are "contains" searches and are case-insensitive. You cannot use wildcards but partial matches will return results, for example: mith will return results for "Smith."
Search results can be filtered by status as follows:
-
All - Show all devices and Workspaces regardless of status.
-
Active - Show devices and Workspaces that are enrolled in the system, plus locked devices and Workspaces. This is the default option.
-
Registered - Show devices and Workspaces that are enrolled in the system, excluding locked devices or Workspaces.
-
De-registered - Show devices and Workspaces that are no longer enrolled in the system. De-registered devices and Workspaces are omitted from the default search results. Use the De-registered status filter to view them.
-
Locked - Show devices and Workspaces that have been locked and disallowed access to the server. Locked devices and Workspaces are active, but are neither registered nor de-registered.
-
Wiped - Show devices and Workspaces with a status of wiped, which signifies that all data has been erased. Wiped devices and Workspaces are omitted from the default search results. Use the Wiped status filter to view them.
Search results can be sorted as follows:
-
Last Sync Time - Sort Workspace search results chronologically using the date and time that the device was last synchronized. This is the default option.
-
Name - Sort Workspace search results alphabetically by name.
-
User - Sort Workspace search results alphabetically by user name.
-
State - Sort managed device and Workspace search results alphabetically by registration state.
-
Identifier - Sort Workspace search results alphanumerically by GUID.
In the search results, a white device icon on a green background indicates an unmanaged device record, whereas a device and gear icon on a green background indicates a managed device. (Managed and unmanaged devices are covered in Section 4.2, "Managing Devices and Workspaces.") A white device and key icon on a blue background indicates a Workspace record. Click an icon to open the device or Workspace record to view additional details.
Table 4-1 Device and Workspace icons
| Icon | Description |
|---|---|
|
|
Indicates an unmanaged device. An unmanaged device is governed by Workspace policies only. Unmanaged devices are typically employee owned. |
|
|
Indicates a managed device. A managed device is governed by device polices. Managed devices are typically employer owned. |
|
|
Indicates a Secure Workspace. The Secure Workspace is the security container deployed to the mobile device that provides secure access to your employer's IT network. |
Users with multiple devices will have multiple entries in the search results table (one entry per enrolled device). If a device is de-registered and re-registered, the system reassociates the device with its previous device record if the Device/Workspace De-registration Policy (located in Server Settings) is set to Archive and not Delete. Reassociating device records enables the same device to have multiple records, which can be helpful for tracking and auditing purposes.
Managing a device or Workspace from the Mobile Devices page is limited to actions such as locking an individual device/Workspace, wiping an individual device/Workspace, and so on. Otherwise, the management of device/Workspace enrollment and compliance is driven by mobile security policies. (Policies are covered in detail in the "Managing Mobile Security Policies" chapter.)
4.1.2 How to View Details About a Managed Device or Workspace
This section includes the following topics:
4.1.2.1 View Details About a Managed Device
Follow the steps in this section to view details about a specific managed device registered to a user. You cannot manage an unmanaged device.
-
Open the Mobile Devices page in the Mobile Security Manager console. To learn how, see Section 2.2.2, "Opening the Mobile Security Manager Console Pages."
-
Search for a user, device, or Workspace as described in Section 4.1.1, "Searching for Devices and Workspaces."
-
Click a managed device record on the Mobile Devices page to open it.
The managed device details section opens.
The following table describes the icons that identify each tabbed page.
Table 4-2 Device management tab icons
Element Description 
Details tab. Click to view device properties.

Credentials tab. Click to view details about certificates provisioned to the device. (The Credentials tab is not available if the device/Secure Workspace is registered with kinit authentication.)

Policies tab. Click to view policies applicable to the device and the effective policy enforced on the device.
A horizontal row of buttons called the Action Bar is located near the top the managed device record. Click an action button (for example, Lock or Wipe) to send a command to the device. See Section 4.2, "Managing Devices and Workspaces" for command descriptions.
-
Choose from the following:
-
To view device properties, click
(the Details tab).The Device Details tab contains three sections: Basic Properties, Device Properties, and Smart Phone Properties.
-
Basic Properties reports mobile account attributes such as platform information, a timestamp indicating when the device was last synchronized with Mobile Security Manager, and Compliance Level, which indicates if the device is in compliance with the effective policy. If the device is out of compliance, click the
 icon to view the reason(s) why.
 -
Device Properties reports device attributes such as model, battery level, and storage capacity.
-
Smart Phone Properties reports device attributes such as
currentCarrierNetwork,SIMCarrierNetwork,carrierSettingsVersion, and so on.
-
-
To view details about certificates provisioned to the device, click
(the Credentials tab). The Credentials tab is only available if a certificate is issued to the device (PKINIT registration). -
To view policies applicable to the device and the effective policy enforced on the device, click
(the Policies tab).The Policies tab contains two sections: Applicable Policies, and Effective Policy.
-
Applicable Policies list the mobile security policies that are applicable for the device. Click a policy in this section to open a pop-up window where you can view policy details.
-
Effective Policy contains limited information about the mobile security policy that is enforced on the device. Specifically, the Effective Policy is the merge of elements across all applicable mobile security policies that apply to the device.
The Apps section provides information about the apps that are assigned to the managed device by the Effective Policy.
-
-
For more information, see "Device Management" in the Help Reference for Oracle Mobile Security Suite Consoles.
4.1.2.2 View Details About a Workspace
Follow the steps in this section to view details about a specific Workspace registered to a user.
-
Open the Mobile Devices page in the Mobile Security Manager console. To learn how, see Section 2.2.2, "Opening the Mobile Security Manager Console Pages."
-
Search for a user, device, or Workspace as described in Section 4.1.1, "Searching for Devices and Workspaces."
-
Click a Workspace record on the Mobile Devices page to open it.
The Workspace details section opens.
The following table describes the icons that identify each tabbed page.
Table 4-3 Workspace management tab icons
Element Description 
Details tab. Click to view read-only device and Workspace properties.

Apps tab. Click to search the mobile app catalog for mobile applications and to view a list of apps installed within the Secure Workspace.

Activity tab. Click to search the Secure Workspace log for events that meet the search criteria and view event details about activities performed on the Secure Workspace app.
Credentials tab. Click to view details about certificates provisioned to the device. (The Credentials tab is not available if the Secure Workspace is registered with kinit authentication.)
Policies tab. Click to view policies applicable to the device and the effective policy enforced on the device, or to view policies applicable to the Workspace and the effective policy enforced on the Workspace.
A horizontal row of buttons called the Action Bar is located near the top the Workspace record. Click an action button (for example, Lock or Wipe) to send a command to the Workspace. See Section 4.2, "Managing Devices and Workspaces" for command descriptions.
-
Choose from the following:
-
To view Workspace properties, click
(the Details tab).The Workspace Details page includes two sections: Basic Properties and Workspace Properties.
-
Basic Properties list information about the Workspace such as the package name and version of the Secure Workspace app, and Compliance Level, which indicates if the device the Workspace is installed on is in compliance with the effective policy. If the device is out of compliance, click the
icon to view the reason(s) why -
Workspace Properties lists additional information about the Workspace such as the configuration URL for the Workspace app hosted by the Mobile Security Access Server, and details about the device that the Workspace is installed on.
-
-
To view apps deployed in the Workspace, click
(the Apps tab).Use search to filter the apps list. If there are more than seven apps, click a radio button to view the apps. Click the app name to view app details in the pop-up.
-
To view event details, click
(the Activity tab).Search a log of Workspace activity from this tab. Search for an event by typing an event key word and search looks across fields for matching strings.
The search results section displays events along with the following information:
-
Event Source indicates if the event was initiated by the Device, or if it was initiated by a command sent from the Mobile Security Manager.
-
Initiated By indicates the user or system that initiated the operation, for example the SecureWorskpace, or a specific user, such as the end user or an Admin user.
-
Location indicates the latitude and longitude coordinates where the event took place. If the latitude and longitude are not available then they will be indicated as -1,1.
-
Date/Time indicates the timestamp recorded on the device.
-
-
To view details about certificates provisioned to the Workspace, click
(the Credentials tab).The Credentials tab is only available if a certificate is issued to the Workspace (PKINIT registration). If there are auxiliary certificates, those are also shown on the Credentials tab. Click a certificate to view certificate details.
-
To view policies applicable to the Workspace and the effective policy enforced on the Workspace, click
(the Policies tab).The Policies tab contains two sections: Applicable Policies, and Effective Policy.
-
Applicable Policies list the mobile security policies that are applicable for the Workspace. Click a policy in this section to open a pop-up window where you can view policy details.
-
Effective Policy contains information about the mobile security policy that is enforced on the Workspace. Specifically, the Effective Policy is the merge of elements across all applicable mobile security policies that apply to the Workspace.
For a description of the Workspace policy fields, see "Workspace Policies Tab" in the Help Reference for Oracle Mobile Security Suite Consoles.
-
-
For more information about the other Workspace Management tabs, see "Workspace Management" in the Help Reference for Oracle Mobile Security Suite Consoles.
4.1.2.3 View a List of Apps Installed on a Workspace
You can view a list of apps installed in the Workspace from the Mobile Devices console page. Search for the Workspace, then open the Workspace Management view. The list of installed apps is displayed on the Apps tab.
-
Open the Mobile Devices page in the Mobile Security Manager console. To learn how, see Section 2.2.2, "Opening the Mobile Security Manager Console Pages."
-
Search for a user, device, or Workspace as described in Section 4.1.1, "Searching for Devices and Workspaces."
-
Click a Workspace record on the Mobile Devices page to open it.
The Workspace details page opens.
-
Click
(the Apps tab).The list of installed apps is displayed. Use search to filter the apps list. If there are more than seven apps, click a radio button to view the apps. Click the app name to view app details in the pop-up.
4.2 Managing Devices and Workspaces
This section includes the following topics:
-
How to Lock, Wipe, De-Register, or set a Passcode on a Device or Workspace
-
How to Lock, Unlock, and Wipe Devices/Workspaces by Role Assignment
Understanding Device Management
Device management is concerned with managing the mobile device on which the Secure Workspace is installed. Mobile devices are either managed or unmanaged. A managed device is governed by MDM+MAM (Mobile Device Management + Mobile Application Management) policies. Typically, managed devices are owned by the employer and provided to employees. An unmanaged device is a device that is governed by MAM policies only. Typically, unmanaged devices are employee-owned. The employee retains total control of their apps and data and the device itself, while the employer owns the apps and data in the Workspace. Oracle Mobile Security Suite supports mixed deployments with both managed and unmanaged devices, and provides significant flexibility for employers to choose which devices they want to manage.
Administrators have extensive control over managed devices, but can only view basic information about unmanaged devices. On the Mobile Devices page, managed and unmanaged devices have different icons as shown in Table 4-1. (Managed devices have a gear, unmanaged devices do not.)
On the Mobile Devices page, you can perform the following actions on individual managed devices:
-
Lock the device. The device PIN or password screen displays and the user is blocked from using the device until the user unlocks it by entering their PIN or password. System Administrators and Help Desk Administrators cannot unlock the device remotely. In the console the device status displays as "Registered"; it does not change to "Locked."
-
Wipe the device. This command resets the device to its original factory settings, wiping all personal and corporate data. Wipe assures nothing remains on the device for anyone to access. All pending operations are cancelled, and certificates issued to the device are revoked. In the console the device status displays as "De-registered," unless the Device/Workspace De-registration Policy (located in Server Settings) is set to Delete, in which case the device record is deleted from the server.
-
De-register the device. Removes the Workspace app, including certificates, restrictions, and other content that was provisioned by the Mobile Security Manager. Containerized apps no longer work, but the user must delete them manually. All pending operations are cancelled, and certificates issued to the device are revoked. Following this action the device is no longer controlled by the server. In the console the device status displays as "De-registered," unless the Device/Workspace De-registration Policy (located in Server Settings) is set to Delete, in which case the device record is deleted from the server.
-
Sync the device. Forces the device to synchronize app, certificate, and restriction details with Mobile Security Manager, and to report the current state of 29 device attributes, including
manufacturerDeviceId,productName,deviceCapacity,availableDeviceCapacity,batteryLevel,phoneNumber, and so on. -
Clear Passcode / Reset Passcode. This action is intended for use if the device user forgets their password.
-
For iOS devices, the Clear Passcode command removes the passcode and grants the user access to the device. The user must enter a compliant passcode within the time allotted by the Passcode Expiration setting (defined under Server Settings). The default value is 60 minutes. If a passcode is not entered in time, the device is marked as non-compliant and the system carries out the Passcode Compliance Action defined by policy.
-
For Android devices, the Reset Passcode command resets the passcode to a new randomly generated passcode. If using the Self-Service Console, the new passcode is displayed on the screen. Otherwise, a Help Desk Administrator or System Administrator should communicate the new passcode to the user.
-
Understanding Workspace Management
Workspace management is concerned with managing the Secure Workspace installed on the device. Workspaces are indicated by a device and key icon on a blue background, as shown in Table 4-1.
On the Mobile Devices page, you can perform the following actions on individual Workspaces:
-
Lock / Unlock. Locks or unlocks the Secure Workspace. If locked, the Workspace is disabled and the user is blocked from accessing containerized apps and Workspace data. To unlock the Workspace remotely when it is locked, click Unlock. To lock the Workspace remotely when it is unlocked, click Lock. If the Workspace is locked, the user can enter their password to verify that it is locked. To unlock the Workspace, the user must contact either a System Administrator or a Help Desk Administrator, who can unlock the Workspace remotely. Once the Workspace is unlocked, the user is required to enter their password to log in.
-
Wipe. Resets the Workspace to its original system state by erasing all of the stored data. This action does not remove the Workspace app. The user can log in to the Workspace again by providing their credentials, but all previously stored data will be lost.
-
Reset Passcode. Resets the passcode to a new randomly generated passcode that is displayed on the screen. The user must enter the new passcode the next time they open the Workspace.
Note: The Reset Passcode button is only available if the Workspace is enrolled using certificate-based (PKINIT) authentication. This button is available if a certificate is present, even though a PIN may not be required.
Table 4-4 Summary of the actions an Administrator can take on devices and Workspaces
| Unmanaged Device | Managed Device | Secure Workspace | |
|---|---|---|---|
|
Lock / Unlock |
NA |
Locks the device. The device PIN or password screen displays and the user is blocked from using the device until the user unlocks it by entering their PIN or password. System Administrators and Help Desk Administrators cannot unlock the device remotely. The device status displays as "Registered"; it does not change to "Locked." |
Locks or unlocks the Secure Workspace. If locked, the Workspace is disabled and the user is blocked from accessing containerized apps and Workspace data. If the Workspace is locked, the user can enter their password to verify that it is locked. To unlock the Workspace, the user must contact either a System Administrator or a Help Desk Administrator, who can unlock the Workspace remotely. Once the Workspace is unlocked, the user is required to enter their password to log in. |
|
Wipe |
NA |
Resets the device to its original factory state by erasing all of the stored settings, data, and applications. |
Resets the Workspace to its original system state by erasing all of the stored data. |
|
De-register |
NA |
Removes the Workspace app, including certificates, restrictions, and other content that was provisioned by the Mobile Security Manager. Containerized apps no longer work, but the user must delete them manually. All pending operations are cancelled, and certificates issued to the device are revoked. Following this action the device is no longer controlled by the server. |
NA |
|
Sync |
NA |
Forces the device to synchronize with the Mobile Security Manager, to update the app, certificates, restrictions, and other content that was provisioned. |
NA |
|
Clear Passcode / Reset Passcode |
NA |
This action is intended for use if the device user forgets their password.
|
Resets the passcode to a new randomly generated passcode that is displayed on the screen. The user must enter the new passcode the next time they open the Workspace. The Reset Passcode button is only available if the Workspace is enrolled using certificate-based (PKINIT) authentication. This button is available if a certificate is present, even though a PIN may not be required. |
4.2.1 How to Lock, Wipe, De-Register, or set a Passcode on a Device or Workspace
Use these steps to secure data on the device or Workspace.
-
Open the Mobile Devices page in the Mobile Security Manager console. To learn how, see Section 2.2.2, "Opening the Mobile Security Manager Console Pages."
-
Search for a user, device, or Workspace as described in Section 4.1.1, "Searching for Devices and Workspaces."
-
Click a device or Workspace record on the Mobile Devices page to open it.
The device or Workspace details page opens.
-
Click an action button (for example, Lock or Wipe) to send a command to the device or Workspace. See Section 4.2, "Managing Devices and Workspaces" for command descriptions.
4.2.2 How to Lock, Unlock, and Wipe Devices/Workspaces by Role Assignment
Use these steps to issue a Lock, Unlock, or Wipe command that will affect all users with the selected role assignment.
-
Open the Mobile Roles page in the Mobile Security Manager console. To learn how, see Section 2.2.2, "Opening the Mobile Security Manager Console Pages."
-
Search for the role that you want to act on. To learn how, see Section 5.4.1, "How to Search for a Role in Mobile Security Manager."
-
Click the
 at the far right side of the role record row.
A pop-up menu opens.
-
Choose a command option from the menu:
-
Lock - Lock the devices/workspaces of users assigned to this role. Users can unlock the device by entering a PIN or password. Users cannot unlock the Workspace. To unlock the Workspace, the user must contact either a System Administrator or a Help Desk Administrator, who can unlock the Workspace remotely. Once the Workspace is unlocked, the user is required to enter their password to log in.
-
Unlock - Unlock the devices/Workspaces of users assigned to this role.
-
Wipe - Wipe the devices/Workspaces that belong to users assigned to this role. If the device is an unmanaged device, only the Secure Workspace and all associated user data is deleted; if the device is a managed device, all stored settings, data, and applications is erased and the device is reset to its original system state.
-
4.3 About Device Configurations
Device Configurations allow you to pre-configure e-mail, calendar, Wi-Fi, and VPN settings that you can then assign to policies so that they can be automatically provisioned to users' devices upon device enrollment.
Note:
Only managed iOS devices support Device Configurations. Device configurations are ignored on Android devices and unmanaged iOS devices.-
E-mail - Configure incoming and outgoing mail server settings.
-
Calendar - Configure calendar server settings.
-
Wi-Fi - Configure Wi-Fi settings including proxy server settings if a proxy server is required to access the Wi-Fi network.
-
VPN - Configure VPN settings for a Layer 2 Tunneling Protocol (L2TP), Point-to-Point Tunneling Protocol (PPTP), or Internet Protocol Security (IPSec) VPN.
In the Mobile Security Manager console, use the Device Configurations page to manage Device Configurations, and on the Policy Management (Create Policy) page, open the Apps and Configuration tab to assign Device Configurations to a policy.
4.4 Managing Devices and Workspaces With Policies
Mobile Security Policies can take action if device or Workspace security properties are out of compliance with the parameters set by the policy. This section discusses how System Administrators can use policies to monitor and restrict devices and Workspaces. For more information about policies, see Chapter 8, "Managing Mobile Security Policies."
The settings on the Enrollment tab of the Policies page allow System Administrators to verify that a device is policy compliant when it enrolls with Mobile Security Manager, as well as on an ongoing basis following enrollment.
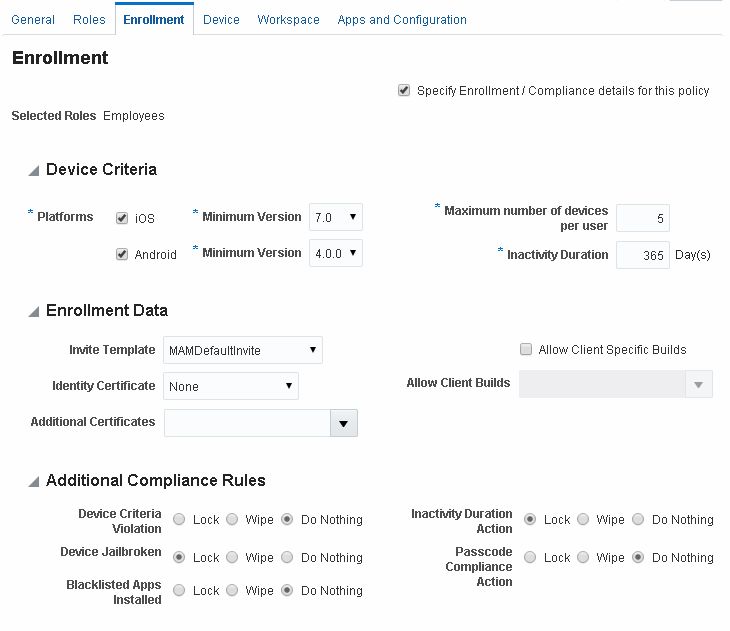
The following device criteria can be configured:
-
The minimum version of iOS or Android - Indicates the oldest version of the platform software that is eligible for enrollment under this policy. For example, for iOS, setting a value of 8.0 will block iOS 7.0.4 from enrolling.
-
The maximum number of enrolled devices per user - Indicates the most devices that a user can enroll under this policy.
-
The maximum number of days of inactivity allowed - Indicates the maximum number of consecutive days that the device/Workspace can go without contacting the Mobile Security Manager server before the security action specified in the Inactivity Duration element is carried out.
If the properties are out of compliance, the System Administrator can configure the following settings to lock or wipe the device, or do nothing:
-
Device Criteria Violation - Indicates the security action to take if either the minimum mobile OS setting or the maximum enrolled devices setting are out of compliance.
-
Inactivity Duration - Indicates the security action to take if the Inactivity Duration value is exceeded.
In addition, the system can lock or wipe the device, or do nothing if the following rules are violated:
-
Device jailbroken - Indicates the security action to take if the device operating system is found to be jailbroken.
-
Blacklisted apps installed - Indicates the security action to take if an app marked as Blacklisted is installed. This compliance rule applies to managed devices, only.
-
Passcode compliance action - Indicates the security action to take if the device password value is out of compliance with the policy.
The settings on the Device policy tab only apply to managed devices. These settings do not work with unmanaged devices. For more information, see Section 8.3, "Understanding Workspace Policies and Device Policies." The Device policy tab includes the following sections:
-
Restrictions - Allows the System Administrator to select device features to restrict. For Android devices, only the camera can be restricted, whereas for iOS devices the camera and 22 other options can be restricted.
-
Authentication - Allows the System Administrator to auto-lock the device if a maximum idle time is exceeded, and wipe the device if the threshold for maximum failed authentication attempts is exceeded. Password policy settings for the device are also set in this section.
-
Android Device Encryption - This section features a single option that enables device encryption for Android devices. This option cannot be turned off again once the policy is saved. This option is not available for devices running Android 5.0 (Lollipop) or higher because Device Encryption is always turned on automatically.
The settings on the Workspace policy tab apply only to the Secure Workspace. The Workspace policy tab includes the following sections:
-
Authentication - Allows the System Administrator to configure password requirements for the Secure Workspace, select single user or multi-user (shared Workspace) mode, and set how often the user needs to authenticate. In addition, the policy can lock or wipe the Secure Workspace, or do nothing if the threshold for maximum failed authentication attempts is exceeded.
-
Workspace / Apps - Lets the System Administrator select which Workspace and Workspace Apps features to allow or restrict.
-
Application Settings - Allows the System Administrator to configure Workspace Apps settings that affect the secure browser, the file manager app, and the PIM app.
-
Time Access / Geo Access - Allows the System Administrator to restrict Workspace access by time of day and/or designate locations (cities, states, or countries) where Workspace access is allowed.
4.5 Multi-User and Kiosk Mode
Single User and Multi-User Support
The Secure Workspace can be configured for single user or multi-user use. In multi-user mode, multiple employees can log on to a single Workspace instance on the same shared device for use in environments such as retail outlets, manufacturing floors, and nurses stations. In this mode, local Workspace data is wiped away every time a user logs out of the Workspace so that user data is not shared between sessions. In single user mode, the Workspace is not wiped.
To Enable Single or Multi-User Mode
Multi-User mode (Shared Workspace mode) is enabled by configuring a Mobile Security Policy property.
-
Open the Mobile Security Policies page in the Mobile Security Manager console. To learn how, see Section 2.2.2, "Opening the Mobile Security Manager Console Pages."
-
Search for the policy to be modified.
-
Click to expand the policy, then click Workspace.
-
In the Authentication section, locate the Shared Workspace Mode property.
-
Choose Single User if the Workspace will only be used by a single user on a given device.
-
Choose Multi-User if the Workspace will be shared by multiple users on a given device.
-
Kiosk Mode is only supported on devices that run Android OS. When Kiosk Mode is enabled, users only see the Workspace and the apps within the Workspace. Interaction with the operating system outside the Workspace is minimized. The user cannot close the Secure Workspace app, making this mode suitable for public environments where supervision is minimal, such as lobbies, exhibit spaces, and show rooms.
To learn how to enable Kiosk Mode, see Section 10.2.11, "Enable Kiosk Mode."