3 Enrolling Devices and Workspaces
This chapter documents the process of enrolling devices and Workspaces. It is organized into the following sections:
3.1 About Device and Workspace Enrollment
Users enroll mobile devices and workspaces with Oracle Mobile Security Suite to access corporate apps and resources (for example, shared folders). A user's eligibility to enroll a device/Workspace is determined by Mobile Security Policies. Each Mobile Security Policy has one or more roles assigned to it, and users that belong to these roles (either directly or indirectly) can enroll a devices/Workspace in Oracle Mobile Security Suite.
Upon enrolling the device, the policies under which the user enrolled the device will be enforced on the device and/or Workspace. For more information, see Section 4.4, "Managing Devices and Workspaces With Policies."
Enrolling a device/Workspace is a two step process:
-
Invite - The system sends an invite e-mail to the user that contains links and (optionally) a One Time Password to be used for enrollment.
-
Enrollment - The user follows the instructions and links in the invite e-mail and enrolls their device/Workspace.
Note:
Before performing either a device or Workspace enrollment, the mobile device must trust the SSL certificate used by the OMSS server. If the SSL server certificate is issued by a publicly-trusted certificate authority that the mobile device already trusts, then no specific action is required. If the SSL server certificate is issued by an enterprise certificate authority, or if the certificate is self-signed, then the user must install and trust the certificate authority root certificate on the mobile device before starting enrollment. System Administrators can provide the certificate authority root certificate to users by including an installation link in the invite e-mail, or by a separate out-of-band process.3.2 Preparing and Sending the Invite Template
This section includes the following topics:
3.2.1 Configuring the Invite Template
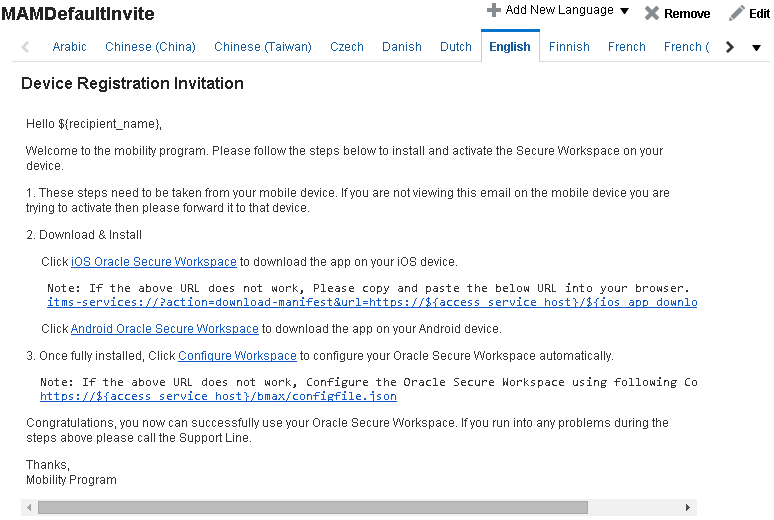
System Administrators can configure enrollment invite templates using the Mobile Security Manager console. Mobile Security Manager ships with a default template for each of the two types of enrollment: MAM-only enrollment and MDM+MAM enrollment.
Figure 3-1 Default MAM-only invite template
Description of ''Figure 3-1 Default MAM-only invite template''
The invite e-mail contains a link with configuration information that tells the Workspace app what servers to communicate with and what types of authentication to display to the user. The user can either click this link in the invitation e-mail, or manually enter the text in the first screen of the Workspace app when it is opened for the first time.
Note:
In Figure 3-1, the template contains a sample link that should be modified to match the actual URL. The sample link is:https://${access_service_host}/bmax/configfile.json
Note that ${access_service_host} is a special placeholder for use with invite templates. When the system sends a notification to a user, it replaces the placeholder with data configured in the system. In this case, the ${access_service_host} placeholder is replaced with the MSAS Runtime Server Base URL.
The Mobile Security Access Server hosts multiple configuration links, and it is up to the administrator to ensure that the correct link for the environment is included in the invite e-mail sent to users.
Table 3-1 Purpose of JSON configurations links for use in invites.
| JSON Link Name | Description | Example URL |
|---|---|---|
|
|
Instructs the workspace to use OAuth Confidential Client authentication. |
|
|
|
Instructs the workspace to use OAuth Mobile Client authentication. |
|
|
|
Instructs the workspace to use Kerberos password authentication. |
|
|
|
Instructs the workspace to use Kerberos PKI-based authentication, with initial registration using a time-limited passcode. |
|
3.2.1.1 How to Create and Edit Notification Templates
Follow these steps to create or edit notification templates that the system uses to send e-mail invitations to users. Notification templates can be created and saved in multiple languages.
-
Open the Mobile Security Settings page. To learn how, see Section 11.2.2, "How to Open the Mobile Security Settings Page."
-
Click Notification Templates on the menu bar. (If Notification Templates is not visible, use the arrow buttons to scroll the menu bar to the right. Or, click
 to view additional menu items.)
 -
Choose from the following:
-
To create a new template, click Create Template.
-
To edit a template, click the template name to open it, then click Edit.
Note that invitations require separate installer links depending on if the user's device is an iOS or Android device, and if the user is enrolling in the MAM-only program or the MDM+MAM program. Use placeholder values to configure these and other variables in the notification template. For descriptions of all of the placeholder values that you can include in the template, click Help or see the "Notification Templates" section in the Oracle Fusion Middleware Help Reference for Oracle Mobile Security Suite Consoles.
-
3.2.2 Attaching Invite Templates to a Policy
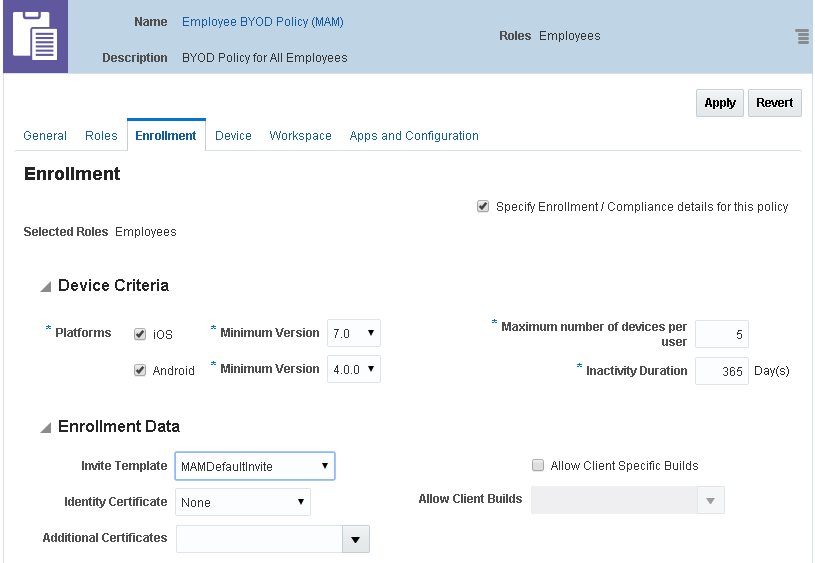
The invite template sent to a user is based on policy. Use the following steps to attach an invite template to a policy.
3.2.2.1 How to Attach an Invite Template to a Policy
-
Open the Mobile Security Policies page in the Mobile Security Manager console. To learn how, see Section 2.2.2, "Opening the Mobile Security Manager Console Pages."
-
Search for the policy that you will attach the invite template to, then click the policy record to expand the policy details section.
-
Click the Enrollment tab.
-
In the Enrollment Data section, locate the Invite Template field and select the invite template from the drop-down menu to attach it to the policy.
-
Click Apply to save your changes.
Figure 3-2 Attaching an invite template to a policy
Description of ''Figure 3-2 Attaching an invite template to a policy ''
3.2.3 Inviting the User
Eligible users can send themselves a mobility program invite, or an administrator can send users an invite.
Administrator Initiated Enrollment
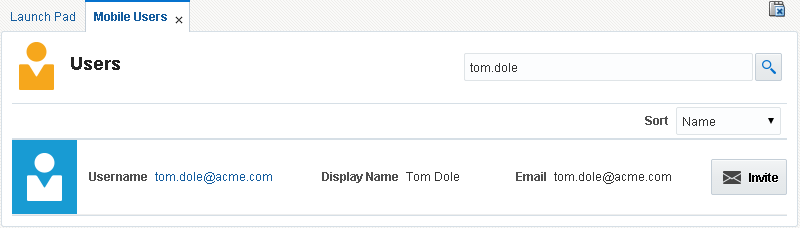
System Administrators and Help Desk Administrators can invite eligible users to enroll a device. If the user is eligible to register a device, an Invite button appears with the user record on the Mobile Users page. Clicking the Invite button opens a pop-up window so that the e-mail notification can be previewed before it is sent.
Note:
The Invite button is disabled if the user's LDAP record does not include an e-mail address, or if the user account is disabled.Figure 3-3 Invite button is part of the user record on the Users page.
Description of ''Figure 3-3 Invite button is part of the user record on the Users page.''
Device Enrollment Using the Self-Service Console
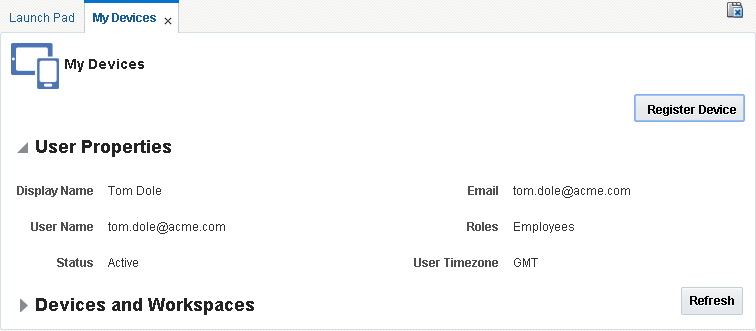
Eligible users can send themselves an invite to the mobility program. Users should open the Oracle Mobile Security Suite "My Devices" self-service console (if using the Oracle Access Management console), or the Self-Service Interface (if using the Oracle Identity Manager console). Upon clicking Register Device and send, the enrollment e-mail is sent to the user's e-mail address. As described above, the e-mail notification includes steps that the user needs to complete on the mobile device to be enrolled.
Figure 3-4 Register Device button on the "My Devices" self-service console
Description of ''Figure 3-4 Register Device button on the "My Devices" self-service console''
3.2.4 How to Invite a Group of Users by Role Assignment
System Administrators can invite users by role assignment to register with Oracle Mobile Security Suite.
Note:
System Administrators can only send registration invites to users in a role that has an associated Mobile Security Policy.-
Open the Mobile Roles page in the Mobile Security Manager console. To learn how, see Section 2.2.2, "Opening the Mobile Security Manager Console Pages."
-
Search for the role that you want to send the invitation to. To learn how, see Section 5.4.1, "How to Search for a Role in Mobile Security Manager."
-
Click the
 at the far right side of the role record row.
A pop-up menu opens.
-
Choose Invite, which invites users with this role assignment to register a device/Workspace with Oracle Mobile Security Suite.
3.3 Enrolling a Workspace (MAM-Only Enrollment)
Enrolling a Workspace is a three step process:
-
The user downloads the Workspace app using the link in the invite e-mail.
-
The user launches the Workspace app with the configuration URL (configuration JSON URL) provided in the invite e-mail.
-
The user provides user credentials in the Workspace login page.
Details are provided below.
To download the Workspace app, the user opens the invite e-mail on the mobile device to be enrolled and clicks the download link. The user then launches the app and enters the configuration URL as shown below.
Figure 3-5 Entering the configuration URL (Workspace enrollment)
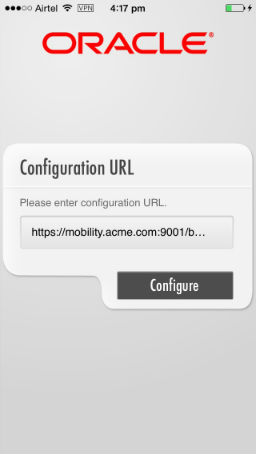
Description of ''Figure 3-5 Entering the configuration URL (Workspace enrollment)''
The Workspace prompts for the user's credentials.
Figure 3-6 Entering user credentials (Workspace enrollment)
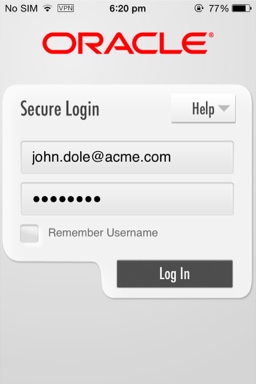
Description of ''Figure 3-6 Entering user credentials (Workspace enrollment)''
If authentication is successful, the workspace is enrolled and the Workspace home page opens.
3.4 Enrolling a Device and Workspace (MDM+MAM Enrollment)
To enroll a device as a managed device (MDM+MAM enrollment), a user must have an assigned policy with the "Device" tab enabled. This topic contains separate sections for iOS and Android because the managed device enrollment differs for iOS and Android devices:
3.4.1 iOS Enrollment
The iOS managed device enrollment launches the iOS MDM Agent enrollment flow. Upon completing the MDM Agent installation, the device prompts the user to install the Secure Workspace app.
-
The user clicks the MDM registration link in the invite e-mail, which launches the Safari browser and opens a login page.
The user enters their credentials and clicks Submit.
Figure 3-7 Entering user credentials (iOS Device and Workspace enrollment)
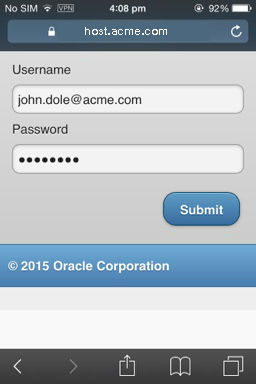
Description of ''Figure 3-7 Entering user credentials (iOS Device and Workspace enrollment)''
-
Upon successful authentication, the iOS MDM Agent enrollment flow launches. It installs the profile from the Mobile Security Manager server so that the server can manage the device.
The user clicks Install.
Figure 3-8 The iOS MDM Agent enrollment launches
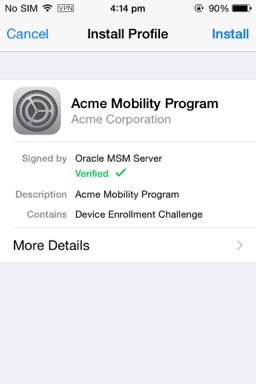
Description of ''Figure 3-8 The iOS MDM Agent enrollment launches ''
-
The user clicks Trust.
Figure 3-9 The Remote Management Trust dialog (iOS Device and Workspace enrollment)
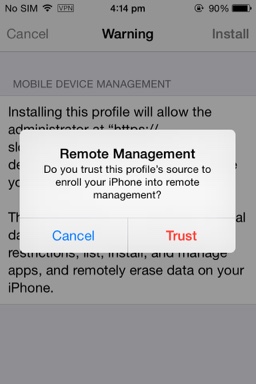
Description of ''Figure 3-9 The Remote Management Trust dialog (iOS Device and Workspace enrollment)''
-
The user clicks Done.
Figure 3-10 The Profile Installed screen (iOS Device and Workspace enrollment)
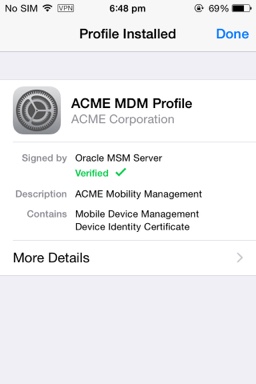
Description of ''Figure 3-10 The Profile Installed screen (iOS Device and Workspace enrollment)''
-
Once the device is successfully enrolled, the device prompts the user to install the Secure Workspace app. The device may also prompt the user to configure additional registration items required by the Mobile Security Manager server. For example, the user may be asked to set a passcode.
Figure 3-11 The Install the Secure Workspace app dialog (iOS Device and Workspace enrollment)
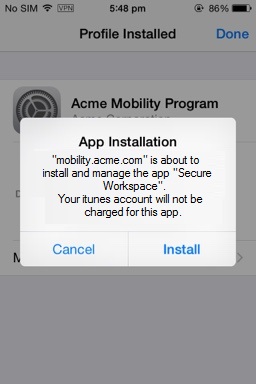
Description of ''Figure 3-11 The Install the Secure Workspace app dialog (iOS Device and Workspace enrollment)''
-
The user launches the Workspace app and registers it. See Section 3.3, "Enrolling a Workspace (MAM-Only Enrollment)" for details.
3.4.2 Android Enrollment
-
The user downloads the Secure Workspace app.
-
The user launches the Secure Workspace app, enters the configuration URL provided in the invite e-mail, and clicks Configure.
Figure 3-12 Entering the configuration URL (Android Device and Workspace enrollment)
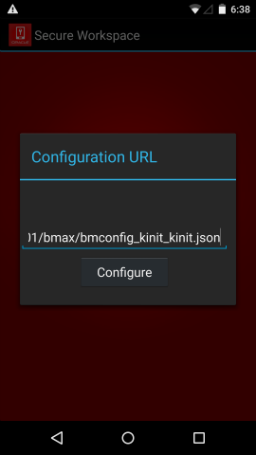
Description of ''Figure 3-12 Entering the configuration URL (Android Device and Workspace enrollment)''
-
Once the app is successfully configured, the Login page opens.
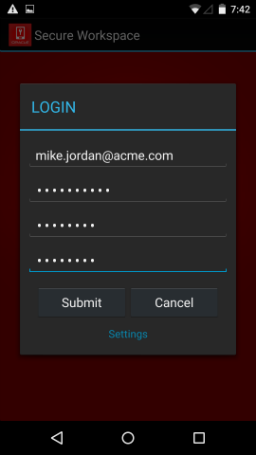
Figure 3-13 Entering user credentials (Android Device and Workspace enrollment)
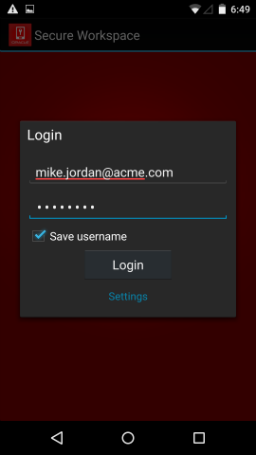
Description of ''Figure 3-13 Entering user credentials (Android Device and Workspace enrollment)''
-
The user enters their credentials and clicks Login.
-
Upon successful authentication, the device asks the user to activate the device administrator setting. The user should click Activate.
Figure 3-14 The Activate Device Administrator screen
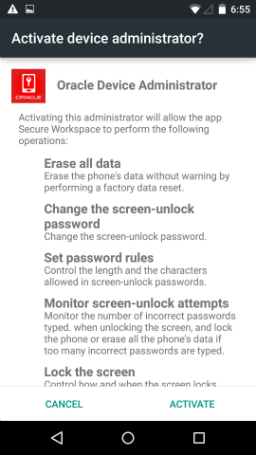
Description of ''Figure 3-14 The Activate Device Administrator screen''
Mobile Security Manager enrolls the device and Workspace, which are linked together in Mobile Security Manager.
3.5 Enrolling a Workspace in PKINIT Mode
If the authentication mode is PKINIT (Kerberos PKI Based Authentication), a time-limited password (TLP) is required during enrollment. Mobile Security Manager sends the time-limited password to the user in the invite e-mail. A System Administrator should configure the invite template to include the ${tlp_expiration_time} placeholder value. For details, see "Notification Templates" in the Help Reference for Oracle Mobile Security Suite Consoles. A sample invite e-mail with the time-limited password placeholder value is shown in Figure 3-15.
Figure 3-15 Invite e-mail configured with a time-limited password placeholder value
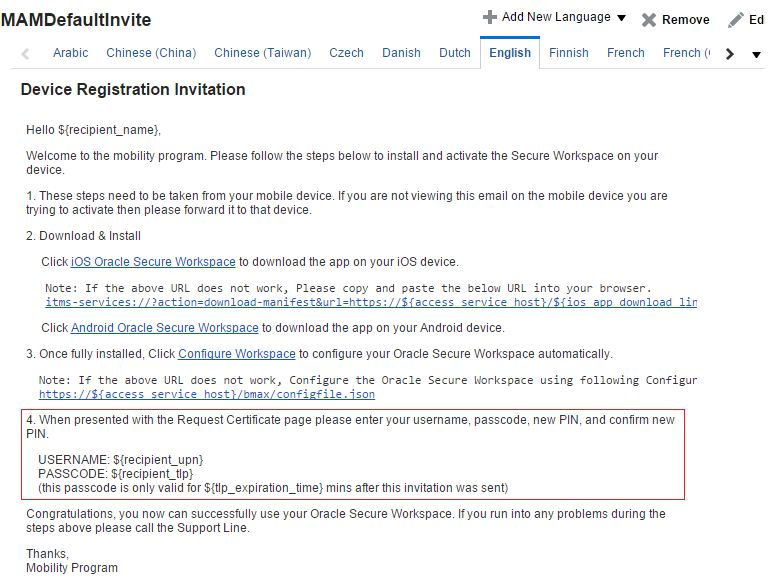
Description of ''Figure 3-15 Invite e-mail configured with a time-limited password placeholder value''
If enrolling a Workspace in PKINIT mode, after the user downloads the Workspace app using the link in the invite e-mail, and after the user launches the Workspace app with the provided configuration URL (configuration JSON URL), the mobile device displays the Reset PIN screen.
Here the user enters his or her user ID, the TLP password included in the invite e-mail, and the new PIN. Once the Workspace is enrolled, the user needs to use the new PIN as the Workspace password going forward.
Figure 3-16 Entering user credentials and resetting the PIN, PKINIT mode (iOS)
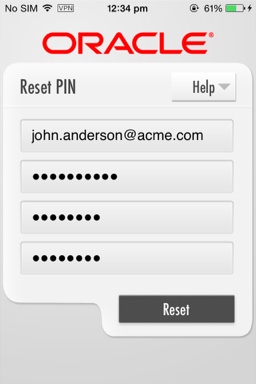
Description of ''Figure 3-16 Entering user credentials and resetting the PIN, PKINIT mode (iOS)''
Figure 3-17 Entering user credentials and resetting the PIN, PKINIT mode (Android)
Description of ''Figure 3-17 Entering user credentials and resetting the PIN, PKINIT mode (Android)''