8 Managing Mobile Security Policies
This chapter documents mobile security policies. It includes the following sections.
8.1 About Mobile Security Policies
Organizations use mobile security policies to empower users by provisioning apps to mobile devices and enabling mobile access to corporate file shares. Policies also protect sensitive data by restricting users' actions and access based on role assignments. System Administrators assign policies to roles, not directly to individual users.
Mobile security policies allow organizations to enforce rules around the following security concerns:
-
Device enrollment - Policies can verify that the device is policy compliant when it enrolls with Mobile Security Manager. Policies can require a minimum version of iOS or Android, and limit the number of devices that a user can enroll.
-
Compliance - Following enrollment, policies can verify that a device is policy compliant. Policies can look for blacklisted apps, check for extended periods of inactivity, detect if a device is jailbroken, and enforce passcode compliance. Policies also continue to enforce enrollment requirements. If a device is flagged as non-compliant, the policy can lock the Workspace, wipe the device, or take no action depending on configuration.
-
Provisioning - Policies can define which apps and device configuration settings are available for users belonging to a specific role or group. Note: Device configuration settings (Wi-Fi, VPN, e-mail, calendar) are available for iOS devices only.
-
Time/Geo access - Policies can restrict employee access to apps in the Secure Workspace container. Access policies include time-based policies (called Time Fence in Mobile Security Manager) that define specific access windows during which apps in the Secure Workspace are available, and location-based policies (called Geo-fence) that define specific cities, states, or countries from which Secure Workspace access is allowed.
-
Data leakage protection - Policies can restrict access to mobile device features such as copy/paste, e-mail, instant messaging, video chat, and so on to prevent information from leaving the Secure Workspace.
-
Device restrictions - MDM (mobile device management) restrictions can be used to restrict access to various device functions, such as the camera and the browser. Refer to the table of device Restrictions in the Help Reference for Oracle Mobile Security Suite Consoles for details of supported functions that can be controlled on iOS and Android.
-
Workspace restrictions - Policy Workspace restrictions affect the Secure Workspace on both managed (MDM+MAM) and unmanaged (MAM-only) devices. Workspace restrictions define access to the built-in Workspace Apps and other Workspace-specific settings.
-
Authentication settings - Policies can enforce password requirements for device (MDM+MAM) and Workspace (MAM-only) users.
After installing Oracle Mobile Security Suite, one policy named Default Policy is present in the system. If no other policies are created after installation, the Default Policy is applied. Be sure to review the Default Policy and modify it to match the controls that are appropriate for your environment.
Note:
Following installation, you must update the WorkspaceUsers placeholder role in the Default Policy with the appropriate role in your identity store. Users belonging to this role/group and its subroles/subgroups will be allowed to enroll Workspaces.8.2 Understanding the Mobile Security Policy Page
The Mobile Security Policy page consists of the following six configuration tabs:
-
General - This tab includes fields for policy name and description.
Figure 8-1 General tab, page one in the Create Policy flow
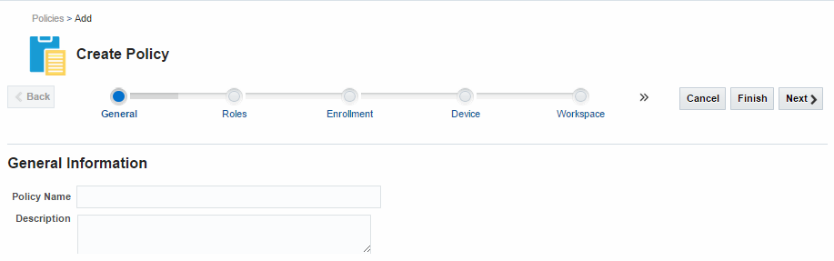
Description of ''Figure 8-1 General tab, page one in the Create Policy flow''
-
Roles - Used to assign the policy to one or more roles. You can also exempt specific child roles from the policy using this tab.
Figure 8-2 Roles tab, page two in the Create Policy flow
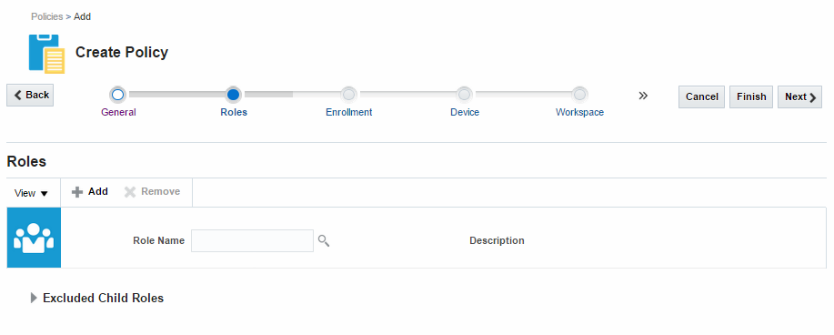
Description of ''Figure 8-2 Roles tab, page two in the Create Policy flow''
-
Enrollment - Used to specify enrollment requirements, enrollment details, and compliance rules. Specifying a minimum version of iOS or Android is an example of an enrollment requirement, specifying an Invite Template is an example of an enrollment detail, and a policy rule that also specifies the security action that should be undertaken if the device is out of compliance is a compliance rule.
Figure 8-3 Enrollment tab, page three in the Create Policy flow
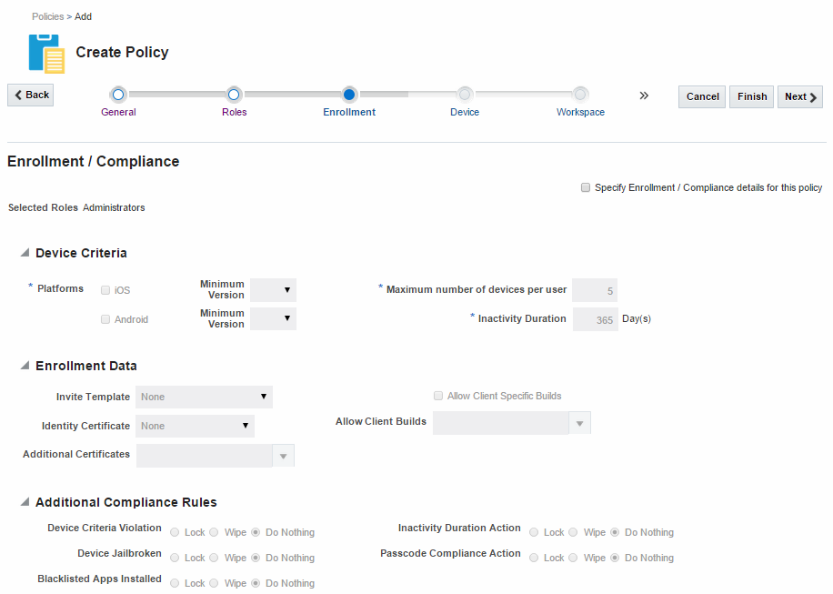
Description of ''Figure 8-3 Enrollment tab, page three in the Create Policy flow''
-
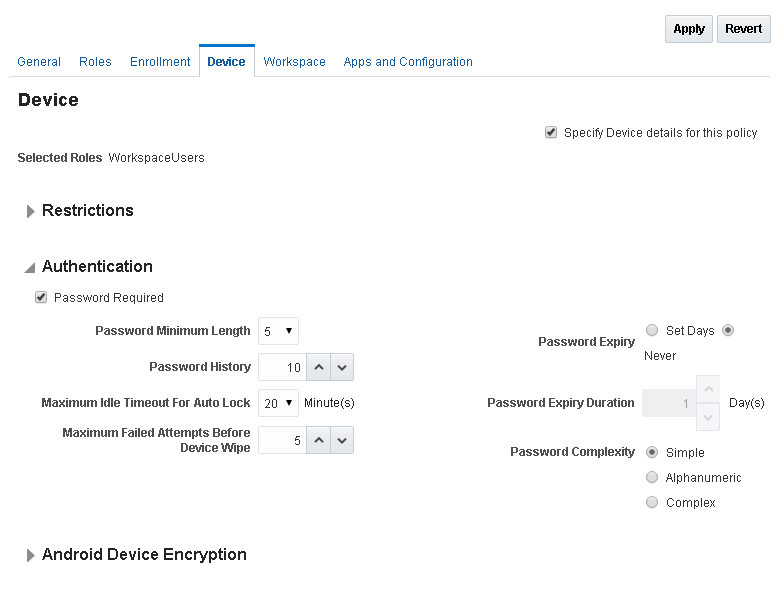
Device - Used to restrict device features, specify device authentication details, and enable Android device encryption. Configuring the Device tab in a policy activates the MDM deployment mode for the roles associated with the policy. (See Section 8.3, "Understanding Workspace Policies and Device Policies" for details.)
Figure 8-4 Device tab, page four in the Create Policy flow
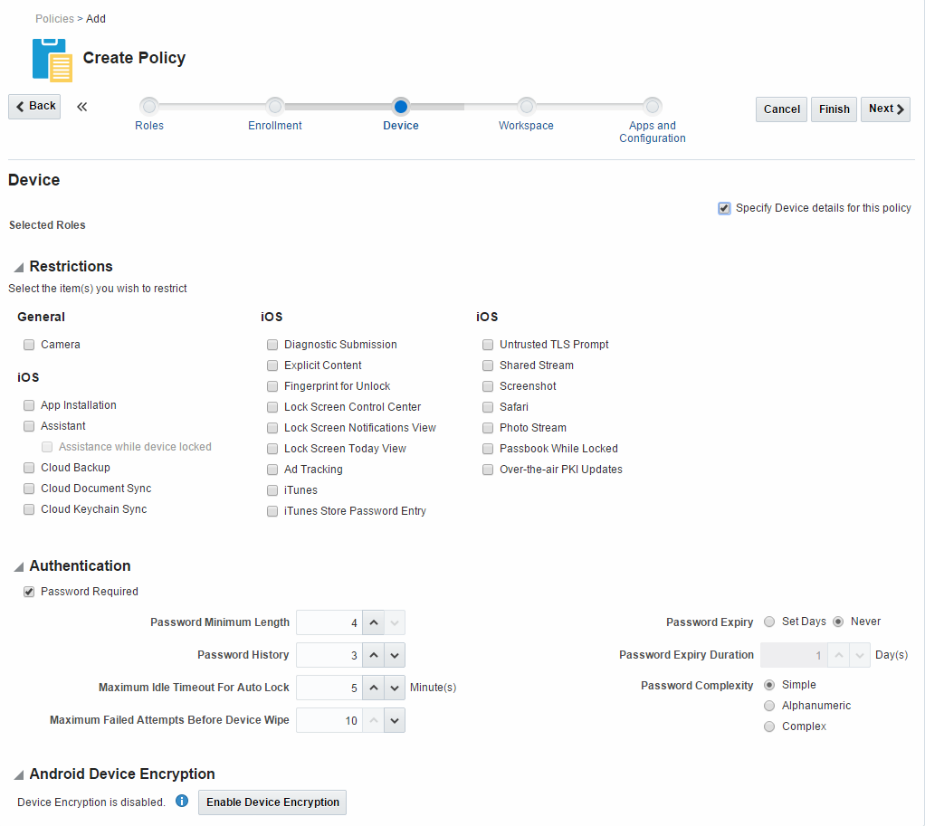
Description of ''Figure 8-4 Device tab, page four in the Create Policy flow''
-
Workspace - Used to specify Workspace authentication details, allow (or restrict) Workspace privileges, enable and configure application settings, and set Time Access and Geo Access settings. Configure the Workspace tab to create a MAM policy that you will assign to either a managed (MDM+MAM) or an unmanaged (MAM-only) enrolled device.
Figure 8-5 Workspace tab, page five in the Create Policy flow
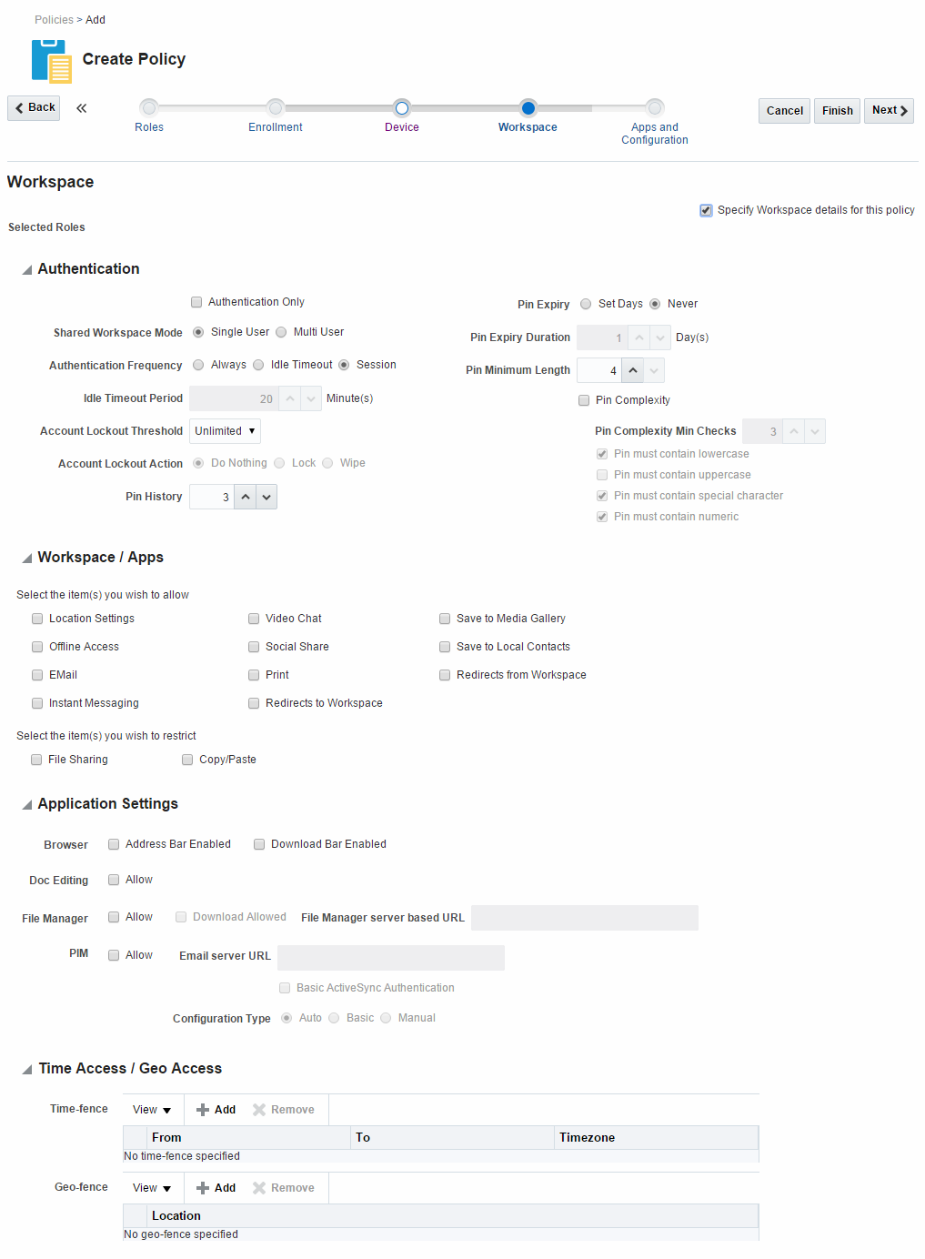
Description of ''Figure 8-5 Workspace tab, page five in the Create Policy flow''
-
Apps and Configuration - Used to specify policy-based app assignments and device configurations. A user can only install an app in the Secure Workspace if the app is included in the policy assigned to the user's role. There are also four device configurations that you can pre-configure and assign to a policy: e-mail, calendar, Wi-Fi, and VPN.
Figure 8-6 Apps and Configuration tab, page six in the Create Policy flow
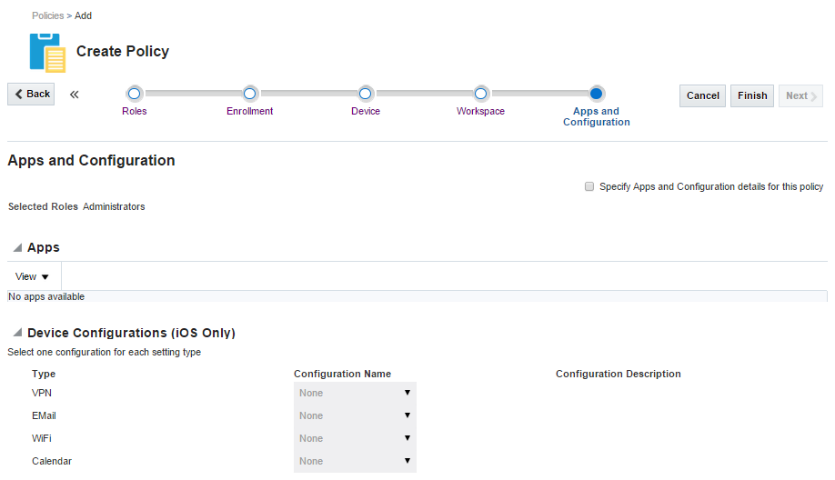
Description of ''Figure 8-6 Apps and Configuration tab, page six in the Create Policy flow''
Note:
Also see Section 4.4, "Managing Devices and Workspaces With Policies" for an overview of how System Administrators can use policies to monitor and restrict mobile devices and Workspaces.8.3 Understanding Workspace Policies and Device Policies
Mobile security policies are either Workspace policies (MAM policies) or device policies (MDM policies). To review the differences between MAM-only and MDM+MAM enrolled devices, see "MAM and MDM" in the "Understanding Oracle Mobile Security Suite" chapter. A device policy is a policy that has the Device tab configured, and a workspace policy is a policy that has any tab other than the Device tab configured. Remember, the Device tab is used to restrict device features and specify device authentication details.
If an invite template is attached to a policy that has the Device tab configured, the managed device enrollment must succeed before the Workspace enrollment can take place. If you do not intend to enroll a device as a managed device, then be sure to attach the invite template to a policy that does not have the Device tab configured.
If your environment includes a mix of managed and unmanaged devices, avoid assigning a device policy to a role that is associated with users who have enrolled unmanaged devices. An unmanaged device cannot enforce a device policy.
Tip:
If your environment includes a mix of managed and unmanaged devices, consider making device polices readily identifiable by using a naming convention, such as adding aMDM_ prefix or _MDM suffix to the policy names. For example: MDM_FieldSupervisor or DispatcherIV_MDM.To simplify the management of managed and unmanaged devices, consider restricting one mode or the other to only a few mobile roles, for example limit unmanaged devices to employees and require managed devices for contractors.
8.4 Understanding How Policies are Enforced
Policies are assigned to roles, not directly to individual users. For each individual user, Mobile Security Manager merges the user's policy assignments (the applicable policies) and arrives at the Effective Policy, which is the merge of policy elements across the applicable policies. When conflicting policies apply to a user, Mobile Security Manager typically enforces the policy rules that are the most restrictive. (See Section 8.5, "Understanding How the System Resolves Policy Conflicts" for details.) The Effective Policy is the policy that is enforced on the device or Workspace. To view a user's Effective Policy, use the Mobile Devices page to search for and view details about the devices or Workspaces registered to the user.
All policies are managed on the server but enforced on the client. Therefore policies are enforced even when the client is offline. Policy updates take effect on the client as follows:
-
If a Workspace policy is updated on the server, the user sees the policy update at the next "heartbeat" interval when the Workspace checks the server for updates. The Secure Workspace checks for policy updates and app updates based on the Workspace Poll Interval setting in Client Settings. The poll interval is set to 60 seconds by default.
-
If a device policy is updated on the server, a scheduled task processes it within five minutes and sends a notification to the device by way of the APNS (Apple Push Notification Service) or GCM (Google Cloud Messaging) servers. When the device receives its notification, it downloads the updated policy from the server.
The client enforces Workspace and device policies at all times.
Note:
When a new Password policy is pushed to the device by the server, the Android MDM agent only sets the policy parameter if the new value is different than the older value. This ensures that counters for parameters like "Password History Length," "Password Expiration Timeout," and "Maximum Failed Passwords For Wipe" are not unintentionally reset.To enforce compliance policies, the client runs rule checks intermittently. For managed devices, compliance rule checks run (1) during the enrollment process, (2) whenever the device Sync command is issued from the MSM server, and (3) every night when the ComplianceCheckTrigger scheduled job runs on the device and evaluates all enrolled devices for policy compliance. For unmanaged devices, compliance rule checks happen (1) during the enrollment process, (2) whenever a policy is updated, and (3) every night when the ComplianceCheckTrigger scheduled job runs on the device and evaluates all enrolled devices for policy compliance.
System Administrators can specify the security actions that should be carried out when compliance violations occur. When configuring these actions, remember that the Wipe action differs for unmanaged and managed devices:
-
On unmanaged devices the Wipe action only wipes data from the Workspace and apps associated with the Workspace.
-
On managed devices the Wipe action de-registers the device and removes apps, certificates, restrictions, and other content that was provisioned by the Mobile Security Manager. Following this action the device is no longer controlled by the server.
Compliance rules are configured on the Enrollment/Compliance page in the course of creating a Mobile Security Policy. For details, see Section 4.4, "Managing Devices and Workspaces With Policies."
8.5 Understanding How the System Resolves Policy Conflicts
Mobile Security Manager has a system that resolves overlapping or conflicting policies. Policy merging and conflict resolution are necessary because multiple policies can be assigned to a role, and multiple roles can be assigned to a user. While System Administrators can take steps to reduce the number of policy conflicts (see Section 8.6, "Creating Manageable Policies"), conflicts can still occur. The preliminary policies that users inherit through role assignments are called the applicable policies, and the merged policy that the system enforces is called the Effective Policy. Mobile Security Manager calculates the Effective Policy for every user enrolled in the mobility program twice daily, at 11 PM when the Compliance Check Trigger job runs, and at 10 PM when the Device Sync Trigger job runs. See Section 11.1, "Understanding Scheduled Jobs" for information about these jobs.
If security-related policies are in conflict, the system enforces the most restrictive policy. For example, policy attributes such as Account Lockout Action and Authentication Frequency, use precedence rules to determine the most restrictive policy. In the case of Account Lockout Action, "Wipe" takes precedence over "Lock" takes precedence over "Do Nothing"; whereas with Authentication Frequency, "Always" takes precedence over "Idle Timeout" takes precedence over "Session."
If access-related policies are in conflict, the system uses one of the following merge rules: MAX, MIN, AND, OR, or UNION. For example, for Idle Timeout Period (merge rule: MIN) the system will enforce the lowest (minimum) value in the Effective Policy. For Print (merge rule: AND) the result is YES (the user is allowed to print) only if all values in the aggregate policy are YES. For PIN Expiry (merge rule: OR), the result is YES (the user credential should expire after a set number of days) if any of the values in the aggregate policy are YES.
Note:
File Sharing and Copy/Paste are restriction policies that use the OR conflict resolution rule. File sharing is restricted if any of the values in the File Sharing aggregate policy are YES, and copy/paste is restricted if any of the values in the Copy/Paste aggregate policy are YES.String attributes such as URLs cannot be merged, so the system selects the first instance it finds using the FIRST_OCCURANCE merge rule. This rule only applies to Application Settings policies, and only if you specify a server URL for the File Manager app, an e-mail server URL for the PIM app, or both. To avoid unexpected results, take special care to avoid overlapping Application Settings policies with different URL values.
The following cases result in a UNION in which all values are added to the Effective Policy:
-
In the case of multiple Device Configurations, all configurations (e-mail, calendar, Wi-Fi, VPN) are added to the Effective Policy.
-
In the case of assigned apps, all app assignments are added to the Effective Policy.
| Merge Rule | Description |
|---|---|
|
MAX |
System will use the highest (maximum) value in the aggregate policy |
|
MIN |
System will use the lowest (minimum) value in the aggregate policy |
|
AND |
The result is YES only if all values are YES |
|
OR |
The result is YES if any of the values are YES |
|
UNION |
All values are added into a list |
|
FIRST_OCCURENCE |
String attribute that cannot be merged. The system will use the first occurrence found |
|
MOST_RESTRICTIVE_AUTH_FREQUENCY |
”Always” takes precedence over ”Idle Timeout” takes precedence over ”Session" |
|
MOST_RESTRICTIVE_COMP_ACTION |
”Wipe” takes precedence over ”Lock” takes precedence over ”Do Nothing" |
|
SHARED_WORKSPACE_MERGE |
”Multi User” takes precedence over ”SingleUser” |
|
MOST_RESTRICTIVE_PIM_CONFIG_TYPE |
”Auto” takes precedence over ”Basic” takes precedence over ”Manual" |
Table 8-2 Merge Rules for Workspace Policy Attributes
| UI Display Element | JSON Attribute Name | Merge Rule |
|---|---|---|
|
Configuration Type |
config-type |
MOST_RESTRICTIVE_PIM_CONFIG_TYPE |
|
Shared Workspace Mode |
shared-workspace-mode |
SHARED_WORKSPACE_MERGE |
|
Account Lockout Action |
auth-failure |
MOST_RESTRICTIVE_COMP_ACTION |
|
Enrollment Page: Compromised Device Action |
compromised |
MOST_RESTRICTIVE_COMP_ACTION |
|
Authentication Frequency |
online-access |
MOST_RESTRICTIVE_AUTH_FREQUENCY |
|
Offline Access |
offline-access |
AND |
|
Idle Timeout Period |
idle-timeout-min |
MIN |
|
Enrollment Page: Inactivity Duration |
inactivity-duration-days |
MIN |
|
Enrollment Page: Inactivity Action |
inactivity-duration-action |
MOST_RESTRICTIVE_COMP_ACTION |
|
Account Lockout Threshold |
pin-retries |
MIN |
|
Account Lockout Action |
pin-retries-failure |
MOST_RESTRICTIVE_COMP_ACTION |
|
Authentication Only |
auth_only |
OR |
|
Location Settings |
enable-location-service |
OR |
|
|
allow-email |
AND |
|
Instant Messaging |
allow-sms |
AND |
|
Video Chat |
allow-videochat |
AND |
|
Social Share |
allow-socialshare |
AND |
|
|
allow-print |
AND |
|
File Sharing |
restrict-openin |
OR |
|
Copy/Paste |
restrict-copypaste |
OR |
|
Save to Media Gallery |
allow-save-media-gallery |
AND |
|
Save to Local Contacts |
allow-save-localcontact |
AND |
|
Redirects From Workspace |
allow-redirects-from-container |
AND |
|
Redirects To Workspace |
allow-redirects-to-container |
AND |
|
PIN Expiry |
n/a |
OR |
|
Browser: Address Bar Enabled |
addressbar-enabled |
AND |
|
Browser: Download Bar Enabled |
download-enabled |
AND |
|
n/a |
share-enabled |
AND |
|
Doc Editing Allow |
Document allow |
AND |
|
File Manager: Allow |
Mfm allow |
AND |
|
File Manager: Download Allowed |
allow-download |
AND |
|
File Manager: Server-based URL |
server-baseurl |
FIRST_OCCURANCE |
|
PIM Allow |
Pim allow |
AND |
|
n/a |
allow-save-attachment |
AND |
|
Basic ActiveSync Authentication |
enable-basic-auth |
AND |
|
PIM E-mail Server URL |
email-server-url |
FIRST_OCCURANCE |
|
PIN History |
password-history |
MAX |
|
PIN Expiry Duration |
password-max-age-day |
MIN |
|
PIN Minimum Length |
password-min-length |
MAX |
|
PIN Complexity |
password-complexity |
OR |
|
Geo-fence |
geo-fence |
UNION |
|
Limit Access |
time-fence |
UNION |
|
PIN Complexity Min Checks |
password-should-pass-minimum-checks |
MAX |
Table 8-3 Merge Rules for Enrollment Policy Attributes
| UI Display Element | JSON Attribute Name | Merge Rule |
|---|---|---|
|
Enrollment Screen: Maximum Number of Devices per User |
MaxDevice Allowed |
MIN |
|
Enrollment Screen: Allow Client Specific Builds |
allowSpecificClientBuild |
AND |
|
Enrollment Screen: Allow Client Builds |
clientbuild |
UNION |
Table 8-4 Merge Rules for Device Settings and Configuration Policy Attributes
| UI Display Element | Settings | Merge Rule |
|---|---|---|
|
Device Encryption |
deviceEncryptionEnabled |
OR |
|
Camera |
allowCamera |
AND |
|
App Installation |
allowAppInstallation |
AND |
|
No UI Element |
allowAppRemoval |
AND |
|
Assistant |
allowAssistant |
AND |
|
Assistance While Device Locked |
allowAssistantWhileLocked |
AND |
|
Cloud Backup |
allowCloudBackup |
AND |
|
Cloud Document Sync |
allowCloudDocumentSync |
AND |
|
Cloud Keychain sync |
allowCloudKeychainSync |
AND |
|
Diagnostic Submission |
allowDiagnosticSubmission |
AND |
|
Explicit Content |
allowExplicitContent |
AND |
|
Fingerprint for Unlock |
allowFingerprintForUnLock |
AND |
|
Lockscreen Control Center |
allowLockScreenControlCenter |
AND |
|
Lockscreen Notifications View |
allowLockScreenNotificationsView |
AND |
|
Lockscreen Today view |
allowLockScreenTodayView |
AND |
|
n/a |
allowOpenFromManagedToUnmanaged |
AND |
|
n/a |
allowOpenFromUnmanagedToManaged |
AND |
|
OTAPKI Updates |
allowOTAPKIUpdates |
AND |
|
Passbook While Locked |
allowPassbookWhileLocked |
AND |
|
Photo Stream |
allowPhotoStream |
AND |
|
Safari |
allowSafari |
AND |
|
Screenshot |
allowScreenShot |
AND |
|
Shared Stream |
allowSharedStream |
AND |
|
Untrusted TLS Prompt |
allowUntrustedTLSPrompt |
AND |
|
YouTube |
allowYouTube |
AND |
|
iTunes |
allowiTunes |
AND |
|
iTunes Store Password Entry |
forceITunesStorePasswordEntry |
OR |
|
AdTracking |
forceLimitAdTracking |
OR |
Table 8-5 Merge Rules for Compliance Policy Attributes
| UI Display Element | Compliance | Merge Rule |
|---|---|---|
|
Enrollment Screen: Inactivity Duration Action |
Inactivity Action |
MOST_RESTRICTIVE_COMP_ACTION |
|
Enrollment Screen: Blacklisted Apps Installed |
Blacklisted Apps |
MOST_RESTRICTIVE_COMP_ACTION |
|
Enrollment Screen: Device Criteria Violation |
Enrollment Criteria Violation |
MOST_RESTRICTIVE_COMP_ACTION |
|
Enrollment Screen: Passcode Compliance Action |
Passcode Compliance Action |
MOST_RESTRICTIVE_COMP_ACTION |
|
Enrollment Screen:Device JailBroken |
Compromised Device Action |
MOST_RESTRICTIVE_COMP_ACTION |
8.6 Creating Manageable Policies
How System Administrators approach the job of designing policies will depend in part on how many roles can be covered by one or more generic policies, and how many roles will require their own custom policies. This section describes some strategies that can be used to create policies that are easy to manage and that will adapt as your organization's needs evolve.
The Restrictive Default Policy With Child-Role Exemptions Approach
This approach calls for a highly restrictive policy that is applied generically to all users in the organization. Additional policies are then created that grant certain niche privileges to specific child roles. Depending on your organization's needs, this approach can be efficient in terms of the number of policies that need to be created. Administrators should assess whether this approach will entail more or less policy maintenance over time than alternate approaches. This approach may also require more initial planning than the other options.
The All-in-one Policy Approach
Small organizations with a limited number of roles may be able to get by with policies that specify a combination of Enrollment, Workspace, and Apps and Configuration settings all in the same policy. "All-in-one" policies can be hard to manage, however, because it is difficult to achieve predictable results when users with multiple roles have multiple overlapping policies.
The Narrowly-Defined Policy Approach
Large organizations with a large number of roles may prefer to create small, narrowly targeted policies that contain little-to-no overlap that you can then assign in various combinations to roles as needed. For example, suppose your organization has three groups: Contractors, Employees, and Vendors. Contractors and Employees share the same enrollment requirements, while Vendors have more stringent requirements. By creating two enrollment policies, one for Contractors and Employees, and the other for Vendors, you can cover your enrollment needs for three groups with two policies. Now suppose you have three departments—Support, Sales, and Engineering—and each department requires their own apps. By creating a narrowly-defined App policy for each department and assigning each policy to its department role, you have covered your app needs without having to worry that an unexpected policy overlap may cause a subset of users to inherit an unintended policy restriction.
To help you limit policies to certain tabs, the Enrollment, Device, Workspace, and Apps and Configuration tabs have a Specify...details for this policy check box at the top-right corner of the form. Clear the check box to deactivate the tab and prevent the tab's properties from being included in the policy, or select the check box to add the selected properties to the policy.
Figure 8-7 The Devices tab of the Mobile Security Policies page
Description of ''Figure 8-7 The Devices tab of the Mobile Security Policies page''
The Narrowly-Defined Policy Approach provides flexibility and minimizes the risk of unintended policy results, however, it can result in a large number of policies that over time may be less efficient to maintain.
8.7 How to Perform Common Mobile Security Policy Tasks
This section includes the following topics:
8.7.1 How to Search for a Policy Record in Mobile Security Manager
Follow these steps to find a policy record in Mobile Security Manager.
-
Open the Mobile Security Policies page in the Mobile Security Manager console. To learn how, see Section 2.2.2, "Opening the Mobile Security Manager Console Pages."
-
Search for the policy using any of the following criteria:
-
Policy name
-
Description
-
Role (Note: Role name search is case sensitive. If you are searching by role name, enter the whole name using the exact sequence of upper and lowercase characters.)
Policies that meet the search criteria are listed in the Search Results section of the page.
-
-
Click a policy record to view (expand) additional policy details; click again to hide the details.
8.7.2 How to Assign a Mobile Policy to a Role
System Administrators can add a policy to a role from the Mobile Security Policies tab, or from the Mobile Roles tab. The following procedure describe the steps starting from the Mobile Security Policies tab. To start from the Mobile Roles tab, see the steps in Section 5.4.2, "How to Assign a Mobile Policy to a Role."
-
Open the Mobile Security Policies page in the Mobile Security Manager console. To learn how, see Section 2.2.2, "Opening the Mobile Security Manager Console Pages."
-
Search for the policy that you want to assign to a role. To learn how, see Section 8.7.1, "How to Search for a Policy Record in Mobile Security Manager."
-
Expand the policy record by clicking it.
-
To assign a policy to a role:
-
In the Roles section, click Add.
A new Role Name row is added to the table.
-
In the Role Name field, type the name of the role that you are adding to the policy. (You can also type part of the name and let the auto-complete feature suggests matching role names.)
-
Click Apply to save your changes, or click Revert to return the page to the last saved version.
To remove a policy from a role:
-
Click to highlight the role that you are removing from the policy.
-
Click Remove.
-
Click Apply to save your changes, or click Revert to return the page to the last saved version.
-
8.7.3 How to Create or Edit a Mobile Security Policy
Before you start, see Section 8.6, "Creating Manageable Policies" for general policy advice. For help completing the form fields, refer to online help or see the Help Reference for Oracle Mobile Security Suite Consoles.
Note:
When editing a configuration tab, if you clear a Specify...policy check box and save your policy changes, the configuration settings for that tab are permanently deleted from Mobile Security Manager.-
Open the Mobile Security Policies page in the Mobile Security Manager console. To learn how, see Section 2.2.2, "Opening the Mobile Security Manager Console Pages."
-
If you are creating a new policy, click Add.
The Create Policy page opens.
If you are editing a policy, search for the policy, then click the policy record to expand the policy details section.
-
On the General Information page, type a name for the policy and click Next.
-
On the Roles page, type the name of a role to add to the policy. (You can also type part of the name and let the auto-complete feature suggests matching role names.)
If you don't want the policy to apply to a child role you can exclude it. Expand the Excluded Child Roles section, click Add to add a row to the table, type the name of the role to exclude, and click Next.
-
The Enrollment/Compliance page opens.
This policy page lets you verify that a device is policy compliant when it enrolls with Mobile Security Manager, as well as on an ongoing basis following enrollment. Use the Enrollment/Compliance policy page to specify enrollment requirements, enrollment details, and/or compliance rules.
To skip creating an Enrollment/Compliance policy, click Next to go to the Device policy page. Otherwise, select Specify Enrollment/Compliance details for this policy to activate the form. See the Help Reference for Oracle Mobile Security Suite Consoles for help completing the Enrollment/Compliance form, then click Next.
-
The Device page opens.
Use the Device policy page to specify an MDM security policy. Complete the page if you plan to add this policy to a role that you will assign only to MDM+MAM users.
To skip creating a Device policy and instead create a policy that you can assign to MAM-only users, click Next to go to the Workspace form. Otherwise, select Specify Device details for this policy to activate the Device policy form. See the Help Reference for Oracle Mobile Security Suite Consoles for help completing the form, then click Next.
-
The Workspace page opens.
Use the Workspace policy page to specify a MAM security policy, including setting Workspace authentication details, allowing (or restricting) Workspace privileges, enabling and configuring application settings, and setting Time Access and Geo Access settings. PIN settings only apply for PKI authentication and clients configured for PKINIT authentication.
To skip creating a Workspace policy, click Next to go to the Apps and Configuration page. Otherwise, select Specify Workspace details for this policy to activate the Workspace policy form. See the Help Reference for Oracle Mobile Security Suite Consoles for help completing the form, then click Next.
-
The Apps and Configuration page opens.
Use the Apps and Configuration policy page to specify policy-based app assignments and device configurations. A user can only install an app from the Mobile Application Catalog if you include the app in a policy assigned to the user's role.
Select Specify Apps and Configuration details for this policy to activate the form. See the Help Reference for Oracle Mobile Security Suite Consoles for help completing the form, then click Finish.
8.7.4 How to Duplicate or Delete a Policy
-
Open the Mobile Security Policies page in the Mobile Security Manager console. To learn how, see Section 2.2.2, "Opening the Mobile Security Manager Console Pages."
-
Search for the policy that you want to duplicate or delete. To learn how, see Section 8.7.1, "How to Search for a Policy Record in Mobile Security Manager."
-
Click
 (Actions) on the right side of the policy record, then choose
  Duplicate or
  Remove from the pop-up menu.