
|
|
|
OPERA Scheduler Batch Processing
The OPERA Scheduler is a utility that is used to process multiple batch jobs at the same time. It is not necessary for the system to complete one job before starting another. From the OPERA Scheduler screens, users can schedule batch jobs; view the state of the jobs to see whether the jobs are in process or satisfactorily completed; view message logs; and maintain the processes such as enabling/disabling them or deleting them.
The Scheduler is accessed from Utilities > Utilities > OPERA Scheduler. When the OPR<Version number>ORS license code is active, the Scheduler can also be accessed from the ORS main menu Miscellaneous > Scheduler.
Currently, the OPERA Scheduler performs batch processing for:
When users have permissions for profile distribution (Permissions > Profiles > Profile Distribute) and points calculation and expiration (Permissions > Membership > Calculate Points) they can process the batch jobs directly from the Profile Distribute screen or from the Points Management screen, respectively. When users access the Scheduler, they will only be able to view the jobs they have selected to run.
Users with the Supervisor Permission will be able to view jobs and details, modify schedules, and delete all jobs running, scheduled to run, and not running by all users. Additionally, the Supervisor can run and schedule new Scheduler procedures (i.e. OPERA Data Purge, Update Rooms, Calculate Membership Points, Expire Membership Points, OBI Cube Maintenance) directly from the OPERA Scheduler Procedures screen. The Supervisor can also enable/disable procedures and make other modifications.
Typical operation for running a procedure involves:
Enter any of the following information on the main Scheduler screen and select Search to display the job information in the grid.
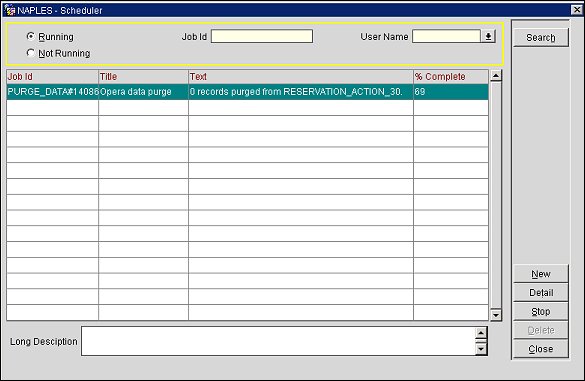
Running. Select this radio button to view the jobs that are currently in queue and are processing. The Running Scheduler screen appears. This is the default screen when the OPERA Scheduler is first accessed.
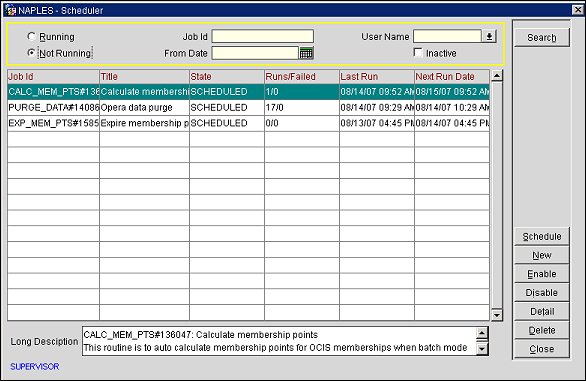
Not Running. Select this radio button to view jobs that are complete and are scheduled for a future run. The Not Running Scheduler screen appears.
Job Id. Enter a portion, or all, of the Job Id. This Id, containing the job name and number, is assigned by the system to the process. It appears in a prompt before processing the batch and throughout various OPERA Scheduler screens.
User Name. Select the user from the LOV who initiated the batch process. If you have the permission SCHEDULE JOBS, you will only be able to schedule and view the jobs you have initiated.
From Date. (Available when the Not Running radio button is selected) Enter the date from when you would like to view the jobs that have already run and still have an active Job Id.
Inactive. (Available when the Not Running radio button is selected) Select this check box so you can view the jobs that are no longer active and have an inactive Job Id. Inactive indicates the batch (Job Id ) has been successfully completed as requested and is not scheduled to run again. When a job is not running, the Job Id is no longer active.
The Not Running Scheduler screen displays jobs that are not currently running, but are scheduled for processing.
The Running Scheduler screen displays jobs that are currently in queue and processing.
The following information identifies the job and its state on the OPERA Scheduler screen.
Job Id. The Job Id, containing the job name and number, as it appeared in a prompt from the OPERA Scheduler before processing the batch. (The full Job Id description and title is displayed in the Long Description box.)
Title. The title of the process, such as Purge Data, Profile Distribution, Membership Point Calculation, or Membership Point Expiration. (The full Job Id description and title is displayed in the Long Description box.)
State. (Available when the Not Running radio button is selected) Whether the job is completed, disabled, or scheduled for another run.
Runs/Failed. (Available when the Not Running radio button is selected) How many times the process was attempted and how many times it failed.
Last Run. (Available when the Not Running radio button is selected) The date and time the OPERA Scheduler last processed the job.
Next Run Date. (Available when the Not Running radio button is selected) The next date and time the OPERA Scheduler is scheduled to run the job.
Long Description. The full Job Id description and title (it is partially viewed in the Job Id and Title rows of the grid).
Text. (Available when the Running radio button is selected) Description of the current sequence in the process, indicating the quantity of items processed for that sequence.
% Complete. (Available when the Running radio button is selected) The current percentage completed of the active running process.
Schedule. (Available when the Not Running radio button is selected) Displays the Schedule screen where you can modify the start times and frequency parameters for the job. See Reports Scheduler for more information about the Schedule Screen and modifying schedules.
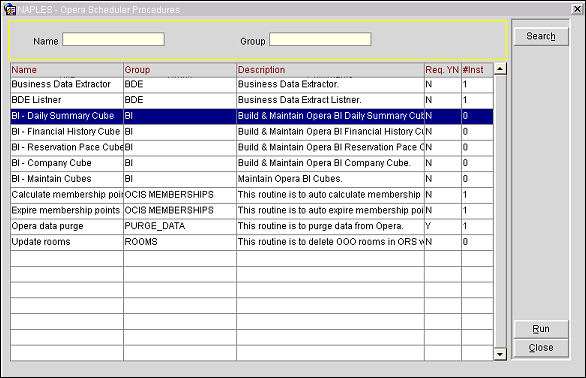
New. Opens the OPERA Scheduler Procedures screen where you may select from the list of procedures to start a new process. See Starting a New Scheduler Process below.
Enable. (Available when the Not Running radio button is selected) Select this button to activate a procedure that was temporarily disabled. The Enable Processes screen appears. See Disabling/Enabling Processes below.
Disable. (Available when the Not Running radio button is selected) Select this button to temporarily de-activate a procedure, keeping it in the system for future use. The Disable Processes screen appears. See Disabling/Enabling Processes below.
Detail. Select this button to view details of the highlighted process. By default, the Message Log appears where you can view if the batch job/process was successful or failed, the date and time it ran, and other details. See Message Log and Run Log Screens below.
Stop. (Available when the Running radio button is selected) Opens the Running Processes screen where you can select the running process you want immediately stopped. The process information remains in the system until it is deleted. Once deleted, this job cannot be run again.
Delete. Deletes the entire highlighted batch job and all run and message logs from the system.
Access the OPERA Scheduler Procedures screen by selecting the New button. Enter the partial or full name of the process you want to start in the Name field, or enter the partial or full name of the group in the Group field. Select Search. If no process or group names are entered, the grid displays a list of OPERA Scheduler processes in alphabetical order.
When the values of the application setting General > Database Time Zone Region and the Property Details > Time Zone Region field differ, scheduled jobs will accurately consider the time differential between the database and resort time so that jobs will run on resort time. Additionally, the property time zone will display in the title bar of the Schedules screen.
For Example:
Assume the database/application server resides in Singapore (GMT+8) with resorts in Sydney (GMT+11)
When launching the scheduler form the report at the database time of 9:36 am when local resort time is 12.36pm; the Report Scheduler will display and print at the resort time as the database considers, then calculates the time differential of (in this case) +3 hours. The job is submitted and then run on the database, but accurately reflects the corresponding resort time of 9:36 am.
Resort Time will display on the following screens:
Note: It is important to understand that workstation time and resort time are not mutually exclusive. Resort time is set via Property Details > Time Zone Region field and may not exactly match the time reflected on your workstation.
Note: For more information on some of the listed Scheduler Procedures, refer to:
- OPERA data purge (see OPERA Data Purge Routine).
- Calculate membership points and Expire membership points (see Calculate Points).
- BI Cubes (see OBI Cube Maintenance and OBI Setup).
The following processes can be set up to run at a specified time and frequency.
This process is optional. When activated, the process finds orphan stay records created in the last 30 days and attaches them to the correct profile. The stay records may not have been originally attached because the profile was staged, or perhaps was not in the database at the time the stay or reservation was uploaded; but has since been processed. The attachment of orphan stays can be performed for all profile types attached to the stay. It is suggested that the Attach Orphan Stay process be run once a week.
This job will auto extend membership points based on the values configured for the Grace Period in Months and the Activity Period in Months. These values are configured under the Calc Period Tab in Membership Types Setup and Maintenance.
This process is optional and auto mass cancels all reservations for which deposit payment or credit card information was not received in time. The reservations will be considered for cancellation based on the way their reservation type is configured. When the Reservations > Parameters > Auto Mass Cancellation application parameter is set to Y for the property, auto mass cancellation can be configured for reservation types. When this process runs, it will look at reservations with types configured for Auto Mass Cancel and cancel these reservations based on their CC Pending Days and/or deposit payment due date.
When the reservation type attached to the reservation has both CC Pending Days and Deposit Required configured, Auto Mass Cancellation will consider the minimum date of the two and evaluate the reservation on that date. For example, if the reservation was made on 6/1, and the CC Pending Days is set to 3 and Deposit Required due date is set to 6/3, the reservation will be auto cancelled on 6/3. If only CC Pending Days was configured for the reservation type, the reservation would not be canceled until 6/4.
This routine will auto process membership upgrades for OCIS memberships that are primary and centrally managed. Downgrade and Renewal will also be considered based on the membership setting.
For Upgrade procedure: The system date will be used as the evaluation date.
For Downgrade/Renewal procedure: If “Rolling” is selected for the Calculation Period for the membership type (see Membership Types Setup and Maintenance), the membership auto-renewal end date will default to the last day of the past month. If “Calendar” is selected for the Calculation Period, the entire calendar year will be considered.
This is an optional process. The BLOCKCUTOFF process releases the available rooms held by the block, after the cutoff date has passed (as indicated in the Quick Business Block screen). Also UPDATE BLOCK GRID messages are generated and sent to the PMS. Select BLOCKCUTOFF to set up the frequency. This procedure always runs for sysdate-1, so the best time to run it is after the last property in the CRO has run the night audit.
Note: The BLOCKCUTOFF process should only run for specific, appropriate properties. The Properties button is enabled when this process is selected. Select the Properties button and the desired property(s) from the Property LOV to have this process applied. Only the appropriate properties should be selected or this process could cause problems with inappropriate properties, cutting off the block before the required time.
The CLEANSE_ADDRESS optional batch process (using third-party software called Address Doctor™) will process large quantities of addresses without any user interaction and validate whether the submitted addresses are accurate. If the addresses are not accurate (i.e. incorrect spelling, address does not exist in the database, address has wrong title, postal code, or city) this process will:
Either automatically correct the addresses and set the following columns in the name_address:
cleansed_status = 'C',
cleansed_datetime = TimeStamp,
cleansed_validationstatus = Validationstatus from Address Doctor
Or, if AddressDoctor is unable to correct the address, then OPERA will update the name_address record columns with the following:
cleansed_status = 'F'
cleansed_datetime = TimeStamp
cleansed_validationstatus = Validationstatus from Address Doctor
cleansed_errormsg = 'Unable to correct or validate address.'
If there is an Error in the procedure, then the Status screen will display the Error.
Note: Another method for address cleansing is done interactively by the user. Interactive address cleansing is done on the Profile screen, where the user makes the corrections. Alternatives are presented to the user. Every time a record is cleansed, it will also be marked as Cleansed on the Profile screen so the user knows the status of the record. See Address Cleansing Result.
The system adds a new daily rate record for the last day of the range, based on the previous last day's daily rate record (includes base rate and extra adult charges). This process can be run at the same time as Purge Daily Rates or independently, based on your needs. Set up the desired time and frequency for processing.
This process will run in the background and check at regular intervals for profiles that meet the requirements for an e-certificate's generation rule. Profiles that meet the requirements of the generation rule will be issued the e-certificate. See E-Certificate Generation Rules for more information on the generation rules.
When statistics records come up from the property to ORS, PMS Name_IDs associated with the records may not have a match with a Name ID in the central system. This background processor goes through the upcoming statistics tables (Financial Stat Daily, Reservation_Stat_Daily and stay records) and finds those records that have a PMS Name ID that is not linked to an ORS Name ID. A link is created if a matching record is found in the Name_Subscriptions Table.
This process is used to auto export data from OPERA. This job can be scheduled to run periodically, as defined by the user, to export membership files to a pre-defined FTP location. The result is that exports are auto generated and placed in the specified location.
The background processor can be used to distribute profile sets and create subscriptions for any quantity of profiles. Selecting Pending_Profile_Subscriptions activates profile subscriptions processing. The profile set can be distributed by time and day of the week/week/month. When the profile distribution starts, it will run for the configured time or the maximum amount of 10,000 profiles. If the profile set consists of more than 10,000 profiles, the remaining profiles will be placed on queue and will continue to be processed 10,000 at a time, based upon the configuration. For more information on creating and distributing profile sets, refer to Profile Distribution.
This process is available when the Data Mart add-on license (OPI-DMBI <version number>) is active and the BOOKING PACE BY MARKET CODE parameter is set to Y (Setup > Application Settings > Global > Reservations > Parameter > BOOKING PACE BY MARKET CODE). This optional process generates Booking Pace Data by Market Code in the Data Mart reservation_pace table.
The RESTARTPROCESSORS procedure is mandatory and restarts the processors so that memory is freed up. Restarting the processors resolves the following system issues: connection issues, out of balances, and backlog. By default, the processors will restart every night at 11:00 p.m. Users can change the frequency.
Note: The previous background procedure of UPDATERESVSTATUS has been removed as an individual process and is now incorporated into this process: Update Statistics.
Note: This process is not available if the DataMart license code is active or if the PMS license code is turned on for a property.
This mandatory process generates the latest revenue and reservation status statistics for your properties within the ORS, ensuring this data is preserved in the OPERA report tables (reservation_stat_daily and other related tables). This procedure updates each guest's stay statistics such as the number of rooms, number of guests, and room revenue. Every night Update Statistics will run for the business date - 1 and business date -2. Running twice within a 24 hour period ensures that the data is accurate.
Package revenue, when configured as Included in Rate (not selected as Add-on), is included in the Room Revenue column of the reservation_stat_daily table. If the user wants to identify and display the Included in Rate package revenue (not selected as Add-on) in the Package Room Revenue column, the user can activate an application setting. Activate ORS > Global > Rate > ADD INCLUDED PACKAGE IN ROOM REVENUE = Y. It is recommended that after setting or resetting this value, the user rerun Update Statistics for all properties for all past dates.
This job will only run once to encrypt the profile ID numbers in the NAME_DOCUMENTS table. In the table, the Passport and ID number related columns (viz. ID_TYPE, ID_PLACE, ID_NUMBER, ID_DATE, ID_COUNTRY, ID_DOCUMENT_ATTACH_ID) are null for all records. Once the NAME_DOCS_ENCRYPT job is completed, all values in ID_NUMBER and S_ID_NUMBER columns in the table will be encrypted.
The AUTO_DEPOSIT_AUTH job will call the auto-deposit procedure to auto-authorize deposits for reservations based on the deposit rule attached.
Note: This job will only authorize deposits. The Reservations > Function > Automatic Deposit Authorization application function must be active for this job to be scheduled.

Message Log and Run Log Screens
By default, the Message Log appears when you select the Details button.
The Message Log displays text messages generated during the entire job, from start to finish. You may want to view the message log if the batch process was unsuccessful in any way, as it provides more detailed information. The Job Id and process are identified on the bottom of this screen.
Selection Criteria
From Date. Open the calendar and select the date from when you want to view the message log for the batch.
Message Text. Enter a search word or entire text for which you want to search the message log. When you select Search, the matching text is highlighted in the Text grid.
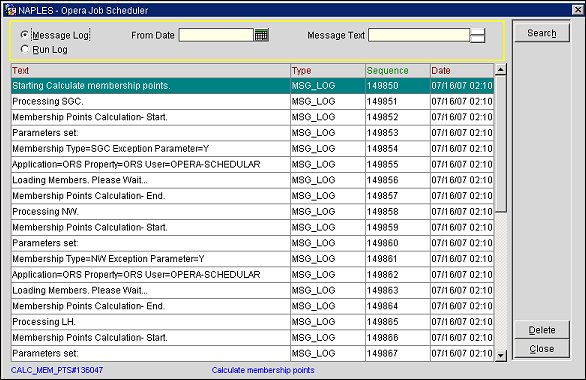
Text. Messages indicating various sequences in the process, generated from when the job began to when it finished. Each message contains the time of the sequence, quantity of items processed for that sequence, and the total amount of items.
Type. The type of message generated. For example, when there are no errors, the type is MSG_LOG.
Sequence. The number of the sequence, in ascending order.
Date. The date and time of the sequence.
Delete. Deletes the Message Log for the Job Id, based on the Date Range.
The Run Log can be used to identify if the batch process was successful and for troubleshooting purposes, if it was not successful. You may select specific dates to view portions of the batch process and its run log. You may also view those portions of the job that were logged as Unsuccessful. The Job Id and process are identified on the bottom of this screen.
From Date. Open the calendar and select the date from when you want to view the run log for the batch.
Unsuccessful. Select this check box to view the unsuccessful run logs (if any) for the batch.
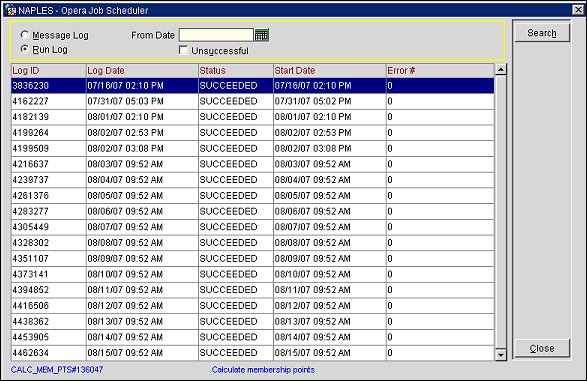
Log ID. The ID for this run log, initiated when the job was processed.
Log Date. The date this run log was generated for the job.
Status. The status of the job, whether it was successful or failed.
Start Date. The date and time the job started.
Error#. The number of errors generated for this job.
See Also