
|
|
|
Transfer Front Office Data
When a guest uses the direct bill payment method, charges to the guest's folio are processed by Night Audit and made available as invoices for transfer into Accounts Receivable either automatically, if the AR>Auto Transfer Folios application function is set to Y, or manually, if the Auto Transfer Folios function is set to N (the default).
Note: The Cashiering>AR Settle Code application setting defines the transaction code for the direct bill payment method.
When the transfer is handled manually, the Transfer Accruals to AR screen is used. Access this screen to transfer invoices to AR by selecting AR>Transfer FO Data. Invoices can be transferred to AR daily or on any manual schedule determined by business practices at your property.
Note: The Cashiering>Bypass Cashier Login application parameter may be used to speed access to Cashiering functions for users having a cashier ID associated with their user ID. If the Cashiering>Bypass Cashier Login application parameter is set to Y, and if you have previously logged in to Cashiering and the Cashier is still open, the Cashier Login screen does not appear when subsequently accessing Cashiering functions. If Bypass Cashier Login is set to N (the default), you are prompted for a Cashier Login each time a Cashiering function is accessed.
Note: Because OVOS does not require further processing of the charges, when the Transfer Owner function is turned on in OVOS and the Transfer to Owner right-click option is selected from the Billing screen, items are directly transferred, without going through the Transfer FO Data process.
Invoices appear on the Transfer Accruals to AR screen on the business date following the business date on which Night Audit is run. For example, if a guest checks out using the direct bill payment method on 09-05, the Night Audit run on 09-05 makes the charges to his folio available on the Transfer Accruals to AR screen on 09-06.
![]()
The Transfer Accruals to AR screen is a "holding area" where you can review invoices before you move them to AR. For example, you may wish to make sure the correct account has been billed and that the correct amounts have been charged. If any changes are required, they can be made before the information is transferred to the AR account.
You can transfer all invoices or one or more selected invoices at any time. Invoices that you do not choose to transfer remain listed on the Transfer Accruals to AR screen. See, Transferring Invoices to AR, below.
To print one or more invoices, select the invoice(s) you wish to print by placing an X in the X column. If you are only printing a single invoice, you may simply highlight the invoice you wish to print. Select the Print button. To print all the listed invoices, you do not need to select invoices. Simply select the Print All button.
Invoices can be selected for any of the functions available on this screen by placing an X in the X column at the left side of the grid. As you mark invoices the total value of the selected invoices is shown for your reference in the Selected field in the lower part of the screen. The total value of the unselected invoices is shown in the Remaining field.
Use the following search criteria to filter the list of invoices.
From Date / To Date. Use the calendar tool to select the date range of the invoices you wish to display in the grid. Or, you may enter the dates manually.
Note: Invoices are not available for transfer to AR until the business date following the Night Audit on the date the direct bill payment is made.
Folio No. Enter the number of the folio you wish to find.
Invoice No. Enter the number of the invoice you wish to find.
Fiscal Bill No. (Available when the Cashiering> Fiscal Folio Printing and Cashiering>Display Fiscal Bill Number application parameters are set to Y.) Enter the fiscal bill number of the folio you wish to find.
Account Name. The name of the AR account to which the invoice will be transferred.
Name. The guest's name. The guest's name may be different from the payer name (the name of the AR account holder)
X. An X in this column indicates that the invoice has been selected for one of the functions available from this screen. Click in the X column to select the invoice. Or you may select the invoice by highlighting it and selecting the spacebar. If you are choosing only one invoice for a function, you may simply highlight the invoice without placing an X in this column.
Account Name. The name of the AR account to which the invoice will be transferred.
Account No. The AR account number.
Name. The guest's name. The guest's name may be different from the payee name (the name of the AR account holder).
Date. The date when the payment was made to direct bill.
Amount. The total amount of the direct bill payment. This is also the amount of the invoice.
Folio No. The folio number assigned to the guest's bill.
Invoice No. The invoice number assigned to the invoice.
Fiscal Bill No. (Available when the Cashiering> Fiscal Folio Printing and Cashiering>Display Fiscal Bill Number application parameters are set to Y.) The fiscal bill number of the folio.
To transfer one or more invoices to Accounts Receivable, select the invoice(s) you wish to transfer by placing an X in the X column. If you are only transferring a single invoice, you may simply highlight the invoice you wish to transfer. Select the Transfer button.
To transfer all the listed invoices, you do not need to select invoices. Select the Transfer All button.
A message asks: "Are you sure?" Select Yes to transfer the invoice(s) to AR.
Note: The selected invoice(s) are immediately removed from the Transfer Accruals to AR screen and moved to Accounts Receivable.
The Account Name and Account No. fields on the Transfer Accruals to AR screen show the account to which the invoice will be added once it has been transferred to AR. To add the invoice to a different account, highlight the invoice on the Transfer Accruals to AR screen and select the Edit button. The Transfer Edit screen appears.
![]()
This screen lists all the available AR Accounts. To search for a specific account, use the search criteria to filter. Highlight your choice and select the OK button. A message asks: "Are you sure?". Select Yes to transfer the invoice to the selected AR account.
Note: The invoice is immediately removed from the Transfer Accruals to AR screen and moved to Accounts Receivable, where it is added to the selected account.
Select No if you do not wish to transfer this invoice to a different account at this time. You may transfer all or a portion of the invoice to another AR account after it has been moved to AR. See AR Transfer for details.
To display all accounts, leave all search criteria fields blank and the All radio button selected. (This is the default.) To filter search results, enter your search criteria in the following fields.
Name. Enter all or the first part of the profile name to which the AR account is attached.
Number. If you are searching for a specific AR account and you know its account number, enter the number in this field.
Type. Each AR account is assigned an account type. Account types are defined in System Configuration>AR>Account Types. Some examples of possible AR account types are: CORP = Corporate, LOCAL = Local Business, CATER = Catering, TRAV = Travel Agents, and BNQT = Banquets. Selecting an account type helps you to categorize your accounts receivable accounts for searching and reporting. Select the down arrow to display the AR Account Types list of values.
Scope of Search. Select a radio button to indicate how broad you wish the search to be.
All. Show accounts having an open balance and accounts having a zero balance. This is the default.
Open Balance. Show accounts having an outstanding balance only.
No Balance. Show accounts having a zero balance only.
On the Transfer Accruals to AR screen, select the invoice(s) to see the billing details and select the Details button. The Invoice Details screen appears.
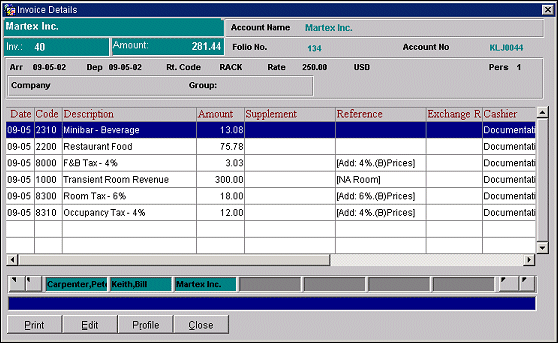
This screen shows the individual transactions charged to the guest. This is the same screen that appears when you select the View button from the AR Account screen. (To access the AR Account screen, select AR>Account Maintenance and select the account you are interested in.) However, when you access the Invoice Details screen from the Transfer Accruals to AR screen, the New and Adjust buttons are never available.
From this screen you may:
Note: This option is not available if the AR application parameter AR_NOMODIFY_INVOICE is set to Y.
See Account Maintenance for details on the Invoice Details screen.
See Also