
|
|
|
IFC Trans Codes Tab
The Trans Codes tabbed area allows you to configure how the interface handles posting accounts, sales itemizers, and transaction codes. By default, the Transaction Codes radio button is selected.
![]()
Select the appropriate radio button and then refer to the table below for an explanation of how to complete the Trans Codes tabbed area.
Radio Button |
Description |
Posting Accounts |
Select this radio button to configure how payments are posted from the POS system. |
Sales Itemizers |
Select this radio button to configure how sales itemizers are posted from the POS system. |
Transaction Codes |
Select this radio button to configure how transaction codes are posted from the POS system. |
The following fields appear regardless of whether you are working with posting accounts, sales itemizers, or transaction codes.
Cash/Credit Card Postings. Setting this value will allow you to configure the posting of cash and credit card payments from the Point of Sales (POS) system. Your selection options are:
Subtotal Postings. Setting this value allows you to configure splitting of the incoming charge from the point of sales system. Your selection options are:
Select the Posting Accounts radio button to configure how payments are posted from the point of sales system. When you select this option, your screen will look similar to the following image.
PM. Payment method code.
SO. Sales outlet code.
Account. The account number.
Account Desc. The account description.
Trans Code. The transaction code.
Trans Desc. The transaction description.
To create a new posting account, place your cursor on a blank line in the grid, then select the New button. The Account Posting - New screen appears.
Complete the following fields, then select the OK button to add a new account posting, or select the Close button to cancel.
Payment Method. Enter the payment method.
Sales Outlet. Enter the sales outlet code that corresponds to where the posting was originated, for example bar, restaurant, store, etc.
Posting Type. Select the posting type.
Account. Available for the PM Account and PM Account (No Autobalancing) posting types, select the account number.
Account Desc. Auto populated with the selected Posting Type or Account selected for the PM Account Posting Type, but the account description can be modified.
Trans Code. Available for the PM Account posting type, select the transaction code.
Trans Desc. Read only field that is populated based on the Posting Type selected. But this field is available for the PM Account posting type and displays a description for the selected transaction code.
To create a new posting account, place your cursor on a blank line in the grid, then select the Edit button. The Account Posting - Edit screen appears.
Complete the following fields, then select the OK button to edit an existing account posting, or select the Close button to cancel.
Payment Method. Enter the payment method.
Sales Outlet. Enter the sales outlet code that corresponds to where the posting was originated, for example bar, restaurant, store, etc.
Posting Type. Select the posting type.
Account. Available for the PM Account and PM Account (No Autobalancing) posting types, select the account number.
Account Desc. Auto populated with the selected Posting Type or Account selected for the PM Account Posting Type, but the account description can be modified.
Trans Code. Available for the PM Account posting type, select the transaction code.
Trans Desc. Read only field that is populated based on the Posting Type selected. But this field is available for the PM Account posting type and displays a description for the selected transaction code.
To delete an existing posting account, place your cursor on the line of the account posting you want to delete, then select the Delete button.
Select the Sales Itemizers radio button to configure how payments are posted from the point of sales system. When you select this option, your screen will look similar to the following image.
Code. An itemizer value abbreviation corresponding to XML attribute (ST1 for SalestItemizer1, DC1 for DiscountItemizer1, TX1 for TaxItemizer1, etc.)
Post#. A number identifying each record uniquely. There must be no gaps in the numbering. For example, a valid entry is "1, 2, 3, 4, 5, 6, 7". An invalid entry is "1, 2, 4, 5, 7", where the numbers 3 and 6 are missing.
Subtotal field. Free definable text for itemizers (i.e. Food, Bev, Misc. etc.)
Factor. The factor that the itemizer is multiplied with. The standard is 1.
#. Same value as the Post# column from the left grid.
Postings. Same value as Subtotal column from the left grid.
To create a new sales itemizer configuration, place your cursor on a blank line in the grid and select the New button. The Itemizer - New screen appears.
Complete the following fields, then select the OK button to edit an existing account posting, or select the Close button to cancel.
Itemizer Code. ST1 – ST16 (Sales Itemizer1 – Sales Itemizer16), DC1 – DC16 (Discount Itemizer 1 – Discount Itemizer16), SC1 – SC16 (Service Charge 1 – Service Charge 16).
Posting Number. A number identifying each record uniquely. There must be no gaps in the numbering. For example, a valid entry is "1, 2, 3, 4, 5, 6, 7". An invalid entry is "1, 2, 4, 5, 7", where the numbers 3 and 6 are missing.
Posting Desc. Posting description data for installers and the support team (Food, Beverage, Tobacco, misc. etc.).
Multiplication factor. The factor that the itemizer is multiplied with. The standard is 1.
To edit an existing sales itemizer configuration, place your cursor on an existing configuration in the grid, then select the Edit button. The Itemizer - Edit screen appears.
Complete the following fields, then select the OK button to edit an existing account posting, or select the Close button to cancel.
Itemizer Code. ST1 – ST16 (Sales Itemizer1 – Sales Itemizer16), DC1 – DC16 (Discount Itemizer 1 – Discount Itemizer16), SC1 – SC16 (Service Charge 1 – Service Charge 16).
Posting Number. A number identifying each record uniquely. There must be no gaps in the numbering. For example, a valid entry is "1, 2, 3, 4, 5, 6, 7". An invalid entry is "1, 2, 4, 5, 7", where the numbers 3 and 6 are missing.
Posting Desc. Posting description data for installers and support team (food, beverage, tobacco, misc., etc.).
Multiplication factor. The factor the itemizer is multiplied with. The standard is 1.
To delete an existing posting account, place your cursor on the line of the account posting you want to delete, then select the Delete button.
Select the Transaction Codes radio button to work with transaction codes. The grid to the right shows existing subtotal configuration, and the grid further to the right displays the description you have assigned to each posting number. It is advised to make the descriptions short and meaningful.
![]()
Transaction Codes. This allows you to configure the different methods for routing a charge to the different transaction codes configured in OPERA. If you select a different value, OPERA displays a message informing you that current transaction code settings will be deleted. Select the Yes button to continue. Changing this value will alter the appearance of the grid.
Number of dialed digits. Select the number of dialed digits that the call accounting system should look at for the unit charge, and/or the number of dialed digits that OPERA should look at for transactions. For example, if 4 is selected in this field and the number dialed is "1-239-555-1212", the call accounting system will only look at "1239" (the first four digits) as the unique identifier of the unit charge. OPERA will look at these same four digits as the unique identifier for transactions.
All Charges. This is where you select your default transaction code for this interface.
Note: When configuring transaction codes that will be applied to charges posted by interfaces (e.g., telephone and minibar interface postings), keep in mind that the IFC>Post Exclusive Tax as Itemizer application parameter will only apply if the Generates Inclusive option is not selected. If the Generates Inclusive option is selected, OPERA will still generate taxes and service charges according to the generates configuration and lump the generates with the base charge. For example, if the Post Exclusive Tax as Itemizer application parameter is set to Y and the transaction code assigned to the phone interface postings in Interface Configuration has the Generates Inclusive option selected, OPERA will not itemize taxes on phone postings received through the interface. See Transaction Code Configuration for details.
Minibar Charges. This is your default minibar transaction code.
Posting Grid. The posting grid is where you configure all of your transaction codes. The columns in the grid are described below:
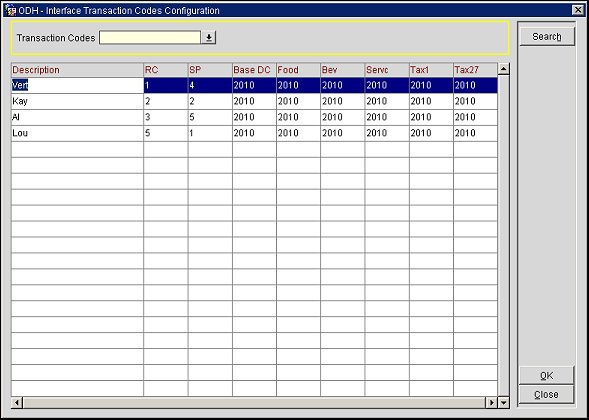
View TC Grid. Select this button to display a larger Posting Grid of all the Interface Transaction Codes configuration. Searching can be completed by selecting the down arrow, selecting the Transaction Code, and clicking the Search button. Existing interface transaction codes can be edited or new interface transaction codes can be added directly from within the grid. After completion, select the OK button or Close button to return to the Trans Codes Tab on the IFC Web Configuration screen.
See Also