
|
|
|
Reservation Screen Header
The reservation header section includes information about the guest and the guest's company, travel agent, group, and membership affiliations.
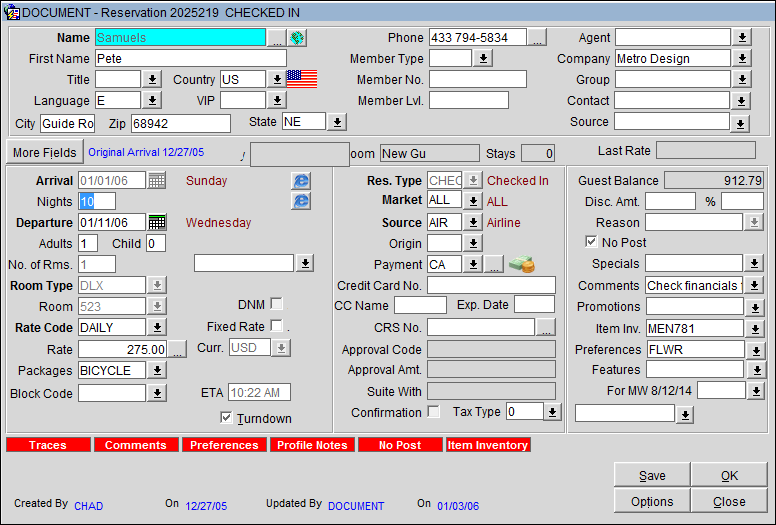
The following fields are included:
Name. The guest's last name. The guest's name fields can be populated from a profile or they can be entered manually. If a new reservation is being created for a profile that is protected, then the Name field is disabled and cannot be modified.
Select the ellipsis button to go to the Profile Search screen to search for an existing profile for this guest, or to create a new profile. When you have selected an existing profile from the Profile Search screen or created a new profile by using the New button from the Profile Search screen, the guest name fields are auto-populated when you return to the Reservation screen. (You cannot tab to the Name field ellipsis button. The [Alt + .] key combination may be used to select the ellipsis button via the keyboard.)
When the RESERVATIONS Group>SIMPLE NAME CHANGE application parameter is set to Y, the Name and First Name fields can be overwritten to easily create a new profile without having to access the Profile screen.
When the General>Alternate Name application function is set to Y, select the Globe button to see the alternate name for the guest.
If you manually enter all or part of a name that matches an existing profile or profiles, and the Reservation>Always Show Profile Search for Matching Names application parameter is set to Y, OPERA automatically displays the Profile Search screen. If the parameter is set to N, then the user is prompted and asked if they want to go to the Profile screen or not. From the Profile screen you may select the appropriate profile if it is among those listed. When you return to the Reservation screen, the guest name fields will be auto- populated.
When the Profiles>Force Auto Central Lookup application parameter is set to Y, and the profile search does not find a match in the OPERA database, a prompt asks, "Do you wish to do a central profile lookup?" Respond Yes to automatically access the Lookup feature which allows you to search for a matching profile in an external database (such as a loyalty membership program, an activities program, or a player tracking system database), depending on the interfaces configured for your property. See Profile Lookup Menu for details.
If you do not select an existing profile or create a new profile, a new profile will be automatically created for this guest when you save the reservation.
If the Comp Accounting>Stop New Profile application parameter is set to Y (this parameter is available if the OPP_GCA OPERA Comp Accounting add on license code is active), you may not attach a new profile to the reservation if there are charges on any of the Billing screen comp windows (101 - 108).
When the Reservations>Populate Primary Profiles for New Reservations application parameter is set to Y and the guest has a relationship attached to their profile, the name of the primary company, travel agent, or source relationship will automatically appear in the appropriate field when a new reservation is created.
First Name. Enter the first name of the guest. If a new reservation is being created for a profile that is protected, then the First Name field is disabled and cannot be modified.
Title. Select the down arrow to open the Title list of values and choose a courtesy greeting (e.g., Mr., Mrs., Ms., Dr.). The greetings are sorted based on the language selected. This title may be used to address the guest in written correspondence. Knowing the courtesy title the guest prefers is also useful when you are dealing with the guest in person.
Note: When the Profiles>Advanced Title application parameter is set to Y but title suffixed have not been configured (see Titles for details), upon selecting the Title down arrow the "Title suffixes not configured" message appears. Title suffixes must be configured when the Advanced Title parameter is active.
Language. Select the down arrow to open the Languages list of values and choose the guest's preferred correspondence language. A default language for confirmation letters, folios, and guest mailings was established for your property during set up.
Country. Select the down arrow to open the Country list and choose the guest's country. If an ISO country code is associated with the country code you select here, the appropriate national flag image will appear next to the Country field and list of values down arrow, if this option has been configured (see Countries for details).
VIP. Select the down arrow to open the VIP list of values and choose a VIP status level, if applicable.
Phone. Enter the guest's primary telephone number.
Member Type. Select the down arrow to display the Membership Type list of values and choose the membership(s) type (for example AA for American Airlines or LP for Loyalty Program) for the guest. (By selecting the membership organization here, you ensure that any negotiated rates for the organization will be displayed when you perform a rate query for this reservation.) Multiple membership types, one membership type per membership class, can be selected for a reservation and when this occurs the field will be highlighted with yellow.
Member Number. Enter the membership organization number, if applicable. Should a membership card be swiped with the cursor in this field, you will be prompted with a message asking if a new membership should be created? Select Yes to display the Memberships screen to setup the new membership (see Memberships for details). When multiple membership types have been attached to a reservation, then this field will be highlighted in yellow.
Membership Level. Enter the guest's level of membership, if applicable. When multiple membership types have been attached to a reservation, then this field will be highlighted in yellow.
Agent. Select the down arrow to display travel agent profiles in the Profile Search screen. Choose the travel agent that is associated with this reservation. (Some properties pay a commission to travel agents based on the reservations they generate. In addition, by selecting the travel agent here, you ensure that any negotiated rates for the travel agent will be displayed when you perform a rate query for this reservation.)
Note: Users granted the Reservations>Travel Agent Reservations permission are able to add/edit/delete Travel Agent profiles on reservations. Users without the permission will not be able to add/edit/delete Travel Agent profiles to reservations and the Travel Agent field is view only. Also, a reservation cannot be made using a Travel Agent profile as the Guest Name, if the user is not granted this permission.
Company. Select the down arrow to display company profiles in the Profile Search screen. Choose the company that is associated with this reservation. (By selecting the company here, you ensure that any negotiated rates for the company will be displayed when you perform a rate query for this reservation.)
Group. Select the down arrow to display group profiles in the Profile Search screen. Choose the group associated with this reservation.
Source. When the Profiles>Source application function is set to Y, select the down arrow to display source profiles in the Profile Search screen. Choose the source associated with this reservation. (By selecting the source here, you ensure that any negotiated rates for the source will be displayed when you perform a rate query for this reservation.)
Contact. When the Reservations>Reservation Contact application parameter is set to Y, this field is displayed. Select the down arrow to open the Reservation/Billing Contacts screen. This screen displays all profiles defined as having a relationship with any of the company, travel agent, group, or source profiles which are attached to the reservation. Select a maximum of two contact profiles a reservation contact and/or a billing contact. If the contact has no relationship and is new, select the New button to create a new or select an existing contact and select their relationship.
When creating a reservation that is part of a block and contact information already exists for the block, then this information is automatically populated for the new reservation.
Note: Only one billing contact and one reservation contact is allowed for each reservation. You can select the same contact to be both reservation contact and billing contact if necessary. If two different contacts are selected, the Contact field is highlighted in yellow. Statistical information is gathered on contact profiles that are linked as reservation contacts. Historical and future stay records are also available for reservation contacts. No statistical or stay information is collected for billing contacts.
Smoking Preference. If a smoking preference has been selected for the profile that is attached to the reservation that preference appears in blue type in the area between the header and details.
See Reservation Main Screen Painting Elements, Checked In Main Screen Painting Elements, Checked Out Main Screen Painting Elements, Due In Main Screen Painting Elements, for details.
The following is a list of the additional screen paintable fields for the Reservation Header/Footer sections of the screen.
Address 1-3. Enter the guest's street address.
Alt. First Name. Enter an alternate first name for the guest.
Alt. Last Name. Enter an alternate last name for the guest.
Note: When the OPR_<version number> OPERA Reservation System license is active, the General>Alternate Name application function is set to Y, and the General>Auto Alternate Name Translate application parameter is set to Y, when creating a new reservation the cursor is automatically defaulted to the Alt. Last Name field. When editing a reservation, alternate names will automatically be translated into English and auto-populated into the First and Last Name fields. For translating from double byte characters to English, this feature requires all the expected characters to have an accurate translation in configuration (Setup>System Configuration>Profile>External IFC>Character Conversion). If the character conversion is not properly configured or does not exist or the alternate name lacks special characters, English will be copied to English.
City. Enter the city portion of the guest's address.
Color Box. The colored box that appears on the right side of the screen between the header and details is used to provide a highly-visible reference. The Reservations>Reservation Color Definition application setting determines what the colors represent. When the color setting is set to Reservation, the colors and descriptions that appear represent information about the reservation or guest (See Reservations Color Codes for details on setting up color codes.) Also, if the color needs to be changed for the reservation, a Color drop-down list field may be screen painted into the main Reservation screen or the Reservation More Fields screen to allow modification of the color for the reservation. (When the application setting is not set to Reservation, the Color field will not display.) When the application setting is VIP Level or Market Code, only a color will display and it represents the guest's VIP level or the market code that has been assigned to the reservation. (See VIP Levels or Market Codes for details).
Date of Birth. Date of birth of the guest attached to the reservation.
District. District associated with the profile address. This field may be screen painted onto the Address screen. This field is view only.
Email. Enter the email address for the guest.
Gender. Enter the gender of the guest.
Last Rate. Last reservation rate that was used for the guest during their last stay.
Last Room. The room number the guest stayed in during their last visit.
Last Stay. Date of the guest's last visit. Not available when the room assigned to the reservation is a pseudo room, that is, a room having a room type that is designated as a pseudo room. Such rooms are not associated with a physical room that is included in inventory (for example, a room used as a posting master (PM)).
Owner Flag. Available when the OPV_<version number> OPERA Vacation Ownership System license code is active, this field displays Owner, Reciprocal Owner, or the relationship to the owner of the Authorized User.
Party. When the Reservation>Party application function is active, the party that the reservation belongs to is displayed. The associated party will display as:
Parent Reservation Confirmation Number + Parent Reservation Guest Last Name + Parent Reservation Guest First Name = 1234567 Smith, John
Passport. Passport number for the guest.
Note: When the Passport/ID Number View permission is not granted to the user, then the Passport/ID Number will be masked with X's except for the last two numbers.
Postal Code. Postal code portion of the guest's address.
Preferred Room No. Room number that the guests prefers to stay in during their visit.
Privacy. Select this check box to indicate that the guest wishes to maintain privacy. This field can also be screen painted on the Profile screen. Changes made in one location will update the setting in other locations. This field may be used to indicate whether or not the guest wants to participate in mailings, surveys, email promotions, etc. A default can be set via Field Defaults.
Redemption. (Available when the OPR<version number>ORS or OPI<version number>OCIS license is active. Available in PMS as read only.) Populated with the membership of the member selected from the ORS Sales-Define Search screen, the points will be consumed from the member's points for the award redemption reservation.
If an award redemption reservation is made for a non-member, who is on a member's Guest List, then the member's membership is populated in this field, but the non-member will be populated for the profile for the reservation.
Note: The membership in this field cannot be changed after the reservation is saved. This is because once a reservation is saved, the award is automatically issued and points are deducted from the membership. However, the name on the reservation can still be changed.
Note: For redemption bookings, OPERA is not able to deduct multiple sets of points when a redemption reservation is for more than one room.
State. Select the down arrow to choose the state or province portion of the address.
Total Stays. Once the reservation is saved, this read only field shows the total number of stays at this property for this guest. The value shown is the total for all years for which data has been collected.
Note: The Total Stays figure is calculated using Reservation Arrivals and Day Use Reservations data found in the NAME_BUDGETS view. Migrated stay data is included within the Total Stays figure. For comparison purposes, Total Stays will match the statistical data found on the Profile History and Profile History Summary screens, and the Profile Stats & Info Statistics tab on the Profile screen. (The Profile Stats & Info data only include statistics for the current and previous years.)
URL Button 1 & 2. Selecting the button will display the URL address that has been configured for the button.
See Also