
|
|
|
Profile Memberships Option
An unlimited number of memberships may be associated with the guest's profile. To review and manage any of the memberships attached to a profile, select the Memberships button from the Profile Options menu. The Profile Membership List screen appears.
The Profile Membership List screen shows the type of membership programs belonging to the guest's profile, such as loyalty programs and gaming programs. The screen can also be used to enroll the guest in new programs, look up whether the guest is currently a member of a program, edit membership information if the guest is already enrolled in a program, and view and edit the guest's membership points history. At this screen you can also apply promotions to a membership program and begin issuing awards.
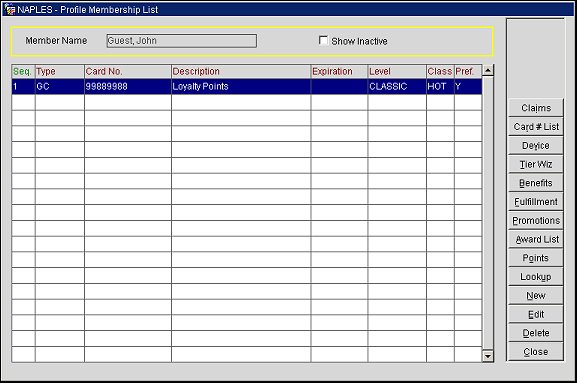
At the top of the screen the profile name is shown in the Member Name field. (Select the Show Inactive check box if you wish to show inactive memberships.)
The following information is shown in the grid.
Seq. This number determines the position of the membership listing on this screen. (In ORS/OCIS, when a membership program is a Primary Membership that is managed centrally, it will default to the top of the list. Subsequently added membership programs will be listed after it.)
Type. The membership program type. (See Membership Types for details.)
Card No. The membership ID number.
Description. The description of the membership type.
Expiration. The membership expiration date.
Level. The membership level. (See Membership Levels for more details.)
Class. The membership program class (Loyalty or Frequent Flier). (See Membership Classes for details.)
Pref. Indicates if this membership card is the preferred membership card to be used, either Y (Yes) or N (No).
Note: In ORS/OCIS, when the parameter Membership>Preferred Card = Y, a profile uploading from an external system into ORS with an attached membership, but not marked as Preferred, is automatically assigned as the Preferred Card. The user can later go into ORS and insert additional memberships and can select a different membership as the Preferred Card Membership.
The following functions are available from this screen.
Fee. (Only available when Fulfillment and Fee options are selected on the Membership Types screen.) Select this option to open the Fee History screen for the membership and view a list of membership fee payments. From the Fee History screen, you also have the option to edit and add membership fee payments. See Fee History for more information.
Claims. When the OPI_<version number> OPERA Customer Information System license is active, this button is available if the profile has any open claims existing. But in an integrated PMS environment, then this button is only available when the Membership>OCIS Membership Claim application parameter is set to Y and the profile has any open claims existing. When selecting the Claims button, the Membership Claims screen is displayed and is view-only, so no modifications can be made to any claims existing for the profile. See Membership Claims for details.
Tier Wiz. (OCIS/PMS integrated environment only) Select to open the Member Tier Wizard screen. Use this screen to view the member's upgrade information, such as the member's next tier level, requirements for next upgrade, and information regarding the member's possible downgrades.
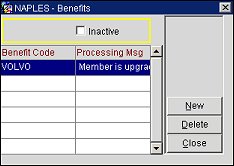
Benefits. (ORS/OCIS or ORS/PMS integrated environment only) Only displayed when a primary membership type is selected. Select to open the Benefits screen and select a benefit for the membership. On the Benefits screen, select the New button and choose a benefit code from the list. Once enrolled into the benefit, the benefit will be applied to the membership. Select the Delete button to remove a highlighted benefit from the member. For information on configuring membership benefit codes, see Membership Benefit Program.
Note: Tier level benefits will only apply if the level in the benefit is higher than the one already on the membership. If multiple benefits are assigned to one member, the highest level benefit will be applied.
Fulfillment. (Available in OPMS when the PMS resides in the same database schema as OCIS.) Select to open the Membership Fulfillment screen, which displays a view-only list of the membership's fulfillment history records.
Note: The Fulfillment button only displays when the following conditions are met:
1. The membership type is configured as "Central Managed."
2. The OPI<version number>OCIS license code is active.
3. The Fulfillment check box is selected on the Membership Setup screen for the membership type.
Promotions. Highlight the desired Membership Type and select the Promotions button to apply promotions to the guest's profile and membership. The Promotions screen appears.
Award List. Go to the Member Award List screen. Use this screen to issue awards for award points.
Device. (Primary membership type only and must have device configured for membership.) Select to open the Membership Device screen and enable/disable, encode, inactivate, replace or verify the member's device.
Points. Display the Membership Transactions screen. This screen shows the membership transaction type (e.g., stays, enrollments) and the points associated with each transaction. The screen may also be used to make adjustments to points awarded for a transaction; adjustments include modifying the points associated with an existing transaction, or creating a new points transaction. In ORS/OCIS, select this button to begin the process of transferring award points from a Primary guest loyalty program to another membership program when award points exchange rates have been set up.
Lookup. (PMS only) Display the Lookup screen. Use this screen to access the membership program's external database and search for the guest. (This button is available if the Membership>Lookup application function is set to Y.)
Enrollment. (PMS only) Enroll the guest in a loyalty program or a gaming program. (This button is available if the Membership>Enrollment application function is set to Y.)
Note: If the Membership>Enrollment function parameter is set to Y, and OPERA Comp Accounting (OPP GCA add-on license) is active, both the guest loyalty program and the OPERA Gaming interface are available at the property. In this case, when you select the Enrollment button, the Profile Enrollment screen prompts you to choose either Loyalty enrollment or Gaming enrollment.
New. Create a new membership record for the guest. The Memberships screen appears, below. (In ORS/OCIS, when the application parameter Membership>Parameters> Preferred Card = Y, users will not be able to create another membership type for the profile if a Primary membership type in ORS is not already set for that profile.)
Edit. Highlight a membership record in the grid and select this button to view or modify existing guest membership information. The Memberships screen appears.
Delete. Highlight a membership record in the grid and select this button to delete a membership record for this guest.
To add a new membership program for the profile, select the New button. To edit an existing membership, highlight the membership record you wish to modify and select the Edit button. The Memberships screen appears.
When enrolling a profile into a membership program in PMS (interfaced environment), if the “Generate Member New Card No” web service is configured, the membership card number will be auto generated from the OCIS sequence defined in the central level.

Member Name. The name of the profile to which the membership is associated. This field displays the name of the current profile and is view only.
Type. Select the down arrow to display the Membership Types list of values. Choose the membership type for the guest. If a membership type is already assigned to the profile, it will not appear in the LOV.
(ORS/OCIS and Points Managed Central only.) When a guest is enrolled in more than one membership program, one of the programs must be designated as Primary. Only when a profile has a Primary Membership Type assigned to it, and the Primary Membership Type is in a class of a hotel loyalty program, can other membership types be supported for that profile.
When a new Centrally Managed Primary membership program for a profile is created, the membership program defaults to the lowest sequence number (1) and thus appears at the top of the list in the Profile Memberships List. When each additional membership is added to the profile, the next available sequence number will be assigned.
Creating a new membership that has a membership type configured with the validation of Validation by Interface (See Membership Type Configuration for details)and an active interface, displays a blue lamp message saying "Validating by Interface, Please wait...". From here, the membership can be validated and saved, invalid (displaying a message that the card is invalid and has to be re-entered), or the validation process will time out.
Note: When adding a new membership, if there is an inactive membership of the type you select, the following message appears: "An inactive membership of this type exists for this profile." Activate the membership type and edit as necessary.
Card Number. Enter the guest's membership ID number. Upon exiting this field, the number will be validated if card number validation is set up for this membership type in Membership Type configuration. If you are adding a new member, this number can be auto-generated if it has been setup for this in the system configuration. Leave this field blank and select Save; you are then prompted to automatically generate a membership number. For more information, see Membership Card Number Auto Generation Setup.
Note: To activate the membership number auto-generation functionality, select Setup>Application Settings>Membership>Parameter and set the Auto Generate Membership No option to Y.
Note: If a membership number is searched upon from the Profile Search screen and returns no results, this membership number is automatically populated in this field when creating the new profile and adding the new membership to the profile.
Note: When the IFC>Chip & PIN application parameter is set to Y and the Membership Type has been configured as Chip & PIN, then the Card Number field is read-only and is populated after the Read Card button has been selected and the guest has placed their membership card into the Chip & PIN card reader device.
Name on Card. By default, the profile name appears here. You may edit this information if the membership name is different (for example, if the membership is in a company's name) from the profile name. This field will auto populate with the profile's alternate name when the Name on Card from Alt Name field is selected under the More tab on the Membership Types Setup screen.
Note: When the MEMBERSHIP>ACCESS MEMBERSHIP NAME ON CARD permission is granted, a non-supervisor user can change the name on card value when a primary guest membership is edited.
Level. Select the down arrow and choose a membership level, if the membership program uses this feature.
Note: Changes made to the membership level propagate to any in-house and future reservations for the guest. In multi-property PMS environments (when the OPP MHOT Multi-property license code is active) membership level changes propagate to all in-house and future reservations at any other properties in the multi-hotel cluster.
Note: When the MEMBERSHIP>ACCESS PRIMARY MEMBERSHIP LEVEL permission is granted, a non-supervisor user can select the membership level when creating a new primary membership. This allows users to prevent the membership level from defaulting to the first level defined for the membership type.
Note: When the IFC>Chip & PIN application parameter is set to Y and the Membership Type has been configured as Chip & PIN, then the Level field is read-only and is populated after the Read Card button has been selected and the guest has placed their membership card into the Chip & PIN card reader device.
Expiration. When the membership type has been configured with the Expiration Date Required check box selected and the membership type is not marked as Points Managed Centrally, the user is required to enter a membership expiration date. If an expiration date is not entered, then a message prompt is displayed to notify the user that an expiration date has to be entered. The date will be validated against the expiration date set up for this membership type in Membership Type configuration.
The date that is entered, or populated from swiping the membership card, in the field will be converted to a MM/YY format and if the date that is entered is not equal to or later than the current business date, then a message prompt is displayed notifying the user that the card has expired.
Seq. Enter a sequence number which will determine where this membership is listed on the Profile Membership Lists screen. If no sequence number is entered, the membership will be listed alphabetically, following any memberships which are assigned a sequence number. If two or more memberships have the same sequence number, they will be listed alphabetically. (In ORS/OCIS, when a membership program is a Primary Membership that is managed centrally, it will default to the top of the list. Subsequently added membership programs will be listed after it.)
Enrollment Code. Select the down arrow to choose an enrollment code. The enrollment code might indicate, for example, how the guest enrolled in the program. If the membership is uploaded to ORS from an external PMS, the property code will appear in this field. (Using this information, enrollment point calculation rules may be set up to award bonus points for enrollments from selected properties. See Memberships Points Calculation Rules for details.)
Member Since. Enter the date when the guest became a member of this program (the join date). You may use the calendar tool or you may enter the date manually. The default is today's business date.
Member Status. (This field is available for the membership type designated as Primary on the Membership Type configuration screen.) Select the down arrow to choose a members status if this feature is used. A member status may be used, for example, to indicate where the guest is in the membership enrollment process (e.g., to indicate a temporary card or to indicate that the member requires a new member info packet, etc.).
Inactive. Select this check box if the membership is inactive.
Preferred Card. Select this check box if the membership program is the guest's Preferred Card. A profile can only have one preferred card. When creating a new membership, the first membership associated with a profile will always default as the preferred card membership. After, when adding additional memberships to the same profile, or editing existing memberships, you have the option to select the preferred card for that membership. If a preferred card membership is deleted, a preferred card will be assigned to the next membership on the list.
Comments. Enter any comments that may be appropriate.
Tier Administration. (This field is available for the membership type designated as Primary on the Membership Type configuration screen.) Select the down arrow if you wish to choose an option that defines the degree of participation for this membership in the tier management portion of the program. Leave this field blank for standard tier administration. Options include:
Note: Once a membership is set to Grace, it will remain at this designation until you manually remove the Grace designation (that is, you must change the Downgrade field setting from Grace to either Never Downgrade, or blank).
Note: Once a membership is set to Grace, it will remain at this designation until you manually remove the Grace designation (that is, you must change the Downgrade field setting from Grace to either Never Downgrade, Do Not Downgrade This Time, or blank).
Enrollment Source. (Read only. Only displayed if the Reservations>Parameters>Cross Brand Recognition application parameter is set to Y and the membership type is primary and centrally managed.) The enrollment source for the membership based on the value entered for the Membership>Setting>Default Membership Source application setting. This represents the enrollment source code for members enrolling in this chain.
Enrolled At. (Read only. Only displayed if the Reservations>Parameters>Cross Brand Recognition application parameter is set to Y and the membership type is primary and centrally managed.) The chain or property where the membership was enrolled.
Exclude from Batch. Select to exclude the member from the Membership Fulfillment extract (ORS > Miscellaneous > File Export > Membership Export). When selected, the member's actions will not be included in the fulfillment extract until this check box is unselected.
Read Card. Available when the General>Chip & PIN application parameter is set to Y and the membership type has been configured as Chip & PIN. Select this button to activate the Chip & PIN card reader device in order for the guest to insert the membership card to populate the membership details. After the guests places their membership card in the Chip & PIN card reader, the Membership Card Number, Expiry Date, Card Type, and Membership Level are returned to OPERA from a 3rd party vendor, if available. If this is a new membership for that specific membership type, OPERA will create a membership record for the guest based on the details that are received from the 3rd party vendor. If the membership already exists, all of the details within OPERA will be updated with the details received from the 3rd party vendor. If no data is provided from the 3rd party vendor, then this Membership Type can’t be added new and existing Membership details can’t be updated.
Gen. New. Available when the Membership > NEW CARD NUMBER GENERATE permission is granted to the user. Select to generate a new membership card number for the member. The Card Number field will automatically update with a new card number each time this button is selected. Select OK to save changes.
OK. Select to save any changes made to the membership and return to the guests profile.
Close. Select to exit the Memberships New/Edit screen and return to the guests profile. If changes were made to the membership, a Yes/No prompt to save the changes will be displayed.
Show Me
See Also
|