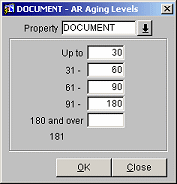
Aging Levels Setup
Select Configuration>AR>Aging Levels to set the AR aging levels for your property. OPERA allows you to define the aging periods most suited to your operation. In these fields you define the ending number of days and OPERA calculates the beginning number. For example, if you enter 30 in the first field, aging period one (current) is 0 - 30 days. OPERA calculates that aging period two begins at day 31 and asks you to supply the end day for that period (e.g., 60). OPERA calculates the beginning of aging period three as day 61 and asks for the end of this aging period; and so on. This pattern continues until you have filled out all five fields. The last field is automatically calculated as everything over the last number you entered.
Aging of accounts receivable invoices allows you to manage your credit policies based on your property's standards. If your accounts receivables are abnormally long, you know you must work harder at collecting for items you have already sold. If on the other hand, your accounts receivable are abnormally short, you may be able to increase sales by easing your credit policies.

The following fields are available on this screen.
Property. This field is visible when the OPP MHOT OPERA Property Management Multi-Property Base (Cross Profiles/Configuration) license code is marked as Active. In the Property list of values, OPERA displays the properties with activated multi property licenses codes allowing you to switch between properties that have been configured in this property cluster (via the Property Details>Alternates Tab).
Up To. Enter the breakpoint for the first aging level you wish to create. For example, if you want your first aging level category to be from 1 to 30 days, enter 30 in this field. All debits and credits that are less than 31 days old will be included in this category.
Proceed to the next aging level field. When you click in the next field, notice that its label automatically indicates the start of that aging level category, based on your entry in the previous field. For example, if you entered 30 in the first field (meaning the first aging level category extends from day 1 to day 30), then click in the next field, its label changes to 31. In the second field enter the end point for the second aging level category. For example, if the second aging level category should run from day 31 to day 60, enter 60 in the second field.
You may specify the break points for up to 5 aging levels in this way. The last aging level category will automatically include all debits and credits that are do not fall into the last aging level category you set up, even if you set up fewer than 5 aging levels. For example, if the final aging level category you designate is for debits and credits that are from 121 to 180 days old, the last category will automatically be labeled 181 and over and will include any debits and credits more than 180 days old.
When you are done, select the OK button.
A message appears, asking whether you wish to update invoice information to reflect the aging level changes you have made immediately or during the next End of Day Sequence. If you elect to update invoices immediately (it is recommended that you do this only when Accounts Receivable is not being heavily used), a message will notify you when the information has been updated with the new aging levels. If you choose to wait until End of Day Sequence, the changes in aging level will not be evident in the AR module and in AR reports until the next business date.
See Also